


Browse by project or character:
Click on any of the thumbnails to watch the full video.
Mortarion Tutorials
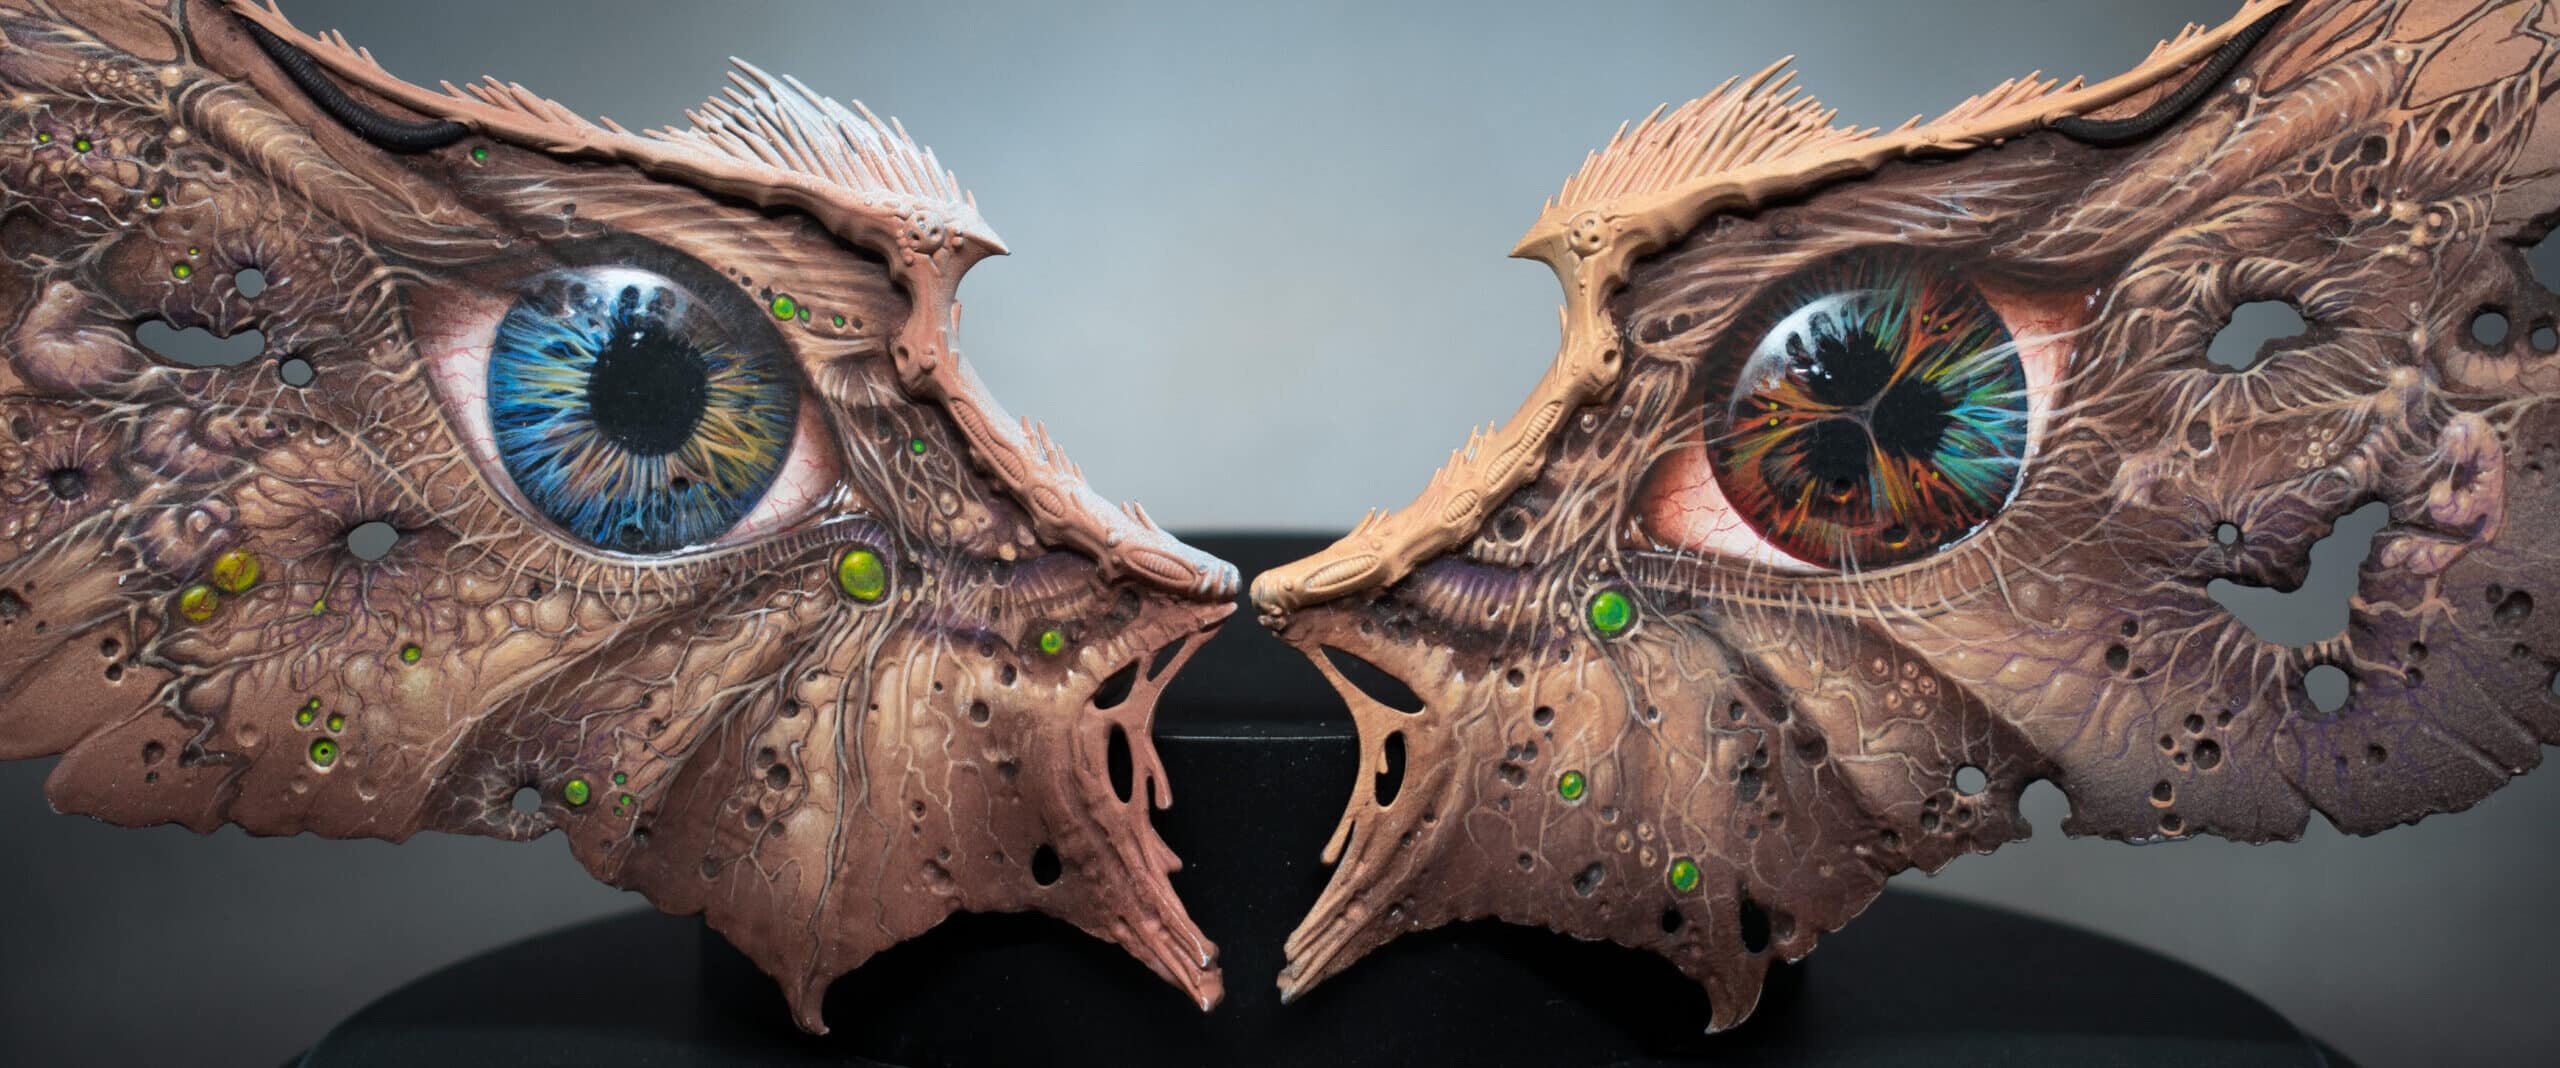
I’ve had a few requests for more photos of Mortarions Wings, alongside the video tutorials!
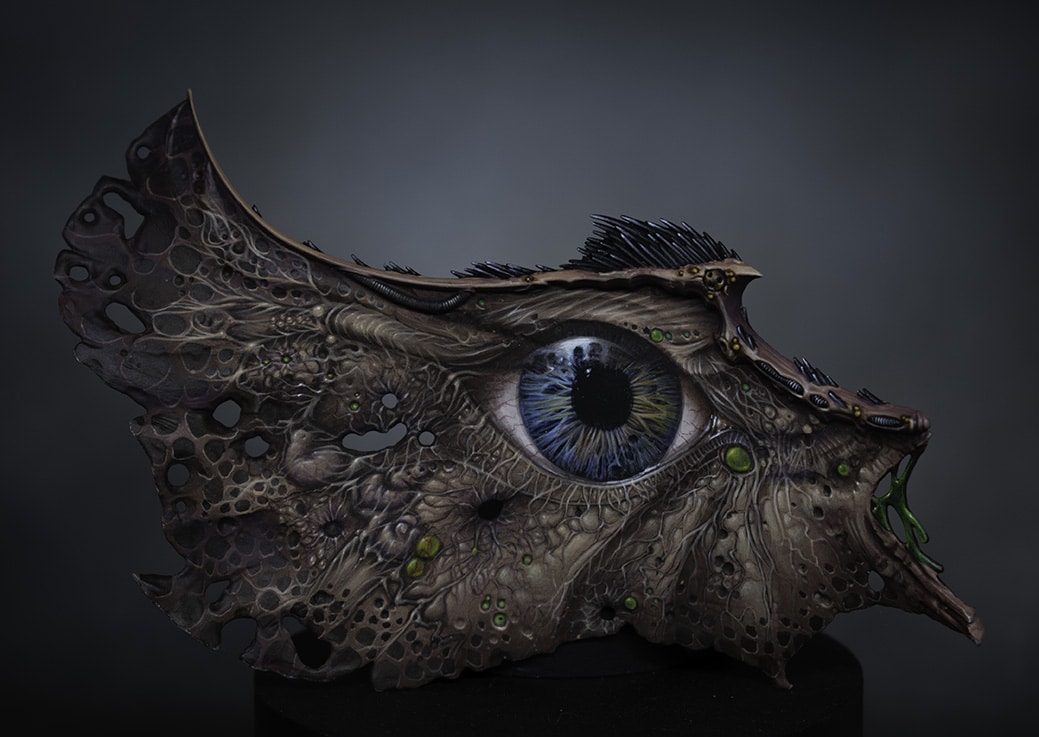
The wings have two sets of patterns. On the front we have a set of eyes, one humanoid and one demon, along with creeping maggoty infested flesh and pustules (of course!)
To Start…
First up, I needed to clean and prep the wings. Originally the wings on the model has a lot of texture and raised areas, which I needed to remove in order to create a flat canvas.
The wing before clean-up
And after!
A step-by step on how I did this, with all the tools is available at:
Mortarion Wing Prep – PDF
“There is no darkness to be found between the void of stars, nor the deepest pits of the earth that equals the darkness of Mankind’s deeds.“—Excerpt from the suppressed Neo-Terran Credos
Then comes the painting!
Website members can follow along with a set of videos at:
Video Tutorials : Mortarions Wings
The Eye on Mortarions Wings…
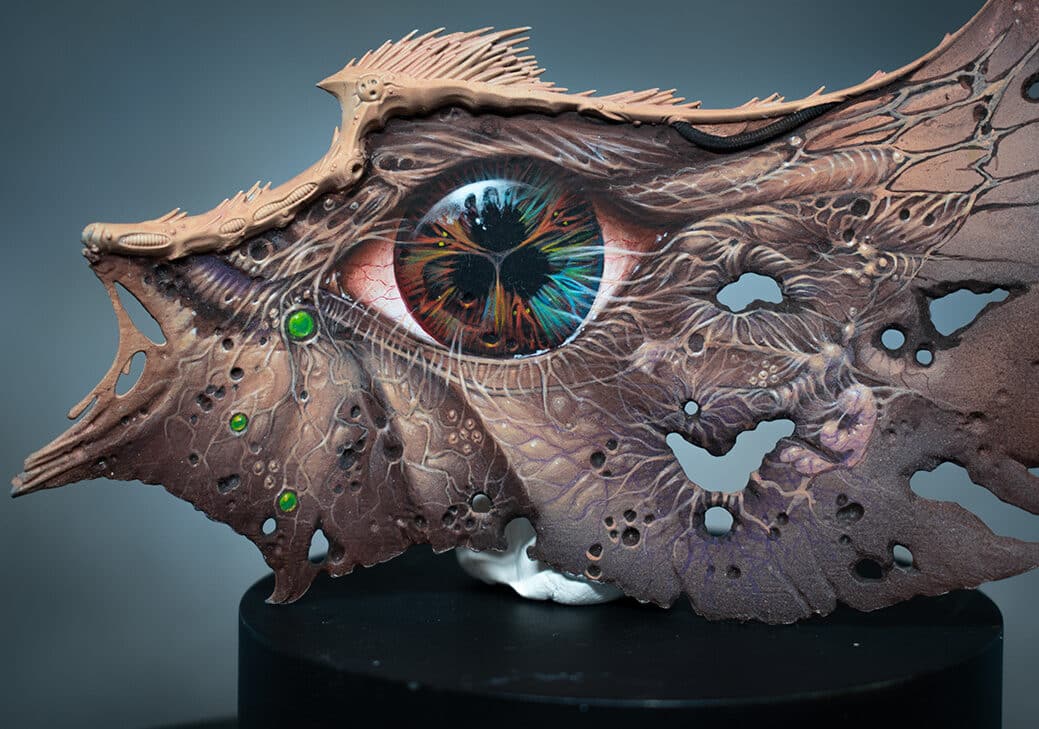
The eyes represent the human and demon side of Mortarion, left his blue pre-Daemon prince eye, the right his corrupted version.
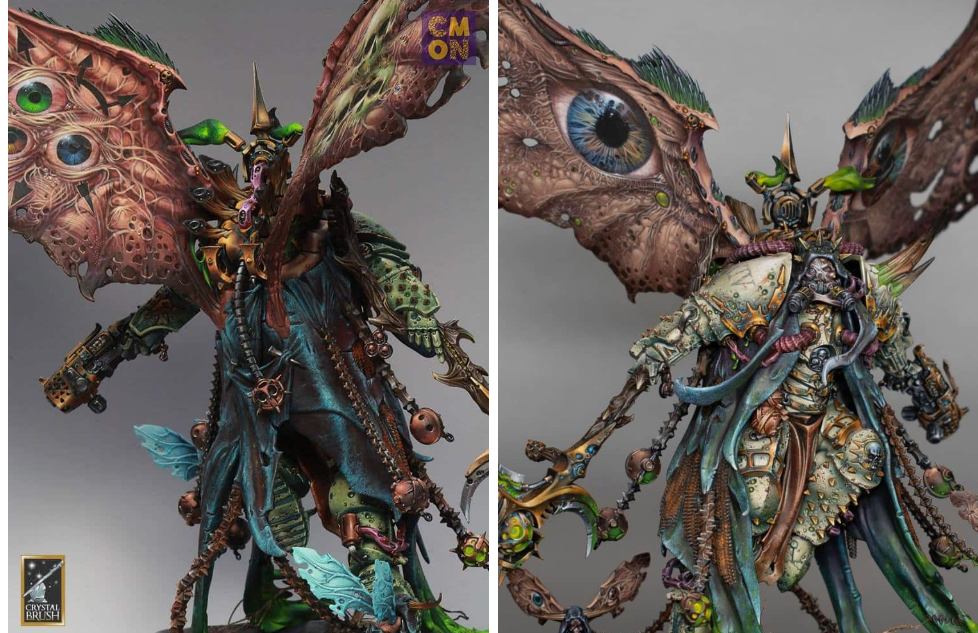
The Reverse of Mortarions Wings
The reverse of his wings show more corruption, with plenty of symbolism.
And there you have it! You can follow along with my painting videos of the wings, plus videos on other parts of the Mortarion model with my commentary by clicking the links below. Thank you.
Follow along with all my Mortarion Tutorials
Free Video Tutorials
Free videos for logged in members – just sign up as a ‘friend’ to view and click any of the thumbs.To explore all of these, visit this page!
If you don’t have an account, please sign up here! The website currently has over 350 video tutorials, plus step by step guides and PDFs. You can explore more free videos with a free “freebies” membership, or take the plunge and become a full subscriber for full access.
If you’d prefer to support me on Patreon, please visit: https://www.patreon.com/RichardGray [...]
A series of videos on how to paint Mortarions green armour! Follow along with a paint guide, video and step-by-step instructions. My Mortarion won Gold in Golden Demon 2019.
Quick note on the white paint I use – with Ceramite White not an option, apparently Corax White is the replacement, but really I don’t think it matters too much which white you use, eg Valleho white, Two Thin Coats, White Star etc!
How to Paint Mortarions Green Armour: Basic colours and knee armour
All videos are recorded in HD 1080p or higher – use full screen for the full effect and let the video load completely.
The following paints were used: Games Workshop: Death Guard Green, Ushabti Bone, Ceramite White, Incubis Darkness.
Step-by-step: How to Paint Mortarions Green Armour: Basic colours and knee armour
Prepare Your Model: Ensure that the base colour (Death Guard green) has been sprayed onto the model. It can be applied using an airbrush or by hand painting.Shadow Bone Base Layer: Use a small brush to apply Ushabti Bone directly on top of the Death Guard green. Apply it roughly to create a textured and rough appearance.Use the side of the brush to avoid filling in details, especially in areas with corrosion or small holes.Directional Lighting: Maintain a consistent light source direction for the entire model. In this case, the lighting is from the top left.Use the side of the brush to catch the edges of details and create shadows where needed.Building Layers: Apply multiple layers of Ushabti Bone, allowing each layer to dry. This builds up texture and depth on the armour. The paint should be fairly watered-down to allow for a gradual transition and darker appearance upon drying.Ceramite White Highlights: Apply Ceramite White on top of Ushabti Bone, following the same process as before but in a reduced area. Highlight the sculpted details and the simple dark areas left by the previous layer.Fine Detailing: Use a small brush to add finer details, such as dimples and small marks, using both Ushabti Bone and Ceramite White. Take care with areas that will be hidden, as they can still be visible from certain angles.Shading with Incubis Darkness: Introduce Incubis Darkness for shading, especially in areas like the holes in the armour. Darken these areas to add contrast. Use the same directional lighting approach for shading.Gold Trim Consideration: Be mindful of the upcoming gold trim painting, as it will affect the surrounding painted areas.Final Details and Blending: Fine-tune details, especially in areas like the knee, ensuring that the lighting direction is consistent.Blend colours using a wet palette for a smoother transition between shades.Yellow Details: Consider using a yellow paint, such as Averland Sunset, for adding small details like dots in the centre of holes
NMM (non metallic metal) armour trim
The following paints were used: Games Workshop: Yriel Yellow, Rhinox Hide, Firedragon Bright, Troll Slayer Orange, Mournfang Brown Vallejo: Ice Yellow
Step-by-step: How to Paint NMM (non metallic metal) armour trim
Prepare Your Workspace: Set up your painting area with good lighting and ventilation.Gather your paints: Yriel Yellow, Rhinox Hide, Firedragon Bright, Troll Slayer Orange, Mournfang Brown, and Ice Yellow from Vallejo.Ensure you have a wet palette for smoother paint application.Have a variety of brushes ready, including a small fine-tip brush for detailed work.Base Coat with Firedragon Bright: Apply Firedragon Bright as the base coat for the non-metallic metal (NMM) effect. Use a wet palette to maintain the paint’s consistency.Focus on covering the areas designated for the metallic trim.Add Troll Slayer Orange for Vibrancy: Introduce Troll Slayer Orange to create a vibrant orange hue.Blend it with Firedragon Bright for a smooth transition.Adjust the intensity by adding more or less Troll Slayer Orange as needed.Create Initial Highlights with Ice Yellow: Utilise Ice Yellow to mark out initial highlight areas.Apply it generously, as it will be blended and softened later.Adjust based on the model’s position and where light would naturally hit.Blend and Soften Highlights: Blend the colours together using small marks and strokes.Use a wet palette to keep the paint workable.Pay attention to transitions and reflections, adjusting as necessary.Introduce Yriel Yellow for Brightness: Add Yriel Yellow for intense brightness.Be cautious not to overdo it; you can always layer and adjust later.Focus on the most prominent areas that catch the light.Tone Down with Mournfang Brown: Use Mournfang Brown to tone down the intensity of the yellow hues.Glaze over areas to create a subtle transition.Consider the reflective properties of metal for realistic effects.Adjust Highlights with White Scar: Apply White Scar to create sharp highlights.Concentrate on areas where light hits sharply.Use a fine-tip brush for precision.Evaluate and Make Adjustments: Assemble the model partially to evaluate how light interacts with the metallic trim.Identify areas that need adjustments, considering the model’s overall composition.Add Final Touches and Reflections: Fine-tune reflections and add small dots to simulate reflective points.Experiment with different angles to ensure the model looks realistic from various perspectives.Pay attention to contrast, emphasising dark areas next to light for a shiny effect.
How to Paint Mortarions Green Armour: Details on the knee armour
The following paints were used: Games Workshop: Death Guard Green Ushabti Bone Incubi Darkness Yriel Yellow Mournfang Brown P3: Morrow White (Ceramite White)
Step-by-step: Paint Mortarions Green Armour: Details on the knee armour
Prepare the Model: Ensure the model is clean and free of any dust or debris.Use an airbrush to apply Death Guard Green as the base colour evenly over the foot.Initial Highlights with Ushabti Bone: Use a sharp brush to apply Ushabti Bone roughly over the Death Guard Green. Apply the highlight at an angle to catch light on the curve of the foot.Brush Technique: Utilize a worn-out size 1 brush for a softer, larger mark.Take advantage of the worn tip to create fatter marks for a textured effect.Layering Highlights: Apply multiple layers of highlights, ensuring they align from toe to the top of the foot.Use Death Guard Green on the palette to create soft blends and transitions.Adding Depth with Incubi Darkness: Glaze or paint Incubi Darkness over the highlights for a dark, contrasting effect.Test visibility behind the cloak to determine areas worth spending time on.Refining Highlights with Morrow White (Ceramite White): Move on to a smaller area with white, refining the highlight points. Underline sculpted details to enhance their 3D appearance.Glazing and Opaque Effects: Apply a sloppy glaze of Incubi Darkness to create a wash-like effect.Be mindful of catching raised details; the goal is to maintain texture.Adjusting Glazes: Fine-tune glazes by adjusting the opacity and color on the palette.Experiment with different mixtures to achieve desired transitions.Fine Details: Use Morrow White (Ceramite White) or a preferred white paint for underlining details.Add an orange base color for a unique glow effect.Shadows and Depth: Introduce shadows with Incubi Darkness on the upper edges of textures.Add shadows to make 3D imperfections in the armor more pronounced.Rivets and Details: Paint the rivets white for contrast and visibility.Address any streaking or imperfections, correcting as needed.Yellow Dots: Water down Yriel Yellow and paint the center of holes with multiple layers.Consider using the paint directly from the pot for a harder yellow dot.Streaking Effect: Use Mournfang Brown to create streaks coming from the holes.Adjust paint thickness to control the streaking effect.Final Touches: Ensure streaking direction aligns with the model’s positioning.
Face and foot
This video shows how to lighten the face of Mortarion and also how to paint the weathering on his armour.
The following paints were used: Games Workshop: Ceramite White, Flayed One Flesh, Pallid Wych Flesh, Ushabti Bone, Rhinox Hide.
Step-by-step: How to Paint Face and foot
Glazing for Face Lightening: Prepare a glaze using Games Workshop’s Flayed One Flesh paint and water (about 5 parts water to 1 part paint).Load the brush with the glaze and remove excess paint on kitchen roll.Apply thin layers of glaze to the face, focusing on central areas like the forehead, bridge of the nose, and cheeks.Be careful not to let the glaze pool in the recesses. Keep adjusting to maintain control over the layering.Pallid Wych Flesh Detailing: Use Games Workshop’s Pallid Wych Flesh, a thicker paint, to highlight the top of creases on the face.Build up contrast between creases and highlights gradually to create a natural look.Ensure that the creases are lightened, but maintain a balance with the overall lighting on the face.Final Highlight with Games Workshop’s Ceramite White: Apply Games Workshop’s Ceramite White to the highest points of the face, focusing on central areas.Use a controlled technique to avoid overdoing the highlights.Maintain subtlety and control over the white highlights for a natural effect.Chip-Weathering on Armor: Choose Games Workshop’s Rhinox Hide for chipping on the armor.Apply the paint with a brush, creating small marks on the model.Leave some patches of white paint between the chipped areas for added interest.Consider the positioning of chips, focusing on areas that would naturally experience wear and tear.Use a colour-coded brush to keep track of the tool’s usage and maintain control.Refining the Chipping: Adjust the thickness of the chipping lines to control the visual impact.Ensure that the chipping looks natural and not too high in contrast.Pay attention to the bottom of the foot, adjusting the highlighting based on the foot’s position.Add more chips on areas that would naturally experience more damage, like the front side of the leg.
Cloth
The following paints were used: Games Workshop: Ceramite White, Sotek Green, Abaddon Black, Evil Sunz Scarlet Vallejo: German Grey (Abaddon Black with a touch of white), Neutral Grey (Skavenblight Dinge), Pale Grey Blue (Celestra Grey).
Step-by-step: How to Paint Cloth
Primer Coat: Begin with a black primed base coat using Games Workshop: Abaddon Black or any black primer of your choice.Base Coat with German Gray: Apply Vallejo German Grey (a mix of Abaddon Black with a touch of white) using a stipple-like, rough fashion with a large, stiff brush. Rotate the brush to avoid obvious patterns.Dry Brush with Neutral Grey: Dry brush the cloth with Vallejo Neutral Grey (Skavenblight Dinge) using a large, stiff brush. Maintain a textured effect without removing the paint too severely.Fine Detailing with Sotek Green: Switch to a smaller brush (size 0 or similar) and use Sotek Green. Apply combinations of scratches and dots, focusing on smaller marks. Keep the paint fairly thick for strong marks.Gradual Highlighting: Mix Sotek Green with a small amount of Celestra Grey (Pale Grey Blue) in around a 2:1 ratio. Gradually build up layers, focusing on creases and details. Highlight raised areas more than recessed ones.Further Highlighting with Pale Blue-Gray: Mix Sotek Green with a small amount of Celestra Grey. Apply this highlight colour delicately, focusing on smaller areas. Enhance texture and pay attention to the shape of folds.Final Highlight with Pale Blue: Use Celestra Grey (Pale Blue) as the final highlight. Be extremely delicate with application, focusing on small details. Less is more at this stage, as the heavy paint can make strong marksGlazing with Abaddon Black: Use Abaddon Black for glazing. Apply it in the recesses to soften the texture marks and create a more blended look. Load the brush heavily for a more pronounced effect.Additional Glazing with Evil Sunz Scarlet: Use Evil Sunz Scarlet for additional glazing, mainly in the recesses. This adds contrast and depth to the demonic clothing. Experiment with colours to make the cloth more interesting.Final Touches and Details: Pay attention to focal points, such as areas where the cloth is attached to chains. Ensure that details are enhanced without losing the depth of the piece.
More Mortarion Tutorials:
Videos Not Showing?
To view any of my paid tutorials, you need to be a member of the website – please click below to log in or join the site.
Not sure about joining just yet? Check out my Youtube for all my free tutorials or sign up as a free “friend” member on this site and visit the free videos page!
If you’d prefer to support me on Patreon, please visit: https://www.patreon.com/RichardGray [...]
Learn how to paint Mortarion NMM Bronze the way I did on my Golden Demon winning model with this detailed guide. Using the techniques demonstrated on Mortarion’s scythe and backpack, you can achieve stunning, realistic bronze effects on your miniatures.
What’s Covered in the Mortarion NMM Bronze Guide:
Materials and Paints Needed: A comprehensive list of paints and tools required for the project, including specific brands and colours used.
Model Preparation and Priming: Tips on preparing your model with a black primer to create a solid foundation for the NMM technique.
Layering and Highlighting: Learn how to build up layers and create smooth transitions, focusing on the importance of primary and secondary highlights to achieve a realistic, shiny surface.
Advanced Highlighting: Discover the use of additional colours to push highlights higher and achieve a warm, golden effect on the bronze.
Final Touches and Glazing: Explore techniques for enhancing shadows and creating contrast to make the metal shine, using specific glazes for a polished look.
Optional Verdigris Effect: Add a verdigris effect for colour contrast and extra depth, with tips on achieving a realistic, weathered appearance.
Additional Features:
High-Quality Images: The guide includes high-resolution images to illustrate each step, providing clear visual references to help you achieve the best results.
Professional Tips: Benefit from my expert tips and tricks to enhance your painting skills and improve your techniques.
Adaptable Methods: The techniques demonstrated in this tutorial are flexible and can be adapted to other models and projects, allowing you to apply your newfound skills across your miniature collection.
Transform your miniatures with stunning non-metallic metal bronze effects using this detailed painting guide. Each step is carefully crafted to help you achieve high-quality results, making your models stand out in any collection.
Download the full Mortarion NMM Bronze guide below and start painting today!
You can also download the PDF here.
Why Non-Metallic Metal Bronze?
Mortarion NMM bronze not only aligns with his character and lore but also offers an artistically challenging and visually striking way to represent this complex and enduring figure from the Warhammer 40,000 universe.
Mortarion, also known as the Prince of Decay, embodies the essence of corruption and pestilence. Painting him with NMM bronze creates a stark contrast between the enduring, solid nature of bronze and the theme of decay and entropy that Mortarion represents. This contrast can symbolize the internal conflict Mortarion faces – his enduring nature as a Primarch clashing with his allegiance to the forces of decay and despair.
More Mortarion Tutorials
If you don’t have an account, please sign up here! The website currently has over 350 video tutorials with steps and tips, plus a selection of PDFs. If you are not sure about joining, you can explore my free videos with a free membership, or take the plunge and become a full subscriber for full access.
If you’d prefer to support me on Patreon, please visit: https://www.patreon.com/RichardGray [...]
There are lots of textures and fine details on the feet and face of Mortarion – here’s how to paint Mortarions Face, Feet and Hood!
Quick Jump to:
Video: Face and footStep-by-step: How to Paint Mortarions Face and footVideo: Hood Part 1Step-by-step: How to Paint Mortarions Hood – Part OneVideo: Head and Hood Part 2Step-by-step: How to Paint Mortarions Head and Hood – Part TwoVideos Not Showing?
Video: Face and foot
This video shows how to lighten the face of Mortarion and also how to paint the weathering on his armour.
The following paints were used:Games Workshop: Ceramite White, Flayed One Flesh, Pallid Wych Flesh, Ushabti Bone, Rhinox Hide.
Step-by-step: How to Paint Mortarions Face and foot
Glazing for Face Lightening: Prepare a glaze using Games Workshop’s Flayed One Flesh paint and water (about 5 parts water to 1 part paint).Load the brush with the glaze and remove excess paint on kitchen roll.Apply thin layers of glaze to the face, focusing on central areas like the forehead, bridge of the nose, and cheeks.Be careful not to let the glaze pool in the recesses. Keep adjusting to maintain control over the layering.Pallid Wych Flesh Detailing: Use Games Workshop’s Pallid Wych Flesh, a thicker paint, to highlight the top of creases on the face.Build up contrast between creases and highlights gradually to create a natural look.Ensure that the creases are lightened, but maintain a balance with the overall lighting on the face.Final Highlight with Games Workshop’s Ceramite White: Apply Games Workshop’s Ceramite White to the highest points of the face, focusing on central areas.Use a controlled technique to avoid overdoing the highlights.Maintain subtlety and control over the white highlights for a natural effect.Chip-Weathering on Armor: Choose Games Workshop’s Rhinox Hide for chipping on the armor.Apply the paint with a brush, creating small marks on the model.Leave some patches of white paint between the chipped areas for added interest.Consider the positioning of chips, focusing on areas that would naturally experience wear and tear.Use a colour-coded brush to keep track of the tool’s usage and maintain control.Refining the Chipping: Adjust the thickness of the chipping lines to control the visual impact.Ensure that the chipping looks natural and not too high in contrast.Pay attention to the bottom of the foot, adjusting the highlighting based on the foot’s position.Add more chips on areas that would naturally experience more damage, like the front side of the leg.
Video: Hood Part 1
The following paints were used: Games Workshop: Abaddon Black, Temple Guard Blue, Xereus Purple, Balor Brown Vallejo: Black (Abaddon Black), Heavy Blue Grey (Celestra Grey), German Grey (Abaddon Black with a touch of white) P3: Morrow White (Ceramite White)
Step-by-step: How to Paint Mortarions Hood – Part One
Prepare the Model: Ensure that the Mortarion model’s hood has been properly primed in black. Fill in any gaps resulting from assembling the model using polystyrene cement. Sand down the gaps to create a smoother surface.
Gather Paints and Tools:On your wet palette, prepare the following paints:
Abaddon Black (Games Workshop)Temple Guard Blue (Games Workshop)Xereus Purple (Games Workshop)Balor Brown (Games Workshop)German Grey (Vallejo) – Mix Abaddon Black with a touch of whiteHeavy Blue Grey (Vallejo) – Celestra Grey (Games Workshop)Morrow White (P3) – Ceramite White (Games Workshop)Tools:Older paintbrush (to avoid quick wear)Size zero artist brush (for finer details)Palette for mixing paintsAbaddon black for glazingBase Coat with Blue: Take the older paintbrush and apply Temple Guard Blue onto the model’s hood. Alternate between German Grey and Temple Guard Blue for a quick blended look. Focus on the edges and tendrils, applying more blue to create a weathered effect.
Refine with Finer Brush: Switch to the size zero artist brush and refine the texture. Pay attention to the spikes on top of Mortarion’s head, making them stand out against the dark color. Apply both German Grey and Temple Guard Blue in a more controlled manner.
Add Black for Shading: Introduce deeper shading by mixing Abaddon Black with a small amount of water. Use the finer brush to apply this mixture to specific areas, enhancing the three-dimensional effect.
Glaze with Red: Create a glaze using Abaddon Black and Xereus Purple (or any purple paint). Start near the highlights and work into the shadows, allowing the glaze to enhance the color variance. Repeat this process to build up the desired tone.
How to paint Mortarions Face: Once the hood is painted, focus on the face. Be cautious around the details, such as the eyes and eyelids. Use Balor Brown for shadows and then apply Morrow White to pick out fine details. Pay attention to the eyes, painting them with a brighter yellow for contrast.
Fine-Tune and Experiment: Continue fine-tuning the paintwork, experimenting with glazes and additional details. Remember to test the paint consistency on a spare surface before applying it to the model.
Glaze and Highlight: Keep glazing over the areas, especially the highlights, to add depth. Use minimal amounts of paint to pick out final highlights, enhancing the overall texture and making it look three-dimensional.
Video: Head and Hood Part 2
Vallejo: Neutral Grey : Skavenblight Dinge German Grey (Abaddon Black with a touch of white) English Uniform (XV-88) Japanese Uniform (Balor Brown) Ice Yellow (Ushabti Bone with a touch of yellow) Heavy Blue Grey (Celestra Grey) Black (Abaddon Black) Games Workshop: Emperor’s Children Rhinox Hide P3: P3: Morrow White (Ceramite White)
Step-by-step: How to Paint Mortarions Head and Hood – Part Two
How to paint Mortarions Face and Eyes: Start with a black paint (Vallejo: Black) to paint the pupils and cover the iris.Use Vallejo: Heavy Blue Grey (Celestra Grey) to paint the eyes themselves, avoiding pure white to create a more natural look.Consider painting cataracts initially but feel free to change to red and blue eyes for a magical effect.Highlighting the Eyes: Use Vallejo: White to highlight the lower edge of the eyes, creating a subtle, realistic contrast.Paint the iris around the black dots to add depth and detail to the eyes.Painting the Metal Halo: Apply a base coat of Vallejo: English Uniform (XV-88) on the metal halo, ensuring it’s less saturated than other gold areas on the model.Use Vallejo: Neutral Grey to blend into crevices and scratches, creating a reverse shading effect.Add Vallejo: Morrow White (Ceramite White) to blend in some warmth and detail.Rebreather Cylinders: Highlight the cylinders with a mix of Vallejo: Ice Yellow (Ushabti Bone with a touch of yellow) and Vallejo: Black.Blend in some of the previous colours to add more detail and scratches.Use Games Workshop: Emperor’s Children for the tubing, and highlight with Vallejo: English Uniform (XV-88).Cabling and Tubes: Highlight cabling with a mix of Vallejo: White and Vallejo: English Uniform (XV-88).Pay attention to angles and details, painting from one angle along the length to maintain consistency.Add final highlights sparingly using Vallejo: Ice Yellow (Ushabti Bone with a touch of yellow).Fleshy Details: Paint the stringy flesh between canisters with Vallejo: Rhinox Hide for an organic look.Use Vallejo: Evil Sunz Scarlet as a glaze to transition light hitting the piping while maintaining details.Final Touches: Paint black ribbing on the inside of the lower tube with Vallejo: Neutral Grey and highlight with Vallejo: Heavy Blue Grey (Celestra Grey).Ensure all details are well-defined and consistent.
More Mortarion? Right this way:
Videos Not Showing?
To view any of my paid tutorials, you need to be a member of the website – please click below to log in or join the site.
Not sure about joining just yet? Check out my Youtube for all my free tutorials or sign up as a free “friend” member on this site and visit the free videos page!
If you’d prefer to support me on Patreon, please visit: https://www.patreon.com/RichardGray [...]
Unlock the secrets to preparing Mortarion wings for stunning freehand painting with this comprehensive guide. This tutorial is designed to help you remove the existing vein details on the wings, providing a smooth canvas for your artistic creations. If you’re looking to create more surface area for freehand work, this guide will show you how.
What’s Covered in the Mortarion Wings Guide:
Materials and Tools Needed: A detailed list of all the tools required, including clippers, a scalpel, fine grain sandpaper, Tamiya Extra Thin Cement, and primer. Learn about the specific tools used and why they are ideal for this project.
Step-by-Step Vein Removal: Techniques for using clippers and a scalpel to remove the vein details from the wings. Tips on ensuring a smooth finish and avoiding damage to the model.
Sanding and Smoothing: Instructions for sanding the wings to achieve a clean, smooth surface ready for priming. Learn about different grades of sandpaper and how to use them effectively.
Applying Tamiya Extra Thin Cement: Discover the magic of Tamiya Extra Thin Cement to soften and smooth any remaining details, enhancing the organic, fleshy appearance of the wings.
Priming and Base Coating: Guidance on priming the wings with Vallejo Surface Primer and applying base colours using an airbrush or hand painting techniques.
Creating a Flat Surface for Freehand Painting: Learn how to create a completely flat surface on Mortarion’s wings, allowing for detailed freehand painting. This technique can be applied to many other models to expand your freehand painting area.
Final Preparations: Tips for preparing the wings with base colours and shading to set the stage for detailed freehand painting.
Additional Features:
High-Quality Images: The guide includes high-resolution images to illustrate each step, providing clear visual references to help you achieve the best results.
Professional Tips: Benefit from my expert tips and tricks to enhance your modeling skills and improve your techniques.
Adaptable Methods: The techniques demonstrated in this tutorial are flexible and can be adapted to other models and projects, allowing you to apply your newfound skills across your miniature collection.
Transform Mortarion wings into a smooth, detailed canvas ready for freehand painting with this detailed modeling guide. Each step is carefully crafted to help you achieve high-quality results, making your model a standout piece. This guide will not only enhance your Mortarion model but can be adapted to create more surface area for freehand work on many other models as well.
Please wait for the below Mortarion Wing Prep PDF to load. Alternatively, you can download it here.
WingPrepforPatreon
Explore more Mortarion Tutorials
If you don’t have an account, please sign up here! The website currently has over 350 video tutorials with steps and tips, plus a selection of PDFs. If you are not sure about joining, you can explore my free videos with a free membership, or take the plunge and become a full subscriber for full access.
If you’d prefer to support me on Patreon, please visit: https://www.patreon.com/RichardGray [...]

A set of video tutorials on How to Paint Mortarions Wings, with paints and step-by-step guides on freehand.
Demon Wing Details
First steps and basics For a pdf on how I cleaned the wing ready for painting, visit : https://richardgraycreations.com/mortarion-wing-prep-pdf/ )
All videos are recorded in HD 1080p or higher – use full screen for the full effect and let the video load completely.
Demon Wing Details: Part One
The following paints were used:Games Workshop: Rhinox Hide, Yriel Yellow, Kislev Flesh, Cadian Fleshtone, Moot Green, Xereus Purple, Evil Sunz Scarlet*note, in the video I show Emperor’s Children and Death Guard Green. These were not used in this video. Vallejo: Ivory
Demon Wing Details: Part Two
The following paints were used:Games Workshop: Mournfang Brown, Cadian Fleshtone, Kislev Flesh, Xereus Purple, Valejo: Ivory
Demon Wing Details: Part Three
The following paints were used:Games Workshop: Cadian Fleshtone, Kislev Flesh, Rhinox Hde, Xereus Purple, Vallejo Model Colour: Ivory
Step by Step Tips: How to Paint Mortarions Wings – Demon Wing Details
Part One:
Prepare the Model: Confirm that the model has been properly primed, and any base colors, such as carmine, have been applied. Take a moment to inspect the model and identify any pre-painted outlines or details.
Outline with Rhinox Hide: Utilise Rhinox Hide to start painting the outlines on the wings. This step involves creating the base pattern and initial details. Opt for Rhinox Hide over black to match the desired fleshy tone of the wings.
Paint Veins with Xereus Purple: Select Xereus Purple to paint the vein-like details on the wings. Use a larger brush for broader coverage and to establish the initial structure. The combination of Xereus Purple and Rhinox Hide will give a dark, diseased appearance to the veins.
Add Variation to Veins: Pay attention to the thickness and variation of the veins. Make deliberate wiggles and different shapes to create depth and interest. Ensure that the veins go over some of the previously painted thick lines for a more realistic effect.
Consider Viscosity of Paint: Observe the viscosity of the paint; it should be thick enough to allow for fine lines. This is crucial for painting detailed and thin veins. You can load the brush more freely when using a thicker paint.
Add Vein Details: Paint thin lines of purple coming out from certain areas, resembling veins spreading out. Use the thickness of the brush to your advantage, allowing for both longer lines and finer details.
Introduce Spot Colours: Incorporate spot colours using Moot Green from Games Workshop. These spots will contrast with the purple, adding visual interest to specific areas, like craters on the wings.
Highlight Veins: Highlight the veins by using Kislev Flesh, creating a raised vein effect. This will add depth and dimension to the wing.
Soften Edges and Add Shadows: Use glue to soften edges and make the veins appear less pustule-like. Introduce shadow areas around the veins to enhance the three-dimensional look.
Plan Lighting Directions: Consider the lighting directions on the model. Reflective lights and multiple light sources can contribute to a realistic 3D effect. Think about how the light interacts with the various elements on the wings.
Part Two:
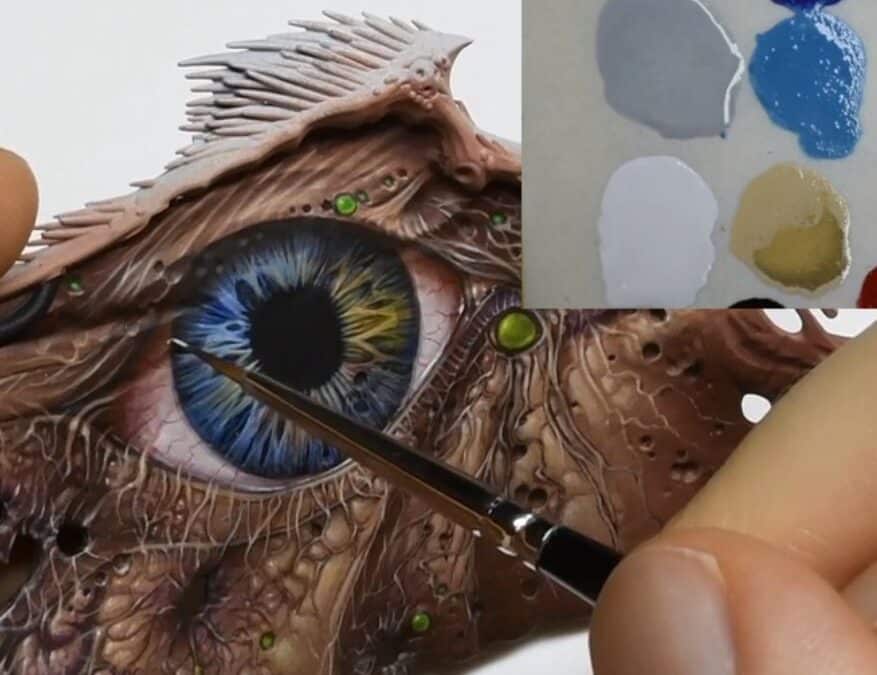
Set Up Your Palette: Arrange your paints on the wet palette, as shown in the top right corner of the video. Let them mix a bit for added variation in your application.
Begin with Cadian Fleshtone: Using Cadian Fleshtone, highlight the small segments between the veins. Focus on the upper areas to mimic light hitting from above.
Use Reasonable Dilution: Ensure the paint is reasonably diluted, allowing for smoother application. As you’re highlighting, create the impression of shadows by avoiding direct application on dark vein edges.
Utilise Mournfang Brown and Xereus Purple: Outline details with Mournfang Brown, and use Xereus Purple to add depth. These details may evolve organically as you progress.
Fine-tune with a Sharp Brush: For fine details, use a sharp-tipped brush. Paint slightly thicker than usual, taking advantage of the wet palette to maintain consistency.
Create Organic Look: Emphasise the fleshy and organic feel by avoiding a precise pattern. Moths and butterflies inspire the style, but the focus is on a fleshy appearance.
Observe Light Source: Keep the light source in mind while highlighting. Work on veins to create shadows, ensuring a dynamic and realistic look.
Add Transition Colours: Utilise mixed-up areas on the palette for transition colours. This adds depth and enhances the shadow effect, especially on larger, rounder areas.
Experiment with Xereus Purple Outlining: Experiment with Xereus Purple outlining to enhance details. Remember, fine details may evolve as you progress, creating a unique and organic look.
Balance the Details: Constantly tweak and balance details as you go. Ensure the veins, fleshy areas, and fine details complement each other for a cohesive appearance.
Keep Consistency: Maintain consistency in the colour palette but vary the ratio of colours. This provides variation while adhering to a cohesive theme.
Avoid Exaggeration: While enhancing details, avoid exaggeration. The goal is to create an organic, fleshy look without turning it into a three-dimensional eyeball.
Part Three:
Understand the Existing Freehand Progress: Examine the progress of the freehand on the model, especially the veins and patterns. Note that Rhinox Hide comes in two versions, with the thinner one used for glazes and quick transitions.
Begin Painting the Veins: Start with Rhinox Hide to paint veins, emphasizing the connections and flow between them. Be mindful of curves and avoid making the veins look too straight or jarring.
Create Veins as Eyelashes: Connect the veins to the eye, using them as eyelashes. This adds a unique and natural touch to the model, representing an organic connection between the eye and wing.
Add Variation to Veins Around Holes: Paint veins around holes using Xereus Purple, varying the pattern to avoid repetition. Darken the area around the hole for contrast and tonal variation.
Adjusting Freehand for a Cohesive Look: As the freehand progresses, ensure that the details flow well with each other, avoiding a disconnected appearance. Veins should follow the natural contours of the wing.
Layering for Depth: Layer veins to create depth, using Kislev Flesh and Ivory for highlights. This technique makes the veins appear more 3D and layered.
Darken and Outline: Darken certain areas using Rhinox Hide to create shadows and depth. Outline veins and details to make them stand out clearly.
Highlighting and Refining: Use Vallejo Ivory to highlight specific sections, creating contrast and emphasizing the shapes. Continuously refine and tweak details, keeping an eye on the overall picture.
Glazing for Smooth Transitions and Shapes: Use glazing to create smooth transitions between different paint layers. This is particularly useful for blending colours seamlessly. Apply glazes to emphasise the shapes of painted sections, ensuring a smooth and coherent look.
Final Touches: Continue refining details, emphasising shapes, and making any final adjustments. Take your time to ensure a high-quality finish.
How To Paint Mortarions Wings: Blue Eye
The following paints were used:Games Workshop: Cybarite White, Flayed One Flesh, Doombull Brown, Balor Brown, Evil Sunz Scarlet, Lothern Blue, Ahriman Blue (optional) Rhinox Hide Vallejo: Ultramarine Blue, Night Blue (optional) Black, Pale Grey Blue P3: Ryn Flesh
Step by Step Tips: How to Paint Mortarions Wings – Blue Eye
Start with the Blue Detail on the Eyes: Commence the process by using Ultramarine Blue to paint a circle in the center of the existing black circle on the wing. Precision isn’t crucial at this point; you can refine it later.
Refine the Blue Circle: Utilize black paint to clean up and refine the edges of the blue circle, serving as a guideline for the forthcoming details.
Add Fine Details with Ultramarine Blue: Apply Ultramarine Blue to create fine lines and intricate details within the circle, representing the complex features of the eye. Allow the lines to follow the organic nature of the wing.
Highlight the Blue Details: Use Flayed One Flesh to highlight selected blue details, creating a smooth transition between colours and enhancing the eye’s three-dimensional appearance.
Introduce Pale Brown for Depth: Apply Pale Brown to add depth to the eye, concentrating on the lower section of the white. Be cautious not to use excessive paint to preserve the details from earlier steps.
Create Highlights with Flayed One Flesh: Revisit Flayed One Flesh to introduce highlights on the blue details, enhancing the overall aesthetic of the eye.
Glaze with Pale Grey Blue: Create a glaze using Pale Grey Blue and apply it to specific areas of the eye. This will help blend colours and add a layered effect to the strands and details.
Add Red Veins and Details: Carefully reintroduce red veins, resembling eyelashes from the bottom of the eye. Utilize a dragging motion with the brush for precise lines.
Correct Mistakes and Refine Detail: If any mistakes occur, use black paint to rectify errors and refine the intricate details, maintaining attention to the shape and flow of the lines.
Final Touches on Reflections: Add reflections to the eye using semi-white to highlight the central part of the reflection. Consider the light source and aim for a realistic and captivating result.
How To Paint Mortarions Wings: Demon Eye
The following paints were used:Games Workshop: Mephiston Red, Wild Rider Red, Rhinox Hide Doombull Brown, Zamesi Desert, Yriel Yellow, Moot Green Temple Guard Blue, Sotek Green, Abaddon Black, Cadian Fleshtone, Kislev Flesh, Ceramite WhiteVallejo Model Colour: Ivory, BlackP3: Iosen Green (GW Warpstone Glow alternative) Ryn Flesh
Step by Step Tips: How to Paint Mortarions Wings – Demon Eye
Outline the Pupil: Begin by outlining the pupil of the eye. Focus on the inner shape rather than the outer, as you can fix any wonkiness later.
Paint the Iris: Using a spread-out pattern, carefully paint the lines of the iris, starting from the center and moving outwards. Use a lighter colour to highlight some imperfections and indentations on the wing.
Refine the Lines: Separate the lines, especially around the Nurgle symbol. Use Abaddon Black as a rubber to create a rough outline and add depth to the design.
Introduce Different Colours: Experiment with different colours such as Temple Guard Blue and Wild Rider Red to add layers and details. Don’t be afraid to mix colours on the brush for a varied effect.
Paint the Sclera: Apply Temple Guard Blue to the sclera, ensuring a smooth transition from the red, and be cautious not to paint over the detailed lines.
Enhance Highlights: Use Ceramite White to brighten the eyes, creating a strong contrast. Paint carefully, following the shape of the eye for a rounded and natural look.
Add Veins: Use Mephiston Red to paint veins onto the white of the eye, creating a realistic effect. Keep the lines subtle and centered for a natural appearance.
Apply Glazes: Use glazes to soften transitions and tie the piece together. Deploy glazes by loading the brush from the wet palette.
Final Highlights: Highlight with Ivory to emphasize details on the veins and enhance the overall look.
Add Reflections: Apply White to the reflections on the eye to give it a lifelike and 3D effect.
Create Wetness Effect: Using a small amount of Kislev Flesh or a similar colour, add small irregular dots to represent the wetness of the eye.
Need more Mortarion? Check out the other tutorial videos, below:
Free Video Tutorials
Free videos (for logged in members – just sign up as a ‘friend’ to view and click any of the thumbs.To explore all of these, visit this page!
If you don’t have an account, please sign up here! The website currently has over 350 video tutorials, plus step by step guides and PDFs. You can explore more free videos with a free “friend” membership, or take the plunge and become a full subscriber for full access.
If you’d prefer to support me on Patreon, please visit: https://www.patreon.com/RichardGray [...]
Another tutorial on how I got Mortarion painted, this time how I did the demon eye on his wings! Follow along with the video and guide, below.
How To Paint Mortarions Demon Eye
The following paints were used:Games Workshop: Mephiston Red, Wild Rider Red, Rhinox Hide Doombull Brown, Zamesi Desert, Yriel Yellow, Moot Green Temple Guard Blue, Sotek Green, Abaddon Black, Cadian Fleshtone, Kislev Flesh, Ceramite WhiteVallejo Model Colour: Ivory, BlackP3: Iosen Green (GW Warpstone Glow alternative) Ryn Flesh
Step by Step Tips: How to Paint Mortarions Wings – Demon Eye
Outline the Pupil: Begin by outlining the pupil of the eye. Focus on the inner shape rather than the outer, as you can fix any wonkiness later.
Paint the Iris: Using a spread-out pattern, carefully paint the lines of the iris, starting from the center and moving outwards. Use a lighter colour to highlight some imperfections and indentations on the wing.
Refine the Lines: Separate the lines, especially around the Nurgle symbol. Use Abaddon Black as a rubber to create a rough outline and add depth to the design.
Introduce Different Colours: Experiment with different colours such as Temple Guard Blue and Wild Rider Red to add layers and details. Don’t be afraid to mix colours on the brush for a varied effect.
Paint the Sclera: Apply Temple Guard Blue to the sclera, ensuring a smooth transition from the red, and be cautious not to paint over the detailed lines.
Enhance Highlights: Use Ceramite White to brighten the eyes, creating a strong contrast. Paint carefully, following the shape of the eye for a rounded and natural look.
Add Veins: Use Mephiston Red to paint veins onto the white of the eye, creating a realistic effect. Keep the lines subtle and centered for a natural appearance.
Apply Glazes: Use glazes to soften transitions and tie the piece together. Deploy glazes by loading the brush from the wet palette. When I was getting Mortarion painted for the Golden Demon, I used a LOT of glazes. Be patient, take your time and glaze slowly.
Final Highlights: Highlight with Ivory to emphasize details on the veins and enhance the overall look.
Add Reflections: Apply White to the reflections on the eye to give it a lifelike and 3D effect.
Create Wetness Effect: Using a small amount of Kislev Flesh or a similar colour, add small irregular dots to represent the wetness of the eye.
Would you like to learn more about how I got Mortarion painted for the Golden Demon? Follow this link!
Need more Mortarion? Check out the other tutorial videos, below:
Free Video Tutorials
Free videos (for logged in members – just sign up as a ‘friend’ to view and click any of the thumbs.
If you don’t have an account, please sign up here! The website currently has over 350 video tutorials, plus step by step guides and PDFs. You can explore more free videos with a free “friend” membership, or take the plunge and become a full subscriber for full access.
If you’d prefer to support me on Patreon, please visit: https://www.patreon.com/RichardGray [...]
A video tutorial with paints and a step-by-step guide on How to Paint Mortarions Blue Eye on his wings.
How to Paint Mortarions Blue Eye
The following paints were used:Games Workshop: Cybarite White, Flayed One Flesh, Doombull Brown, Balor Brown, Evil Sunz Scarlet, Lothern Blue, Ahriman Blue (optional) Rhinox Hide Vallejo: Ultramarine Blue, Night Blue (optional) Black, Pale Grey Blue P3: Ryn Flesh
Step by Step Tips: How to Paint Mortarions Blue Eye
Start with the Blue Detail on the Eyes: Commence the process by using Ultramarine Blue to paint a circle in the center of the existing black circle on the wing. Precision isn’t crucial at this point; you can refine it later.
Refine the Blue Circle: Use black paint to clean up and refine the edges of the blue circle, serving as a guideline for the forthcoming details.
Add Fine Details with Ultramarine Blue: Apply Ultramarine Blue to create fine lines and intricate details within the circle, representing the complex features of the eye. Allow the lines to follow the organic nature of the wing.
Highlight the Blue Details: Use Flayed One Flesh to highlight selected blue details, creating a smooth transition between colours and enhancing the eye’s three-dimensional appearance.
Introduce Pale Brown for Depth: Apply Pale Brown to add depth to the eye, concentrating on the lower section of the white. Be cautious not to use excessive paint to preserve the details from earlier steps.
Create Highlights with Flayed One Flesh: Revisit Flayed One Flesh to introduce highlights on the blue details, enhancing the overall aesthetic of the eye.
Glaze with Pale Grey Blue: Create a glaze using Pale Grey Blue and apply it to specific areas of the eye. This will help blend colours and add a layered effect to the strands and details.
Add Red Veins and Details: Carefully reintroduce red veins, resembling eyelashes from the bottom of the eye. Utilize a dragging motion with the brush for precise lines.
Correct Mistakes and Refine Detail: If any mistakes occur, use black paint to rectify errors and refine the intricate details, maintaining attention to the shape and flow of the lines.
Final Touches on Reflections: Add reflections to the eye using semi-white to highlight the central part.
All videos are recorded in HD 1080p or higher – use full screen for the full effect and let the video load completely.
Need more Mortarion? Check out the other tutorial videos, below:
Free Video Tutorials
Free videos (for logged in members – just sign up as a ‘friend’ to view and click any of the thumbs.To explore all of these, visit this page!
If you don’t have an account, please sign up here! The website currently has over 350 video tutorials, plus step by step guides and PDFs. You can explore more free videos with a free “friend” membership, or take the plunge and become a full subscriber for full access.
If you’d prefer to support me on Patreon, please visit: https://www.patreon.com/RichardGray [...]
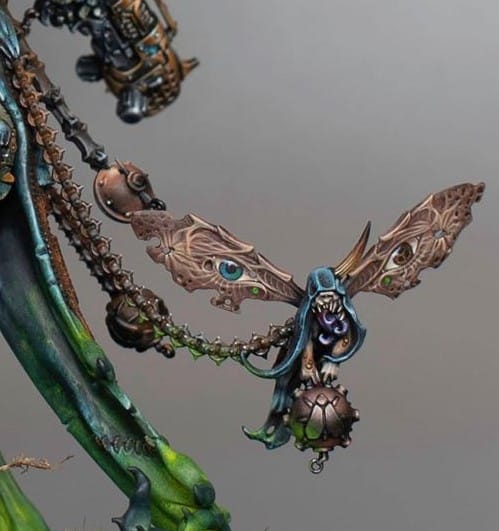
I had to make the Nurgling companions of Mortarion have wings to match their master! Here is How to Paint Freehand Tiny Nurgle Wings, with two videos, paints and a step-by-step guide.
How to Paint Freehand Tiny Nurgle Wings : Part One
The following paints were used: Games Workshop: Ushabti Bone, Kislev Flesh, Cadian Fleshtone, Bugmans Glow, Rhinox Hide Vallejo: Model Colour Black (Abaddon Black)
Step by Step: How to Paint Freehand Tiny Nurgle Wings
Preparation Before you begin painting the cherub wings on your Mortarion model, ensure you have the necessary paints and tools. The paints used in this tutorial are Rhinox Hide, Bugmans Glow, Ushabti Bone, Kislev Flesh, Cadian Fleshtone, and Vallejo Model Colour Black (equivalent to Abaddon Black). Additionally, you’ll need a wet palette, a size double zero artist opus brush, and a scalpel.
Wing Preparation Prepare the cherub wings by carefully removing any sculpted veins with a scalpel. Sand down the wings, apply glue to smooth the details, and then give them a black prime. Use an airbrush to apply a quick layer of Ushabti Bone to create a base.
Base Layer Start with a 50/50 mix of Rhinox Hide and Bugmans Glow. Using the tip of your size double zero brush, apply this mixture to the wings, building up layers to achieve a translucent effect. This darker base will allow for easier highlighting later.
Painting Details Using the tip of your brush, paint the lines and details on the wings with Rhinox Hide. Be mindful of the small scale, adapting the details as needed. Focus on creating flowing lines that follow the contours of the wings.
Adding Depth Mix Kislev Flesh and Cadian Fleshtone on the wet palette. Apply this mixture to highlight the lines painted with Rhinox Hide. This glazing technique adds depth without excessive layering, providing a smooth transition.
Eyes and Black Details Using Vallejo Model Colour Black, paint the eyes on the wings. Don’t worry about the size; you’ll refine them later. This step helps balance tones on the model. Use the tip of the brush to paint black details, such as spikes or dots, around the wings.
Veins and Highlights Switch to Kislev Flesh and paint in the veins on the wings. Ensure they are clear and defined. Gradually build up highlights using Cadian Fleshtone and Ushabti Bone, focusing on edges and details. Soften transitions for a more natural look.
Refining and Tweaking Continuously refine and tweak the details as you go along. Adjust the size and position of the eyes, ensuring they complement the overall composition. Use the wet palette for any necessary paint mixing.
Final Touches Highlight imperfections in the wings, emphasizing dimensional details. Pay attention to areas underneath the eyes, adapting details to fit the small scale. Continue refining until you achieve the desired depth and clarity.
All videos are recorded in HD 1080p or higher – use full screen for the full effect and let the video load completely.
How to Paint Freehand Tiny Nurgle Wings: Part Two
The following paints were used: Games Workshop: Kislev Flesh, Cadian Fleshtone, Rhinox Hide, Bugman’s Glow, Ushabti Bone, Ceramite White, Moot Green, Warpstone Glow, Sotek Green, Mephiston Red, Fire Dragon Bright, Waaagh! FleshVallejo: Black, Pale Blue Grey
Step by Step: How to Paint Freehand Tiny Nurgle Wings
Softening Previous Details Commence by gently blending and softening the details on the wings painted in the previous video. Utilize a glaze mixture of approximately five parts water to one part paint, specifically using Rhinox Hide, to seamlessly merge and soften the fleshing marks on the wings.
Painting the Whites of the Eyes Proceed to paint the whites of the eyes with Kislev Flesh. Ensure to leave a small gap at the top of the eye to introduce a subtle shadow effect. Apply clean and flesh tones, directing your strokes towards you for a polished finish.
Building Up Highlights on the Eyes Employ a slightly thicker paint to build up highlights on the whites of the eyes. Introduce a pale blue-gray colour later for a desaturated effect. Apply highlights by initiating strokes on the left-hand side, moving towards the centre, and then returning to the right-hand side, drawing towards the centre again for more pronounced highlights at the bottom.
Adding Organic Details Apply Ryza Oxide to paint small dots around the eyes, creating an organic and three-dimensional appearance. Exercise caution to avoid disrupting existing lines, maintaining the realism of veins.
Green Dots and Highlights Use Waaagh! Flesh and Moot Green to paint green dots around the tear duct area. Enhance the green dots by applying a line along the bottom right edge and a dot on the top left for a glossy bubble effect.
Painting the Iris and Pupil For the blue eye, use Sotek Green and Mint Green to paint a ring around the lower section of the eye to represent the iris. The actual grey doesn’t matter; choose a light grey for painting reflections, ensuring a realistic and shiny appearance. Start with Vallejo Pale Blue Grey to paint a ring around the lower section of the eye to represent the iris. The actual grey doesn’t matter; choose a light grey for painting reflections, ensuring a realistic and shiny appearance. Highlight the iris with Ceramite White, adding a few strokes to enhance the glossy effect.
Complete the red eye by applying Mephiston Red to the entire iris and pupil area. Use Fire Dragon Bright to add small lines separating the circles on the iris. Apply a highlight using Vallejo Pale Blue Grey, ensuring to maintain the same technique as with the blue eye.
More Mortarion Tutorials:
Videos Not Showing?
To view any of my paid tutorials, you need to be a member of the website – please click below to log in or join the site.
Not sure about joining just yet? Check out my Youtube for all my free tutorials or sign up as a free “friend” member on this site and visit the free videos page!
If you’d prefer to support me on Patreon, please visit: https://www.patreon.com/RichardGray [...]
Void Dragon
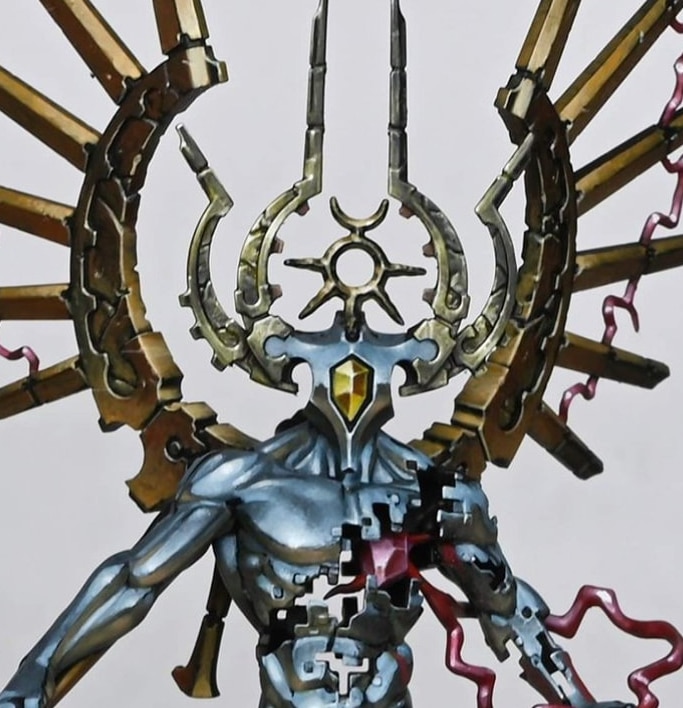
Part two of my Void Dragon Tutorial! This time I am showing you a little more of the SENMNN (Sky Earth Non Metallic Metal) plus the technique uses to paint the gem on his face.
Video: Part Two – How to Paint Sky Earth Non Metallic Metal
All videos are recorded in HD 1080p or higher – use full screen for the full effect and let the video load completely.
Materials and Paints
Vallejo Paints: Pastel Blue, Heavy Grey, Heavy Skintone, Black, Ice Yellow, English Uniform, Japanese Uniform
Games Workshop Paints: Morghast Bone, Screaming Skull, Flash Gitz Yellow, Doombull Brown
P3 Paint: Morrow White
Tools: A wet palette, fine detail brushes, a lamp for proper lighting
Refining the Sky Earth Non Metallic Metal Chrome Effect
Mix Your Paints: On your wet palette, prepare a gradient of Pastel Blue mixed with varying amounts of Black to create desaturated shades. For earth tones, mix Heavy Grey with Black for a subtle, greenish hue.
Apply Subtle Highlights: Using the mixed shades, refine the chrome effect by adding nuanced highlights and shadows, emphasizing the model’s curvature and angles to mimic reflective metal.
Painting the Gem
Base Layer: Start with Doombull Brown as a base for the gem. Ensure a smooth application but avoid filling the crevices to maintain depth.
Build the Yellow: Layer Ice Yellow and then Flash Gitz Yellow, focusing the latter towards the bottom right to simulate light passing through the gem.
Create a Gradient: Mix Ice Yellow and Flash Gitz Yellow (50/50) for a mid-tone. Apply carefully to build a transition from light to dark within the gem facets.
Finishing Touches: Use Morrow White for the brightest points, emphasizing the light reflection and giving the gem a sparkling appearance.
Detailing the Horns
Initial Layers: Begin with English Uniform as the base. If coverage is poor, consider using XV88 for a more opaque application.
Add Depth with Japanese Uniform: Apply Japanese Uniform for the mid-tones, enhancing the texture and volume of the horns.
Highlighting: Progressively highlight towards Morghast Bone and Screaming Skull for the raised edges and details, mimicking light reflection and texture.
Final Highlights: Use Morrow White sparingly for the most pronounced edges and tips, creating a sharp contrast and focus on the texture.
Techniques and Tips
Layering and Blending: Carefully layer and blend your paints, especially when working on the Sky Earth Non Metallic Metal chrome effect and gem. The transition from dark to light should be smooth, without harsh lines.
Texture and Detail: Emphasize texture by using a stippling technique for the horns and rougher areas, contrasting the smooth, reflective surfaces of the chrome body.
Light Direction: Always consider the source and direction of light when applying highlights and shadows, ensuring consistency across the model.
Patience and Precision: Take your time with each step, especially when refining details and working on smaller sections like the gem and horns.
To watch all of my Void Dragon videos, with the Sky Earth Non Metallic Metal techniques from the start, click below:
Void Dragon – SENMM
I wanted a different effect for the NMM so I went for SENMM and am pretty happy with how it turned out. For those who don’t know, SENMM just means Sky Earth Non Metallic Metal.
Watch Now
For lots more tutorials on Non-Metallic Metals, click on any of the thumbs below:
If you don’t have an account, please sign up here! The website currently has over 350 video tutorials with steps and tips, plus a selection of PDFs. If you are not sure about joining, you can explore my free videos with a free membership, or take the plunge and become a full subscriber for full access.
If you’d prefer to support me on Patreon, please visit: https://www.patreon.com/RichardGray [...]
Here are my step by step guides on how to paint SENMM on a Void Dragon, sculpted by Darren Latham. It’s such a beautiful model!
I’ve simplified it from the original sculpt, so no tail, less lightning and I modified the head a little. I wanted a different effect for the NMM so I went for SENMM and am pretty happy with how it turned out.
For those who don’t know, SENMM just means Sky Earth Non Metallic Metal. You may remember that old White Dwarf magazines used a similar look on their title text.
In these tutorials, we’re aiming to achieve a stunning chrome effect, also known as sky-earth non-metallic metal (NMM), which mimics the appearance of reflective metal without using metallic paints.
Video: Part One – How to Paint SENMM
All videos are recorded in HD 1080p or higher – use full screen for the full effect and let the video load completely.
Primer: Black
Vallejo Paints: Pastel Blue, Pale Blue Grey, Heavy Grey, Heavy Skintone, Black
P3 Paint: Morrow White
Tools: A wet palette, fine detail brushes, and a lamp to observe light direction
Step-by-Step Process on How to Paint SENMM:
1. Priming
Begin by priming the Void Dragon model with a black primer. Ensure a uniform coat for a solid foundation.
2. Base Layer for Chrome Effect
Sky Colours: Start with Vallejo Pastel Blue. Apply this colour on areas that would naturally catch the light from above. Expect to apply multiple layers to achieve an opaque finish due to the light colour over a dark primer.
Earth Colours: Use a mix of Heavy Grey and Heavy Skintone for parts that reflect the ground. Keep these colours desaturated to maintain the grim dark aesthetic of the Necron range.
3. Refining Highlights and Shadows
Highlight Blocks: Use a lamp to identify where light naturally falls on the model. Initially, create large blocks of highlight with Pastel Blue for sky reflection and Heavy Grey for ground reflection.
Desaturation: Mix Pastel Blue with a small amount of Black to create darker, desaturated shades for shaded areas. This technique ensures the model does not appear too vibrant, preserving the grim atmosphere.
4. Detailing
Focus on refining the chrome effect by adding gradients and transitions between the light and dark areas. The key is to simulate the mirror-like reflective quality of chrome.
Incorporate subtle variations in the earth tones by adding more Black into Heavy Grey for deeper shadows. Utilize Heavy Skintone to add warmth to the earth reflections, contrasting with the cool sky reflections.
Paint edges and fine lines with Pale Blue Grey and Morrow White to highlight sharp features and enhance the model’s reflective quality.
5. Final Adjustments
Revisit areas needing sharper contrast or more pronounced highlights. Use Morrow White sparingly to accentuate the brightest points where light directly hits the model.
Adjust the intensity of the earth tones where necessary, using Rhinox Hide to deepen shadows or reinforce the model’s texture.
Video: Part Two – How to Paint SENMM
All videos are recorded in HD 1080p or higher – use full screen for the full effect and let the video load completely.
Materials and Paints
Vallejo Paints: Pastel Blue, Heavy Grey, Heavy Skintone, Black, Ice Yellow, English Uniform, Japanese Uniform
Games Workshop Paints: Morghast Bone, Screaming Skull, Flash Gitz Yellow, Doombull Brown
P3 Paint: Morrow White
Tools: A wet palette, fine detail brushes, a lamp for proper lighting
Refining the Sky Earth Non Metallic Metal Chrome Effect
Mix Your Paints: On your wet palette, prepare a gradient of Pastel Blue mixed with varying amounts of Black to create desaturated shades. For earth tones, mix Heavy Grey with Black for a subtle, greenish hue.
Apply Subtle Highlights: Using the mixed shades, refine the chrome effect by adding nuanced highlights and shadows, emphasizing the model’s curvature and angles to mimic reflective metal.
Painting the Gem
Base Layer: Start with Doombull Brown as a base for the gem. Ensure a smooth application but avoid filling the crevices to maintain depth.
Build the Yellow: Layer Ice Yellow and then Flash Gitz Yellow, focusing the latter towards the bottom right to simulate light passing through the gem.
Create a Gradient: Mix Ice Yellow and Flash Gitz Yellow (50/50) for a mid-tone. Apply carefully to build a transition from light to dark within the gem facets.
Finishing Touches: Use Morrow White for the brightest points, emphasizing the light reflection and giving the gem a sparkling appearance.
Detailing the Horns
Initial Layers: Begin with English Uniform as the base. If coverage is poor, consider using XV88 for a more opaque application.
Add Depth with Japanese Uniform: Apply Japanese Uniform for the mid-tones, enhancing the texture and volume of the horns.
Highlighting: Progressively highlight towards Morghast Bone and Screaming Skull for the raised edges and details, mimicking light reflection and texture.
Final Highlights: Use Morrow White sparingly for the most pronounced edges and tips, creating a sharp contrast and focus on the texture.
Techniques and Tips
Layering and Blending: Carefully layer and blend your paints, especially when working on the Sky Earth Non Metallic Metal chrome effect and gem. The transition from dark to light should be smooth, without harsh lines.
Texture and Detail: Emphasize texture by using a stippling technique for the horns and rougher areas, contrasting the smooth, reflective surfaces of the chrome body.
Light Direction: Always consider the source and direction of light when applying highlights and shadows, ensuring consistency across the model.
Patience and Precision: Take your time with each step, especially when refining details and working on smaller sections like the gem and horns.
Glossary of Terms:
Primer: A base layer of paint applied to the model to improve the adhesion of subsequent layers of paint. Primers are typically applied in neutral colours to ensure that the colours applied on top are vibrant and true to their hue.
Chrome Effect: A painting technique used to mimic the appearance of reflective metal surfaces without using metallic paints. Achieved through strategic placement of light and dark colours to simulate reflections.
Sky-Earth Non-Metallic Metal (NMM): A specific type of non-metallic metal painting technique wherein the painted object reflects the sky above and the earth below, creating a realistic metallic effect.
Wet Palette: A tool used by painters to keep acrylic paints moist during the painting process. It consists of a container with a layer of water underneath a porous paper sheet, on which the paint is placed.
Opacity: The measure of transparency or coverage provided by a paint. High opacity means the paint is less transparent and covers the underlayer well.
Desaturation: The process of reducing the intensity of a colour by adding grey or the colour’s complement, making it less vivid and more neutral.
Highlight: The application of lighter colours to the raised areas of a model to simulate the effect of light naturally hitting those surfaces.
Shadow: The use of darker colours in recessed areas to create the illusion of depth and to emphasise the contours of the model.
Gradient: A smooth transition between colours, often used to create a realistic lighting effect on miniatures.
Edge Highlighting: A technique where the very edges of the model are painted with a lighter colour to make them stand out, simulating the way light would reflect off sharp edges.
Stippling: A painting technique that involves applying small dots of paint to build up colour and texture.
Glazing: A method of applying a thin, transparent layer of paint over another, allowing the colours below to show through. This technique is used to subtly adjust the tone, shade, or colour of the surface.
Translucency: The quality of allowing light, but not detailed images, to pass through; semi-transparent. In painting, it refers to the application of thin layers of paint that let the underlying colour or primer show through.
Dry Brushing: A technique in which a paintbrush is lightly dipped in paint, wiped off until almost dry, and then lightly brushed over the model. This highlights raised surfaces.
Blending: A technique used to create a smooth transition between two or more colours on the model’s surface.
If you don’t have an account, please sign up here! The website currently has over 350 video tutorials with steps and tips, plus a selection of PDFs. If you are not sure about joining, you can explore my free videos with a free membership, or take the plunge and become a full subscriber for full access.
If you’d prefer to support me on Patreon, please visit: https://www.patreon.com/RichardGray [...]
Necrons
A set of videos on how to paint a Skorpekh Lord from the Indomitus boxed set from Games Workshop. With NMM (Non-metallic metal) and red OSL. Read on to explore the tutorials in order, or quick jump using the contents below!
Video – How to Paint Skorpekh Lord Part OnePaints and Materials NeededStep-by-Step GuideVideo – How to Paint Skorpekh Lord Part TwoPaints and Materials NeededStep-by-Step Guide
Video – How to Paint Skorpekh Lord Part One
Paints and Materials Needed
Paints:
Vallejo Paints:
Black
Dark Grey
Heavy Grey
Deep Blue Pale
P3 Paints:
Morrow White (Alternatively, you can choose your preferred white paint)
Brushes:
Fine Detail Brush: For intricate work and precise highlights, a Size 00 brush is recommended. This will allow you to apply the smaller, more detailed marks needed for the final highlights and finer details.
Standard Brush: A Size 0 or 1 brush for the broader strokes and layering. This will be useful for the initial application of the 50/50 mix of Dark Grey and Heavy Grey, and for applying the Heavy Grey.
Step-by-Step Guide
Step 1: Preparation
Assemble and prime your Skorpekh Lord. Note that the model is push-fit, so keeping parts separate for detailed painting can be tricky. However, assembling it fully then painting is possible and can yield great results.
Step 2: Establishing Base Tones
Start by applying a mix of Vallejo Dark Grey and Heavy Grey (mixed in a 50/50 ratio). This mix is your foundation for mapping out light points on the model. Apply it roughly to create texture, aiming for a grungy look.
Step 3: Adding Depth with Heavy Grey
Use Vallejo Heavy Grey to add depth. This grey has a slight green tint, enhancing the contrast with later red elements. Apply it over the initial mix, enhancing the textured, worn effect.
Step 4: Working with Blue Tones
Introduce Vallejo Deep Blue Pale to your palette. Apply this to areas you want to emphasise as reflecting the sky, adding a colder, metallic feel.
Create a 50/50 mix of Deep Blue Pale and White (P3 Morrow White or your choice of white) for lighter highlights. Apply these to the most raised and prominent areas, following the form of the model.
Step 5: Finishing with White Highlights
Use pure white paint for the final highlights. Focus on the smallest and brightest light points. This step requires precision – use a fine brush and aim for small, deliberate marks.
Step 6: Considerations During Painting
Align your brushstrokes with the armour’s shape. Vary your marks to reflect different levels of wear and tear.
Use a smaller brush (I used Artist Opus size 0 or 00) for finer details, especially as you work towards smaller, more precise highlights.
Be mindful of the light source. Understand how it interacts with the model to guide your placement of primary and secondary highlights.
Step 7: Refinement and Detailing
As you progress, refine the details. Ensure that areas like the head and weapons stand out.
Adjust your brushwork to enhance the model’s intricate features, adding depth and dimension.
Video – How to Paint Skorpekh Lord Part Two
Paints and Materials Needed
Paints:
Games Workshop: Mournfang Brown, Mephiston Red, Wildrider Red
Vallejo: English Uniform, Japanese Uniform, Ice Yellow, Neutral Grey, Dark Grey
Step-by-Step Guide
Golden Necklace:
Start with Vallejo English Uniform. Focus on specific areas, leaving sides dark to create a light-shining effect. This technique helps avoid a flat, overly contrasted appearance and maintains a gold-like hue.
Progress to Vallejo Japanese Uniform, highlighting details while considering the light reflecting from surrounding metal.
Use Vallejo Ice Yellow for final highlights. Place dots and dashes on hard edges and corners, simulating imperfections and dents in the metal.
Eyes:
Begin with Mephiston Red from Games Workshop.
Layer Wildrider Red, adding a little Ice Yellow for higher highlights. Be cautious not to make the eyes too pinkish. Adjust the red glow to achieve a sinister, darker tone.
Blade:
Use Vallejo Neutral Grey and Dark Grey as base colors.
Mix Neutral Grey with Ice Yellow, creating two mixes: one with a 2:1 ratio and another with more Ice Yellow.
Apply the mixes to the blade, starting with larger brushstrokes and gradually decreasing the size for finer details. Follow the blade’s curve with your brushstrokes.
Add Vallejo Ice Yellow with Neutral Grey for the final highlights. Apply with a delicate touch to maintain the metal’s weathered appearance.
For added realism, place tiny dots and lines using Vallejo Ice Yellow and Neutral Grey mix, simulating scratches and imperfections.
Rod on Weapon Handle:
Glaze the rod with Mournfang Brown, diluted with water (approximately 4 parts water to 1 part paint). Apply over the metallic colors previously painted, creating a brass-like effect.
Final Details and Touch-ups:
Go back and refine any areas as needed. Be especially careful with the sharp edge of the blade to maintain a clean, bright highlight.
Adjust any colors or highlights to ensure consistency and realism across the model.
Finishing Touches:
Once satisfied with the painting, you can apply a matte varnish to reduce any unwanted shine from the paint, enhancing the model’s overall appearance.
If you don’t have an account, please sign up here! The website currently has over 350 video tutorials with steps and tips, plus a selection of PDFs. If you are not sure about joining, you can explore my free videos with a free membership, or take the plunge and become a full subscriber for full access.
If you’d prefer to support me on Patreon, please visit: https://www.patreon.com/RichardGray [...]
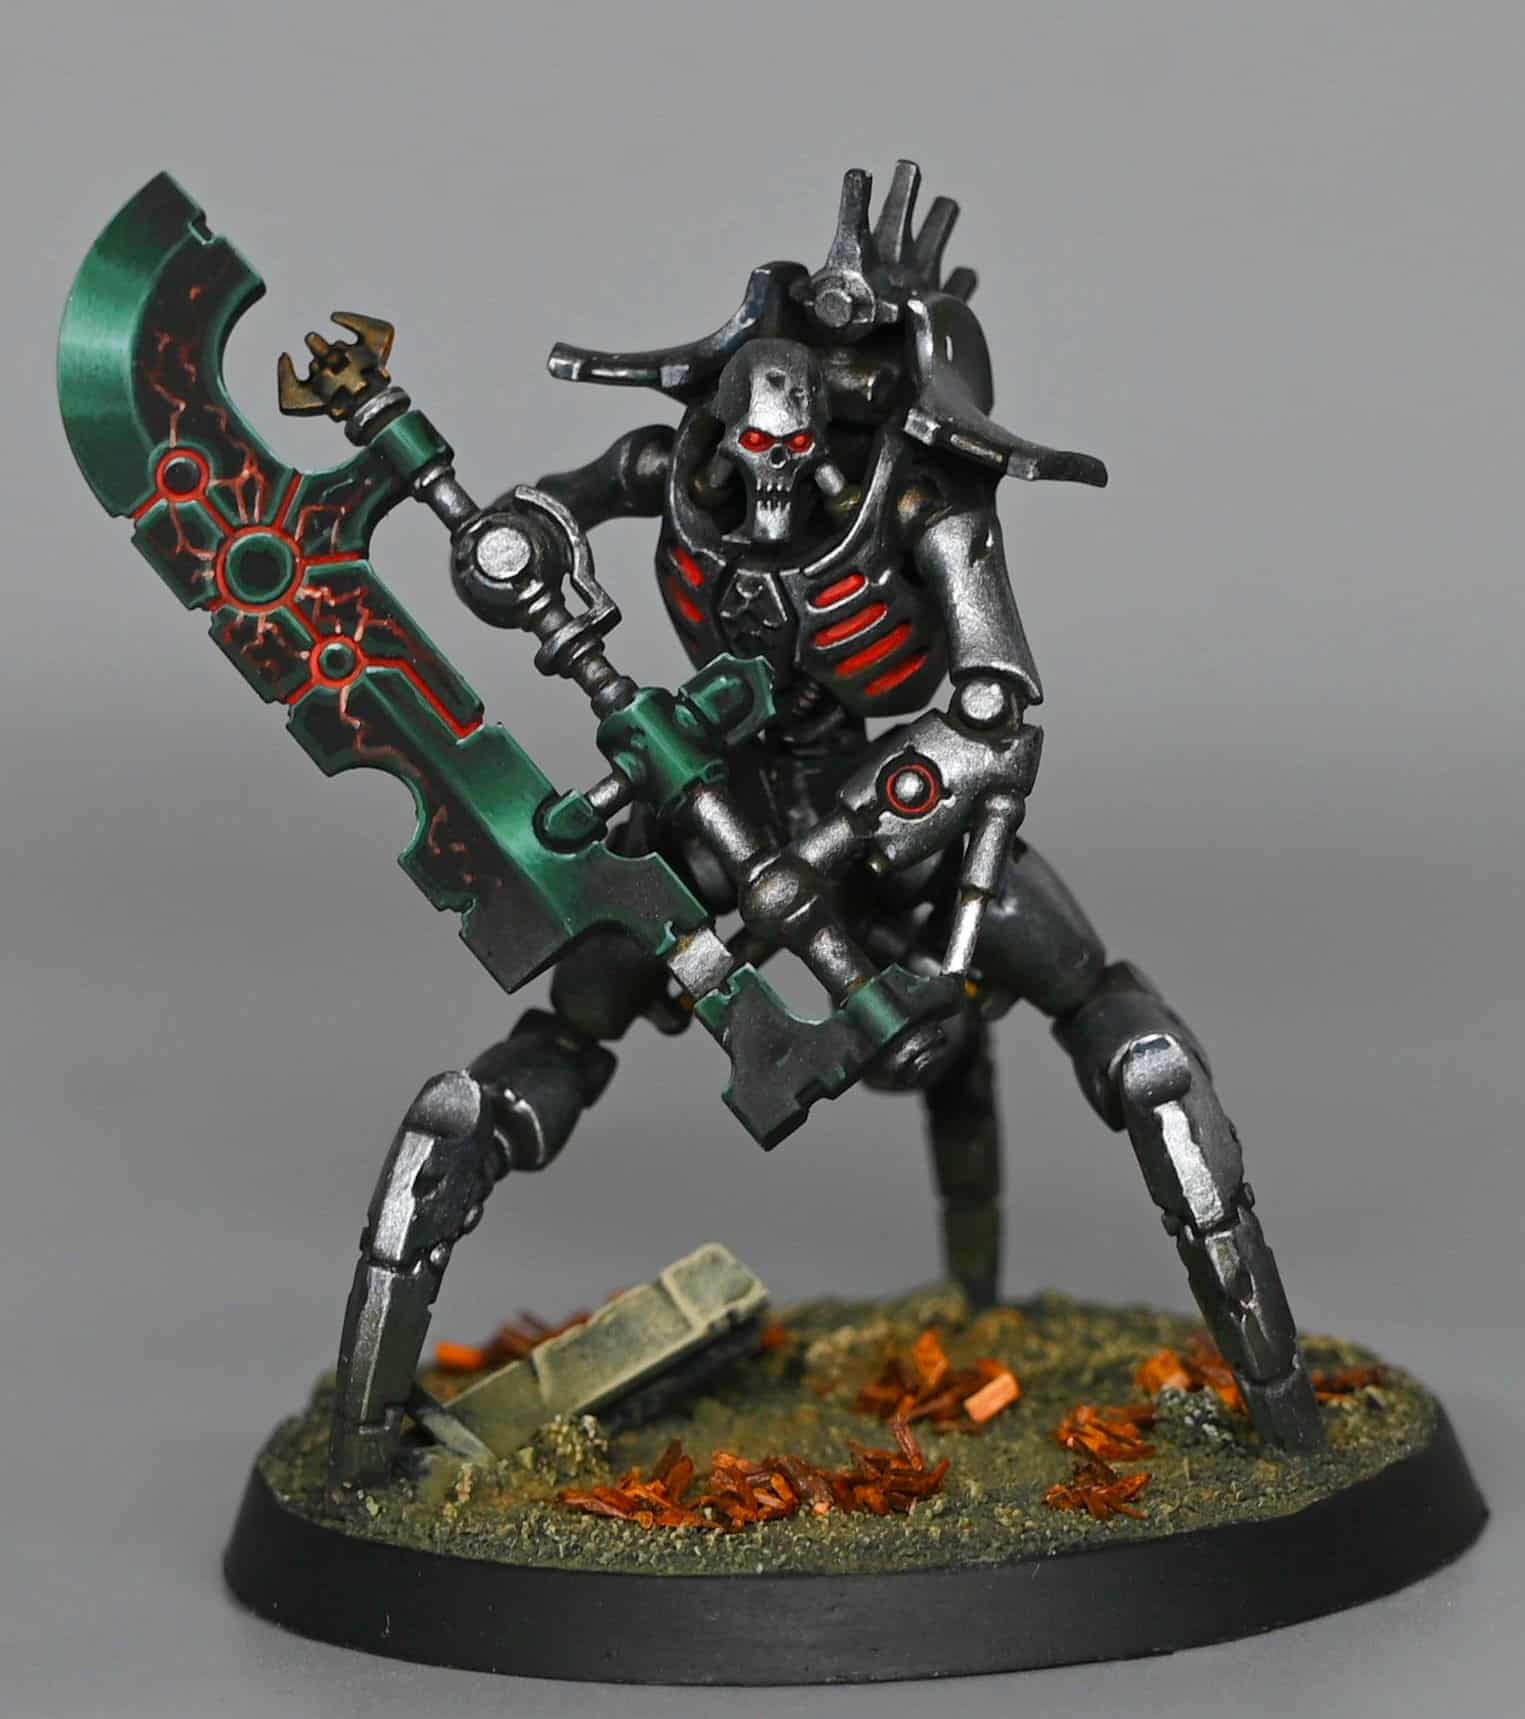
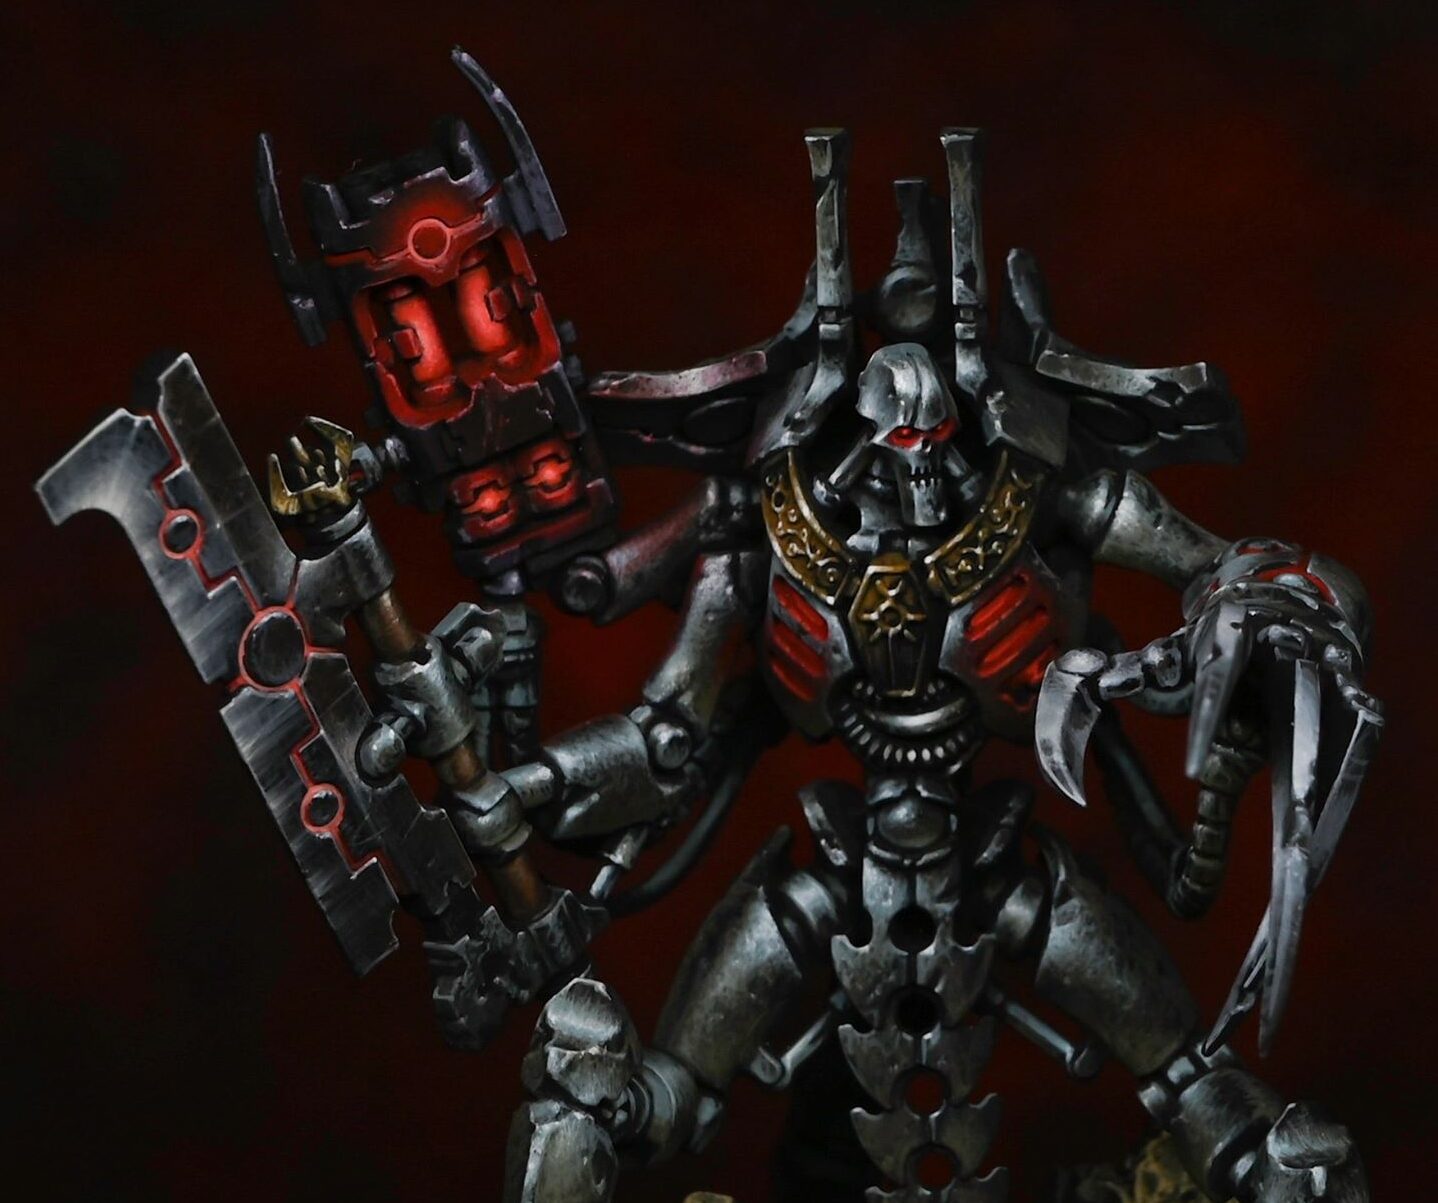
A little bit different from me, a gaming true metal Necron Skorpekh Destroyer. I think he’ll be the only one I paint with true metals though!
Video Tutorial: How to Paint a Necron Skorpekh Destroyer in True Metals
Paints Used on the Necron Skorpekh Destroyer:
Metallics for TMM:
Vallejo Model Air Gunmetal: Base coat for a smooth, metallic finish.
Vallejo Model Air Chrome: For bright, reflective highlights.
Games Workshop Nuln Oil: A shade to add depth and shadows.
Games Workshop Seraphim Sepia: For aging effects and adding grime.
Vallejo Scale 75 Victorian Brass: An option for gold metallic parts.
For the Green Blade (NMM effect):
Vallejo Game Color Heavy Blackgreen: Base color for the blade.
Vallejo Model Color White Grey: To mix for gradients and highlights.
For Red Lightning:
Games Workshop Mephiston Red: The base layer for lightning effects.
Games Workshop Wildrider Red: Intermediate highlights.
Games Workshop Lugganath Orange: Final, bright highlights.
Additional Contrast Paints for Effects:
Games Workshop Space Wolves Grey, Snakebite Leather, Gore Grunter Fur: For varied surface effects and detailing.
Brushes and Tools:
Fine Detail Brushes: For precision in painting highlights and intricate details.
A Well Palette: Recommended for metallic paints to prevent particle contamination.
A Wet Palette: Ideal for non-metallic paints to keep them moist and workable.
Two Water Jars: One for cleaning brushes used with metallic paints and one for non-metallic paints, to avoid transferring metallic particles.
Additional Materials:
Matte Varnish: To seal the paint job, providing durability and a uniform finish.
Cleaning Solution for Brushes: To maintain the quality and extend the lifespan of your brushes.
Why the Separation and Care Tips:
Separate Palettes and Water Jars: Using separate palettes and water jars for metallic and non-metallic paints is crucial. Metallic paints contain fine particles that can contaminate your non-metallic paints, leading to an unwanted sparkle in areas you may want matte. This separation also extends to water jars; mixing water used for cleaning metallic paint off brushes with non-metallics can inadvertently introduce shimmer to your entire palette.
Brush Care: Metallic paints can be harsher on brushes due to their particle content. It’s essential to clean your brushes thoroughly after each painting session, especially when using metallics. Utilizing a gentle brush soap can help remove paint residues without damaging the bristles. Avoid leaving brushes submerged in water, as this can cause bristle damage and loosen the glue holding the brush head, leading to shedding.
Base Coating and Initial Steps
Preparation: Begin by assembling your Necron Skorpekh Destroyer, ensuring all parts are clean and free from mould lines. Prime the model with a black primer to provide a dark base for metallic paints.
Base Coat with Gunmetal: Apply Vallejo Model Air Gunmetal as the base coat using a brush or airbrush. This metallic paint provides a smooth, dark metallic base for your model. Avoid thick applications to maintain detail.
Applying the Red Glow: Before proceeding with further metallics, paint the recessed areas intended for the red glow with Mephiston Red. Build this up in layers until you achieve a solid base. Highlight these areas progressively with Wildrider Red and Lugganath Orange to create a glowing effect.
Applying Metallic Highlights and Shadows
Highlighting with Chrome: Use Vallejo Model Air Chrome to highlight the edges and raised areas of the Necron Skorpekh Destroyer. This bright metallic paint simulates the reflective nature of metal. Apply it sparingly to areas that would naturally catch the light.
Shading with Washes: Use Nuln Oil to add depth to recesses and undercuts. For areas where you want to create a worn or tarnished look, apply Seraphim Sepia. These washes help define the model’s details and give it character.
Creating Texture and Additional Effects: To add variety and realism to the metallic surfaces, consider using a combination of washes and contrast paints like Snakebite Leather and Gore Grunter Fur. Apply these selectively to add oil stains, rust, or other weathering effects.
Painting the Green Blade (NMM Effect)
Base Coat the Blade: Start with Heavy Blackgreen for the base of the blade. This sets the stage for the NMM green effect.
Layering for the NMM Effect: Mix Heavy Blackgreen with White Grey in varying ratios to create a gradient of shades. Begin with the darkest mixture and apply it sparingly towards the edges and points where light would be less direct. Progressively mix in more White Grey for the mid-tones and highlights, focusing on areas that would catch the light.
Finishing Touches on the Blade: Use almost pure White Grey for the brightest highlights on the blade. Apply these highlights strategically to simulate the reflective properties of metal.
Detailing and Final Touches
Applying Red Lightning: Use Mephiston Red to sketch out the lightning patterns emanating from the blade’s core or other focal points. Layer over this with Wildrider Red and finally, Lugganath Orange at the brightest points to create an energised effect.
Refining Metallic Surfaces: Revisit the metallic areas with Chrome and possibly Mithril Silver to define edges and bright spots further. Use a fine detail brush for precision.
Matte Varnish (Optional): If desired, apply a matte varnish to unify the sheen on the model and protect your work. Be mindful that this can dull metallic finishes, so you may choose to selectively apply it to non-metallic areas only.
Glazing for Shine: As a final step, you can mix Chrome with a medium or water to create a thin glaze. Apply this glaze to metallic areas you wish to have a higher sheen, enhancing the TMM effect.
More Necrons:
If you don’t have an account here on my website, please sign up here! I have over 350 video tutorials with steps and tips, plus a selection of PDFs. If you are not sure about joining, you can explore my free videos with a free membership, or take the plunge and become a full subscriber for full access.
If you’d prefer to support me on Patreon, please visit: https://www.patreon.com/RichardGray [...]
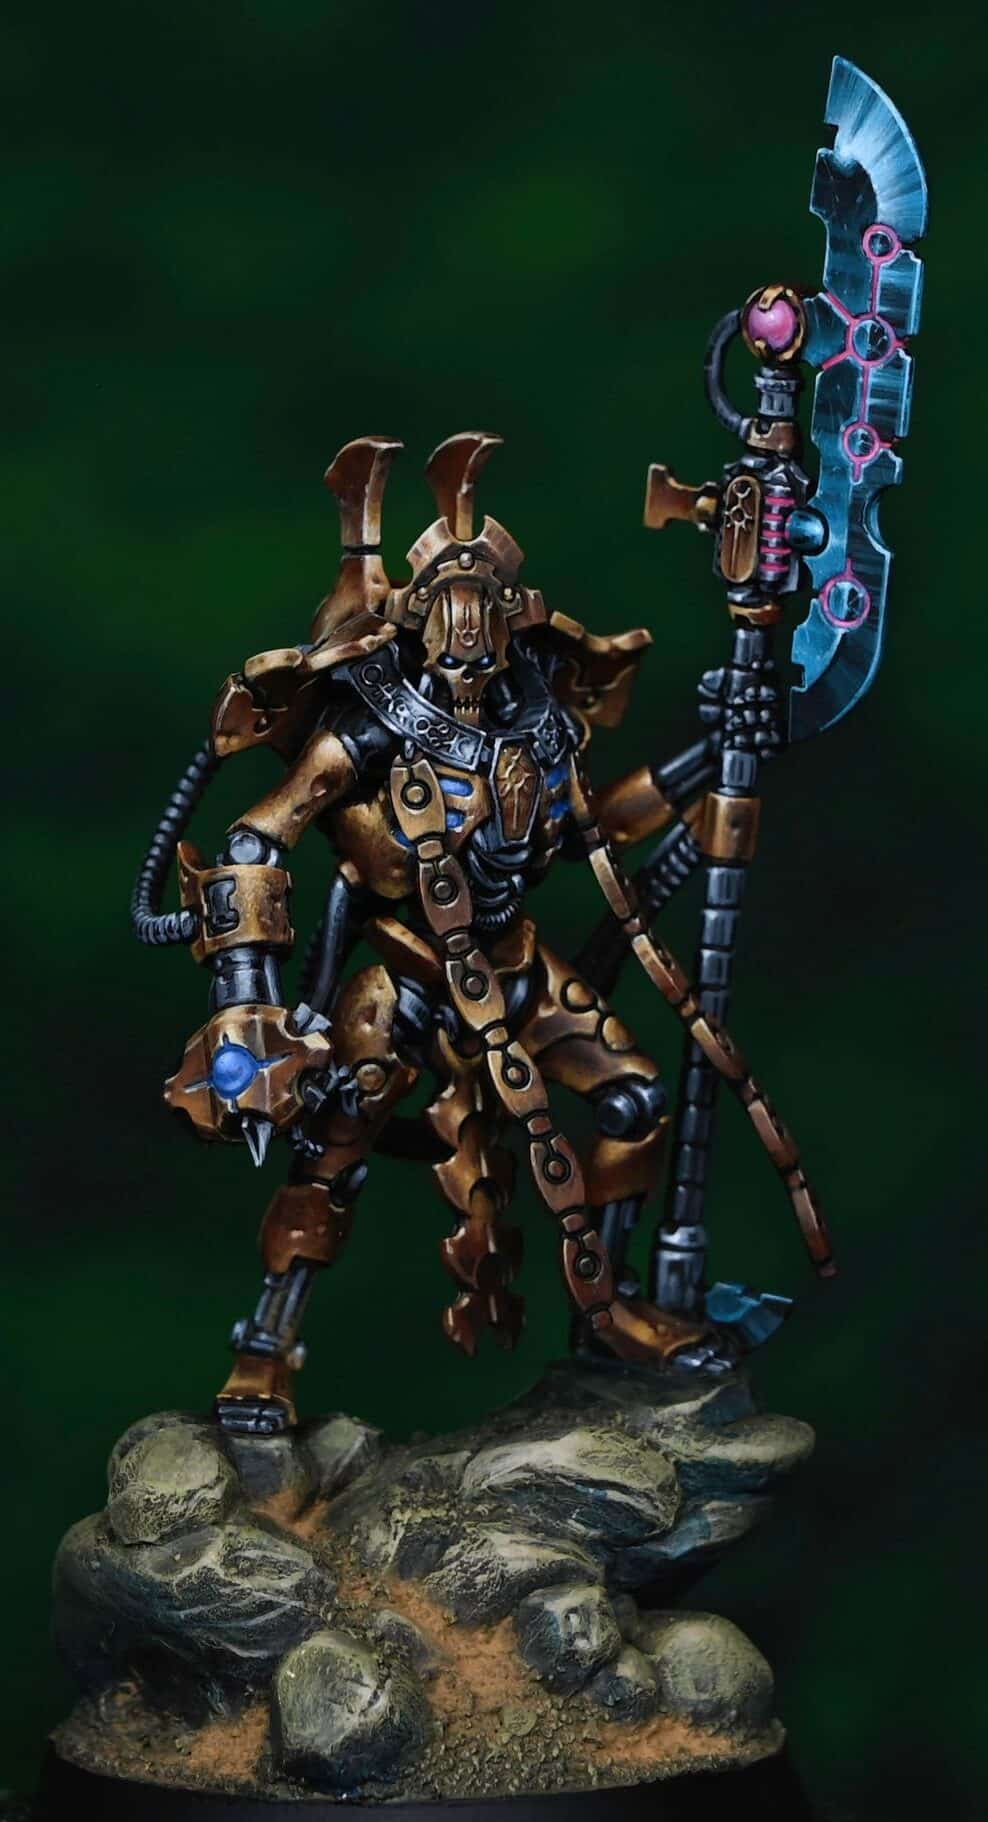
Here are all of my tutorials on how to paint a Gold Necron Overlord from the Indomitus box set, from his shining gold NMM armour, to his weapons and more. I sculpted a base for him from milliput, so he can stand tall while looking down on his enemies!
Scroll down to explore the how to paint a Gold Necron Overlord tutorials in order, or use the contents below to quickly jump to a specific part or technique:
Video: How to Paint a Gold Necron Overlord Part OneMaterials RequiredStep-by-Step Guide: How to Paint a Gold Necron Overlord Part OneVideo: How to Paint a Gold Necron Overlord Part TwoPaintsStep-by-Step Guide: How to Paint a Gold Necron Overlord Part TwoVideo: How to Paint a Gold Necron Overlord Part ThreePaintsStep-by-Step Guide: How to Paint a Gold Necron Overlord Part ThreeVideo: How to paint a Necron Overlord Blade PaintsStep-by-Step Guide: How to Paint a Necron BladeVideo: How to Paint a Gold Necron Overlord Back Carapace NMMPaintsStep-by-Step Guide: How to Paint a Gold Necron Overlord Back Carapace NMMVideo: How to Create a BaseMaterials NeededStep-by-Step Guide: How to Create a BaseSculpting the BasePainting the BaseFinishing TouchesTips
Video: How to Paint a Gold Necron Overlord Part One
Materials Required
Prime: The model is primed in black.
Paints: Vallejo Heavy Ochre, Heavy Goldbrown, Ice Yellow, Ultramarine Blue, Doombull Brown, and P3 Morrow White.
Brushes: Fine detail brushes, ideally size 0 or 00, suitable for precise application and blending. I use the Artist Opus series of brushes.
Palette: A wet palette to help keep your paints at the correct consistency.
Step-by-Step Guide: How to Paint a Gold Necron Overlord Part One
Step 1: Base Layer
Start with Doombull Brown, applying it to areas you want to be gold. Doombull Brown will serve as our base because of its deep, rich red-brown hue that provides a good foundation for gold. Expect it to darken as it dries, so multiple thin layers may be necessary for an even base without obscuring details.
Step 2: First Highlights
Mix Doombull Brown and Heavy Ochre in a 50/50 ratio and apply this mixture to areas where light naturally hits the model. This blend starts the transition towards the brighter gold tones. Be mindful of the paint’s translucency; apply in thin layers to build up the colour gradually.
Step 3: Enhancing the Gold
Apply pure Heavy Ochre to enhance the gold effect, focusing on raised areas and edges that would catch the light. This pigment is stronger and more opaque, allowing for more pronounced highlights.
Step 4: Bright Highlights
Create a 50/50 mix of Heavy Goldbrown and Ice Yellow for the next layer of highlights. This combination starts to introduce the characteristic shine of gold, applied more selectively to the highest points and sharpest edges where light would be most intense.
Step 5: Final Highlights
Use Ice Yellow for the brightest highlights, focusing on very specific areas that would reflect the most light. This step is crucial for selling the NMM effect, making the gold look luminous and reflective.
Step 6: Adding Depth and Contrast
For the deepest shadows and to add contrast, return to Doombull Brown in areas opposite the light source or where shadows would be most pronounced. This contrast is key to the NMM technique, giving the illusion of metal.
Step 7: Fine Details
Use Ultramarine Blue for elements like the Overlord’s eyes, adding a pop of colour and visual interest. This also prepares for potential object source lighting (OSL) effects in later stages.
Step 8: Refining and Adjusting
Continue to refine and adjust the distribution of light and shadow across the model, ensuring a coherent light source and believable metallic effect. You may need to go back and forth between shades to achieve smooth transitions.
Step 9: Final Touches
For the sharpest highlights and to represent the most reflective parts of the metal, apply tiny dots or very fine lines of Morrow White. Use this sparingly, as too much can detract from the gold effect.
Tips:
Patience and Layers: NMM gold requires patience and numerous thin layers to build up the desired effect. Don’t rush the process.
Light Source Consistency: Ensure all highlights and shadows are consistent with a single, imagined light source.
Brush Care: Use different brushes for applying paint and mixing on your palette to maintain their condition. A worn brush can provide softer marks for blending, while a newer, sharper brush is ideal for fine details and edge highlighting.
Video: How to Paint a Gold Necron Overlord Part Two
In this session, we continue adding gold details, focusing on the elements cascading from the Overlord’s necklace and introducing more techniques for achieving a realistic NMM gold effect.
Paints
Vallejo: Heavy Ochre, Heavy Goldbrown, Ice Yellow, Dark Grey, Neutral Grey, Silver Grey.
Games Workshop: Doombull Brown.
P3: Morrow White (used sparingly for final highlights).
Step-by-Step Guide: How to Paint a Gold Necron Overlord Part Two
Segmented Chains Highlighting:
Begin with the chains descending from the necklace. Each segment must be painted according to its angle relative to the light source. This approach ensures a varied and realistic representation of light across the figure, enhancing the NMM effect.
Use the colour palette established in Part 1: Doombull Brown, a mix of Doombull Brown and Heavy Ochre, Heavy Ochre, Heavy Goldbrown mixed with Ice Yellow, and pure Ice Yellow.
Adjusting Highlights According to Angle:
For segments angling upwards or more horizontally, apply more light to reflect their increased exposure. Conversely, more vertical segments should have subdued highlights to mimic realistic shadowing.
Application Technique:
Apply the base colours smoothly, ensuring that transitions between shades are gradual and natural. The aim is to mimic the light’s natural fall off on metallic surfaces without losing the detailed sculptural elements of the miniature.
Detailing and Texture:
As you move onto different sections, adjust the intensity and placement of highlights to suit each area’s orientation. Use a combination of stippling and smooth brushwork to add texture and depth, particularly on battle-damaged areas.
Necklace and Carapace:
For the necklace and parts of the carapace, transition to cooler tones using Dark Grey, Neutral Grey, and Silver Grey. These areas should complement the gold while maintaining the overall NMM technique.
Mix these greys to achieve the desired mid-tones and highlights, creating a metallic sheen that contrasts with the warmer gold tones.
Edge Highlighting and Final Touches:
Emphasise edges and details with finer highlights, gradually building up to the lightest tones. Reserve Morrow White for the most pronounced highlights to draw attention and impart a gleaming metallic finish.
Focus on ensuring that each part of the miniature works together as a cohesive whole. The goal is to have the NMM effect believable across the entire model, with careful attention to the light source consistency.
Video: How to Paint a Gold Necron Overlord Part Three
In this third installment of our painting guide, we focus on the Tachyon Arrow of the Necron Overlord from the Indomitus box set, continuing the theme of non-metallic metal (NMM) gold and adding depth to the blue globe.
Paints
Vallejo Heavy Ochre, Heavy Goldbrown, Ice Yellow, Ultramarine Blue; Games Workshop Doombull Brown; P3 Morrow White.
Step-by-Step Guide: How to Paint a Gold Necron Overlord Part Three
Preparing the Model:
If you’re following from previous videos, the model will have a base coat of Doombull Brown for the gold sections and Vallejo Ultramarine Blue for the blue globe.
Applying the Base Highlights:
Using the same colours as previous sections, begin enhancing the Tachyon Arrow. The palette includes Doombull Brown, a 50/50 mix of Doombull Brown and Heavy Ochre, pure Heavy Ochre, Heavy Goldbrown, a mix of Heavy Goldbrown and Ice Yellow, and pure Ice Yellow for the highest highlights.
Focusing on Key Highlights:
Pay special attention to a vertical crease to the right of the blue globe. Highlight this crease directly to simulate reflected light, using a brighter tone such as the Heavy Goldbrown and Ice Yellow mix or Ice Yellow for the most intense reflection.
Building Up Layers:
Gradually work up the highlights, starting with deeper shades like the 50/50 Doombull Brown and Heavy Ochre mix, moving through Heavy Ochre, and then to the lighter mixes involving Ice Yellow. This creates a realistic metallic sheen.
Remember to revisit darker shades if necessary to refine transitions and add depth to the NMM effect.
Handling Flat Panels:
The weapon’s flat panels require careful attention. Ensure that the transition from the base colour up to the lighter highlights is smooth, avoiding the temptation to skip straight to the lightest colours without building up the mid-tones.
Detailing the Blue Globe:
For the blue globe, start with a base of Ultramarine Blue. Gradually lighten the top of the globe where the light would naturally hit, blending towards Ice Yellow for the brightest points.
Incorporate a soft highlight at the globe’s base to simulate a bounce light effect, ensuring the transition is smooth to maintain the appearance of a soft, glowing object.
Final Touches:
Revisit the gold sections around the globe, ensuring that the transitions between colours are smooth and that the reflective qualities of the metal are accurately represented.
For the metallic sections not covered in gold, such as the weapon’s armature, use a gradient from Dark Grey to Silver Grey to create a steel effect, mirroring the techniques used on the gold but with cooler tones.
Video: How to paint a Necron Overlord Blade
In this tutorial, we’ll explore how to paint the blade of the Necron Overlord from the Indomitus boxed set, aiming for a standout effect with an alien technology vibe. We’ll employ a combination of vibrant and contrasting colours to achieve this unique look.
Paints
Vallejo Game Colour Turquoise, Sunset Red, Ice Yellow, Black; Games Workshop Abaddon Black, Ahriman Blue, Incubi Darkness; P3 Morrow White.
Step-by-Step Guide: How to Paint a Necron Blade
Step 1: Base Details
Start with Ice Yellow, thinning it with approximately two parts water to one part paint for smooth flow. This thinned mixture should be applied to the recessed circular details on the blade, allowing capillary action to draw the paint into these areas. Let dry, then apply a second coat if needed for opacity.
Step 2: Adding Colour Contrast
Apply Sunset Red (a vibrant magenta/hot pink shade) to further highlight the recessed areas, contrasting sharply with the future turquoise and blue elements. This step enhances the alien technology aspect with its striking colour difference.
Step 3: Initial Highlights
Mix a little white with Sunset Red to desaturate the pink slightly for the first stage of highlights. Focus these lighter pink highlights around the recesses to emphasize the glow effect. Avoid adding too much white to maintain the vibrancy of the pink.
Step 4: Cleaning Up
Once the recessed areas are highlighted, use Vallejo Black (or Games Workshop Abaddon Black) to tidy up the edges around these highlights. This step will sharpen the contrast and make the details pop against the blade’s darker base.
Step 5: Turquoise Application
Begin applying Vallejo Game Colour Turquoise to the flat of the blade. This isn’t aimed at realistic reflection but rather at adding an otherworldly glow. Use this alongside a mix of Turquoise with a small amount of Black for shading and pure Turquoise for mid-tones.
Step 6: Adding Scratches and Texture
For creating scratches and texture on the blade’s surface, use a very fine brush and lightly apply lines using a mix of Turquoise and White, gradually increasing the amount of white for the brightest highlights. Add these scratches sparingly to avoid overwhelming the design.
Step 7: Glazing for Depth
To soften and blend the transitions on the blade, prepare glazes with Ahriman Blue (or an equivalent turquoise shade), Incubi Darkness for dark areas, and Abaddon Black for the deepest shadows. Apply these glazes carefully to merge the highlights and shades smoothly, enhancing the blade’s dimensional appearance.
Step 8: Final Highlights and Adjustments
Using Morrow White, add final spot highlights to the edges and tips of the blade where light would naturally catch the most. This step brings together all the elements, giving the blade a polished, gleaming look that stands out from the rest of the model.
Tips for Success:
Layering: Build up colours gradually, allowing each layer to dry before applying the next. This approach gives you more control over the final outcome.
Contrast: Make use of contrasting colours to create visual interest and highlight the alien nature of the technology.
Texture: Adding small scratches and imperfections can lend realism and character to the blade, suggesting wear and use.
Video: How to Paint a Gold Necron Overlord Back Carapace NMM
This guide provides detailed steps for painting the back carapace of a Necron Overlord miniature from the Indomitus box set.
Paints
Games Workshop Doombull Brown, Abaddon Black; Vallejo Heavy Ochre, Heavy Goldbrown, Ice Yellow; P3 Morrow White.
Step-by-Step Guide: How to Paint a Gold Necron Overlord Back Carapace NMM
Preparation:
Ensure the carapace is primed and ready for painting. If you have painted other parts of the model, make sure they are protected or carefully work around them.
Step 1: Establishing Base Layers
Start with Doombull Brown as your base layer, covering the entire carapace area. This rich, deep brown will serve as the foundation for building up the gold effect.
Step 2: Building Up Layers
Create a gradient of colours on your palette, starting with Doombull Brown and gradually mixing in Heavy Ochre to lighten the shade. Apply these mixed shades to areas where light naturally hits the carapace, considering your light source to be coming from the top right.
Progress to Heavy Goldbrown, focusing on smaller areas within those previously highlighted. This creates depth and the illusion of a light source affecting the metal’s appearance.
Mix Heavy Goldbrown with Ice Yellow for the next set of highlights, further refining the areas hit by light. This combination starts to give the gold a vibrant, reflective quality.
Step 3: Finishing Highlights
Pure Ice Yellow is used for the highest points of light reflection. Apply this sparingly to the most prominent edges and areas where the light would be strongest.
For the final highlights and to achieve the brightest points of light reflection, use Morrow White. This should be used very sparingly and only on the most elevated areas to simulate the reflection of light on metal.
Step 4: Adjusting Shadows
Use Abaddon Black to glaze into the deepest recesses and shadows of the carapace. This step is crucial for enhancing the contrast, making the NMM effect more pronounced. It’s important to maintain a balance, ensuring that the dark areas do not overpower the lighter, reflective sections.
Step 5: Refining and Cleaning Up
Go back with your initial colours, like Doombull Brown mixed with Heavy Ochre, to smooth out any transitions between shades or correct any oversights. This step also allows you to adjust the contrast and ensure that the lighting looks natural and consistent across the carapace.
Use a fine detail brush to clean up edges or redefine lines that may have become muddled during the painting process.
Step 6: Final Inspection and Adjustments
Once the main painting is complete, inspect the model from various angles to ensure the lighting looks consistent and the NMM effect is convincing. Make any necessary adjustments to the highlights or shadows to perfect the appearance.
Tips for Success:
Lighting Consistency: Keep the light source direction consistent across the model for a cohesive look. Imagine how the light falls on the model and paint accordingly.
Layering: Build up your colours gradually for a smooth transition between shades. This technique is key to achieving a realistic metal appearance.
Controlled Brushwork: Use controlled, precise brush strokes, especially for the finer highlights and shadows, to ensure the best outcome for your NMM effect.
Video: How to Create a Base
This guide will walk you through sculpting and painting the base for the Necron Overlord from the Indomitus boxed set, utilising Milliput for the sculpting part and a selection of Games Workshop paints for painting.
Materials Needed
Milliput (Super Fine White preferred, but any type will do)
Sculpting tools and a scalpel
Water or a lubricant like Vaseline for smoothing Milliput
PVA glue and fine grain sand for texture
Paints: Vallejo Model Color Black, Games Workshop Deathworld Forest, Ogryn Camo, Morghast Bone, Ushabti Bone, and Kantor Blue
Weathering pigment (e.g., Forge World Dark Sand)
Brushes, including a small Artist Opus dry brush
Matte varnish for sealing
Step-by-Step Guide: How to Create a Base
Sculpting the Base
Mixing Milliput: Take equal parts of Milliput’s two components and knead until uniformly beige. It might initially be flaky; continue until smooth.
Forming the Terrain: Roll the mixed Milliput into a ball and press onto the base. Begin sculpting the rough shape of the terrain using sculpting tools, dipped in water or lubricant to prevent sticking.
Adding Details: Once you have a basic shape, use tools and a scalpel to carve more detailed rock formations. Ensure the terrain is level where the model will stand.
Creating Smaller Rocks: Take excess Milliput, form small balls, and press onto the base to simulate smaller rocks, blending them into the larger mass.
Smoothing and Refining: Continue to refine the shapes, adding crevices and smoothing surfaces. Allow the Milliput to partially dry for easier handling.
Painting the Base
Base Coat: Once the Milliput is dry, apply a thin base coat of Vallejo Model Color Black. Ensure it’s watered down to cover quickly without obscuring details.
Adding Sand: Apply PVA glue to the base and sprinkle fine grain sand over it for additional texture. Allow to dry.
Applying Weathering Pigment: Use a dark sand weathering pigment, pushing it into crevices and blowing away the excess.
Washing: Create a wash with Deathworld Forest (5 parts water to 1 part paint) and cover the entire base. This will spread the pigment and add depth.
Dry Brushing: Once dry, dry brush the base with Deathworld Forest, followed by Ogryn Camo, focusing on top-down strokes to highlight edges and textures.
Detailing: Use Morghast Bone and Ushabti Bone to pick out individual rocks and edges for added contrast and detail.
Adding Shadows: Water down Kantor Blue and apply it to the undersides of rocks and in shadowed areas to simulate ambient occlusion and enhance depth.
Finishing Touches
Sealing: Once fully painted and dry, apply a matte varnish to seal the weathering pigment and paint, protecting your work.
Base Rim: Tidy up the base’s rim with Vallejo Model Color Black for a neat finish.
Tips
Work in stages, allowing materials to dry fully between steps.
Be creative with your rock shapes but ensure the model will stand level on the finished base.
Use a variety of brush sizes for dry brushing to reach different areas without disturbing the painted model.
Test fit your model frequently on the base during the sculpting process to ensure a good fit
If you don’t have an account, please sign up here! The website currently has over 350 video tutorials with steps and tips, plus a selection of PDFs. If you are not sure about joining, you can explore my free videos with a free membership, or take the plunge and become a full subscriber for full access.
If you’d prefer to support me on Patreon, please visit: https://www.patreon.com/RichardGray [...]
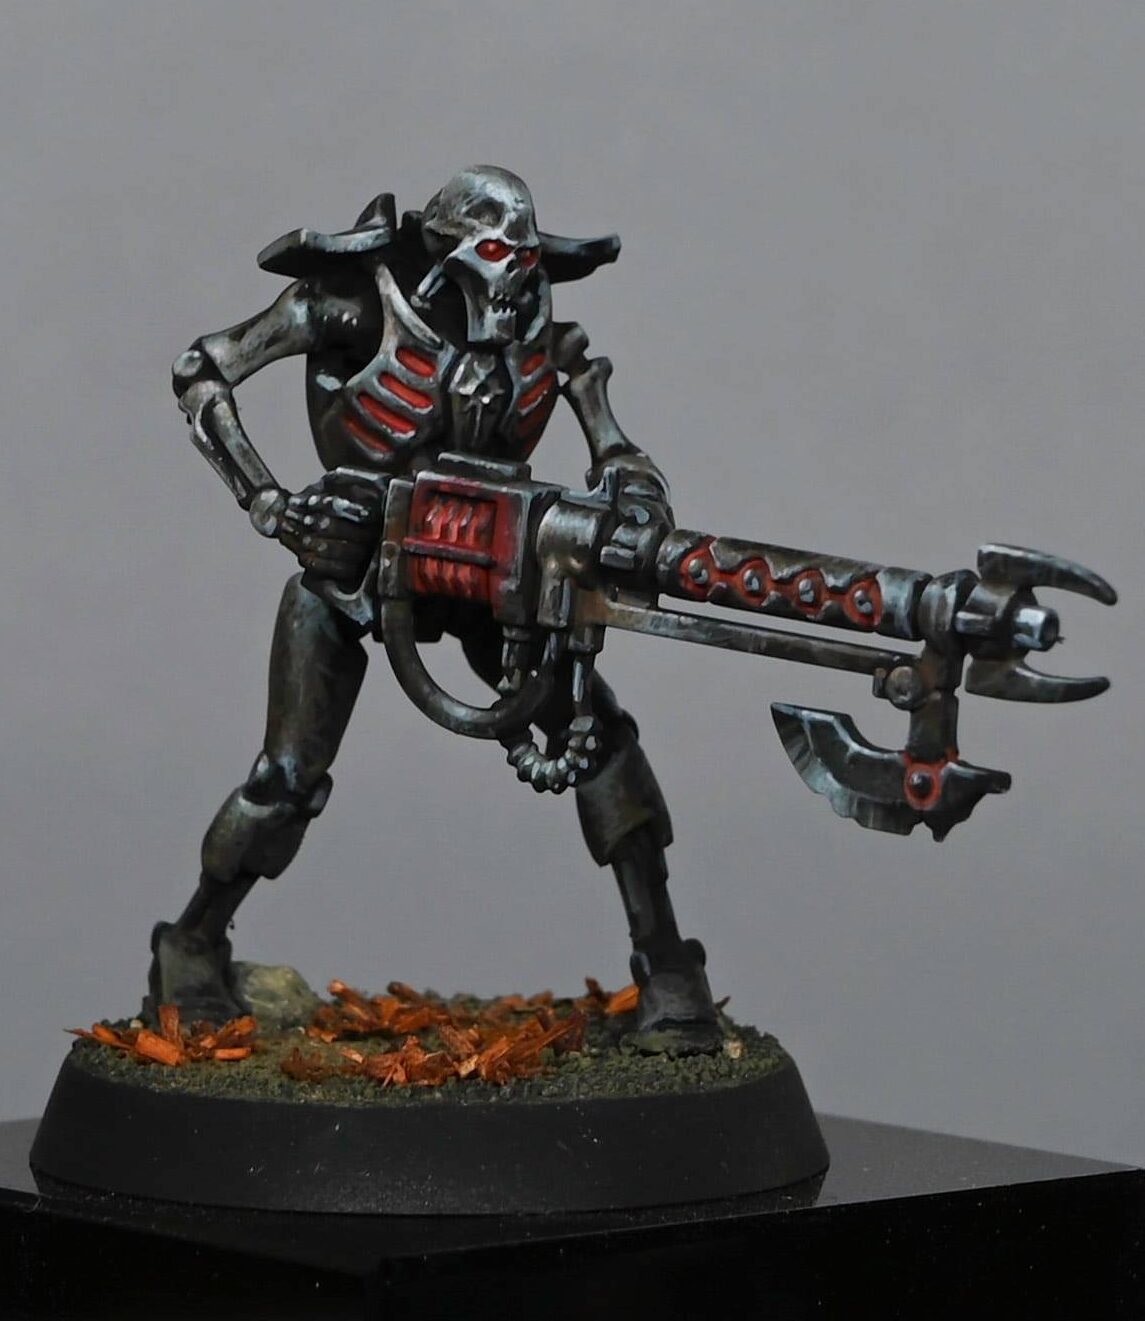
A bit less fancy than my Skorpekh Lord, here is how to paint a Necron warrior in NMM (non metallic metal) for my Necron army.
Video Tutorial: How to Paint a Necron Warrior
Paints used:
Vallejo Dark Grey: Used for mixing the initial base coat, providing a solid, neutral foundation.
Vallejo Heavy Grey: Combined with Dark Grey for the base coat and used for lighter areas and initial highlights.
Vallejo Deep Blue Pale: Added to mixes for cool-toned highlights and to incorporate subtle color variation.
Games Workshop Mournfang Brown: Utilized in glazes to impart a worn, rust-like effect, enhancing the NMM finish with a touch of realism.
Games Workshop Deathworld Forest: Offers an alternative hue for creating variation in the NMM effect, enhancing the model’s worn appearance.
P3 Morrow White: Applied for the brightest highlights, creating high contrast and drawing attention to focal points on the miniature.
Games Workshop Abaddon Black: Used to reinforce the deepest shadows and to outline and separate different sections of the NMM armor.
Materials and Preparation
Prime your Necron Warrior with black primer, including the base pre-coated with sand for texture.
You’ll need Vallejo Dark Grey, Heavy Grey, and a mix of the two for the initial layers. The exact colours aren’t critical, but aim for a dark, warm grey. Adjustments can be made as you glaze additional colours later.
Vallejo Dark Blue Pale, White, and a mix for highlighting.
For added warmth and grunge, prepare Mournfang Brown and Deathworld Forest.
Base Coating
Initial Layer: Start by mixing Vallejo Dark Grey and Heavy Grey in a 50:50 ratio. This base layer sets the stage for subsequent detailing, providing a dark, warm grey undertone. Apply this mix across the Necron Warrior, ensuring even coverage.
Highlighting and Detailing
Applying Highlights: Use Heavy Grey for the first set of highlights. Focus on the model’s head and upper parts, where light naturally hits. This creates a focal point and draws attention to the model’s face and chest.
Further Highlights: Mix Dark Blue Pale with White in varying ratios to create different shades for additional highlights. These should be applied to emphasize the model’s contours, edges, and details, such as the ribs and the energy blade of the gun. Aim for a high contrast by placing highlights near shadows.
Special Attention to the Head: Spend extra time on the head to make it a key focal point. Use lighter mixes for the most prominent highlights here.
Creating Wear and Tear
Adding Wear with Mournfang Brown and Deathworld Forest: To convey a sense of age and disrepair, glaze areas of the model with Mournfang Brown and Deathworld Forest. These colours add a grubby look that suits the Necron lore, suggesting these warriors are ancient and somewhat neglected.
Finishing Touches
Red Details: For glowing elements, start with a base of Mephiston Red, applying it to the gun’s power source and other selected areas. Layer over with Wild Rider Red and a touch of Ice Yellow mixed with Wild Rider Red for the brightest points, creating a glow effect.
Blade Detailing: The blade can be highlighted using the same greys as the rest of the model, followed by glazing with reds to suggest a power source or energy effect.
Final Glazing: To unify the model and enhance the worn look, apply thin glazes of Mournfang Brown and Deathworld Forest over metallic areas. This step adds depth and a sense of realism to the metallic surfaces.
More Necrons:
If you don’t have an account here on my website, please sign up here! I have over 350 video tutorials with steps and tips, plus a selection of PDFs. If you are not sure about joining, you can explore my free videos with a free membership, or take the plunge and become a full subscriber for full access.
If you’d prefer to support me on Patreon, please visit: https://www.patreon.com/RichardGray [...]
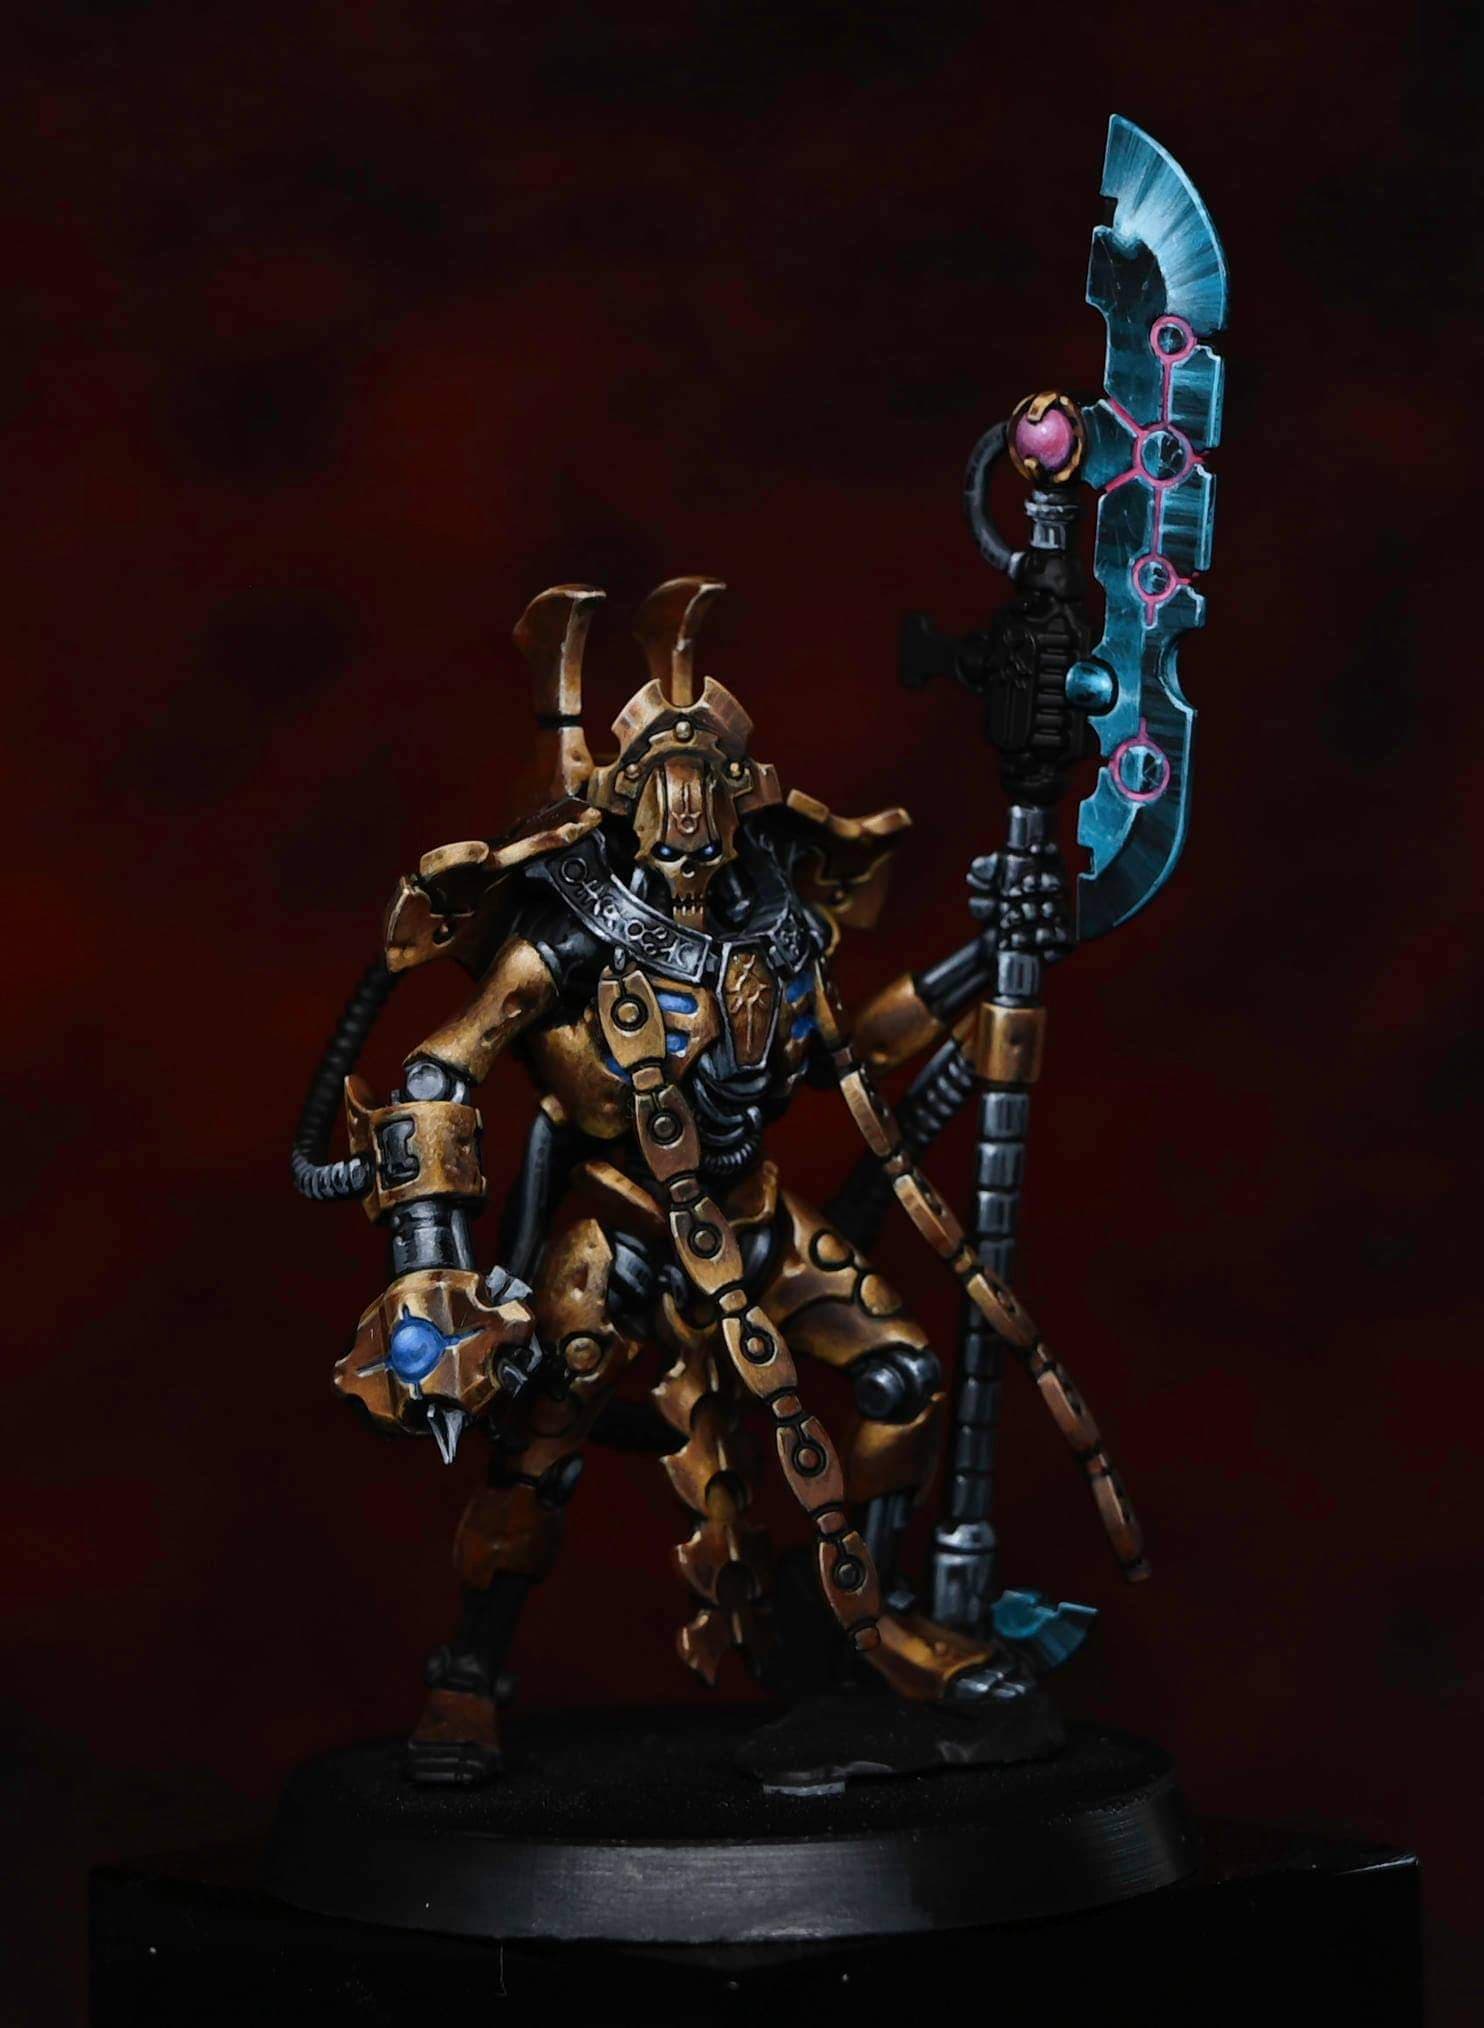
In this tutorial, we’ll explore how to paint a necron blade for the Necron Overlord from the Indomitus boxed set, aiming for a standout effect with an alien technology vibe. We’ll employ a combination of vibrant and contrasting colours to achieve this unique look.
Video: How to Paint a Necron Blade
Paints
Vallejo Game Colour Turquoise, Sunset Red, Ice Yellow, Black; Games Workshop Abaddon Black, Ahriman Blue, Incubi Darkness; P3 Morrow White.
Step-by-Step Guide: How to Paint a Necron Blade
Step 1: Base Details
Start with Ice Yellow, thinning it with approximately two parts water to one part paint for smooth flow. This thinned mixture should be applied to the recessed circular details on the blade, allowing capillary action to draw the paint into these areas. Let dry, then apply a second coat if needed for opacity.
Step 2: Adding Colour Contrast
Apply Sunset Red (a vibrant magenta/hot pink shade) to further highlight the recessed areas, contrasting sharply with the future turquoise and blue elements. This step enhances the alien technology aspect with its striking colour difference.
Step 3: Initial Highlights
Mix a little white with Sunset Red to desaturate the pink slightly for the first stage of highlights. Focus these lighter pink highlights around the recesses to emphasize the glow effect. Avoid adding too much white to maintain the vibrancy of the pink.
Step 4: Cleaning Up
Once the recessed areas are highlighted, use Vallejo Black (or Games Workshop Abaddon Black) to tidy up the edges around these highlights. This step will sharpen the contrast and make the details pop against the blade’s darker base.
Step 5: Turquoise Application
Begin applying Vallejo Game Colour Turquoise to the flat of the blade. This isn’t aimed at realistic reflection but rather at adding an otherworldly glow. Use this alongside a mix of Turquoise with a small amount of Black for shading and pure Turquoise for mid-tones.
Step 6: Adding Scratches and Texture
For creating scratches and texture on the blade’s surface, use a very fine brush and lightly apply lines using a mix of Turquoise and White, gradually increasing the amount of white for the brightest highlights. Add these scratches sparingly to avoid overwhelming the design.
Step 7: Glazing for Depth
To soften and blend the transitions on the blade, prepare glazes with Ahriman Blue (or an equivalent turquoise shade), Incubi Darkness for dark areas, and Abaddon Black for the deepest shadows. Apply these glazes carefully to merge the highlights and shades smoothly, enhancing the blade’s dimensional appearance.
Step 8: Final Highlights and Adjustments
Using Morrow White, add final spot highlights to the edges and tips of the blade where light would naturally catch the most. This step brings together all the elements, giving the blade a polished, gleaming look that stands out from the rest of the model.
Tips for Success:
Layering: Build up colours gradually, allowing each layer to dry before applying the next. This approach gives you more control over the final outcome.
Contrast: Make use of contrasting colours to create visual interest and highlight the alien nature of the technology.
Texture: Adding small scratches and imperfections can lend realism and character to the blade, suggesting wear and use.
For all of my Tutorials on how I painted this Necron, go here:
Necron Overlord NMM Gold
A series of video tutorials on how I painted this Necro Overlord, with gold non metallic metals and a guide to how to paint his glowing weapons. Plus, a guide on creating his base.
Watch Now
More Necron Tutorials
If you don’t have an account, please sign up here! The website currently has over 350 video tutorials with steps and tips, plus a selection of PDFs. If you are not sure about joining, you can explore my free videos with a free membership, or take the plunge and become a full subscriber for full access.
If you’d prefer to support me on Patreon, please visit: https://www.patreon.com/RichardGray [...]
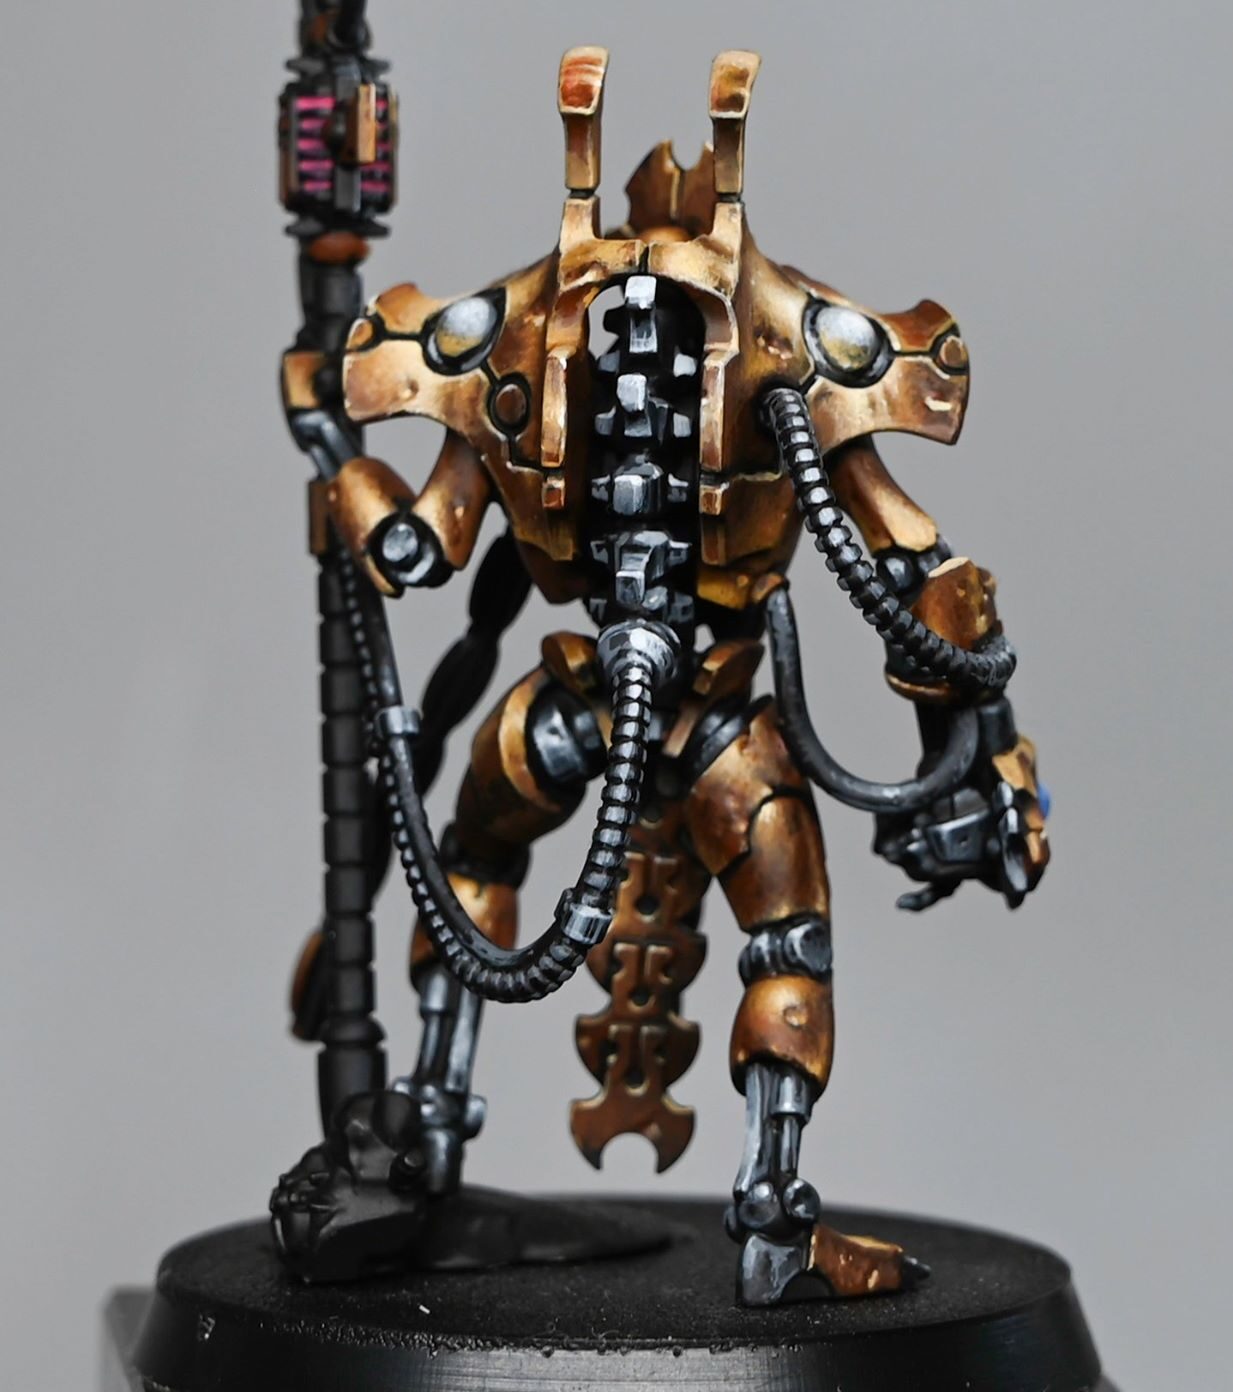
This guide provides detailed steps for painting the Necron Overlord Carapace for the miniature from the Indomitus box set.
The next video is how to make his base with sculpting and painting as it’s a large, raised base with rocks, you can quickly jump to it, here:
How to Create a Boulder Base
This guide will walk you how to create a boulder base with realistic large rocks using Milliput for the sculpting part and a selection of Games Workshop paints for painting.
Watch Now
After that will be Abaddon’s face with Red OSL, and then I will start The Light of Eltharion for the Lumineth range (High elves!)
Video: Necron Overlord Carapace
Paints
Games Workshop Doombull Brown, Abaddon Black; Vallejo Heavy Ochre, Heavy Goldbrown, Ice Yellow; P3 Morrow White.
Step-by-Step Guide: How to Paint a Gold Necron Overlord Carapace NMM
Preparation:
Ensure the carapace is primed and ready for painting. If you have painted other parts of the model, make sure they are protected or carefully work around them.
Step 1: Establishing Base Layers
Start with Doombull Brown as your base layer, covering the entire carapace area. This rich, deep brown will serve as the foundation for building up the gold effect.
Step 2: Building Up Layers
Create a gradient of colours on your palette, starting with Doombull Brown and gradually mixing in Heavy Ochre to lighten the shade. Apply these mixed shades to areas where light naturally hits the carapace, considering your light source to be coming from the top right.
Progress to Heavy Goldbrown, focusing on smaller areas within those previously highlighted. This creates depth and the illusion of a light source affecting the metal’s appearance.
Mix Heavy Goldbrown with Ice Yellow for the next set of highlights, further refining the areas hit by light. This combination starts to give the gold a vibrant, reflective quality.
Step 3: Finishing Highlights
Pure Ice Yellow is used for the highest points of light reflection. Apply this sparingly to the most prominent edges and areas where the light would be strongest.
For the final highlights and to achieve the brightest points of light reflection, use Morrow White. This should be used very sparingly and only on the most elevated areas to simulate the reflection of light on metal.
Step 4: Adjusting Shadows
Use Abaddon Black to glaze into the deepest recesses and shadows of the carapace. This step is crucial for enhancing the contrast, making the NMM effect more pronounced. It’s important to maintain a balance, ensuring that the dark areas do not overpower the lighter, reflective sections.
Step 5: Refining and Cleaning Up
Go back with your initial colours, like Doombull Brown mixed with Heavy Ochre, to smooth out any transitions between shades or correct any oversights. This step also allows you to adjust the contrast and ensure that the lighting looks natural and consistent across the carapace.
Use a fine detail brush to clean up edges or redefine lines that may have become muddled during the painting process.
Step 6: Final Inspection and Adjustments
Once the main painting is complete, inspect the model from various angles to ensure the lighting looks consistent and the NMM effect is convincing. Make any necessary adjustments to the highlights or shadows to perfect the appearance.
Tips for Success:
Lighting Consistency: Keep the light source direction consistent across the model for a cohesive look. Imagine how the light falls on the model and paint accordingly.
Layering: Build up your colours gradually for a smooth transition between shades. This technique is key to achieving a realistic metal appearance.
Controlled Brushwork: Use controlled, precise brush strokes, especially for the finer highlights and shadows, to ensure the best outcome for your NMM effect.
More Necrons? This way!
If you don’t have an account, please sign up here! The website currently has over 350 video tutorials with steps and tips, plus a selection of PDFs. If you are not sure about joining, you can explore my free videos with a free membership, or take the plunge and become a full subscriber for full access.
If you’d prefer to support me on Patreon, please visit: https://www.patreon.com/RichardGray [...]
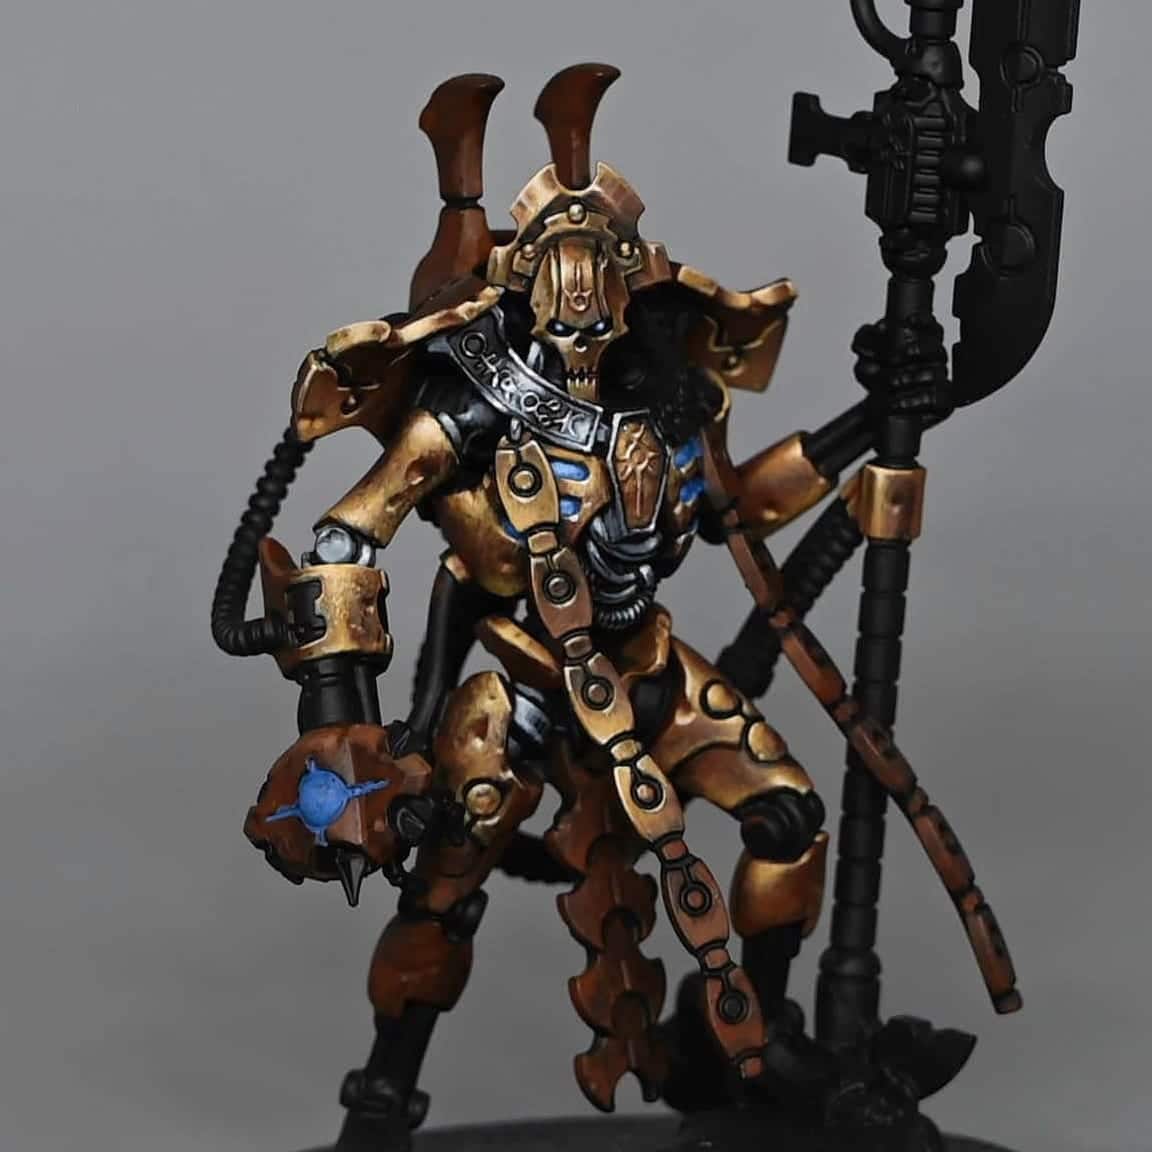
A series of how to paint the Necron Overlord in NMM Gold from the Indomitus boxset by Games Workshop.
Video: How to Paint a Necron Overlord NMM Gold Part One
Materials Required
Prime: The model is primed in black.
Paints: Vallejo Heavy Ochre, Heavy Goldbrown, Ice Yellow, Ultramarine Blue, Doombull Brown, and P3 Morrow White.
Brushes: Fine detail brushes, ideally size 0 or 00, suitable for precise application and blending. I use the Artist Opus series of brushes.
Palette: A wet palette to help keep your paints at the correct consistency.
Step-by-Step Guide: How to Paint a Necron Overlord NMM Gold Part One
Step 1: Base Layer
Start with Doombull Brown, applying it to areas you want to be gold. Doombull Brown will serve as our base because of its deep, rich red-brown hue that provides a good foundation for gold. Expect it to darken as it dries, so multiple thin layers may be necessary for an even base without obscuring details.
Step 2: First Highlights
Mix Doombull Brown and Heavy Ochre in a 50/50 ratio and apply this mixture to areas where light naturally hits the model. This blend starts the transition towards the brighter gold tones. Be mindful of the paint’s translucency; apply in thin layers to build up the colour gradually.
Step 3: Enhancing the Gold
Apply pure Heavy Ochre to enhance the gold effect, focusing on raised areas and edges that would catch the light. This pigment is stronger and more opaque, allowing for more pronounced highlights.
Step 4: Bright Highlights
Create a 50/50 mix of Heavy Goldbrown and Ice Yellow for the next layer of highlights. This combination starts to introduce the characteristic shine of gold, applied more selectively to the highest points and sharpest edges where light would be most intense.
Step 5: Final Highlights
Use Ice Yellow for the brightest highlights, focusing on very specific areas that would reflect the most light. This step is crucial for selling the NMM effect, making the gold look luminous and reflective.
Step 6: Adding Depth and Contrast
For the deepest shadows and to add contrast, return to Doombull Brown in areas opposite the light source or where shadows would be most pronounced. This contrast is key to the NMM technique, giving the illusion of metal.
Step 7: Fine Details
Use Ultramarine Blue for elements like the Overlord’s eyes, adding a pop of colour and visual interest. This also prepares for potential object source lighting (OSL) effects in later stages.
Step 8: Refining and Adjusting
Continue to refine and adjust the distribution of light and shadow across the model, ensuring a coherent light source and believable metallic effect. You may need to go back and forth between shades to achieve smooth transitions.
Step 9: Final Touches
For the sharpest highlights and to represent the most reflective parts of the metal, apply tiny dots or very fine lines of Morrow White. Use this sparingly, as too much can detract from the gold effect.
Tips:
Patience and Layers: NMM gold requires patience and numerous thin layers to build up the desired effect. Don’t rush the process.
Light Source Consistency: Ensure all highlights and shadows are consistent with a single, imagined light source.
Brush Care: Use different brushes for applying paint and mixing on your palette to maintain their condition. A worn brush can provide softer marks for blending, while a newer, sharper brush is ideal for fine details and edge highlighting.
Video: How to Paint a Necron Overlord NMM Gold Part Two
In this session, we continue adding gold details, focusing on the elements cascading from the Overlord’s necklace and introducing more techniques for achieving a realistic NMM gold effect.
Paints
Vallejo: Heavy Ochre, Heavy Goldbrown, Ice Yellow, Dark Grey, Neutral Grey, Silver Grey.
Games Workshop: Doombull Brown.
P3: Morrow White (used sparingly for final highlights).
Step-by-Step Guide: Paint a Necron Overlord NMM Gold Part Two
Segmented Chains Highlighting:
Begin with the chains descending from the necklace. Each segment must be painted according to its angle relative to the light source. This approach ensures a varied and realistic representation of light across the figure, enhancing the NMM effect.
Use the colour palette established in Part 1: Doombull Brown, a mix of Doombull Brown and Heavy Ochre, Heavy Ochre, Heavy Goldbrown mixed with Ice Yellow, and pure Ice Yellow.
Adjusting Highlights According to Angle:
For segments angling upwards or more horizontally, apply more light to reflect their increased exposure. Conversely, more vertical segments should have subdued highlights to mimic realistic shadowing.
Application Technique:
Apply the base colours smoothly, ensuring that transitions between shades are gradual and natural. The aim is to mimic the light’s natural fall off on metallic surfaces without losing the detailed sculptural elements of the miniature.
Detailing and Texture:
As you move onto different sections, adjust the intensity and placement of highlights to suit each area’s orientation. Use a combination of stippling and smooth brushwork to add texture and depth, particularly on battle-damaged areas.
Necklace and Carapace:
For the necklace and parts of the carapace, transition to cooler tones using Dark Grey, Neutral Grey, and Silver Grey. These areas should complement the gold while maintaining the overall NMM technique.
Mix these greys to achieve the desired mid-tones and highlights, creating a metallic sheen that contrasts with the warmer gold tones.
Edge Highlighting and Final Touches:
Emphasise edges and details with finer highlights, gradually building up to the lightest tones. Reserve Morrow White for the most pronounced highlights to draw attention and impart a gleaming metallic finish.
Focus on ensuring that each part of the miniature works together as a cohesive whole. The goal is to have the NMM effect believable across the entire model, with careful attention to the light source consistency.
Video: How to Paint a Gold Necron Overlord Part Three
In this third installment of our painting guide, we focus on the Tachyon Arrow of the Necron Overlord from the Indomitus box set, continuing the theme of non-metallic metal (NMM) gold and adding depth to the blue globe.
Paints
Vallejo Heavy Ochre, Heavy Goldbrown, Ice Yellow, Ultramarine Blue; Games Workshop Doombull Brown; P3 Morrow White.
Step-by-Step Guide: Paint a Necron Overlord NMM Gold Part Three
Preparing the Model:
If you’re following from previous videos, the model will have a base coat of Doombull Brown for the gold sections and Vallejo Ultramarine Blue for the blue globe.
Applying the Base Highlights:
Using the same colours as previous sections, begin enhancing the Tachyon Arrow. The palette includes Doombull Brown, a 50/50 mix of Doombull Brown and Heavy Ochre, pure Heavy Ochre, Heavy Goldbrown, a mix of Heavy Goldbrown and Ice Yellow, and pure Ice Yellow for the highest highlights.
Focusing on Key Highlights:
Pay special attention to a vertical crease to the right of the blue globe. Highlight this crease directly to simulate reflected light, using a brighter tone such as the Heavy Goldbrown and Ice Yellow mix or Ice Yellow for the most intense reflection.
Building Up Layers:
Gradually work up the highlights, starting with deeper shades like the 50/50 Doombull Brown and Heavy Ochre mix, moving through Heavy Ochre, and then to the lighter mixes involving Ice Yellow. This creates a realistic metallic sheen.
Remember to revisit darker shades if necessary to refine transitions and add depth to the NMM effect.
Handling Flat Panels:
The weapon’s flat panels require careful attention. Ensure that the transition from the base colour up to the lighter highlights is smooth, avoiding the temptation to skip straight to the lightest colours without building up the mid-tones.
Detailing the Blue Globe:
For the blue globe, start with a base of Ultramarine Blue. Gradually lighten the top of the globe where the light would naturally hit, blending towards Ice Yellow for the brightest points.
Incorporate a soft highlight at the globe’s base to simulate a bounce light effect, ensuring the transition is smooth to maintain the appearance of a soft, glowing object.
Final Touches:
Revisit the gold sections around the globe, ensuring that the transitions between colours are smooth and that the reflective qualities of the metal are accurately represented.
For the metallic sections not covered in gold, such as the weapon’s armature, use a gradient from Dark Grey to Silver Grey to create a steel effect, mirroring the techniques used on the gold but with cooler tones.
Video: How to paint a Necron Overlord Blade
In this tutorial, we’ll explore how to paint the blade of the Necron Overlord from the Indomitus boxed set, aiming for a standout effect with an alien technology vibe. We’ll employ a combination of vibrant and contrasting colours to achieve this unique look.
Paints
Vallejo Game Colour Turquoise, Sunset Red, Ice Yellow, Black; Games Workshop Abaddon Black, Ahriman Blue, Incubi Darkness; P3 Morrow White.
Step-by-Step Guide: How to Paint a Necron Blade
Step 1: Base Details
Start with Ice Yellow, thinning it with approximately two parts water to one part paint for smooth flow. This thinned mixture should be applied to the recessed circular details on the blade, allowing capillary action to draw the paint into these areas. Let dry, then apply a second coat if needed for opacity.
Step 2: Adding Colour Contrast
Apply Sunset Red (a vibrant magenta/hot pink shade) to further highlight the recessed areas, contrasting sharply with the future turquoise and blue elements. This step enhances the alien technology aspect with its striking colour difference.
Step 3: Initial Highlights
Mix a little white with Sunset Red to desaturate the pink slightly for the first stage of highlights. Focus these lighter pink highlights around the recesses to emphasize the glow effect. Avoid adding too much white to maintain the vibrancy of the pink.
Step 4: Cleaning Up
Once the recessed areas are highlighted, use Vallejo Black (or Games Workshop Abaddon Black) to tidy up the edges around these highlights. This step will sharpen the contrast and make the details pop against the blade’s darker base.
Step 5: Turquoise Application
Begin applying Vallejo Game Colour Turquoise to the flat of the blade. This isn’t aimed at realistic reflection but rather at adding an otherworldly glow. Use this alongside a mix of Turquoise with a small amount of Black for shading and pure Turquoise for mid-tones.
Step 6: Adding Scratches and Texture
For creating scratches and texture on the blade’s surface, use a very fine brush and lightly apply lines using a mix of Turquoise and White, gradually increasing the amount of white for the brightest highlights. Add these scratches sparingly to avoid overwhelming the design.
Step 7: Glazing for Depth
To soften and blend the transitions on the blade, prepare glazes with Ahriman Blue (or an equivalent turquoise shade), Incubi Darkness for dark areas, and Abaddon Black for the deepest shadows. Apply these glazes carefully to merge the highlights and shades smoothly, enhancing the blade’s dimensional appearance.
Step 8: Final Highlights and Adjustments
Using Morrow White, add final spot highlights to the edges and tips of the blade where light would naturally catch the most. This step brings together all the elements, giving the blade a polished, gleaming look that stands out from the rest of the model.
Tips for Success:
Layering: Build up colours gradually, allowing each layer to dry before applying the next. This approach gives you more control over the final outcome.
Contrast: Make use of contrasting colours to create visual interest and highlight the alien nature of the technology.
Texture: Adding small scratches and imperfections can lend realism and character to the blade, suggesting wear and use.
Video: Paint a Necron Overlord NMM Gold (Back Carapace)
This guide provides detailed steps for painting the back carapace of a Necron Overlord miniature from the Indomitus box set.
Paints
Games Workshop Doombull Brown, Abaddon Black; Vallejo Heavy Ochre, Heavy Goldbrown, Ice Yellow; P3 Morrow White.
Step-by-Step Guide: How to Paint a Necron Overlord NMM Gold (Back Carapace)
Preparation:
Ensure the carapace is primed and ready for painting. If you have painted other parts of the model, make sure they are protected or carefully work around them.
Step 1: Establishing Base Layers
Start with Doombull Brown as your base layer, covering the entire carapace area. This rich, deep brown will serve as the foundation for building up the gold effect.
Step 2: Building Up Layers
Create a gradient of colours on your palette, starting with Doombull Brown and gradually mixing in Heavy Ochre to lighten the shade. Apply these mixed shades to areas where light naturally hits the carapace, considering your light source to be coming from the top right.
Progress to Heavy Goldbrown, focusing on smaller areas within those previously highlighted. This creates depth and the illusion of a light source affecting the metal’s appearance.
Mix Heavy Goldbrown with Ice Yellow for the next set of highlights, further refining the areas hit by light. This combination starts to give the gold a vibrant, reflective quality.
Step 3: Finishing Highlights
Pure Ice Yellow is used for the highest points of light reflection. Apply this sparingly to the most prominent edges and areas where the light would be strongest.
For the final highlights and to achieve the brightest points of light reflection, use Morrow White. This should be used very sparingly and only on the most elevated areas to simulate the reflection of light on metal.
Step 4: Adjusting Shadows
Use Abaddon Black to glaze into the deepest recesses and shadows of the carapace. This step is crucial for enhancing the contrast, making the NMM effect more pronounced. It’s important to maintain a balance, ensuring that the dark areas do not overpower the lighter, reflective sections.
Step 5: Refining and Cleaning Up
Go back with your initial colours, like Doombull Brown mixed with Heavy Ochre, to smooth out any transitions between shades or correct any oversights. This step also allows you to adjust the contrast and ensure that the lighting looks natural and consistent across the carapace.
Use a fine detail brush to clean up edges or redefine lines that may have become muddled during the painting process.
Step 6: Final Inspection and Adjustments
Once the main painting is complete, inspect the model from various angles to ensure the lighting looks consistent and the NMM effect is convincing. Make any necessary adjustments to the highlights or shadows to perfect the appearance.
Tips for Success:
Lighting Consistency: Keep the light source direction consistent across the model for a cohesive look. Imagine how the light falls on the model and paint accordingly.
Layering: Build up your colours gradually for a smooth transition between shades. This technique is key to achieving a realistic metal appearance.
Controlled Brushwork: Use controlled, precise brush strokes, especially for the finer highlights and shadows, to ensure the best outcome for your NMM effect.
If you don’t have an account, please sign up here! The website currently has over 350 video tutorials with steps and tips, plus a selection of PDFs. If you are not sure about joining, you can explore my free videos with a free membership, or take the plunge and become a full subscriber for full access.
If you’d prefer to support me on Patreon, please visit: https://www.patreon.com/RichardGray [...]
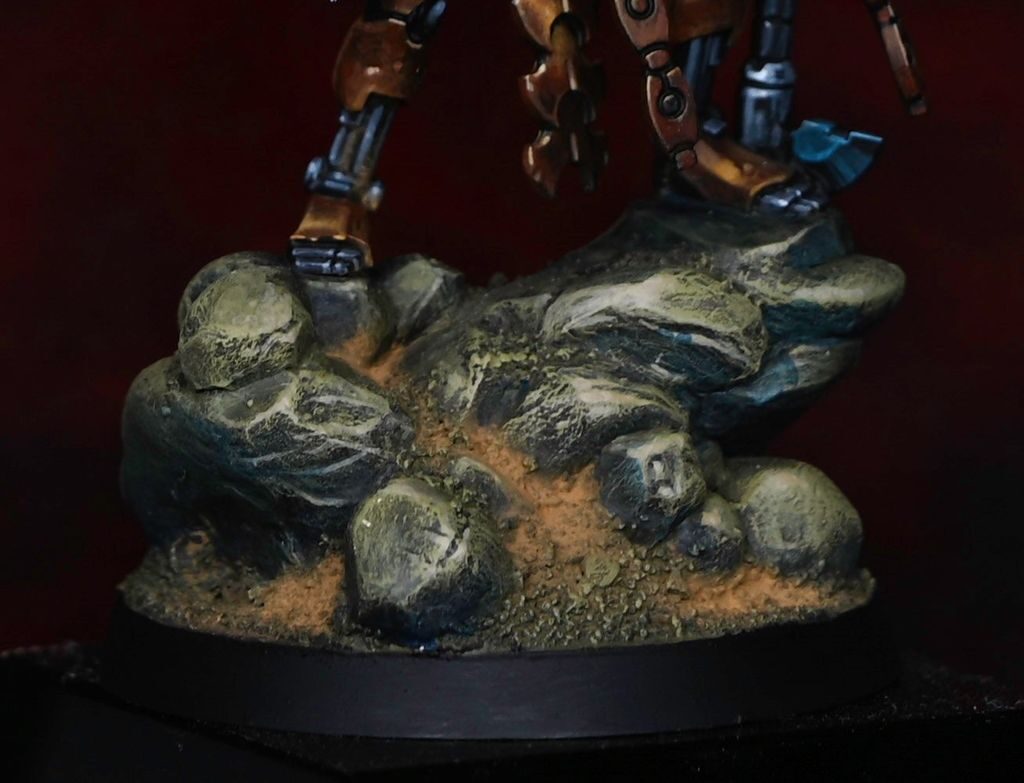
This video shows how to sculpt and paint the base for the Necron Overlord from the Indomitus boxed set.
Video: How to Sculpt and Paint a Necron Overlord Base
Materials Needed
Milliput (Super Fine White preferred, but any type will do)
Sculpting tools and a scalpel
Water or a lubricant like Vaseline for smoothing Milliput
PVA glue and fine grain sand for texture
Paints: Vallejo Model Color Black, Games Workshop Deathworld Forest, Ogryn Camo, Morghast Bone, Ushabti Bone, and Kantor Blue
Weathering pigment (e.g., Forge World Dark Sand)
Brushes, including a small Artist Opus dry brush
Matte varnish for sealing
Step-by-Step Guide: How to Create a Necron Overlord Base
Sculpting the Necron Overlord Base
Mixing Milliput: Take equal parts of Milliput’s two components and knead until uniformly beige. It might initially be flaky; continue until smooth.
Forming the Terrain: Roll the mixed Milliput into a ball and press onto the base. Begin sculpting the rough shape of the terrain using sculpting tools, dipped in water or lubricant to prevent sticking.
Adding Details: Once you have a basic shape, use tools and a scalpel to carve more detailed rock formations. Ensure the terrain is level where the model will stand.
Creating Smaller Rocks: Take excess Milliput, form small balls, and press onto the base to simulate smaller rocks, blending them into the larger mass.
Smoothing and Refining: Continue to refine the shapes, adding crevices and smoothing surfaces. Allow the Milliput to partially dry for easier handling.
Painting the Necron Overlord Base
Base Coat: Once the Milliput is dry, apply a thin base coat of Vallejo Model Color Black. Ensure it’s watered down to cover quickly without obscuring details.
Adding Sand: Apply PVA glue to the base and sprinkle fine grain sand over it for additional texture. Allow to dry.
Applying Weathering Pigment: Use a dark sand weathering pigment, pushing it into crevices and blowing away the excess.
Washing: Create a wash with Deathworld Forest (5 parts water to 1 part paint) and cover the entire base. This will spread the pigment and add depth.
Dry Brushing: Once dry, dry brush the base with Deathworld Forest, followed by Ogryn Camo, focusing on top-down strokes to highlight edges and textures.
Detailing: Use Morghast Bone and Ushabti Bone to pick out individual rocks and edges for added contrast and detail.
Adding Shadows: Water down Kantor Blue and apply it to the undersides of rocks and in shadowed areas to simulate ambient occlusion and enhance depth.
Finishing Touches
Sealing: Once fully painted and dry, apply a matte varnish to seal the weathering pigment and paint, protecting your work.
Base Rim: Tidy up the base’s rim with Vallejo Model Color Black for a neat finish.
Tips
Work in stages, allowing materials to dry fully between steps.
Be creative with your rock shapes but ensure the model will stand level on the finished base.
Use a variety of brush sizes for dry brushing to reach different areas without disturbing the painted model.
Test fit your model frequently on the base during the sculpting process to ensure a good fit
How to Paint a Gold Necron Overlord
Keen to learn how to paint the model standing on this base? Go here:
Necron Overlord NMM Gold
A series of video tutorials on how I painted this Necro Overlord, with gold non metallic metals and a guide to how to paint his glowing weapons. Plus, a guide on creating his base.
Watch Now
If you don’t have an account, please sign up here! The website currently has over 350 video tutorials with steps and tips, plus a selection of PDFs. If you are not sure about joining, you can explore my free videos with a free membership, or take the plunge and become a full subscriber for full access.
If you’d prefer to support me on Patreon, please visit: https://www.patreon.com/RichardGray
Other video tutorials on how to paint the gold for this Necron and my other Necrons are available below!: [...]
Master Lazarus
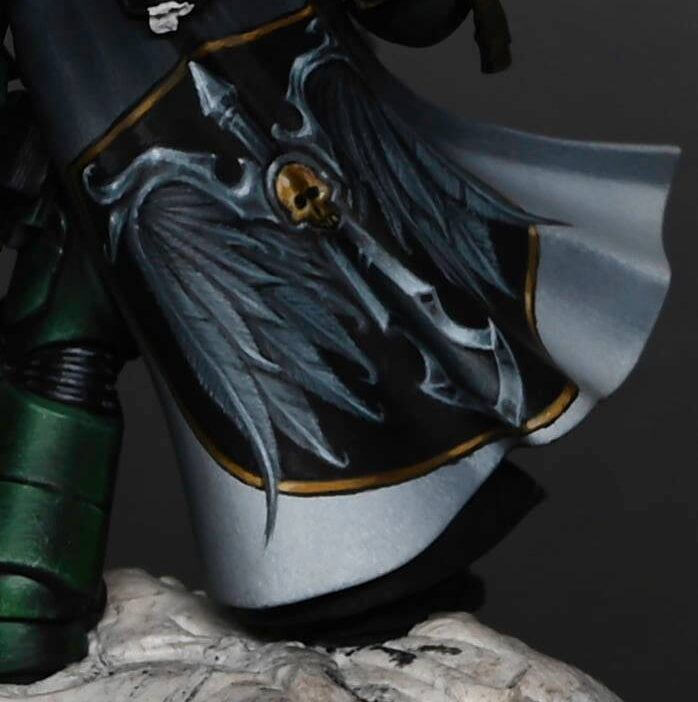
A selection of tutorials on how to paint Master Lazarus’ Cloak. In these we explore simple freehand with bold, clean lines, then move onto the more complex custom Dark Angel symbol on the rear of Master Lazarus of the Dark Angels.
Video: Simple Freehand Cloak – Front
This video shows how to paint the simple Dark Angel freehand symbol on the inside of the cloak of Master Lazarus
The following paints were used: Games Workshop: Mephiston Red Vallejo: Ice Yellow, Neutral Grey, Pale Grey Blue
Step-by-Step – How to paint the cloak of Master Lazarus of the Dark Angels
Step 1: Preparation
Ensure that you have already glued the cloak onto the model.Have Mephiston Red paint ready for the freehand work.Make sure you’ve applied texture work to the cloak before starting the freehand.Step 2: Starting the FreehandBegin with a drag motion using Mephiston Red along the edge of the cloak. This will be your first guideline.Maintain consistent pressure while painting to ensure an even line.Step 3: Lower EdgeRepeat the process for the lower edge.Step 4: Creating Simple ShapesPaint a line equidistant from horizontal and vertical lines, forming the basis for the sword part of the wing.Be cautious with thickness and avoid making it too thick.Step 5: Painting WingsPaint the wings by going straight up towards the guideline, making your life easier.Focus on leaving space at the top for the hilt of the sword.Feel free to paint curves for feathers, keeping in mind the hilt’s space.Step 6: Painting the HiltPaint a line straight across for the hilt, extending it to touch the wings.Use neutral gray and pale gray blue to define the diamond shapes on the hilt.Cut into the edges with the appropriate gray colours to make it sharp.Step 7: Adding Details to FeathersUse neutral gray and pale gray blue to define individual feathers on the wing.Make them as sharp as possible, and don’t worry if they look slightly patchy.Step 8: Adding Lighting EffectsMix ice yellow with the base colour to create a gradient for the highlights.Paint a gradient up towards the lightest part on the cloak, following the natural flow of light.Ensure neat painting, using the tip of the brush and bracing your arms for stability.Step 9: Final TouchOptionally, add a touch of ice yellow to the line underneath the hand for a subtle transition.Soften the contrast and make the lighting more cohesive with the overall model.
Video: Complex Cloak – Back Freehand Part One
This video shows the difficulty of painting a design for the cloak of Master Lazarus and how to paint the freehand.
The following paints were used: Vallejo: Black, Pale Grey Blue, Dark Blue Pale, Dark Grey, Black P3: Morrow White
Step-by-Step – How to paint the cloak of Master Lazarus of the Dark Angels
Step 1: Prepare the BaseMake sure your model has been previously stippled and glazed, creating a smooth surface for the freehand work.If needed, adjust the base colours by adding white and gray-blue to achieve a smoother finish.Step 2: Outline the DesignBegin by using Vallejo model colour black to outline the freehand design on the rear of Master Lazarus’s cloak.Take note of any folds or challenges in the cloak’s sculpt, as these may impact the symmetry and centralization of the design.Step 3: Adjust PlacementAddress any issues with the cloak’s fold or bias to one side by adjusting the placement of the design.Consider the visibility of the main focal points, such as a sword, and ensure they are not hidden within creases.Step 4: Start the Freehand WorkUse black as a base colour for the freehand work, focusing on creating the overall shapes and outlines of the design.The black background allows for easier corrections, but the details should be lighter than black to ensure visibility.Step 5: Refine the DesignRefine the shapes and details by using a 50/50 mix of dark blue pale and dark gray.Take your time with the refining stage, using the tip of the brush to add intricate details to feathers and other elements.Step 6: Add Organic DetailsIntroduce organic details, such as veins in the feathers, to make the freehand design look more natural.Make small tweaks to enhance the overall appearance, ensuring the design is visually appealing.Step 7: Focus on Feather HighlightsHighlight the feathers using a 50/50 mix of dark blue pale and dark gray, focusing on the tips and edges.Avoid making the edge highlights too obvious, maintaining the illusion of feathers.Step 8: Work on Sword HiltMove on to the detailed and complex freehand on the hilt of the sword, planning for a non-metallic effect.Use various shades, starting with dark blue pale and gradually adding pale gray blue for highlights.Step 9: Create Texture and HighlightsBuild texture by creating small marks and bumps on the hilt, paying attention to the shapes and transitions.Add dots with white on the brightest parts to enhance contrast and create a more dynamic effect.Step 10: Final TouchesMake final adjustments as needed, ensuring that the freehand complements the overall model without overshadowing it.Take breaks when necessary to maintain focus and avoid painting when fatigued.Note: Keep an eye on the wet palette, especially in warmer conditions, to prevent paint from thickening and affecting the painting process.
Video: Complex Cloak – Back Freehand Part Two
This video is part 2 for how to paint the custom Dark Angel symbol on the rear of Master Lazarus of the Dark Angels.
The following paints were used: Vallejo: Dark Grey, Blue Grey Pale, Pale Grey Blue, Heavy Goldbrown, Ice Yellow, English Uniform, Black Games Workshop: Mournfang Brown P3: Morrow White
Step-by-Step – How to paint freehand on Master Lazarus of the Dark Angels
Step 1: PreparationEnsure you have the necessary paints ready: Dark Grey, Blue Grey Pale, Pale Grey Blue, Heavy Goldbrown, Nuln Oil, Pale Grey Blue, P3 Morrow White, and a 50/50 mix of Heavy Gold Brown and Ice Yellow.Step 3: Start with Skull and CircleUse English Uniform to roughly block in the skull and circle in the center of the cloak.Use Nuln Oil to define eye sockets and nose hole.Cut into shapes with black paint to refine details.Step 4: Gold Non-Metallic SkullHighlight skull with a mix of Heavy Goldbrown and Ice Yellow.Emphasize high contrast, especially on the forehead for a non-metallic look.Step 5: Detailing the BladePaint the blade using Blue, Blue Grey Pale, a 50/50 mix of Dark Gray and Pale Blue, and Pale Gray Blue.Consider the highlights on the blade separately to ensure clarity.Step 6: Refining the DesignCut back into the design with fluid black paint for sharper edges and finer highlights.Emphasize the central section of the blade, adjusting highlights accordingly.Add random highlights with Blue Grey Pale to enhance the non-metallic look.Step 7: Wings and TrimPaint the second wing with slight variations, maintaining an organic feel.Cut into black edges for sharpness, especially at the bottom of the cloak.Highlight the gold trim, aligning it with the natural highlights on the cloak.Step 8: Final TouchesCheck for any faults or blobs and address them.Avoid making highlights too bright, maintaining a realistic feel.Consider adding small details for visual interest without overshadowing the main design.
All videos are recorded in HD 1080p or higher – use full screen for the full effect and let the video load completely.
More Freehand tips:
Videos Not Showing?
To view any of my paid tutorials, you need to be a member of the website – please click below to log in or join the site.
Not sure about joining just yet? Check out my Youtube for all my free tutorials or sign up as a free “friend” member on this site and visit the Freebies video page!
If you’d prefer to support me on Patreon, please visit: https://www.patreon.com/RichardGray [...]
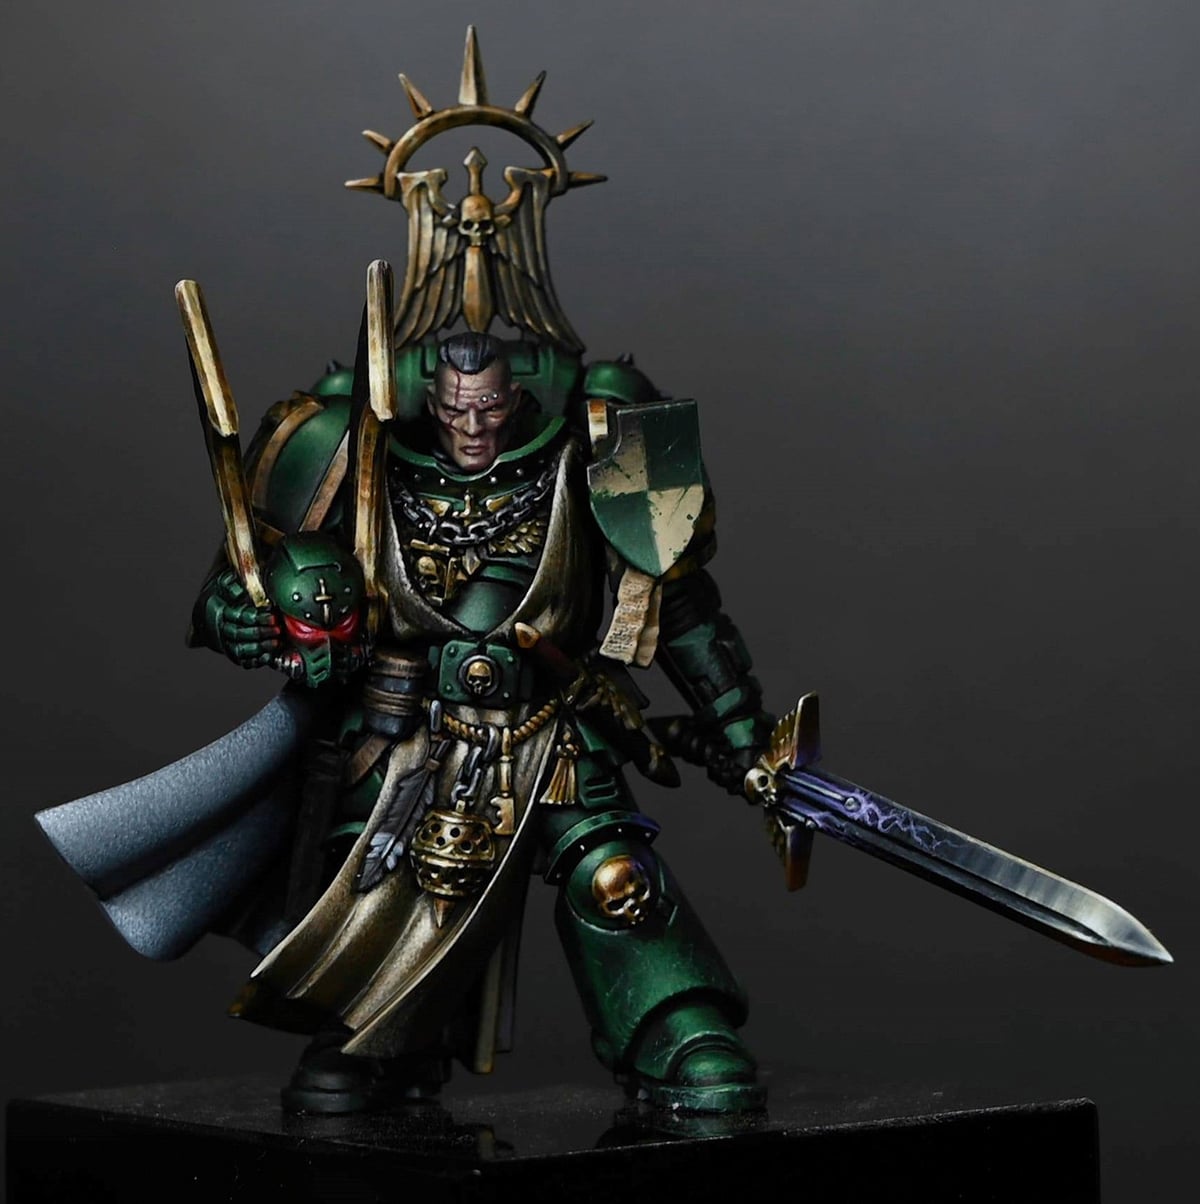
A set of video tutorials on how to paint Lazarus of the Dark Angels.
Stage 1: Base Colours
Step by Step : Dark Angels Master Lazarus – Stage 1: Blocking in Colours
Stage 2: Refining – First Video
Refining – Second Video
Refining the Leg
Step-by-Step – Refinement
Stage 3: How to Paint Lazarus of the Dark Angels Head
Step-by-Step – How to Paint Lazarus of the Dark Angels Head
Stage 4: NMM Sword with Purple Lightning
Step-by-Step – How to paint the sword of Master Lazarus of the Dark Angels
Stage 5: Helmet with glowing eyes!
Step-by-Step – How to paint the helmet of Master Lazarus of the Dark Angels
Stage 6: Simple Freehand Cloak – Front
Step-by-Step – How to paint the cloak of Master Lazarus of the Dark Angels
Stage 7: Complex Cloak – Back Freehand Part One
Step-by-Step – How to paint the cloak of Master Lazarus of the Dark Angels
Stage 8: Complex Cloak – Back Freehand Part Two
Step-by-Step – How to paint freehand on Master Lazarus of the Dark Angels
Stage 1: Base Colours
The following paints were used: Vallejo: Heavy Blackgreen, Ice Yellow, English Uniform, Heavy Goldbrown, Dark Grey, Neutral Grey, Heavy Bluegrey, Heavy Red, White
Step by Step : Dark Angels Master Lazarus – Stage 1: Blocking in Colours
Step 1: Prepare the ModelEnsure the model is primed black, with the head already painted separately.Step 2: Choosing Base ColourUse Vallejo Heavy Black Green, an extra opaque game colour, for the base colur.Consider mixing it with Vallejo Ice Yellow for a unique Dark Angels green.Step 3: Application TechniqueApply the base colour roughly, covering the entire model.Don’t focus only on highlights; use it as a base color for a natural finish.Be intentionally messy to create interesting marks and imperfections on the armor.Step 4: Highlight PlacementIdentify areas where highlights should go, considering the shape of the object.For cylindrical objects, create long straight highlights; for globes, go for round highlights.Step 5: Work All AroundPaint the entire model at this stage, ensuring a consistent application all around.This provides a rough playable model and a base to work from during the refining stages.Step 6: Disregard Sharp BrushesAvoid using brushes with a strong tip; a slightly rounded tip helps in better coverage.Use a brush with a larger surface area to slap on the paint for a smooth finish.Step 7: Remember to Thin Your Paints!Maintain a 50/50 water-to-paint ratio for a smoother finish.Applying a thicker paint may result in lumps and a difficult-to-fix finish.Step 8: Zenithal Lighting (Optional)For strong lighting effects, consider zenithal lighting.Incorporate shadows and highlights in the base color for added interest.Step 9: Non-Metallic GoldUse Heavy Goldbrown for the first highlight on non-metallic gold areas.Focus on creating reflective reflections for a visually interesting look.Step 10: Cloth and Bone HighlightsApply highlights on cloth and bone areas, using colours like XV88 and English Uniform.Scrub the paint on with an old brush to create a textured and rough finish.Step 11: End of Stage 1The model should now have a rough, textured look with block colours and initial highlights.
Stage 2: Refining – First Video
This video shows the first stage of how to refine the painting from the previous video for Master Lazarus of the Dark Angels to display standard painting.
Refining – Second Video
This video shows how to refine the bone coloured robes and the shoulder shield of Master Lazarus of the Dark Angels.
Refining the Leg
This video shows how to refine and blend the green armoured leg along with adding scratches to Master Lazarus of the Dark Angels, and also how to paint the bright NMM skull on his kneecap.
The following paints were used: Vallejo: Heavy Blackgreen, Ice Yellow, Neutral Grey, Heavy Bluegrey, Black, White, Heavy Goldbrown Games Workshop: Mournfang Brown
Step-by-Step – Refinement
Step 1: Prepare Your PaletteGather your paints: Vallejo heavy black green, Ice yellow, Vallejo model colour black, Corvus black (optional), and Mournfang Brown.Create a wet palette to keep your paints workable.Step 2: Base CoatApply the base coat using heavy black green for the lower leg, following the rough highlights from previous layers.Step 3: HighlightsMix heavy black green with ice yellow for highlights.Start with the top trim of the knee, applying alternating dark and light bands for added reflections.Work on the highlights down the leg, paying attention to the facing surfaces catching more light.Use horizontal marks to aid blending and create a textured finish.Step 4: BlendingBlend colours by going back and forth, adding water to paints on the wet palette.Create a soft transition between colours, avoiding hard edges.Step 5: Additional HighlightsIntroduce ice yellow for brighter highlights, creating a shiny armour effect.Be bold with highlights, and don’t worry about going too bright; you can always adjust later.Step 6: NMM Gold SkullUse ice yellow as the primary colour for the non-metallic metal (NMM) gold skull on the knee.Add small reflections with pure white to create a dazzling effect.Paint reflected light along the edges to make the skull stand out.Step 7: Scratches and WeatheringUse a fine brush for scratches; be delicate and irregular in your application.Apply scratches sparingly, focusing on areas where wear and tear would naturally occur.Use the highest highlight to add imperfections and catch light on the scratches.Step 8: GlazingGlaze over the scratches and weathering to soften transitions.Keep the glaze thin (around 5 parts water to 1 part paint) for a subtle effect.Step 9: Final TouchesAdjust highlights and shadows as needed.Consider glazing the entire foot and lower leg for a cohesive finish.
Stage 3: How to Paint Lazarus of the Dark Angels Head
This video shows how to paint a space marine head with strong lighting.
The following paints were used: Games Workshop: Cadian Fleshtone, Bugman’s Glow, Kislev Flesh, Screaming Skull, Corvus Black Vallejo: Dark Grey, Neutral Grey, Heavy Bluegrey, Pale Grey Blue
Step-by-Step – How to Paint Lazarus of the Dark Angels Head
Step 1: Prepare the ModelStart with a black-primed Space Marine head.Apply a base coat of Bugman’s Glow for the face. If unavailable, mix a dark face colour using Rhinox Hide or a dark brown and mix it with a flesh tone.Step 2: Base HighlightsOn a wet palette, have Bugman’s Glow, Cadian Fleshtone, Kislev Flesh, and Screaming Skull ready.Using clean flesh tone, roughly place highlight points on the left side of the face. The lighting is coming from the top left.Step 3: Refine HighlightsFocus on the left side of the face for now.Use Kislev Flesh to add lighter tones, ensuring not to cover all previous highlights.Pay attention to natural light-catching areas, avoiding a too high-contrast look.Step 4: Eye PaintingPaint the eyes with white or a pale gray-blue (preferably P3 Morrow White).Later, consider adjusting eye brightness by glazing over with a mixture closer to Bergman’s Glow.Step 5: Adding DetailsPaint service studs and other details with P3 Morrow White or any white paint.Step 6: Shading and ShadowsUse Corvus Black sparingly for shadows, concentrating on recessed areas.Be cautious not to cover highlighted areas with Corvus Black, as it may look messy.Step 7: Refinement and GlazingRefine highlights by glazing if needed, especially if any areas appear too harsh.Soften hard highlights with glazes of Citadel Reikland Fleshshade if necessary.Step 8: Hair PaintingFor hair, use neutral gray, stippling on the left side and softly on the right.Add darker gray on the right for stronger highlights.Don’t worry about going too light; you can glaze back with a dark colour if needed.Step 9: Final TouchesFix any mistakes quickly using Corvus Black.Optional: Add white dots in the eyes for a realistic effect.
Stage 4: NMM Sword with Purple Lightning
This video shows how to paint the sword of Master Lazarus of the Dark Angels’ sword in NMM and with purple lightning.
The following paints were used: Vallejo: Neutral Grey, Dark Grey, Black, Ice Yellow, Pale Grey BlueGames Workshop: Abaddon Black, Xereus Purple P3: Morrow White
Step-by-Step – How to paint the sword of Master Lazarus of the Dark Angels
Step 1: Base Coat and Lighting ColoursIn previous videos, the model was roughly blocked in with lighting colours. The power sword’s tip will be the main focus, with a large shine point. Use a wet palette with various gray tones, a bit of ice yellow, and other necessary colours.
Step 2: Establishing Vertical and Horizontal LinesStart by painting vertical lines on most of the blade, creating a reflective effect. Toward the tip, introduce some horizontal lines to simulate a strong shine. This helps build up a dynamic and interesting texture.
Step 3: Translucency and Paint ApplicationWork with the translucency of the paint to achieve smoother transitions. Be cautious of tonal steps between lines. Keep paint application minimal, testing on your thumb to ensure smoothness. A feathering movement during application helps avoid thick layers.
Step 4: Adding Ice YellowApply ice yellow sparingly toward the tip of the blade. This creates a significant tonal jump and enhances the brightness. Use a quick and controlled stroke to prevent a heavy texture finish.
Step 5: Glazing and Softening TransitionsConsider glazing with neutral gray to soften transitions. Be mindful not to glaze over the bright highlight spot, as it may dull the effect. Adjust the glazing intensity based on how soft you want the transitions.
Step 6: Final Highlights with Pure WhiteApply pure white to the upper edge and curve of the blade, leaving some parts untouched for a balanced finish. Use draw strokes towards you, focusing around two-thirds of the way down the blade.
Step 7: Adding Purple GlowMix a small amount of purple with white and apply it around the nodes on the blade. Blend it with a 50/50 mix of neutral gray and abundant black for a seamless transition into the black of the blade.
Step 8: Painting Lightning DetailsUse pale gray-blue to paint straight lines going up to the nodes. Thin the lines and make them thinner towards the tip. Add a small amount of white for the next section, creating a subtle jiggle in the brush to avoid super sharp lines. Ensure the lightning goes down the blade, not back towards the hilt.
Step 9: Final TouchesReview the model, adjust any mistakes, and make necessary touch-ups. The final result should showcase a masterful non-metallic metal effect on Lazarus’s power sword with captivating purple lightning details.
Remember to enjoy the process and feel free to experiment with variations to make the model uniquely yours!
Stage 5: Helmet with glowing eyes!
This video shows how to paint the helmet of Master Lazarus of the Dark Angels, along with glowing red eyes.
The following paints were used: Vallejo: Heavy Blackgreen, Ice Yellow, English Uniform, Japanese Uniform, Black Games Workshop: Mournfang Brown, Mephiston Red, Wild Rider Red (optional), Rhinox Hide P3: Morrow White
Step-by-Step – How to paint the helmet of Master Lazarus of the Dark Angels
Step 1: Preparing the ModelBegin by ensuring that the base colours have been blocked in, as shown in the previous videos. The primary colours include green armour, gold metallic trim, and glowing eyes. The specified colours used for the metallic gold are English uniform, Japanese uniform, Icy yellow, white, and rown.
Step 2: Highlighting the Metallic TrimRefer to the colour scheme and place the highlights on the metallic trim based on the existing rough work.Use English uniform for tidying up and blending, paying attention to the lighting direction.Note that highlights may vary in intensity depending on the angle and position of the primary light source.
Step 3: Understanding Light VolumesRecognise that different materials may have varying light volumes, as seen in the contrast between green armour and gold trim.Utilise Ice Yellow for initial highlights, creating a strong mark for better visibility.Gradually build up the highlights to enhance the non-metallic look and achieve a glowing effect.Step 4: Painting the HelmetRemove the helmet from the model to facilitate painting and prevent accidental spillage on other parts.Focus on the helmet’s shape, especially the forehead, where the highlights will be the strongest.Avoid painting around the eyes’ lower edge, as this area will have OSL (Object Source Lighting) in red later.Step 5: OSL and Red GlowAdd a subtle red glow to the eyes using Khador Red Base.Be cautious not to overemphasize the glow, as the intention is to keep it subtle and not overpowering.Soften the blend on the green sections, maintaining a smooth transition for a realistic non-metallic look.Step 6: Final TouchesRefrain from painting into the deep recesses around the eyes to preserve the strength of the OSL effect.Avoid using pure white for the forehead, as it may appear unnatural. Instead, use a desaturated white to maintain the red glow.Spend time refining the blend on the green sections for a polished finish.
Stage 6: Simple Freehand Cloak – Front
This video shows how to paint the simple Dark Angel freehand symbol on the inside of the cloak of Master Lazarus
The following paints were used: Games Workshop: Mephiston Red Vallejo: Ice Yellow, Neutral Grey, Pale Grey Blue
Step-by-Step – How to paint the cloak of Master Lazarus of the Dark Angels
Step 1: Preparation
Ensure that you have already glued the cloak onto the model.Have Mephiston Red paint ready for the freehand work.Make sure you’ve applied texture work to the cloak before starting the freehand.Step 2: Starting the FreehandBegin with a drag motion using Mephiston Red along the edge of the cloak. This will be your first guideline.Maintain consistent pressure while painting to ensure an even line.Step 3: Lower EdgeRepeat the process for the lower edge.Step 4: Creating Simple ShapesPaint a line equidistant from horizontal and vertical lines, forming the basis for the sword part of the wing.Be cautious with thickness and avoid making it too thick.Step 5: Painting WingsPaint the wings by going straight up towards the guideline, making your life easier.Focus on leaving space at the top for the hilt of the sword.Feel free to paint curves for feathers, keeping in mind the hilt’s space.Step 6: Painting the HiltPaint a line straight across for the hilt, extending it to touch the wings.Use neutral gray and pale gray blue to define the diamond shapes on the hilt.Cut into the edges with the appropriate gray colours to make it sharp.Step 7: Adding Details to FeathersUse neutral gray and pale gray blue to define individual feathers on the wing.Make them as sharp as possible, and don’t worry if they look slightly patchy.Step 8: Adding Lighting EffectsMix ice yellow with the base colour to create a gradient for the highlights.Paint a gradient up towards the lightest part on the cloak, following the natural flow of light.Ensure neat painting, using the tip of the brush and bracing your arms for stability.Step 9: Final TouchOptionally, add a touch of ice yellow to the line underneath the hand for a subtle transition.Soften the contrast and make the lighting more cohesive with the overall model.
Stage 7: Complex Cloak – Back Freehand Part One
This video shows the difficulty of painting a design for the cloak of Master Lazarus and how to paint the freehand.
The following paints were used: Vallejo: Black, Pale Grey Blue, Dark Blue Pale, Dark Grey, Black P3: Morrow White
Step-by-Step – How to paint the cloak of Master Lazarus of the Dark Angels
Step 1: Prepare the BaseMake sure your model has been previously stippled and glazed, creating a smooth surface for the freehand work.If needed, adjust the base colours by adding white and gray-blue to achieve a smoother finish.Step 2: Outline the DesignBegin by using Vallejo model colour black to outline the freehand design on the rear of Master Lazarus’s cloak.Take note of any folds or challenges in the cloak’s sculpt, as these may impact the symmetry and centralization of the design.Step 3: Adjust PlacementAddress any issues with the cloak’s fold or bias to one side by adjusting the placement of the design.Consider the visibility of the main focal points, such as a sword, and ensure they are not hidden within creases.Step 4: Start the Freehand WorkUse black as a base colour for the freehand work, focusing on creating the overall shapes and outlines of the design.The black background allows for easier corrections, but the details should be lighter than black to ensure visibility.Step 5: Refine the DesignRefine the shapes and details by using a 50/50 mix of dark blue pale and dark gray.Take your time with the refining stage, using the tip of the brush to add intricate details to feathers and other elements.Step 6: Add Organic DetailsIntroduce organic details, such as veins in the feathers, to make the freehand design look more natural.Make small tweaks to enhance the overall appearance, ensuring the design is visually appealing.Step 7: Focus on Feather HighlightsHighlight the feathers using a 50/50 mix of dark blue pale and dark gray, focusing on the tips and edges.Avoid making the edge highlights too obvious, maintaining the illusion of feathers.Step 8: Work on Sword HiltMove on to the detailed and complex freehand on the hilt of the sword, planning for a non-metallic effect.Use various shades, starting with dark blue pale and gradually adding pale gray blue for highlights.Step 9: Create Texture and HighlightsBuild texture by creating small marks and bumps on the hilt, paying attention to the shapes and transitions.Add dots with white on the brightest parts to enhance contrast and create a more dynamic effect.Step 10: Final TouchesMake final adjustments as needed, ensuring that the freehand complements the overall model without overshadowing it.Take breaks when necessary to maintain focus and avoid painting when fatigued.Note: Keep an eye on the wet palette, especially in warmer conditions, to prevent paint from thickening and affecting the painting process.
Stage 8: Complex Cloak – Back Freehand Part Two
This video is part 2 for how to paint the custom Dark Angel symbol on the rear of Master Lazarus of the Dark Angels.
The following paints were used: Vallejo: Dark Grey, Blue Grey Pale, Pale Grey Blue, Heavy Goldbrown, Ice Yellow, English Uniform, Black Games Workshop: Mournfang Brown P3: Morrow White
Step-by-Step – How to paint freehand on Master Lazarus of the Dark Angels
Step 1: PreparationEnsure you have the necessary paints ready: Dark Grey, Blue Grey Pale, Pale Grey Blue, Heavy Goldbrown, Nuln Oil, Pale Grey Blue, P3 Morrow White, and a 50/50 mix of Heavy Gold Brown and Ice Yellow.Step 3: Start with Skull and CircleUse English Uniform to roughly block in the skull and circle in the center of the cloak.Use Nuln Oil to define eye sockets and nose hole.Cut into shapes with black paint to refine details.Step 4: Gold Non-Metallic SkullHighlight skull with a mix of Heavy Goldbrown and Ice Yellow.Emphasize high contrast, especially on the forehead for a non-metallic look.Step 5: Detailing the BladePaint the blade using Blue, Blue Grey Pale, a 50/50 mix of Dark Gray and Pale Blue, and Pale Gray Blue.Consider the highlights on the blade separately to ensure clarity.Step 6: Refining the DesignCut back into the design with fluid black paint for sharper edges and finer highlights.Emphasize the central section of the blade, adjusting highlights accordingly.Add random highlights with Blue Grey Pale to enhance the non-metallic look.Step 7: Wings and TrimPaint the second wing with slight variations, maintaining an organic feel.Cut into black edges for sharpness, especially at the bottom of the cloak.Highlight the gold trim, aligning it with the natural highlights on the cloak.Step 8: Final TouchesCheck for any faults or blobs and address them.Avoid making highlights too bright, maintaining a realistic feel.Consider adding small details for visual interest without overshadowing the main design.
All videos are recorded in HD 1080p or higher – use full screen for the full effect and let the video load completely.
More of my latest full character tutorials:
Videos Not Showing?
To view any of my paid tutorials, you need to be a member of the website – please click below to log in or join the site.
Not sure about joining just yet? Check out my Youtube for all my free tutorials or sign up as a free “friend” member on this site and visit the free videos page!
If you’d prefer to support me on Patreon, please visit: https://www.patreon.com/RichardGray [...]
Nagash
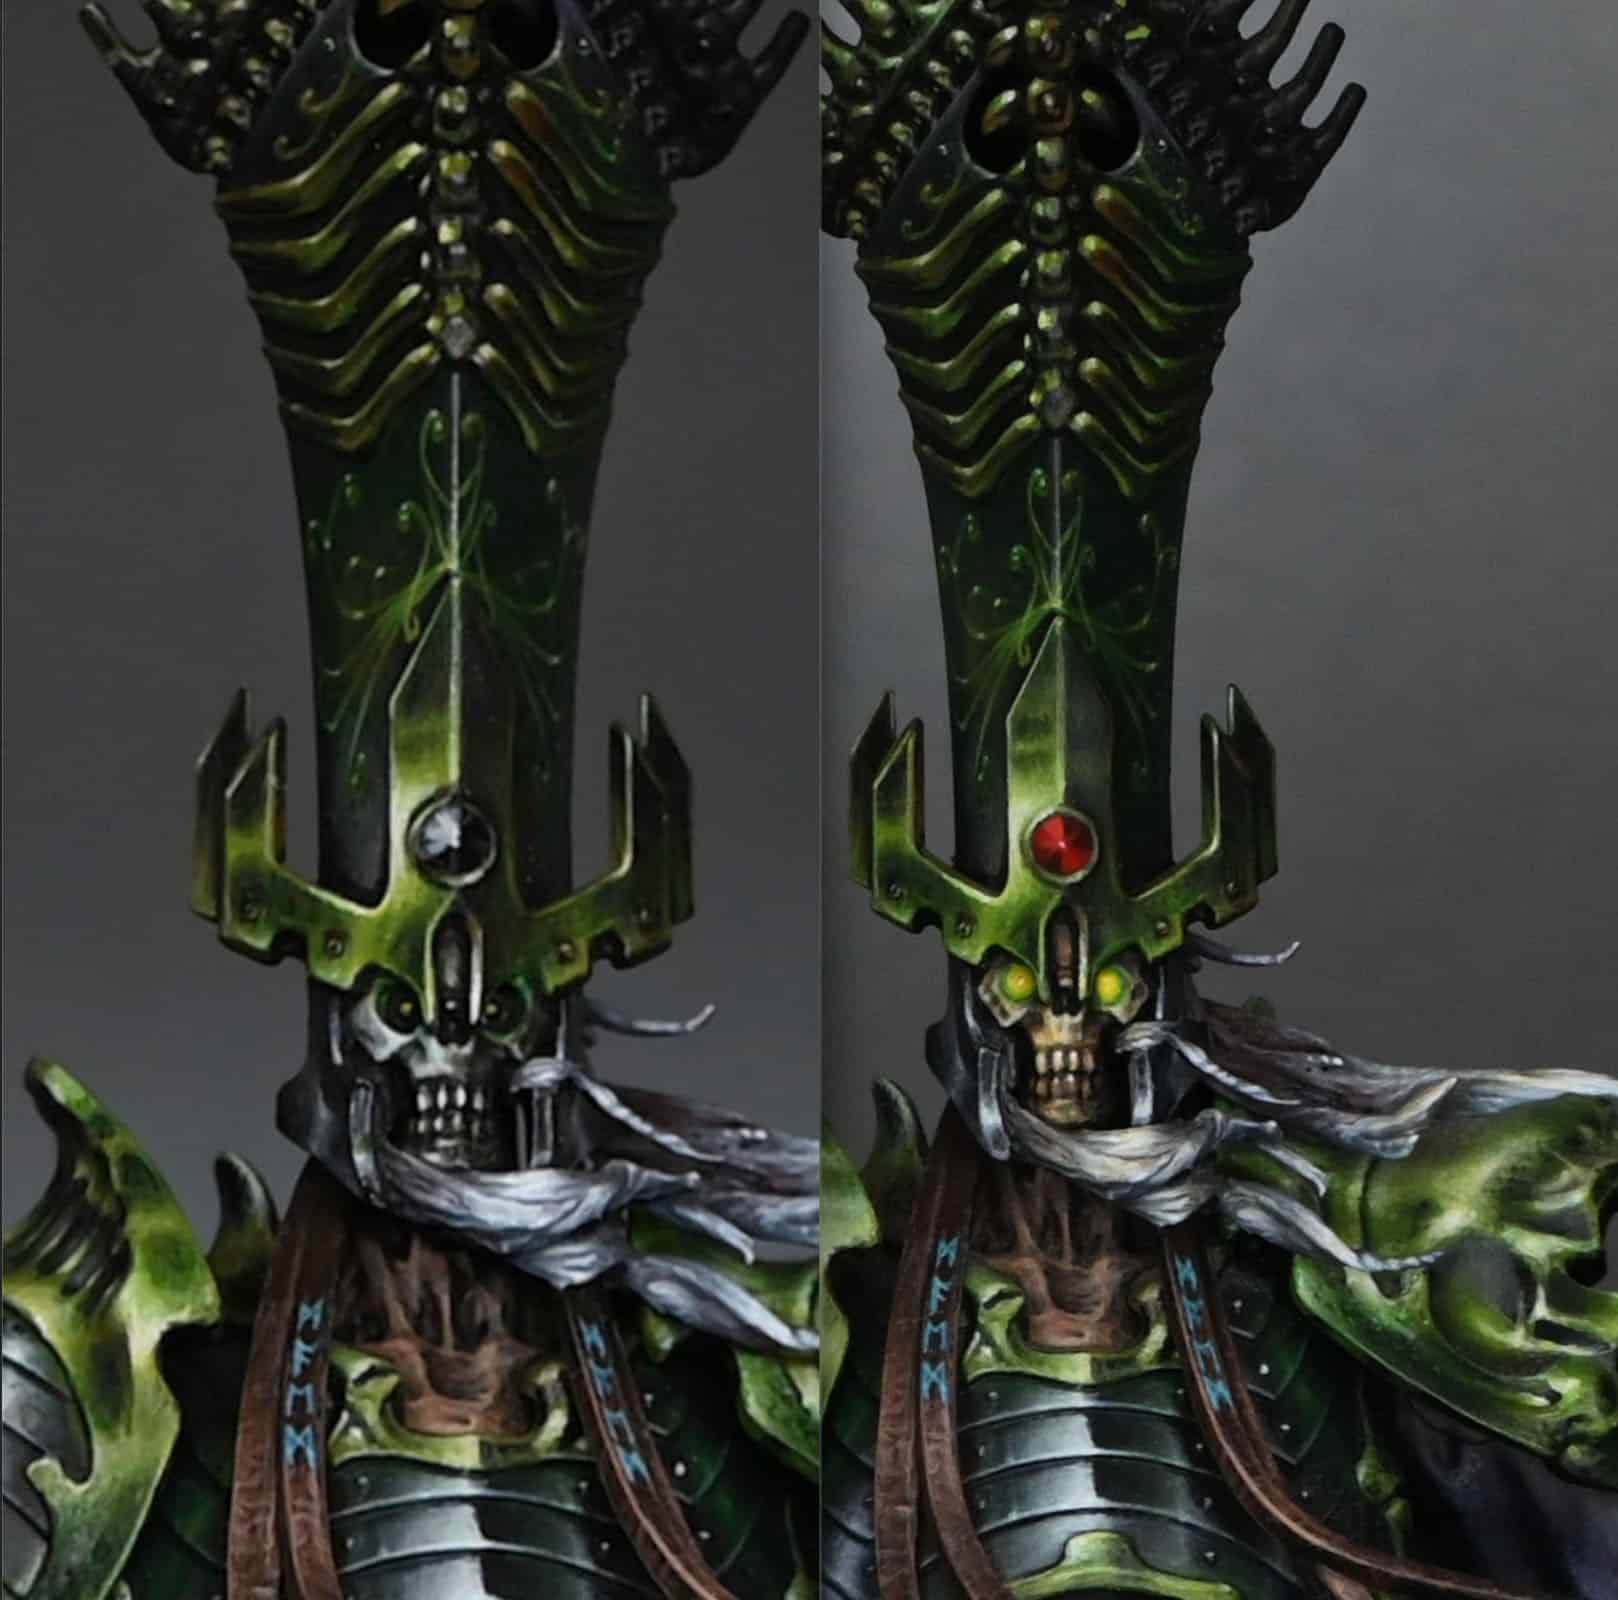
This is the first in a new series of videos for the Nagash repaint to get him suitable to be a Golden Demon entry. I’m not sure if he’ll end up as a diorama or a large model, but in either case there will be a lot of work needed!
Nagash Repaint by Richard Gray – Video Part One: Nagash Head, Eyes and Hat Gem
Nagash Repaint by Richard Gray – Materials Needed:
Paints: Games Workshop (Balor Brown, Morghast Bone, Screaming Skull, Yriel Yellow, Moot Green, Mephiston Red, Rhinox Hide, Evil Sunz Scarlet, Wild Rider Red), P3 (Iosen Green), Kimera Colours (White)
Tools: Scalpel, PVA glue, Green Stuff (epoxy putty), various brushes, head-mounted magnifier
Preparation:
Initial Cleanup: I began by reassessing the model’s current state. For areas like the leather loin cloth, remove them if they no longer meet the desired quality. Sand down any rough edges where modifications were removed.
Modifying Eye Sockets:
Filling Eye Sockets: Instead of using PVA glue for its tendency to shrink, I opted for Green Stuff to fill the eye sockets of Nagash. Ensure the Green Stuff is smoothly applied, using the blunt end of a paintbrush to achieve a concave shape within the sockets.
Base Colour for Eyes: Apply two to three layers of Kimera White inside the now shallow eye sockets. This creates a solid and clean white base.
Adding Glow Effects: Due to the reduced depth, enhancing the glow effect is trickier. Use a mix of Yriel Yellow and White to create a transition shade, apply it close to the white base, then layer pure Yriel Yellow followed by Moot Green, focusing on the edges of the sockets.
Repainting the Face:
Base Facial Details: Start with Balor Brown thinned slightly for a glaze over the face, enhancing the warmth of the underlying colours.
Detailing with Lighter Tones: Progressively lighten the face using Morghast Bone and Screaming Skull, avoiding too bright highlights to prevent clashing with other high points on the model.
Teeth Enhancement: Focus on making the front teeth stand out by applying concentrated light tones, adding depth and interest.
Modifying and Painting the Crown:
Taking a Risk with the Gemstone: I chose to repaint the gem on Nagash’s crown in a vibrant red. Base the gem with a mix of Mephiston Red and Rhinox Hide to subdue the red.
Building up Red Tones: Layer up through Evil Sunz Scarlet and Wild Rider Red, adding White to the highest highlights to achieve a shiny, reflective look on the facets of the gem.
Finishing Touches:
Final Adjustments: Ensure all modified areas blend seamlessly with the existing paintwork. This might include adding shadows and highlights to redefined areas like the eye sockets and crown.
Sealing the Model: Once satisfied with the repaint, seal the model with a matte varnish to protect the paintwork and reduce any unwanted glossiness from previous layers.
I’m excited to continue this series and share more about the ongoing transformations Nagash will undergo. Thank you for following along, and I look forward to presenting an even more impressive version of Nagash in the future!
Previous Nagash Tutorials!
If you don’t have an account here on my website, please sign up here! I have over 350 video tutorials with steps and tips, plus a selection of PDFs. If you are not sure about joining, you can explore my free videos with a free membership, or take the plunge and become a full subscriber for full access.
If you’d prefer to support me on Patreon, please visit: https://www.patreon.com/RichardGray [...]
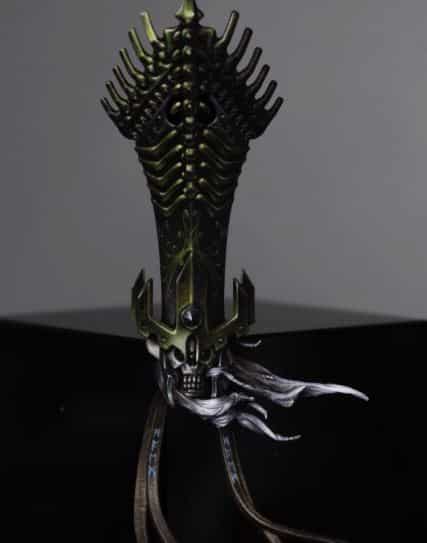
My detailed how to paint the Nagash helmet tutorials, with videos plus step by step guide and tips with full paints used.
Video – How to Paint the Nagash Helmet Part OnePaints and Materials UsedPaintsBrushesOther MaterialsSteps and Tips on How to Paint the Nagash HelmetVideo – How to Paint the Nagash Helmet Part TwoPaintsSteps and Tips on How to Paint the Nagash Helmet (Part Two)Video – How to Paint the Nagash Freehand Swirls/FiligreePaintsTips for the Freehand FiligreeVideo – How to Paint the Nagash Helmet Leather Strips and RunesPaintsStep and Tips on How to Paint the Nagash Helmet Leather Strips and RunesFor all of my Nagash Tutorials in one place, go hereExplore More Nagash Technique Tutorials
Video – How to Paint the Nagash Helmet Part One
In this tutorial, we’ll focus on painting the metallic areas of Nagash, specifically the head. The colours used for this tutorial are a bit different from the standard, and in the video I discuss techniques in more detail to achieve a textured, refined finish.
Paints and Materials Used
Paints
Vallejo:
English Uniform (VX-88)
Golden Olive (Elysian Green mixed with Yriel Yellow)
Yellow Green (Dorn Yellow mixed with Moot Green)
Ice Yellow (Dorn Yellow)
Ivory (Screaming Skull)
Games Workshop:
Rhinox Hide
Abaddon Black
Naggaroth Night (for future use)
Brushes
Fine detail brush (suitable for intricate work and small highlights)
Medium-sized brush (for larger areas and base coating)
Wet palette (to keep paints fresh and workable)
Other Materials
Wet palette
Green stuff (for sculpting additional details, if desired)
Painting lamp (for consistent lighting during the painting process)
Miniature holder (for ease of handling and painting)
Steps and Tips on How to Paint the Nagash Helmet
Prepare the Model: Ensure your miniature is assembled and primed appropriately for painting. I’ve used a black primer for my Nagash.
Block in the Base Colour: Start by blocking in the main highlights using Vallejo’s English Uniform (VX-88). Apply this colour where you want the primary light source to hit, focusing on a top-left orientation.Be mindful not to make the colour too opaque; a slight texture is desirable for the metallic effect.
Understanding Colour Choices: The choice of metallic colours doesn’t have to be conventional. For this model, I went for a dark and moody theme inspired by the artwork of Nagash.My chosen metallic shades include Golden Olive, Yellow Green, and Ice Yellow from Vallejo, along with Rhinox Hide and Abaddon Black from Games Workshop.
Building Layers of Colour: Use Golden Olive to build layers on top of the English Uniform, focusing on areas that require additional depth and shading.The opacity of Vallejo paints allows for strong, defined marks, ideal for creating small details and textures.
Creating Texture and Depth: With each layer, gradually introduce lighter shades such as Yellow Green and Ice Yellow to enhance highlights and add dimension to the metallic surfaces.Keep in mind the direction of light and focus on maintaining a balance between light and shadow.
Understanding Volume and Light: Highlighting metallic surfaces requires understanding how light interacts with volume. Unlike standard blending techniques, aim for distinct contrasts between light and shadow. Make sure you consider how light reflects off different surfaces, creating highlights and shadows of varying intensities. I like to use lots of real-life references of metal to study as I paint.
Achieving a Moody Atmosphere: For an undead character like Nagash, aim for a dark, desaturated overall appearance. Use strong, small highlights strategically to draw attention to focal points.
Avoid smooth blending; purposefully textured painting adds depth and character to the model.
Experimenting with Glazing TechniquesExperiment with glazing techniques to blend colours seamlessly and soften transitions between different areas of the model.Glazing allows for subtle colour adjustments and can help unify the overall color scheme, creating a harmonious visual effect.
Video – How to Paint the Nagash Helmet Part Two
In this part, we’ll focus on painting the skull face, hair, and bone structures atop the hat.
Paints
Vallejo Model Colour: English Uniform (VX-88), Golden Olive (Elysian Green mixed with Yriel Yellow), Yellow Green (Dorn Yellow mixed with Moot Green), Ice Yellow (Dorn Yellow), Ivory (Screaming Skull), Neutral Grey (Mechanicus Standard Grey), Pale Grey Blue (Grey Seer mixed with Blue Horror)
Games Workshop: Rhinox Hide, Warpstone Green Contrast, Deathclaw Brown
P3: Morrow White
Steps and Tips on How to Paint the Nagash Helmet (Part Two)
Paint the Bone Structures: Using Vallejo’s English Uniform (VX-88), begin by painting the bone structures on top of the hat. Focus on picking out the highlights, keeping in mind the top-left orientation of the light source. Apply the paint carefully to emphasize the edges and contours of the bones.Enhance the Bone Texture: Utilise Golden Olive (a mix of Elysian Green and Yriel Yellow) to add depth and shading to the bone structures. Concentrate on areas that require additional definition, such as the joints and sockets. Remember to maintain a balance between light and shadow to create a realistic, textured effect.Add Highlights: With Yellow Green (a mix of Dorn Yellow and Moot Green), further highlight the bone structures, focusing on the areas where light would naturally hit. Pay attention to the left-hand side of the model to create a stronger contrast and emphasise the lighting direction.Refine the Highlights: Using Ice Yellow (Dorn Yellow), continue to build up the highlights on the bone structures, especially on the left-hand side. Gradually increase the brightness of the highlights towards the center of the model to draw attention to focal points.Adjusting with Rhinox Hide: If necessary, use Rhinox Hide to refine any areas where you’ve made mistakes or to add depth to the shadows. The translucency of this paint allows for easy blending and adjustment while maintaining a natural look.Painting the Skull Face: For the skull face, start with Deathclaw Brown, focusing on creating a weathered, textured appearance. Apply the paint in a rough, uneven manner to mimic the natural wear and tear of ancient bones.Highlighting the Skull: Gradually add highlights to the skull using Morghast Bone. Concentrate the highlights towards the left-hand side of the face to maintain consistency with the overall lighting scheme. Ensure the highlights stand out against the darker base colour to create depth and dimension.Adding Detail to the Eyes: Use a small amount of Morghast Bone to pick out the details around the eyes, emphasising the cheekbones and brow ridge. Be mindful of the sculpted eye sockets and adjust the highlights accordingly to enhance the overall appearance.Painting the Hair: Begin painting the hair with Neutral Grey, focusing on the large, clumpy strands. Keep the highlights towards the top side of the hair to simulate light hitting the surface. Apply the paint in a rough, textured manner to achieve a realistic look.Adding Texture to the Hair: Continue to build up the texture of the hair using Pale Grey Blue. Emphasize the highlights on the top side of the hair while leaving the underside darker to create depth and volume.Refining the Highlights: Using Morrow White sparingly, refine the highlights on the hair strands to add contrast and dimension. Focus on the areas closest to the face to draw attention to the focal points.
Video – How to Paint the Nagash Freehand Swirls/Filigree
Paints
Vallejo: English Uniform (VX-88), Golden Olive (Elysian Green mixed with Yriel Yellow), Yellow Green (Dorn Yellow mixed with Moot Green), Ivory (Screaming Skull), Neutral Grey (Mechanicus Standard Grey), Pale Grey Blue (Grey Seer mixed with Blue Horror)Games Workshop: Warpstone Green Contrast, Abaddon BlackP3: Morrow White
Tips for the Freehand Filigree
Base Coat: Apply a base coat of Vallejo English Uniform (VX-88) to start the filigree on the Nagash hat. Ensure even coverage and allow it to dry completely.
Highlighting with Yellow-Green: Mix Vallejo Yellow Green (Dorn Yellow mixed with Moot Green) with a small amount of white to increase opacity. Use a fine tip brush to apply highlights to what would be the raised areas of the filigree. Focus on creating sharp lines and highlights to enhance the detail.
Adding Ivory Highlight Dots: Using Vallejo Ivory (Screaming Skull), create small highlight dots on the filigree. These dots should be strategically placed on curves and extreme curve points to simulate shine and reflectivity. Ensure consistency in placement for a cohesive look.
Enhancing Contrast with Black: With Games Workshop Abaddon Black, carefully outline the filigree details to enhance contrast and definition. Use a fine tip brush and steady hand to create clean lines and borders.
Glazing with Warpstone Green Contrast: Thin Games Workshop Warpstone Green Contrast with water (about two parts water to one part paint) to create a glaze. Apply the glaze over the filigree to enhance shading and highlights.
Final Touches: Use P3 Morrow White to add final highlights to the filigree, focusing on the most raised and reflective areas. Ensure consistency and restraint with the white highlights to avoid overpowering the overall effect.
Video – How to Paint the Nagash Helmet Leather Strips and Runes
By following these steps and techniques, you can effectively paint leather strips and runes on your Nagash (or any other model, really!) adding depth, texture, and character.
Paints
Games Workshop: Rhinox Hide, Mournfang Brown, Cadian Fleshtone, Temple Guard Blue, Barroth Blue.
Step and Tips on How to Paint the Nagash Helmet Leather Strips and Runes
Base Coat: Ensure that the leather strips on the Nagash helmet are properly primed with black primer. Once primed, apply a base coat of Games Workshop Mournfang Brown to the leather strips. This will serve as the foundation for the leather texture.
Highlighting with Mournfang Brown: Using Games Workshop Mournfang Brown, begin highlighting the curves and raised areas of the leather strips. Apply the paint in a textured manner, focusing on creating depth and dimension to simulate the appearance of weathered leather. Don’t worry about perfect blending; imperfections add to the realism.
Layering with Cadian Fleshtone: Next, switch to Games Workshop Cadian Fleshtone and continue highlighting the leather strips. Apply this paint more sparingly, focusing on the most raised areas and curves to enhance the texture. The tonal contrast between Mournfang Brown and Cadian Fleshtone will create depth and visual interest.
Glazing with Rhinox Hide: Thin Games Workshop Rhinox Hide with water to create a glaze. Apply the glaze over the highlighted areas to tone down the highlights and add depth to the leather texture. Focus on applying the glaze in the shadowed areas and along the edges of the leather strips for a realistic look.
Painting Runes: Using Games Workshop Temple Guard Blue and Barroth Blue, paint the runes onto the leather strips. Ensure that the runes are clearly visible and neatly painted. Use a fine tip brush and steady hand to create clean lines and shapes. Less is more; avoid overcrowding the leather strips with too many runes to maintain balance.
Touching Up: Review the painted leather strips and runes, making any necessary touch-ups or adjustments. Ensure consistency in highlighting placement and rune design throughout the miniature model.
For all of my Nagash Tutorials in one place, go here
Nagash, Supreme Lord of the Undead
Nagash, Supreme Lord of the Undead is the father of necromancy. I created a series of detailed tutorials on how I painted him.
Watch Now
Explore More Nagash Technique Tutorials
If you don’t have an account here on my website, please sign up here! I have over 350 video tutorials with steps and tips, plus a selection of PDFs. If you are not sure about joining, you can explore my free videos with a free membership, or take the plunge and become a full subscriber for full access.
If you’d prefer to support me on Patreon, please visit: https://www.patreon.com/RichardGray [...]
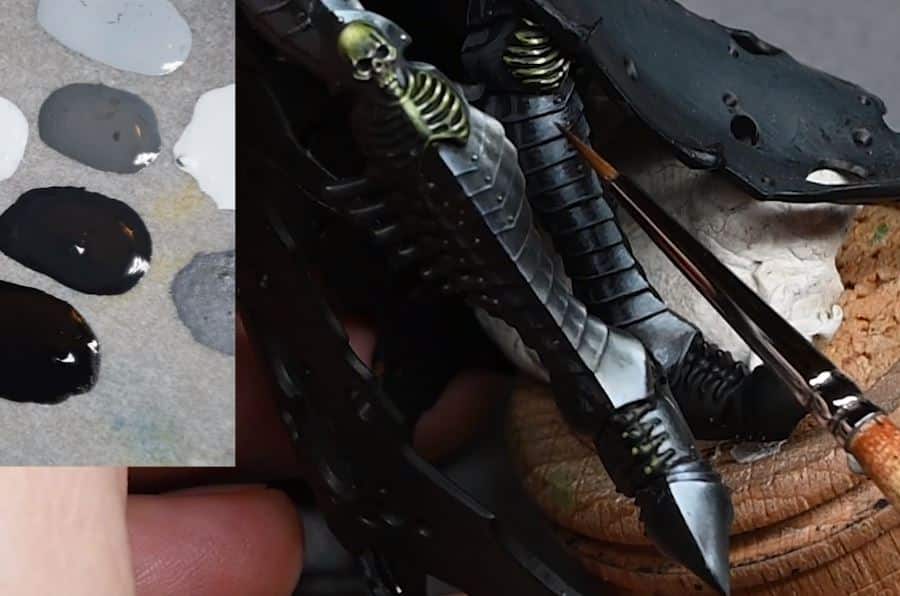
A video tutorial showing the techniques I used to paint the leg armour on Nagash.
All videos are recorded in HD 1080p or higher – use full screen for the full effect and let the video load completely.
Need more Nagash? Click below:
Videos Not Showing?
To view any of my paid tutorials, you need to be a member of the website – please click below to log in or join the site.
Not sure about joining just yet? Check out my Youtube for all my free tutorials or sign up as a free “friend” member on this site and visit the free videos page!
If you’d prefer to support me on Patreon, please visit: https://www.patreon.com/RichardGray [...]
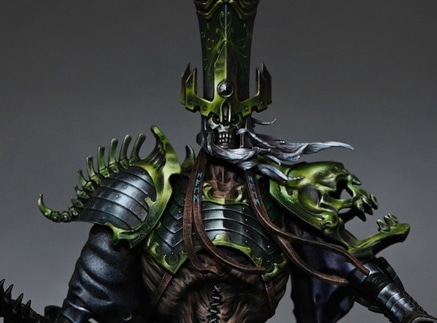
A video tutorial showing the techniques I used to paint Nagashs’ delicious looking skin.
Nagash Skin
Need more Nagash? Click below:
Videos Not Showing?
To view any of my paid tutorials, you need to be a member of the website – please click below to log in or join the site.
Not sure about joining just yet? Check out my Youtube for all my free tutorials or sign up as a free “friend” member on this site and visit the free videos page!
If you’d prefer to support me on Patreon, please visit: https://www.patreon.com/RichardGray [...]
Video tutorials showing the techniques I used to paint Nagashes armour.
Skull Shoulder Pads
Chest Armour
All videos are recorded in HD 1080p or higher – use full screen for the full effect and let the video load completely.
Leg Armour
Need more Nagash? Click below:
If you don’t have an account here on my website, please sign up here! I have over 350 video tutorials with steps and tips, plus a selection of PDFs. If you are not sure about joining, you can explore my free videos with a free membership, or take the plunge and become a full subscriber for full access.
If you’d prefer to support me on Patreon, please visit: https://www.patreon.com/RichardGray [...]
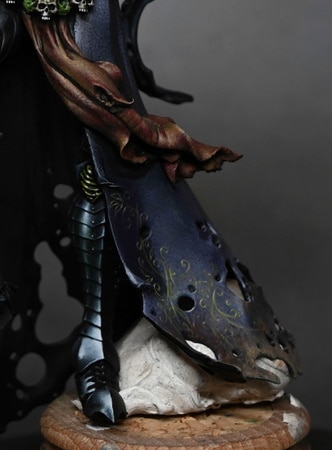
A video tutorial showing the techniques I used to paint the filigree pattern on Nagshes dress and weathering.
Dress basics and stippling
Filigree Pattern
All videos are recorded in HD 1080p or higher – use full screen for the full effect and let the video load completely.
Weathering
Need more Nagash? Click below:
Videos Not Showing?
To view any of my paid tutorials, you need to be a member of the website – please click below to log in or join the site.
Not sure about joining just yet? Check out my Youtube for all my free tutorials or sign up as a free “friend” member on this site and visit the free videos page!
If you’d prefer to support me on Patreon, please visit: https://www.patreon.com/RichardGray [...]
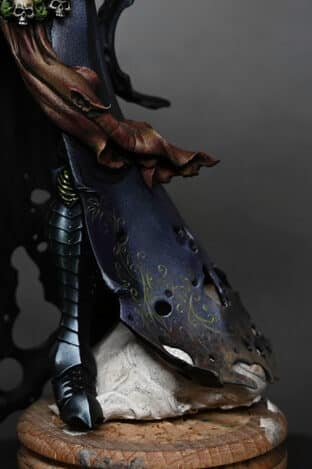
A video tutorial showing the techniques I used to paint this weathered cloth and leather effect on Nagash.
All videos are recorded in HD 1080p or higher – use full screen for the full effect and let the video load completely.
Need more Nagash? Click below:
Videos Not Showing?
To view any of my paid tutorials, you need to be a member of the website – please click below to log in or join the site.
Not sure about joining just yet? Check out my Youtube for all my free tutorials or sign up as a free “friend” member on this site and visit the free videos page!
If you’d prefer to support me on Patreon, please visit: https://www.patreon.com/RichardGray [...]
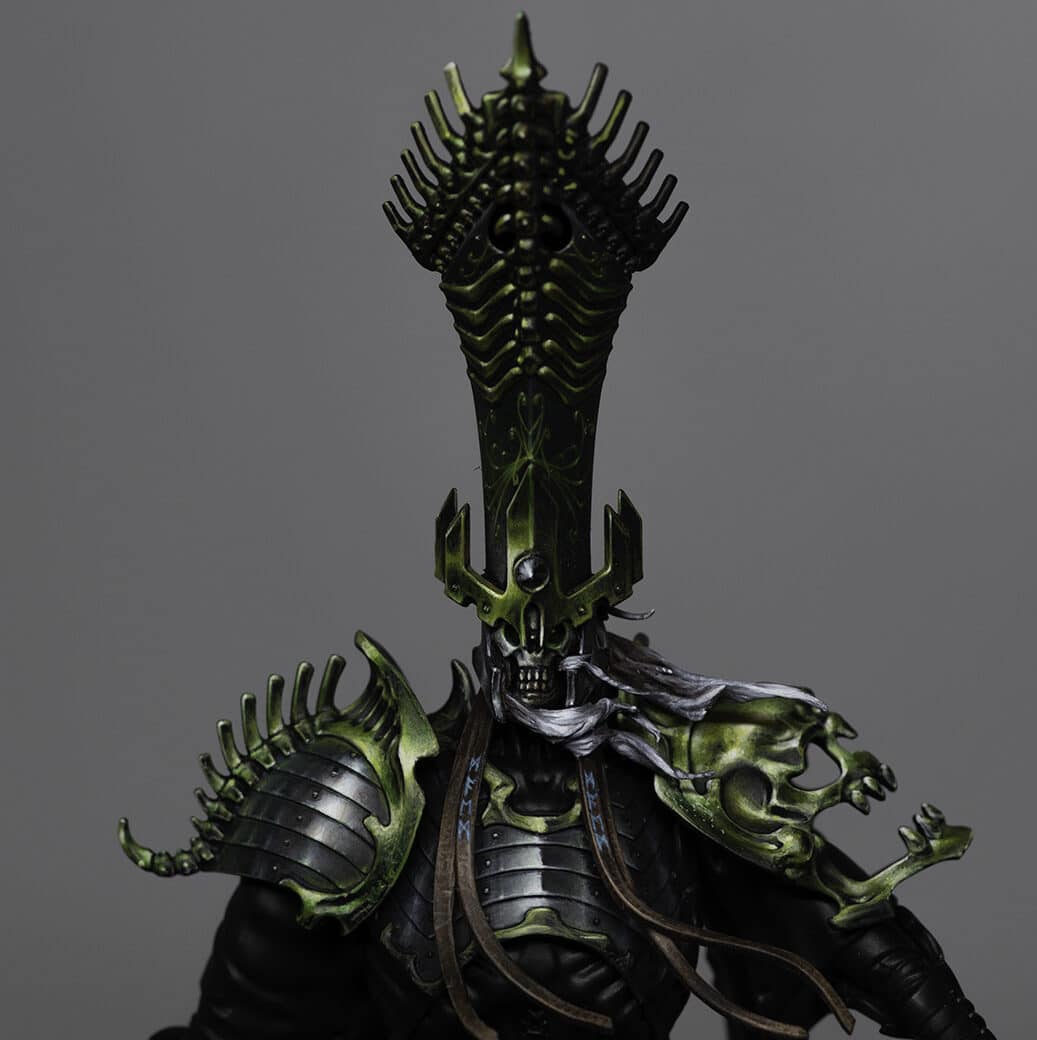
A set of video tutorials showing the many techniques I have used in painting this model.
Staff
All videos are recorded in HD 1080p or higher – use full screen for the full effect and let the video load completely.
Sword
Skin
Dress
Skull Shoulder Armour
Chest Armour One
Chest Armour Two
Leg Armour
Nagash Loincloth
Video – How to Paint the Nagash Helmet Part One
In this tutorial, we’ll focus on painting the metallic areas of Nagash, specifically the head. The colours used for this tutorial are a bit different from the standard, and in the video I discuss techniques in more detail to achieve a textured, refined finish.
Paints and Materials Used
Paints
Vallejo:
English Uniform (VX-88)
Golden Olive (Elysian Green mixed with Yriel Yellow)
Yellow Green (Dorn Yellow mixed with Moot Green)
Ice Yellow (Dorn Yellow)
Ivory (Screaming Skull)
Games Workshop:
Rhinox Hide
Abaddon Black
Naggaroth Night (for future use)
Brushes
Fine detail brush (suitable for intricate work and small highlights)
Medium-sized brush (for larger areas and base coating)
Wet palette (to keep paints fresh and workable)
Other Materials
Wet palette
Green stuff (for sculpting additional details, if desired)
Painting lamp (for consistent lighting during the painting process)
Miniature holder (for ease of handling and painting)
Steps and Tips on How to Paint the Nagash Helmet
Prepare the Model: Ensure your miniature is assembled and primed appropriately for painting. I’ve used a black primer for my Nagash.
Block in the Base Colour: Start by blocking in the main highlights using Vallejo’s English Uniform (VX-88). Apply this colour where you want the primary light source to hit, focusing on a top-left orientation.Be mindful not to make the colour too opaque; a slight texture is desirable for the metallic effect.
Understanding Colour Choices: The choice of metallic colours doesn’t have to be conventional. For this model, I went for a dark and moody theme inspired by the artwork of Nagash.My chosen metallic shades include Golden Olive, Yellow Green, and Ice Yellow from Vallejo, along with Rhinox Hide and Abaddon Black from Games Workshop.
Building Layers of Colour: Use Golden Olive to build layers on top of the English Uniform, focusing on areas that require additional depth and shading.The opacity of Vallejo paints allows for strong, defined marks, ideal for creating small details and textures.
Creating Texture and Depth: With each layer, gradually introduce lighter shades such as Yellow Green and Ice Yellow to enhance highlights and add dimension to the metallic surfaces.Keep in mind the direction of light and focus on maintaining a balance between light and shadow.
Understanding Volume and Light: Highlighting metallic surfaces requires understanding how light interacts with volume. Unlike standard blending techniques, aim for distinct contrasts between light and shadow. Make sure you consider how light reflects off different surfaces, creating highlights and shadows of varying intensities. I like to use lots of real-life references of metal to study as I paint.
Achieving a Moody Atmosphere: For an undead character like Nagash, aim for a dark, desaturated overall appearance. Use strong, small highlights strategically to draw attention to focal points.
Avoid smooth blending; purposefully textured painting adds depth and character to the model.
Experimenting with Glazing TechniquesExperiment with glazing techniques to blend colours seamlessly and soften transitions between different areas of the model.Glazing allows for subtle colour adjustments and can help unify the overall color scheme, creating a harmonious visual effect.
Video – How to Paint the Nagash Helmet Part Two
In this part, we’ll focus on painting the skull face, hair, and bone structures atop the hat.
Paints
Vallejo Model Colour: English Uniform (VX-88), Golden Olive (Elysian Green mixed with Yriel Yellow), Yellow Green (Dorn Yellow mixed with Moot Green), Ice Yellow (Dorn Yellow), Ivory (Screaming Skull), Neutral Grey (Mechanicus Standard Grey), Pale Grey Blue (Grey Seer mixed with Blue Horror)
Games Workshop: Rhinox Hide, Warpstone Green Contrast, Deathclaw Brown
P3: Morrow White
Steps and Tips on How to Paint the Nagash Helmet (Part Two)
Paint the Bone Structures: Using Vallejo’s English Uniform (VX-88), begin by painting the bone structures on top of the hat. Focus on picking out the highlights, keeping in mind the top-left orientation of the light source. Apply the paint carefully to emphasize the edges and contours of the bones.Enhance the Bone Texture: Utilise Golden Olive (a mix of Elysian Green and Yriel Yellow) to add depth and shading to the bone structures. Concentrate on areas that require additional definition, such as the joints and sockets. Remember to maintain a balance between light and shadow to create a realistic, textured effect.Add Highlights: With Yellow Green (a mix of Dorn Yellow and Moot Green), further highlight the bone structures, focusing on the areas where light would naturally hit. Pay attention to the left-hand side of the model to create a stronger contrast and emphasise the lighting direction.Refine the Highlights: Using Ice Yellow (Dorn Yellow), continue to build up the highlights on the bone structures, especially on the left-hand side. Gradually increase the brightness of the highlights towards the center of the model to draw attention to focal points.Adjusting with Rhinox Hide: If necessary, use Rhinox Hide to refine any areas where you’ve made mistakes or to add depth to the shadows. The translucency of this paint allows for easy blending and adjustment while maintaining a natural look.Painting the Skull Face: For the skull face, start with Deathclaw Brown, focusing on creating a weathered, textured appearance. Apply the paint in a rough, uneven manner to mimic the natural wear and tear of ancient bones.Highlighting the Skull: Gradually add highlights to the skull using Morghast Bone. Concentrate the highlights towards the left-hand side of the face to maintain consistency with the overall lighting scheme. Ensure the highlights stand out against the darker base colour to create depth and dimension.Adding Detail to the Eyes: Use a small amount of Morghast Bone to pick out the details around the eyes, emphasising the cheekbones and brow ridge. Be mindful of the sculpted eye sockets and adjust the highlights accordingly to enhance the overall appearance.Painting the Hair: Begin painting the hair with Neutral Grey, focusing on the large, clumpy strands. Keep the highlights towards the top side of the hair to simulate light hitting the surface. Apply the paint in a rough, textured manner to achieve a realistic look.Adding Texture to the Hair: Continue to build up the texture of the hair using Pale Grey Blue. Emphasize the highlights on the top side of the hair while leaving the underside darker to create depth and volume.Refining the Highlights: Using Morrow White sparingly, refine the highlights on the hair strands to add contrast and dimension. Focus on the areas closest to the face to draw attention to the focal points.
Video – How to Paint the Nagash Freehand Swirls/Filigree
Paints
Vallejo: English Uniform (VX-88), Golden Olive (Elysian Green mixed with Yriel Yellow), Yellow Green (Dorn Yellow mixed with Moot Green), Ivory (Screaming Skull), Neutral Grey (Mechanicus Standard Grey), Pale Grey Blue (Grey Seer mixed with Blue Horror)Games Workshop: Warpstone Green Contrast, Abaddon BlackP3: Morrow White
Tips for the Freehand Filigree
Base Coat: Apply a base coat of Vallejo English Uniform (VX-88) to start the filigree on the Nagash hat. Ensure even coverage and allow it to dry completely.
Highlighting with Yellow-Green: Mix Vallejo Yellow Green (Dorn Yellow mixed with Moot Green) with a small amount of white to increase opacity. Use a fine tip brush to apply highlights to what would be the raised areas of the filigree. Focus on creating sharp lines and highlights to enhance the detail.
Adding Ivory Highlight Dots: Using Vallejo Ivory (Screaming Skull), create small highlight dots on the filigree. These dots should be strategically placed on curves and extreme curve points to simulate shine and reflectivity. Ensure consistency in placement for a cohesive look.
Enhancing Contrast with Black: With Games Workshop Abaddon Black, carefully outline the filigree details to enhance contrast and definition. Use a fine tip brush and steady hand to create clean lines and borders.
Glazing with Warpstone Green Contrast: Thin Games Workshop Warpstone Green Contrast with water (about two parts water to one part paint) to create a glaze. Apply the glaze over the filigree to enhance shading and highlights.
Final Touches: Use P3 Morrow White to add final highlights to the filigree, focusing on the most raised and reflective areas. Ensure consistency and restraint with the white highlights to avoid overpowering the overall effect.
Video – How to Paint the Nagash Helmet Leather Strips and Runes
By following these steps and techniques, you can effectively paint leather strips and runes on your Nagash (or any other model, really!) adding depth, texture, and character.
Paints
Games Workshop: Rhinox Hide, Mournfang Brown, Cadian Fleshtone, Temple Guard Blue, Barroth Blue.
Step and Tips on How to Paint the Nagash Helmet Leather Strips and Runes
Base Coat: Ensure that the leather strips on the Nagash helmet are properly primed with black primer. Once primed, apply a base coat of Games Workshop Mournfang Brown to the leather strips. This will serve as the foundation for the leather texture.
Highlighting with Mournfang Brown: Using Games Workshop Mournfang Brown, begin highlighting the curves and raised areas of the leather strips. Apply the paint in a textured manner, focusing on creating depth and dimension to simulate the appearance of weathered leather. Don’t worry about perfect blending; imperfections add to the realism.
Layering with Cadian Fleshtone: Next, switch to Games Workshop Cadian Fleshtone and continue highlighting the leather strips. Apply this paint more sparingly, focusing on the most raised areas and curves to enhance the texture. The tonal contrast between Mournfang Brown and Cadian Fleshtone will create depth and visual interest.
Glazing with Rhinox Hide: Thin Games Workshop Rhinox Hide with water to create a glaze. Apply the glaze over the highlighted areas to tone down the highlights and add depth to the leather texture. Focus on applying the glaze in the shadowed areas and along the edges of the leather strips for a realistic look.
Painting Runes: Using Games Workshop Temple Guard Blue and Barroth Blue, paint the runes onto the leather strips. Ensure that the runes are clearly visible and neatly painted. Use a fine tip brush and steady hand to create clean lines and shapes. Less is more; avoid overcrowding the leather strips with too many runes to maintain balance.
Touching Up: Review the painted leather strips and runes, making any necessary touch-ups or adjustments. Ensure consistency in highlighting placement and rune design throughout the miniature model.
Spell Book
Book Part Two
Videos Not Showing?
To view any of my paid tutorials, you need to be a member of the website – please click below to log in or join the site.
Not sure about joining just yet? Check out my Youtube for all my free tutorials or sign up as a free “friend” member on this site and visit the free videos page!
If you’d prefer to support me on Patreon, please visit: https://www.patreon.com/RichardGray [...]
Abaddon
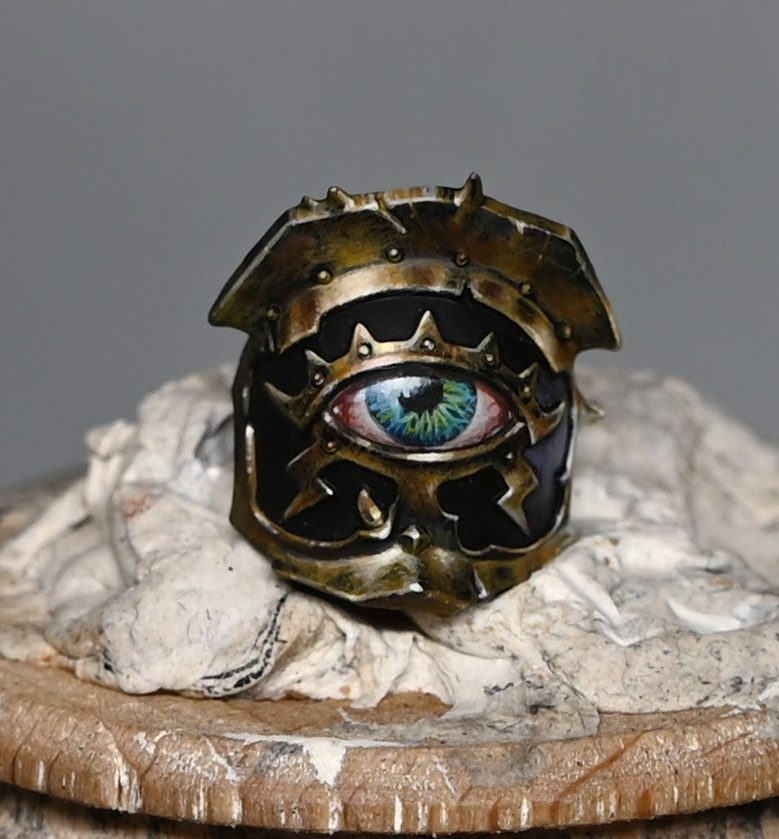
In this tutorial, we’ll focus on How to Paint Abaddon’s Shoulder Pad – painting the freehand eye on Abaddon the Despoiler’s shoulder armour, along with the non-metallic metal (NMM) gold trim. We will use a variety of paints from Games Workshop, Vallejo, and P3.
Video – How to Paint Abaddon’s Shoulder Pad
Step-by-Step Guide – How to Paint Abaddon’s Shoulder Pad
Paints used
Games Workshop: Flash Gitz Yellow, Temple Guard Blue, Kantor Blue, Cadian Fleshtone, Ushabti Bone, Balor Brown, Mournfang Brown, Rhinox Hide
Vallejo: Black, Pale Grey Blue, Ice Yellow
P3: Morrow White
Preparing the Surface
Surface Preparation: Start by filling in any sculpted details you don’t need, such as the V-shape on the shoulder pad, using green stuff. Make sure it’s smooth and even. Prime the entire area with black primer.
Base Coating the Eye
Base Coat: Apply a base coat of Cadian Fleshtone to the entire area where the eye will be. Thin the paint with water (about 1.5 parts water to 1 part paint) and apply 3-4 coats for a smooth, opaque finish.
Painting the Pupil
Pupil Outline: Using Vallejo Model Color Black, paint a small black circle in the center of the eye area. Gradually enlarge the circle, ensuring it stays centered and smooth. Thin the paint with water (about 1.5 parts water to 1 part paint).
Painting the Iris
Base Layer:
Paint the iris using Kantor Blue. This layer doesn’t need to be perfect; it just provides a base for the subsequent layers.
Detailing the Iris:
Use Temple Guard Blue to paint the detailed lines and shapes within the iris. These lines should radiate from the pupil outward. Vary the direction and thickness of the lines to create a natural look. Ensure the paint is thin and the brush tip is sharp for precise lines.
Adding Depth:
Apply Flash Gitz Yellow over the Temple Guard Blue lines to create a greenish tone. Then, use Pale Grey Blue to refine the details and add highlights within the iris.
Highlighting the Eye
White of the Eye:
Highlight the white of the eye using Ushabti Bone. Thin the paint (1.5 parts water to 1 part paint) and build up the highlights towards the center of the eye. Use stippling to blend the transitions smoothly.
Veins:
Paint veins in the eye using Khorne Red. Make sure the lines are thin and subtle. Draw them from the edges towards the center, and then glaze over them with heavily thinned Doombull Brown (about 6 parts water to 1 part paint) to blend them in.
Shadow and Depth:
Add shadows using Rhinox Hide. Thin the paint (about 2 parts water to 1 part paint) and apply it to the upper eyelid area to create a shadow. This adds depth and realism to the eye.
Painting the NMM Gold Trim
Base Layer:
Apply a base coat of XV-88 to the trim. Ensure smooth coverage.
Building Layers:
Layer Balor Brown over XV-88, focusing on the raised areas and edges. Use Mournfang Brown for shadows and deeper areas.
Highlights:
Add highlights with Ice Yellow. Apply them to the upper parts and edges of the trim. Use Pale Grey Blue sparingly to add cool tones to the gold.
Final Highlights:
Use Morrow White for the brightest highlights. Apply small dots and lines to the edges and points for a sharp, reflective effect.
Adding Final Details
Texture and Scratches:
Add texture to the trim with Balor Brown and Mournfang Brown. Use thin, scratchy lines to create a worn effect. Blend these with Mournfang Brown to maintain the warmth of the gold.
Rivets and Reflections:
Highlight rivets with the same colors used for the trim. Ensure they are brighter than the surrounding areas. Add additional reflection points with Ice Yellow and Morrow White to enhance the metallic effect.
Top Tips for Painting Abaddon The Despoiler’s Shoulder Armor Freehand Eye and NMM Gold Trim
Preparation is Key:
Ensure the surface is smooth and primed properly before starting. Filling in any unnecessary sculpted details with green stuff will give you a clean canvas to work on.
Thin Your Paints:
For base coating and detailed work, keep your paints thinned (about 1.5 parts water to 1 part paint). This ensures smooth application and better control.
Start Small:
When painting details like the pupil, start with a small circle and gradually enlarge it. This allows for better control and fewer mistakes.
Layering and Blending:
Build up colours gradually with multiple thin layers. This helps in achieving smooth transitions and realistic shading.
Use a Sharp Brush:
A brush with a good tip is essential for fine details. A size 00 brush works well for intricate work, ensuring precise lines and control.
Check Paint Consistency:
Always check your paint consistency on your thumb or a palette before applying it to the model. This helps prevent blobbing and ensures smooth application.
Highlighting Techniques:
Always paint towards the center of the highlight to build up opacity gradually. For a more natural look, use a stippling technique to blend transitions.
Detailing the Iris:
Create varied lines and shapes within the iris to mimic natural patterns. Overlapping lines and varied thicknesses add realism.
Veins in the Eye:
Use a darker red for veins and blend them with heavily thinned Doombull Brown to make them look subtle and natural
When painting NMM, ensure the highlights and shadows are placed accurately to mimic reflective surfaces. Use a combination of warm and cool tones to add depth and realism.
Non-Metallic Metal (NMM) Technique:
Adding Texture:
Use thin, scratchy lines to add texture and wear to the gold trim. This enhances the realism and adds character to the piece.
Small Dots and Lines:
For the brightest highlights, use small dots and lines. This creates a sharp, reflective effect, especially on edges and points.
Use Glazes for Blending:
To soften transitions and blend colors, use glazes. A heavily thinned paint (about 6 parts water to 1 part paint) can help create smooth transitions.
Patience and Practice:
Detailed freehand work and NMM techniques require patience and practice. Take your time and don’t rush the process. With each attempt, you’ll improve and achieve better results.
There are lots more tutorials for painting Abaddon! Follow the link below to watch them all, or scroll town to explore them by model part.
Abaddon the Despoiler
A series of videos on how to paint Abbadon the Despoiler to competition standard – (new step-by-step guides included!)
Watch Now
Need more Abaddon? Look no further:
If you don’t have an account here on my website, please sign up here! I have over 350 video tutorials with steps and tips, plus a selection of PDFs. If you are not sure about joining, you can explore my free videos with a free membership, or take the plunge and become a full subscriber for full access.
If you’d prefer to support me on Patreon, please visit: https://www.patreon.com/RichardGray [...]
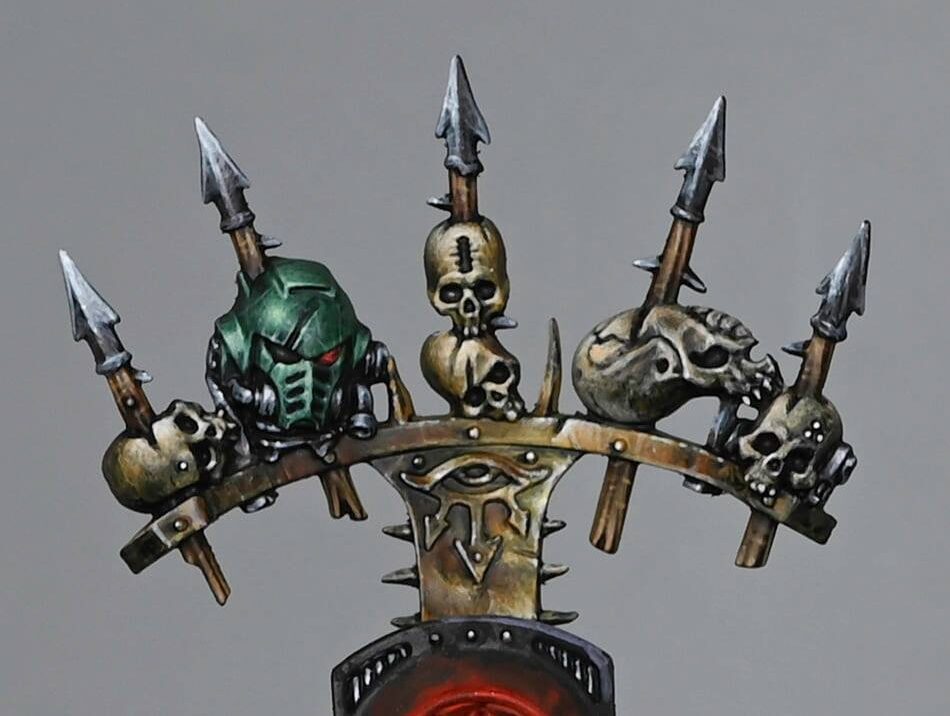
In this How to Paint Abaddon Trophy Rack tutorial, we’re diving into the grim and iconic details of Abaddon the Despoiler’s trophy rack, focusing on everything from weathered Space Marine helmets to wooden spikes and skulls. Using a mix of Games Workshop and Vallejo paints, we’ll cover a variety of techniques to bring out the dark, battle-hardened essence of Abaddon’s war trophies. Whether you’re after smooth transitions for non-metallic metal effects or want to add that perfect amount of battle damage to a helmet, this guide will help!
Video – How to Paint Abaddon Trophy Rack
Paints used:
Games Workshop: Balor Brown, Mournfang Brown, XV-88, Morghast Bone, Screaming Skull, Rhinox Hide, Khorne Red, Evil Sunz Scarlet, Wild Rider Red
Vallejo: Neutral Grey, Pale Grey Blue, Ice Yellow, White Grey, Heavy Black Green, Black
Space Marine Helmet
Base Coat:
Apply a base coat of Vallejo Heavy Black Green, thinned down with water (about 50/50 water to paint). Apply a couple of coats for a smooth finish.
Initial Highlights:
Mix Heavy Black Green with Ice Yellow for the first highlight. Start applying this mix to the raised areas, especially the forehead and the curves of the helmet.
Refining Highlights:
Gradually add more Ice Yellow to the mix and continue highlighting. Focus on the forehead curve, the edges, and the top of the helmet. Use controlled brush strokes towards the center of the highlight areas to build opacity and achieve a smooth transition.
Scratches and Battle Damage:
Use the same highlight mix to add scratches and battle damage. Vary the length and direction of the scratches, focusing on edges and raised areas. For deeper scratches, add Rhinox Hide to the mix and apply thin lines.
Final Highlights:
Use a mix of mostly Ice Yellow with a small amount of Heavy Black Green for the brightest highlights. Apply these to the most prominent areas, such as the center of the forehead and the edges of the helmet.
Eye Lens:
Paint the eye lens with Khorne Red, then layer Evil Sunz Scarlet and Wild Rider Red towards the front. Add a tiny dot of Ice Yellow mixed with Wild Rider Red for the final highlight. Finish with a small white dot in the back corner for a reflection.
Wooden Spikes
Base Coat:
Base coat the wooden spikes with Rhinox Hide.
Grain and Texture:
Use Mournfang Brown to paint the wood grain, following the sculpted lines on the model. Focus on the top and bottom of the spikes, leaving the middle section darker.
Layering:
Apply XV-88 to the raised areas and the grain lines, blending it into the Mournfang Brown. This creates a natural wood texture.
Highlights:
Use Morghast Bone for the final highlights, focusing on the edges and the splintered parts of the wood. Add a few thin horizontal lines to represent scratches and imperfections.
NMM Metal Spike Tips
Base Coat:
Base coat the metal tips with Neutral Grey.
Initial Highlights:
Apply Pale Grey Blue to the highlight areas, focusing on the upper parts of the tips and the edges.
Refining Highlights:
Add White Grey to Pale Grey Blue and apply smaller highlights, concentrating on the sharp edges and points.
Final Highlights:
Use pure White Grey for the brightest highlights, applying small dots and lines to the edges and points to simulate a shiny metal effect.
Consistency:
Ensure that the highlight direction is consistent with the light source. For the spikes on the left side, highlight the left edges, and for those on the right, highlight the right edges to create a natural look.
Step 4: Skulls
Base Coat:
Apply a base coat of Rhinox Hide to the skulls.
First Layer:
Apply Balor Brown in thin layers, focusing on the raised areas and leaving the deeper recesses darker.
Building Highlights:
Layer Morghast Bone over Balor Brown, concentrating on the upper sections of the skulls and the areas facing the light source.
Final Highlights:
Use Screaming Skull for the final highlights, applying it to the most prominent areas, such as the forehead, cheekbones, and edges. Use thin layers and build up the color gradually.
Details:
Paint the teeth and eye sockets carefully, using a mix of Morghast Bone and Screaming Skull for highlights. Add small dots and lines to represent cracks and imperfections.
There are lots more tutorials for painting Abaddon! Follow the link below to watch them all, or scroll town to explore them by model part.
Abaddon the Despoiler
A series of videos on how to paint Abbadon the Despoiler to competition standard – (new step-by-step guides included!)
Watch Now
Need more Abaddon? Look no further:
Videos Not Showing?
To view any of my paid tutorials, you need to be a member of the website – please click below to log in or join the site.
Not sure about joining just yet? Check out my Youtube for all my free tutorials or sign up as a free “friend” member on this site and visit the free videos page!
If you’d prefer to support me on Patreon, please visit: https://www.patreon.com/RichardGray [...]
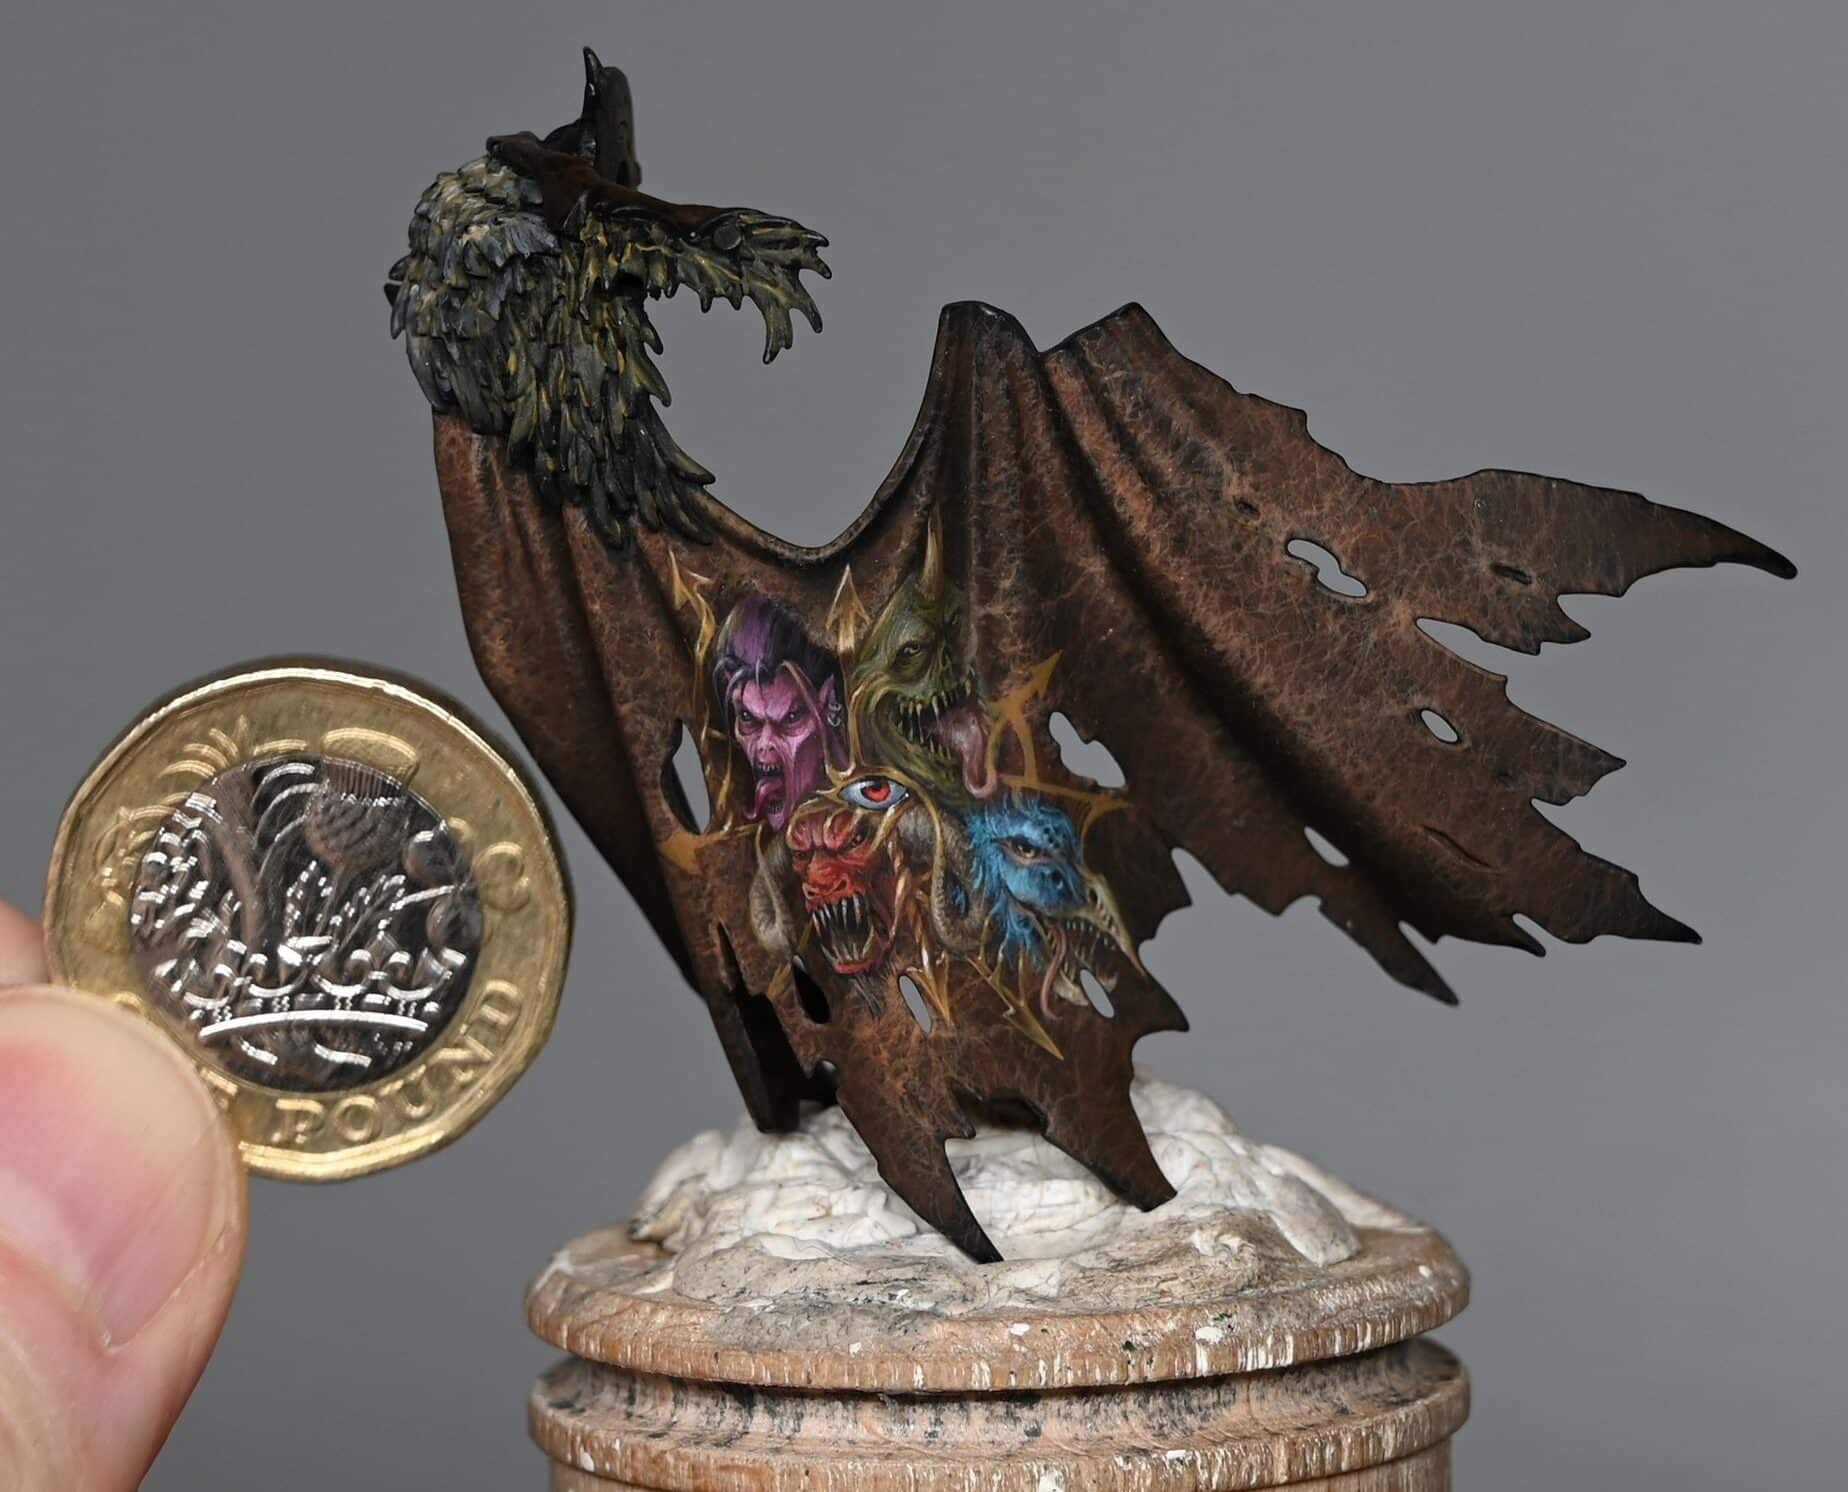
In my How to Paint Abaddon Cloak video series, we’ll be taking a deep dive into painting the cloak of Abaddon the Despoiler—one of the most iconic and menacing figures in the Warhammer 40K universe. From creating a rich, weathered leather effect to the intricate freehand designs symbolising the four Chaos Gods, this tutorial will guide you through every step. We’ll be using a mix of Games Workshop and Vallejo paints to bring out the dark, foreboding atmosphere of Abaddon’s cloak while ensuring it matches his brutal, battle-hardened aesthetic.
Video – How to Paint Abaddon Cloak (Leather Effect)Paints neededPainting the Inside of the Cloak Video – How to Paint Abaddon Cloak Freehand Part OnePaints and materials neededPreparing the CloakStarting the Freehand Video – How to Paint Abaddon Cloak Freehand Part TwoPaints needed:Refining the Slaanesh HeadDetailing and TexturingVideo – How to Paint Abaddon Cloak Freehand Part ThreePaints neededPainting the Khorne Head Video – How to Paint Abaddon Cloak Freehand Part FourPaints and materials neededPainting the Nurgle Head Video – How to Paint Abaddon Cloak Freehand Part FivePaints needed:Video – How to Paint Abaddon Cloak Freehand Final PartPaints neededWhy I Chose to Paint the Cloak This Way:All Abaddon TutorialsVideos Not Showing?
Video – How to Paint Abaddon Cloak (Leather Effect)
Paints needed
Paints:
Vallejo: Heavy Sienna, Dwarf Skin, Scab Red
Games Workshop: Rhinox Hide, Mournfang Brown
Painting the Inside of the Cloak
Base Coating:
Prime the cloak black. This will serve as the base for the following layers.
Apply a rough coat of Rhinox Hide. Use a scrubbing motion with your brush to create an uneven, patchy texture. This coat should be about 1.5 parts paint to 1 part water. The goal is to have a base colour that isn’t perfectly smooth, as this will add to the weathered effect.
First Layer of Texture:
Use Vallejo Heavy Sienna to add the first layer of texture. This paint is extra opaque, which makes it ideal for creating highlights and adding detail.
Apply the paint using the tip of your brush, creating very rough, random marks all over the cloak. Use a cross-hatching and squiggling technique to add a sense of worn leather. This coat should be around 50/50 paint to water for better flow.
Second Layer of Texture:
Once the first layer is dry, use Cadian Fleshtone to add more refined texture marks. These marks should be thinner and more considered than the previous layer. Focus on the highlight areas but make sure to add some detail in the shadowed areas as well.
Highlight Detailing:
With Dwarf Skin (or a similar light flesh tone), add fine highlights to the cloak. These highlights should be placed carefully to enhance the texture and add depth. Use very thin paint (more than 50/50 water to paint) and minimal paint on the brush to achieve subtle, translucent marks.
Glazing:
Prepare three colors on your wet palette: Mournfang Brown, Rhinox Hide, and Scab Red.
Using heavily thinned Mournfang Brown (around 6 parts water to 1 part paint), glaze over the cloak, focusing on the mid-tones and recesses. This will add a warm tone and help unify the previous layers.
Apply Rhinox Hide glaze to the shadow areas to enhance depth. This glaze should also be very thin.
Use Scab Red to add some variation and interest, especially in the darker areas.
Fading the Edges:
To create a faded effect at the bottom of the cloak, use Scab Red mixed with Rhinox Hide. Thin the paint significantly and apply multiple layers, building up the color gradually.
Make sure the transitions are soft by using long strokes that follow the flow of the cloak.
Final Touches and Varnishing:
After completing the texturing and glazing, apply a coat of matte varnish to protect your work and reduce shine. This will also help to soften the overall effect and integrate all the layers.
Video – How to Paint Abaddon Cloak Freehand Part One
Paints and materials needed
Paints:
Games Workshop: Emperor’s Children, Fulgrim Pink, Rhinox Hide, Kantor Blue
Vallejo: Black, Heavy Grey, Sunset Red
Brushes:
Detail brush with a fine tip (size 00 or 0)
Standard brush
Palette: Wet palette recommended
Tools:
Clean cloth or paper towel
Magnifying visor (optional for fine details)
Ultramar Varnish (for a protective layer)
Preparing the Cloak
Visualizing the Design:
Before starting the freehand, visualize your design. You can use a photo editing tool to superimpose a rough sketch on a picture of the cloak to align your design. This helps in understanding the flow and positioning of the elements.
Base Preparation:
Ensure the texture work on the cloak is complete. This includes the heavy weathering and crack effects as detailed in the previous videos.
Applying a Protective Layer:
Apply a thin coat of Ultramar Varnish to the cloak. This provides a slight protective layer that can make it easier to correct mistakes without damaging the underlying paint.
Starting the Freehand
Marking Guidelines:
Use a thinned black paint to draw a cross on the cloak. This helps in aligning your design elements and ensuring symmetry.
Blocking in Colors:
Start by blocking in rough shapes for each of the Chaos Gods. Use the following colors for the base blocks:
Slaanesh: Fulgrim Pink
Nurgle: Rhinox Hide
Khorne: Sunset Red
Tzeentch: Kantor Blue
Detailed Blocking for Slaanesh:
Focus on the Slaanesh section first. Block in the basic face shape using Fulgrim Pink. Remember, this is just the base layer, so it doesn’t need to be perfect.
Refining the Shape:
Add basic facial features with a darker pink or purple mixed with Fulgrim Pink. This includes the rough position of the eyes, nose, and mouth.
Adjusting and Correcting:
Use Rhinox Hide to correct and refine the shapes. Rhinox Hide is great for this purpose due to its translucency, which allows you to darken areas without completely obscuring the details underneath.
Video – How to Paint Abaddon Cloak Freehand Part Two
Paints needed:
Paints:
Games Workshop: Emperor’s Children, Fulgrim Pink, Mephiston Red
Vallejo: Black, Sunset Red
P3: Morrow White
Refining the Slaanesh Head
Starting with the Horns (Optional):
Initially, I planned to add horns to the Slaanesh head, but later decided against it for compositional reasons. If you prefer to include horns, start by blocking them in with Fulgrim Pink or a similar color. Remember, details on such a small scale can become cluttered quickly.
Painting Over Mistakes:
If you decide against an element (like the horns), don’t worry. Paint over it with the base color of the cloak (Rhinox Hide) to blend it back in. Mistakes are part of the process and can be easily fixed.
Adding Black Hair:
Using Vallejo Black, paint in the hair for the Slaanesh head. Keep the hair wavy and flowing to add movement and dynamism. Focus on keeping the strokes soft and thin.
Refining Facial Features:
Continue refining the face. Use Emperor’s Children mixed with Morrow White for highlights, and Sunset Red mixed with Black for shadows. Work slowly and build up the layers gradually.
Pay special attention to the eye sockets, nose, and mouth. These areas define the expression and overall look of the face.
Balancing Highlights and Shadows:
It’s important to balance your highlights and shadows. Ensure the lighting is consistent across the face to maintain a three-dimensional look. Use Fulgrim Pink and Emperor’s Children for lighter areas and mix in more white for the brightest highlights.
Detailing and Texturing
Teeth and Tongue:
For the teeth, use Morrow White. Since the teeth are very small, it’s challenging to add transitions. Focus on making them look sharp and slightly pointy without over-emphasizing.
For the tongue, start with Sunset Red and add shading with a darker red. Add subtle highlights with Emperor’s Children mixed with Sunset Red.
Softening the Edges:
Around the eyes and mouth, use diluted Rhinox Hide to soften the edges and blend the features into the face. This helps avoid a cartoony look and makes the face appear more natural.
Adding Red Tones:
Use Mephiston Red diluted with water (2.5 parts water to 1 part paint) to add red tones to the face. Apply this glaze lightly to enhance the overall color without overpowering the existing details.
Video – How to Paint Abaddon Cloak Freehand Part Three
Paints needed
Paints:
Games Workshop: Mephiston Red, Evil Sunz Scarlet, Wild Rider Red, Balor Brown, Rhinox Hide, Morghast Bone, Blue Horror
Vallejo: Model Colour Black
Painting the Khorne Head
Base Colours:
Start with Mephiston Red to block in the base color of the Khorne head. Ensure even coverage.
Use Evil Sunz Scarlet to add highlights, focusing on areas that catch the most light.
Outlining with Black:
Use Vallejo Black to outline the features of the face. This helps define the shapes and make them stand out against the brown leather background.
Focus on outlining the eyes, nose, and mouth areas to start shaping the face.
Shading and Highlighting:
For shadows, use Rhinox Hide mixed with Mephiston Red. This helps deepen the shadows without losing the red tone.
Use Balor Brown for the first layer of highlights, especially on the raised areas like the cheekbones and forehead.
For more pronounced highlights, use Wild Rider Red mixed with Morghast Bone. Apply these sparingly to maintain the red color.
Detailing the Horns:
Paint the horns with Balor Brown as the base color.
Add highlights using Morghast Bone, focusing on creating a ribbed texture to give the horns a natural look.
Use Rhinox Hide to add shadows and define the ribs on the horns. The goal is to create a cylindrical appearance.
Adding Facial Features:
Paint the eyes black, then add a small dot of Balor Brown to represent the iris.
Add details to the teeth using Morghast Bone. The teeth should be sharp and prominent.
Use Blue Horror for final highlights on the face and horns. This helps tie all the heads together with a consistent light source.
Additional Details:
Add small horns or spikes on the Khorne head to fill in empty spaces and add more detail. Paint these with Balor Brown and highlight with Morghast Bone.
Use Mephiston Red to paint the gums around the teeth, adding Rhinox Hide for shading.
Video – How to Paint Abaddon Cloak Freehand Part Four
Paints and materials needed
Paints:
Games Workshop: Rhinox Hide, Deathworld Forest, Warboss Green (optional), Balor Brown, Morghast Bone, Screaming Skull, Mournfang Brown, Bugman’s Glow, Cadian Fleshtone
Vallejo: Black, Heavy Grey (optional), Golden Olive, Pale Grey Blue
Painting the Nurgle Head
Base Coloirs:
Start by sketching the rough shape of the Nurgle head with Deathworld Forest.
Use Rhinox Hide to outline and add shadows to define the initial shape of the head.
Building Up Details:
Use Warboss Green and Golden Olive to add highlights, focusing on areas that catch the most light. For a less vivid color, minimize the use of Warboss Green.
Apply Vallejo Black to outline the eyes, nose, and mouth, adding definition to the facial features.
Adding Wrinkles and Texture:
Paint wrinkles and lines using Golden Olive mixed with Deathworld Forest. Follow the natural flow of the face to make the lines look more realistic.
Use Rhinox Hide to deepen the shadows and add more depth to the wrinkles.
Painting the Mouth and Teeth:
Use Bugman’s Glow and Cadian Fleshtone for the gums. Start with Bugman’s Glow for the base and highlight with Cadian Fleshtone.
Paint the teeth with Morghast Bone, and add highlights with Screaming Skull. Outline the teeth with Vallejo Black for better definition.
Highlighting and Shading:
Use Balor Brown and Morghast Bone for additional highlights on the face and horn.
Blend the highlights using Rhinox Hide for smooth transitions. This helps in maintaining the three-dimensional look of the head.
Painting the Horn:
Base coat the horn with Balor Brown. Add highlights using Morghast Bone and Screaming Skull.
Create a ribbed texture on the horn using fine lines and blend with Rhinox Hide.
Detailing the Eyes:
Paint the eyes with Vallejo Black for the pupils and Balor Brown for the iris. Add a small white dot for the light reflection.
Adding the Tongue:
Paint the tongue with Bugman’s Glow and highlight with Cadian Fleshtone.
Add depth and shadows using Rhinox Hide and Pale Grey Blue.
Adjust the shape of the tongue as needed for better composition.
Video – How to Paint Abaddon Cloak Freehand Part Five
Paints needed:
Paints:
Games Workshop: Rhinox Hide, Balor Brown, Morghast Bone, Ushabti Bone, Mournfang Brown, Bugman’s Glow, Cadian Fleshtone, Blue Horror, Night Lords Blue, Temple Guard Blue
Vallejo: Black
Painting the Tzeentch Head
Base Colours:
Start by blocking in the rough shape of the Tzeentch head with Night Lords Blue. This dark background will help define the initial shape.
Use Temple Guard Blue to add initial highlights and define the contours of the head. This contrast will make the shape more visible despite the translucency of the paint.
Refining the Shape:
Use Vallejo Black to outline and add bold details. This will help define the facial features and add depth.
Apply Balor Brown to areas that will represent the beak and other prominent features of the head.
Detailing the Beak:
Use Balor Brown as the base for the beak. Add highlights with Morghast Bone and Ushabti Bone to create a gradient effect.
Paint the inside of the mouth with Vallejo Black to create depth.
Add details to the beak, such as small teeth, using Morghast Bone. Highlight with Ushabti Bone for a more pronounced effect.
Creating Texture:
Use Blue Horror and Temple Guard Blue to create a feathery texture on the head. These marks should be softer and more translucent to blend well with the darker base.
Add small tendrils or feathery protrusions using the same colors to differentiate the Tzeentch head from the other Chaos heads.
Painting the Eye:
Paint the eye with Balor Brown. Use multiple layers to build opacity, focusing on the lower part of the iris for a highlighted effect.
Add the pupil with Vallejo Black and a small white reflection dot with Morghast Bone.
Adding the Tongue:
Use Bugman’s Glow and Cadian Fleshtone to paint the tongue. Start with Bugman’s Glow for the base and highlight with Cadian Fleshtone.
Add depth and shadows using Rhinox Hide and Blue Horror. Adjust the shape of the tongue as needed to fit the overall design.
Final Touches:
Use Mournfang Brown to add subtle shading and transitions on the beak and other areas. This colour’s low opacity will help create smooth blends.
Add small details, such as saliva or other organic textures, with Blue Horror. Ensure the marks are thin and subtle for a more natural look.
Video – How to Paint Abaddon Cloak Freehand Final Part
This final part of the freehand painting series brings together the intricate design on Abaddon’s cloak, highlighting the iconic eight-pointed star of chaos and adding weathering effects for a unified, detailed finish.
Paints needed
Paints:
Games Workshop: XV-88, Balor Brown, Mournfang Brown, Rhinox Hide, Mephiston Red, Evil Sunz Scarlet, Wild Rider Red, Cadian Fleshtone, Temple Guard Blue, Kantor Blue (for additional eyes – iris)
Vallejo: Black, Pale Grey Blue, Neutral Grey, Ice Yellow
P3: Morrow White
Painting the Eight-Pointed Star of Chaos
Base Color:
Start by painting the base of the eight-pointed star with XV-88. This will serve as the foundation for a non-metallic gold effect.
Sketch the star and its arrows lightly, ensuring they fit around the four Chaos Gods’ heads without overpowering the design.
Refining the Star:
Add detail to the arrows, making them irregular in size and shape for a chaotic effect. Be mindful of the faces you have already painted.
Incorporate the star into the existing design by blending it into the heads and the background.
Painting the Eye of Chaos:
In the center of the star, paint an oval shape with Vallejo Black for the eye.
Add highlights around the eye using Neutral Grey and Pale Grey Blue, leaving a black outline for definition.
Paint the iris with Mephiston Red, then layer Evil Sunz Scarlet and Wild Rider Red towards the bottom for a glowing effect.
Add a highlight shine with Pale Grey Blue and a small dot of Morrow White for a realistic eye.
Adding Non-Metallic Gold Effects
Highlighting and Shading:
Add highlights to the star using Balor Brown, Mournfang Brown, and Rhinox Hide for depth. Use Ice Yellow for sharp highlights.
Focus on creating a three-dimensional look by highlighting edges and adding shadow in the appropriate areas.
Use small dots of Morrow White for the brightest points to simulate metallic reflections.
Integrating the Design:
Paint subtle connecting lines from the star to the heads using the same gold colors. This helps unify the design.
Blend some of the gold into the heads, especially around the edges, to show that they are part of a single piece.
Weathering Effects
Adding Wear and Tear:
Use Cadian Fleshtone to add fine scratches and wear marks over the entire design. These should be thin and subtle to avoid overpowering the details.
Focus on the edges and high points of the design where natural wear would occur.
Glazing:
Create glazes with Rhinox Hide and Mournfang Brown by diluting them with water (7:1 or 10:1 ratio).
Apply these glazes over the scratches and around the heads to tone down the highlights and add depth.
Use Mournfang Brown to add warmth back to the gold areas where needed.
Final Touches
Additional Eyes:
Paint small additional eyes throughout the design using the same technique as the main eye, but using Temple Guard Blue and Kantor Blue for the iris.
These eyes add a creepy, chaotic element to the design.
Final Review:
Step back and review the entire cloak to ensure the design is cohesive and balanced.
Make any final adjustments to highlights, shadows, and details to ensure the freehand looks integrated and realistic.
Why I Chose to Paint the Cloak This Way:
When painting Abaddon’s cloak, I wanted to reflect both his status and the weight of his millennia-spanning crusades. The inside of the cloak features a worn, leather texture, which I chose to represent the endless battles Abaddon has fought—this cloak has been through as much war as the Warmaster himself. The scrubbing and layering techniques help give it a rich, aged look, adding a sense of history and character to the model.
The freehand design on the back is a visual homage to the four Chaos Gods—Slaanesh, Nurgle, Khorne, and Tzeentch—who each play a critical role in Abaddon’s rise to power. Each head is painted with its own unique style and colour scheme to represent their distinct personalities, but I also aimed to blend them into the chaotic flow of the cloak, reflecting how intertwined their influences are in Abaddon’s life.
The eight-pointed star of Chaos ties it all together, symbolising Abaddon’s mastery over the forces of Chaos Undivided. It’s not just about painting the symbols, but about integrating the chaos of these gods into the fabric of his existence, making the cloak more than just a piece of his armour—it’s a canvas for his dark legacy.
All Abaddon Tutorials
There are lots more tutorials for painting Abaddon! Follow the link below to watch them all, or scroll town to explore them by model part.
Abaddon the Despoiler
A series of videos on how to paint Abbadon the Despoiler to competition standard – (new step-by-step guides included!)
Watch Now
Videos Not Showing?
To view any of my paid tutorials, you need to be a member of the website – please click below to log in or join the site.
Not sure about joining just yet? Check out my Youtube for all my free tutorials or sign up as a free “friend” member on this site and visit the free videos page!
If you’d prefer to support me on Patreon, please visit: https://www.patreon.com/RichardGray [...]
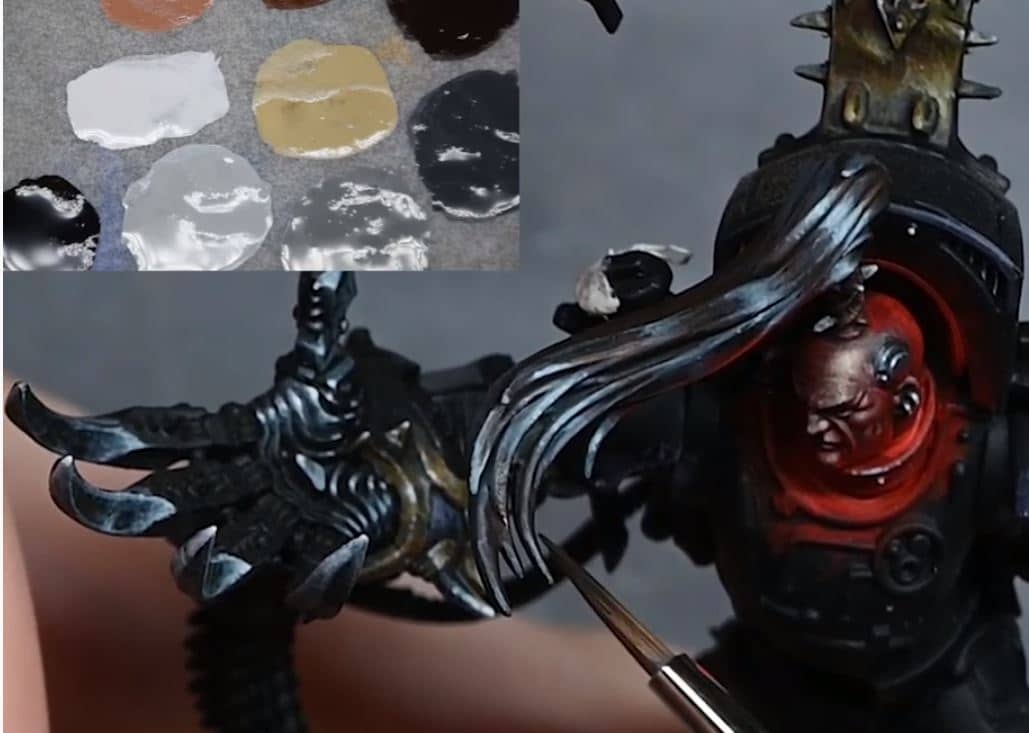
Abaddon’s talon and hair combine to create a striking contrast between organic texture and metallic sheen, both of which add depth and realism to the model. The talon, painted using a non-metallic metal (NMM) effect, features a worn, weathered appearance.
For Abaddon’s hair, I used Rhinox Hide as the base, with Mournfang Brown and Cadian Fleshtone to build up highlights. By applying Ushabti Bone to the very tips of the hair strands, I created a natural, textured finish that mimics the flow and movement of real hair.
Video: How to Paint Abaddon’s Hair and Abaddon’s Talon
Paints needed
Paints:
Games Workshop: Mournfang Brown, Rhinox Hide, Cadian Fleshtone, Ushabti Bone
Vallejo: Neutral Grey, Pale Grey Blue
P3: Morrow White (or any preferred white)
Painting Abaddon’s Talon (Non-Metallic Metal Effect)
Base Coating:
Start by applying a base coat of Neutral Grey on Abaddon’s Talon. Ensure an even coverage over the entire claw.
Initial Highlights:
Using Pale Grey Blue, begin to highlight the raised areas and the edges of the talon. The highlights should be applied in a random, scratchy manner to replicate a worn and weathered effect. Focus more highlights towards the tips of the talon.
Refining the Highlights:
Add Morrow White to your palette. Apply this white in smaller, more concentrated areas to create a strong highlight effect. These highlights should follow the scratches and wear marks to enhance the worn look.
Adjusting Shadows:
If any areas are too bright or need more definition, use Abaddon Black or a mix of Neutral Grey and black to tone down and refine the shadows. Apply this mix to the recesses and areas further from the light source.
Adding Depth:
Introduce a bit of Mournfang Brown thinned with water (around 2:1 ratio) to glaze over the lower parts of the talon. This adds a subtle dirt effect and ground reflection, enhancing the realism.
Painting the Hair
Base Coating:
Start by applying a base coat of Rhinox Hide over all the hair. Be careful around the face to avoid damaging the detailed work already done.
Building Up Highlights:
Use Mournfang Brown to paint the majority of each hair strand, leaving the deeper recesses in Rhinox Hide. This creates the first level of highlight.
Refining Highlights:
With Cadian Fleshtone, begin highlighting the edges and raised areas of the hair. Apply the paint in a slightly scruffy manner to mimic the texture of hair strands. Ensure to follow the direction of the hair flow.
Final Highlights:
Apply Ushabti Bone to the very edges and tips of the hair strands to create the brightest highlights. Use a fine detail brush to add individual strands and enhance the overall texture.
Enhancing Shine:
Introduce Neutral Grey, Pale Grey Blue, and a mix of both to the palette. Apply these colors sparingly to areas where the hair would naturally catch the most light, creating a shiny effect. Add Morrow White to the highest points for a final touch of brightness.
Balancing Colors:
To prevent the hair from looking too non-metallic, glaze over with Rhinox Hide or Mournfang Brown thinned down to dull any overly bright areas. This helps integrate the hair with the rest of the model’s color scheme.
Final Touches
Detailing the Leather Wrap:
Paint the leather wrap around the hair with Rhinox Hide as the base coat. Highlight with Mournfang Brown and then add finer highlights with Cadian Fleshtone and Ushabti Bone. Apply small lines and dots to mimic worn leather.
Painting Metal Spikes:
Paint the small metal spikes on the leather wrap using the same NMM technique as the talon. Use Neutral Grey, Pale Grey Blue, and Morrow White to create highlights and depth.
Matte Varnish:
Apply a coat of matte varnish to the model to protect your work and tone down any unwanted shine. This will also help to differentiate between the non-metallic metal effect on the Abaddon’s Talon and the shiny hair.
There are lots more tutorials for painting Abaddon! Follow the link below to watch them all, or scroll town to explore them by model part.
Abaddon the Despoiler
A series of videos on how to paint Abbadon the Despoiler to competition standard – (new step-by-step guides included!)
Watch Now
Need more Abaddon? :
Videos Not Showing?
To view any of my paid tutorials, you need to be a member of the website – please click below to log in or join the site.
Not sure about joining just yet? Check out my Youtube for all my free tutorials or sign up as a free “friend” member on this site and visit the free videos page!
If you’d prefer to support me on Patreon, please visit: https://www.patreon.com/RichardGray [...]
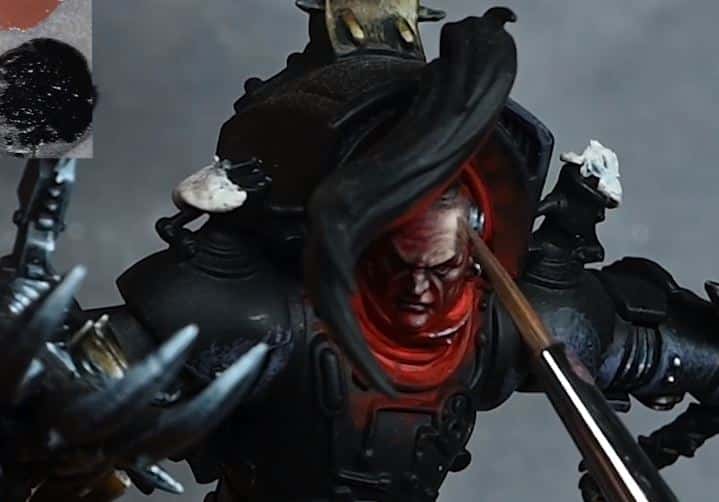
Learn how to paint red OSL in this video guide! A major focal point of Abaddon’s model is the red glow of chaos that he eminates. For this, I employed Object Source Lighting (OSL) techniques using Mephiston Red, Evil Sunz Scarlet, and Wild Rider Red. Carefully layering these reds over Bugman’s Glow and Kislev Flesh creates a subtle yet intense glow that adds a sense of malevolence to Abaddon’s visage.
Video – How to Paint Red OSL
Paints needed
Paints:
Games Workshop: Bugman’s Glow, Cadian Fleshtone, Kislev Flesh, Ushabti Bone, Mephiston Red, Evil Sunz Scarlet, Wild Rider Red, Abaddon Black, Rhinox Hide
P3: Morrow White
Painting the Head
Base Coating:
Start by applying a base coat of Bugman’s Glow to Abaddon’s head. The paint should be thinned to ensure translucency, allowing the black primer to show through slightly. This helps to build up the layers gradually and control the lighting effect.
Layering the Skin:
Apply multiple thin layers of Bugman’s Glow to build up the opacity on the areas where light would naturally hit, such as the forehead, cheeks, and chin. Avoid the recessed areas under the eyebrows and the lower parts of the face to maintain shadow.
Adding Shadows:
Use Abaddon Black thinned down with water (around 6:1 ratio) to glaze the lower parts of the face, such as under the cheeks, eyebrows, and chin. This creates a strong contrast and enhances the lighting effect.
Highlighting the Skin:
Begin highlighting the skin with Cadian Fleshtone, focusing on the higher points like the forehead, nose, and upper cheeks. Apply the paint in thin, controlled strokes to create smooth transitions.
Follow with Kislev Flesh for the next level of highlights. Concentrate on the most prominent areas, keeping the highlights small and precise.
Final Highlights:
Use Ushabti Bone mixed with Kislev Flesh for the highest highlights. Apply sparingly to the brightest areas, such as the forehead and the tops of the cheeks.
For the ultimate highlight, add a small amount of P3 Morrow White to the Ushabti Bone mix and apply tiny dots to the highest points. This adds a final touch of brightness.
Creating the Red OSL Effect
Base Red Glow:
Apply Mephiston Red to the areas where the red glow will be the strongest, such as the underside of the chin, lower cheeks, and under the eyebrows. The paint should be thinned and applied in layers to build up the intensity gradually.
Enhancing the Glow:
Use Evil Sunz Scarlet to intensify the red glow. Focus on the areas closest to the light source, such as the lower part of the face and the underside of the chin. Blend the edges smoothly into the Mephiston Red.
Highlighting the Red:
Add Wild Rider Red to the mix for the highlights within the red areas. Apply this to the recesses where the light would be most intense, such as the underside of the chin and the lower edges of the cheeks.
Balancing the Glow:
Occasionally switch back to Bugman’s Glow to refine the flesh highlights and balance them with the red glow. This ensures a seamless transition between the skin tones and the red lighting effect.
Refining and Detailing
Refining Shadows:
Use Rhinox Hide thinned down (around 7:1 ratio) to glaze the deepest recesses and enhance the shadows. Apply this carefully to avoid overpowering the existing layers.
Detailing the Eyes:
Paint the eyes black with Abaddon Black. Add a small white dot with P3 Morrow White to create a catchlight, giving the eyes a lifelike appearance.
Red Glows on Armour:
With the armour in place, use Mephiston Red and Evil Sunz Scarlet to add red highlights to the insides of the armour around the neck and any other areas that would catch the glow. This helps to integrate the head with the rest of the model.
There are lots more tutorials for painting Abaddon! Follow the link below to watch them all, or scroll town to explore them by model part.
Abaddon the Despoiler
A series of videos on how to paint Abbadon the Despoiler to competition standard – (new step-by-step guides included!)
Watch Now
Videos Not Showing?
To view any of my paid tutorials, you need to be a member of the website – please click below to log in or join the site.
Not sure about joining just yet? Check out my Youtube for all my free tutorials or sign up as a free “friend” member on this site and visit the free videos page!
If you’d prefer to support me on Patreon, please visit: https://www.patreon.com/RichardGray [...]
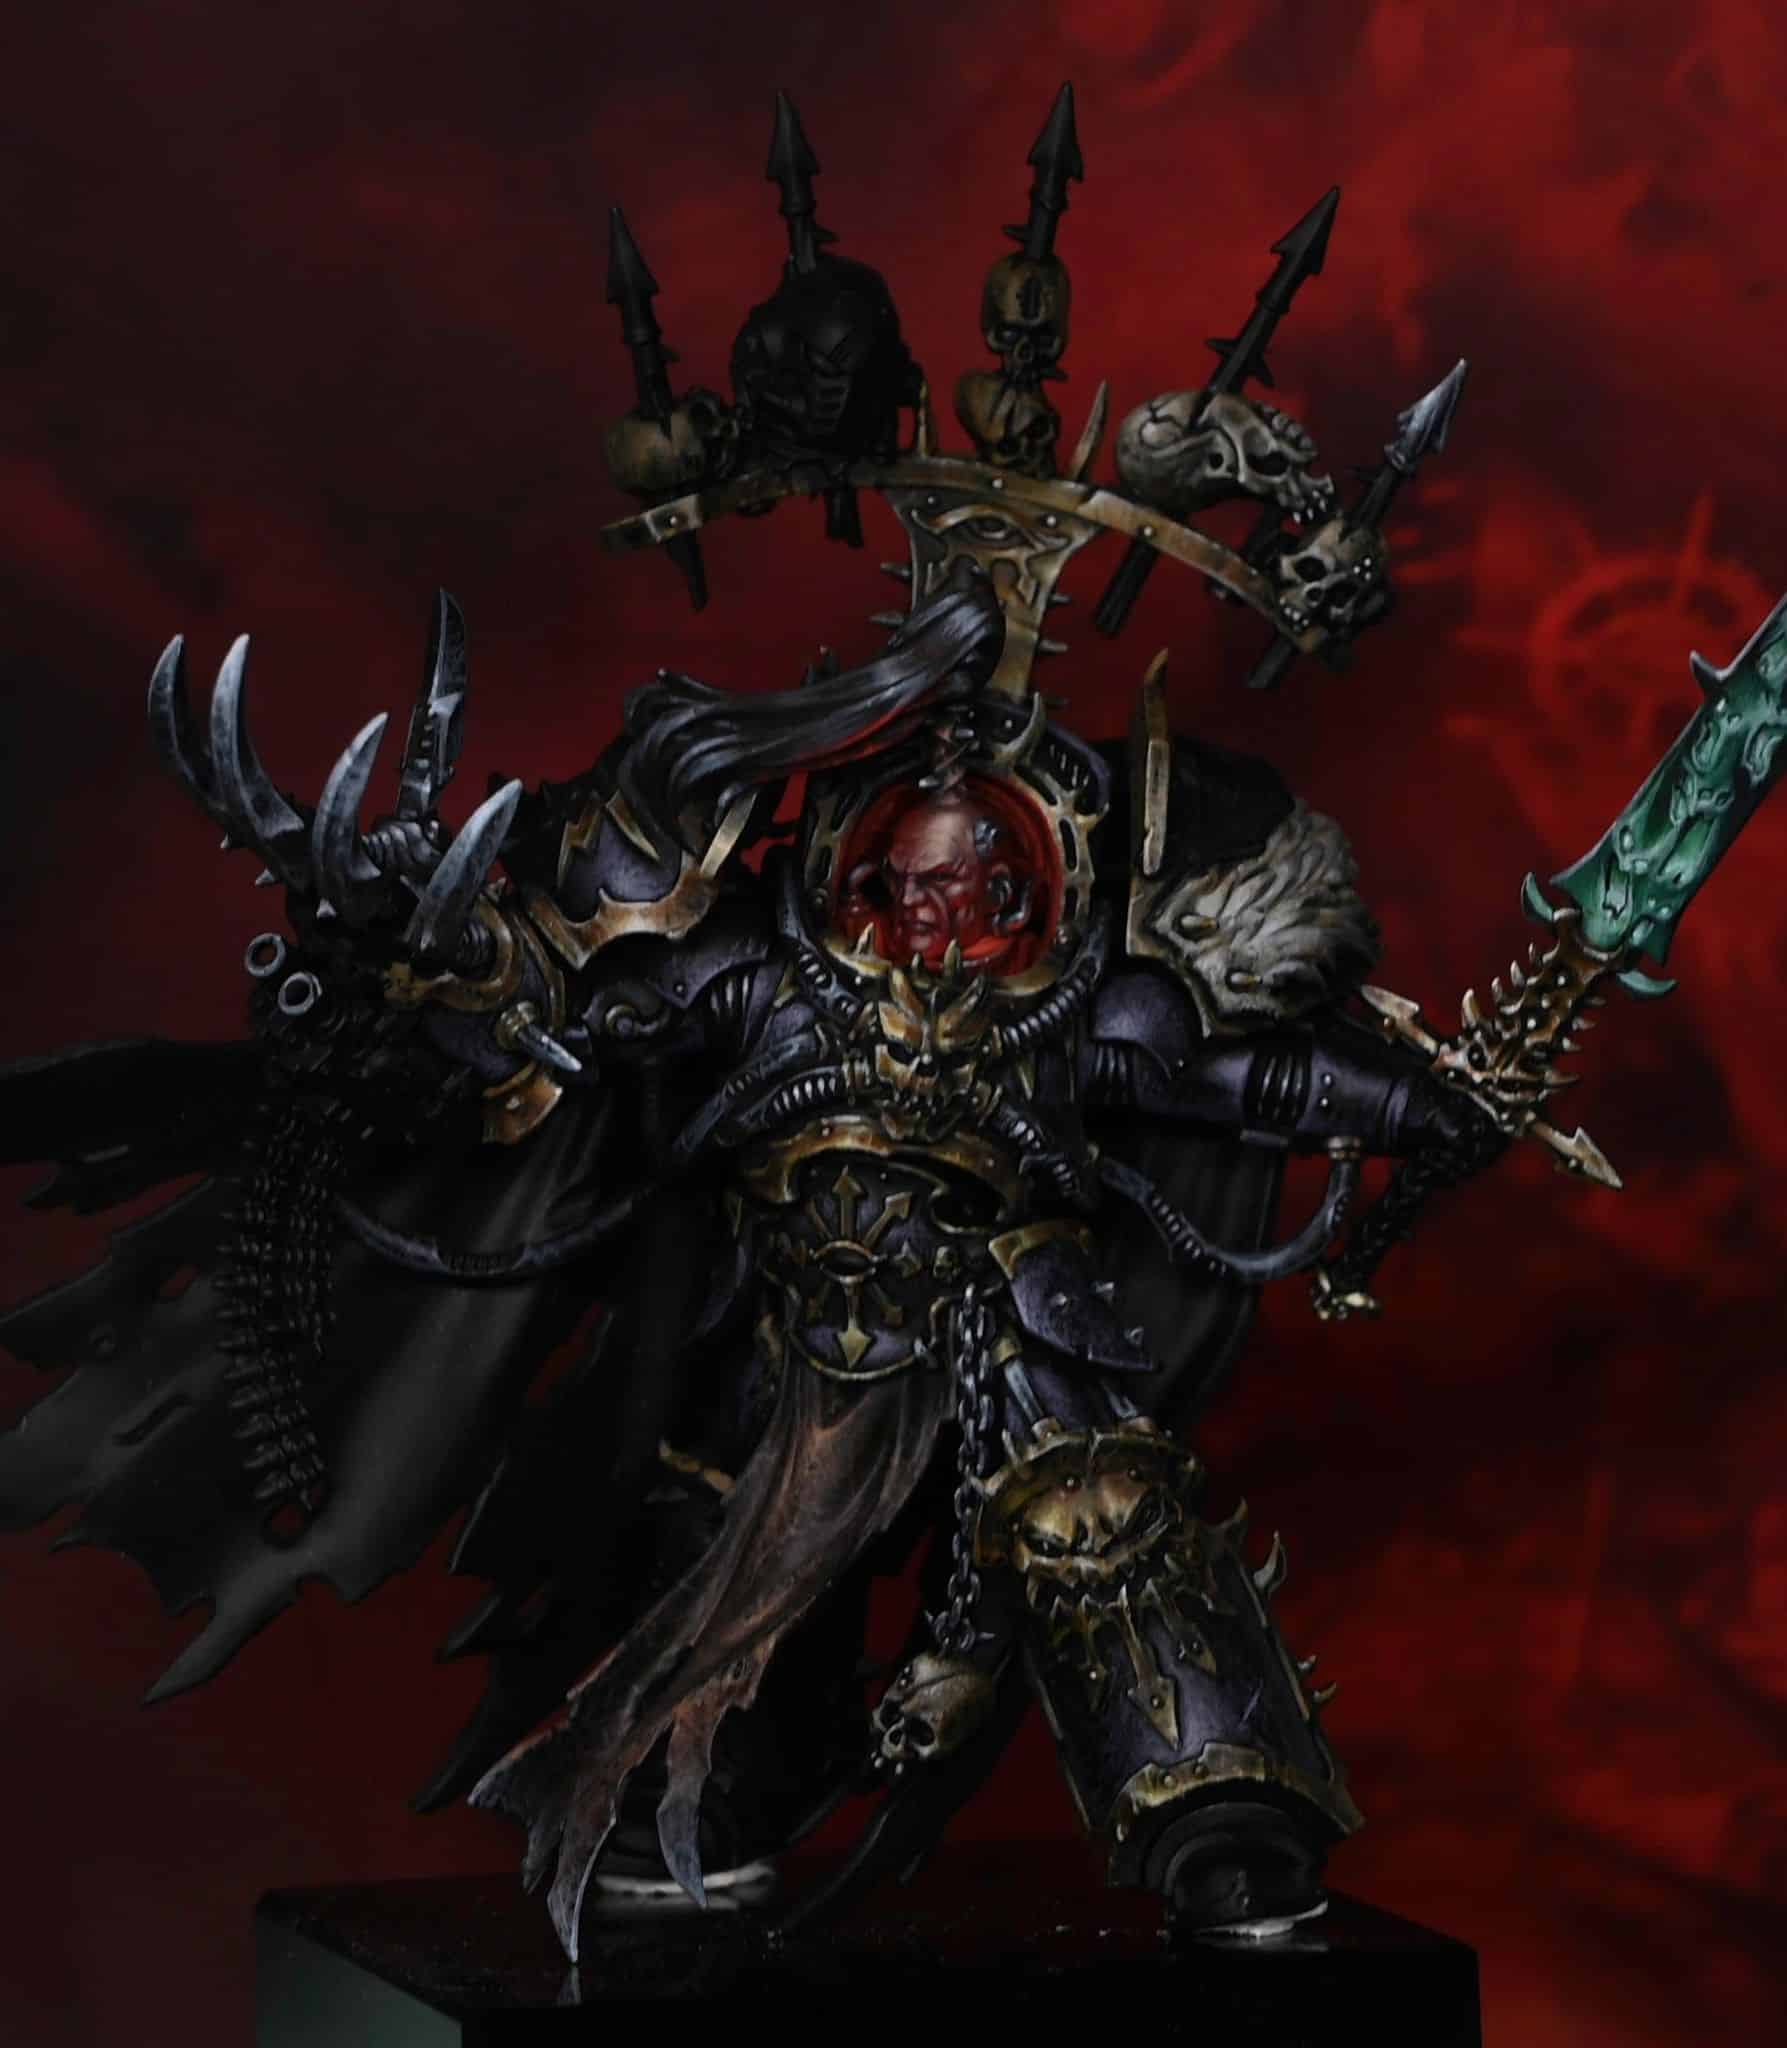
In the first video of this series ‘How to Paint Abaddon Golden Trim’, we dive into one of the most defining features of Abaddon’s armour: the rich, dark gold trim. Instead of using metallic paints, I opted for a non-metallic metal (NMM) technique to really make the gold pop. The base coat of XV-88, layered with Balor Brown and Pale Grey Blue, creates depth and complexity, while small touches of white add that final reflective edge. Painting gold in NMM can be tricky, but it gives the armour an otherworldly, luminous quality that captures the grandeur of the Despoiler.
Video – How to Paint Abaddon Golden Trim: Part One
Materials and paints needed
Paints:
Games Workshop: Daemonette Hide, Balor Brown, XV-88
Vallejo: Pale Grey Blue, Neutral Grey
Brushes:
Detail brush (size 0 or 00 – I used the Artist Opus range for details)
Standard brush
Primer: Black spray primer
Tools:
Blu Tack
Palette
Water cup
Clean cloth or paper towel
Preparation
Prime the Model:
Ensure the model is clean and free from any mould lines.
Use a black spray primer to coat the entire model evenly. This helps the paint adhere better and provides a solid base for painting.
Not sure how to build and clean your Abaddon?
This video and step by step guide shows the whole process how to build Abraxia, which shows you the techniques you can use when cleaning and prepping your Abaddon. I go over lots of little tips and tricks to hide join lines, remove and smooth down mould marks and fill in gaps.
Watch Now
Read PDF Guide
Initial Assembly
Temporary Assembly:
Use Blu Tack to temporarily hold the model together. This allows easy access to hard-to-reach areas while painting. Parts like the claw and sword can be glued on as they won’t hinder your brush.
Base Coating
Non-Metallic Metal Gold:
Start with the non-metallic gold areas using XV-88 and Balor Brown. These colours are less saturated to create a more desaturated gold effect.
Apply XV-88 as the base coat for the gold areas.
Add Balor Brown to create depth and variation.
Adding Textures
Texture Application:
Use a stippling technique with Balor Brown to create a rough, textured look on the gold areas.
This involves applying the paint in a dabbing motion to simulate scratches and imperfections.
Highlights and Details
Highlighting Gold:
Mix Pale Grey Blue with Balor Brown for the highlights. This will desaturate the gold, giving it a cooler, metallic appearance.
Apply the highlights sparingly, focusing on the edges and raised areas to create contrast.
Painting the Armour:
Use Daemonette Hide for the armour. This light purple has good coverage and adds a unique hue to the model.
Apply it in a rough, uneven manner to maintain the textured look.
Detailing the Armour
Detail Brush Work:
Use a size 0 detail brush to carefully apply highlights and details. This helps avoid accidental paint application on unwanted areas.
For the tubing and other details, use Vallejo Neutral Grey. This neutral colour separates these elements from the armour, providing visual contrast.
Finishing Touches
Final Highlights and Adjustments:
Revisit the highlighted areas with Pale Grey Blue, adding final touches to ensure the gold and armour have the desired reflective quality.
If needed, use a fine brush to add edge highlights with Balor Brown or Pale Grey Blue, ensuring they are sharp and precise.
Balancing the Model:
Ensure that the focal points, like the chest and head, are balanced. Add more warmth to the gold if necessary using a mix of XV-88 and a tiny amount of ice yellow.
Video – How to Paint Abaddon Golden Trim: Part Two
Paints needed
Games Workshop: XV-88, Balor Brown, Rhinox Hide, Mournfang Brown, Daemonette Hide
Vallejo: Pale Grey Blue
P3: Morrow White
Painting the Golden Trim
Base Coating:
Start by applying a base coat of XV-88 to all the golden trim areas. Use thin layers to ensure an even coverage and maintain the details of the model.
Building Up the Gold:
Apply Balor Brown over the base coat, focusing on the raised areas and edges. This will create depth and variation in the gold.
Add Mournfang Brown to warm up the gold. Apply this colour to the shadowed areas and deeper recesses, blending it smoothly into the Balor Brown.
Highlighting:
Use Pale Grey Blue to start highlighting the trim. This will create a cooler, more desaturated look. Apply the highlights carefully, focusing on the edges and raised areas.
Add final highlights with P3 Morrow White. Use small dots and lines to simulate light reflecting off the gold. Be sparing with this colour to avoid overpowering the other highlights.
Refining and Balancing:
Go back with Balor Brown to reinforce the mid-tones and blend the highlights smoothly. This helps maintain the warmth in the gold and prevents it from looking too silver.
Use Rhinox Hide for deeper shadows, applying it to the darkest areas to enhance the contrast and depth.
Painting the Armour
Base Coating:
Apply a base coat of Daemonette Hide to the armour. Use a textured technique with a stippling or scrubbing motion to create a rough, worn look.
Building Up the Armour:
Mix Daemonette Hide with Pale Grey Blue in a 50/50 ratio. Use this mix to highlight the armour, focusing on the raised areas and edges. Apply the paint in a textured manner, using small dots, scratches, and smears to create a worn effect.
Highlighting:
For the highest highlights, use pure Pale Grey Blue. Apply it sparingly to the most prominent areas, such as the chest and shoulders, to create a focal point.
Refining and Blending:
Use Rhinox Hide and Abaddon Black to glaze the shadows and unify the colours. Apply thin layers to deepen the shadows and enhance the contrast. This step is crucial for creating a dramatic lighting effect.
Painting the Tubing and Cables
Base Coating:
Start with a base coat of Neutral Grey for the tubing and cables. Ensure an even coverage, paying attention to the ribbed sections.
Building Up the Highlights:
Use Pale Grey Blue to highlight the tubing and cables. Apply the highlights to the raised areas, following the curves and contours of the model.
Add final highlights with P3 Morrow White, focusing on the edges and most prominent parts. Use small dots and lines to simulate light reflecting off the cables.
Creating Shiny Effects:
Pay attention to the direction of the light source when applying highlights. Ensure that the highlights are aligned with the light direction on the rest of the model.
Use very small amounts of paint and apply it with the tip of the brush to create precise, controlled highlights.
All the Abaddon Tutorials on one page!
A series of videos on how to paint Abbadon the Despoiler to competition standard – (new step-by-step guides included!)
Watch Now
Videos Not Showing?
To view any of my paid tutorials, you need to be a member of the website – please click below to log in or join the site.
Not sure about joining just yet? Check out my Youtube for all my free tutorials or sign up as a free “friend” member on this site and visit the free videos page!
If you’d prefer to support me on Patreon, please visit: https://www.patreon.com/RichardGray [...]

Drach’nyen, Abaddon’s sword, is a daemon weapon capable of wreaking havoc on the battlefield, and painting it was one of the most exciting parts of this project. The blade’s eerie blue and green glow, achieved with Warpstone Glow and Sotek Green, draws attention to the faces that seem to emerge from the sword itself. Using NMM techniques for the metallic parts of the hilt adds a cohesive look, tying the weapon into the overall feel of Abaddon’s model.
Video – How to Paint Drach’nyen – A Daemon-Infused Sword
Paints needed
Paints:
Games Workshop: Warpstone Glow, Sotek Green, Gauss Blaster Green
Vallejo: Neutral Grey, Pale Blue Grey, Black
P3: Morrow White
Painting the Blade
Base Coating:
Start by applying a base coat of Warpstone Glow mixed with Sotek Green. This mix should have a bluish tint. Apply multiple thin layers to build up a solid base colour, as Warpstone Glow has poor coverage.
Highlighting the Blade:
Begin highlighting the blade with a mix of Sotek Green and Gauss Blaster Green. Focus on the central and lower sections of the blade to create a gradient effect. Use thin layers to gradually build up the highlights.
Use Gauss Blaster Green for the brightest highlights, especially near the bottom of the blade and around the eyes and mouths of the faces sculpted on the blade.
Detailing the Faces:
Paint the eyes and mouths of the faces on the blade using Gauss Blaster Green. Apply multiple layers to achieve a smooth, glowing effect. Focus the highlights towards the bottom of the eyes and mouths for a more intense glow.
Ensure there is a fine dark line around the edges of the eyes and mouths to maintain definition.
Adding Non-Metallic Metal (NMM) Effects to Drach’nyen
Mapping Out the NMM Areas:
Use Neutral Grey to map out the areas where you want the NMM effects. Apply this to the edges and central spine of the blade. Keep your brush strokes in the same direction to create a feathered edge effect.
Building Up the NMM Highlights:
Gradually build up the highlights using Pale Blue Grey. Focus on the edges and central spine of the blade. Apply thin layers, blending them into the Neutral Grey.
Add P3 Morrow White for the brightest highlights. Use small, controlled dots and lines to simulate light reflecting off the blade. Be sparing with this colour to avoid overpowering the other highlights.
Refining the Details:
Use Black to deepen the shadows and add contrast. Apply this carefully around the eyes and mouths to enhance the glow effect and define the edges.
Revisit the highlights with Gauss Blaster Green and P3 Morrow White as needed to maintain the glowing effect and sharpness of the NMM.
Painting the Hilt
Base Coating:
Apply a base coat of Rhinox Hide to the hilt. Ensure an even coverage, as this will be the foundation for the gold NMM effect.
Building Up the Gold NMM:
Use English Uniform to start building up the highlights. Apply this to the raised areas and edges of the hilt. Focus on the left-hand side of the demon face on the hilt to create a focal point.
Gradually add Japanese Uniform and Ice Yellow to the highlights. Be careful with the amount of Ice Yellow used, as it is a significant step up in tone.
Final Highlights:
Apply P3 Morrow White for the final highlights. Use tiny dots and lines to simulate light glinting off the metallic surfaces. Focus on the highest points and edges.
Refining and Blending:
Use Mournfang Brown to glaze over the gold areas, unifying the colours and softening transitions. Apply thin layers to avoid losing the detail in the highlights.
There are lots more tutorials for painting Abaddon! Follow the link below to watch them all, or scroll town to explore them by model part.
Abaddon the Despoiler
A series of videos on how to paint Abbadon the Despoiler to competition standard – (new step-by-step guides included!)
Watch Now
Need more Abaddon? Click below:
Videos Not Showing?
To view any of my paid tutorials, you need to be a member of the website – please click below to log in or join the site.
Not sure about joining just yet? Check out my Youtube for all my free tutorials or sign up as a free “friend” member on this site and visit the free videos page!
If you’d prefer to support me on Patreon, please visit: https://www.patreon.com/RichardGray [...]
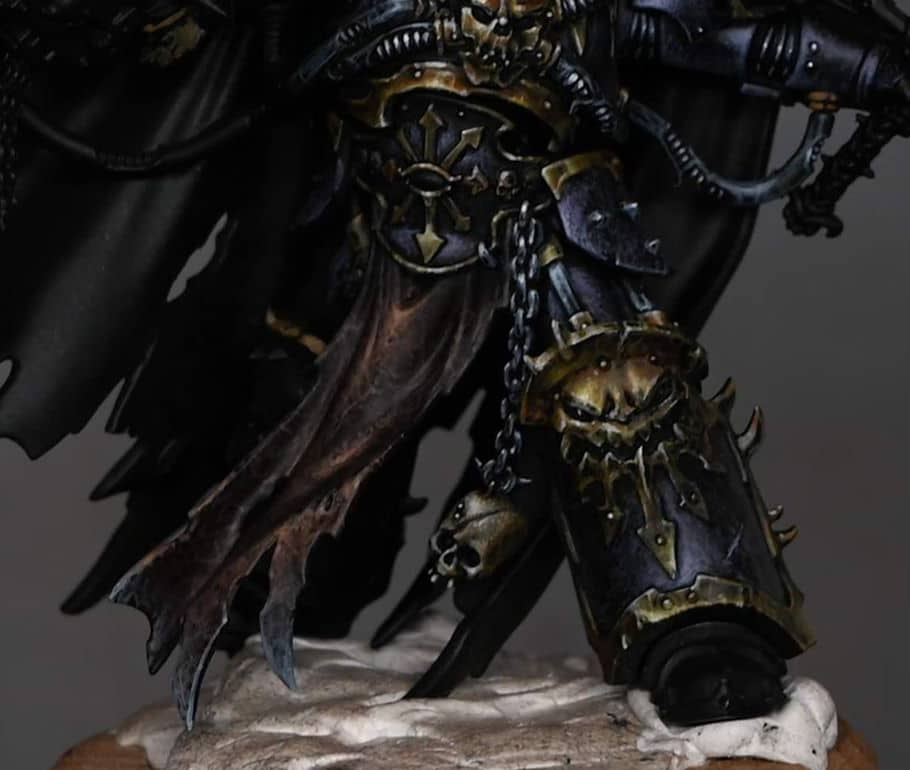
Learn how to paint Abaddon Skull and Leather in this tutorial and guide! Abaddon’s skull, dangling around between his legs (!), serves as a grim reminder of his connection to death and destruction. Painting it required careful layering of XV-88, Morghast Bone, and Screaming Skull to create the right mix of texture and realism. The leather loincloth, on the other hand, allowed for a more rugged, worn appearance. By using Rhinox Hide as the base, and carefully layering Cadian Fleshtone and Morghast Bone for highlights, I aimed to give the leather a weathered, battle-scarred look.
Video – How to Paint Abaddon Skull and Leather
Paints needed
Paints:
Games Workshop: XV-88, Morghast Bone, Screaming Skull, Rhinox Hide, Cadian Fleshtone, Mournfang Brown
Vallejo: Neutral Grey
P3: Morrow White
Painting the Skull
Base Coat:
Start by applying a base coat of XV-88 to the skull. Use a rough, stippling technique to create texture. Thin the paint slightly (1.5 parts water to 1 part paint) to allow the black primer to show through, providing natural shading.
First Highlight:
Apply Morghast Bone using a similar stippling technique. Focus on smaller areas than the base coat, building up highlights gradually. Ensure the paint is thin and applied delicately to avoid overpowering the base coat.
Second Highlight:
Use Screaming Skull for the next layer of highlights. Apply smaller stipples, concentrating on the areas that would catch the most light from the top left. This creates a sense of depth and realism.
Final Highlight:
Add the final highlights with P3 Morrow White. Use a fine brush to apply very small, controlled stipples. This step emphasizes the brightest points on the skull, giving it a natural bone appearance.
Detailing the Studs:
Paint the service studs on the forehead with Vallejo Pale Grey Blue and add a small dot of P3 Morrow White for the final highlight, creating a shiny metallic effect.
Painting the Leather Loincloth
Base Coat:
Apply a rough base coat of Rhinox Hide to the leather loincloth. The coverage doesn’t need to be perfect; a patchy application adds to the texture and realism.
Initial Highlights:
Mix Rhinox Hide and Cadian Fleshtone in a 50/50 ratio. Apply this mix to the highlight areas, using a rough, textured technique. Highlight both convex and concave areas, reflecting where the light hits.
Further Highlights:
Use pure Cadian Fleshtone to add more delicate highlights. Focus on the most raised or prominent areas, using fine, controlled strokes to create the appearance of worn leather.
Final Highlights:
Carefully apply Morghast Bone to the highest points of the leather. Use thin, controlled lines to simulate creases and cracks in the leather, adding depth and realism.
Adding Wear and Tear:
Apply Vallejo Neutral Grey to the torn edges of the leather. This step is optional but adds an interesting worn effect. Be sparing with this colour to avoid overpowering the brown tones.
Glazing:
Glaze the entire loincloth with Rhinox Hide to unify the colours and add depth. Thin the paint to a wash consistency and apply it carefully, focusing more on the shadowed areas to enhance contrast.
Final Touches:
For additional warmth and contrast, apply very light glazes of Mournfang Brown to selected areas. Be cautious with this step to avoid lightening the shadows too much.
There are lots more tutorials for painting Abaddon! Follow the link below to watch them all, or scroll town to explore them by model part.
Abaddon the Despoiler
A series of videos on how to paint Abbadon the Despoiler to competition standard – (new step-by-step guides included!)
Watch Now
Videos Not Showing?
To view any of my paid tutorials, you need to be a member of the website – please click below to log in or join the site.
Not sure about joining just yet? Check out my Youtube for all my free tutorials or sign up as a free “friend” member on this site and visit the free videos page!
If you’d prefer to support me on Patreon, please visit: https://www.patreon.com/RichardGray [...]

Welcome to this detailed guide on how to paint Abaddon the Despoiler, the Warmaster of Chaos. Follow along with my videos to achieve a competition-standard display model. Make sure you have the necessary paints and tools ready – each video will have a complete materials list below it.
Scroll down to explore the tutorials in order, or quick jump to a technique or part on how to paint Abaddon the Despoiler, just below:
Video – How to Paint Abaddon the Despoiler Part One (Gold Armour)Materials and paints neededPreparationInitial AssemblyBase CoatingAdding TexturesHighlights and DetailsDetailing the ArmourFinishing TouchesVideo – How to Paint Abaddon the Despoiler: Skull and LeatherPaints neededPainting the SkullPainting the Leather LoinclothVideo – How to Paint Abaddon Sword, Drach’nyenPaints neededPainting the BladeAdding Non-Metallic Metal (NMM) EffectsPainting the HiltVideo – How to Paint Abaddon Armour TrimPaints neededPainting the Golden TrimPainting the ArmourPainting the Tubing and CablesVideo – How to Paint Abaddon Head and Red OSLPaints neededPainting the HeadCreating the Red OSL EffectRefining and DetailingVideo – How to Paint Abaddon Hair and TalonPaints neededPainting the Talon (Non-Metallic Metal Effect)Painting the HairFinal TouchesVideo – How to Paint Abaddon Cloak (Leather Effect)Paints neededPainting the Inside of the Cloak Video – How to Paint Abaddon Cloak Freehand Part OnePaints and materials neededPreparing the CloakStarting the Freehand Video – How to Paint Abaddon Cloak Freehand Part TwoPaints needed:Refining the Slaanesh HeadDetailing and TexturingVideo – How to Paint Abaddon Cloak Freehand Part ThreePaints neededPainting the Khorne Head Video – How to Paint Abaddon Cloak Freehand Part FourPaints and materials neededPainting the Nurgle Head Video – How to Paint Abaddon Cloak Freehand Part FivePaints needed:Video – How to Paint Abaddon Cloak Freehand Final PartPaints neededVideo – How to Paint Abaddon Trophy RackPaints used:Space Marine HelmetWooden SpikesNMM Metal Spike TipsStep 4: SkullsVideo – How to Paint Abaddon Shoulder PadPaints usedPreparing the SurfaceBase Coating the EyePainting the PupilPainting the IrisHighlighting the EyePainting the NMM Gold TrimAdding Final Details
Video – How to Paint Abaddon the Despoiler Part One (Gold Armour)
Materials and paints needed
Paints:
Games Workshop: Daemonette Hide, Balor Brown, XV-88
Vallejo: Pale Grey Blue, Neutral Grey
Brushes:
Detail brush (size 0 or 00 – I used the Artist Opus range for details)
Standard brush
Primer: Black spray primer
Tools:
Blu Tack
Palette
Water cup
Clean cloth or paper towel
Preparation
Prime the Model:
Ensure the model is clean and free from any mould lines.
Use a black spray primer to coat the entire model evenly. This helps the paint adhere better and provides a solid base for painting.
Not sure how to build and clean your Abaddon?
This video and step by step guide shows the whole process how to build Abraxia, which shows you the techniques you can use when cleaning and prepping your Abaddon. I go over lots of little tips and tricks to hide join lines, remove and smooth down mould marks and fill in gaps.
Watch Now
Read PDF Guide
Initial Assembly
Temporary Assembly:
Use Blu Tack to temporarily hold the model together. This allows easy access to hard-to-reach areas while painting. Parts like the claw and sword can be glued on as they won’t hinder your brush.
Base Coating
Non-Metallic Metal Gold:
Start with the non-metallic gold areas using XV-88 and Balor Brown. These colours are less saturated to create a more desaturated gold effect.
Apply XV-88 as the base coat for the gold areas.
Add Balor Brown to create depth and variation.
Adding Textures
Texture Application:
Use a stippling technique with Balor Brown to create a rough, textured look on the gold areas.
This involves applying the paint in a dabbing motion to simulate scratches and imperfections.
Highlights and Details
Highlighting Gold:
Mix Pale Grey Blue with Balor Brown for the highlights. This will desaturate the gold, giving it a cooler, metallic appearance.
Apply the highlights sparingly, focusing on the edges and raised areas to create contrast.
Painting the Armour:
Use Daemonette Hide for the armour. This light purple has good coverage and adds a unique hue to the model.
Apply it in a rough, uneven manner to maintain the textured look.
Detailing the Armour
Detail Brush Work:
Use a size 0 detail brush to carefully apply highlights and details. This helps avoid accidental paint application on unwanted areas.
For the tubing and other details, use Vallejo Neutral Grey. This neutral colour separates these elements from the armour, providing visual contrast.
Finishing Touches
Final Highlights and Adjustments:
Revisit the highlighted areas with Pale Grey Blue, adding final touches to ensure the gold and armour have the desired reflective quality.
If needed, use a fine brush to add edge highlights with Balor Brown or Pale Grey Blue, ensuring they are sharp and precise.
Balancing the Model:
Ensure that the focal points, like the chest and head, are balanced. Add more warmth to the gold if necessary using a mix of XV-88 and a tiny amount of ice yellow.
Video – How to Paint Abaddon the Despoiler: Skull and Leather
Paints needed
Paints:
Games Workshop: XV-88, Morghast Bone, Screaming Skull, Rhinox Hide, Cadian Fleshtone, Mournfang Brown
Vallejo: Neutral Grey
P3: Morrow White
Painting the Skull
Base Coat:
Start by applying a base coat of XV-88 to the skull. Use a rough, stippling technique to create texture. Thin the paint slightly (1.5 parts water to 1 part paint) to allow the black primer to show through, providing natural shading.
First Highlight:
Apply Morghast Bone using a similar stippling technique. Focus on smaller areas than the base coat, building up highlights gradually. Ensure the paint is thin and applied delicately to avoid overpowering the base coat.
Second Highlight:
Use Screaming Skull for the next layer of highlights. Apply smaller stipples, concentrating on the areas that would catch the most light from the top left. This creates a sense of depth and realism.
Final Highlight:
Add the final highlights with P3 Morrow White. Use a fine brush to apply very small, controlled stipples. This step emphasizes the brightest points on the skull, giving it a natural bone appearance.
Detailing the Studs:
Paint the service studs on the forehead with Vallejo Pale Grey Blue and add a small dot of P3 Morrow White for the final highlight, creating a shiny metallic effect.
Painting the Leather Loincloth
Base Coat:
Apply a rough base coat of Rhinox Hide to the leather loincloth. The coverage doesn’t need to be perfect; a patchy application adds to the texture and realism.
Initial Highlights:
Mix Rhinox Hide and Cadian Fleshtone in a 50/50 ratio. Apply this mix to the highlight areas, using a rough, textured technique. Highlight both convex and concave areas, reflecting where the light hits.
Further Highlights:
Use pure Cadian Fleshtone to add more delicate highlights. Focus on the most raised or prominent areas, using fine, controlled strokes to create the appearance of worn leather.
Final Highlights:
Carefully apply Morghast Bone to the highest points of the leather. Use thin, controlled lines to simulate creases and cracks in the leather, adding depth and realism.
Adding Wear and Tear:
Apply Vallejo Neutral Grey to the torn edges of the leather. This step is optional but adds an interesting worn effect. Be sparing with this colour to avoid overpowering the brown tones.
Glazing:
Glaze the entire loincloth with Rhinox Hide to unify the colours and add depth. Thin the paint to a wash consistency and apply it carefully, focusing more on the shadowed areas to enhance contrast.
Final Touches:
For additional warmth and contrast, apply very light glazes of Mournfang Brown to selected areas. Be cautious with this step to avoid lightening the shadows too much.
Video – How to Paint Abaddon Sword, Drach’nyen
Paints needed
Paints:
Games Workshop: Warpstone Glow, Sotek Green, Gauss Blaster Green
Vallejo: Neutral Grey, Pale Blue Grey, Black
P3: Morrow White
Painting the Blade
Base Coating:
Start by applying a base coat of Warpstone Glow mixed with Sotek Green. This mix should have a bluish tint. Apply multiple thin layers to build up a solid base colour, as Warpstone Glow has poor coverage.
Highlighting the Blade:
Begin highlighting the blade with a mix of Sotek Green and Gauss Blaster Green. Focus on the central and lower sections of the blade to create a gradient effect. Use thin layers to gradually build up the highlights.
Use Gauss Blaster Green for the brightest highlights, especially near the bottom of the blade and around the eyes and mouths of the faces sculpted on the blade.
Detailing the Faces:
Paint the eyes and mouths of the faces on the blade using Gauss Blaster Green. Apply multiple layers to achieve a smooth, glowing effect. Focus the highlights towards the bottom of the eyes and mouths for a more intense glow.
Ensure there is a fine dark line around the edges of the eyes and mouths to maintain definition.
Adding Non-Metallic Metal (NMM) Effects
Mapping Out the NMM Areas:
Use Neutral Grey to map out the areas where you want the NMM effects. Apply this to the edges and central spine of the blade. Keep your brush strokes in the same direction to create a feathered edge effect.
Building Up the NMM Highlights:
Gradually build up the highlights using Pale Blue Grey. Focus on the edges and central spine of the blade. Apply thin layers, blending them into the Neutral Grey.
Add P3 Morrow White for the brightest highlights. Use small, controlled dots and lines to simulate light reflecting off the blade. Be sparing with this colour to avoid overpowering the other highlights.
Refining the Details:
Use Black to deepen the shadows and add contrast. Apply this carefully around the eyes and mouths to enhance the glow effect and define the edges.
Revisit the highlights with Gauss Blaster Green and P3 Morrow White as needed to maintain the glowing effect and sharpness of the NMM.
Painting the Hilt
Base Coating:
Apply a base coat of Rhinox Hide to the hilt. Ensure an even coverage, as this will be the foundation for the gold NMM effect.
Building Up the Gold NMM:
Use English Uniform to start building up the highlights. Apply this to the raised areas and edges of the hilt. Focus on the left-hand side of the demon face on the hilt to create a focal point.
Gradually add Japanese Uniform and Ice Yellow to the highlights. Be careful with the amount of Ice Yellow used, as it is a significant step up in tone.
Final Highlights:
Apply P3 Morrow White for the final highlights. Use tiny dots and lines to simulate light glinting off the metallic surfaces. Focus on the highest points and edges.
Refining and Blending:
Use Mournfang Brown to glaze over the gold areas, unifying the colours and softening transitions. Apply thin layers to avoid losing the detail in the highlights.
Video – How to Paint Abaddon Armour Trim
Paints needed
Games Workshop: XV-88, Balor Brown, Rhinox Hide, Mournfang Brown, Daemonette Hide
Vallejo: Pale Grey Blue
P3: Morrow White
Painting the Golden Trim
Base Coating:
Start by applying a base coat of XV-88 to all the golden trim areas. Use thin layers to ensure an even coverage and maintain the details of the model.
Building Up the Gold:
Apply Balor Brown over the base coat, focusing on the raised areas and edges. This will create depth and variation in the gold.
Add Mournfang Brown to warm up the gold. Apply this colour to the shadowed areas and deeper recesses, blending it smoothly into the Balor Brown.
Highlighting:
Use Pale Grey Blue to start highlighting the trim. This will create a cooler, more desaturated look. Apply the highlights carefully, focusing on the edges and raised areas.
Add final highlights with P3 Morrow White. Use small dots and lines to simulate light reflecting off the gold. Be sparing with this colour to avoid overpowering the other highlights.
Refining and Balancing:
Go back with Balor Brown to reinforce the mid-tones and blend the highlights smoothly. This helps maintain the warmth in the gold and prevents it from looking too silver.
Use Rhinox Hide for deeper shadows, applying it to the darkest areas to enhance the contrast and depth.
Painting the Armour
Base Coating:
Apply a base coat of Daemonette Hide to the armour. Use a textured technique with a stippling or scrubbing motion to create a rough, worn look.
Building Up the Armour:
Mix Daemonette Hide with Pale Grey Blue in a 50/50 ratio. Use this mix to highlight the armour, focusing on the raised areas and edges. Apply the paint in a textured manner, using small dots, scratches, and smears to create a worn effect.
Highlighting:
For the highest highlights, use pure Pale Grey Blue. Apply it sparingly to the most prominent areas, such as the chest and shoulders, to create a focal point.
Refining and Blending:
Use Rhinox Hide and Abaddon Black to glaze the shadows and unify the colours. Apply thin layers to deepen the shadows and enhance the contrast. This step is crucial for creating a dramatic lighting effect.
Painting the Tubing and Cables
Base Coating:
Start with a base coat of Neutral Grey for the tubing and cables. Ensure an even coverage, paying attention to the ribbed sections.
Building Up the Highlights:
Use Pale Grey Blue to highlight the tubing and cables. Apply the highlights to the raised areas, following the curves and contours of the model.
Add final highlights with P3 Morrow White, focusing on the edges and most prominent parts. Use small dots and lines to simulate light reflecting off the cables.
Creating Shiny Effects:
Pay attention to the direction of the light source when applying highlights. Ensure that the highlights are aligned with the light direction on the rest of the model.
Use very small amounts of paint and apply it with the tip of the brush to create precise, controlled highlights.
Video – How to Paint Abaddon Head and Red OSL
Paints needed
Paints:
Games Workshop: Bugman’s Glow, Cadian Fleshtone, Kislev Flesh, Ushabti Bone, Mephiston Red, Evil Sunz Scarlet, Wild Rider Red, Abaddon Black, Rhinox Hide
P3: Morrow White
Painting the Head
Base Coating:
Start by applying a base coat of Bugman’s Glow to Abaddon’s head. The paint should be thinned to ensure translucency, allowing the black primer to show through slightly. This helps to build up the layers gradually and control the lighting effect.
Layering the Skin:
Apply multiple thin layers of Bugman’s Glow to build up the opacity on the areas where light would naturally hit, such as the forehead, cheeks, and chin. Avoid the recessed areas under the eyebrows and the lower parts of the face to maintain shadow.
Adding Shadows:
Use Abaddon Black thinned down with water (around 6:1 ratio) to glaze the lower parts of the face, such as under the cheeks, eyebrows, and chin. This creates a strong contrast and enhances the lighting effect.
Highlighting the Skin:
Begin highlighting the skin with Cadian Fleshtone, focusing on the higher points like the forehead, nose, and upper cheeks. Apply the paint in thin, controlled strokes to create smooth transitions.
Follow with Kislev Flesh for the next level of highlights. Concentrate on the most prominent areas, keeping the highlights small and precise.
Final Highlights:
Use Ushabti Bone mixed with Kislev Flesh for the highest highlights. Apply sparingly to the brightest areas, such as the forehead and the tops of the cheeks.
For the ultimate highlight, add a small amount of P3 Morrow White to the Ushabti Bone mix and apply tiny dots to the highest points. This adds a final touch of brightness.
Creating the Red OSL Effect
Base Red Glow:
Apply Mephiston Red to the areas where the red glow will be the strongest, such as the underside of the chin, lower cheeks, and under the eyebrows. The paint should be thinned and applied in layers to build up the intensity gradually.
Enhancing the Glow:
Use Evil Sunz Scarlet to intensify the red glow. Focus on the areas closest to the light source, such as the lower part of the face and the underside of the chin. Blend the edges smoothly into the Mephiston Red.
Highlighting the Red:
Add Wild Rider Red to the mix for the highlights within the red areas. Apply this to the recesses where the light would be most intense, such as the underside of the chin and the lower edges of the cheeks.
Balancing the Glow:
Occasionally switch back to Bugman’s Glow to refine the flesh highlights and balance them with the red glow. This ensures a seamless transition between the skin tones and the red lighting effect.
Refining and Detailing
Refining Shadows:
Use Rhinox Hide thinned down (around 7:1 ratio) to glaze the deepest recesses and enhance the shadows. Apply this carefully to avoid overpowering the existing layers.
Detailing the Eyes:
Paint the eyes black with Abaddon Black. Add a small white dot with P3 Morrow White to create a catchlight, giving the eyes a lifelike appearance.
Red Glows on Armour:
With the armour in place, use Mephiston Red and Evil Sunz Scarlet to add red highlights to the insides of the armour around the neck and any other areas that would catch the glow. This helps to integrate the head with the rest of the model.
Video – How to Paint Abaddon Hair and Talon
Paints needed
Paints:
Games Workshop: Mournfang Brown, Rhinox Hide, Cadian Fleshtone, Ushabti Bone
Vallejo: Neutral Grey, Pale Grey Blue
P3: Morrow White (or any preferred white)
Painting the Talon (Non-Metallic Metal Effect)
Base Coating:
Start by applying a base coat of Neutral Grey on the talon. Ensure an even coverage over the entire claw.
Initial Highlights:
Using Pale Grey Blue, begin to highlight the raised areas and the edges of the talon. The highlights should be applied in a random, scratchy manner to replicate a worn and weathered effect. Focus more highlights towards the tips of the talon.
Refining the Highlights:
Add Morrow White to your palette. Apply this white in smaller, more concentrated areas to create a strong highlight effect. These highlights should follow the scratches and wear marks to enhance the worn look.
Adjusting Shadows:
If any areas are too bright or need more definition, use Abaddon Black or a mix of Neutral Grey and black to tone down and refine the shadows. Apply this mix to the recesses and areas further from the light source.
Adding Depth:
Introduce a bit of Mournfang Brown thinned with water (around 2:1 ratio) to glaze over the lower parts of the talon. This adds a subtle dirt effect and ground reflection, enhancing the realism.
Painting the Hair
Base Coating:
Start by applying a base coat of Rhinox Hide over all the hair. Be careful around the face to avoid damaging the detailed work already done.
Building Up Highlights:
Use Mournfang Brown to paint the majority of each hair strand, leaving the deeper recesses in Rhinox Hide. This creates the first level of highlight.
Refining Highlights:
With Cadian Fleshtone, begin highlighting the edges and raised areas of the hair. Apply the paint in a slightly scruffy manner to mimic the texture of hair strands. Ensure to follow the direction of the hair flow.
Final Highlights:
Apply Ushabti Bone to the very edges and tips of the hair strands to create the brightest highlights. Use a fine detail brush to add individual strands and enhance the overall texture.
Enhancing Shine:
Introduce Neutral Grey, Pale Grey Blue, and a mix of both to the palette. Apply these colors sparingly to areas where the hair would naturally catch the most light, creating a shiny effect. Add Morrow White to the highest points for a final touch of brightness.
Balancing Colors:
To prevent the hair from looking too non-metallic, glaze over with Rhinox Hide or Mournfang Brown thinned down to dull any overly bright areas. This helps integrate the hair with the rest of the model’s coloor scheme.
Final Touches
Detailing the Leather Wrap:
Paint the leather wrap around the hair with Rhinox Hide as the base coat. Highlight with Mournfang Brown and then add finer highlights with Cadian Fleshtone and Ushabti Bone. Apply small lines and dots to mimic worn leather.
Painting Metal Spikes:
Paint the small metal spikes on the leather wrap using the same NMM technique as the talon. Use Neutral Grey, Pale Grey Blue, and Morrow White to create highlights and depth.
Matte Varnish:
Apply a coat of matte varnish to the model to protect your work and tone down any unwanted shine. This will also help to differentiate between the non-metallic metal effect on the talon and the shiny hair.
Video – How to Paint Abaddon Cloak (Leather Effect)
Paints needed
Paints:
Vallejo: Heavy Sienna, Dwarf Skin, Scab Red
Games Workshop: Rhinox Hide, Mournfang Brown
Painting the Inside of the Cloak
Base Coating:
Prime the cloak black. This will serve as the base for the following layers.
Apply a rough coat of Rhinox Hide. Use a scrubbing motion with your brush to create an uneven, patchy texture. This coat should be about 1.5 parts paint to 1 part water. The goal is to have a base color that isn’t perfectly smooth, as this will add to the weathered effect.
First Layer of Texture:
Use Vallejo Heavy Sienna to add the first layer of texture. This paint is extra opaque, which makes it ideal for creating highlights and adding detail.
Apply the paint using the tip of your brush, creating very rough, random marks all over the cloak. Use a cross-hatching and squiggling technique to add a sense of worn leather. This coat should be around 50/50 paint to water for better flow.
Second Layer of Texture:
Once the first layer is dry, use Cadian Fleshtone to add more refined texture marks. These marks should be thinner and more considered than the previous layer. Focus on the highlight areas but make sure to add some detail in the shadowed areas as well.
Highlight Detailing:
With Dwarf Skin (or a similar light flesh tone), add fine highlights to the cloak. These highlights should be placed carefully to enhance the texture and add depth. Use very thin paint (more than 50/50 water to paint) and minimal paint on the brush to achieve subtle, translucent marks.
Glazing:
Prepare three colors on your wet palette: Mournfang Brown, Rhinox Hide, and Scab Red.
Using heavily thinned Mournfang Brown (around 6 parts water to 1 part paint), glaze over the cloak, focusing on the mid-tones and recesses. This will add a warm tone and help unify the previous layers.
Apply Rhinox Hide glaze to the shadow areas to enhance depth. This glaze should also be very thin.
Use Scab Red to add some variation and interest, especially in the darker areas.
Fading the Edges:
To create a faded effect at the bottom of the cloak, use Scab Red mixed with Rhinox Hide. Thin the paint significantly and apply multiple layers, building up the color gradually.
Make sure the transitions are soft by using long strokes that follow the flow of the cloak.
Final Touches and Varnishing:
After completing the texturing and glazing, apply a coat of matte varnish to protect your work and reduce shine. This will also help to soften the overall effect and integrate all the layers.
Video – How to Paint Abaddon Cloak Freehand Part One
Paints and materials needed
Paints:
Games Workshop: Emperor’s Children, Fulgrim Pink, Rhinox Hide, Kantor Blue
Vallejo: Black, Heavy Grey, Sunset Red
Brushes:
Detail brush with a fine tip (size 00 or 0)
Standard brush
Palette: Wet palette recommended
Tools:
Clean cloth or paper towel
Magnifying visor (optional for fine details)
Ultramar Varnish (for a protective layer)
Preparing the Cloak
Visualizing the Design:
Before starting the freehand, visualize your design. You can use a photo editing tool to superimpose a rough sketch on a picture of the cloak to align your design. This helps in understanding the flow and positioning of the elements.
Base Preparation:
Ensure the texture work on the cloak is complete. This includes the heavy weathering and crack effects as detailed in the previous videos.
Applying a Protective Layer:
Apply a thin coat of Ultramar Varnish to the cloak. This provides a slight protective layer that can make it easier to correct mistakes without damaging the underlying paint.
Starting the Freehand
Marking Guidelines:
Use a thinned black paint to draw a cross on the cloak. This helps in aligning your design elements and ensuring symmetry.
Blocking in Colors:
Start by blocking in rough shapes for each of the Chaos Gods. Use the following colors for the base blocks:
Slaanesh: Fulgrim Pink
Nurgle: Rhinox Hide
Khorne: Sunset Red
Tzeentch: Kantor Blue
Detailed Blocking for Slaanesh:
Focus on the Slaanesh section first. Block in the basic face shape using Fulgrim Pink. Remember, this is just the base layer, so it doesn’t need to be perfect.
Refining the Shape:
Add basic facial features with a darker pink or purple mixed with Fulgrim Pink. This includes the rough position of the eyes, nose, and mouth.
Adjusting and Correcting:
Use Rhinox Hide to correct and refine the shapes. Rhinox Hide is great for this purpose due to its translucency, which allows you to darken areas without completely obscuring the details underneath.
Video – How to Paint Abaddon Cloak Freehand Part Two
Paints needed:
Paints:
Games Workshop: Emperor’s Children, Fulgrim Pink, Mephiston Red
Vallejo: Black, Sunset Red
P3: Morrow White
Refining the Slaanesh Head
Starting with the Horns (Optional):
Initially, I planned to add horns to the Slaanesh head, but later decided against it for compositional reasons. If you prefer to include horns, start by blocking them in with Fulgrim Pink or a similar color. Remember, details on such a small scale can become cluttered quickly.
Painting Over Mistakes:
If you decide against an element (like the horns), don’t worry. Paint over it with the base color of the cloak (Rhinox Hide) to blend it back in. Mistakes are part of the process and can be easily fixed.
Adding Black Hair:
Using Vallejo Black, paint in the hair for the Slaanesh head. Keep the hair wavy and flowing to add movement and dynamism. Focus on keeping the strokes soft and thin.
Refining Facial Features:
Continue refining the face. Use Emperor’s Children mixed with Morrow White for highlights, and Sunset Red mixed with Black for shadows. Work slowly and build up the layers gradually.
Pay special attention to the eye sockets, nose, and mouth. These areas define the expression and overall look of the face.
Balancing Highlights and Shadows:
It’s important to balance your highlights and shadows. Ensure the lighting is consistent across the face to maintain a three-dimensional look. Use Fulgrim Pink and Emperor’s Children for lighter areas and mix in more white for the brightest highlights.
Detailing and Texturing
Teeth and Tongue:
For the teeth, use Morrow White. Since the teeth are very small, it’s challenging to add transitions. Focus on making them look sharp and slightly pointy without over-emphasizing.
For the tongue, start with Sunset Red and add shading with a darker red. Add subtle highlights with Emperor’s Children mixed with Sunset Red.
Softening the Edges:
Around the eyes and mouth, use diluted Rhinox Hide to soften the edges and blend the features into the face. This helps avoid a cartoony look and makes the face appear more natural.
Adding Red Tones:
Use Mephiston Red diluted with water (2.5 parts water to 1 part paint) to add red tones to the face. Apply this glaze lightly to enhance the overall color without overpowering the existing details.
Video – How to Paint Abaddon Cloak Freehand Part Three
Paints needed
Paints:
Games Workshop: Mephiston Red, Evil Sunz Scarlet, Wild Rider Red, Balor Brown, Rhinox Hide, Morghast Bone, Blue Horror
Vallejo: Model Colour Black
Painting the Khorne Head
Base Colours:
Start with Mephiston Red to block in the base color of the Khorne head. Ensure even coverage.
Use Evil Sunz Scarlet to add highlights, focusing on areas that catch the most light.
Outlining with Black:
Use Vallejo Black to outline the features of the face. This helps define the shapes and make them stand out against the brown leather background.
Focus on outlining the eyes, nose, and mouth areas to start shaping the face.
Shading and Highlighting:
For shadows, use Rhinox Hide mixed with Mephiston Red. This helps deepen the shadows without losing the red tone.
Use Balor Brown for the first layer of highlights, especially on the raised areas like the cheekbones and forehead.
For more pronounced highlights, use Wild Rider Red mixed with Morghast Bone. Apply these sparingly to maintain the red color.
Detailing the Horns:
Paint the horns with Balor Brown as the base color.
Add highlights using Morghast Bone, focusing on creating a ribbed texture to give the horns a natural look.
Use Rhinox Hide to add shadows and define the ribs on the horns. The goal is to create a cylindrical appearance.
Adding Facial Features:
Paint the eyes black, then add a small dot of Balor Brown to represent the iris.
Add details to the teeth using Morghast Bone. The teeth should be sharp and prominent.
Use Blue Horror for final highlights on the face and horns. This helps tie all the heads together with a consistent light source.
Additional Details:
Add small horns or spikes on the Khorne head to fill in empty spaces and add more detail. Paint these with Balor Brown and highlight with Morghast Bone.
Use Mephiston Red to paint the gums around the teeth, adding Rhinox Hide for shading.
Video – How to Paint Abaddon Cloak Freehand Part Four
Paints and materials needed
Paints:
Games Workshop: Rhinox Hide, Deathworld Forest, Warboss Green (optional), Balor Brown, Morghast Bone, Screaming Skull, Mournfang Brown, Bugman’s Glow, Cadian Fleshtone
Vallejo: Black, Heavy Grey (optional), Golden Olive, Pale Grey Blue
Painting the Nurgle Head
Base Coloirs:
Start by sketching the rough shape of the Nurgle head with Deathworld Forest.
Use Rhinox Hide to outline and add shadows to define the initial shape of the head.
Building Up Details:
Use Warboss Green and Golden Olive to add highlights, focusing on areas that catch the most light. For a less vivid color, minimize the use of Warboss Green.
Apply Vallejo Black to outline the eyes, nose, and mouth, adding definition to the facial features.
Adding Wrinkles and Texture:
Paint wrinkles and lines using Golden Olive mixed with Deathworld Forest. Follow the natural flow of the face to make the lines look more realistic.
Use Rhinox Hide to deepen the shadows and add more depth to the wrinkles.
Painting the Mouth and Teeth:
Use Bugman’s Glow and Cadian Fleshtone for the gums. Start with Bugman’s Glow for the base and highlight with Cadian Fleshtone.
Paint the teeth with Morghast Bone, and add highlights with Screaming Skull. Outline the teeth with Vallejo Black for better definition.
Highlighting and Shading:
Use Balor Brown and Morghast Bone for additional highlights on the face and horn.
Blend the highlights using Rhinox Hide for smooth transitions. This helps in maintaining the three-dimensional look of the head.
Painting the Horn:
Base coat the horn with Balor Brown. Add highlights using Morghast Bone and Screaming Skull.
Create a ribbed texture on the horn using fine lines and blend with Rhinox Hide.
Detailing the Eyes:
Paint the eyes with Vallejo Black for the pupils and Balor Brown for the iris. Add a small white dot for the light reflection.
Adding the Tongue:
Paint the tongue with Bugman’s Glow and highlight with Cadian Fleshtone.
Add depth and shadows using Rhinox Hide and Pale Grey Blue.
Adjust the shape of the tongue as needed for better composition.
Video – How to Paint Abaddon Cloak Freehand Part Five
Paints needed:
Paints:
Games Workshop: Rhinox Hide, Balor Brown, Morghast Bone, Ushabti Bone, Mournfang Brown, Bugman’s Glow, Cadian Fleshtone, Blue Horror, Night Lords Blue, Temple Guard Blue
Vallejo: Black
Painting the Tzeentch Head
Base Colours:
Start by blocking in the rough shape of the Tzeentch head with Night Lords Blue. This dark background will help define the initial shape.
Use Temple Guard Blue to add initial highlights and define the contours of the head. This contrast will make the shape more visible despite the translucency of the paint.
Refining the Shape:
Use Vallejo Black to outline and add bold details. This will help define the facial features and add depth.
Apply Balor Brown to areas that will represent the beak and other prominent features of the head.
Detailing the Beak:
Use Balor Brown as the base for the beak. Add highlights with Morghast Bone and Ushabti Bone to create a gradient effect.
Paint the inside of the mouth with Vallejo Black to create depth.
Add details to the beak, such as small teeth, using Morghast Bone. Highlight with Ushabti Bone for a more pronounced effect.
Creating Texture:
Use Blue Horror and Temple Guard Blue to create a feathery texture on the head. These marks should be softer and more translucent to blend well with the darker base.
Add small tendrils or feathery protrusions using the same colors to differentiate the Tzeentch head from the other Chaos heads.
Painting the Eye:
Paint the eye with Balor Brown. Use multiple layers to build opacity, focusing on the lower part of the iris for a highlighted effect.
Add the pupil with Vallejo Black and a small white reflection dot with Morghast Bone.
Adding the Tongue:
Use Bugman’s Glow and Cadian Fleshtone to paint the tongue. Start with Bugman’s Glow for the base and highlight with Cadian Fleshtone.
Add depth and shadows using Rhinox Hide and Blue Horror. Adjust the shape of the tongue as needed to fit the overall design.
Final Touches:
Use Mournfang Brown to add subtle shading and transitions on the beak and other areas. This colour’s low opacity will help create smooth blends.
Add small details, such as saliva or other organic textures, with Blue Horror. Ensure the marks are thin and subtle for a more natural look.
Video – How to Paint Abaddon Cloak Freehand Final Part
This final part of the freehand painting series brings together the intricate design on Abaddon’s cloak, highlighting the iconic eight-pointed star of chaos and adding weathering effects for a unified, detailed finish.
Paints needed
Paints:
Games Workshop: XV-88, Balor Brown, Mournfang Brown, Rhinox Hide, Mephiston Red, Evil Sunz Scarlet, Wild Rider Red, Cadian Fleshtone, Temple Guard Blue, Kantor Blue (for additional eyes – iris)
Vallejo: Black, Pale Grey Blue, Neutral Grey, Ice Yellow
P3: Morrow White
Painting the Eight-Pointed Star of Chaos
Base Color:
Start by painting the base of the eight-pointed star with XV-88. This will serve as the foundation for a non-metallic gold effect.
Sketch the star and its arrows lightly, ensuring they fit around the four Chaos Gods’ heads without overpowering the design.
Refining the Star:
Add detail to the arrows, making them irregular in size and shape for a chaotic effect. Be mindful of the faces you have already painted.
Incorporate the star into the existing design by blending it into the heads and the background.
Painting the Eye of Chaos:
In the center of the star, paint an oval shape with Vallejo Black for the eye.
Add highlights around the eye using Neutral Grey and Pale Grey Blue, leaving a black outline for definition.
Paint the iris with Mephiston Red, then layer Evil Sunz Scarlet and Wild Rider Red towards the bottom for a glowing effect.
Add a highlight shine with Pale Grey Blue and a small dot of Morrow White for a realistic eye.
Adding Non-Metallic Gold Effects
Highlighting and Shading:
Add highlights to the star using Balor Brown, Mournfang Brown, and Rhinox Hide for depth. Use Ice Yellow for sharp highlights.
Focus on creating a three-dimensional look by highlighting edges and adding shadow in the appropriate areas.
Use small dots of Morrow White for the brightest points to simulate metallic reflections.
Integrating the Design:
Paint subtle connecting lines from the star to the heads using the same gold colors. This helps unify the design.
Blend some of the gold into the heads, especially around the edges, to show that they are part of a single piece.
Weathering Effects
Adding Wear and Tear:
Use Cadian Fleshtone to add fine scratches and wear marks over the entire design. These should be thin and subtle to avoid overpowering the details.
Focus on the edges and high points of the design where natural wear would occur.
Glazing:
Create glazes with Rhinox Hide and Mournfang Brown by diluting them with water (7:1 or 10:1 ratio).
Apply these glazes over the scratches and around the heads to tone down the highlights and add depth.
Use Mournfang Brown to add warmth back to the gold areas where needed.
Final Touches
Additional Eyes:
Paint small additional eyes throughout the design using the same technique as the main eye, but using Temple Guard Blue and Kantor Blue for the iris.
These eyes add a creepy, chaotic element to the design.
Final Review:
Step back and review the entire cloak to ensure the design is cohesive and balanced.
Make any final adjustments to highlights, shadows, and details to ensure the freehand looks integrated and realistic.
Video – How to Paint Abaddon Trophy Rack
Paints used:
Games Workshop: Balor Brown, Mournfang Brown, XV-88, Morghast Bone, Screaming Skull, Rhinox Hide, Khorne Red, Evil Sunz Scarlet, Wild Rider Red
Vallejo: Neutral Grey, Pale Grey Blue, Ice Yellow, White Grey, Heavy Black Green, Black
Space Marine Helmet
Base Coat:
Apply a base coat of Vallejo Heavy Black Green, thinned down with water (about 50/50 water to paint). Apply a couple of coats for a smooth finish.
Initial Highlights:
Mix Heavy Black Green with Ice Yellow for the first highlight. Start applying this mix to the raised areas, especially the forehead and the curves of the helmet.
Refining Highlights:
Gradually add more Ice Yellow to the mix and continue highlighting. Focus on the forehead curve, the edges, and the top of the helmet. Use controlled brush strokes towards the center of the highlight areas to build opacity and achieve a smooth transition.
Scratches and Battle Damage:
Use the same highlight mix to add scratches and battle damage. Vary the length and direction of the scratches, focusing on edges and raised areas. For deeper scratches, add Rhinox Hide to the mix and apply thin lines.
Final Highlights:
Use a mix of mostly Ice Yellow with a small amount of Heavy Black Green for the brightest highlights. Apply these to the most prominent areas, such as the center of the forehead and the edges of the helmet.
Eye Lens:
Paint the eye lens with Khorne Red, then layer Evil Sunz Scarlet and Wild Rider Red towards the front. Add a tiny dot of Ice Yellow mixed with Wild Rider Red for the final highlight. Finish with a small white dot in the back corner for a reflection.
Wooden Spikes
Base Coat:
Base coat the wooden spikes with Rhinox Hide.
Grain and Texture:
Use Mournfang Brown to paint the wood grain, following the sculpted lines on the model. Focus on the top and bottom of the spikes, leaving the middle section darker.
Layering:
Apply XV-88 to the raised areas and the grain lines, blending it into the Mournfang Brown. This creates a natural wood texture.
Highlights:
Use Morghast Bone for the final highlights, focusing on the edges and the splintered parts of the wood. Add a few thin horizontal lines to represent scratches and imperfections.
NMM Metal Spike Tips
Base Coat:
Base coat the metal tips with Neutral Grey.
Initial Highlights:
Apply Pale Grey Blue to the highlight areas, focusing on the upper parts of the tips and the edges.
Refining Highlights:
Add White Grey to Pale Grey Blue and apply smaller highlights, concentrating on the sharp edges and points.
Final Highlights:
Use pure White Grey for the brightest highlights, applying small dots and lines to the edges and points to simulate a shiny metal effect.
Consistency:
Ensure that the highlight direction is consistent with the light source. For the spikes on the left side, highlight the left edges, and for those on the right, highlight the right edges to create a natural look.
Step 4: Skulls
Base Coat:
Apply a base coat of Rhinox Hide to the skulls.
First Layer:
Apply Balor Brown in thin layers, focusing on the raised areas and leaving the deeper recesses darker.
Building Highlights:
Layer Morghast Bone over Balor Brown, concentrating on the upper sections of the skulls and the areas facing the light source.
Final Highlights:
Use Screaming Skull for the final highlights, applying it to the most prominent areas, such as the forehead, cheekbones, and edges. Use thin layers and build up the color gradually.
Details:
Paint the teeth and eye sockets carefully, using a mix of Morghast Bone and Screaming Skull for highlights. Add small dots and lines to represent cracks and imperfections.
Video – How to Paint Abaddon Shoulder Pad
Paints used
Games Workshop: Flash Gitz Yellow, Temple Guard Blue, Kantor Blue, Cadian Fleshtone, Ushabti Bone, Balor Brown, Mournfang Brown, Rhinox Hide
Vallejo: Black, Pale Grey Blue, Ice Yellow
P3: Morrow White
Preparing the Surface
Surface Preparation:
Start by filling in any sculpted details you don’t need, such as the V-shape on the shoulder pad, using green stuff. Make sure it’s smooth and even. Prime the entire area with black primer.
Base Coating the Eye
Base Coat:
Apply a base coat of Cadian Fleshtone to the entire area where the eye will be. Thin the paint with water (about 1.5 parts water to 1 part paint) and apply 3-4 coats for a smooth, opaque finish.
Painting the Pupil
Pupil Outline:
Using Vallejo Model Color Black, paint a small black circle in the center of the eye area. Gradually enlarge the circle, ensuring it stays centered and smooth. Thin the paint with water (about 1.5 parts water to 1 part paint).
Painting the Iris
Base Layer:
Paint the iris using Kantor Blue. This layer doesn’t need to be perfect; it just provides a base for the subsequent layers.
Detailing the Iris:
Use Temple Guard Blue to paint the detailed lines and shapes within the iris. These lines should radiate from the pupil outward. Vary the direction and thickness of the lines to create a natural look. Ensure the paint is thin and the brush tip is sharp for precise lines.
Adding Depth:
Apply Flash Gitz Yellow over the Temple Guard Blue lines to create a greenish tone. Then, use Pale Grey Blue to refine the details and add highlights within the iris.
Highlighting the Eye
White of the Eye:
Highlight the white of the eye using Ushabti Bone. Thin the paint (1.5 parts water to 1 part paint) and build up the highlights towards the center of the eye. Use stippling to blend the transitions smoothly.
Veins:
Paint veins in the eye using Khorne Red. Make sure the lines are thin and subtle. Draw them from the edges towards the center, and then glaze over them with heavily thinned Doombull Brown (about 6 parts water to 1 part paint) to blend them in.
Shadow and Depth:
Add shadows using Rhinox Hide. Thin the paint (about 2 parts water to 1 part paint) and apply it to the upper eyelid area to create a shadow. This adds depth and realism to the eye.
Painting the NMM Gold Trim
Base Layer:
Apply a base coat of XV-88 to the trim. Ensure smooth coverage.
Building Layers:
Layer Balor Brown over XV-88, focusing on the raised areas and edges. Use Mournfang Brown for shadows and deeper areas.
Highlights:
Add highlights with Ice Yellow. Apply them to the upper parts and edges of the trim. Use Pale Grey Blue sparingly to add cool tones to the gold.
Final Highlights:
Use Morrow White for the brightest highlights. Apply small dots and lines to the edges and points for a sharp, reflective effect.
Adding Final Details
Texture and Scratches:
Add texture to the trim with Balor Brown and Mournfang Brown. Use thin, scratchy lines to create a worn effect. Blend these with Mournfang Brown to maintain the warmth of the gold.
Rivets and Reflections:
Highlight rivets with the same colors used for the trim. Ensure they are brighter than the surrounding areas. Add additional reflection points with Ice Yellow and Morrow White to enhance the metallic effect.
All videos are recorded in HD 1080p or higher – use full screen for the full effect and let the video load completely.
Explore more of my latest tutorials
If you don’t have an account here on my website, please sign up here! I have over 350 video tutorials with steps and tips, plus a selection of PDFs. If you are not sure about joining, you can explore my free videos with a free membership, or take the plunge and become a full subscriber for full access.
If you’d prefer to support me on Patreon, please visit: https://www.patreon.com/RichardGray [...]
Ogroid
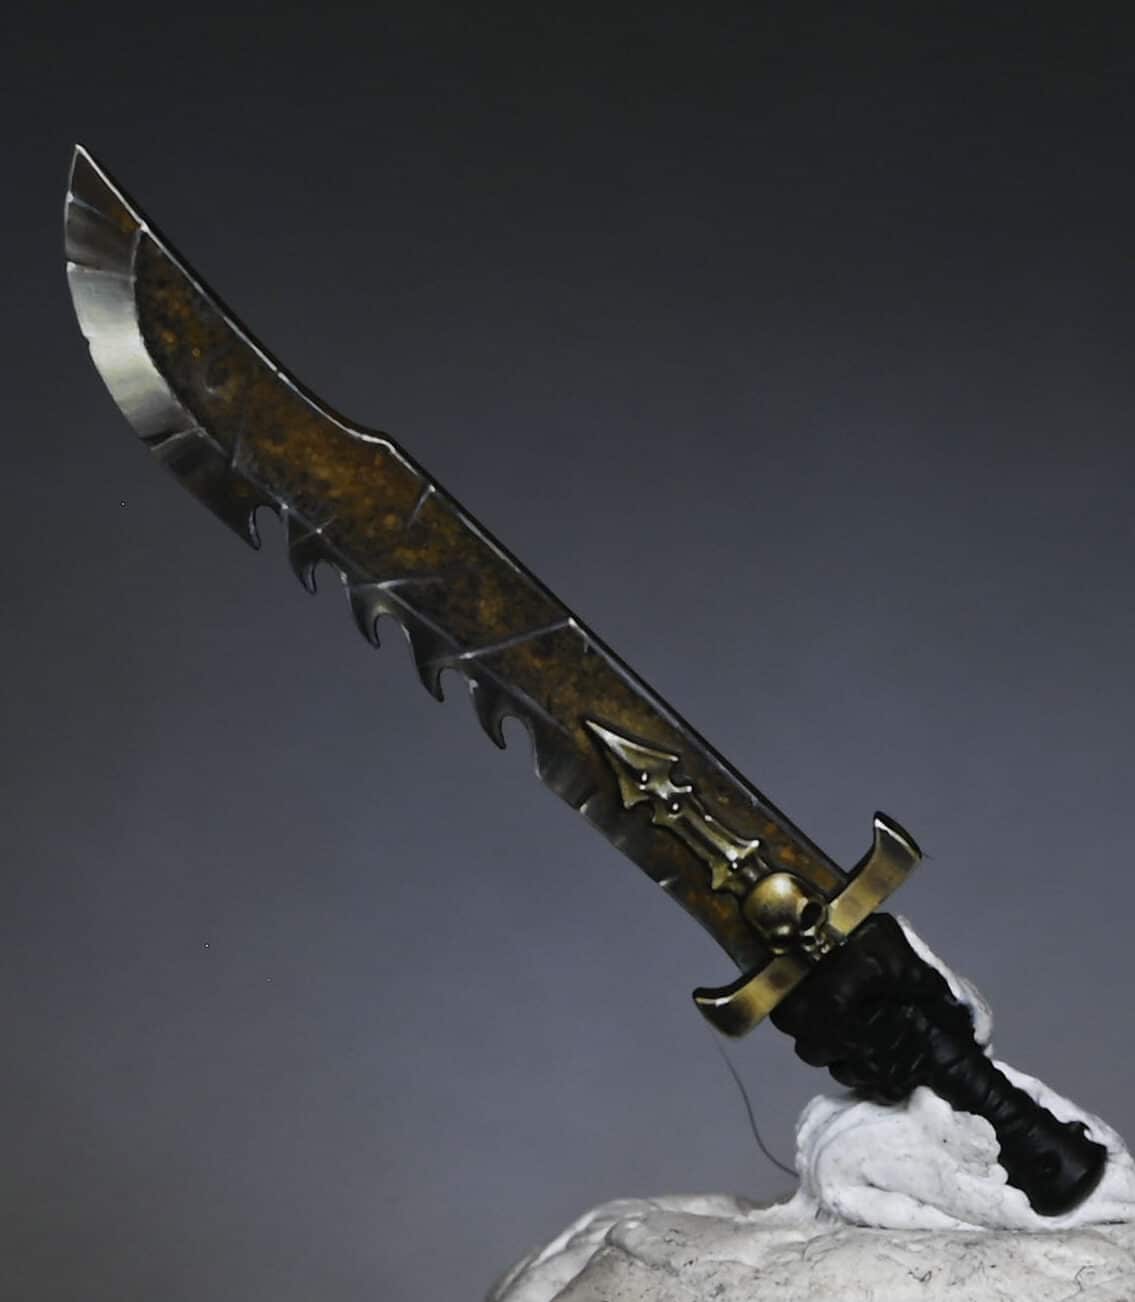
This video and guide shows how to paint an Ogroid sword with NMM (non-metallic metal) and rusty effects.
(Apologies for the dog hair)
Video : How to Paint an Ogroid Sword with NMM and Rust
All videos are recorded in HD 1080p or higher – use full screen for the full effect and let the video load completely. You can also click the little “cog” and change the speed of the video, if I am going too fast (or slow!)
Paints and Materials
Paints
Games Workshop:
Mournfang Brown
Troll Slayer Orange
Fire Dragon Bright
Rhinox Hide
Vallejo:
Ice Yellow
Black
German Grey
Neutral Grey
Pure White (Mecha Color)
Brushes
A range of brushes were used, including but not limited to:
A fine detail brush (such as a size 0 or 00), used for detailed work and fine highlights.
A larger brush (like a size 2), which can be useful for broader strokes and glazing.
Other Materials
Blue Tack: Used to temporarily attach the sword to the model for assessing lighting and highlight placement.
Wet Palette: Essential for mixing and maintaining paint consistency.
Water: For thinning paints, essential for techniques like glazing and stippling.
Step-by-Step
Basecoat and Shades:
Start with a neutral grey, darkened slightly with black.
Create a gradient of greys by mixing German Grey with Neutral Grey, and then adding Ice Yellow for various shades. This creates a series of warm greys for highlights.
Use a wet palette to mix and maintain the paint consistency.
Highlighting the Blade:
Focus on creating a main shine spot on the curved part of the blade, as this area naturally catches more light.
Add random reflections down the blade. Over-highlight initially as you will glaze over these later to reduce their intensity.
Remember that the flat of the blade will be rusty, so avoid highlighting this area.
Adding Details:
Paint distinct blocks of highlights or reflections on the blade, especially around the curved section.
Start with darker greys and layer up to lighter ones, finishing with Pure White for the brightest spots.
Use vertical brush strokes for control and consistency.
Rust Effects on the Blade:
Stipple Mournfang Brown over the flat of the blade for a textured rust effect. Be random and uneven in your application.
Layer Troll Slayer Orange over this, focusing on specific patches for an uneven and realistic rust effect.
Optionally, use Fire Dragon Bright for the brightest rust highlights.
Refining and Adding Scratches:
Add scratches and chips using a mixture of Neutral Grey and Ice Yellow.
Apply these details sparingly and randomly to avoid patterns.
For added depth, add a line of a darker colour (like Rhinox Hide) above some of the scratches.
Finishing Touches:
Make final adjustments to the highlights and rust effects.
Use glazing techniques to soften transitions and blend colours seamlessly.
Be cautious with the use of white; too much can detract from the warm effect.
More tutorials to explore!
If you don’t have an account, please sign up here! The website currently has over 350 video tutorials with steps and tips, plus a selection of PDFs. If you are not sure about joining, you can explore my free videos with a free membership, or take the plunge and become a full subscriber for full access.
If you’d prefer to support me on Patreon, please visit: https://www.patreon.com/RichardGray [...]

This video and guide shows how to paint an Ogroid head, (an Ogriod Theridon) which includes skin, horns, eyes, fur and other details.
Video: How to Paint an Ogroid Theridon Head
Materials Used
Paints from Games Workshop:
Bugman’s Glow
Screaming Skull
Ushabti Bone
Morghast Bone
Hobgrot Hide
XV-88
Mournfang Brown
Rhinox Hide
Death Korps Drab
Evil Sunz Scarlet
Nuln Oil
Balor Brown
Paints from Vallejo:
Ice Yellow
Black
P3:
Morrow White
Step-by-Step Guide
Base Coating:
Begin with a base coat of Bugman’s Glow, applied with an airbrush for efficiency, though hand painting is also acceptable.
Painting Horns:
Start with Screaming Skull, transitioning through Ushabti Bone, Morghast Bone, Hobgrot Hide, XV-88, Mournfang Brown, and finish with Rhinox Hide.
Remember to use multiple coats for a smoother finish.
Apply a thick glaze of watered-down Mournfang Brown for deeper colour in recesses and blending.
Highlighting Horns:
Use a lighter shade such as Morghast Bone, Ushabti Bone, or Screaming Skull for highlighting.
Gradually increase the brightness, moving towards smaller areas.
Add a final touch of white (e.g., Morrow White) for the brightest spots.
Painting the Face:
Start with a base of Bugman’s Glow.
Highlight using a mix of Bugman’s Glow and Ice Yellow, increasing Ice Yellow content for brighter highlights.
Use a mix of Bugman’s Glow and a small amount of Rhinox Hide for shadows.
Painting Eyes:
Base the whites of the eyes with an off-white colour.
Paint the irises with Evil Sunz Scarlet.
Use Vallejo Black for pupils, ensuring they’re higher up in the eye.
Add a tiny white dot for reflection.
Spots on the Forehead:
Start with Rhinox Hide, gradually mixing in Bugman’s Glow for lighter spots lower down the face.
Ensure the paint is thick enough to create a solid, opaque mark.
Teeth:
Base coat with Bugman’s Glow, washed with Nuln Oil.
Edge highlight with Hobgrot Hide.
Apply a glaze of thinned Evil Sunz Scarlet at the gum line.
Further highlight with a lighter bone colour (e.g., Ushabti Bone).
Beard:
Base coat with Death Korps Drab.
Apply successive highlights, adding Ice Yellow to the base colour for each stage.
Focus on creating a smooth, flowing texture.
Metallic Clasp on Beard:
Start with a base of XV-88.
Apply progressive highlights using lighter shades and Ice Yellow.
Add a touch of Mournfang Brown for warmth.
Finish with a bright dot of white for shine.
Notes:
For smoother paint applications, use a wet palette.
Consistently thin your paints, particularly for glazes and highlights.
Brush choice can vary based on preference; smaller brushes offer more control for fine details.
Ensure a consistent light source for realistic highlights and shadows.
Adjust the paint consistency and application technique based on the texture you’re painting (e.g., smooth for horns, diffused for fur).
More Ogroid Tutorials
If you don’t have an account, please sign up here! The website currently has over 350 video tutorials with steps and tips, plus a selection of PDFs. If you are not sure about joining, you can explore my free videos with a free membership, or take the plunge and become a full subscriber for full access.
If you’d prefer to support me on Patreon, please visit: https://www.patreon.com/RichardGray [...]
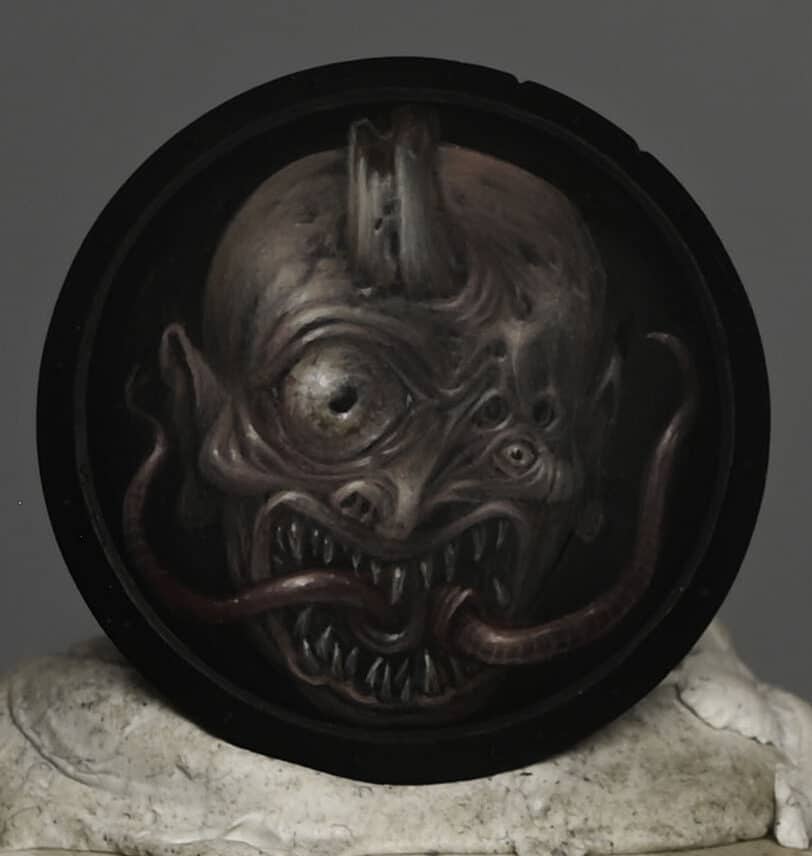
These videos show how to a paint a Nurgle shield with freehand for an Ogroid from the Slaves to Darkness army box.The freehand is if a Nurgle Plaguebearer head and is intended as a potential Golden Demon entry.
Scroll down to explore the tutorials and steps in order, or click the below to quick jump to a technique or section.
Video One: How to Paint a Nurgle Shield with FreehandPaints and Materials UsedPaintsBrushesOther MaterialsStep-by-Step Guide: PreparationBase PaintingFreehand SketchingRefining and DetailingFinal TouchesImportant NotesVideo Two: How to Paint the Shield Shine and NMM TrimPaints and Materials UsedPaintsBrushesOther MaterialsStep-by-Step GuidePreparing the PalettePainting the ShinePainting the NMM TrimFinal TouchesImportant NotesMore Freehand Tutorials to Explore
Video One: How to Paint a Nurgle Shield with Freehand
Paints and Materials Used
Paints
Games Workshop Paints:
Rhinox Hide
Bugman’s Glow
Mournfang Brown
Morghast Bone
Deathworld Forest
Yriel Yellow
Khorne Red
Ushabti Bone
Vallejo Paints:
Black
Ice Yellow
P3 Paint:
Morrow White
Brushes
Artist Opus:
Size 00 brushes (both a newer brush for finer details and an older brush for blending)
Other Materials
Wet Palette: To keep paints moist and workable.
Scalpel: For removing details from the shield.
Sandpaper: For smoothing the shield after using the scalpel.
Primer: Ultimate primer (specifically thinned with X20A for this project).
Mixing Water: For thinning paints on the palette.
Matte Varnish: To even out the surface and finish of the paint job.
Step-by-Step Guide:
Preparation
Prep the Nurgle Shield with Freehand: Remove intricate details from the shield using a scalpel and sand it slightly. Keep some battle damage for authenticity, if you wish.
Prime the Shield: Use Ultimate primer, thinned with X20A, applied in 4-5 thin coats.
Base Painting
Wet Palette Setup: Prepare a wet palette with the following Games Workshop colours: Ice Yellow, Bugman’s Glow, Rhinox Hide, Mournfang Brown, Morghast Bone, Deathworld Forest, Yriel Yellow, Khorne Red, and Ushabti Bone. Also, have Vallejo Black and P3 Morrow White ready.
Mixing Colours: Create various mixes of these colours on the palette, adjusting with water for a thinner consistency (approximately 50/50).
Freehand Sketching
Initial Sketch: Start sketching the Nurgle face on the shield using Bugman’s Glow. This doesn’t have to be symmetrical or realistic.
Adding Details: Gradually add more details like eyes, horns, and facial deformations using the mixed colours. Use Rhinox Hide for shading.
Background Technique: Use Vallejo Black as a ‘rubber’ to tweak and correct the sketch as needed.
Refining and Detailing
Light and Shadow: Use the lighter and darker mixes to create depth, focusing on the facial features. Ensure a balance between highlights and shadows.
Adding Texture: Pay attention to the direction of brushstrokes to replicate skin texture and facial creases.
Final Touches
Metallic Effects: For a Golden Demon entry, ensure to incorporate light volumes and reflective effects on the shield, as well as on the freehand.
Glazing: You may need to glaze over the freehand to integrate it with the shield’s overall shine and metallic effect.
Varnishing: Finish the shield with a matte varnish to even out different paint finishes.
Important Notes
Brush Technique: Use the very tip of your brush for detailed work. Switch between an older brush for blending and a newer one for sharp details.
Colour Importance: While exact colour mixes are flexible, ensure to maintain the overall desaturated, moody look characteristic of Nurgle.
Patience and Layers: Build up the image with multiple thin layers, allowing for smooth transitions and a detailed finish.
Personal Style: Remember, this guide is a base. Feel free to adjust and experiment according to your style.
Video Two: How to Paint the Shield Shine and NMM Trim
Paints and Materials Used
Paints
Vallejo Paints:
Black
German Grey
Neutral Grey
Ice Yellow
White
Games Workshop Paints:
Mournfang Brown
Brushes
Size 00 Brush: Ideal for detailed work and fine textures. Used for most of the work including the shine and trim.
Size 2 Brush: Used for broader strokes and glazing, especially over larger areas.
Other Materials
Wet Palette: To keep the paints moist and workable.
Lamp: For observing how natural light falls on the model, crucial for accurate highlight placement.
Blu Tack or Similar Adhesive: To temporarily attach the shield to the model for correct angle assessment.
Step-by-Step Guide
Preparing the Palette
Setup Wet Palette: Prepare a wet palette with Vallejo Black, German Grey, Neutral Grey, Ice Yellow, White, and Games Workshop Mournfang Brown. Create a gradient of grey shades from black to white, mixing in Ice Yellow and White with Neutral Grey for various mid-tones.
Painting the Shine
Analyzing Light Direction: Position the model under a lamp to observe natural light fall. This will guide the placement of the shine.
Initial Highlights: Start with a Neutral Grey or a mix of Neutral Grey and German Grey to block in the primary highlight areas on the shield.
Building Up Layers: Gradually increase the brightness of the highlights, focusing on the top left as the primary light source. Remember, the paint will appear brighter when wet and duller when dry.
Textured Effect: Use scratchy and stipple brushstrokes with minimal paint for a textured shine effect. Use the very tip of your brush.
Bounce Highlight: Add a bounce highlight at the bottom of the shield, reflecting light from the ground. This should be less bright than the primary highlight. Use a watered-down Mournfang Brown for a glaze over this area.
Painting the NMM Trim
Blocking in Highlights: Use Neutral Grey to block in primary highlights on the trim, focusing on the top area.
Adding Variation: Create a variety of light grey blocks along the trim, ensuring they get darker and more spaced out as they move away from the top highlight.
Refining Highlights: Gradually add lighter tones, culminating in white for the brightest parts. Ensure these highlights align with the shield’s central highlight.
Detailing Scratches: Use white to pick out tiny dots on sculpted scratches for added realism and depth.
Bounce Highlight on Trim: Similar to the shield, add a less intense bounce highlight at the bottom of the trim.
Final Touches
Glazing: Apply a thin glaze of Mournfang Brown over certain areas for colour integration and smooth transitions.
Detail Checks: Make any necessary adjustments to neaten the highlights and ensure consistency in lighting and texture across the shield and trim.
Important Notes
Consistency and Control: Maintain a good balance in paint consistency – not too thick for opaque marks and not too watery to avoid spreading.
Brush Technique: Always pull the brush towards yourself for control and precision, especially important when working near the freehand area.
Learning and Experimentation: Remember, this technique is both challenging and rewarding. Don’t be afraid to experiment and learn from the process.
These guides should provide a clear roadmap to achieving a high-standard finish for your freehand on shields, suitable for display or competition. Remember, practice and patience are key to mastering these techniques and don’t be afraid to do your own thing and add your own personal touch or style to your freehand!
More Freehand Tutorials to Explore
If you don’t have an account, please sign up here! The website currently has over 350 video tutorials with steps and tips, plus a selection of PDFs. If you are not sure about joining, you can explore my free videos with a free membership, or take the plunge and become a full subscriber for full access.
If you’d prefer to support me on Patreon, please visit: https://www.patreon.com/RichardGray [...]
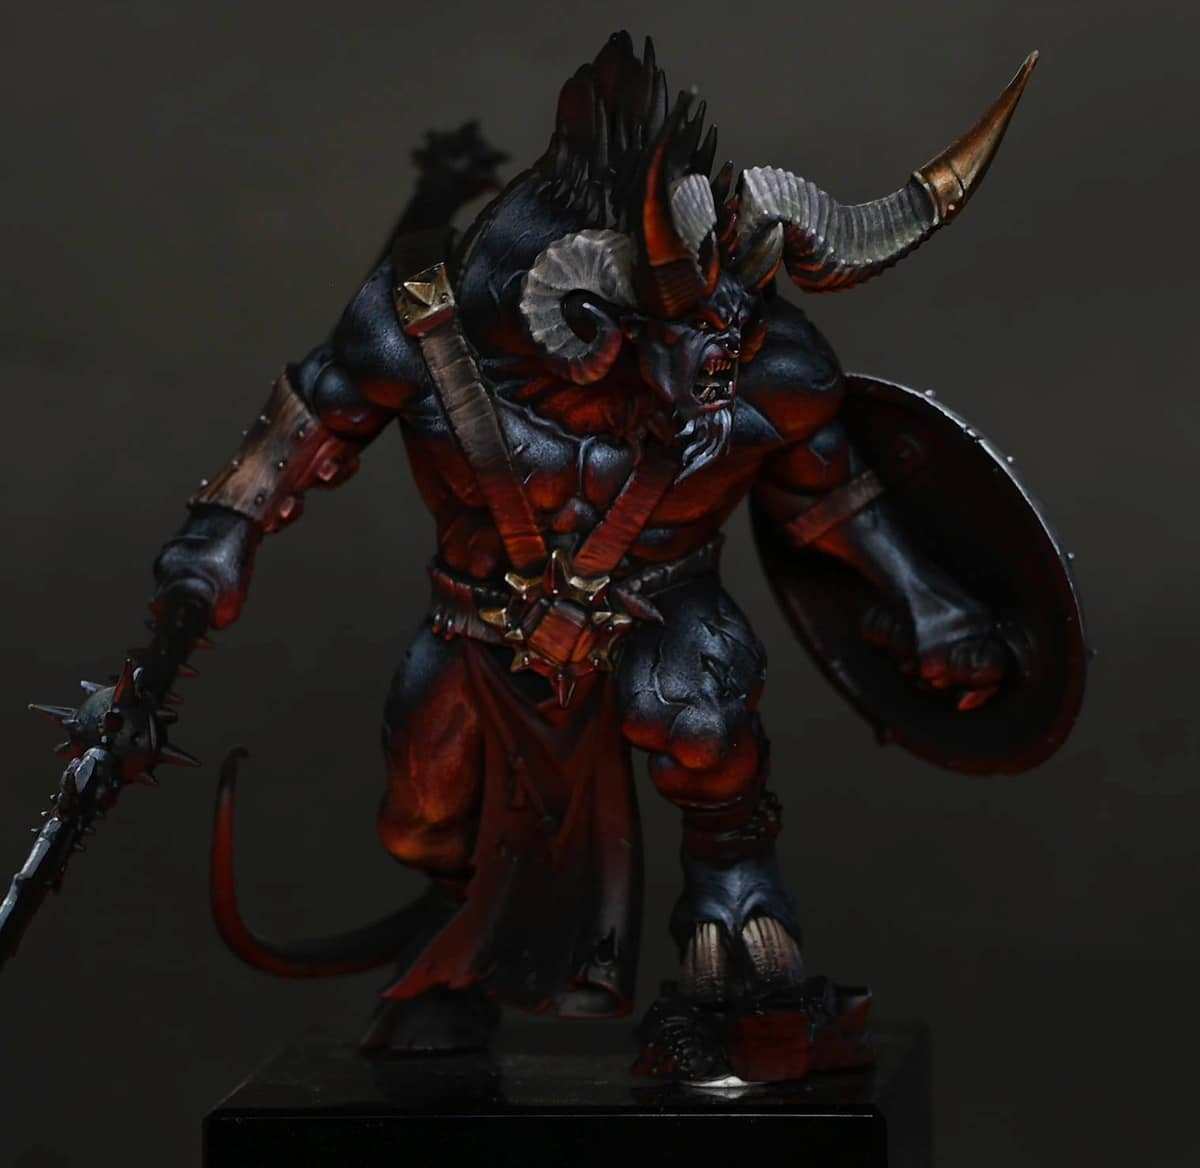
A selection of detailed how to paint an Ogroid Myrmidon videos including red OSL, NMM, fur effect, horns and freehand on his shield.
Myrmidons are masters of the Varanspire’s fighting pits, and have spent decades mastering the gladiatorial arts. In battle, they lead those who seek to join the Everchosen’s legions, for to impress a Myrmidon is to be marked for glory.
Scroll this page to explore the Ogroid Myrmidon videos in order, or click on the below contents to jump to a specific part of the model or technique:
Video: Ogroid Myrmidon Face and HornsMaterials Needed:PreparationPainting the HornsPainting the NMM Gold TipsPainting the FaceFinishing TouchesVideo: Ogroid Myrmidon SkinMaterials NeededStep-by-Step Guide to Ogroid Myrmidon SkinVideo: Ogroid Myrmidon Armour and MusclesMaterials Needed:Painting the Leather ArmourHighlighting Black SkinVideo: Scorpion Freehand First StepsMaterials Needed and PreparationPainting the Ogroid Myrmidon Shield’s BackgroundStarting the Scorpion FreehandVideo: Scorpion Freehand Refinement and DetailsAdditional Materials:What do These Techniques Mean?:Paints:Rendering the ScorpionWeathering the Ogroid Myrmidon Shield
All videos are recorded in HD 1080p or higher – use full screen for the full effect and let the video load completely.
Video: Ogroid Myrmidon Face and Horns
This video shows how to paint the face and horns along with the NMM golden horn tips.
Materials Needed:
Primer: Black
Base Colours: Mephiston Red (GW), Zandri Dust (GW), English Uniform (Vallejo)
Highlights and Shadows: Wild Rider Red (GW), Troll Slayer Orange (GW), Firedragon Bright (GW), Neutral Grey (Vallejo), Pale Grey Blue (Vallejo), Japanese Uniform (Vallejo), Ice Yellow (Vallejo), White (Vallejo), Heavy Warm Grey (Vallejo), Heavy Skintone (Vallejo)
Glazes and Details: Mournfang Brown (GW), Corvus Black (GW)
Airbrush (optional for underside glow effect)
Preparation
Priming: Begin with a black primer for deep shadows and to prepare the model for painting.
Underglow Effect: Optionally, apply Mephiston Red thinned down with an airbrush (or manually) for an underside glow. This step is not essential but helps to establish the mood and lighting direction for the model.
Painting the Horns
Base Layer: Apply a base coat of Rhinox Hide (GW) on the horns, focusing on a rough texture to highlight the weathered appearance.
Adding Texture: Use Zandri Dust (GW) to build the texture on the horns, applying it unevenly to create a worn look.
Highlighting: Mix Zandri Dust with lighter shades such as Heavy Warm Grey and Heavy Skintone (Vallejo) for highlights, concentrating lighter colours towards the centre of the horns and darker shades towards the tips.
Refining Texture: Return with Rhinox Hide to deepen the shadows in textured areas, using a fine brush to emphasise details and the rough texture.
Glazing: Employ thin glazes of Mournfang Brown and Corvus Black sparingly to blend and soften transitions.
Painting the NMM Gold Tips
Base Colours: Start with English Uniform (Vallejo) for the metallic areas’ base.
Building up Metallics: Progress from Japanese Uniform to Ice Yellow (Vallejo), highlighting edges and raised areas to simulate gold reflection.
Final Highlights: Use White (Vallejo) for the sharpest highlights on edges and high points to mimic metal shine.
Glazing for Depth: Apply glazes of Mournfang Brown to deepen and enrich the gold, being careful not to cover the brightest highlights.
Painting the Face
Base Layer for Skin: Use Neutral Grey (Vallejo) for the skin, avoiding areas catching the underglow.
Adding Shadows and Highlights: Apply Pale Grey Blue (Vallejo) for highlights on raised areas like the brow, nose, and cheeks, maintaining the glowing effect in recesses.
Detailing and Refining: Deepen shadows and define features with Corvus Black (GW), enhancing skin texture and facial details with fine highlights of Pale Grey Blue and White (Vallejo).
Adjusting the Underglow: Touch up the underglow with Mephiston Red, Wild Rider Red, and Troll Slayer Orange (GW) to ensure it complements the overall painting, adjusting intensity accordingly.
Finishing Touches
Adjusting Highlights: Reassess highlights and shadows, ensuring they align with the desired atmosphere and light source.
Details: Focus on small details like teeth and eyes, applying light and shadow principles for emphasis.
Glazing: Use glazes to smooth transitions and adjust colour saturation where needed, particularly on the horns and face to unify the piece.
Video: Ogroid Myrmidon Skin
This guide will focus on achieving a textured ogroid skin effect with top-down highlights and red underlighting, alongside a detailed approach to creating a realistic muscle definition. We’ll be using a mix of Vallejo and Games Workshop paints to achieve this effect.
Materials Needed
Vallejo Paints: Black, Dark Grey, Neutral Grey, Pale Grey Blue
Games Workshop Paints: Mephiston Red, Evil Sunz Scarlet, Wild Rider Red, Troll Slayer Orange, Fire Dragon Bright
Size 0 Artist Opus Brush (preferably a newer one for fine stippling)
A wet palette
Water for thinning paints
Step-by-Step Guide to Ogroid Myrmidon Skin
Step 1: Base Coating
Begin by base coating the skin of your Ogroid Myrmidon with Mephiston Red to prepare for the red underlighting. This will serve as the base for our stippling technique later on.
Step 2: Stippling Technique Introduction
For the skin’s texture, we’re going to use a stippling technique. This involves applying tiny dots of paint to create a textured appearance. Start with Vallejo Dark Grey and a touch of Neutral Grey, using a fairly new brush for precise dot application. The goal is to create very fine dots, so remember to apply very light pressure to avoid creating larger, triangular marks.
Step 3: Adding Red Underlighting
Switch to Games Workshop’s Evil Sunz Scarlet, stippling over the red base layer to begin creating the underlighting effect. This will initially appear very bright but will dull down as it dries. Layer over with Mephiston Red to help blend and soften the transition.
Step 4: Top-Down Highlights
For the top-down highlights, use a gradient from Dark Grey to Pale Grey Blue, progressing from darkest to lightest as you move up the model. This mimics natural lighting, emphasizing the muscle contours and giving the skin a realistic depth. Remember, the highlights should reflect where natural light would hit the model, focusing on the tops of curves and muscle peaks.
Step 5: Fine-Tuning Highlights and Shadows
As you apply your highlights, consider the model’s anatomy. Paint sharp lines of Pale Grey Blue in the recesses between muscles, such as between the pectorals and deltoids, to accentuate the definition. Use the light from your lamp as a guide to ensure consistency in your highlighting.
Step 6: Red and Orange Highlights
For the lower parts of the muscles, closer to the model’s base, switch to the warmer tones on your palette: Wild Rider Red, Troll Slayer Orange, and Fire Dragon Bright. Apply these colours opposite to the top-down lighting, focusing on areas that would be illuminated from below. This step may require patience due to the translucency of reds and oranges, necessitating multiple layers for a solid appearance.
Step 7: Blending and Correcting
If any areas stand out too much or the transitions between colours are too stark, revisit them with intermediary shades to blend them more naturally. Stippling allows for easy correction; simply overlay with the appropriate colour to soften and integrate any harsh lines or spots.
Step 8: Final Touches to the Skin
After completing the stippling, examine the model for any areas that may need additional work. Adjust the intensity of the highlights and shadows as necessary, ensuring that the focal points, such as the face and upper torso, are the brightest and most detailed areas.
Video: Ogroid Myrmidon Armour and Muscles
All videos are recorded in HD 720p or higher – use full screen for the full effect and let the video load completely.
Materials Needed:
Games Workshop Paints: Rhinox Hide, Mournfang Brown, Cadian Fleshtone, Morghast Bone, Abaddon Black, Wild Rider Red, Fire Dragon Bright, Corvus Black
Vallejo Paints: Pale Grey Blue, Neutral Grey, Dark Grey, Black
A wet palette for mixing and thinning paints
Fine detail brushes
Water for thinning paints
Painting the Leather Armour
Base Layer: Start with a base layer of Rhinox Hide. This dark brown serves as a foundation, offering a subtle brown hue. Apply multiple coats if necessary, but remember, the subsequent layers will add depth and detail.
Mixing for Texture: Create a 50/50 mix of Rhinox Hide and Cadian Fleshtone on your wet palette. This mix will serve as the primary texture colour for the leather.
Applying Texture: Use the 50/50 mix to start adding texture to the leather. Focus on long, vertical, slightly erratic strokes to mimic the natural wear and tear of leather. Pay attention to the armour’s sculpted details, like studs and indentations, to guide your texturing.
Adding Highlights: Gradually lighten the texture by incorporating more Cadian Fleshtone and Morghast Bone into your mixes. Apply these lighter tones to areas that would naturally catch the light, enhancing the texture and giving the leather a more three-dimensional appearance.
Glazing for Depth: Once you’re satisfied with the texture, use a glaze of Mournfang Brown and Abaddon Black to tone down the highlights and integrate the textures, adding depth and richness to the leather. This step unifies the various layers of texture and colour.
Highlighting Black Skin
Preparing Your Palette: On your wet palette, arrange Vallejo paints from Dark Grey to Pale Grey Blue, including mixed shades for smoother transitions. Thin these paints more than usual to avoid building up too thick a layer with the stippling technique.
Stippling Technique: Begin stippling with Dark Grey, gradually transitioning through the greys to Pale Grey Blue for the highlights. Stippling involves applying numerous tiny dots to build up texture and colour depth. This technique is particularly effective for creating a nuanced, textured appearance on the skin.
Attention to Lighting: When applying your highlights, consider the model’s primary viewing angle and the imaginary light source. Focus your highlights on areas that would naturally be illuminated, like the tops of muscles, while keeping the base skin tone visible in shadowed areas.
Refining Highlights: Use glazes of Abaddon Black and Corvus Black to soften and blend the stippled highlights, ensuring they contribute to the model’s overall appearance without overpowering the base skin tone. These glazes help integrate the highlights and create a cohesive look.
Final Touches: Revisit any areas that may require additional highlights or adjustments, enhancing the model’s dimensional appearance. Pay special attention to achieving a balance between the highlighted areas and the overall dark tone of the skin.
Video: Scorpion Freehand First Steps
This first part of the tutorial covers the preparation and beginning stages of scorpion freehand painting on the Ogroid Myrmidon’s shield
Materials Needed and Preparation
Primer: Black
Base Colours: XV-88, Mournfang Brown, Zandri Dust, Morghast Bone (All Games Workshop)
Detailing: Model Colour Black (Vallejo)
Tools: Scalpel, fine-grit sandpaper, large and fine brushes, wet palette
Preparing the Shield: Remove the model’s original shield detail using a scalpel and fine-grit sandpaper to create a smooth surface for freehand painting. This process ensures a flat canvas for your artwork.
Priming: Prime the entire model, including the shield, in black to provide a uniform base coat. If desired, apply an underglow effect with Mephiston Red using an airbrush on the model’s underside for atmospheric lighting.
Painting the Ogroid Myrmidon Shield’s Background
Base Layer: Start by applying XV-88 in multiple thin layers to achieve an opaque finish. Mix approximately one part water to one part paint, using a fairly large brush for broad strokes. Patience is key; allow each layer to dry thoroughly.
Blending: While the XV-88 base is still workable, begin blending Mournfang Brown from the bottom of the shield upwards. This technique creates a gradient effect that adds depth to the shield’s background.
Highlighting and Texture: Use Zandri Dust and Morghast Bone to introduce highlights, particularly focusing on the top of the shield where light naturally hits. This process also starts to introduce the worn, textured look desired for the shield.
Brush Techniques: To achieve a smoother blend and avoid harsh brush marks, employ cross-hatching and other texturing techniques with your brush. This approach will help create a more natural transition between colours.
Glazing for Smoothness: After the initial layering and texturing, apply glazes of the same colours (XV-88, Mournfang Brown, Zandri Dust, Morghast Bone) diluted with water (about six or seven parts water to one part paint). Glazing helps smooth out transitions and enrich the colour depth.
Starting the Scorpion Freehand
Design Placement: Before starting the scorpion freehand, consider the shield’s round shape and ensure your design aligns properly with the model’s orientation. Use the back of the shield as a reference to determine the top and bottom.
Sketching the Design: With Model Colour Black, begin sketching your scorpion freehand design. For this tutorial, a scorpion motif is used. Start with basic shapes and outlines, keeping the lines thin and manageable. This stage is about laying down the design’s foundation, so precision is more important than coverage.
Refining the Design: Gradually thicken and refine the outlines of your scorpion freehand design, paying close attention to symmetry and proportion. Adjust the thickness of the lines to create depth and interest.
Correcting Mistakes: If you make any errors or wish to adjust the design, you can cover mistakes with the base colours (XV-88, Mournfang Brown, Zandri Dust, Morghast Bone). This step may require reapplying glazes to blend the corrections into the background.
Video: Scorpion Freehand Refinement and Details
Looking at rendering the freehand scorpion to achieve a three-dimensional appearance and then weathering the shield for a battle-worn look.
Additional Materials:
A wet palette to keep paints hydrated and to mix custom colours.
Fine grit sandpaper for smoothing the shield surface after modifications.
A scalpel or hobby knife for removing details from the shield.
Water container for rinsing brushes.
Paper towels or a clean cloth for brush drying and paint removal.
Mixing palette for creating custom colours and diluting paints for glazing.
Hairdryer (optional) for speeding up the drying process between layers.
Sponge (optional, not used but mentioned) for creating textured weathering effects.
What do These Techniques Mean?:
Pointillism and Stippling: For creating textured effects on the scorpion’s carapace.
Glazing: Thin layers of paint applied to subtly shift colours or blend transitions.
Fine Detail Work: Using the very tip of a fine brush to outline and add intricate details to the scorpion.
Weathering: Applying chips, scratches, and wear to both the scorpion and the shield’s surface to create a battle-worn look.
Paints:
Games Workshop (Citadel):
Mournfang Brown
XV-88
Zandri Dust
Morghast Bone
Naggaroth Night
Khorne Red
Corax White (for mixing and creating lighter tones)
Vallejo:
Neutral Grey
Dark Grey
Warm Grey
Pale Grey Blue
Model Colour Black (for outlining and fine details)
P3 (Privateer Press):
Morrow White
Iyanden Yellow (mentioned as a substitute for Iosen Green for brighter effect)
Rendering the Scorpion
Base Layer: Begin with Neutral Grey for stippling and pointillism across the scorpion, creating texture and initial shadows. This technique simulates the scorpion’s shiny carapace.
Changing Techniques: Partway through, you might find the style needs adjustment to better represent the scorpion on a smaller scale. While aiming for realism, ensure the final look is visually appealing on the model.
Colour Palette Adjustment: Add Warm Grey and Pale Grey Blue to introduce subtle tonal variations, enhancing the scorpion’s three-dimensional appearance.
Highlighting: Use Morrow White sparingly for the highest highlights, focusing on areas like the pincers, the body segments, and the stinger to emphasize their importance and shininess.
Colour Glazing: Apply thin glazes of Naggaroth Night and Iyanden Yellow (substituted for Iosen Green for a brighter effect) to add colour depth without overpowering the grey tones. This step subtly alters the scorpion’s colour while maintaining its overall grey appearance.
Weathering the Ogroid Myrmidon Shield
Preparation: Use the base colours (Mournfang Brown, XV-88, Zandri Dust, Morghast Bone) to match the weathering effects to the shield’s underlying tones.
Technique: Apply small, opaque marks with Dark Grey and Neutral Grey to simulate chips and wear, focusing on areas that would naturally receive more damage. Use a fine brush for precision.
Detailing: Enhance the weathering with thin lines and stippling, simulating scratches and abrasions. This creates a realistic effect of battle damage across the shield, including over the scorpion design.
Integration: To integrate the scorpion with the shield’s weathered look, apply thin glazes of Mournfang Brown over the entire design. This unifies the scorpion with the shield’s background, softening contrasts and blending the freehand work into the overall shield design.
Colour Highlights: For areas requiring correction or emphasis, use the shield’s base colours, adjusted one shade lighter, to subtly highlight edges and details, ensuring the scorpion remains the focal point.
If you don’t have an account, please sign up here! The website currently has over 350 video tutorials with steps and tips, plus a selection of PDFs. If you are not sure about joining, you can explore my free videos with a free membership, or take the plunge and become a full subscriber for full access.
If you’d prefer to support me on Patreon, please visit: https://www.patreon.com/RichardGray [...]
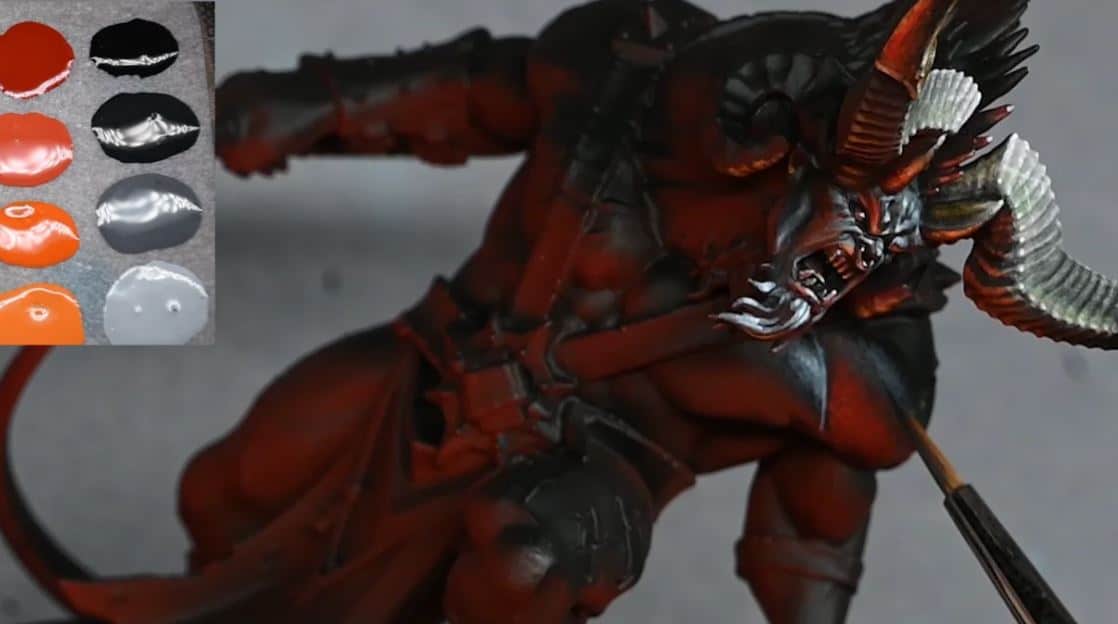
This tutorial video and step-by-step guide shows how to paint the textured ogroid skin and red glow of the Ogroid Myrmidon from Games Workshop.
Video: How to Paint Ogroid Skin
This guide will focus on achieving a textured ogroid skin effect with top-down highlights and red underlighting, alongside a detailed approach to creating a realistic muscle definition. We’ll be using a mix of Vallejo and Games Workshop paints to achieve this effect.
Materials Needed:
Vallejo Paints: Black, Dark Grey, Neutral Grey, Pale Grey Blue
Games Workshop Paints: Mephiston Red, Evil Sunz Scarlet, Wild Rider Red, Troll Slayer Orange, Fire Dragon Bright
Size 0 Artist Opus Brush (preferably a newer one for fine stippling)
A wet palette
Water for thinning paints
Step-by-Step Guide to Ogroid Skin
Step 1: Base Coating
Begin by base coating the skin of your Ogroid Myrmidon with Mephiston Red to prepare for the red underlighting. This will serve as the base for our stippling technique later on.
Step 2: Stippling Technique Introduction
For the skin’s texture, we’re going to use a stippling technique. This involves applying tiny dots of paint to create a textured appearance. Start with Vallejo Dark Grey and a touch of Neutral Grey, using a fairly new brush for precise dot application. The goal is to create very fine dots, so remember to apply very light pressure to avoid creating larger, triangular marks.
Step 3: Adding Red Underlighting
Switch to Games Workshop’s Evil Sunz Scarlet, stippling over the red base layer to begin creating the underlighting effect. This will initially appear very bright but will dull down as it dries. Layer over with Mephiston Red to help blend and soften the transition.
Step 4: Top-Down Highlights
For the top-down highlights, use a gradient from Dark Grey to Pale Grey Blue, progressing from darkest to lightest as you move up the model. This mimics natural lighting, emphasizing the muscle contours and giving the skin a realistic depth. Remember, the highlights should reflect where natural light would hit the model, focusing on the tops of curves and muscle peaks.
Step 5: Fine-Tuning Highlights and Shadows
As you apply your highlights, consider the model’s anatomy. Paint sharp lines of Pale Grey Blue in the recesses between muscles, such as between the pectorals and deltoids, to accentuate the definition. Use the light from your lamp as a guide to ensure consistency in your highlighting.
Step 6: Red and Orange Highlights
For the lower parts of the muscles, closer to the model’s base, switch to the warmer tones on your palette: Wild Rider Red, Troll Slayer Orange, and Fire Dragon Bright. Apply these colors opposite to the top-down lighting, focusing on areas that would be illuminated from below. This step may require patience due to the translucency of reds and oranges, necessitating multiple layers for a solid appearance.
Step 7: Blending and Correcting
If any areas stand out too much or the transitions between colors are too stark, revisit them with intermediary shades to blend them more naturally. Stippling allows for easy correction; simply overlay with the appropriate color to soften and integrate any harsh lines or spots.
Step 8: Final Touches
After completing the stippling, examine the model for any areas that may need additional work. Adjust the intensity of the highlights and shadows as necessary, ensuring that the focal points, such as the face and upper torso, are the brightest and most detailed areas.
This painting technique, while time-consuming, results in a strikingly realistic and textured skin effect for your Ogroid Myrmidon, emphasizing the muscular definition and adding depth with the red underlighting. The key to this method is patience and layering, allowing each layer to dry and building up the texture gradually. Good luck!
More Ogroid? Click below! :
If you don’t have an account, please sign up here! The website currently has over 350 video tutorials with steps and tips, plus a selection of PDFs. If you are not sure about joining, you can explore my free videos with a free membership, or take the plunge and become a full subscriber for full access.
If you’d prefer to support me on Patreon, please visit: https://www.patreon.com/RichardGray [...]
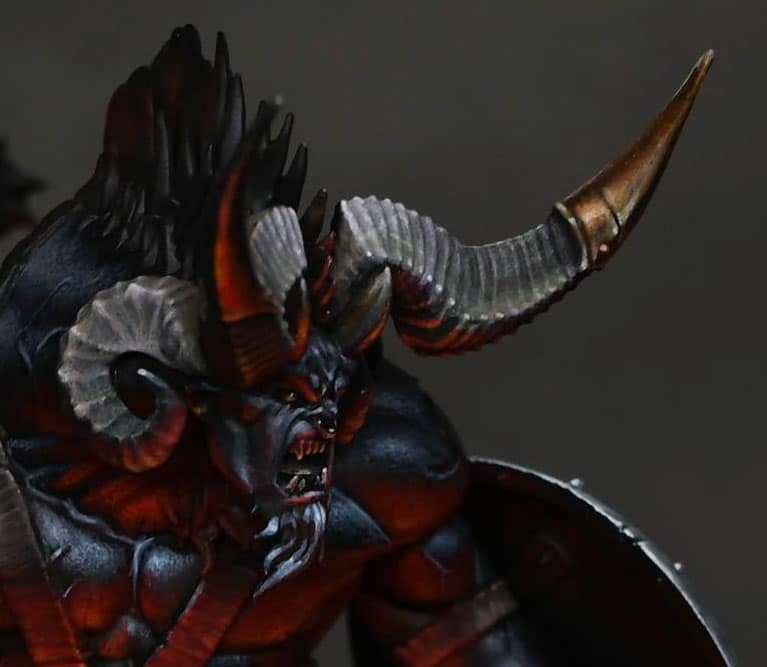
Video and step by step guide on how to paint an Ogroid Head, with the distinctive lighting effects, horns and NMM (non metallic metal.
I have done more than how to paint an Ogroid head, however! To watch all of my tutorials for him on one page, follow the link below:
Ogroid Myrmidon
A selection of detailed videos including red OSL, NMM, fur effect, horns and freehand on his shield.
Watch Now
Video Tutorial: How to Paint an Ogroid Head with Horns and NMM
Materials Needed to Paint the Ogroid Head, Horns and NMM:
Primer: Black
Base Colours: Mephiston Red (GW), Zandri Dust (GW), English Uniform (Vallejo)
Highlights and Shadows: Wild Rider Red (GW), Troll Slayer Orange (GW), Firedragon Bright (GW), Neutral Grey (Vallejo), Pale Grey Blue (Vallejo), Japanese Uniform (Vallejo), Ice Yellow (Vallejo), White (Vallejo), Heavy Warm Grey (Vallejo), Heavy Skintone (Vallejo)
Glazes and Details: Mournfang Brown (GW), Corvus Black (GW)
Airbrush (optional for underside glow effect)
Preparation
Priming: Begin with a black primer for deep shadows and to prepare the model for painting.
Underglow Effect: Optionally, apply Mephiston Red thinned down with an airbrush (or manually) for an underside glow. This step is not essential but helps to establish the mood and lighting direction for the model.
Painting the Horns
Base Layer: Apply a base coat of Rhinox Hide (Games Workshop) on the horns, focusing on a rough texture to highlight the weathered appearance.
Adding Texture: Use Zandri Dust (Games Workshop) to build the texture on the horns, applying it unevenly to create a worn look.
Highlighting: Mix Zandri Dust with lighter shades such as Heavy Warm Grey and Heavy Skintone (Vallejo) for highlights, concentrating lighter colours towards the centre of the horns and darker shades towards the tips.
Refining Texture: Return with Rhinox Hide to deepen the shadows in textured areas, using a fine brush to emphasise details and the rough texture.
Glazing: Employ thin glazes of Mournfang Brown and Corvus Black sparingly to blend and soften transitions.
Painting the NMM Gold Tips
Base Colours: Start with English Uniform (Vallejo) for the metallic areas’ base.
Building up Metallics: Progress from Japanese Uniform to Ice Yellow (Vallejo), highlighting edges and raised areas to simulate gold reflection.
Final Highlights: Use White (Vallejo) for the sharpest highlights on edges and high points to mimic metal shine.
Glazing for Depth: Apply glazes of Mournfang Brown to deepen and enrich the gold, being careful not to cover the brightest highlights.
Painting the Face
Base Layer for Skin: Use Neutral Grey (Vallejo) for the skin, avoiding areas catching the underglow.
Adding Shadows and Highlights: Apply Pale Grey Blue (Vallejo) for highlights on raised areas like the brow, nose, and cheeks, maintaining the glowing effect in recesses.
Detailing and Refining: Deepen shadows and define features with Corvus Black (GW), enhancing skin texture and facial details with fine highlights of Pale Grey Blue and White (Vallejo).
Adjusting the Underglow: Touch up the underglow with Mephiston Red, Wild Rider Red, and Troll Slayer Orange (GW) to ensure it complements the overall painting, adjusting intensity accordingly.
Finishing Touches
Adjusting Highlights: Reassess highlights and shadows, ensuring they align with the desired atmosphere and light source.
Details: Focus on small details like teeth and eyes, applying light and shadow principles for emphasis.
Glazing: Use glazes to smooth transitions and adjust colour saturation where needed, particularly on the horns and face to unify the piece.
More Ogroid Videos can be viewed below:
If you don’t have an account here on my website, please sign up here! I have over 350 video tutorials with steps and tips, plus a selection of PDFs. If you are not sure about joining, you can explore my free videos with a free membership, or take the plunge and become a full subscriber for full access.
If you’d prefer to support me on Patreon, please visit: https://www.patreon.com/RichardGray [...]
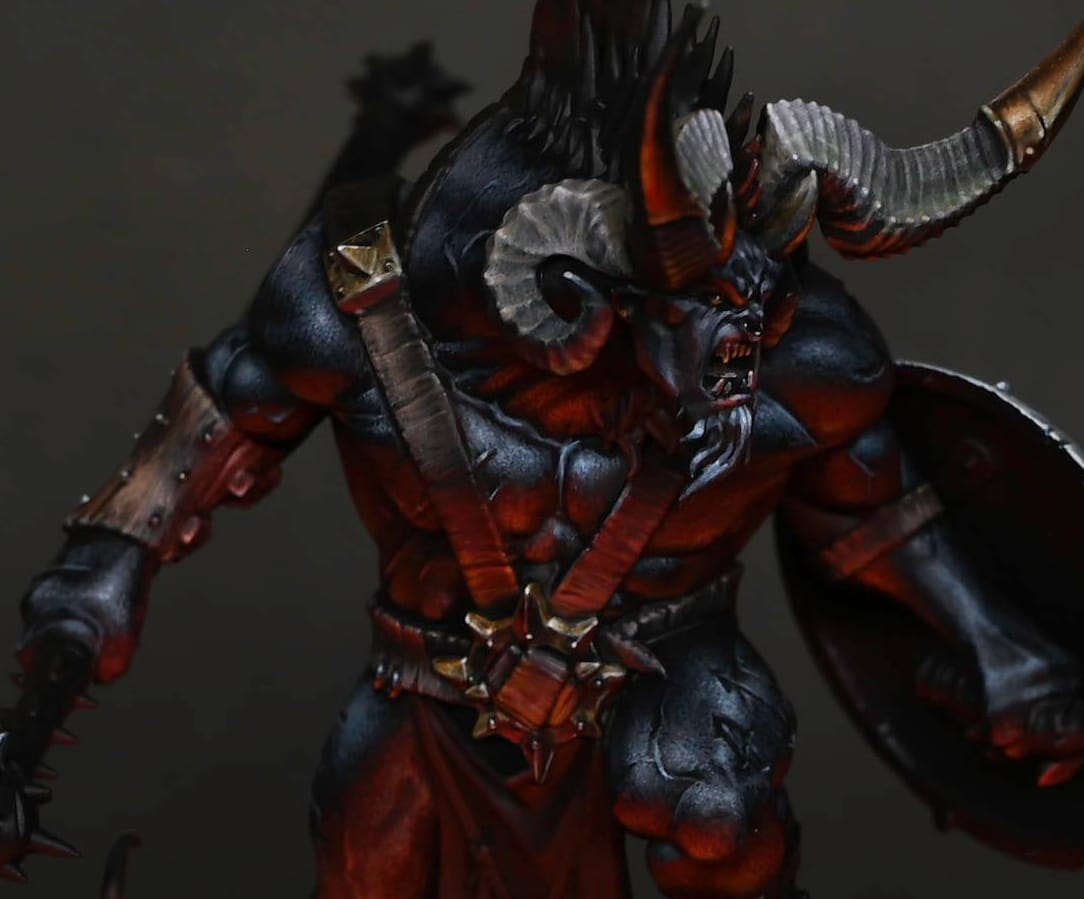
Guide on how to paint the armour and muscles on the Warcry Ogroid Myrmidon, with video tutorials, paints and steps to follow.
Video: Warcry Ogroid Myrmidon Armour and Muscles
All videos are recorded in HD 720p or higher – use full screen for the full effect and let the video load completely.
Materials Needed
Games Workshop Paints: Rhinox Hide, Mournfang Brown, Cadian Fleshtone, Morghast Bone, Abaddon Black, Wild Rider Red, Fire Dragon Bright, Corvus Black
Vallejo Paints: Pale Grey Blue, Neutral Grey, Dark Grey, Black
A wet palette for mixing and thinning paints
Fine detail brushes
Water for thinning paints
Painting the Leather Armour
Base Layer: Start with a base layer of Rhinox Hide. This dark brown serves as a foundation, offering a subtle brown hue. Apply multiple coats if necessary, but remember, the subsequent layers will add depth and detail.
Mixing for Texture: Create a 50/50 mix of Rhinox Hide and Cadian Fleshtone on your wet palette. This mix will serve as the primary texture colour for the leather.
Applying Texture: Use the 50/50 mix to start adding texture to the leather. Focus on long, vertical, slightly erratic strokes to mimic the natural wear and tear of leather. Pay attention to the armour’s sculpted details, like studs and indentations, to guide your texturing.
Adding Highlights: Gradually lighten the texture by incorporating more Cadian Fleshtone and Morghast Bone into your mixes. Apply these lighter tones to areas that would naturally catch the light, enhancing the texture and giving the leather a more three-dimensional appearance.
Glazing for Depth: Once you’re satisfied with the texture, use a glaze of Mournfang Brown and Abaddon Black to tone down the highlights and integrate the textures, adding depth and richness to the leather. This step unifies the various layers of texture and colour.
Highlighting Black Skin
Preparing Your Palette: On your wet palette, arrange Vallejo paints from Dark Grey to Pale Grey Blue, including mixed shades for smoother transitions. Thin these paints more than usual to avoid building up too thick a layer with the stippling technique.
Stippling Technique: Begin stippling with Dark Grey, gradually transitioning through the greys to Pale Grey Blue for the highlights. Stippling involves applying numerous tiny dots to build up texture and colour depth. This technique is particularly effective for creating a nuanced, textured appearance on the skin.
Attention to Lighting: When applying your highlights, consider the model’s primary viewing angle and the imaginary light source. Focus your highlights on areas that would naturally be illuminated, like the tops of muscles, while keeping the base skin tone visible in shadowed areas.
Refining Highlights: Use glazes of Abaddon Black and Corvus Black to soften and blend the stippled highlights, ensuring they contribute to the model’s overall appearance without overpowering the base skin tone. These glazes help integrate the highlights and create a cohesive look.
Final Touches: Revisit any areas that may require additional highlights or adjustments, enhancing the model’s dimensional appearance. Pay special attention to achieving a balance between the highlighted areas and the overall dark tone of the skin.
Video: Warcry Ogroid Myrmidon Skin
This guide will focus on achieving a textured ogroid skin effect with top-down highlights and red underlighting, alongside a detailed approach to creating a realistic muscle definition. We’ll be using a mix of Vallejo and Games Workshop paints to achieve this effect.
Materials Needed:
Vallejo Paints: Black, Dark Grey, Neutral Grey, Pale Grey Blue
Games Workshop Paints: Mephiston Red, Evil Sunz Scarlet, Wild Rider Red, Troll Slayer Orange, Fire Dragon Bright
Size 0 Artist Opus Brush (preferably a newer one for fine stippling)
A wet palette
Water for thinning paints
Step-by-Step Guide to Ogroid Myrmidon Skin
Step 1: Base Coating
Begin by base coating the skin of your Warcry Ogroid Myrmidon with Mephiston Red to prepare for the red underlighting. This will serve as the base for our stippling technique later on.
Step 2: Stippling Technique Introduction
For the skin’s texture, we’re going to use a stippling technique. This involves applying tiny dots of paint to create a textured appearance. Start with Vallejo Dark Grey and a touch of Neutral Grey, using a fairly new brush for precise dot application. The goal is to create very fine dots, so remember to apply very light pressure to avoid creating larger, triangular marks.
Step 3: Adding Red Underlighting
Switch to Games Workshop’s Evil Sunz Scarlet, stippling over the red base layer to begin creating the underlighting effect. This will initially appear very bright but will dull down as it dries. Layer over with Mephiston Red to help blend and soften the transition.
Step 4: Top-Down Highlights
For the top-down highlights, use a gradient from Dark Grey to Pale Grey Blue, progressing from darkest to lightest as you move up the model. This mimics natural lighting, emphasizing the muscle contours and giving the skin a realistic depth. Remember, the highlights should reflect where natural light would hit the model, focusing on the tops of curves and muscle peaks.
Step 5: Fine-Tuning Highlights and Shadows
As you apply your highlights, consider the model’s anatomy. Paint sharp lines of Pale Grey Blue in the recesses between muscles, such as between the pectorals and deltoids, to accentuate the definition. Use the light from your lamp as a guide to ensure consistency in your highlighting.
Step 6: Red and Orange Highlights
For the lower parts of the muscles, closer to the model’s base, switch to the warmer tones on your palette: Wild Rider Red, Troll Slayer Orange, and Fire Dragon Bright. Apply these colours opposite to the top-down lighting, focusing on areas that would be illuminated from below. This step may require patience due to the translucency of reds and oranges, necessitating multiple layers for a solid appearance.
Step 7: Blending and Correcting
If any areas stand out too much or the transitions between colours are too stark, revisit them with intermediary shades to blend them more naturally. Stippling allows for easy correction; simply overlay with the appropriate colour to soften and integrate any harsh lines or spots.
Step 8: Final Touches to the Skin
After completing the stippling, examine the model for any areas that may need additional work. Adjust the intensity of the highlights and shadows as necessary.
All Videos on How to Paint an Warcry Ogroid
Warcry Ogroid Myrmidon
A selection of detailed videos including red OSL, NMM, fur effect, horns and freehand on his shield.
Watch Now
Warcry Ogroid Myrmidon Shield
Guides on how to paint the Warcry Ogroid Myrmidon shield.
Watch Now
If you don’t have an account, please sign up here! The website currently has over 350 video tutorials with steps and tips, plus a selection of PDFs. If you are not sure about joining, you can explore my free videos with a free membership, or take the plunge and become a full subscriber for full access.
If you’d prefer to support me on Patreon, please visit: https://www.patreon.com/RichardGray [...]
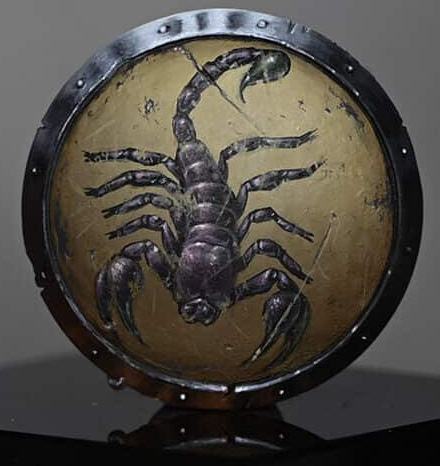
Video guides and step-by-steps on how to paint the Warcry Ogroid Myrmidon shield with this Scorpion Freehand.
Video: Scorpion Freehand First Steps
This first part of the tutorial covers the preparation and beginning stages of scorpion freehand painting on the Ogroid Myrmidon’s shield
Materials Needed:
Primer: Black
Base Colours: XV-88, Mournfang Brown, Zandri Dust, Morghast Bone (All Games Workshop)
Detailing: Model Colour Black (Vallejo)
Tools: Scalpel, fine-grit sandpaper, large and fine brushes, wet palette
Preparation:
Preparing the Shield: Remove the model’s original shield detail using a scalpel and fine-grit sandpaper to create a smooth surface for freehand painting. This process ensures a flat canvas for your artwork.
Priming: Prime the entire model, including the shield, in black to provide a uniform base coat. If desired, apply an underglow effect with Mephiston Red using an airbrush on the model’s underside for atmospheric lighting.
Painting the Shield’s Background:
Base Layer: Start by applying XV-88 in multiple thin layers to achieve an opaque finish. Mix approximately one part water to one part paint, using a fairly large brush for broad strokes. Patience is key; allow each layer to dry thoroughly.
Blending: While the XV-88 base is still workable, begin blending Mournfang Brown from the bottom of the shield upwards. This technique creates a gradient effect that adds depth to the shield’s background.
Highlighting and Texture: Use Zandri Dust and Morghast Bone to introduce highlights, particularly focusing on the top of the shield where light naturally hits. This process also starts to introduce the worn, textured look desired for the shield.
Brush Techniques: To achieve a smoother blend and avoid harsh brush marks, employ cross-hatching and other texturing techniques with your brush. This approach will help create a more natural transition between colours.
Glazing for Smoothness: After the initial layering and texturing, apply glazes of the same colours (XV-88, Mournfang Brown, Zandri Dust, Morghast Bone) diluted with water (about six or seven parts water to one part paint). Glazing helps smooth out transitions and enrich the colour depth.
Starting the Scorpion Freehand:
Design Placement: Before starting the scorpion freehand, consider the shield’s round shape and ensure your design aligns properly with the model’s orientation. Use the back of the shield as a reference to determine the top and bottom.
Sketching the Design: With Model Colour Black, begin sketching your scorpion freehand design. For this tutorial, a scorpion motif is used. Start with basic shapes and outlines, keeping the lines thin and manageable. This stage is about laying down the design’s foundation, so precision is more important than coverage.
Refining the Design: Gradually thicken and refine the outlines of your scorpion freehand design, paying close attention to symmetry and proportion. Adjust the thickness of the lines to create depth and interest.
Correcting Mistakes: If you make any errors or wish to adjust the design, you can cover mistakes with the base colours (XV-88, Mournfang Brown, Zandri Dust, Morghast Bone). This step may require reapplying glazes to blend the corrections into the background.
Video: Scorpion Freehand Refinement and Details
Looking at rendering the freehand scorpion to achieve a three-dimensional appearance and then weathering the shield for a battle-worn look.
Additional Materials:
A wet palette to keep paints hydrated and to mix custom colours.
Fine grit sandpaper for smoothing the shield surface after modifications.
A scalpel or hobby knife for removing details from the shield.
Water container for rinsing brushes.
Paper towels or a clean cloth for brush drying and paint removal.
Mixing palette for creating custom colours and diluting paints for glazing.
Hairdryer (optional) for speeding up the drying process between layers.
Sponge (optional, not used but mentioned) for creating textured weathering effects.
What do These Techniques Mean?:
Pointillism and Stippling: For creating textured effects on the scorpion’s carapace.
Glazing: Thin layers of paint applied to subtly shift colours or blend transitions.
Fine Detail Work: Using the very tip of a fine brush to outline and add intricate details to the scorpion.
Weathering: Applying chips, scratches, and wear to both the scorpion and the shield’s surface to create a battle-worn look.
Paints:
Games Workshop (Citadel):
Mournfang Brown
XV-88
Zandri Dust
Morghast Bone
Naggaroth Night
Khorne Red
Corax White (for mixing and creating lighter tones)
Vallejo:
Neutral Grey
Dark Grey
Warm Grey
Pale Grey Blue
Model Colour Black (for outlining and fine details)
P3 (Privateer Press):
Morrow White
Iyanden Yellow (mentioned as a substitute for Iosen Green for brighter effect)
Rendering the Scorpion
Base Layer: Begin with Neutral Grey for stippling and pointillism across the scorpion, creating texture and initial shadows. This technique simulates the scorpion’s shiny carapace.
Changing Techniques: Partway through, you might find the style needs adjustment to better represent the scorpion on a smaller scale. While aiming for realism, ensure the final look is visually appealing on the model.
Colour Palette Adjustment: Add Warm Grey and Pale Grey Blue to introduce subtle tonal variations, enhancing the scorpion’s three-dimensional appearance.
Highlighting: Use Morrow White sparingly for the highest highlights, focusing on areas like the pincers, the body segments, and the stinger to emphasize their importance and shininess.
Colour Glazing: Apply thin glazes of Naggaroth Night and Iyanden Yellow (substituted for Iosen Green for a brighter effect) to add colour depth without overpowering the grey tones. This step subtly alters the scorpion’s colour while maintaining its overall grey appearance.
Weathering the Shield
Preparation: Use the base colours (Mournfang Brown, XV-88, Zandri Dust, Morghast Bone) to match the weathering effects to the shield’s underlying tones.
Technique: Apply small, opaque marks with Dark Grey and Neutral Grey to simulate chips and wear, focusing on areas that would naturally receive more damage. Use a fine brush for precision.
Detailing: Enhance the weathering with thin lines and stippling, simulating scratches and abrasions. This creates a realistic effect of battle damage across the shield, including over the scorpion design.
Integration: To integrate the scorpion with the shield’s weathered look, apply thin glazes of Mournfang Brown over the entire design. This unifies the scorpion with the shield’s background, softening contrasts and blending the freehand work into the overall shield design.
Colour Highlights: For areas requiring correction or emphasis, use the shield’s base colours, adjusted one shade lighter, to subtly highlight edges and details, ensuring the scorpion remains the focal point.
How to Paint an Ogroid from Games Workshop – Step-by-step guides:
Ogroid Myrmidon
A selection of detailed videos including red OSL, NMM, fur effect, horns and freehand on his shield.
Watch Now
More Freehand Tutorials
If you don’t have an account, please sign up here! The website currently has over 350 video tutorials with steps and tips, plus a selection of PDFs. If you are not sure about joining, you can explore my free videos with a free membership, or take the plunge and become a full subscriber for full access.
If you’d prefer to support me on Patreon, please visit: https://www.patreon.com/RichardGray [...]
Undead

This is another video looking at Sekhar the vampire, this time focusing on how to paint a skeleton with glowing eyes for the model on her base. This video looks at the skeleton, how to paint his glowing eyes, sword and bones etc. The whole model is covered!
Video: How to Paint a Skeleton with Glowing Eyes
Materials needed:
Skeleton ModelPriming spray (I’ve used black!)
Brushes:I use the Artist Opus range of brushesFine detail brushMedium-sized brushLarge brush (optional, for basecoating larger areas)
Wet Palette (for mixing and thinning paints)Varnish (to protect the finished paint job)
Paints:All paints mentioned are from Games Workshop’s Citadel range.
Yriel Yellow
Moot Green
Balor Brown
Morghast Bone
Screaming Skull
Mournfang Brown
XV-88
Rhinox Hide
Other Materials:
Rocks or pebblesFoliage (such as static grass or miniature leaves)Sand or texture paste (for ground texture)Super glue (for attaching basing materials)Water (for thinning paints)Paper towels or cloth to ensure your brushes are totally clean!
How to Paint a Skeleton with Glowing Eyes – Step 1: Priming
Prime your model with a suitable undercoat. Black is recommended as it provides a good base for both the glowing effects and the shadowed recesses of the skeleton.
Step 2: Base Coating
Skeleton: Apply a thin base coat of XV-88 over the entire skeleton. Ensure the paint is thinned with water to maintain detail.
Eyes: Start by painting the eye sockets with Kimera White. Given the deep recesses, apply multiple thin layers to build up a solid white base. Patience is key here to avoid a textured look.
Step 3: Adding Depth to Eyes
Mix Yriel Yellow with Kimera White to create a pale yellow. Carefully fill in the eye sockets, leaving the deepest part still white to simulate glow.
Gradually add more Yriel Yellow towards the front of the eye sockets, intensifying the colour as you move forwards.
Define the edges of the sockets with Moot Green to enhance the glow effect, blending it slightly into the yellow for a smooth transition.
Step 4: Skeletal Detailing
General Bone Texture: Lightly dry brush the skeleton with a mixture of Mournfang Brown and XV-88 to bring out the texture.
Enhanced Details: Use Morghast Bone to highlight edges and raised details across the bones.
Deepening Shadows: Mix Rhinox Hide with a small amount of black to create shadows in the deeper recesses and under the bones for added depth.
Step 5: Sword and Metallic Effects
Base Coat: Apply Neutral Grey as a base for the sword and any metallic elements.
Weathering: Add scratch effects using Troll Slayer Orange mixed with Mournfang Brown to simulate rust and age.
Highlights: Use Screaming Skull to pick out edges and features, giving the impression of worn, yet still sharp, metal.
Step 6: Final Touches
Refining Glows: Go back to the eyes, adding pure Yriel Yellow to the centres and intensifying the green at the edges if necessary.
Blending and Smoothing: Use glazes of the base colours to smooth out transitions and unify the appearance, particularly around the eye sockets and on the sword to blend the rust effects.
Contrasting Details: For a final layer of detail, use Screaming Skull to highlight teeth, knuckles, and other small bone protrusions, adding a subtle layer of Rhinox Hide for ageing.
Step 7: Sealing the Model
Once fully satisfied with your painting, seal the model with a matte varnish to protect your work and reduce any unwanted shininess, ensuring the skeletal figure looks as haunting in the display case as it does on the battlefield.
Explore more of my Golden Demon entry tutorials
If you don’t have an account here on my website, please sign up here! I have over 350 video tutorials in addition to my How to Paint a Skeleton with Glowing Eyes, with steps and tips, plus a selection of PDFs. If you are not sure about joining, you can explore my free videos with a free membership, or take the plunge and become a full subscriber for full access.
If you’d prefer to support me on Patreon, please visit: https://www.patreon.com/RichardGray [...]
My detailed how to paint the Nagash helmet tutorials, with videos plus step by step guide and tips with full paints used.
Video – How to Paint the Nagash Helmet Part OnePaints and Materials UsedPaintsBrushesOther MaterialsSteps and Tips on How to Paint the Nagash HelmetVideo – How to Paint the Nagash Helmet Part TwoPaintsSteps and Tips on How to Paint the Nagash Helmet (Part Two)Video – How to Paint the Nagash Freehand Swirls/FiligreePaintsTips for the Freehand FiligreeVideo – How to Paint the Nagash Helmet Leather Strips and RunesPaintsStep and Tips on How to Paint the Nagash Helmet Leather Strips and RunesFor all of my Nagash Tutorials in one place, go hereExplore More Nagash Technique Tutorials
Video – How to Paint the Nagash Helmet Part One
In this tutorial, we’ll focus on painting the metallic areas of Nagash, specifically the head. The colours used for this tutorial are a bit different from the standard, and in the video I discuss techniques in more detail to achieve a textured, refined finish.
Paints and Materials Used
Paints
Vallejo:
English Uniform (VX-88)
Golden Olive (Elysian Green mixed with Yriel Yellow)
Yellow Green (Dorn Yellow mixed with Moot Green)
Ice Yellow (Dorn Yellow)
Ivory (Screaming Skull)
Games Workshop:
Rhinox Hide
Abaddon Black
Naggaroth Night (for future use)
Brushes
Fine detail brush (suitable for intricate work and small highlights)
Medium-sized brush (for larger areas and base coating)
Wet palette (to keep paints fresh and workable)
Other Materials
Wet palette
Green stuff (for sculpting additional details, if desired)
Painting lamp (for consistent lighting during the painting process)
Miniature holder (for ease of handling and painting)
Steps and Tips on How to Paint the Nagash Helmet
Prepare the Model: Ensure your miniature is assembled and primed appropriately for painting. I’ve used a black primer for my Nagash.
Block in the Base Colour: Start by blocking in the main highlights using Vallejo’s English Uniform (VX-88). Apply this colour where you want the primary light source to hit, focusing on a top-left orientation.Be mindful not to make the colour too opaque; a slight texture is desirable for the metallic effect.
Understanding Colour Choices: The choice of metallic colours doesn’t have to be conventional. For this model, I went for a dark and moody theme inspired by the artwork of Nagash.My chosen metallic shades include Golden Olive, Yellow Green, and Ice Yellow from Vallejo, along with Rhinox Hide and Abaddon Black from Games Workshop.
Building Layers of Colour: Use Golden Olive to build layers on top of the English Uniform, focusing on areas that require additional depth and shading.The opacity of Vallejo paints allows for strong, defined marks, ideal for creating small details and textures.
Creating Texture and Depth: With each layer, gradually introduce lighter shades such as Yellow Green and Ice Yellow to enhance highlights and add dimension to the metallic surfaces.Keep in mind the direction of light and focus on maintaining a balance between light and shadow.
Understanding Volume and Light: Highlighting metallic surfaces requires understanding how light interacts with volume. Unlike standard blending techniques, aim for distinct contrasts between light and shadow. Make sure you consider how light reflects off different surfaces, creating highlights and shadows of varying intensities. I like to use lots of real-life references of metal to study as I paint.
Achieving a Moody Atmosphere: For an undead character like Nagash, aim for a dark, desaturated overall appearance. Use strong, small highlights strategically to draw attention to focal points.
Avoid smooth blending; purposefully textured painting adds depth and character to the model.
Experimenting with Glazing TechniquesExperiment with glazing techniques to blend colours seamlessly and soften transitions between different areas of the model.Glazing allows for subtle colour adjustments and can help unify the overall color scheme, creating a harmonious visual effect.
Video – How to Paint the Nagash Helmet Part Two
In this part, we’ll focus on painting the skull face, hair, and bone structures atop the hat.
Paints
Vallejo Model Colour: English Uniform (VX-88), Golden Olive (Elysian Green mixed with Yriel Yellow), Yellow Green (Dorn Yellow mixed with Moot Green), Ice Yellow (Dorn Yellow), Ivory (Screaming Skull), Neutral Grey (Mechanicus Standard Grey), Pale Grey Blue (Grey Seer mixed with Blue Horror)
Games Workshop: Rhinox Hide, Warpstone Green Contrast, Deathclaw Brown
P3: Morrow White
Steps and Tips on How to Paint the Nagash Helmet (Part Two)
Paint the Bone Structures: Using Vallejo’s English Uniform (VX-88), begin by painting the bone structures on top of the hat. Focus on picking out the highlights, keeping in mind the top-left orientation of the light source. Apply the paint carefully to emphasize the edges and contours of the bones.Enhance the Bone Texture: Utilise Golden Olive (a mix of Elysian Green and Yriel Yellow) to add depth and shading to the bone structures. Concentrate on areas that require additional definition, such as the joints and sockets. Remember to maintain a balance between light and shadow to create a realistic, textured effect.Add Highlights: With Yellow Green (a mix of Dorn Yellow and Moot Green), further highlight the bone structures, focusing on the areas where light would naturally hit. Pay attention to the left-hand side of the model to create a stronger contrast and emphasise the lighting direction.Refine the Highlights: Using Ice Yellow (Dorn Yellow), continue to build up the highlights on the bone structures, especially on the left-hand side. Gradually increase the brightness of the highlights towards the center of the model to draw attention to focal points.Adjusting with Rhinox Hide: If necessary, use Rhinox Hide to refine any areas where you’ve made mistakes or to add depth to the shadows. The translucency of this paint allows for easy blending and adjustment while maintaining a natural look.Painting the Skull Face: For the skull face, start with Deathclaw Brown, focusing on creating a weathered, textured appearance. Apply the paint in a rough, uneven manner to mimic the natural wear and tear of ancient bones.Highlighting the Skull: Gradually add highlights to the skull using Morghast Bone. Concentrate the highlights towards the left-hand side of the face to maintain consistency with the overall lighting scheme. Ensure the highlights stand out against the darker base colour to create depth and dimension.Adding Detail to the Eyes: Use a small amount of Morghast Bone to pick out the details around the eyes, emphasising the cheekbones and brow ridge. Be mindful of the sculpted eye sockets and adjust the highlights accordingly to enhance the overall appearance.Painting the Hair: Begin painting the hair with Neutral Grey, focusing on the large, clumpy strands. Keep the highlights towards the top side of the hair to simulate light hitting the surface. Apply the paint in a rough, textured manner to achieve a realistic look.Adding Texture to the Hair: Continue to build up the texture of the hair using Pale Grey Blue. Emphasize the highlights on the top side of the hair while leaving the underside darker to create depth and volume.Refining the Highlights: Using Morrow White sparingly, refine the highlights on the hair strands to add contrast and dimension. Focus on the areas closest to the face to draw attention to the focal points.
Video – How to Paint the Nagash Freehand Swirls/Filigree
Paints
Vallejo: English Uniform (VX-88), Golden Olive (Elysian Green mixed with Yriel Yellow), Yellow Green (Dorn Yellow mixed with Moot Green), Ivory (Screaming Skull), Neutral Grey (Mechanicus Standard Grey), Pale Grey Blue (Grey Seer mixed with Blue Horror)Games Workshop: Warpstone Green Contrast, Abaddon BlackP3: Morrow White
Tips for the Freehand Filigree
Base Coat: Apply a base coat of Vallejo English Uniform (VX-88) to start the filigree on the Nagash hat. Ensure even coverage and allow it to dry completely.
Highlighting with Yellow-Green: Mix Vallejo Yellow Green (Dorn Yellow mixed with Moot Green) with a small amount of white to increase opacity. Use a fine tip brush to apply highlights to what would be the raised areas of the filigree. Focus on creating sharp lines and highlights to enhance the detail.
Adding Ivory Highlight Dots: Using Vallejo Ivory (Screaming Skull), create small highlight dots on the filigree. These dots should be strategically placed on curves and extreme curve points to simulate shine and reflectivity. Ensure consistency in placement for a cohesive look.
Enhancing Contrast with Black: With Games Workshop Abaddon Black, carefully outline the filigree details to enhance contrast and definition. Use a fine tip brush and steady hand to create clean lines and borders.
Glazing with Warpstone Green Contrast: Thin Games Workshop Warpstone Green Contrast with water (about two parts water to one part paint) to create a glaze. Apply the glaze over the filigree to enhance shading and highlights.
Final Touches: Use P3 Morrow White to add final highlights to the filigree, focusing on the most raised and reflective areas. Ensure consistency and restraint with the white highlights to avoid overpowering the overall effect.
Video – How to Paint the Nagash Helmet Leather Strips and Runes
By following these steps and techniques, you can effectively paint leather strips and runes on your Nagash (or any other model, really!) adding depth, texture, and character.
Paints
Games Workshop: Rhinox Hide, Mournfang Brown, Cadian Fleshtone, Temple Guard Blue, Barroth Blue.
Step and Tips on How to Paint the Nagash Helmet Leather Strips and Runes
Base Coat: Ensure that the leather strips on the Nagash helmet are properly primed with black primer. Once primed, apply a base coat of Games Workshop Mournfang Brown to the leather strips. This will serve as the foundation for the leather texture.
Highlighting with Mournfang Brown: Using Games Workshop Mournfang Brown, begin highlighting the curves and raised areas of the leather strips. Apply the paint in a textured manner, focusing on creating depth and dimension to simulate the appearance of weathered leather. Don’t worry about perfect blending; imperfections add to the realism.
Layering with Cadian Fleshtone: Next, switch to Games Workshop Cadian Fleshtone and continue highlighting the leather strips. Apply this paint more sparingly, focusing on the most raised areas and curves to enhance the texture. The tonal contrast between Mournfang Brown and Cadian Fleshtone will create depth and visual interest.
Glazing with Rhinox Hide: Thin Games Workshop Rhinox Hide with water to create a glaze. Apply the glaze over the highlighted areas to tone down the highlights and add depth to the leather texture. Focus on applying the glaze in the shadowed areas and along the edges of the leather strips for a realistic look.
Painting Runes: Using Games Workshop Temple Guard Blue and Barroth Blue, paint the runes onto the leather strips. Ensure that the runes are clearly visible and neatly painted. Use a fine tip brush and steady hand to create clean lines and shapes. Less is more; avoid overcrowding the leather strips with too many runes to maintain balance.
Touching Up: Review the painted leather strips and runes, making any necessary touch-ups or adjustments. Ensure consistency in highlighting placement and rune design throughout the miniature model.
For all of my Nagash Tutorials in one place, go here
Nagash, Supreme Lord of the Undead
Nagash, Supreme Lord of the Undead is the father of necromancy. I created a series of detailed tutorials on how I painted him.
Watch Now
Explore More Nagash Technique Tutorials
If you don’t have an account here on my website, please sign up here! I have over 350 video tutorials with steps and tips, plus a selection of PDFs. If you are not sure about joining, you can explore my free videos with a free membership, or take the plunge and become a full subscriber for full access.
If you’d prefer to support me on Patreon, please visit: https://www.patreon.com/RichardGray [...]

Creating a Non-Metallic Metal (NMM) texture on a sword for a miniature model requires patience, precision, and a good understanding of light and shadow. This guide is designed to walk you through the process of painting the weapon blade of Sekhar The Vampire, focusing on achieving a weathered, high-contrast, NMM effect.
Video: Non Metallic Metal Texture Sword
Materials Required
Paints: Vallejo Neutral Grey, Ice Yellow; Games Workshop Mournfang Brown, Rhinox Hide; P3 Morrow White; Two Thin Coats Dark Sun Yellow.
Brushes: Fine detail brushes capable of making very thin lines.
Palette: A wet palette to ensure your paints remain workable.
Water or Thinner: For diluting your paints to the desired consistency.
Step-by-Step Guide to the Non Metallic Metal Texture Sword
Preparing the Blade: Begin with a clean, primed miniature. Ensure Sekhar’s blade is smooth and free from any debris or fingerprints.
Base Coating: Apply a base coat of Neutral Grey on the blade. This serves as your midpoint for building up highlights and deepening shadows.
Establishing Light Points: Identify the main light points on the blade using a lamp. Typically, the flat back section of the blade and the curved edges will catch the most light. Mark these areas mentally as points where the highest highlights will be placed.
Initial Highlights and Shadows: Create a gradient on your palette ranging from Neutral Grey to Ice Yellow, progressively adding Ice Yellow to lighten the mixture. Include a separate mix with Mournfang Brown and Neutral Grey for warmer tones, and pure white for the brightest highlights.
Begin adding these mixtures to the blade, focusing on the predetermined light points. Use a scratchy, controlled technique with the very tip of your brush for texture.
Refining the Texture: As the paint on your palette dries slightly, it will naturally become thicker. Use this to your advantage to add textured highlights and shadows, adjusting the water content as necessary for softer transitions or more pronounced scratches.
Correcting and Sharpening Details: Utilise black to correct any oversteps or to sharpen the divisions between different sections of the blade. This step is crucial for defining the shape and enhancing the contrast of your NMM effect.
Adding Depth with Glazes: Mix highly diluted glazes of Mournfang Brown (and variations with Neutral Grey) to apply to the lower sections of the blade. This creates a sense of depth and simulates a subtle reflection from the environment.
Final Highlights: Use the brightest mixtures, including pure white, to add the final highlights to the top light points. This step might require going back to reinforce the contrast between the brightest highlights and the adjacent shadows.
Weathering Effects: To add a weathered look, incorporate fine scratches across the blade’s surface with a very thin brush and lighter paint mixes. These should traverse both the light and dark areas to create a unified texture across the blade.
Bounce Light: For a more advanced NMM effect, paint a bounce light on the cutting edge of the blade. This is a subtle highlight that simulates light reflecting off the ground, adding to the realism of your metal effect.
Finishing Touches: Reassess the overall effect from multiple angles, ensuring that the blade looks good from all perspectives.
Additional Tips
Patience is Key: Achieving a convincing NMM effect is time-consuming. Work slowly and carefully.
Lighting: Understanding how light interacts with metal is crucial for NMM. Study real-life examples if possible.
More Soulblight, Undead and Vampire Tutorials!
If you don’t have an account, please sign up here! The website currently has over 350 video tutorials with steps and tips, plus a selection of PDFs. If you are not sure about joining, you can explore my free videos with a free membership, or take the plunge and become a full subscriber for full access.
If you’d prefer to support me on Patreon, please visit: https://www.patreon.com/RichardGray [...]
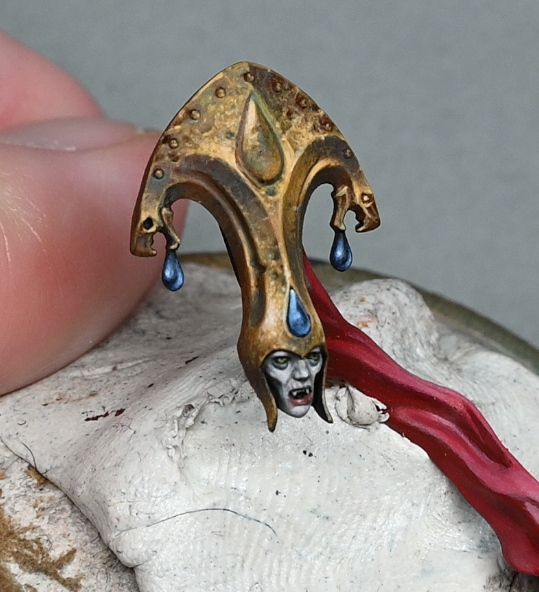
How to paint the skin, face, and eyes of Sekhar the Blood Queen, highlighting common pitfalls when painting tiny faces like hers, and how to rectify them. We’ll use a specific set of paints from Games Workshop, Vallejo, and P3 to achieve our desired effects.
Video Part Three: Sekhar the Blood Queen Face with Eyes, and Skin
Paints Needed
Games Workshop: Bugman’s Glow, Sotek Green, Yriel Yellow, Evil Sunz Scarlet, Morghast Bone
Vallejo: Ice Yellow, Neutral Grey, Black
P3: Morrow White (or any white paint)
Step-by-Step Guide to Sekhar the Blood Queen Face, Eyes and Skin
Preparing the Base Mixture for Skin: Mix a 50/50 blend of Sotek Green and Bugman’s Glow to create the base skin tone. This unique combination provides a natural, yet distinctly fantastical, skin colour for our vampire queen.
Adding Highlights to the Skin: Gradually incorporate Ice Yellow into the base mixture for highlights. Start with small quantities and increase the Ice Yellow for each successive highlight layer. This technique helps achieve a smooth gradient in the skin tone, offering a more lifelike appearance.
Advanced Skin Highlights: For a creamy and realistic skin tone, mix Bugman’s Glow with Ice Yellow, carefully adjusting the blend to prevent the colours from becoming overly vibrant. Add a tiny amount of white to this mixture for the lightest highlights, aiming for an off-white shade that retains a hint of the base tones.
Painting Contrast and Metallic Elements: Apply a grey base to the collar, preparing it for a metallic silver finish. This step is crucial for setting up the contrast between the metallic textures and the skin, ensuring that both elements stand out without competing for attention.
Achieving Skin Texture and Smooth Transitions: Use thin layers for the skin, starting with a mix of approximately 1.5 parts water to 1 part paint, and adjust as necessary for smoother finishes. Ensure each layer is completely dry before applying the next to avoid any unwanted textures.
Highlighting Techniques: Focus on painting towards the highlights, lifting the brush at the brightest points for precise application. This method ensures that the highlights are sharp and well-defined, enhancing the model’s dimensional details.
Painting Facial Features: Pay particular attention to the face, adjusting features like the nose with shading and highlighting to ensure it fits naturally under any headgear. Avoid relying solely on box art for colour references, as this can mislead your perception of how facial features should be represented.
Painting the Eyes: Start with a solid base colour for the eyes, using black or a deep brown. Paint the iris in a striking colour, adding a small dot of white to each eye to simulate light reflection. This detail adds life and intensity to the figure’s gaze.
Enhancing the Lips: Choose a vibrant red for the lips, applying it carefully to add depth and dimension. This colour choice should complement the vampire theme, adding an element of allure and danger to the figure.
Overall Facial Harmony: Revisit the entire face to ensure all elements work together harmoniously. Adjust shadows, highlights, and colour intensity to achieve a balanced and realistic facial expression that suits the character’s persona.
More Soulblight, Undead and Vampire Tutorials!
If you don’t have an account, please sign up here! The website currently has over 350 video tutorials with steps and tips, plus a selection of PDFs. If you are not sure about joining, you can explore my free videos with a free membership, or take the plunge and become a full subscriber for full access.
If you’d prefer to support me on Patreon, please visit: https://www.patreon.com/RichardGray [...]
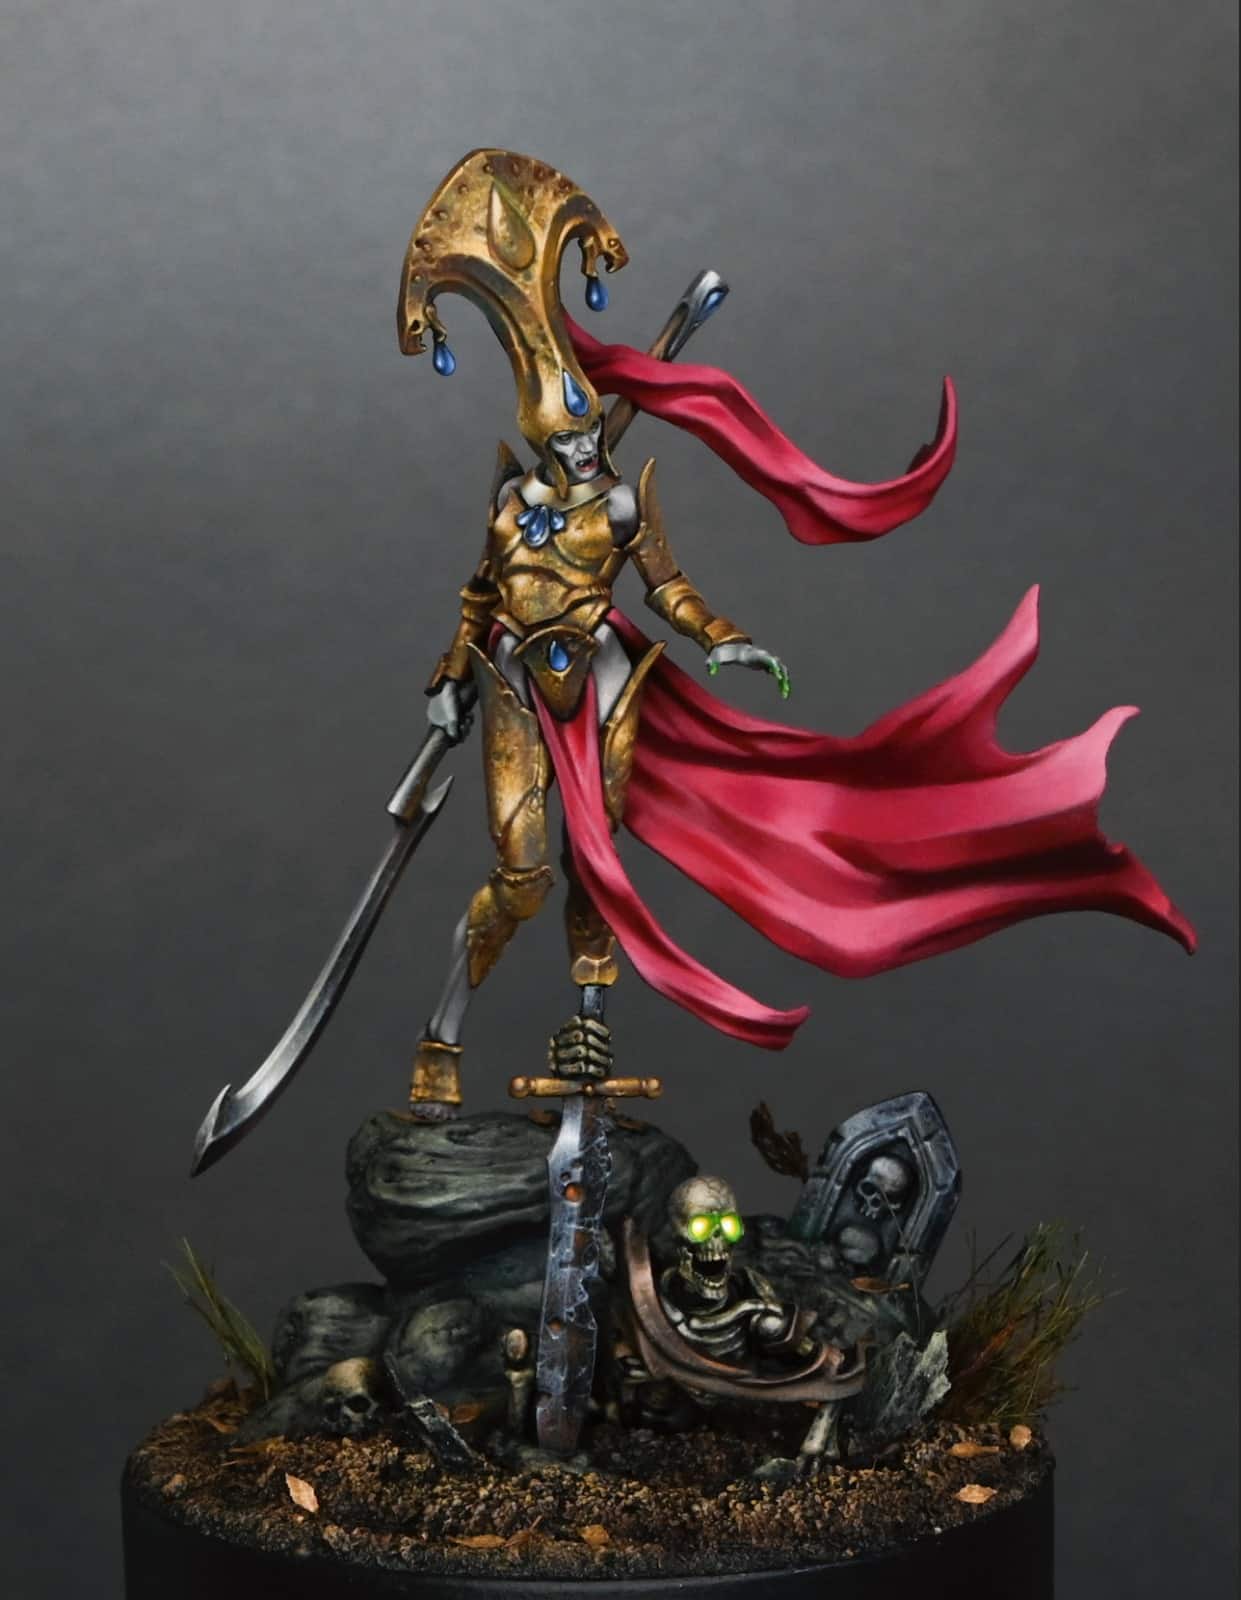
I was lucky enough to be sent Sekhar, Fang of Nulahmia by Games Workshop as an early review copy and couldn’t wait to paint her up for you. I’ve gone for an aged bronze look for her. Read on for my tutorials so far on how to paint her, with paints and step-by-step guide.
Sekhar, Fang of Nulahmia, stands as a formidable agent of Neferata, wielding hypnotic powers to enthrall her foes. Accompanied by the serpent Ouboroth (although not in my version, sorry!) and leading packs of Dire Wolves and Fell Bats into battle, she embodies the deadly elegance of Nulahmia’s dark majesty. This set introduces Sekhar, her loyal Dire Wolves, and swooping Fell Bats, ready to bring terror to the Soulblight Gravelord armies!
First Video Tutorial: Sekhar, Fang of NulahmiaMaterials NeededPreparationPainting the ArmourAdditional TipsVideo Part Two: Red Satin Cloak and Bronze HelmetPaintsPainting the Bronze HelmetPainting the Satin Red CloakVideo Part Three: Sekhar Fang of Nulahmia Face with Eyes, and SkinPaints NeededStep-by-Step Guide to her Face, Eyes and SkinVideo Part Four: Non Metallic Metal Texture SwordMaterials RequiredStep-by-Step Guide to the Non Metallic Metal Texture SwordAdditional TipsVideo Part Five: How to Paint a Skeleton with Glowing EyesMaterials needed:More Soulblight, Undead and Vampire Tutorials!
First Video Tutorial: Sekhar, Fang of Nulahmia
Welcome to this step-by-step painting guide for Sekhar, a new vampire model from the Soulblight Gravelords range by Games Workshop. In this tutorial, we will focus on achieving a bronzed armour effect using a non-metallic metal (NMM) technique and subtly applying verdigris for an aged look.
Materials Needed
Primer: Black
Base Paints: Mournfang Brown, Mephiston Red (for the cloak)
Main Paints: Mournfang Brown, Sybarite Green, Rhinox Hide, Dark Sun Yellow (or Balor Brown with a bit of yellow), Morrow White
Tools: Airbrush (optional), brushes (sizes 1 or 2 and a finer 00 for details), wet palette, super glue, and plastic glue.
Preparation
Prime the Model: Begin with a black primer. If desired, airbrush the cloak with Mephiston Red. Allow the primer to fully cure to avoid rubbing off the paint.
Assembly: Attach all parts with plastic glue, except for the head, which you should temporarily attach with a tiny bit of super glue for easy removal and precise painting.
Painting the Armour
Base Layer: Apply a solid base layer of Mournfang Brown over the armour. The coverage doesn’t need to be perfect due to the textured look we’re aiming for.
Highlight Preparation: Mix your highlights on a wet palette. Start with Mournfang Brown and progressively mix in Dark Sun Yellow and Morrow White to create a gradient of shades from dark brown to light yellow, finishing with white for the brightest highlights.
Applying Highlights: Start with a mid-tone mix of Mournfang Brown and Dark Sun Yellow, then progressively lighten the highlights by adding more Dark Sun Yellow and eventually white. Map out the highlights, focusing on the armour’s raised areas and edges.
Texture Effect: Use a scratchy technique to add texture to the highlights, simulating wear and tear. Combine this with stippling for denser highlights. Ensure the texture is consistent across the armour to maintain a cohesive look.
Verdigris Effect: Thin down Sybarite Green with water (approximately 70:30 water to paint ratio) for a heavy glaze. Apply this to mid-tones and shadows, avoiding the highest highlights to maintain the metallic sheen. For a more subtle verdigris, mix a small amount of Rhinox Hide into Sybarite Green. Avoid using the mix of Sybarite Green and white, as this may look too bright and unnatural.
Additional Tips
Brush Selection: Use larger brushes for broad highlights and switch to a finer brush (like a 00) for detailed texture work and smaller areas.
Glazing: Use glazes to smooth transitions or adjust the intensity of colours. This is especially useful for blending the verdigris into the surrounding areas.
Reflections and Details: For areas like the silver collar necklace, consider how it will reflect its surroundings. This includes colours from the helmet, the sky, and possibly the red cloak. Use lighter, desaturated colours to simulate reflection.
Evaluating Your Work: Frequently step back and review your progress. Adjust highlights, shadows, and textures as needed to ensure a balanced and cohesive look.
Video Part Two: Red Satin Cloak and Bronze Helmet
Paints
Mournfang Brown (Games Workshop)
Sybarite Green (Games Workshop)
Rhinox Hide (Games Workshop)
Mephiston Red (Games Workshop)
Morrow White (P3; any white will do)
Dark Sun Yellow (Two Thin Coats; Balor Brown can be substituted with added yellow)
White (Kimera Colours; any white optional)
Painting the Bronze Helmet
Base Layer: Start with a base layer of Mournfang Brown on the helmet. Ensure even coverage for a solid foundation.
Mixing for Bronze: Prepare a mix of Mournfang Brown and a small amount of Dark Sun Yellow (or Balor Brown with added yellow) to create the bronze shade. This mix should be applied in two thin coats to ensure smooth coverage without obscuring details.
Highlighting: Gradually add white to the bronze mix to create highlights. Focus these lighter shades on areas where light would naturally hit the helmet, enhancing the non-metallic metal effect. For very high highlights, use a mix predominantly of white with a touch of the bronze mixture.
Verdigris Effect: Mix Sybarite Green and Rhinox Hide to create the verdigris shade. Apply this sparingly in recesses and areas where weathering would naturally accumulate. This step is optional and can be adjusted based on personal preference for the weathered look.
Texture and Final Highlights: For added texture and to simulate wear, apply very fine dots and scratches using the lighter bronze mix. These should be concentrated around edges and high points where wear would be most apparent.
Painting the Satin Red Cloak
Base Layer: Apply a base coat of Mephiston Red over the cloak. Ensure smooth, even coverage as this will be the foundation for subsequent layers.
Shadows: Create a shadow mix by combining Mephiston Red with Rhinox Hide. Apply this mixture in areas that would naturally be in shadow, such as under folds or lower parts of the cloak.
Highlighting: Begin highlighting by adding white to Mephiston Red for a brighter red mix. Apply this to areas where light would naturally strike the cloak, such as the top of folds and raised areas. Gradually increase the amount of white in the mix for higher highlights, but avoid going up to pure white to maintain a satin finish.
Glazing for Smoothness: Use glazes (thin, transparent layers) of your red mixes to smooth out transitions between shadows, mid-tones, and highlights. This step is crucial for achieving the smooth, satin look of the cloak.
Final Adjustments: Revisit both the helmet and cloak for any final adjustments. Add more highlights or shadows as needed to enhance contrast and detail. Pay special attention to maintaining the balance between detailed texture on the helmet and the smooth finish of the cloak.
Video Part Three: Sekhar Fang of Nulahmia Face with Eyes, and Skin
Paints Needed
Games Workshop: Bugman’s Glow, Sotek Green, Yriel Yellow, Evil Sunz Scarlet, Morghast Bone
Vallejo: Ice Yellow, Neutral Grey, Black
P3: Morrow White (or any white paint)
Step-by-Step Guide to her Face, Eyes and Skin
Preparing the Base Mixture for Skin: Mix a 50/50 blend of Sotek Green and Bugman’s Glow to create the base skin tone. This unique combination provides a natural, yet distinctly fantastical, skin colour for our vampire queen.
Adding Highlights to the Skin: Gradually incorporate Ice Yellow into the base mixture for highlights. Start with small quantities and increase the Ice Yellow for each successive highlight layer. This technique helps achieve a smooth gradient in the skin tone, offering a more lifelike appearance.
Advanced Skin Highlights: For a creamy and realistic skin tone, mix Bugman’s Glow with Ice Yellow, carefully adjusting the blend to prevent the colours from becoming overly vibrant. Add a tiny amount of white to this mixture for the lightest highlights, aiming for an off-white shade that retains a hint of the base tones.
Painting Contrast and Metallic Elements: Apply a grey base to the collar, preparing it for a metallic silver finish. This step is crucial for setting up the contrast between the metallic textures and the skin, ensuring that both elements stand out without competing for attention.
Achieving Skin Texture and Smooth Transitions: Use thin layers for the skin, starting with a mix of approximately 1.5 parts water to 1 part paint, and adjust as necessary for smoother finishes. Ensure each layer is completely dry before applying the next to avoid any unwanted textures.
Highlighting Techniques: Focus on painting towards the highlights, lifting the brush at the brightest points for precise application. This method ensures that the highlights are sharp and well-defined, enhancing the model’s dimensional details.
Painting Facial Features: Pay particular attention to the face, adjusting features like the nose with shading and highlighting to ensure it fits naturally under any headgear. Avoid relying solely on box art for colour references, as this can mislead your perception of how facial features should be represented.
Painting the Eyes: Start with a solid base colour for the eyes, using black or a deep brown. Paint the iris in a striking colour, adding a small dot of white to each eye to simulate light reflection. This detail adds life and intensity to the figure’s gaze.
Enhancing the Lips: Choose a vibrant red for the lips, applying it carefully to add depth and dimension. This colour choice should complement the vampire theme, adding an element of allure and danger to the figure.
Overall Facial Harmony: Revisit the entire face to ensure all elements work together harmoniously. Adjust shadows, highlights, and colour intensity to achieve a balanced and realistic facial expression that suits the character’s persona.
Video Part Four: Non Metallic Metal Texture Sword
Creating a Non-Metallic Metal (NMM) texture on a sword for a miniature model requires patience, precision, and a good understanding of light and shadow. This guide is designed to walk you through the process of painting the weapon blade of Sekhar The Vampire, focusing on achieving a weathered, high-contrast, NMM effect.
Materials Required
Paints: Vallejo Neutral Grey, Ice Yellow; Games Workshop Mournfang Brown, Rhinox Hide; P3 Morrow White; Two Thin Coats Dark Sun Yellow.
Brushes: Fine detail brushes capable of making very thin lines.
Palette: A wet palette to ensure your paints remain workable.
Water or Thinner: For diluting your paints to the desired consistency.
Step-by-Step Guide to the Non Metallic Metal Texture Sword
Preparing the Blade: Begin with a clean, primed miniature. Ensure Sekhar’s blade is smooth and free from any debris or fingerprints.
Base Coating: Apply a base coat of Neutral Grey on the blade. This serves as your midpoint for building up highlights and deepening shadows.
Establishing Light Points: Identify the main light points on the blade using a lamp. Typically, the flat back section of the blade and the curved edges will catch the most light. Mark these areas mentally as points where the highest highlights will be placed.
Initial Highlights and Shadows: Create a gradient on your palette ranging from Neutral Grey to Ice Yellow, progressively adding Ice Yellow to lighten the mixture. Include a separate mix with Mournfang Brown and Neutral Grey for warmer tones, and pure white for the brightest highlights.
Begin adding these mixtures to the blade, focusing on the predetermined light points. Use a scratchy, controlled technique with the very tip of your brush for texture.
Refining the Texture: As the paint on your palette dries slightly, it will naturally become thicker. Use this to your advantage to add textured highlights and shadows, adjusting the water content as necessary for softer transitions or more pronounced scratches.
Correcting and Sharpening Details: Utilise black to correct any oversteps or to sharpen the divisions between different sections of the blade. This step is crucial for defining the shape and enhancing the contrast of your NMM effect.
Adding Depth with Glazes: Mix highly diluted glazes of Mournfang Brown (and variations with Neutral Grey) to apply to the lower sections of the blade. This creates a sense of depth and simulates a subtle reflection from the environment.
Final Highlights: Use the brightest mixtures, including pure white, to add the final highlights to the top light points. This step might require going back to reinforce the contrast between the brightest highlights and the adjacent shadows.
Weathering Effects: To add a weathered look, incorporate fine scratches across the blade’s surface with a very thin brush and lighter paint mixes. These should traverse both the light and dark areas to create a unified texture across the blade.
Bounce Light: For a more advanced NMM effect, paint a bounce light on the cutting edge of the blade. This is a subtle highlight that simulates light reflecting off the ground, adding to the realism of your metal effect.
Finishing Touches: Reassess the overall effect from multiple angles, ensuring that the blade looks good from all perspectives.
Additional Tips
Patience is Key: Achieving a convincing NMM effect is time-consuming. Work slowly and carefully.
Lighting: Understanding how light interacts with metal is crucial for NMM. Study real-life examples if possible.
Video Part Five: How to Paint a Skeleton with Glowing Eyes
This is another video looking at Sekhar the vampire, this time focusing on how to paint a skeleton with glowing eyes for the model on her base. This video looks at the skeleton, how to paint his glowing eyes, sword and bones etc. The whole model is covered!
Materials needed:
Skeleton ModelPriming spray (I’ve used black!)
Brushes:I use the Artis Opus range of brushesFine detail brushMedium-sized brushLarge brush (optional, for basecoating larger areas)
Wet Palette (for mixing and thinning paints)Varnish (to protect the finished paint job)
Paints:All paints mentioned are from Games Workshop’s Citadel range.
Yriel Yellow
Moot Green
Balor Brown
Morghast Bone
Screaming Skull
Mournfang Brown
XV-88
Rhinox Hide
Other Materials:
Rocks or pebblesFoliage (such as static grass or miniature leaves)Sand or texture paste (for ground texture)Super glue (for attaching basing materials)Water (for thinning paints)Paper towels or cloth to ensure your brushes are totally clean!
More Soulblight, Undead and Vampire Tutorials!
If you don’t have an account here on my website, please sign up here! I have over 350 video tutorials with steps and tips, plus a selection of PDFs. If you are not sure about joining, you can explore my free videos with a free membership, or take the plunge and become a full subscriber for full access.
If you’d prefer to support me on Patreon, please visit: https://www.patreon.com/RichardGray [...]
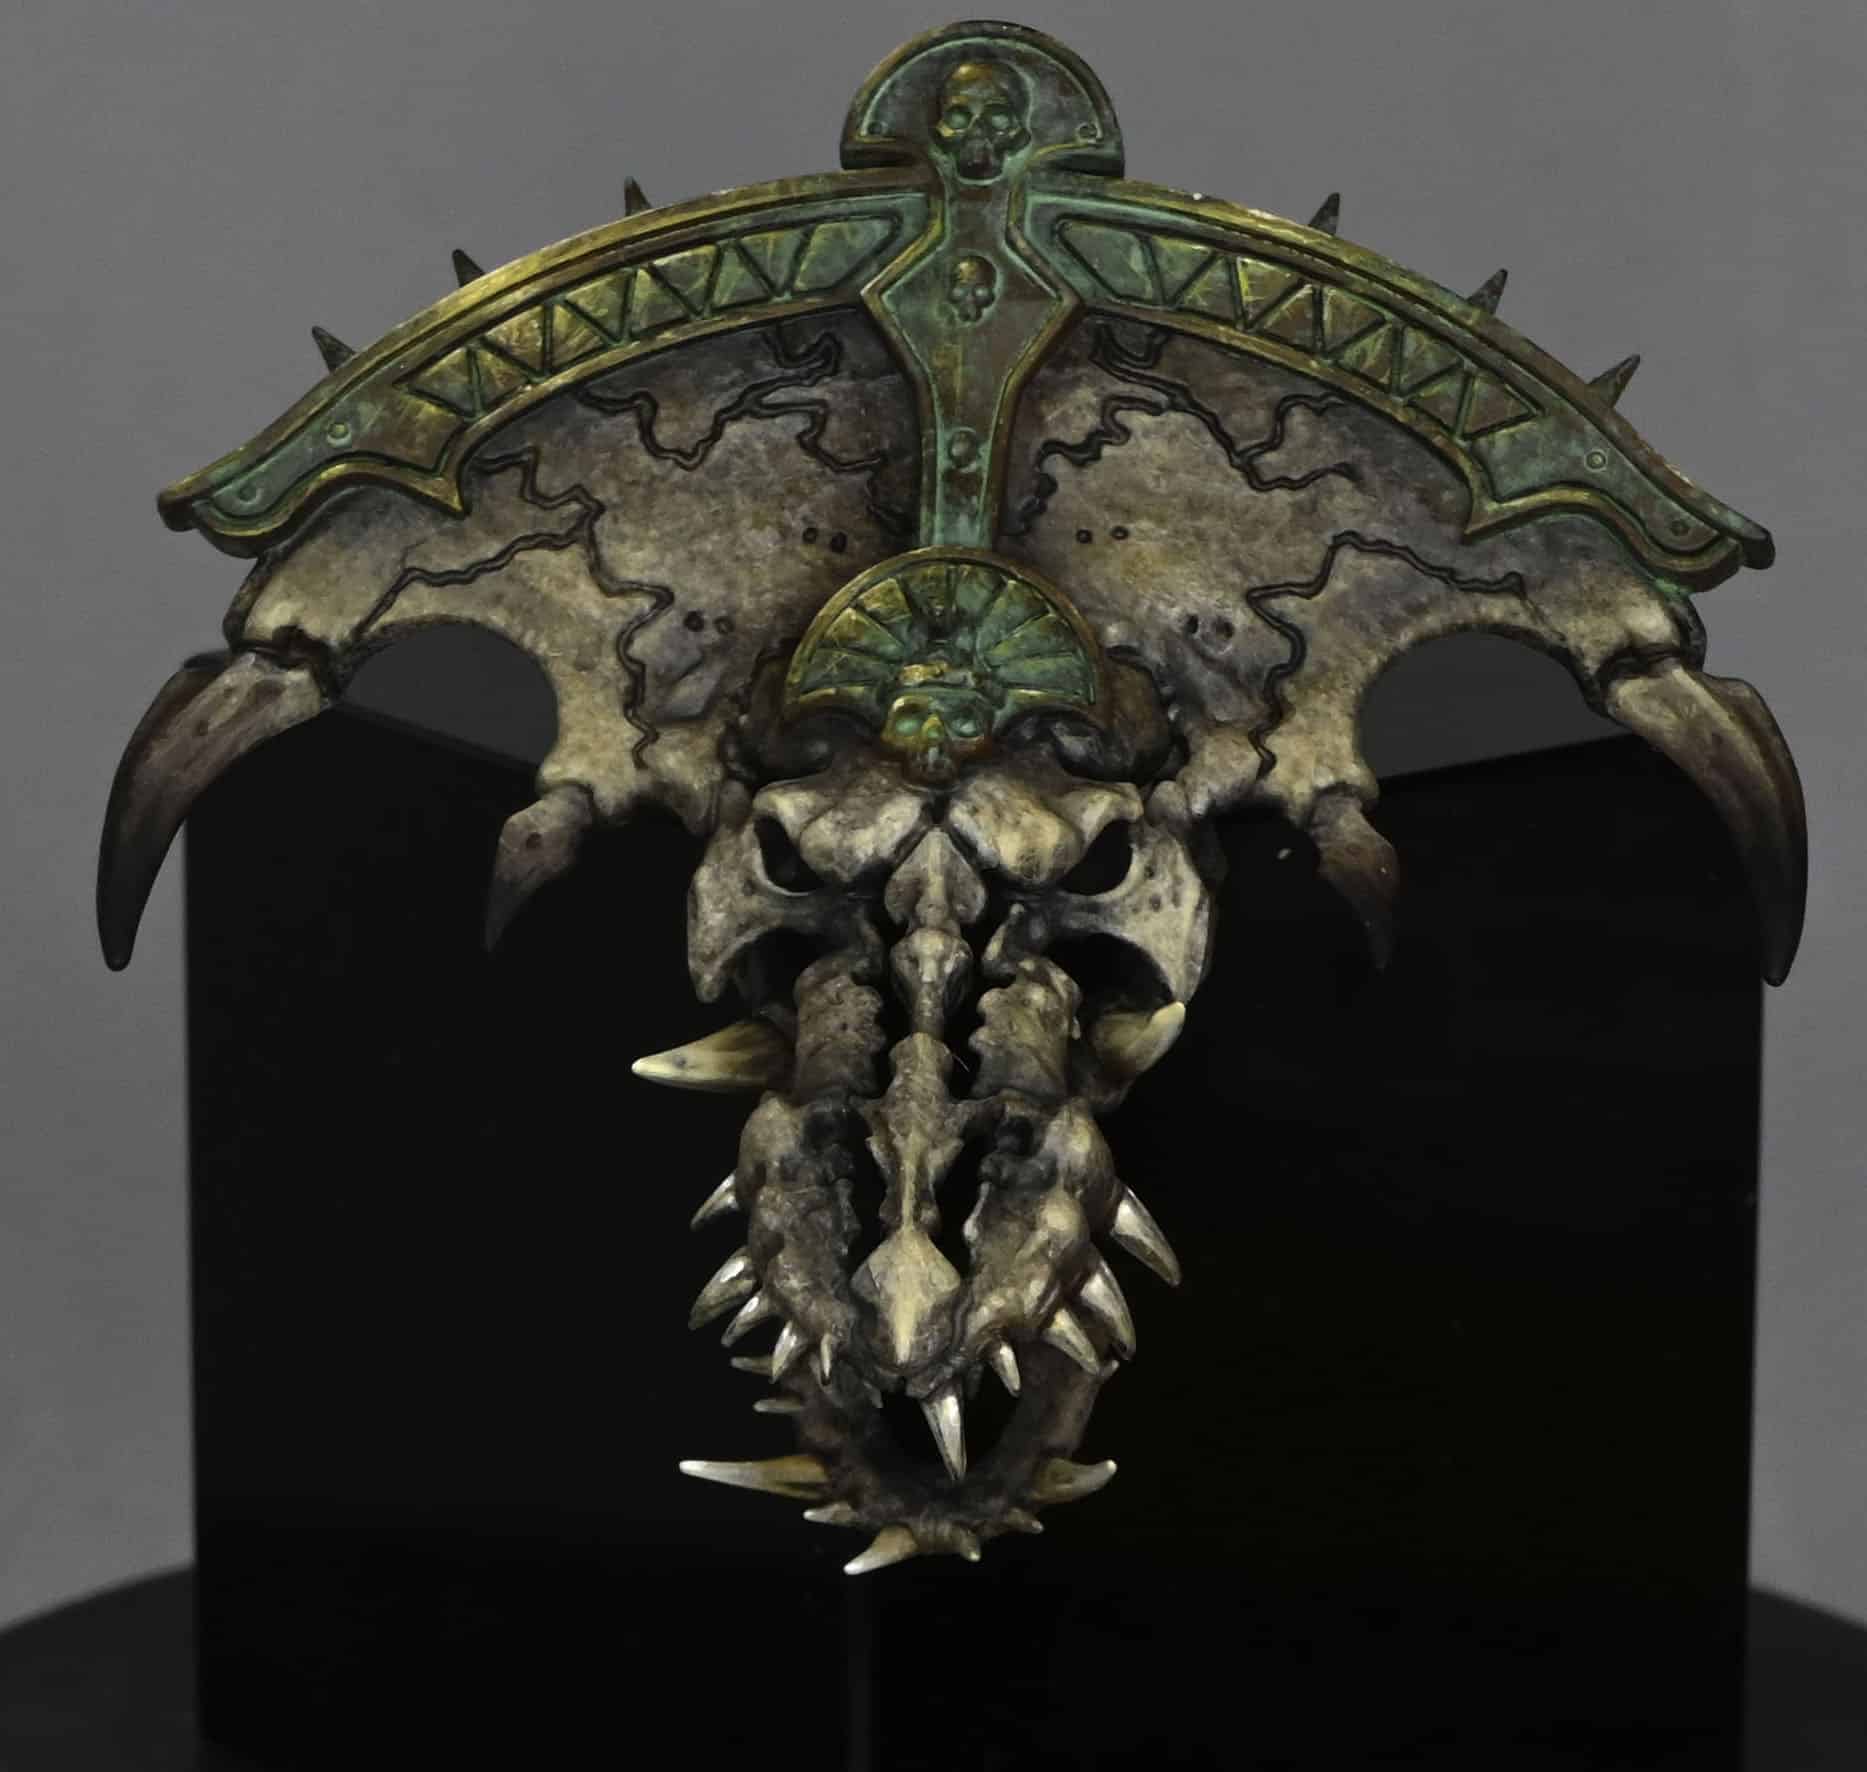
This video looks at how to paint the head of the Tomb Kings Bone Dragon. The video looks at the textured bone, how to add colour and interest and then how to add verdigris and NMM to the bronze trim.
Video – How to Paint the Tomb Kings Bone Dragon Head
Paints and Materials Used on the Tomb Kings Bone Dragon
Paints:
Games Workshop Paints: Mournfang Brown, XV-88, Morghast Bone, Screaming Skull, Skavenblight Dinge, (Skeleton Horde Contrast optional)
Kimera Colours: Fallen Grass (Sybarite Green as an alternative)
Two Thin Coats: Dark Sun (Balor Brown alternative)
Brushes and Tools:
Artis Opus Small Dry Brush: Used for stippling the base coat and first highlights.
Size 2 Brush (Old): Ideal for glazing with Scavenblight Dinge and applying the verdigris effect on metallic elements. An older brush is recommended as the techniques used can be rough on the bristles.
Size Z00 Brush: Used for finer detail work, such as adding texture to the verdigris effect. However, a larger brush may be more efficient for larger areas.
Size 1 Brush: Recommended for applying non-metallic metal highlights. An older brush is suitable as long as it maintains a good point.
Wet Palette: Handy for keeping your paint mixes workable and blending colours.
Kitchen Roll: For dabbing off excess paint and ensuring the right consistency on the brush.
Water Pot: For thinning paints and cleaning brushes.
Step-by-Step Guide to Painting the Tomb Kings Bone Dragon
Step 1: Base Coat
Create a mix of Mournfang Brown and XV-88 in approximately a 50/50 ratio. The exact mix isn’t crucial, but aim for a reddish-brown shade.
Thin this mixture with water (about two parts water to one part paint).
Using an Artist Opus small dry brush, apply this mixture to the dragon head using a stippling method. Ensure the brush is damp, not wet, to avoid a dusty look.
Cover the entire surface, allowing the small dots of paint to create texture. This might require two to three layers for opaque coverage.
Step 2: First Highlight
Switch to Morghast Bone for the next layer of highlight.
Again, thin the paint (similar ratio as before) and dab off excess paint on kitchen roll before applying.
Stipple Morghast Bone more selectively, focusing on creating a transition from darker to lighter areas.
Pay special attention to the metal crests and teeth-like protrusions, ensuring they are light enough for later glazing.
Step 3: Final Highlight
Move on to Screaming Skull for the highest highlights.
Apply this colour even more sparingly and delicately, focusing on the most raised areas and textures.
Remember, this is not dry brushing. Dab the brush straight onto the model to create the desired texture.
Step 4: Painting the Teeth
Start with the base colours used for the bone and apply them with a normal brush for a smoother finish.
For the top teeth, paint from the bottom upwards. This creates a shiny effect, with the brightest part of the tooth at the top.
Use Screaming Skull for the very top section of the teeth to enhance the shiny look.
Step 5: Softening Textures
Use Scavenblight Dinge to soften the texture on the skull.
Thin the paint significantly (about three to four parts water to one part paint).
Apply with a large brush, focusing on midtones to shadows to enhance depth and contrast.
Step 6: Glazing and Highlighting
Return to the mixture of XV-88 and Mournfang Brown, now very watered down.
Glaze around the teeth and other areas to add warmth and contrast, separating different elements like teeth from the skull.
Step 7: Additional Details and Glazing
Use Morghast Bone and Screaming Skull to pick out details, focusing on areas like the eye sockets and brow for added focus.
For the bone spikes, start glazing with Rhinox Hide, thinned down.
Progress from Rhinox Hide to a black colour (like Vallejo Model Color Black), applying from halfway down the bone spike towards the tip, creating a dark gradient.
Step 8: Metallic Elements
Base the metal parts with Mournfang Brown.
Apply a wash of Fallen Grass, heavily watered down (five parts water to one part paint), focusing on recesses.
Follow up with black lining for added definition, using watered-down black paint.
Step 9: Non-Metallic Metal Highlights
Create a palette with Mournfang Brown, a 50/50 mix of Mournfang Brown and Dark Sun, Dark Sun, Dark Sun mixed with white, and pure white.
Start with the darker mixes and progressively highlight with lighter mixes, focusing on edges and areas where wear would naturally occur.
Add finer highlights and scratches with the lightest mixtures.
Step 10: Finishing Touches
Revisit areas with Scavenblight Dinge for further softening and definition.
Optionally, add warmth with a glaze of Mournfang Brown and XV-88, or Skeleton Horde Contrast for subtlety.
Explore more Old World and Bone Tutorials!
If you don’t have an account, please sign up here! The website currently has over 350 video tutorials with steps and tips, plus a selection of PDFs. If you are not sure about joining, you can explore my free videos with a free membership, or take the plunge and become a full subscriber for full access.
If you’d prefer to support me on Patreon, please visit: https://www.patreon.com/RichardGray [...]
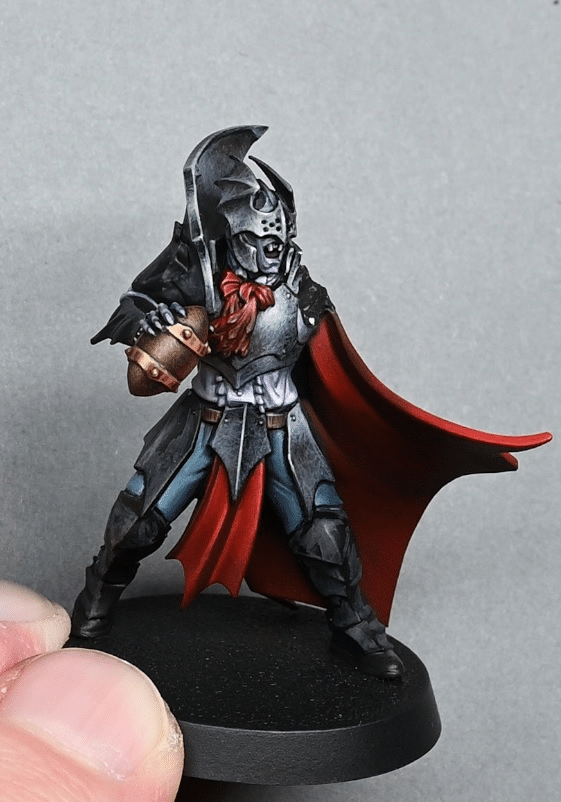
A series showing how to paint a Blood Bowl Vampire from the new Vampire Blood Bowl team, which Games Workshop sent me as an early review copy.
Quick Jump to:
Video: How to Paint a Blood Bowl Vampire: Part OneMaterials Needed:Step-by-Step GuideVideo: How to Paint a Blood Bowl Vampire: Part TwoMaterials Needed:Step-by-Step GuideVideo: How to Paint a Blood Bowl Vampire: Part ThreeMaterials Needed:Step-by-Step GuideMore Vampires and Undead Tutorials to Explore!
Video: How to Paint a Blood Bowl Vampire: Part One
This video focuses on the NMM armour and the wing arm.
Materials Needed:
Primer: Black
Paints: Games Workshop: Rhinox Hide, Pink Horror, Sotek Green; Vallejo’s Neutral Grey, Ice YellowP3: Morrow White
Brushes: Various sizes, including a worn-out size two for broader strokes and a finer Artist Opus size 00 for details
Step-by-Step Guide
Step 1: Priming
Start by priming your Blood Bowl Vampire miniature with a black primer. Ensure an even coat to provide a solid base for your paint layers.
Step 2: Painting the Wing Arm
Begin with the wing arm, using Sotek Green mixed with Pink Horror. Apply this mix following the direction of the wing’s fingers to create a natural flow and texture.
Gradually add Ice Yellow to the mix for the middle sections of the wing, enhancing the texture and giving depth to the wing membranes.
Maintain long, directional brush strokes for a consistent and textured appearance, allowing some of the black primer to show through for natural shadows.
Step 3: Non-Metallic Metal (NMM) Armor
Mix Neutral Grey with a small amount of Rhinox Hide to start creating the base for the NMM effect on the armour.
Apply this mix to the armor plates, focusing on creating light volumes and highlights. Use a worn-out brush for a more natural, scratchy texture.
Enhance the NMM effect by adding more Rhinox Hide to the mix for deeper shades and Ice Yellow for brighter highlights. Focus these highlights on areas where light naturally hits the armour, such as the top of the shoulder pads and helmet.
Use finer brushes for detailed scratch marks and edge highlights to define the armor plates further.
Step 4: Refining Details
Go back to areas that need more definition or contrast. Use your lighter and darker mixes to refine the textures and highlights on both the wings and armour.
Pay special attention to edges and areas that would naturally catch more light, increasing contrast and depth.
Step 5: Final Touches
For the final touches, use Morrow White to add extreme highlights where the light would be strongest, such as the edges of armor plates and the tips of the wings.
Keep refining until you are satisfied with the contrast and depth.
Video: How to Paint a Blood Bowl Vampire: Part Two
The video focuses on the rest of the model, including the wing, skin, dress shirt etc.
Materials Needed:
Brushes: Various sizes for different details
Paints (Games Workshop): Rhinox Hide, Mephiston Red, Evil Sunz Scarlet, Wild Rider Red, Sotek Green, Pink Horror, Mournfang Brown, XV-88, Balor Brown, Kislev Flesh
Paints (Vallejo): Neutral Grey, Ice Yellow
Paint (P3): Morrow White
Step-by-Step Guide
Step 1: Cloak and Red Details
Start by blocking in the cloak and other red details using Mephiston Red. For a darker base, mix Mephiston Red with Rhinox Hide.
Focus on creating a vibrant red, remembering that areas under shadows or covered by other parts (like wings) will have less visible bright highlights.
For a consistent look across the model, consider painting all red elements (cloak, necktie, etc.) in similar shades.
Step 2: Armour Panels
The armour panels are painted to appear weathered. Use Neutral Grey as a base, then layer with lighter greys and whites to create a worn look.
Avoid bright, shiny finishes, aiming for a contrast between the smoothness of the cloak and the ruggedness of the armour.
Step 3: Skin Tones
Mix Sotek Green with Pink Horror for the base skin colour, aiming for a slightly greyish tone.
Layer with increasing amounts of Pink Horror and Ice Yellow for highlights, ensuring a gradual transition for a natural look.
Step 4: Dress Shirt
Use Demonet Hide as a base for the dress shirt, covering all visible parts.
Progressively lighten the shirt using Ice Yellow mixed with Demonet Hide, finishing with pure Ice Yellow and Morrow White for the brightest highlights.
Ensure all recesses are filled with Demonet Hide to avoid harsh contrasts.
Step 5: Wing Membranes
Initially, create a textured effect on the wings using Pink Horror mixed with Ice Yellow. Apply in parallel lines, paying attention to the curvature of the wings.
For a smoother finish, blend over these lines with a mix of the base vampire skin colour, softening the texture.
Paint the wing membranes with Sotek Green, adding patterns in a loose, random fashion for a chaotic look.
Step 6: Ball
Start with a base of Rhinox Hide, followed by stippling Mournfang Brown and XV-88 for texture. Finish with lighter highlights in XV-88 mixed with Ice Yellow and finally pure Ice Yellow.
Add a bounce highlight on the underside to add depth and realism.
Step 7: Metallic Rings
Paint the metallic rings starting with Mournfang Brown, followed by XV-88 for the primary highlight.
Use a mix of Balor Brown and Ice Yellow for subsequent highlights, finishing with Morrow White for the brightest points.
Pay attention to edge highlights and add small details on the spikes and rivets for added realism.
Video: How to Paint a Blood Bowl Vampire: Part Three
This video looks at how to paint his red cloak.
Materials Needed:
Brushes: Size 3 Artist Opus M brush or similar
Paints (Games Workshop): Rhinox Hide, Mephiston Red, Evil Sunz Scarlet, Wild Rider Red
Step-by-Step Guide
Step 1: Base Coat
Begin with a base coat of Mephiston Red mixed 50/50 with Rhinox Hide. This creates a deep, dark red that will serve as both a shadow and a base for building highlights.
Apply this mix over the entire cloak. Note that while it appears vividly red when wet, it dries to a darker, more desaturated shade.
Step 2: Highlighting
After the base coat dries, apply Mephiston Red to highlight the raised areas of the cloak. This paint appears bright when wet but dulls as it dries.
Aim for a smooth finish with no texture, contrasting nicely against any textured armour on the model.
Use multiple coats for an opaque finish, ensuring a solid base for further highlights.
Step 3: Blending
For a seamless transition, blend Mephiston Red into the shadowed areas, gradually merging into the darker base.
Use slightly thinner paint for this step, allowing for smooth transitions.
Focus on maintaining a balance between the bright highlights and darker base.
Step 4: Deepening Shadows
Enhance the shadows by applying Rhinox Hide to the deepest parts of the cloak, increasing contrast.
Avoid using straight black for shadows, as it can appear too harsh.
Step 5: Further Highlighting with Evil Sunz Scarlet
Apply Evil Sunz Scarlet to the brightest parts of the cloak, using a 50/50 water to paint mix initially.
Increase the opacity with additional layers, focusing on the top of the cloak where light naturally hits.
Blend this brighter red into the Mephiston Red for smooth transitions.
Step 6: Finishing Touches
If desired, take the highlights further with Wild Rider Red, applying it sparingly to the sharpest creases and edges for emphasis.
Avoid using Wild Rider Red on large, smooth areas to prevent the cloak from appearing pink.
More Vampires and Undead Tutorials to Explore!
If you don’t have an account, please sign up here! The website currently has over 350 video tutorials with steps and tips, plus a selection of PDFs. If you are not sure about joining, you can explore my free videos with a free “freebies” membership, or take the plunge and become a full subscriber for full access.
If you’d prefer to support me on Patreon, please visit: https://www.patreon.com/RichardGray [...]
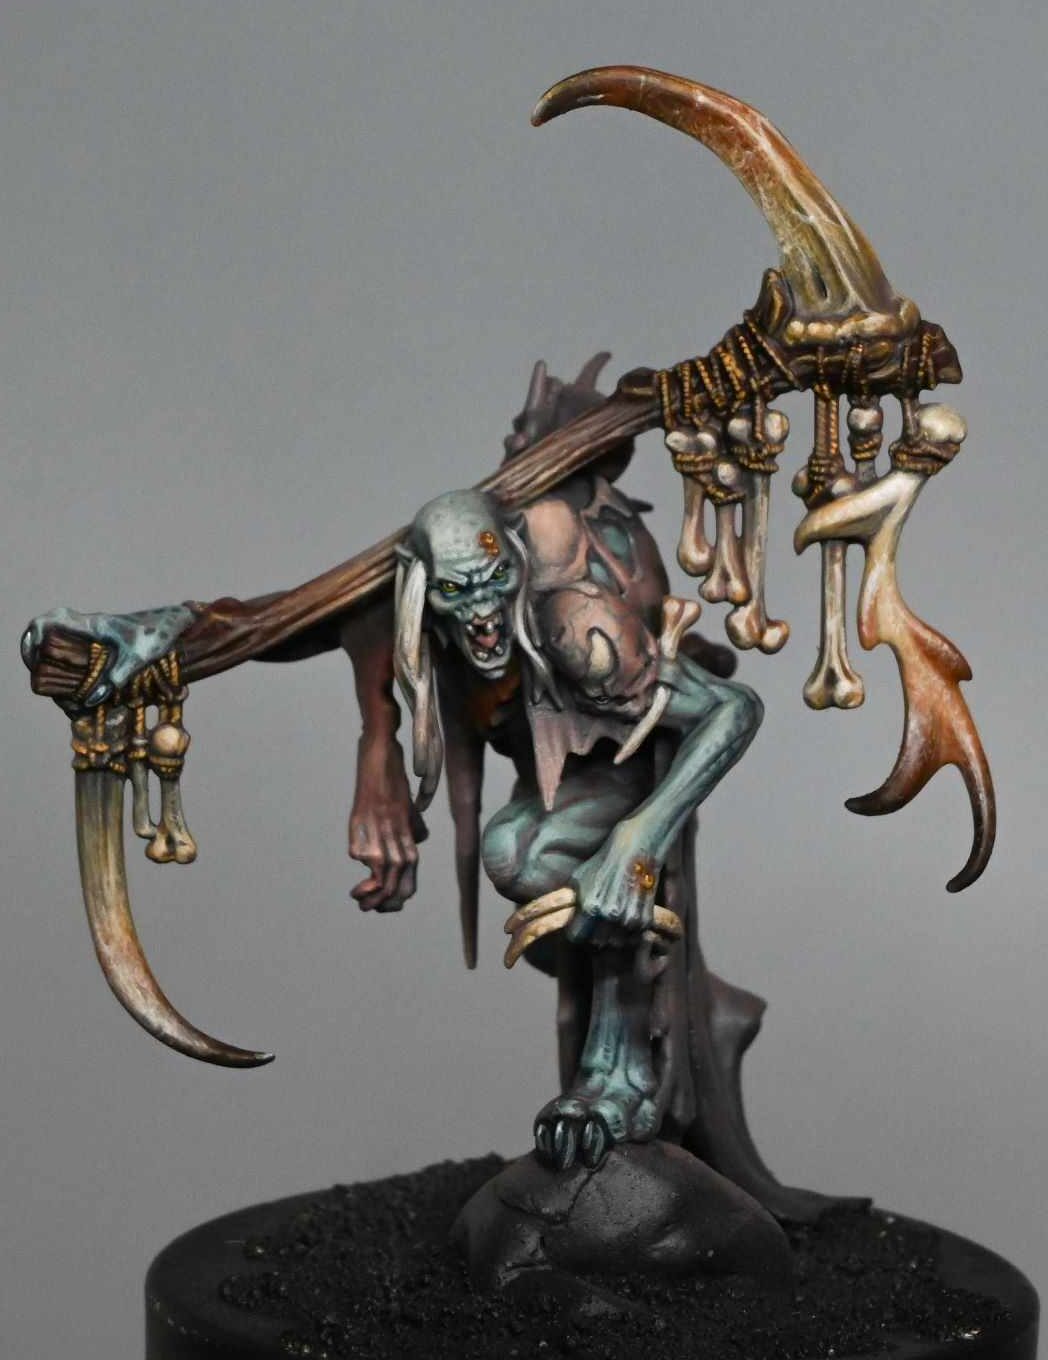
This video shows how to paint the Marrowscroll Herald Ghoul from the Flesh Eater Courts, that Games Workshop sent me as an early review copy.
Video – How to Paint the Marrowscroll Herald – Flesh-Eater Courts
All videos are recorded in HD 1080p or higher – use full screen for the full effect and let the video load completely.
The following paints were used: Games Workshop: Bugman’s Glow, Cadian Fleshtone, Rhinox Hide, Mournfang Brown, Morghast Bone, Screaming Skull, Sotek Green, Skavenblight Dinge, Balor Brown
Step by Step Guide
Step 1: Initial Coat and Base Colours
Prime the Marrowscroll Herald, then apply a quick airbrush coat of Bugman’s Glow.
Paint wooden parts like weapon handles with Rhinox Hide using a size 2 brush.
For skin areas, apply Sotek Green, ensuring a translucent effect to let the Bugman’s Glow show through for natural shadows.
Step 2: Additional Base Colours and Details
Add shading and a grimy look to the skin coat with Skavenblight Dinge.
For the first skin highlight, mix Sotek Green with Cadian Fleshtone. Further highlights are achieved by adding more Cadian Fleshtone and a small amount of P3 Morrow White.
Step 3: Facial Details
Concentrate on the face, dedicating more time to highlights and textures.
Paint the eye sockets black, apply Uriel Yellow for the iris, and add a black dot for the pupil followed by a small white dot for reflection.
Use Cadian Fleshtone for the Marrowscroll Herald gums and Morghast Bone for teeth, highlighting the tops of teeth with white.
Step 4: Enhancing the Skin
Apply a variety of skin highlights using mixtures of Sotek Green, Cadian Fleshtone, and white.
For liver spots or skin patterns, use a mixture of Balor Brown and skin colours, then soften with glazes of highlight colours.
Step 5: Bone and Horn Textures
Begin with Balor Brown for bones and horns, focusing on raised areas for highlights.
Progress to Morghast Bone and Screaming Skull for higher highlights, adding texture with scratchy brushstrokes.
For the antler, use a similar process but concentrate the highlights towards the top.
Step 6: Boils and Ropes
Paint boils with Mournfang Brown, add a yellow edge highlight with Uriel Yellow, and top with a white dot.
For ropes, start with Rhinox Hide as a base, then add texture using Balor Brown by creating parallel lines.
Step 7: Final Touches
Revisit areas needing more work, such as the skin or horns, to adjust highlights or add textures.
Continually assess the overall look for balance in colour and texture.
Note:
The process is iterative, involving alternation between different paints and techniques, focusing on building up layers and textures gradually.
Pay particular attention to light placement and contrasts, especially on the face and prominent features.
If you don’t have an account, please sign up here! The website currently has over 350 video tutorials with steps and tips, plus a selection of PDFs. If you are not sure about joining, you can explore my free videos with a free membership, or take the plunge and become a full subscriber for full access.
If you’d prefer to support me on Patreon, please visit: https://www.patreon.com/RichardGray [...]
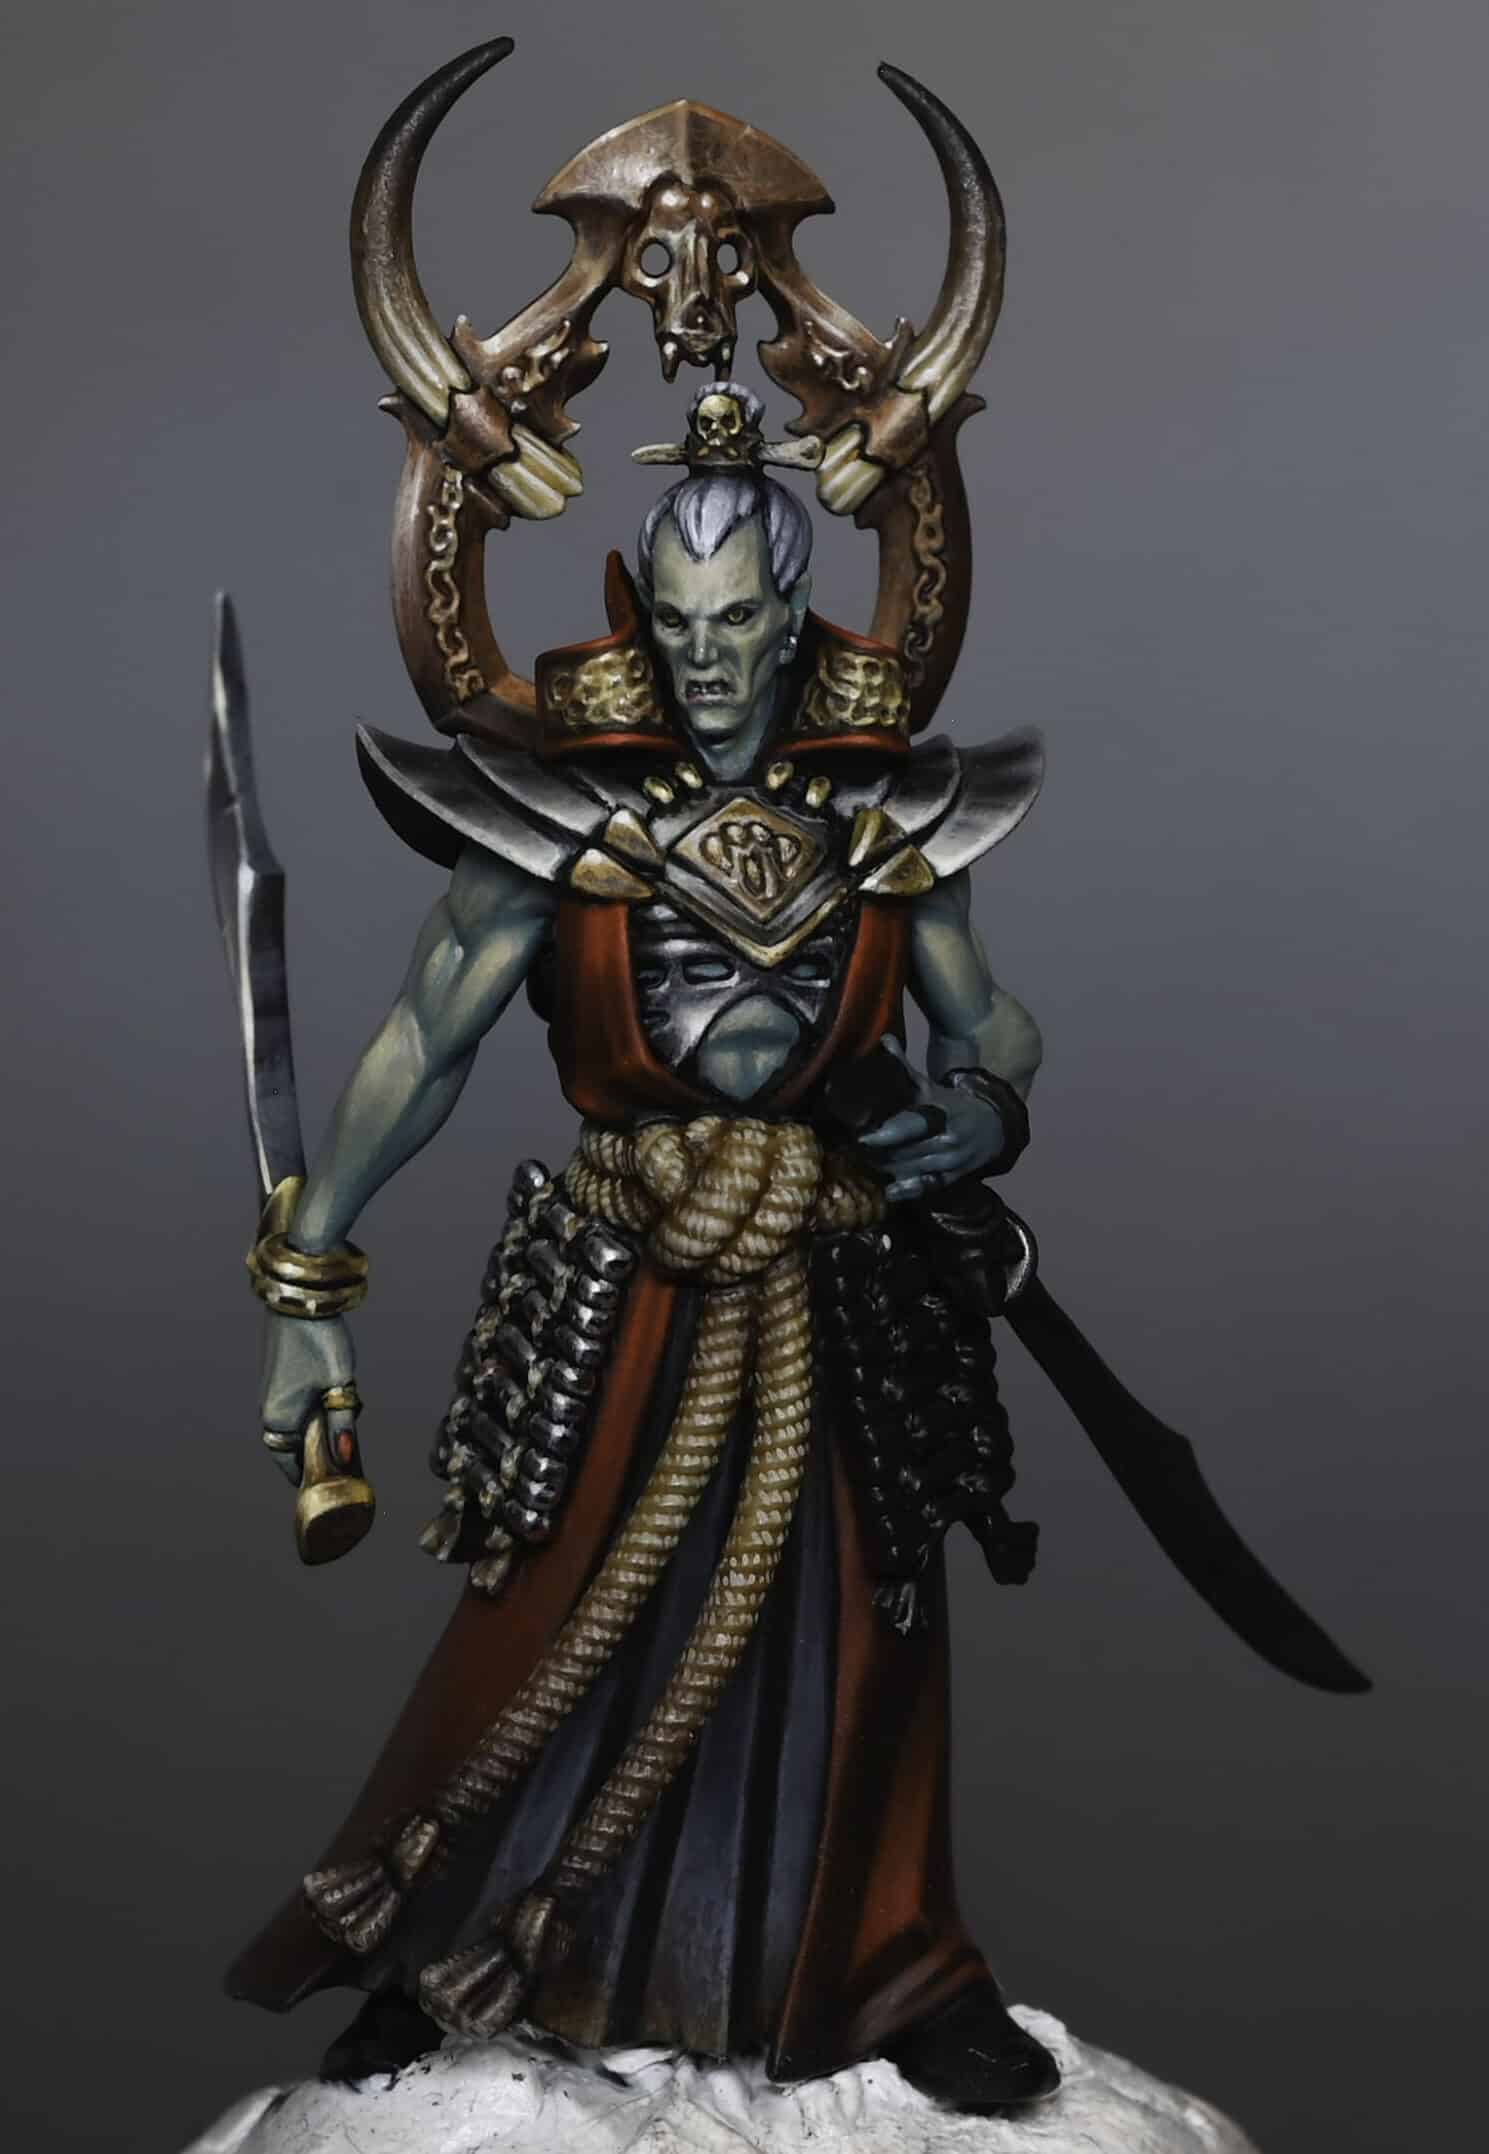
A series for how to paint an Askurgan Exemplar from the Warcry Bloodhunt box, who I painted as part of my Commended Golden Demon Entry for 2023. Because it’s a Demon entry, the techniques will be very in-depth and very precise!In these videos you will learn how to paint his undead skin, red robes and rope, NMM metals on his weapon and armour, horn effect on his trophy rack and lots of other little tips and tricks. Read on to explore them along with paints, materials and step by step help.
How to Paint an Askurgan Exemplar Vampire Part One: Face, Arm and ShoulderMaterials and PaintsPainting the SkinNon-Metallic Metal (NMM) on ArmourAdditional TipsHow to Paint an Askurgan Exemplar Vampire Part Two: Red Robes, Hair and RopeMaterials and PaintsPainting Red RobesTechnique and BrushworkPainting HairPainting the RopeNon-Metallic Metal Effect on CollarOther TipsHow to Paint an Askurgan Exemplar Vampire Part 3: Sword Blade, Gold Sword Hilt and Hip ArmourMaterials and PaintsBase CoatingPainting the RopeHip ArmourSword Blade and HandleDetailing and Finishing TouchesEdge Highlighting and RefinementHow to Paint an Askurgan Exemplar Vampire Part 4: Trophy Rack and HornsMaterials and PaintsTrophy Rack Horns How to Paint an Askurgan Exemplar Vampire Part 5: NMM SwordPaints and Materials RequiredBase Coat and HighlightingBlade Edge DetailingFlat Blade SurfaceReflections and HighlightsEdge HighlightsRefining and Adjusting HighlightsFinal TouchesHow to Paint an Askurgan Exemplar Vampire Dirt On His RobePreparing to PaintAdding Depth with Mournfang BrownFinishing Touches with Balor BrownGeneral Tips for an Authentic EffectMore Undead and Vampire Tutorials to Explore!
How to Paint an Askurgan Exemplar Vampire Part One: Face, Arm and Shoulder
All videos are recorded in HD 1080p or higher – use full screen for the full effect and let the video load completely. You can also click the little “cog” and change the speed of the video, if I am going too fast (or slow!).
Materials and Paints
Paints: Games Workshop (Sotek Green, Cadian Fleshtone, Kislev Flesh, Mournfang Brown, Balor Brown, Yriel Yellow, Evil Sunz Scarlet), Vallejo (Toxic Yellow, Ice Yellow, Neutral Grey, German Grey, Black), Two Thin Coats (Dark Sun Yellow – optional)
White Paint: Schmincke White
Brushes: Size 00 and other fine brushes for detailed work
Painting the Skin
Base Colour: Mix Sotek Green with Cadian Fleshtone for a warm, turquoise green. This will be your base colour for the skin, providing a unique look while not being too dark.
Building Highlights: Progressively lighten this mixture by adding more Kislev Flesh, and Toxic Yellow from Vallejo for higher highlights. The aim is to create a series of progressively lighter shades, leading up to a final mix of Toxic Yellow, Kislev Flesh, and Schmincke White for the brightest highlights.
Application Technique: Use a very thin consistency (about 1.5 parts water to 1 part paint). Apply with a size 00 brush, focusing on upwards-facing surfaces and muscles for a natural look. Remember, the key is to layer thinly and build up the colour gradually.
Detailing the Face: For the vampire’s face, focus on defining sharp features while maintaining a natural appearance. Use the lightest colour mix for the highest points like the brow ridges and cheekbones. The eyes are painted black with Yriel Yellow for the irises, positioned such that the upper eyelid slightly covers the iris.
Non-Metallic Metal (NMM) on Armour
Chest Armour: Begin with a base of Mournfang Brown. For highlighting, use a mix of Neutral Grey and Ice Yellow, progressively adding more Ice Yellow for brighter areas. Paint the armour’s detailed features like fangs and textures with care, incrementally building up to white for the highest highlights.
Shoulder Armour: Start with Neutral Grey, building up highlights towards the top where the light naturally hits. Add reflections and finer details, creating a smooth transition from light to dark. Use Mournfang Brown, thinned down, for adding tonal variation and depth.
Gold Details: Utilise a combination of Mournfang Brown and Dark Sun Yellow (or Balor Brown) for the base of gold areas. Highlight with Ice Yellow, and for the brightest spots, use a mix of Ice Yellow and Schmincke White. Be sure to maintain the gold’s richness by not over-highlighting with white, thus keeping the metallic effect.
Additional Tips
Glazing: Use glazes (thin, transparent layers of paint) to smooth out transitions between colours, especially on the gold and armour sections.
Edge Highlighting: On the armour, especially the shoulder guards, use edge highlighting to define shapes and enhance the metallic appearance.
Reflections and Light Sources: Be mindful of the environment’s impact on reflections. Vary the reflections on different parts of the armour to create a more dynamic and realistic look.
Detailing and Textures: Pay attention to the texture of each surface. For instance, the vampire’s skin should have a smooth finish, while the armour can have a more textured appearance.
Consistency Across the Unit: If this model is part of a unit, ensure consistency in the painting style and colour scheme across all models, while allowing for individual variations. One of the reasons I believe I missed out on a trophy with my vampires is because I made them all much too unique and they didn’t look like they were part of the group. Cohesion and lore accuracy is very important for Golden Demon! I talk about this a bit more in my Golden Demon 2023 video, here. Anyway, sorry, back to the model..!
How to Paint an Askurgan Exemplar Vampire Part Two: Red Robes, Hair and Rope
All videos are recorded in HD 1080p or higher – use full screen for the full effect and let the video load completely. You can also click the little “cog” and change the speed of the video, if I am going too fast (or slow!).
Materials and Paints
Games Workshop Colours:Rhinox Hide: A deep brown, used as a base for the red robes.Mournfang Brown: Utilized in creating non-metallic gold effects and for darkening rope.Mephiston Red: Employed to enrich the red highlights.Evil Sunz Scarlet: A vibrant red for brighter highlights.Wild Rider Red: Used very sparingly for the highest red highlights.Balor Brown: Mixed with other colors for non-metallic gold effects.Karak Stone: The base for the rope.Skeleton Horde (Contrast): Applied for shading and depth on the rope.
Vallejo Colours:Toxic Yellow: Mixed for non-metallic gold effects and for rope detailing.Ice Yellow: Used in similar contexts as Toxic Yellow.Neutral Grey: A base for light grey hair and for mixing higher highlights.German Grey: Mixed with Neutral Grey for hair.Black: Used for various detailing and mixing.
Other Materials:Schmincke White: An artist’s acrylic paint used for the highest highlights, particularly in the hair.
Painting Red Robes
Base Coat: Start with Rhinox Hide. Despite its brown tone, it’s essentially a deep red. Apply this as a base for the robe.
First Highlight: Mix Rhinox Hide with Mephiston Red. This creates a richer, warmer red. Apply with a size 2 brush for broad strokes.
Subsequent Highlights: Progressively lighten the red using Evil Sunz Scarlet and Wild Rider Red. Be cautious with Wild Rider Red, using it sparingly to maintain the robe’s red saturation.
Technique and Brushwork
Use a larger brush for the broader areas of the robe to achieve smooth, clean strokes.
For finer areas, switch to a smaller brush for precise application and to highlight raised details and creases.
Painting Hair
Initially, aim for shiny black hair, but later shift to a light grey, matte finish.
Use Neutral Grey mixed with white for higher highlights, painting in the direction of the hair’s texture.
Be mindful of the hairline; avoid a stark contrast between the skin and hair. Aim for a subtle shadow effect.
Painting the Rope
Base coat the rope with Karak Stone.
Use a larger brush to cover the area efficiently.
Apply Skeleton Horde contrast paint for shading and depth.
For texture, add tiny lines with a mix of Karak Stone and white, representing the rope’s fibres.
Non-Metallic Metal Effect on Collar
This segment is challenging due to its intricate texture.
Use a mix of Mournfang Brown, Balor Brown, Toxic Yellow, and Ice Yellow to create a gold effect.
Add white for the brightest highlights, focusing on the collar’s embossed details.
Other Tips
Throughout the process, maintain a balance between boldness and subtlety. The goal is to accentuate the model’s features without overwhelming its overall appearance. Key points to remember:
Layering and Blending: The layering technique is crucial, especially for the red robes. Begin with dark tones and gradually build up to lighter hues, ensuring a seamless transition.
Directional Brushwork: Align your brush strokes with the texture and direction of the materials you are painting, whether it’s the flow of the robes or the strands of hair. This approach enhances realism.
Contrast and Focal Points: High contrast areas, like the non-metallic metal collar, should be approached with caution. Ensure they complement, rather than overpower, the focal points like the face.
Texture and Detailing: The rope’s texture is a time-consuming but rewarding aspect. Those fine lines, while tedious, add a significant level of detail to the model.
How to Paint an Askurgan Exemplar Vampire Part 3: Sword Blade, Gold Sword Hilt and Hip Armour
All videos are recorded in HD 1080p or higher – use full screen for the full effect and let the video load completely. You can also click the little “cog” and change the speed of the video, if I am going too fast (or slow!).
Materials and Paints
Games Workshop Colours:
Rhinox Hide: A deep, dark brown, used for shading and creating gradients on elements like the rope and as a base for other colours.
Mournfang Brown: Employed in non-metallic metal effects and to add depth to certain elements.
Mephiston Red: A bright red, used for adding vivid highlights and details.
Balor Brown: Mixed with other colours for non-metallic gold effects.
Karak Stone: Used as a base colour for the rope.
Skeleton Horde (Contrast): Applied for shading and to add depth, especially on the rope.
Vallejo Colours:
Ice Yellow: Mixed for creating highlights and for non-metallic gold effects.
Neutral Grey: A base for grey tones and for mixing higher highlights.
German Grey: Used in conjunction with Neutral Grey for various details.
Black: Employed for shading and defining details.
Other Materials:
Schmincke White: An artist-grade acrylic paint used for the highest level of highlights.
Base Coating
Apply the base colours: Rhinox Hide for darker areas, Mournfang Brown for metallic parts, Karak Stone for the rope, and other base colours as required for different parts.
Painting the Rope
Apply Karak Stone as the base colour.
Shade with Skeleton Horde (Contrast) to add depth.
For weathering effects, use Rhinox Hide in a glaze consistency (about three parts water to one part paint) at the bottom of the rope.
Hip Armour
Paint the ropes in the armour with the same technique as the main rope.
For the armoured plates (that resemble bones), start with a metallic base using Mournfang Brown.
Create a non-metallic metal effect by gradually building up layers, transitioning to lighter colours like Balor Brown and then Ice Yellow. Include reflective highlights where light would naturally hit.
Sword Blade and Handle
For the sword blade, use Neutral Grey as a base, applying highlights where light would naturally reflect. Pay attention to any sculpted details like indents or edges, and enhance these with your highlights.
The sword hilt is treated similarly, with a non-metallic gold technique. Start with Mournfang Brown, adding highlights and transitioning to lighter tones like Ice Yellow and White.
For both the blade and hilt, remember to add glazes for smoother transitions.
Detailing and Finishing Touches
Enhance the gold sections (such as the bracelets and sword hilt) with Ice Yellow and White for bright highlights.
For small details like rings or intricate parts of the armour, use precise brush strokes. Highlight the top edges and create contrast with darker shades in recesses.
If necessary, use glazes (a thin mix of paint and water) to smooth out transitions and make the colours more cohesive.
Pay attention to the consistency of the paint. It should be thin enough to flow smoothly but not so thin that it loses opacity.
Edge Highlighting and Refinement
Carefully apply edge highlights to the armor and sword, using lighter colors like Ice Yellow or White. This step brings out the details and gives a more three-dimensional appearance.
For the sword blade, create the effect of light reflecting off the blade by adding thin lines and highlights. Remember to adjust the intensity based on the angle and curvature of the blade.
Use a mix of Neutral Grey, Ice Yellow, and White to create the non-metallic metal effect, building up to the brightest highlights where the light would be strongest.
How to Paint an Askurgan Exemplar Vampire Part 4: Trophy Rack and Horns
Materials and Paints
Brushes: Size 2 M Artist Opus, Size 0 and 00
Paints: Games Workshop’s Rhinox Hide, Evil Sunz Scarlet, Balor Brown, Ushabti Bone, Skeleton Horde (Contrast); Vallejo’s Ice Yellow, Dead White
Trophy Rack
Base Coat
Combine Rhinox Hide and Evil Sunz Scarlet in a 2:1 ratio
Thin the mixture with equal parts water for a smoother application
First Highlight
Add Balor Brown to the base mix for a subdued pink tone
Apply carefully, ensuring light effects align with the model’s other parts
Additional Highlights
Incrementally introduce more Balor Brown and a touch of Ice Yellow for brighter highlights
Utilise the larger brush for expansive areas, switching to finer brushes for detailed texturing
Detailing Filigree
Employ a slender brush for precision
Gently add lighter paint to intricate patterns, avoiding overly fluid paint
Horns
Begin with Ushabti Bone on a black base, requiring several layers for full coverage
Typically, four coats achieve a solid foundation
Gradients
Gradually mix in Rhinox Hide with Ushabti Bone for shading
Paint each segment, progressing towards the horn’s tip
Texture Highlights
Revert to Ushabti Bone for accentuating raised textures
Apply using small wiggles and dots, extending into less detailed areas
Horns – Finishing Touches
Apply a significantly diluted Rhinox Hide for softening transitions
Use Skeleton Horde Contrast for added depth and hue
Final Notes
Ensure uniform painting on all sides of the horns
Balance detailed work with broader strokes for a unified, realistic appearance
How to Paint an Askurgan Exemplar Vampire Part 5: NMM Sword
This guide focuses on creating a realistic non-metallic metal (NMM) effect on a sword, employing careful layering and blending techniques to achieve a shiny appearance. Patience and attention to detail are key in this process.
Paints and Materials Required
Brushes: Various sizes for detailed work
Paints: Vallejo Neutral Grey, Ice Yellow, German Grey, Black; Games Workshop Mournfang Brown
Base Coat and Highlighting
Start with Neutral Grey as the base colour
Mix Neutral Grey with a small amount of Ice Yellow for the first stage highlight
Progressively add Ice Yellow to the mixture for brighter highlights
Use Ice Yellow with a touch of White for the brightest points
Thin the paints appropriately for smooth application
Blade Edge Detailing
Focus on parallel line textures for the cutting blade edge
Use horizontal and vertical strokes for diverse textural effects
Emphasize the sharpness of the blade with these line details
Flat Blade Surface
Change brush marks on the flat blade surface for distinction
Plan for coloured reflections, using Mournfang Brown as a glazing colour
Reflections and Highlights
Paint all reflections in grey tones before applying colour glazes
Remember that the lower edge of the blade will reflect the ground, requiring a different treatment
Use glazes to soften and blend reflections and highlights
Edge Highlights
Apply fine line highlights along the sharpest part of the blade
Ensure these highlights are thin and precise for a realistic effect
Refining and Adjusting Highlights
Adjust and refine highlights as needed for balance and symmetry
Use a mix of stippling and glazing techniques for smoother transitions
Pay attention to the spine of the sword, adjusting the placement and intensity of highlights
Final Touches
Use glazes to smooth out textures, especially when working with lighter colours
Consider the overall composition and aesthetic appeal when placing final highlights
Ensure a unified and realistic look by balancing light and shadow
How to Paint an Askurgan Exemplar Vampire Dirt On His Robe
Paints Required
Games Workshop: Rhinox Hide, Mournfang Brown, Balor Brown
Preparing to Paint
Begin with Rhinox Hide: Apply at the very bottom of the robe. This colour blends well with the red robe, creating a subtle effect. As you move upwards, make the application more visible with small dots and splotches. This creates an impression of staining.
Adding Depth with Mournfang Brown
Switch to Mournfang Brown: This shade gives depth to the weathering effect. Initially, it might seem light but it darkens as it dries. If you find it too strong, you can tone it down with Rhinox Hide to soften the effect. The key here is to balance the intensity, ensuring it doesn’t overpower the base colour of the robe.
Finishing Touches with Balor Brown
Finalise with Balor Brown: This is a strong colour, so apply it cautiously. It’s significantly different from the previous colours and can make a bold impact. Focus on the very bottom of the robe, gradually building up a denser application of paint. Be mindful of areas near the highlights, such as near the foot of the robe at the front. Here, you might need to add more Balor Brown to counteract the brighter red tones.
General Tips for an Authentic Effect
Strive for unevenness: Avoid symmetrical or uniform patterns. Some areas should appear dirtier than others for a realistic effect.
Control the paint consistency: Aim for a 50/50 mix of paint to water for optimal flow and control. This consistency allows you to work for an extended period without creating a heavy texture.
Use a smaller brush: A smaller brush gives you more control, especially for creating uneven, chaotic patterns. Avoid pressing too hard to prevent large, unintended marks.
Adjust for mistakes: If you apply too much paint, quickly rub it off with your finger. For smears, stipple over them with a bit of Rhinox Hide to create interesting marks.
More Undead and Vampire Tutorials to Explore!
Videos Not Showing?
To view any of my paid tutorials, you need to be a member of the website – please click below to log in or join the site.
Not sure about joining just yet? Check out my Youtube for all my free tutorials or sign up as a free “friend” member on this site and visit the Freebies video page! [...]

These videos show you how to paint a Sons of Velmorn Skeleton from the Sons of Velmorn warband, which comes in the new Warhammer Underworlds Gnarlwood box that Games Workshop sent me.
Video – How to Paint a Sons of Velmorn Skeleton Part One
All videos are recorded in HD 1080p or higher – use full screen for the full effect and let the video load completely. You can also click the little “cog” and change the speed of the video, if I am going too fast (or slow!).
Paints and Materials
Brushes: A size 2 brush for most painting and a smaller brush for details.
Paints: Rhinox Hide, Mournfang Brown, XV-88, Balor Brown, Morghast Bone, Troll Slayer Orange, Firedragon Bright, Sybarite Green, Gauss Blaster Green, Dryad Bark (Games Workshop); German Grey (Vallejo); Morrow White (P3).
Step by Step Guide
Basecoat Armour: Start by base coating all metal areas with Dryad Bark. This unconventional start sets the stage for rusty, worn armour.
Mix Fabric Colour: Create a custom fabric colour by mixing Sybarite Green and German Grey. Adjust this mix to your preference – more grey for desaturation or pure green for vibrancy.
Apply Base Colours: Block in other base colours: Rhinox Hide for leather and wood parts, and Morghast Bone for skeletal areas. Don’t worry about perfect opacity; focus on coverage.
Rusty Effect: To achieve a rusty effect on the armour, mix a small amount of Mournfang Brown into the Dryad Bark, then add a bit of white to desaturate. Apply this mix to the armour, focusing on recesses and areas where rust would naturally accumulate.
Enhance Rust: Use straight Mournfang Brown, thinned with water, to intensify the rust effect, especially in recesses and dents.
Brighten Rust: Add Troll Slayer Orange and Firedragon Bright to certain rust areas for colour variation, keeping in mind how rust behaves in reality.
Non-Metallic Metal Highlights: Start highlighting the armour. Mix white into your base armour colour progressively, applying these lighter shades to raised areas and edges to simulate metallic reflection.
Detailing: Use the very tip of your brush for small highlights and scratches, particularly on the armour and blade. This step adds depth and realism to the rusty, worn metal effect.
White Highlights: Finally, use Morrow White for the brightest points on the armour. Be selective and minimal with white to maintain focus and contrast.
Finish Up: Conclude by refining highlights and ensuring a smooth transition between shades.
Additional Tips
Rust Placement: Apply rust thoughtfully, considering where it would naturally form and accumulate.
Highlighting Technique: Combine stippling and precise brushwork for a realistic, weathered look.
Focus on Key Areas: Spend more time on prominent areas like the helmet and chest for better visual impact.
Maintain Brush Control: Regularly adjust your brush’s load to avoid unwanted paint marks.
Balance Realism and Style: Choose your rust and highlight placement for both aesthetic appeal and realism.
Video – How to Paint a Sons of Velmorn Skeleton Part Two
Paints and Materials
Paints: Rhinox Hide, Mournfang Brown, XV-88, Balor Brown, Morghast Bone, Troll Slayer Orange, Firedragon Bright, Sybarite Green, Gauss Blaster Green, Dryad Bark (Games Workshop); German Grey (Vallejo); Morrow White (P3).
Brushes: A size 2 brush for larger areas and a finer brush for details.
Step by Step Guide
Fabric Highlights:
Mix Sybarite Green, German Grey, and a bit of Morrow White.
Apply the mix to the fabric, focusing on smooth transitions. Use a larger brush for fewer brush strokes.
Multiple thin layers are needed. Add a small amount of white for each layer, focusing on the most illuminated areas.
Bone Details:
The bone areas are detailed and require precision. Consider using a smaller brush.
Highlight the raised areas and sculpted details, like elbow joints and knuckles.
For the face, accentuate teeth more than other bone parts for contrast.
Leather and Wood:
Start with Rhinox Hide, then apply Mournfang Brown, focusing on the upper edges.
Mix in Cadian Flesh Tone with Mournfang Brown for subsequent highlights, concentrating on the top edge and creating creases.
For the wood, after Mournfang Brown, use Balor Brown with Neutral Grey for desaturation. Highlight raised grain details.
Non-Metallic Gold:
Basecoat with XV-88.
Mix XV-88 with Ice Yellow for highlights.
Accentuate the brightest spots with a mixture of Ice Yellow and White.
Weathering Fabric:
Use heavily watered-down Rhinox Hide to create dirt and stains on the fabric.
Apply in thin layers, allowing each to dry before adding more. Focus on areas that would naturally gather dirt.
Painting the Skirt:
Base the skirt with Dark Grey or German Grey.
Add White progressively for highlights, concentrating on the curves and upper areas.
Use Rhinox Hide for weathering, similar to the green fabric.
Finishing Touches:
Add fine details like bone texture, teeth, and small crevices.
For the base, a simple grey stone effect with highlights works well.
Additional Tips
Brush Choice: Use larger brushes for broad areas and smaller ones for detailed work. I used the Artist Opus range of brushes, but any high-quality brush is good.
Weathering: Weathering can mask imperfections and add realism.
Balance of Colours: Ensure the fabric and armour contrast in cleanliness and texture.
Attention to Details: Small details like teeth or bone texture can significantly enhance the model’s appearance.
Lighting Consistency: Ensure your highlights are consistent with the light source direction established across the model.
Explore more Undead Tutorials
If you don’t have an account, please sign up here! The website currently has over 350 video tutorials with steps and tips, plus a selection of PDFs. If you are not sure about joining, you can explore my free videos with a free membership, or take the plunge and become a full subscriber for full access.
If you’d prefer to support me on Patreon, please visit: https://www.patreon.com/RichardGray [...]
Space Marines
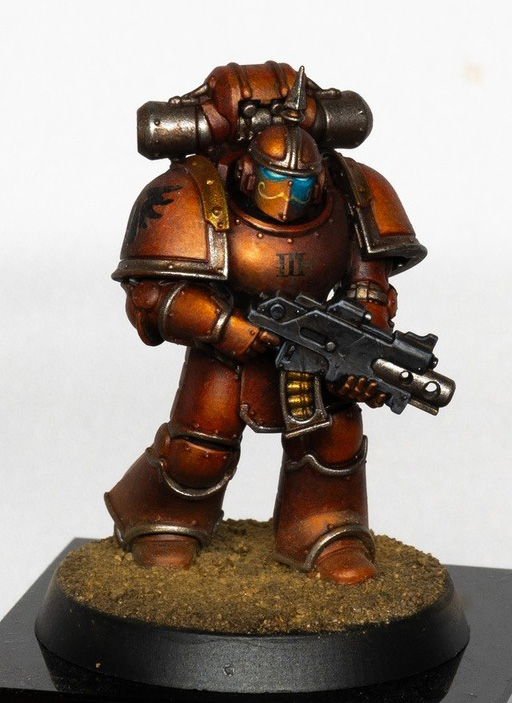
This tutorial with video will guide you through how to paint an orange Blood Angel Space Marine with a unique orange twist to his armour. Painted as part of Movember for mental health awareness, this model also features a freehand moustache as a quirky homage to the cause. One of the key challenges of this project was working with Troll Slayer Orange—an infamously tricky paint—and blending it into the Blood Angels’ classic aesthetic, reminiscent of their older colour schemes.
Video: How to Paint an Orange Blood Angel
Paints Used
Games Workshop
Mephiston Red
Rhinox Hide
Balor Brown
XV-88
Troll Slayer Orange
Sotek Green
Contrast Medium
Contrast Dark Oath Flesh
Vallejo
Ice Yellow
Black
Neutral Grey
Metal Colour Exhaust Manifold
Game Colour Scarlet Blood
Scale 75
Necro Gold
P3
Morrow White
AK 3rd Gen (Optional)
Golden Brown
Light Brown
Step-By-Step – How to Paint an Orange Blood Angel
1. Basecoat with Mephiston Red
Method: Begin by stippling Mephiston Red over a black-primed model using a small drybrush. This base layer ensures smoother transitions when applying the Troll Slayer Orange later, as orange paint is notoriously translucent over black.
Consistency: Thin the Mephiston Red with a 50/50 mix of water and paint for better flow. Use a damp brush for stippling to achieve a consistent texture.
Tips:
Regularly clean and dry your brush to avoid flooding the model with excess paint.
Use a smaller, chunky brush to fill in hard-to-reach areas to eliminate visible primer in the recesses.
2. Add Scarlet Blood for Vibrancy
Paint: Vallejo Scarlet Blood
Method: Stipple this matte red paint over the basecoat, focusing on areas that catch light, such as the chest, shoulder pads, and helmet. This adds richness to the tone while subtly transitioning towards orange.
Placement: Apply with precision, keeping the brush perpendicular to the model to avoid drybrush streaks.
Alternatives:
Evil Sunz Scarlet can be used instead if you prefer GW paints, but Scarlet Blood offers excellent coverage and vibrancy.
3. Highlight with Troll Slayer Orange
Paint: Troll Slayer Orange
Method: Thin the orange paint (1:1 water to paint) and apply it to the raised areas in multiple thin layers. Its translucency works in your favour, blending naturally with the red beneath.
Technique: Work around the model, allowing sections to dry before returning for additional layers. This prevents muddy transitions and creates a soft gradient.
Pro Tip:
For a less orange look, mix Scarlet Blood with small amounts of white or yellow to lighten highlights without veering too far into orange territory.
4. Shade with Contrast Dark Oath Flesh
Paint: Contrast Dark Oath Flesh + Contrast Medium
Method: Apply a diluted wash of Dark Oath Flesh over the entire model. This acts as a filter, unifying the tones, shading the recesses, and reducing the vibrancy of the orange.
Consistency: Use Contrast Medium instead of water to maintain the wash’s properties. Check for pooling and wick away excess with a clean, damp brush.
5. Painting Details and Metallics
Metallic Paints: Vallejo Metal Colour Exhaust Manifold, Scale 75 Necro Gold (or Viking Gold)
Method: Pick out the trim, weapon details, and any embellishments.
Silver: Use Vallejo Exhaust Manifold for weaponry.
Gold: Apply Necro Gold on selected trims (e.g., shoulder pads). Highlight with a lighter gold for emphasis.
Pro Tip:
To create a weathered look, glaze Dark Oath Flesh over metallics for a patina effect.
6. Adding Glow to the Eyes
Paints: Sotek Green, Ice Yellow, and White
Steps:
Paint the eye lenses with Ice Yellow to create a bright base.
Glaze over with Sotek Green to establish the colour.
Highlight the centre of the lens with Ice Yellow and pure White for the brightest point.
Add Object Source Lighting (OSL): Thin Sotek Green and lightly glaze the surrounding areas to simulate a glow effect.
Tips:
Focus OSL on areas in shadow for the most dramatic effect. If the surrounding armour is well-lit, the glow will appear less intense.
7. The Moustache
As a nod to Movember, the model features a freehand moustache on its faceplate.
Basecoat: Use Golden Brown for the initial design.
Highlight: Build up with Ice Yellow for a metallic gold appearance.
Symmetry: For best results, face the model head-on while painting and use short, confident brush strokes.
Pro Tip:
If you make a mistake, mix Rhinox Hide and Troll Slayer Orange to “erase” errors and blend corrections seamlessly.
8. Final Touches and Base
Decals: Apply transfers with Micro Set to conform them to the armour, then stipple over with basecoat colours for a weathered look.
New to Decals, or need some tips?
Use this handy step by step guide and video!
Watch Now
Base: Keep it simple—sand painted with Agrax Earthshade, finished with a touch of weathering powder.
This project was a fun challenge, blending unconventional colours into a Blood Angels scheme while supporting an important cause. Whether you tackle the freehand mustache or adapt the colour palette for your own chapter, the techniques here can add character and vibrancy to any Space Marine.
If you want to support the Movember mental health campaign, check out the link below: https://movember.com/m/15175299
Videos Not Showing?
To view any of my paid tutorials, you need to be a member of the website – please click below to log in or join the site.
Not sure about joining just yet? Check out my Youtube for all my free tutorials or sign up as a free “friend” member on this site and visit the free videos page!
If you’d prefer to support me on Patreon, please visit: https://www.patreon.com/RichardGray [...]
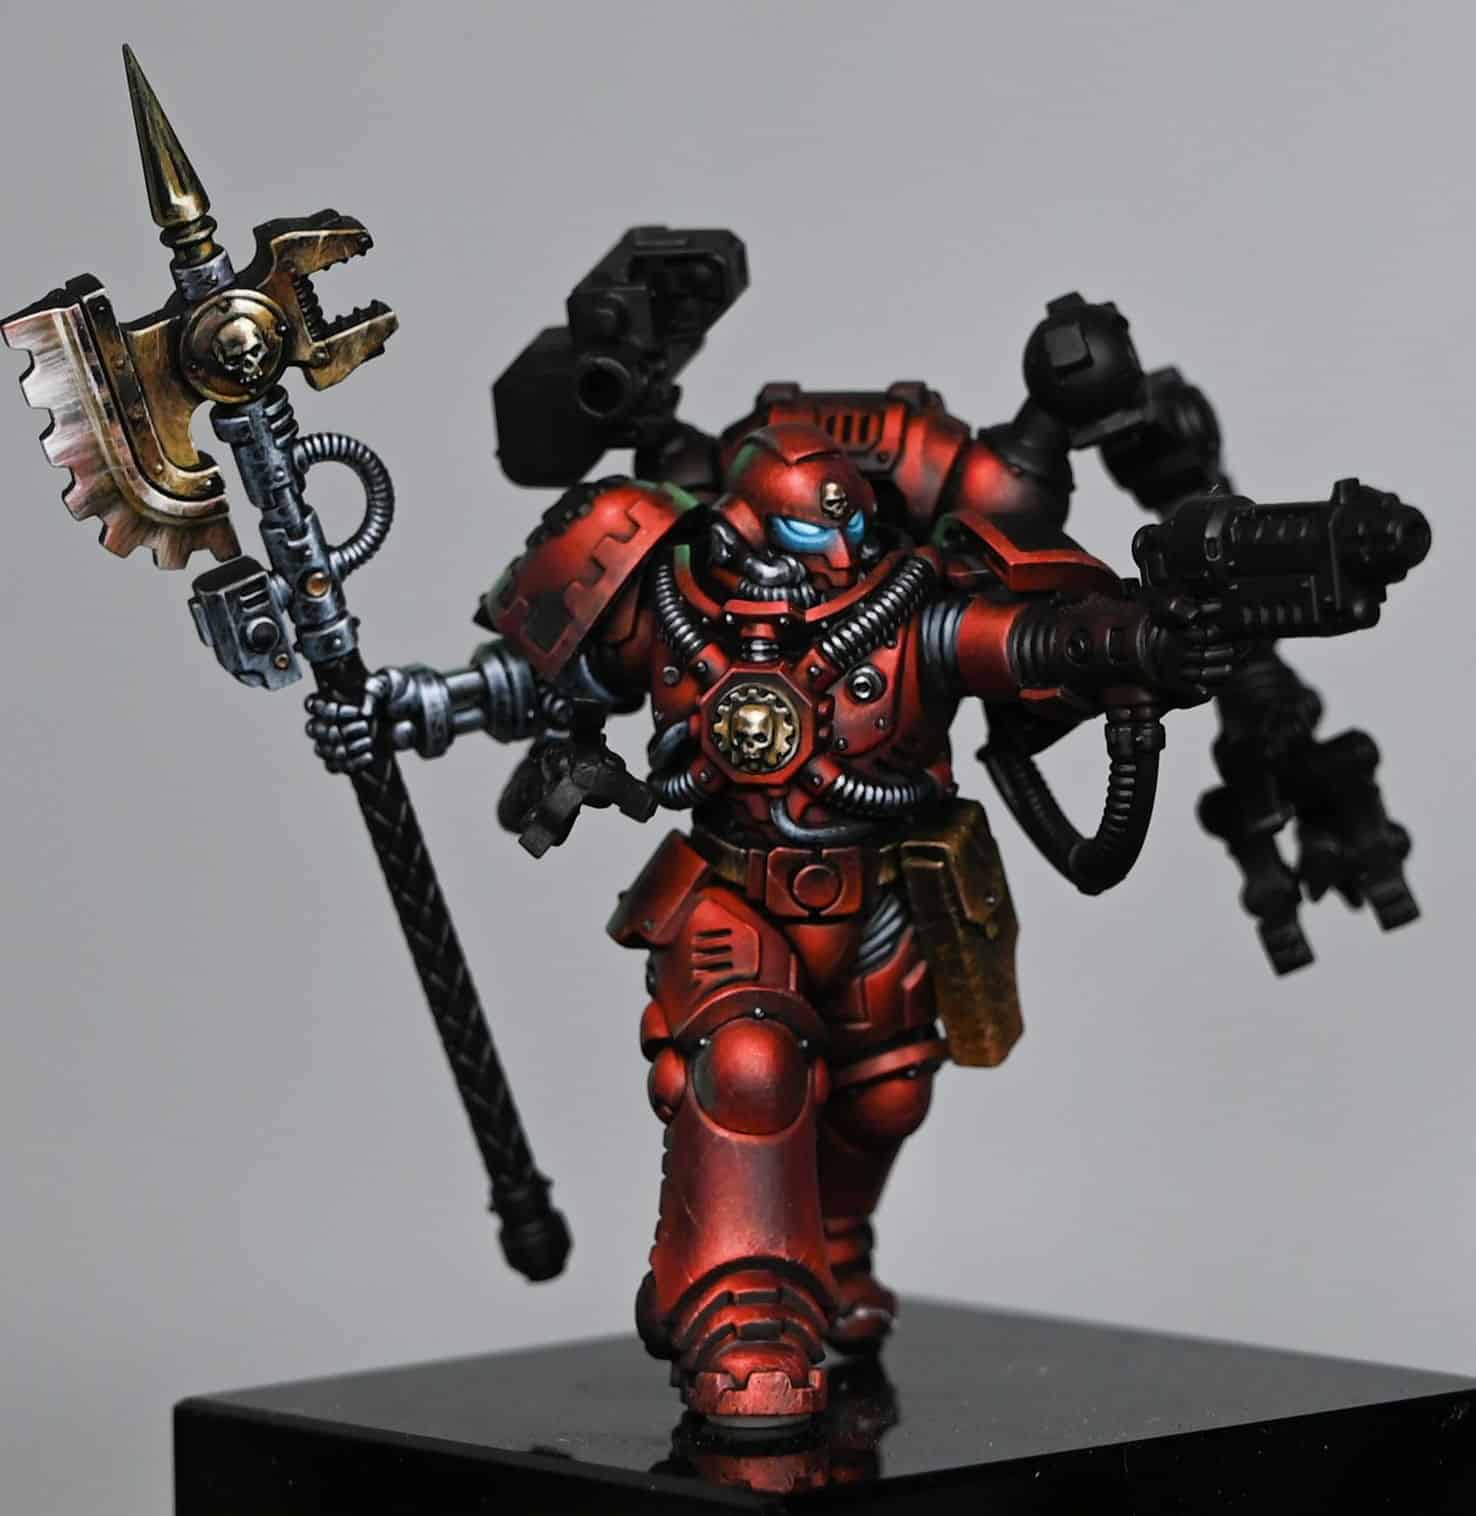
This how to paint a Red Techmarine NMM Axe guide aims to help you achieve a realistic non-metallic metal effect on your Techmarine’s axe, with a focus on contrast, texture, and light reflection.
For all of the videos on how to paint a Red Techmarine, follow the link below, or scroll down here for just the axe guide!
Red Techmarine
A series for how to paint a Primaris Techmarine by Games Workshop.
Watch Now
Video: How to Paint a Red Techmarine – NMM Axe
This guide aims to help you achieve a realistic non-metallic metal effect on your Techmarine’s axe, with a focus on contrast, texture, and light reflection.
Materials Needed:
Fine detail brushes for precise application. (I use the Artis Opus range, but any decent quality brush works!)
A wet palette to keep your paints hydrated.
Vallejo and Games Workshop paints: Doombull Brown, Mournfang Brown, Balor Brown, XV-88, Ice Yellow, Pale Grey Blue, and P3 Morrow White (or any white).
Preparing the NMM Axe:
Metal Pole: Begin by painting the metal pole using the same NMM techniques detailed in the previous video. This ensures consistency across metallic elements of the miniature.
Painting the Circular Detail on the NMM Axe:
Base Colour: Start with the darker brown (Doombull Brown), applying it as the base for the small circular detail on the pole. This connects the colour scheme with the axe head, adding warmth and interest.
Highlighting: Gradually build up the highlights transitioning from dark (Doombull Brown) to light (XV-88 to Ice Yellow) from the top to the bottom of the circular detail. Finish with a thin edge highlight at the top for definition.
Painting the NMM Axe Blade:
Vertical Lines: Initially, paint vertical lines across the blade with a mixture of 50:50 water to paint. This underlayer softens the stark contrast between subsequent horizontal lines and the dark primer.
Adding Texture: Apply horizontal lines over the vertical ones to create a cross-hatching effect. This technique adds texture and subtlety to the blade, avoiding harsh contrasts.
Defining Highlights: Focus on creating a diagonal highlight across the axe head, marking the primary light reflection. This line should be brighter at the top edge of the blade, tapering and becoming more subtle as it crosses the blade.
Building Up the Blade’s Texture:
Further Highlights: Use Mournfang Brown to add more texture and depth, emphasizing the top of the blade where the light is strongest. The aim is to make the top appear lighter than the bottom, enhancing the NMM effect.
Ice Yellow Highlights: Progress to Ice Yellow for the highest highlights, concentrating on areas that would catch the most light. Ensure these lines are fine and precise to maintain the textured look.
Detailing the Axe Head:
Base Texturing: With Mournfang Brown, create scribbly, textured marks on the flat of the axe head, focusing on creating a light to dark modulation from one edge to the other.
Enhancing Texture: Progress through Balor Brown and XV-88, adding finer, more controlled highlights to build up the texture. These should be more focused and less extensive than the base texture, adding depth and interest to the surface.
Final Highlights: Use Ice Yellow and Pale Grey Blue for the final highlights, paying particular attention to areas like the skull and the circle on the axe head. These colours should only be applied to the blade for differentiation, so don’t go too crazy with them, adding a cool tone to contrast with the warmer body of the axe head.
Finishing Touches:
Neatening Edges: Go back and tidy up any overspill or overly broad lines with the base colours, ensuring the texture remains coherent and the contrasts sharp.
Evaluation: Step back and review the entire piece, making any necessary adjustments to ensure the NMM effect is convincing and the textures and contrasts work together harmoniously.
If you can’t see the videos, please sign up here! The website currently has over 350 video tutorials with steps and tips, plus a selection of PDFs. If you are not sure about joining, you can explore my free videos with a free membership, or take the plunge and become a full subscriber for full access.
If you’d prefer to support me on Patreon, please visit: https://www.patreon.com/RichardGray [...]
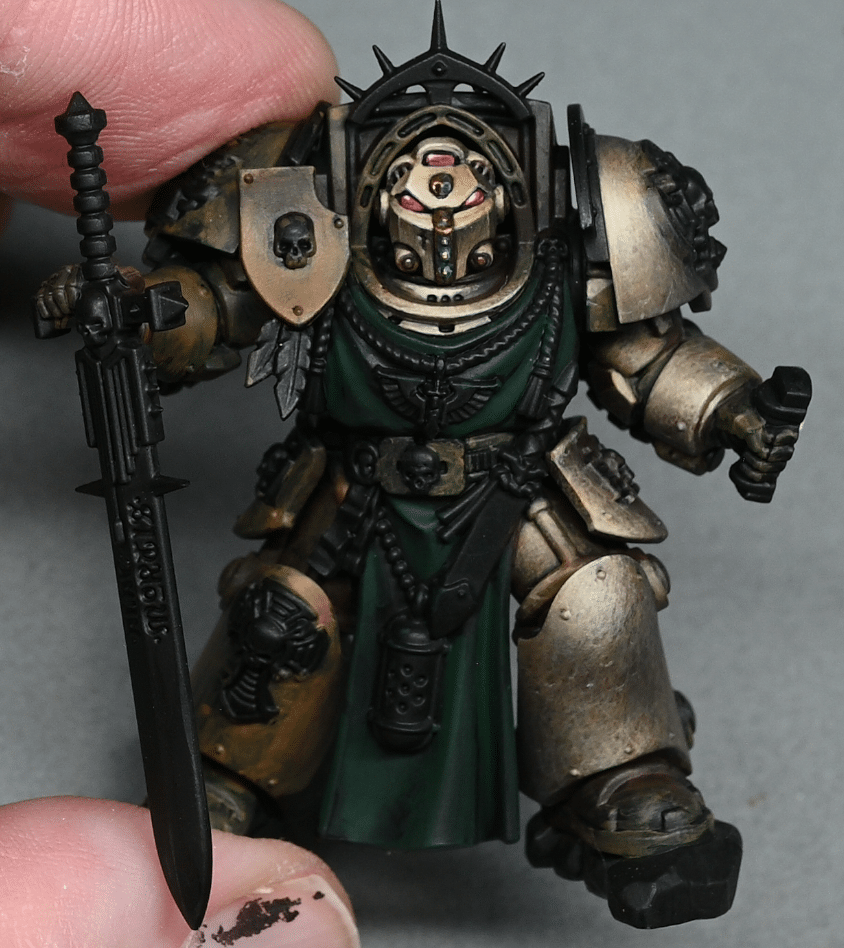
Games Workshop sent me the new Deathwing Assault box as an early review copy. It’s a little rushed but I’ve started to paint a Deathwing Assault Knight with the aim to make him very weathered and rough looking. A video tutorial on how I painted this Deathwing Assault Knight will be on YouTube and here on the website, too, along with my step-by-step guides once I’ve done a bit more.
The most esteemed warriors among the enigmatic and steadfast Dark Angels are those of the Deathwing! Each member, a battle-hardened veteran, is led by legendary champions who have weathered countless conflicts. They don imposing Terminator armour and wield formidable armaments, treasures from the Chapter’s revered armouries.
At the helm of the Deathwing stands Belial, the esteemed Grand Master. His command extends over 15 Terminators. Among them, ten are versatile multi-part Terminators, adorned in the iconic Deathwing style, enhanced with two newly crafted Dark Angels upgrade frames. The remaining five are the formidable Deathwing Knights, unyielding colossi armed with ancestral weapons of great power.
Included in the set is the Codex Supplement: Dark Angels. This 96-page tome provides comprehensive rules and rich lore for the Dark Angels, embellished with a distinctive cover. The package is further enriched with 20 datasheet cards, encompassing every unit described in the Codex Supplement, and two decal sheets, each boasting over 200 transfers.
Join the Discord and Chat about new Releases!
I have a friendly Discord community filled with painters both experienced and new who love to chat all things model-painting and help each other out. Join in with live model painting in the video rooms, give feedback (or get some) or just hang out and talk.
Come say hello!
If you don’t have an account on the website, please sign up here! The website currently has over 350 video tutorials with steps and tips, plus a selection of PDFs. If you are not sure about joining, you can explore my free videos with a free membership, or take the plunge and become a full subscriber for full access.
If you’d prefer to support me on Patreon, please visit: https://www.patreon.com/RichardGray [...]
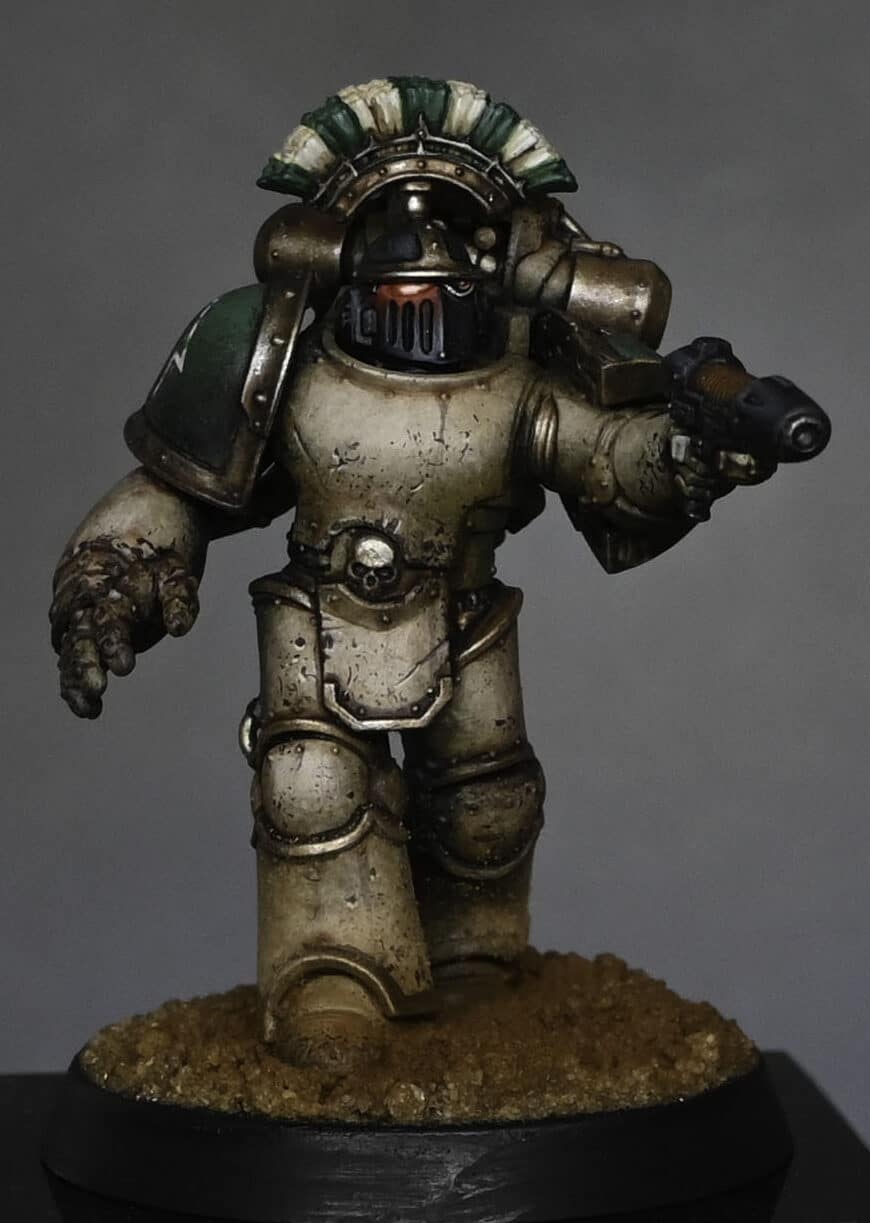
This video shows how to paint a Grimdark Grimy Death Guard for the Horus Heresy. The model is a new MKIII plastic marine and is painted in the Grimdark style to try and capture the weight and brutal nature of the armour.
The following paints were used:Games Workshop: Balor Brown, Morghast Bone, Screaming Skull, Mephiston Red, Wildrider Red, Yriel Yellow, Contrast Darkoath Flesh, Contrast Medium, Rhinox Hide, Agrax Earthshade Vallejo: Heavy Blackgreen, Ice Yellow P3: Morrow White (Any white will do) Kimera Colours: Black (Any black will do) Pro Acryl: Light Bronze Metallic, Rich Gold Metallic
Top Grimdark Grimy Death Guard Tips!:
Prepare Your Palette: Utilize a wet palette to maintain paint hydration.For the initial dry brushing, use Balor Brown from Games Workshop on a wet palette.Choose the Right Brush:Select a small dry brush, like the Artis Opus dry brush, for the stippling technique.Stippling Technique:Diverge from traditional dry brushing; instead, stipple the paint onto the model.Aim for a disheveled, grimy, and weathered appearance.Start with Balor Brown, advancing to lighter hues like Morghast Bone, Screaming Skull, and Yriel Yellow for a textured effect.Application Method:Stipple the paint directly onto the model, concentrating on armour panels.Rotate the model as you paint to ensure each section dries before revisiting.Focus on hitting the model face-on with the brush to create a textured, dotty buildup.Chipping Effect:For chipping effects, use Rhinox Hide with a sponge chipping technique.Contemplate hand-painting some scratches for added detail.Accentuating Details:Employ a fine brush for details like scratches and chips.Highlight specific armour panels for added depth.Contrast and Weathering:Apply Darkoath Flesh contrast paint mixed with contrast medium to unify the your Grimdark Grimy Death Guard.Experiment with adding more brightness by layering appropriately watered-down contrast paints.Highlighting and Shadows:
Highlight edges using Morrow White from P3.Contemplate applying washes like Agrax Earthshade to blend highlights and shadows.Use Ice Yellow from Vallejo for specific details, building up the colour gradually.Fine-Tune Highlights:Use a finer brush to refine highlights and correct any over-spill.Introduce Agrax Earthshade for added depth in recessed areas.Final Touches:Experiment with Wildrider Red and Mephiston Red from Games Workshop for added details.Apply a matte varnish to seal the paint job.Consider adding additional details to your Grimdark Grimy Death Guard like basing with textures and powders.
If you don’t have an account, please sign up here! The website currently has over 350 video tutorials with steps and tips, plus tips and PDFs. If you are not sure about joining, you can explore my free videos with a free “friend” membership, or take the plunge and become a full subscriber for full access.
If you’d prefer to support me on Patreon, please visit: https://www.patreon.com/RichardGray [...]
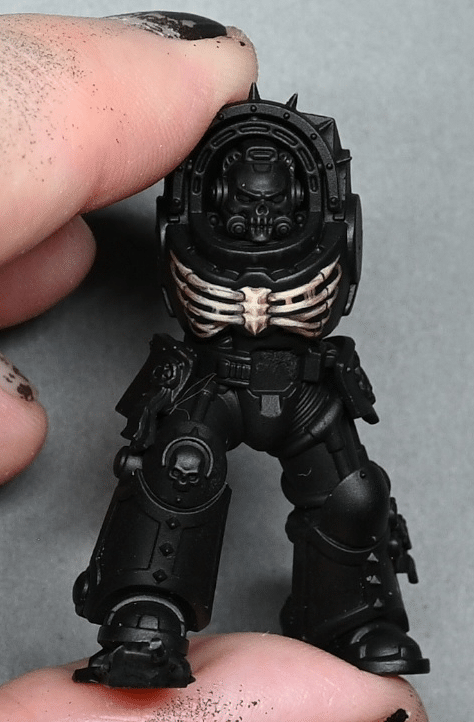
How to freehand ribs on the new Terminator Chaplain that Games Workshop sent me for review. I know some people were disappointed that it didn’t have sculpted on ribs, so this should fix it! This guide should help you add a striking rib detail to your Chaplain Terminator, enhancing its visual impact and bringing it closer to the iconic Chaplain imagery.
Video: How to Paint Chaplain Ribs Freehand
Materials Required:
Paints: Games Workshop XV-88, Morghast Bone, Screaming Skull, Rhinox Hide; Vallejo Neutral Grey; P3 Morrow White; Kimera Colours Black
Brushes: A variety of sizes for detailed work
Milliput or Sprew Glue: For filling and smoothing the chest area
Sandpaper: For sanding down the filled areas
Palette and Water: For paint mixing and brush cleaning
Steps for Freehanding Ribs:
1. Preparation:
Fill the chest holes with Milliput or Sprew Glue.
Sand down to create a smooth surface. Be patient and allow adequate drying time to avoid issues.
2. Base Painting:
Begin with a base coat of XV-88. This will be your primary rib colour.
Ensure the background remains a flat black for high contrast. Chimera Black is recommended for its matte finish and good coverage.
3. Adding the Ribs:
With XV-88, sketch out the shape of the ribs. Remember, space is limited, so it’s more about suggesting ribs rather than anatomical accuracy.
For human-like ribs, remember that Space Marines are portrayed with fused ribs, but standard human ribs are usually depicted on Chaplains for visual impact.
4. Shading and Detailing:
Use Rhinox Hide to create shadows and define the separation between ribs and sternum.
This paint can be applied translucently to allow underlying colours to show through, adding depth.
5. Highlighting:
Progressively add highlights with Morghast Bone. Focus on the front of the ribs, gradually reducing intensity towards the sides.
Add fine details and further highlights with Screaming Skull, but use sparingly to avoid excessive brightness.
6. Refining:
Use Neutral Grey and Morrow White for subtle colour variations and additional highlights.
Keep refining the details until you achieve the desired level of depth and realism.
Use black paint to clean up any errors and sharpen the edges of the ribs.
7. Finishing Touches:
For the sternum, devise a suitable design that complements the ribs. This might include fused elements or socket-like features.
Tips:
Asymmetry: Deliberately make the ribs asymmetric for ease of painting and to avoid the challenge of perfect symmetry.
Light Source: Consider the model’s overall lighting when placing highlights to maintain consistency.
Take Your Time: With freehanding, patience is key. Build up layers gradually and refine as needed.
By following my “How to Paint Chaplain” guide, you’ve now mastered the art of freehanding rib details, enhancing the iconic look of your miniature. Check out more of my freehand tutorials, below, for more ideas for your next project.
More Freehand Videos
If you don’t have an account, please sign up here! The website currently has over 350 video tutorials with steps and tips, plus a selection of PDFs. If you are not sure about joining, you can explore my free videos with a free “freebies” membership, or take the plunge and become a full subscriber for full access.
If you’d prefer to support me on Patreon, please visit: https://www.patreon.com/RichardGray [...]
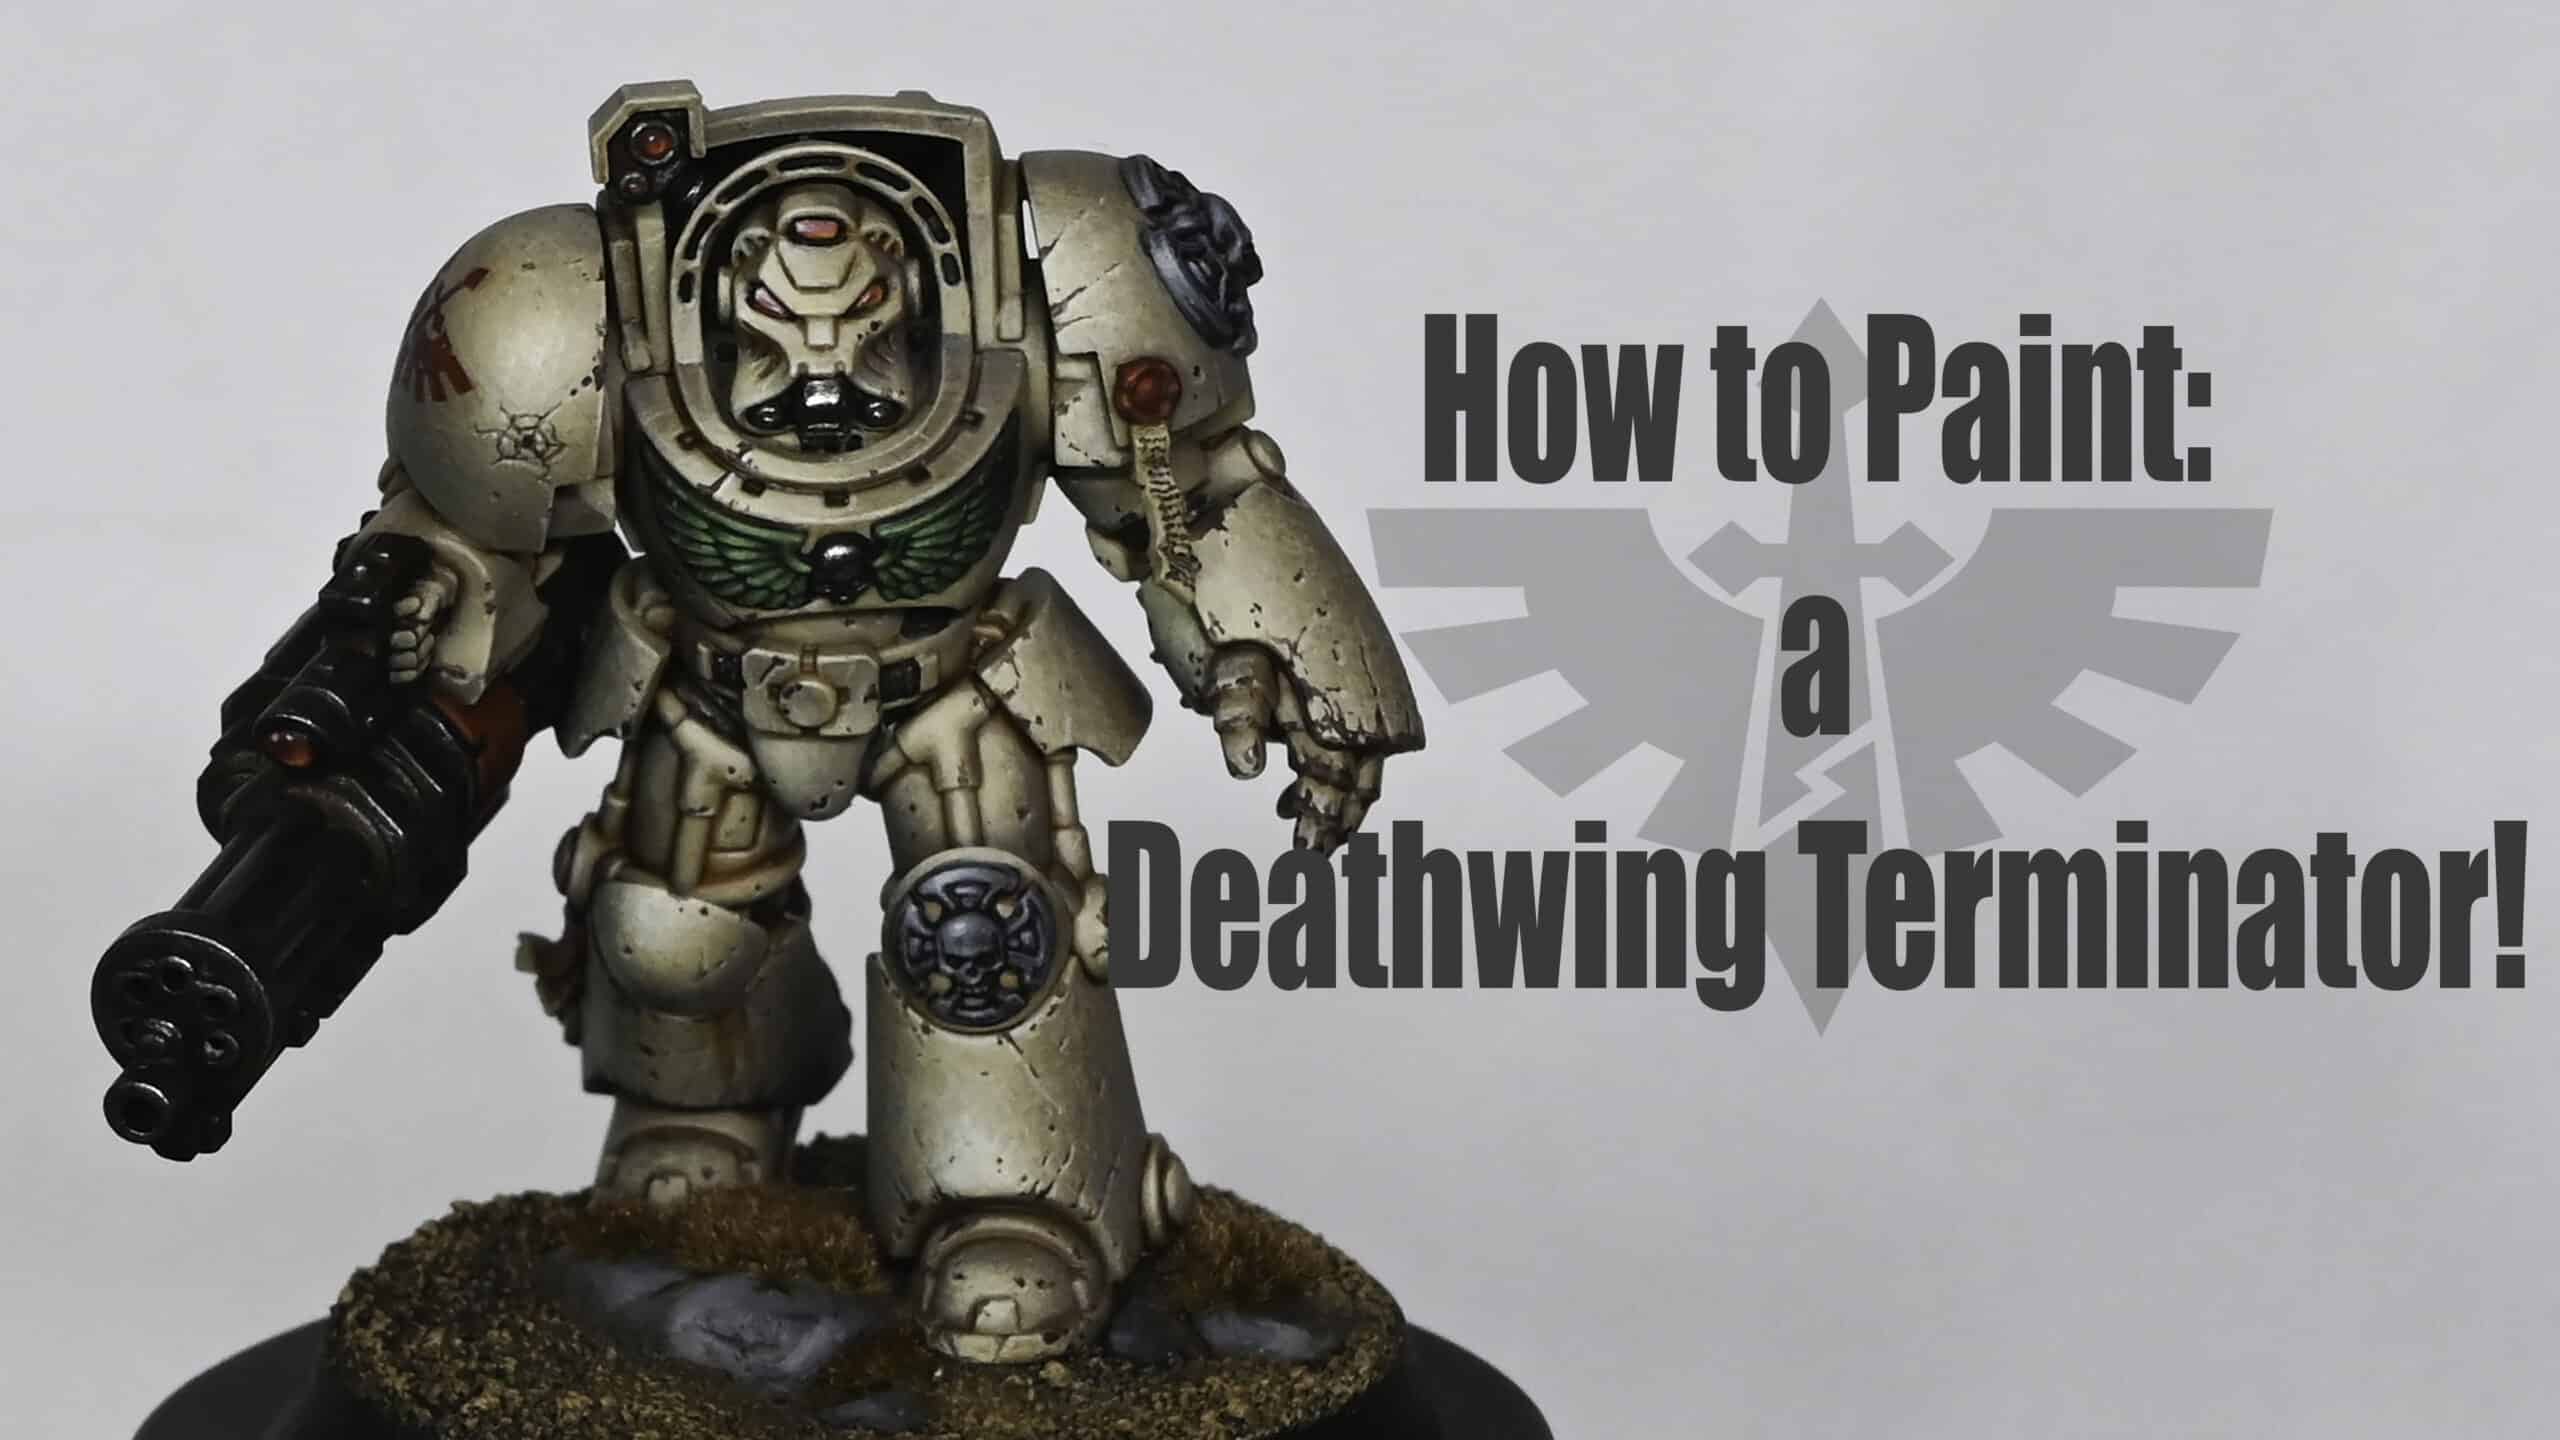
This video looks at how to paint a Deathwing Terminator from the new Leviathan boxed set, which Games Workshop sent to me as an early review copy.
Video – How to Paint a Deathwing Terminator
The following paints were used
Games Workshop: Black Templar (Contrast), Darkoath Flesh (Contrast), Contrast Medium, XV-88, Morghast Bone, Ushabti Bone, Screaming Skull, Mephiston Red, Evil Sunz Scarlet, Wild Rider Red, Yriel Yellow
Vallejo: Game Colour Dark Green, Neutral Grey, German Grey, Black, Gunmetal Grey (Metallic), Chrome (Metallic)
P3: Morrow White
Step by Step Guide
Preparation and Priming:
Assemble the Deathwing Terminator, modifying as desired (e.g., swapping weapons).
Prime the model in black.
Base Coat and Airbrush Highlighting:
Apply a base coat of XV-88.
Highlight with Morghast Bone using an airbrush, focusing on natural light areas.
Applying Contrast Paint:
Mix Darkoath Flesh with Contrast Medium and cover the Deathwing Terminator, emphasising recesses over large, smooth areas.
Highlighting and Texturing:
Hand apply highlights and textures using Ushabti Bone and Screaming Skull, targeting brighter airbrushed areas.
Detailing with Black Paint:
Paint areas destined for other colours (metal, red, green) with Black Templar Contrast or thinned black paint.
Metallic Parts:
Apply Vallejo Gunmetal Grey to metal parts.
Use Agrax Earthshade for a matte effect.
Add highlights with Chrome.
Red Areas (Eyes, Lenses, Purity Seals):
Base with Mephiston Red mixed with a small amount of black.
Progressively highlight with Mephiston Red, Evil Sunz Scarlet, and Wild Rider Red.
Green Areas (Chest Eagle):
Base in Vallejo Game Colour Dark Green.
Add highlights by progressively mixing in white.
Bone Armour Texturing and Detailing:
Further texture and scratch effects using Morghast Bone, Ushabti Bone, and Screaming Skull.
Mix Morghast Bone with a bit of Mournfang Brown for shadows.
Chest Eagle and Purity Seal Text:
Use fine brushwork for text effects on purity seals with black paint.
Final Highlights and Details:
Apply final highlights with Screaming Skull or white, focusing on areas for maximum contrast.
Blend and soften with Neutral Grey glazing.
Basing:
Base the Deathwing Terminator as preferred, employing sand texturing, painting rocks in German Grey and Neutral Grey, and adding grass tufts.
Finishing Touches:
Add chips and scratches across the armour with Rhinox Hide and Screaming Skull.
Enhance details and edge highlights to complete your Deathwing Terminator!
Show it off!
As you progress, feel free to adapt and tweak techniques to suit your style. Good luck! When you’ve finished, why not pop into our Discord and show it off to other website members? 🙂
More Free Video Tutorials
Free videos for logged in members – just sign up as a ‘friend’ to view and click any of the thumbs.To explore all of these, visit this page!
If you don’t have an account, please sign up here! The website currently has over 350 video tutorials, plus step by step guides and PDFs. You can explore more free videos with a free “freebies” membership, or take the plunge and become a full subscriber for full access.
If you’d prefer to support me on Patreon, please visit: https://www.patreon.com/RichardGray [...]
Richard was sent the new Warhammer 40,000 Leviathan box set from Games Workshop, and of course had to pick out his favourite model to paint up for a tutorial video for you guys. This is up on the website, ad free for freebie members and above, but also on Youtube – follow the link below or click in the embed to watch:
The following paints were used: Games Workshop: Black Templar (Contrast), Darkoath Flesh (Contrast), Contrast Medium, XV-88, Morghast Bone, Ushabti Bone, Screaming Skull, Mephiston Red, Evil Sunz Scarlet, Wild Rider Red, Yriel Yellow Vallejo: Game Colour Dark Green, Neutral Grey, German Grey, Black, Gunmetal Grey (Metallic), Chrome (Metallic) P3: Morrow White
About the Leviathan box set – (Review by Rebecca)
The “launch box” contains two armies (Space Marines and Tyranids), a limited edition book, and lots of other treats. However, if you’re a newbie to this hobby, brace yourself for a slightly steeper learning curve. Unlike some dedicated starter sets, Leviathan skips the dice, measuring tools, and handy “get started” guide.
The box also contains a set of transfers covering a host of Space Marine Chapters.In the video Richard says that there are no Dark Angel ones, but there are, (sorry).
In addition to this, while the rules for every Warhammer 40k unit will be available for free download from Warhammer Community, be aware that the box itself does not include physical cards. Instead, you’ll find basic profiles tucked away in the back of the instruction manual.
Richard enjoyed painting a Terminator for the video above, and was impressed by the level of detail. They’ve managed to retain the classic charm of their predecessors while seamlessly blending into the ranks of the latest Space Marine models.
In this new edition, the Terminators boast some nifty tricks up their power-armoured sleeves. Imagine being able to plant a teleport marker anywhere on the battlefield right from the get-go, courtesy of these bad boys. And the best part? You can use Rapid Ingress without spending a single resource to appear right next to that marker. Finally, they give a resounding “no thanks” to any negative hit modifiers. That means they’re practically unstoppable in combat.
For beginners and those who stick themselves together more than their miniatures, the models in the Leviathan box set are push fit, requiring no glue. Despite their easy assembly, they stand strong against intricate multi-part kits, however and still boast a great level of detail and good customisability.
I, personally, love the books that comes with the sets, especially when they are as full of background information as the rule book that comes with the Leviathan set.This exclusive book encompasses a whopping 200 pages of background information, hobby details, and lore. Not only does it provide insights into every Combat Patrol available, but it also showcases stunning images of painted models.
In short, the Leviathan box set is a great set if you are looking to get a lot of very cool models plus some great lore!
Rebecca Gray
This website showcases lots of Warhammer tutorial videos by Richard Gray! If you don’t have an account on the website, please sign up here! In total, the website currently has over 350 video tutorials with steps and tips, plus a selection of PDFs. If you are not sure about joining, you can explore the free videos with a free membership, or take the plunge and become a full subscriber for full access.
If you’d prefer to support me Richard on Patreon, please visit: https://www.patreon.com/RichardGray [...]
This video tutorial and step-by-step guide shows how to paint a Desolation Dark Angel, one of the new Desolation Marines from the Strike Force Agastus, which was sent to me by Games Workshop. Read on for a full video, lots of tips and full materials and paints list.
Video Tutorial – Desolation Dark Angel
Materials:
Vallejo Model Colour (New): Angel Green, Charcoal, Toxic Yellow, Black, Turquoise, Aquamarine, Grunge Brown, Orange Fire, Nocturnal Red, Scarlet Blood
Games Workshop: Darkoath Flesh (Contrast), Contrast Medium
Two Thin Coats: Plate Armour, Dragon’s Gold
P3: Morrow White
Steps:
Base Coat:Mix Angel Green and Charcoal (50:50 ratio).Apply this mix over the entire model using a large dry brush or makeup brush.Water the paint down slightly for a smoother application, aiming for a 50:50 water-to-paint ratio.
Layering:Apply straight Angel Green on top, using a kitchen roll to dab off excess paint for a thin layer.Focus on light volumes, covering flat surfaces more than edges.
Metallics:Paint metallic areas using Two Thin Coats’ Plate Armour and Dragon’s Gold.Thin these slightly for better flow and coverage.
Red Details:Use Nocturnal Red and Scarlet Blood for red areas, like the gun.Mix them for a base layer, then use Scarlet Blood mixed with a bit of white for highlights.
Adding Depth:Use Vallejo Black for shading and defining darker areas.
Highlighting Armour:Create three mixes on your palette: pure Angel Green, a 50:50 mix of Angel Green and Toxic Yellow, and a majority Toxic Yellow with a small amount of Angel Green.Apply these mixes progressively, starting with the darkest and moving to the lightest for highlights. Use a brush control technique similar to edge highlighting.
Contrast and Washes:Apply Darkoath Flesh (Contrast) selectively, followed by Contrast Medium for dilution in specific areas.Use Nuln Oil for metallic parts to create depth.
Detailing Metallics:Add highlights to metallic areas using a mix of Plate Armour and white.
Eyes and Lenses:Paint eyes with a base of Nocturnal Red, adding highlights with a mix of Scarlet Blood and white.Use a small white dot for reflection. For lenses, use Turquoise mixed with Charcoal, then highlight with Aquamarine and pure white.
Final Touches:Add fine scratches and details using lighter shades of the base colours.For the belt, use Grunge Brown base and Orange Fire for highlights.
Basing:Apply PVA glue and sand.Once dry, wash with Agrax Earthshade and apply weathering powder.
More Free Video Tutorials
Free videos for logged in members – just sign up as a ‘friend’ to view and click any of the thumbs.To explore all of these, visit this page!
If you don’t have an account, please sign up here! The website currently has over 350 video tutorials, plus step by step guides and PDFs. You can explore more free videos with a free “freebies” membership, or take the plunge and become a full subscriber for full access.
If you’d prefer to support me on Patreon, please visit: https://www.patreon.com/RichardGray [...]
In this guide you will be shown how to paint Imperial Fists with Heavy Bolters without the need for an Airbrush or Oil Paints!
Video – How to Paint Imperial Fists with Heavy Bolters
Paints and Materials Used
Games Workshop: Mournfang Brown, Zamesi Desert, Yriel Yellow, Mephiston Red, Wild Rider Red, Sotek Green, Forge World Weathering Powder Dark Sand, Darkoath Flesh (Contrast), Contrast Medium
Vallejo: German Grey, Neutral Grey, Black
Vallejo: Mecha Varnish Gloss, Mecha Varnish Matt, Metal Exhaust Manifold
P3: Morrow White (Any White will do)
Micro Set
Step by Step Guide on How to Paint Imperial Fists with Heavy Bolters
Preparing the Base
Begin by applying Mournfang Brown, heavily watered down with a ratio of about two or three parts water to one part paint. Patience is key here; you’ll need to apply multiple coats. Ensure each layer is thin to avoid a bumpy finish. This step is time-consuming compared to airbrushing but results in a more weathered, textured look.
Applying the Base Yellow
Next, use Zamesi Desert for the base yellow. Don’t be alarmed if it appears desaturated and pale; this is merely the foundation for a cleaner yellow. This stage might require up to four coats due to the paint being heavily watered down. Though initially patchy, the paint evens out as it dries.
Highlighting with Yriel Yellow
Once the base layers are dry, start highlighting with Yriel Yellow. Focus on areas where light naturally falls, like the chest, head, and forward-facing elements of the armour. The contrast created by less yellow paint in shadowed areas will add depth and make the highlighted sections pop.
Detailing the Black Elements
For the black elements, like the gun and eyes, Vallejo Black is a suitable choice. Paint a black stripe on the head to denote a heavy weapon marine. Keep in mind, sergeants may have different helmet colours, but for practicality and ease, you can rely on the red plume to indicate the sergeant’s status.
Metallic Trims
The metallic trims, especially on Mark III shoulder pads, add considerable painting time. Use Vallejo Metal Colour Exhaust Manifold for these areas. Pay special attention to highlighting as it requires neat painting around the trim, increasing time spent on each marine.
Applying Decals
After painting the trims, apply a layer of Vallejo Mecha Gloss Varnish to the shoulder pads for a smooth surface. This helps in applying decals neatly. Use Micro Set for decal application. Ensure to add another layer of gloss varnish after the decals to blend them seamlessly with the surface.
Creating Shadows and Depth
For creating shadows and depth, use Darkoath Flesh contrast paint mixed with Contrast Medium. Apply it quickly and efficiently as it dries faster than oils. Focus on the brighter areas and remove any excess to avoid losing detail in crevices.
Final Yellow Glazing
Post the contrast application and a layer of matte varnish, begin the final yellow glazing. Use the thinned down Yriel Yellow, focusing on the model’s focal points. The matte varnish’s texture aids in a smoother application of this glaze, highlighting the model’s prominent features.
Heavy Bolter Detailing
For the heavy bolter, start with German Grey and gradually transition to Neutral Grey. The paint should be thinned down for smoother blending. Focus on the upward-facing surfaces and sides for a realistic effect. Highlight edges with pure Neutral Grey for a more three-dimensional look.
Plume and Eye Details
The plume is initially painted with Mephiston Red, followed by highlights using Wild Rider Red. For the eyes, start with Sotek Green, adding P3 Morrow White for subsequent highlights. Ensure the brightest part of the eye is off-centre for a more natural look.
Chipping and Weathering
Use Rhinox Hide for chipping effects, focusing on edges and high-wear areas. Highlight the lower edges of these chips with a mix of Yriel Yellow and Morrow White for a realistic worn look. For the metal parts, return to Exhaust Manifold for highlights, focusing on areas where light naturally hits.
Final Touches with Weathering Powder
Finish off with Forge World Weathering Powder Dark Sand, particularly on the lower parts of the armour and base. This adds a realistic, battle-worn effect. Seal with a matte varnish to fix the powder in place.
More Free Video Tutorials
Free videos for logged in members – just sign up as a ‘friend’ to view and click any of the thumbs.To explore all of these, visit this page!
If you don’t have an account, please sign up here! The website currently has over 350 video tutorials, plus step by step guides and PDFs. You can explore more free videos with a free membership, or take the plunge and become a full subscriber for full access.
If you’d prefer to support me on Patreon, please visit: https://www.patreon.com/RichardGray [...]
In this guide you will be shown how to paint a Plastic Contemptor Dreadnought in Imperial First colours from the new Horus Heresy boxed game. Many of you were asking for help painting a model in this style without using an airbrush or oils – so here he is!
Video: How to Paint a Plastic Contemptor Dreadnought
All videos are recorded in HD 1080p or higher – use full screen for the full effect and let the video load completely. You can also click the little “cog” and change the speed of the video, if I am going too fast (or slow!).
The following paints were used:
Games Workshop: Mournfang Brown, Yriel Yellow, Darkoath Flesh (Contrast), Contrast Medium, Sotek Green, Forge World Weathering Powder Dark Sand. Vallejo: Black, Mecha Varnish Gloss, Mecha Varnish Matt, Metal Colour Burnt Iron P3: Morrow White (Any White will do)
Step by Step Guide: How to Paint a Plastic Contemptor Dreadnought
Initial Preparation
Begin with assembling the Plastic Contemptor Dreadnought. Keep arms and backpack separate for easier painting. Prime your Plastic Contemptor Dreadnought in black to set the stage for the upcoming colours.
Base Coating with Mournfang Brown Start with Mournfang Brown, heavily diluted with water for a translucent effect. Using a large brush, apply the paint in a stippling motion. This technique creates a mottled, weathered look on the model. Multiple thin coats are needed, around three or four, to achieve the desired coverage.
Creating Highlights Mix P3 Morrow White (or any available white paint) with Mournfang Brown. This mixture is used for creating highlights on the model. Apply with a smaller dry brush for more controlled and precise placement of highlights, especially on areas like the chest and upper stomach.
Adding Layers and Textures Progress with the painting by layering and texturing the model. Focus on building up colours gradually. Use the stippling method to apply these layers, which enhances the weathered and battle-worn appearance.
Incorporating Uriel Yellow Uriel Yellow, diluted in a similar fashion to Mournfang Brown, is used next. It’s important to keep the brush damp, not wet, to avoid the paint running. Apply in a dabbing motion, focusing on areas where light naturally falls. This stage is crucial for developing the yellow hue characteristic of the Imperial Fist.
Glazing and Fine Details Move to glazing layers using Uriel Yellow. This involves a thinner consistency and focuses on the model’s focal points like the head and chest. Pay attention to edges and hard lines, using a fine brush for precise application.
Weathering and Final Touches For weathering effects, employ Rhinox Hide for chipping and damage marks. Apply these strategically across the model to create a realistic battle-damaged effect. Focus on edges and areas likely to receive wear.
Enhancing Eyes and Metal Details Sotek Green is used for the eyes, creating a layered effect with a transition from green-blue to pure white. For metal parts, use Vallejo Metal Color Exhaust Manifold and Copper, applying carefully due to their fluid nature.
Applying Transfers and Final Varnishing After applying decals or transfers, coat them with gloss varnish to blend them seamlessly into the model. Use Micro Set for applying and setting the transfers.
Base Details Finish by creating a cohesive base using Forge World Weathering Powder Dark Sand. Apply multiple layers, interspersed with matte varnish, to build up a textured, grimy effect that complements your Contemptor Dreadnought
Show it off!
As you progress, feel free to adapt and tweak techniques to suit your style. Good luck! When you’ve finished, why not pop into our Discord and show it off to other website members? 🙂
More Free Video Tutorials
Free videos for logged in members – just sign up as a ‘friend’ to view and click any of the thumbs.To explore all of these, visit this page!
If you don’t have an account, please sign up here! The website currently has over 350 video tutorials, plus step by step guides and PDFs. You can explore more free videos with a free “freebies” membership, or take the plunge and become a full subscriber for full access.
If you’d prefer to support me on Patreon, please visit: https://www.patreon.com/RichardGray [...]
Adeptus Titanicus
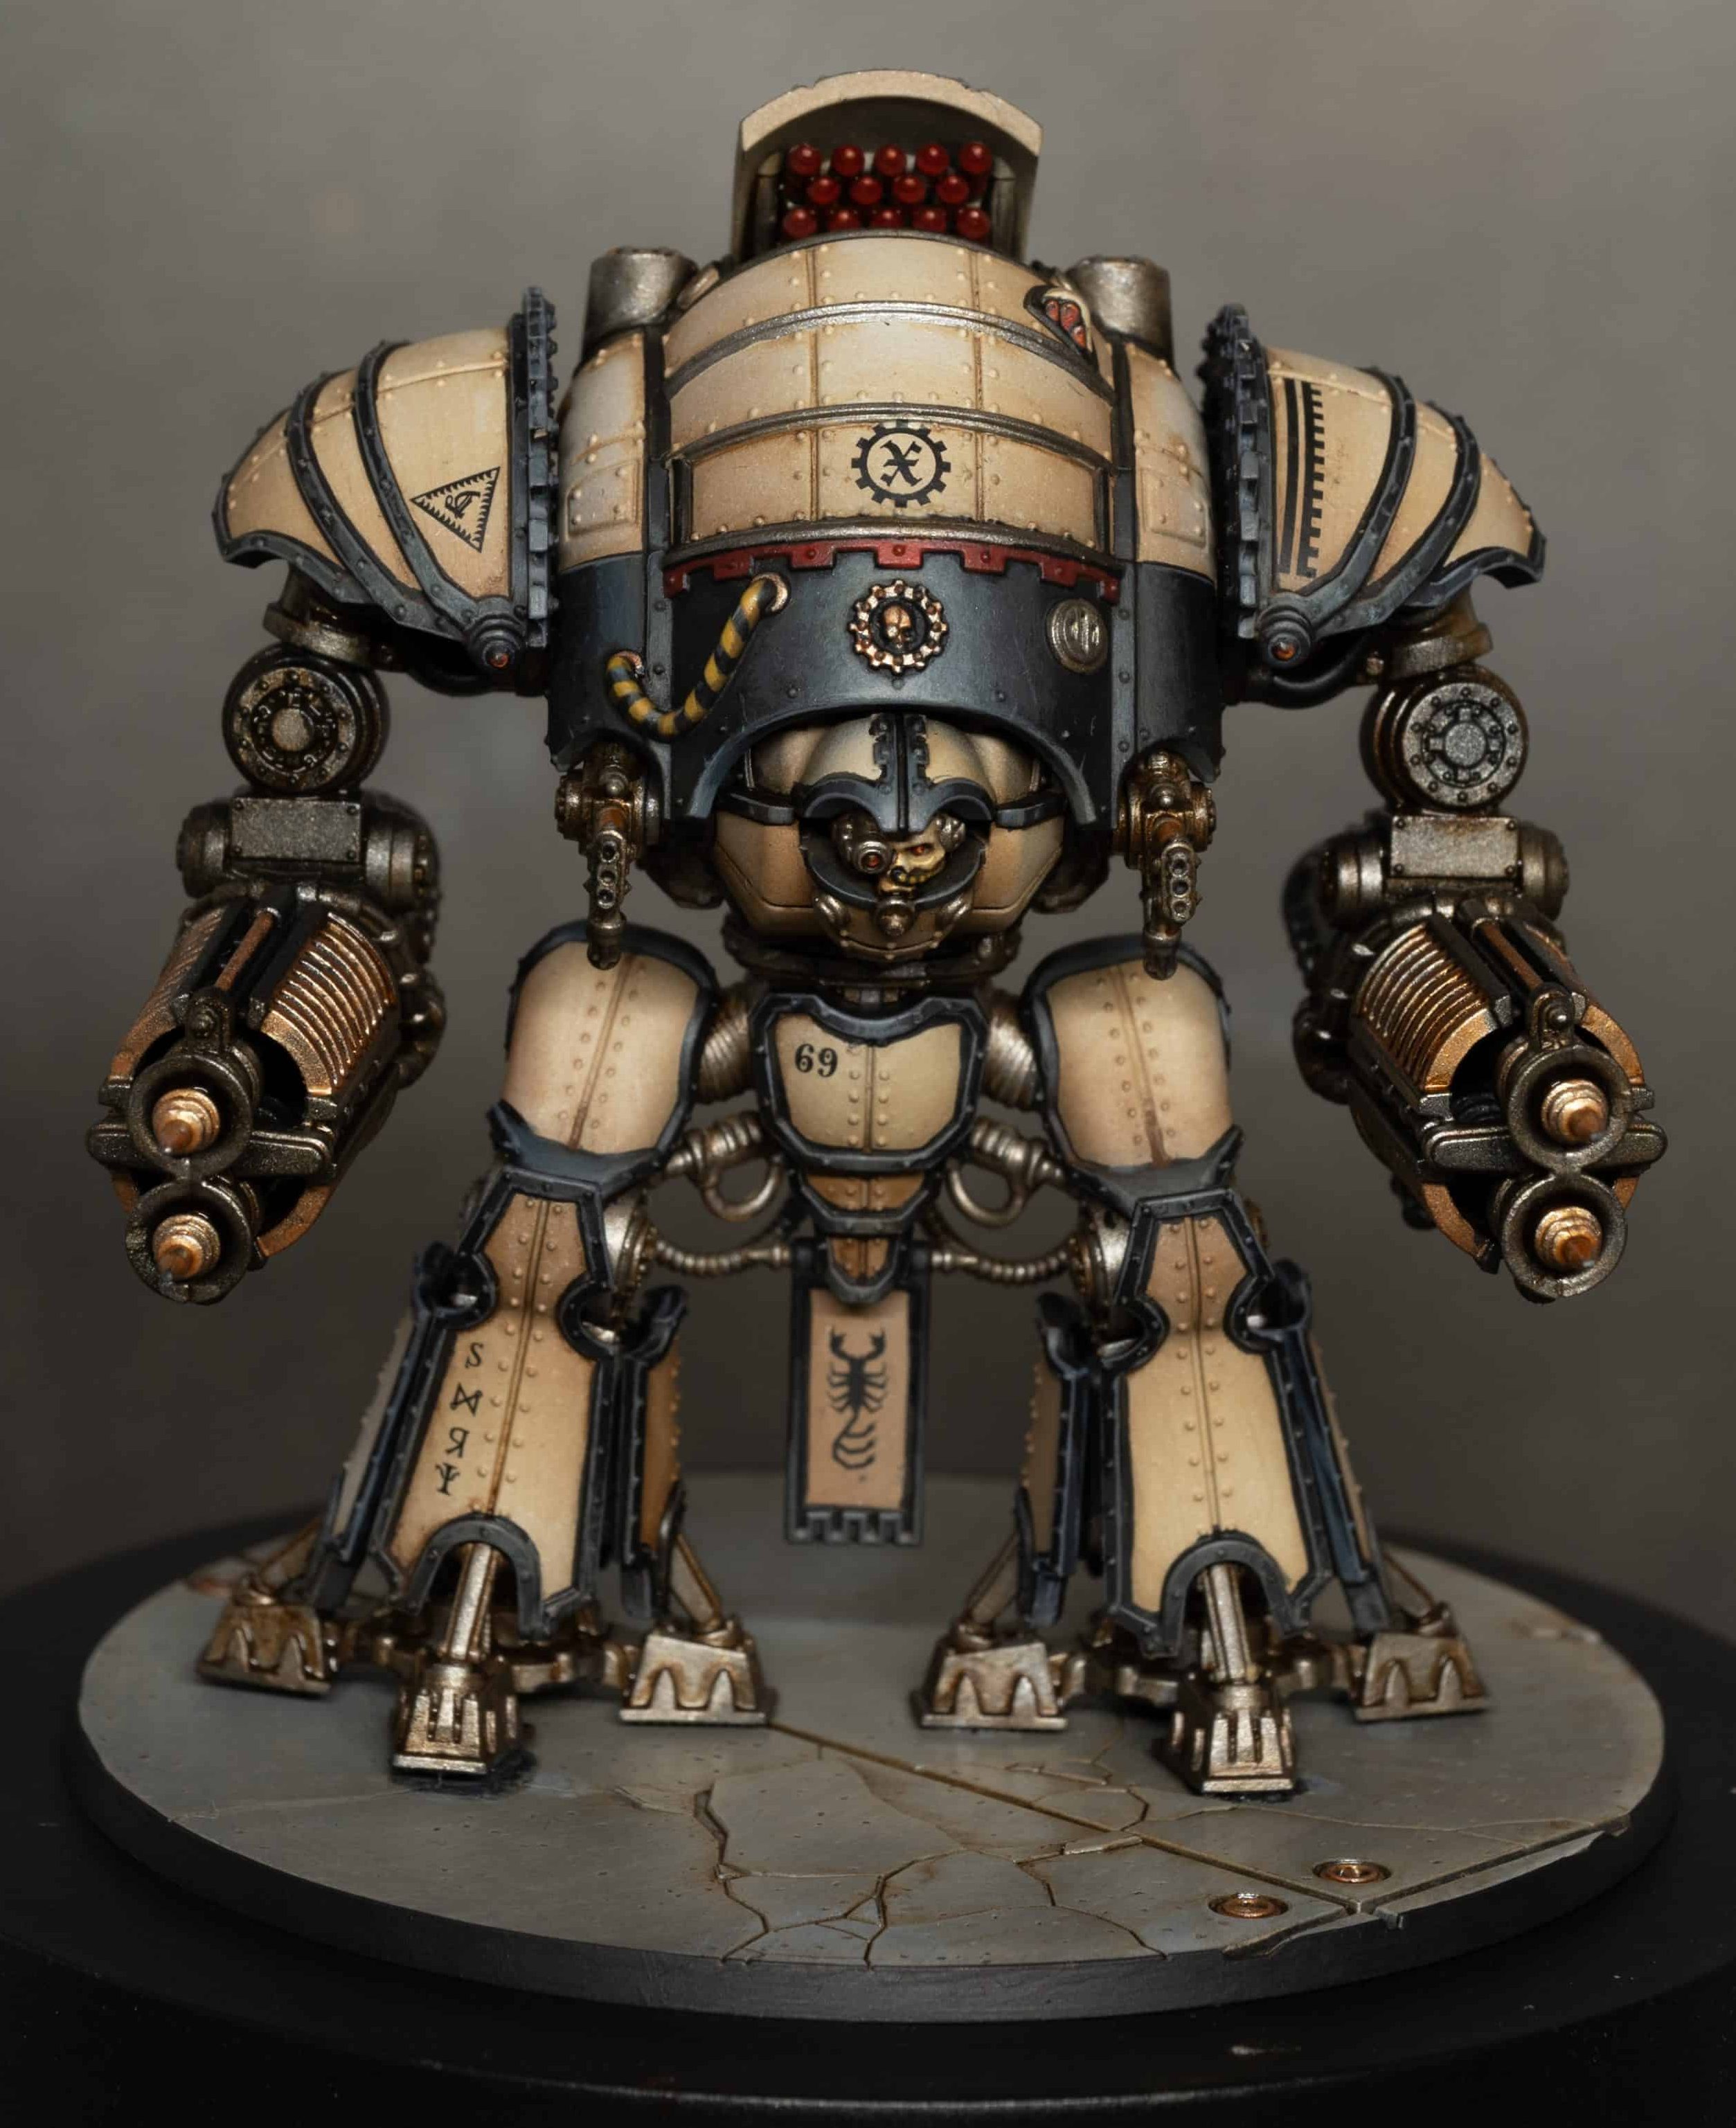
In this tutorial, we’re tackling how to paint an Acastus Asterius, one of the most striking knight models in Legions Imperialis and Adeptus Titanicus. Whether you’re building your force for display or tabletop, this guide shows how to achieve a quick, neat, and impactful finish that captures the model’s scale detail while still working fast.
This model was part of an early review set from Games Workshop, and I’ve painted it to match my existing House Malinax force, complete with their signature bone armour, black trim, and bold red crenellations.
Video: How to Paint an Acastus Asterius for Legions Imperialis
Paints and Materials
Games Workshop
Morghast Bone
Mephiston Red
Evil Sunz Scarlet
Rhinox Hide
XV-88
AK Interactive
Cork
Ivory
Burnt Red
Anthracite Grey
White (for base highlighting)
Black
Vallejo
Neutral Grey
Metal Color: Exhaust Manifold, Copper
Winsor and Newton
Burnt Umber
Sansodor thinner (for oil washes)
Other Materials
Micro Set for decals
Vallejo Mecha Matte Varnish
Artis Opus drybrush and size 4/00 brushes
Painting Big in Small Scale: When working on a model that looks towering and intricate (like the Acastus Asterius) but is actually quite small, it helps to simplify your technique without sacrificing impact. Focus on bold highlight placement and clear tonal contrast rather than micro-detail. Use texture and broken edge transitions to suggest depth, and lean on weathering or washes to add realism without clutter. It’s all about selling the illusion of scale, not replicating every tiny detail.
Step-by-Step Guide
1. Airbrushing the Armour
Basecoat with AK Cork, followed by highlights using Morghast Bone and AK Ivory.
Key tip: Focus on upwards-facing curves for realistic light placement. Thin your paint with Vallejo airbrush thinner, and use a 0.4 needle at 35 PSI for smooth layers.
2. Metallic Areas
Sprayed with Vallejo Metal Color Exhaust Manifold, then touched up by brush for overspray.
Add accents in Copper for visual interest.
3. Red Detailing
Mix Mephiston Red with Burnt Red for the base, then layer up with Mephiston Red and Evil Sunz Scarlet for saturated highlights on missile pods and crenellations.
4. Black Trim & Edge Highlights
Blocked in with AK Black, then progressively highlighted with mixes of Anthracite Grey, Neutral Grey, and a touch of white at the brightest spots.
Use stippling and drybrush effects for texture on carapace trim, but edge highlighting for smaller details like legs and joints.
5. Hazard Stripes
Cables painted with XV-88 and highlighted with Two Thin Coats Dark Sun Yellow.
Use crisp diagonal lines and finish with spot highlights in yellow for a feathered blend.
6. Base
Drybrushed with Vallejo Neutral Grey and AK White, then oil washed with Burnt Umber mixed with Sansodor thinner for a grimy, realistic effect.
7. Oil Wash
Applied across the whole model to tie colours together and enhance shadow contrast. No gloss varnish is needed—this technique softly bleeds into the acrylic paint for a natural look.
Pro Tips
Don’t mask your metals—just go back over them by hand. It’s quicker and the oil wash will unify tones later.
Rivet trouble? Use a size 00 brush and a thicker edge highlight consistency to reduce pooling around trim details.
Skip the varnish stage for the wash to get a more organic weathered finish. Just tidy up any pooling afterwards.
This method is perfect for painters looking to get strong results without investing hundreds of hours on each mini. Whether you’re building a full House Malinax force or just want a showstopping centrepiece for your Imperialis army, this is a versatile approach you can adapt across your Knight builds.
Videos Not Showing?
To view any of my paid tutorials, you need to be a member of the website – please click below to log in or join the site.
Not sure about joining just yet? Check out my Youtube for all my free tutorials or sign up as a free “friend” member on this site and visit the free videos page!
If you’d prefer to support me on Patreon, please visit: https://www.patreon.com/RichardGray [...]
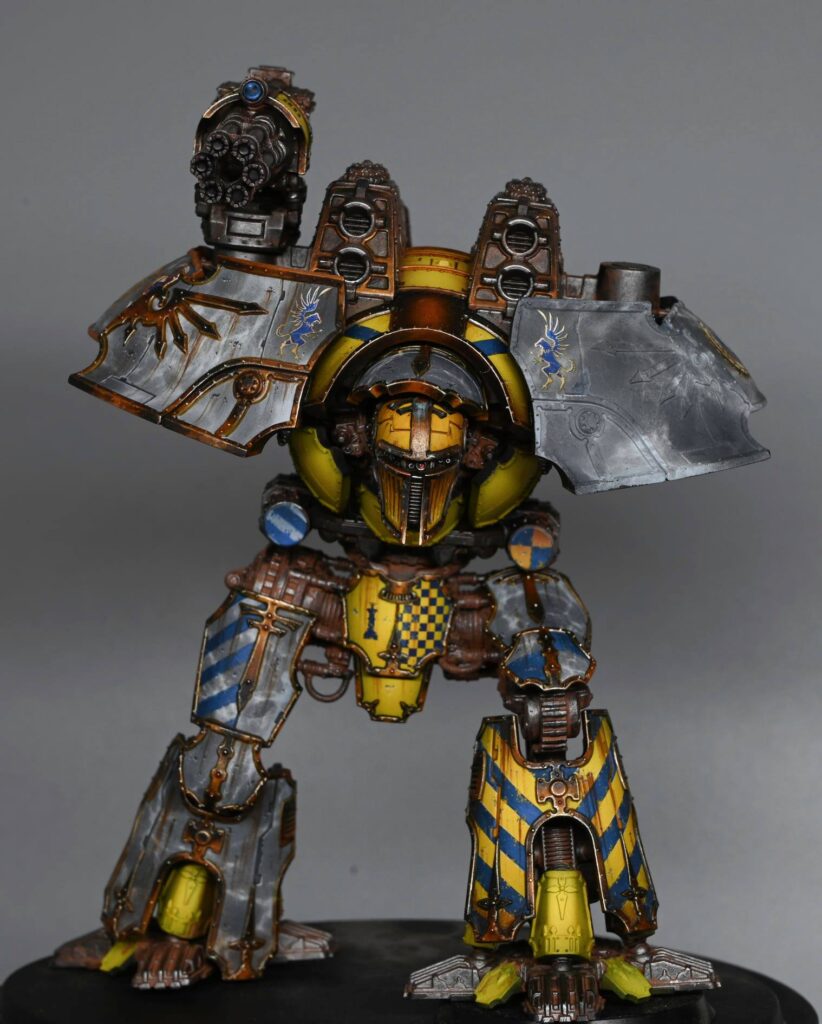
In this guide, we’ll explore how to paint marble armour effect on the armour of an Adeptus Titanicus Legio Gryphonicus Titan.
This technique creates a visually striking pattern that mimics the speckled and veined appearance of marble, adding depth and interest to your miniature’s armour plating. The process is designed to be quick and straightforward and uses some unexpected materials!
Video – How to Paint a War Griffons Warlord with Marble Armour
All videos are recorded in HD 1080p or higher – use full screen for the full effect and let the video load completely.
Materials List:
Airbrush: Essential for applying smooth base coats and gradients.
Hand disinfectant wipes or baby wipes: Used to create the marble effect.
Paints:
Vallejo Pale Grey Blue: For the initial base coat.
Vallejo Neutral Grey: To begin creating the marble effect.
Vallejo Dark Grey (German Grey): For adding darker veins to the marble.
Vallejo Heavy Goldbrown: Base colour for yellow armour sections.
Games Workshop Phalanx Yellow: For highlighting yellow armour sections.
How to Paint Marble Armour Step-by-Step Guide:
Base Coat:
Begin by airbrushing Vallejo Pale Grey Blue onto the carapace of the Titan. This may require a few coats to achieve a smooth finish. The paint can be thinned a bit, but not excessively, to ensure good coverage without too much speckling.
Preparing the Wipe:
Take a hand disinfectant wipe or baby wipe and stretch it out so it’s slightly spread and thin. This texture will be transferred to the armour to create the marble effect.
Applying the Wipe:
Lay the stretched wipe over the armour part you’ve just painted. Ensure it’s not too densely applied; the idea is to leave some areas exposed more than others for a varied marble effect.
Adding Darker Tones:
Airbrush Vallejo Neutral Grey over the wipe-covered armour. Keep the airbrush pressure low to avoid displacing the wipe. Focus more on the edges and less on the centre to mimic natural shading.
Without completely covering the previous layer, lightly apply Vallejo Dark Grey in a few select areas to create the appearance of darker veins within the marble.
Revealing the Effect:
Carefully remove the wipe to reveal the marble armour effect beneath. You’ll find areas of light and dark grey creating a naturalistic marble pattern.
Cleaning Up:
After removing the wipe, there may be strands left on the model. Take your time to clean these off to avoid them becoming permanently attached in later steps.
Painting Yellow Armour Sections:
For Legio Gryphonicus’s iconic grey and yellow scheme, base coat the relevant armour sections with Vallejo Heavy Goldbrown. Highlight these areas with Games Workshop Phalanx Yellow to achieve a vibrant, contrasting look against the grey marble armour.
All of my War Griffons Warlord Tutorials
War Griffons Warlord
All of my series of quick videos on the different techniques used on this model. These include the marble effect, the stripes, applying decals and weathering.
Watch Now
If you don’t have an account, please sign up here! The website currently has over 350 video tutorials with steps and tips, plus a selection of PDFs. If you are not sure about joining, you can explore my free videos with a free membership, or take the plunge and become a full subscriber for full access.
If you’d prefer to support me on Patreon, please visit: https://www.patreon.com/RichardGray [...]
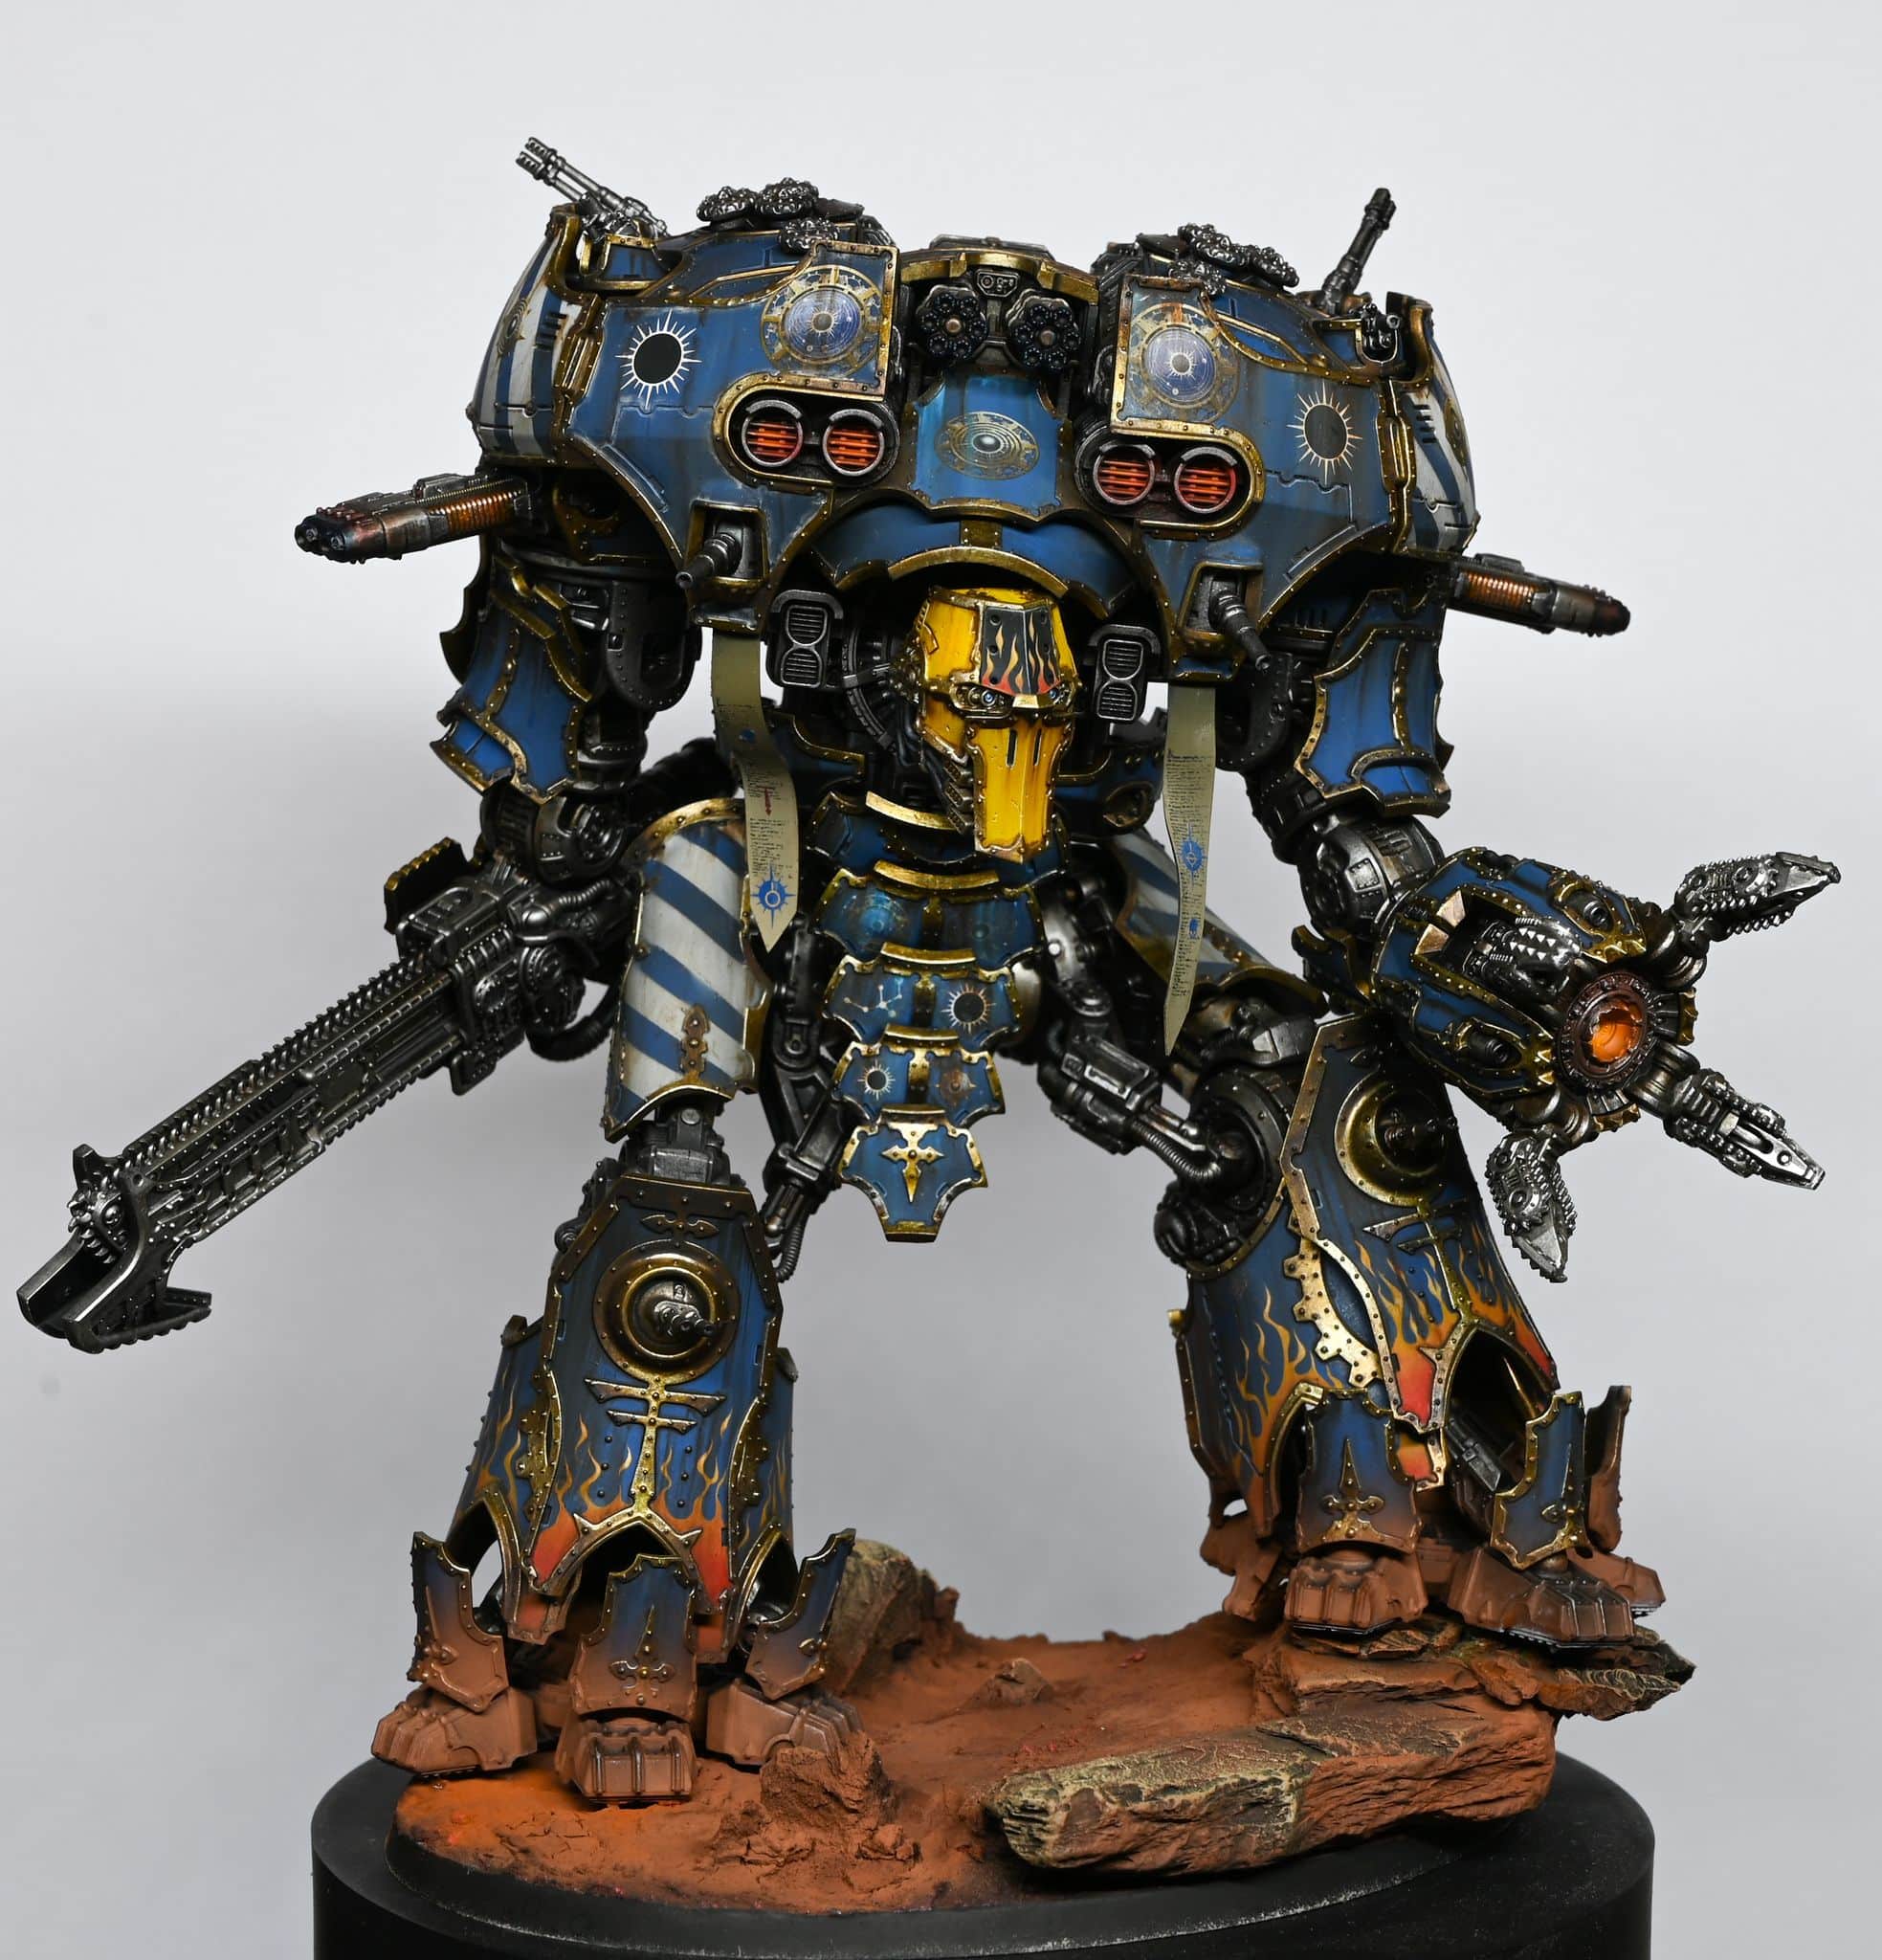
I’m excited to share my journey of painting the Warmaster Iconoclast Titan, a majestic model sent to me by Games Workshop. My focus is to highlight the crucial role of airbrushing in bringing this titan to life with the vibrant colours of the Legio Astorum, also known as the Warp Runners.
Watch the Video
The Importance of Airbrushing: Airbrushing is a game-changer in miniature painting, offering unparalleled smoothness and efficiency. It’s especially valuable when painting large models like the Iconoclast Titan, where traditional brushing might fall short. The fluidity of airbrush paints, like Vallejo’s Metal Color series, is perfect for both airbrushing and regular brushwork.
The following paints were used: Games Workshop: Night Lords Blue, Calgar Blue, Mephiston Red, Balor Brown, Hashut Copper, Yriel YellowVallejo: Dark Sea Grey, White, Metal Colour Burnt Iron, Metal Colour Gold, Metal Colour Chrome, Mecha Gloss VarnishScale 75: Necro GoldAmmo: Ultra-Matt Lucky VarnishWinsor and Newton: Sansodor mineral spirit, oil colour Black, oil colour Burnt Sienna Badger: Ultimate Primer Black
Initial Steps: Before diving into painting, it’s essential to prepare the model. I left off the armor plates of the titan to separately paint the skeleton with metallic colours and the armor panels with the distinctive Warp Runner scheme.
Airbrushing Techniques:
Base Coating: Starting with Vallejo’s Burnt Iron, I applied the base coat to the skeleton. Despite being formulated for airbrushing, its fluid nature worked well with a large, soft brush for a non-textured finish.
Detailing with Copper: For the hips, I used Games Workshop’s metallic colour, applying it straight from the pot. This step required multiple thin coats for a consistent finish.
Creating Verdigris Effects: I used oil paints to simulate the verdigris effect on the copper parts. Stippling the paint onto the model, I focused on crevices and rivets, where oxidation naturally occurs.
Oil Washes: An overall wash of oil paints, mixed with spirits, added depth to the metallic parts. This technique requires patience, as it’s essential to allow the wash to dry completely, typically 24 hours.
Highlighting with Chrome: Vallejo’s Chrome, another airbrush-focused paint, was used for highlights. Its liquid consistency demanded careful application to avoid flooding recessed areas.
Colouring the Armor Panels: The real challenge and joy of airbrushing came alive while painting the armor panels. I started with Night Lords Blue, followed by Macragge Blue, both thinned with Vallejo airbrush thinner. The process involved covering entire panels with the darker blue, then focusing on upper sections and curves for the lighter blue, creating a pleasing visual gradient.
Stripe and Flame Patterns: For detailed patterns like stripes and flames, I relied on masking techniques and freehand painting. Tamiya tape helped in creating crisp, clean lines for stripes, while freehanding flames allowed for a more organic and fitting look on the armor panels.
Applying Decals and Weathering: After the base colours and patterns, I applied decals for additional detailing. This step required a steady hand and patience, especially when dealing with folded decals. Weathering was achieved with oil paints, enhancing the realism of the titan.
Final Touches: Matte varnishing the model brought all elements together, providing a uniform look and protecting the paint job. For the trim, I chose to paint it with Scale 75’s Necro Gold, followed by weathering and sealing with a matte varnish.
Airbrushing the Iconoclast Titan was a rewarding experience, showcasing the versatility and efficiency of this painting method. The ability to layer colours, create gradients, and apply washes and weathering with ease made airbrushing an indispensable tool in my painting arsenal. Whether you’re a seasoned veteran or a beginner, incorporating airbrushing into your miniature painting can elevate your models to new heights.
More Free Video Tutorials
More free videos for logged in members – just sign up as a ‘friend’ to view and click any of the thumbs.To explore all of these, visit this page!
If you don’t have an account, please sign up here! The website currently has over 350 video tutorials, plus step by step guides and PDFs. You can explore more free videos with a free “freebies” membership, or take the plunge and become a full subscriber for full access.
If you’d prefer to support me on Patreon, please visit: https://www.patreon.com/RichardGray [...]
This free video shows how to paint a Warmaster Iconoclast Titan for the Legio Astorum (Warp Runners) from the Adeptus Titanicus game.
The following paints were used: Games Workshop: Night Lords Blue, Calgar Blue, Mephiston Red, Balor Brown, Hashut Copper, Yriel YellowVallejo: Dark Sea Grey, White, Metal Colour Burnt Iron, Metal Colour Gold, Metal Colour Chrome, Mecha Gloss VarnishScale 75: Necro GoldAmmo: Ultra-Matt Lucky VarnishWinsor and Newton: Sansodor mineral spirit, oil colour Black, oil colour Burnt Sienna Badger: Ultimate Primer Black
Steps to Follow on How to Paint a Warmaster Iconoclast Titan
Preparing the Model
Build the Model: Assemble your Warmaster Iconoclast Titan, leaving off the armour plates for separate painting. This allows easier access to the skeleton for painting in metallic colours.
Painting the Skeleton
Base Coat in Metallic: Start with Vallejo Metal Colour Burnt Iron applied with a large soft brush or a dry brush for a smooth metallic base on the skeleton.
Detailing with Copper: Use Games Workshop Hashut Copper for the hips and other details, applying multiple coats as necessary for even coverage. Thin with water if the paint is too thick.
Verdigris Effect: Mix oil paints on cardboard to create a light green verdigris colour. Stipple this onto the copper parts with an old brush, focusing on crevices and rivets. Thin with white spirit for a more natural effect.
Weathering the Metal
Oil Wash: Create an oil wash with black and burnt sienna oil paints thinned with mineral spirits. Apply over the entire metal skeleton, excluding verdigris areas, to add depth and an oily finish.
Highlighting: Highlight edges and raised details with Vallejo Metal Colour Chrome for a sharp contrast.
Painting the Armour Panels
Base Coat in Blue: Airbrush the panels with Games Workshop Night Lords Blue, followed by highlights with Calgar Blue focusing on upper sections and curves.
Detailing Stripes and Flames: For striped areas, use Tamiya masking tape and Vallejo Dark Sea Grey. For flames, start with Balor Brown as a base, building up to lighter tones and finally white for the hottest parts.
Applying Decals: Use Forge World or Games Workshop decals for additional detailing, sealing them with Microset or Microsol. I’ve put a link to another free video on how to do that, below!
Final Weathering: Apply oil washes for weathering effects, focusing on creating streaks and grime accumulation that fits with the battlefield-worn look.
How to Apply Forge World Decals and Weather Them
A beginners guide on how to apply Forge World decals and weather them so they look a natural part of the painting on your model. Painting and applying decals to your models adds significant details and realism, making it stand out during tabletop gaming. It’s also a lot easier than freehand! I still use decals a lot in my models, despite also enjoying freehand work.
Watch and Read Now
Finishing Touches
Painting Trim and Details: Use Scale 75 Necro Gold for gold trim, applying carefully around edges and details. For a brighter highlight, apply Vallejo Metal Colour Gold.
Matte Varnish: Seal the entire model with an ultra-matte varnish to tie together the different finishes and protect the paintwork.
Optional Ribbon Streamers: Create custom ribbon streamers from plastic card, painted and detailed to match the Titan’s colour scheme, adding dynamism and a personalised touch to your model.
Additional Tips
Always thin your paints to ensure smooth application and avoid obscuring fine details.
When working with oil paints for weathering, allow ample drying time between layers to prevent smudging.
Use a hairdryer to speed up drying times cautiously, avoiding too much heat on plastic parts.
Experiment with lighting and colour modulation on the armour panels for a dynamic appearance.
If you don’t have an account, please sign up here! The website currently has over 350 video tutorials with steps and tips, plus a selection of PDFs. If you are not sure about joining, you can explore my free videos with a free membership, or take the plunge and become a full subscriber for full access.
If you’d prefer to support me on Patreon, please visit: https://www.patreon.com/RichardGray [...]
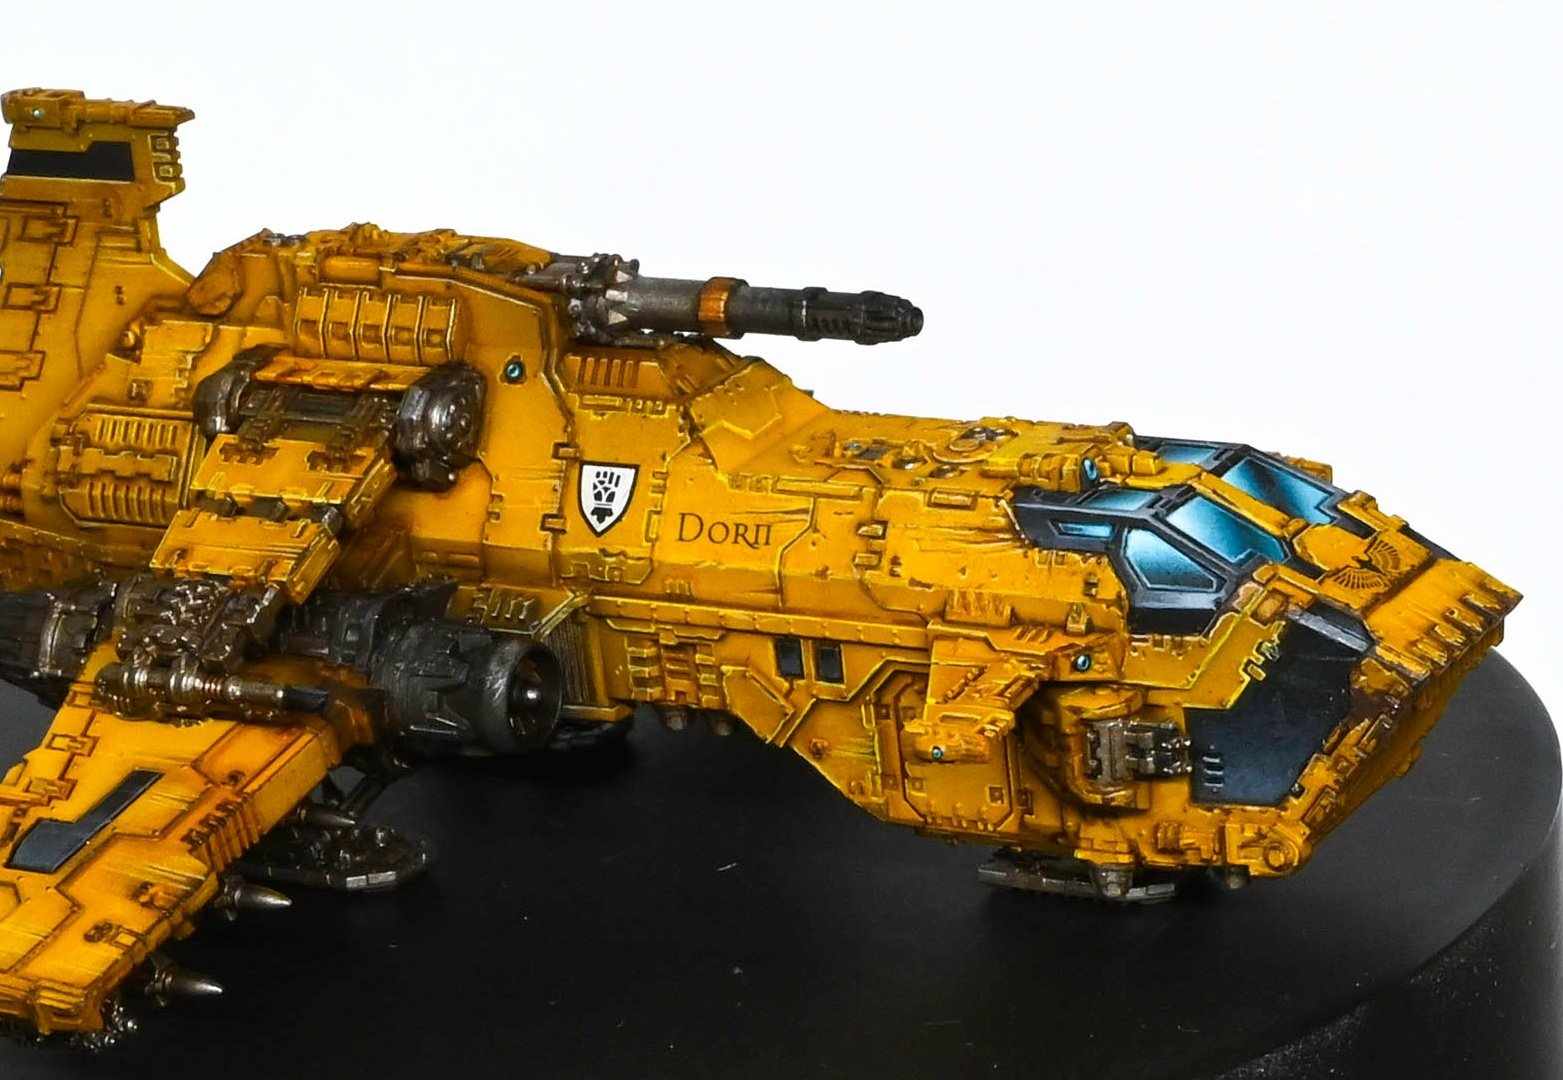
This video looks at how to paint a tiny Thunderhawk Gunship. I painted it in anticipation for the new Legions Imperialis, but is from Aeronautica Imperialis as both scales are the same and the model will be used for the new game.
Paints and Materials
Games Workshop: Sotek Green, Imperial Fist (Contrast), Rhinox Hide, Yriel Yellow, Corvus Black Vallejo: German Grey, Black Winsor and Newton: Burnt Sienna (series 1 oil paint), Black, Sansodoor mineral spirit Vallejo: Mecha Varnish Gloss, Mecha Varnish Matt, Metal Burnt IronP3: Morrow White (Any White will do) Micro Set
Steps to Paint a Tiny Thunderhawk Gunship
Preparing the Model
Start by assembling the model, priming it black, and giving it a base coat of Corn Red. This initial red layer helps in avoiding a grimy, olive drab look when applying yellow over black.
Airbrushing White
Spray the model with white paint (P3 Morrow White thinned with Vallejo airbrush thinner), creating a light-dark-light modulation effect. This step adds contrast and sets the stage for the yellow layer.
Applying Yellow
Coat the model with Imperial Fist yellow contrast paint. You can also use yellow ink for a similar effect. This step enhances the pre-shading effect done with the white.
Decals and Varnishing
Apply gloss varnish (Vallejo Mecha gloss varnish) to create a smooth surface for decal application. Place the decals, using Microset for better adhesion, and leave to dry. Post drying, cover the model with another layer of gloss varnish.
Metallics and Matte Varnishing
Paint the metallic parts of the model while waiting for the decals to dry. Following this, cover the entire model with a coat of matte varnish. This helps even out the model’s look and prepares it for oil washes. If you want a cleaner appearance for your model, apply a gloss varnish before panel lining.
Canopy and Windows
Block in the windows on the canopy with black. Paint the frames and windows with Sotek Green, gradually adding white to create lighter shades. For a more varied look, paint each panel differently to suggest varied light reflections.
Detailing and Chipping
Carefully apply chipping effects using Rhinox Hide. Focus on the edges and areas where wear would naturally occur. For a more three-dimensional look, highlight the lower edges of the chips with a mix of Yriel Yellow and white.
Oil Wash for Panel Lining
Mix Burnt Sienna and Black oil paints with Sansodor mineral spirit to create an oil wash. Carefully apply this wash to the panel lines. This step adds depth and a weathered look to the model.
Final Touches
Finish by edge highlighting the details using a mix of Yriel Yellow and white. This brings out the model’s features and adds depth to its appearance.
Show it off!
As you progress, feel free to adapt and tweak techniques to suit your style. Good luck! When you’ve finished, why not pop into our Discord and show it off to other website members? 🙂
Explore more Legions Imperialis Tutorials
If you don’t have an account, please sign up here! The website currently has over 350 video tutorials with steps and tips, plus a selection of PDFs. If you are not sure about joining, you can explore my free videos with a free membership, or take the plunge and become a full subscriber for full access.
If you’d prefer to support me on Patreon, please visit: https://www.patreon.com/RichardGray [...]
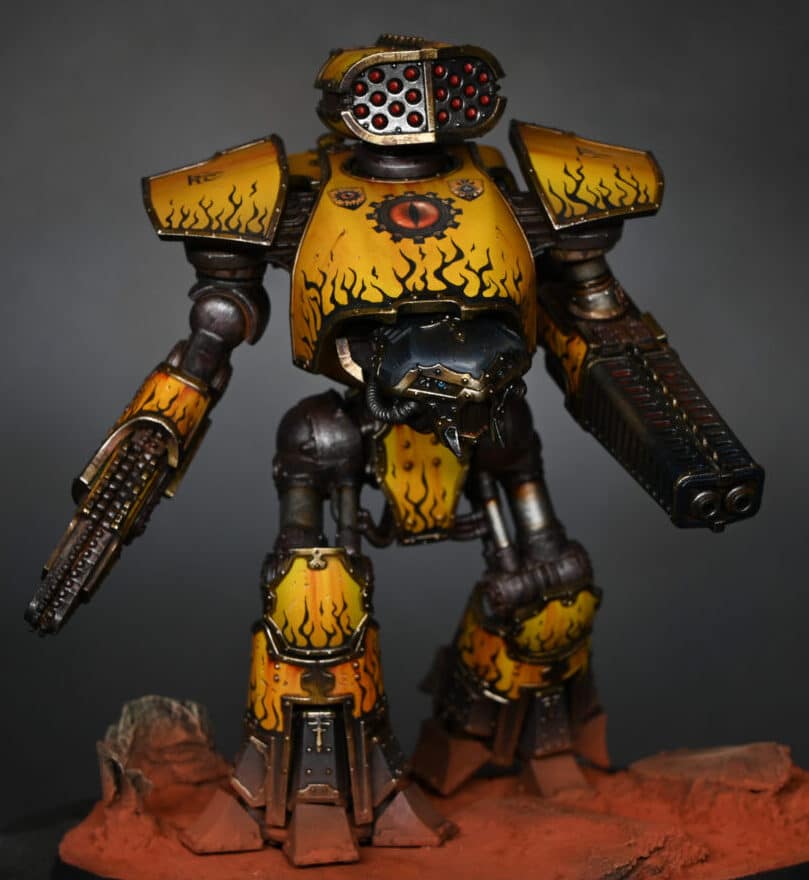
My lovely wife got me a reaver titan for my birthday, so I thought I’d have a bash at painting it up for the Legio Fureans. I’ve done it as a gaming piece, but I’ll be doing a Warlord for a potential Golden Demon entry!
You can watch a tutorial video on how I painted my Legio Fureans Reaver, plus a list of the paints I used and a step-by-step written guide with tips by following this link:
Video Tutorial: How to Paint a Legio Fureans Reaver
There will be another video for Be’lakor next, plus a video for painting a Space Marine head.
I’ve started work on painting Black Templars for gaming, in a similar fashion to the Imperial Fists and Ultramarines videos I have done.
Make sure you are logged in to view my video content. If you can’t access that page, sign up as a “Friend” – it’s completely free, plus you get to watch the below videos, too!
Free Video Tutorials
Free videos for logged in members – just sign up as a ‘friend’ to view and click any of the thumbs.To explore all of these, visit this page!
If you don’t have an account, please sign up here! The website currently has over 350 video tutorials, plus step by step guides and PDFs. You can explore more free videos with a free “freebies” membership, or take the plunge and become a full subscriber for full access.
If you’d prefer to support me on Patreon, please visit: https://www.patreon.com/RichardGray [...]
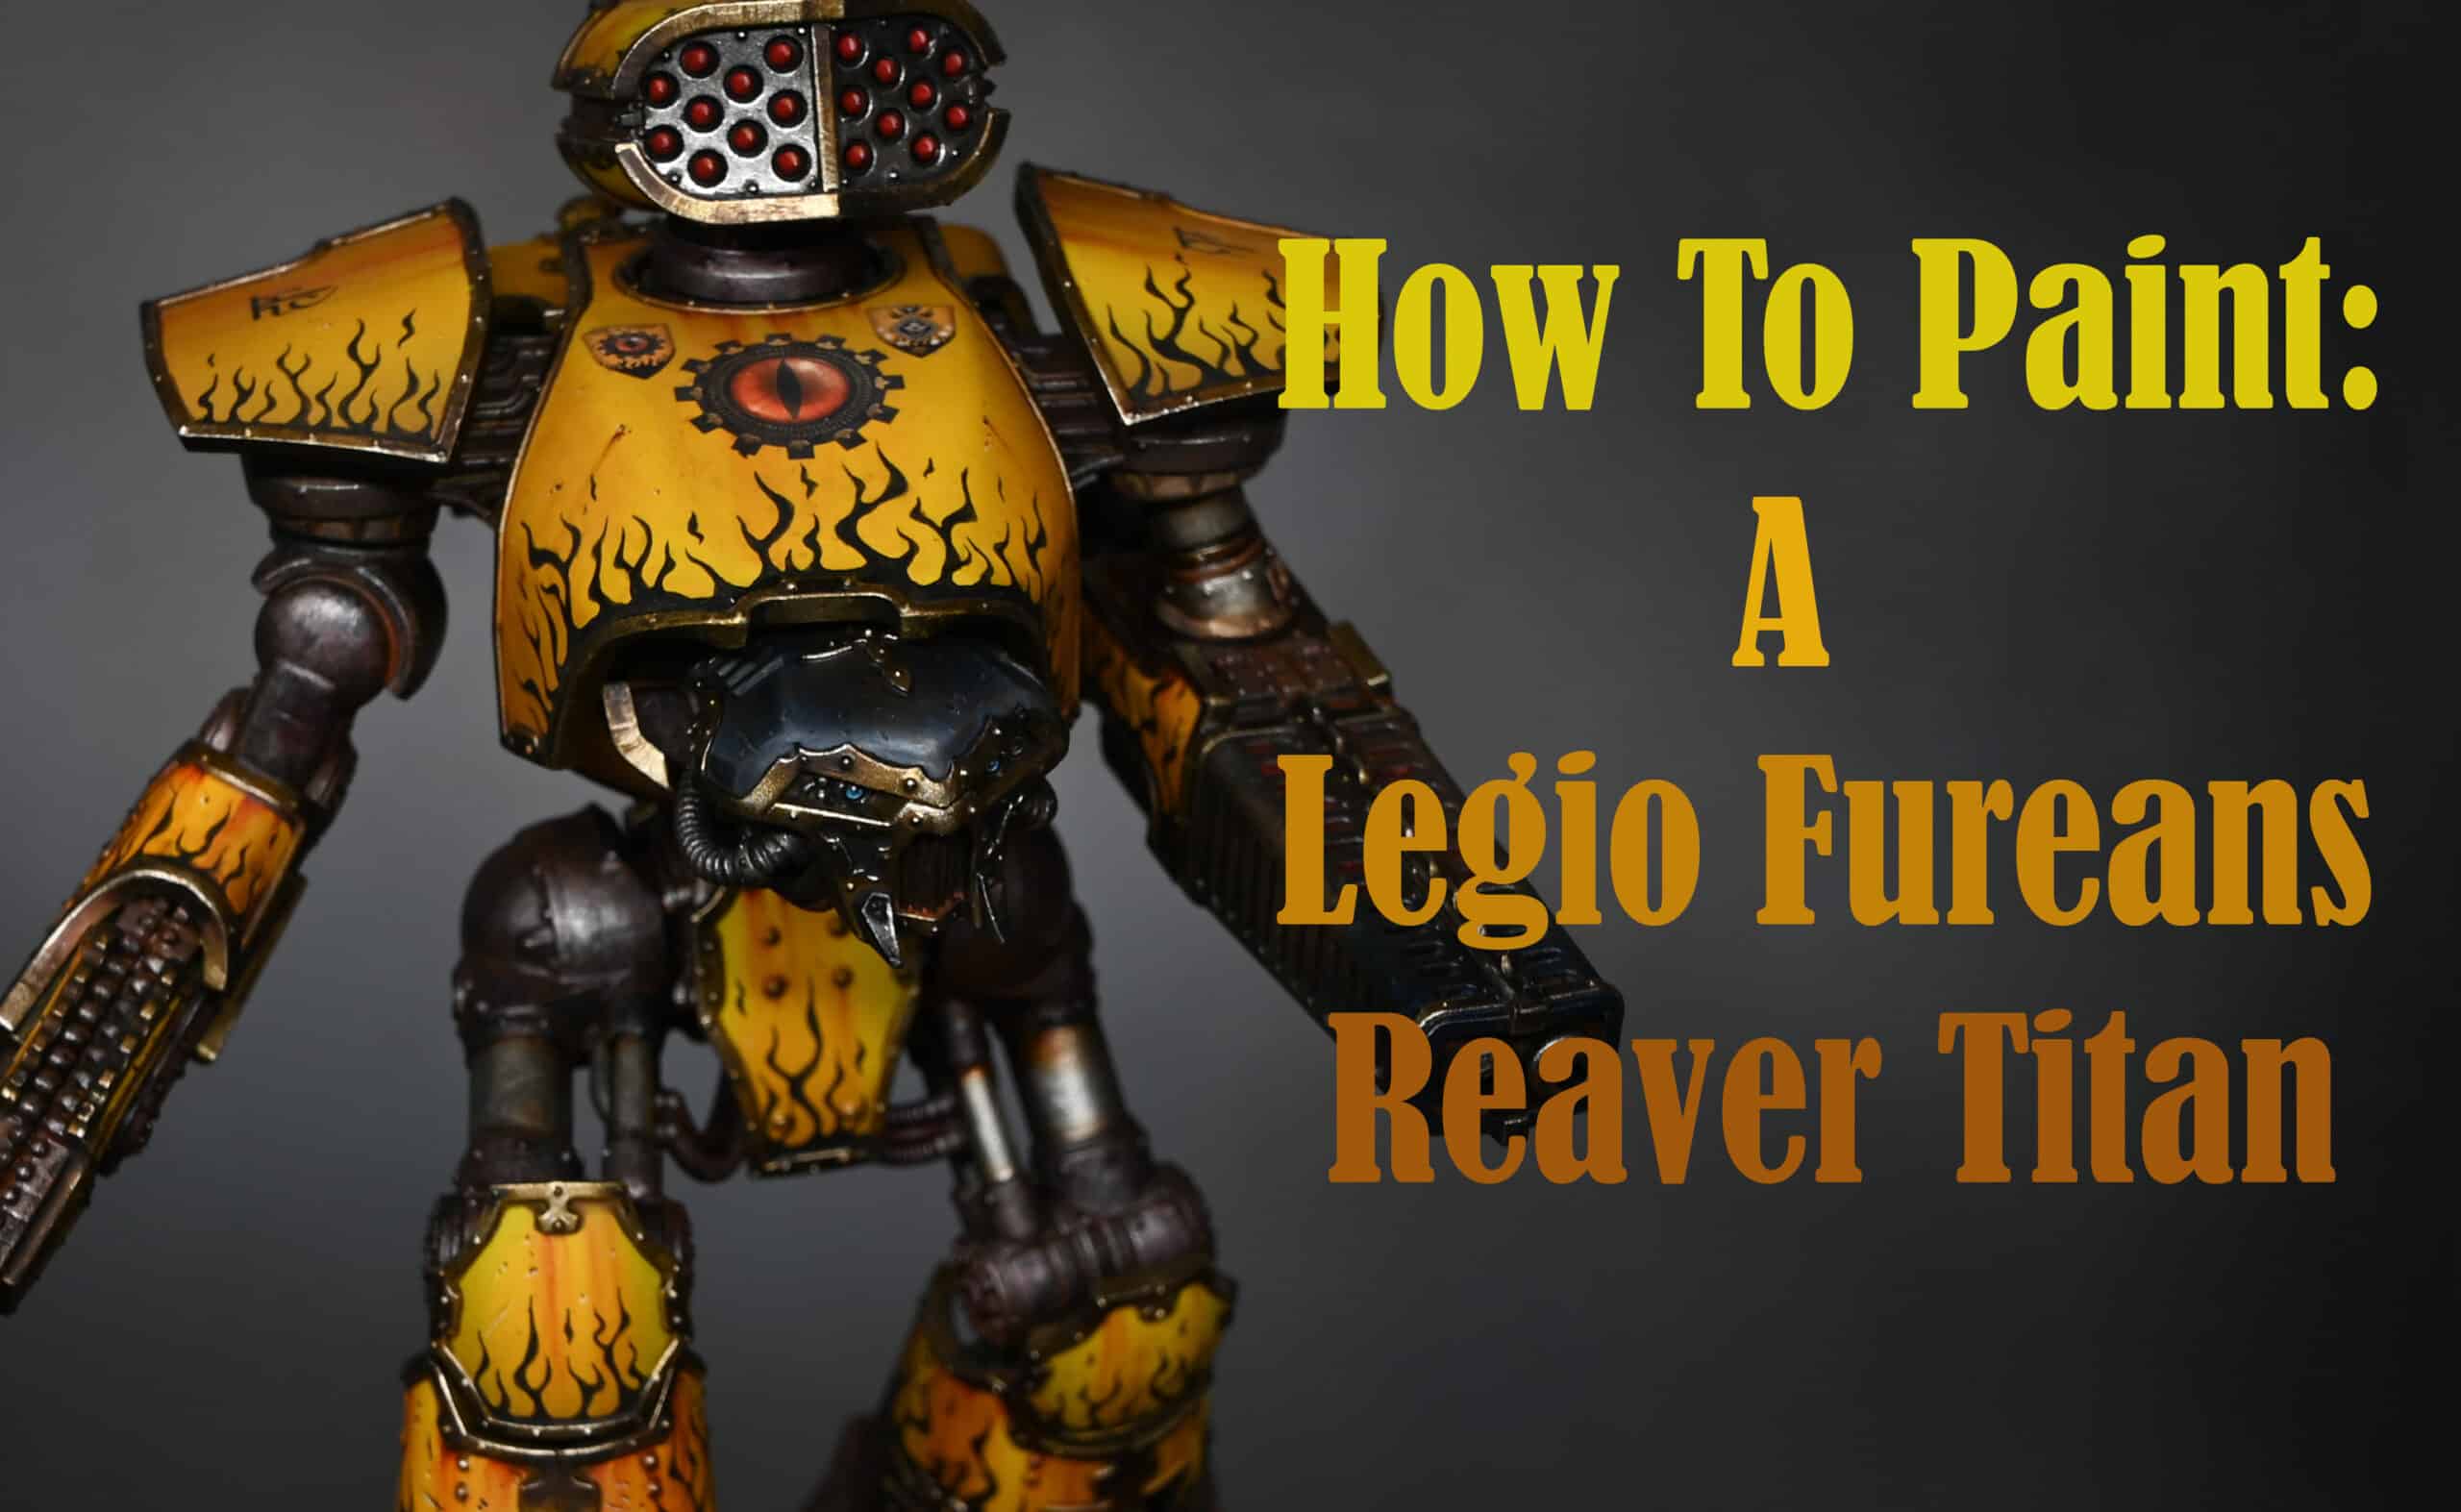
This video tutorial shows How to Paint a Legio Fureans Reaver (Tiger Eyes) from the Adeptus Titanicus game. I’ve done it as a gaming piece, but I’ll be doing a Warlord for a potential Golden Demon entry.
All videos are recorded in HD 1080p or higher – use full screen for the full effect and let the video load completely. You can also click the little “cog” and change the speed of the video, if I am going too fast (or slow!).
Materials and Paints:
Paints from Games Workshop (Yriel Yellow, Flash Gitz Yellow, Mournfang Brown, XV-88, Magos Purple Contrast, Technical Stormshield, Corvus Black, Sotek Green, Rhinox Hide), Vallejo (Dark Sea Grey, German Grey, Black, Metal Colour Burnt Iron, Metal Colour Chrome, Ice Yellow, White), and Scale 75 (Necro Gold).
Oil Colours: Winsor and Newton’s Sansodor mineral spirit, Black, and Burnt Sienna.
Primer: Badger Ultimate Primer in Black.
Airbrush: Infinity CR Plus, set at about 30-35 PSI.
Additional Tools: Mixing cups, a selection of brushes and a magnifying headset.
Step-by-Step Guide:
Priming: Start with a base coat of black primer.
Airbrushing the Carapace:
Dilute Yriel Yellow with Vallejo airbrush thinner. Apply several coats for a solid finish.
Optionally, start with a base of XV-88 for a quicker yellow hue.
Add depth with Mournfang Brown in recessed areas.
Reapply Yriel Yellow for a smooth blend.
Highlight the edges with Flash Gitz Yellow.
Mix a bit of Mournfang Brown with Yriel Yellow for a gentler transition.
Trim Painting:
Apply Necro Gold, thinned down to about a 50/50 mix with water.
Add depth with a wash of Aggrex Earthshade.
Detailing with Black Flames:
Hand-paint black flames using Model Color Black. Start with simple S-curves, then refine.
Applying Decals:
Apply a gloss varnish, then the decals with microset.
Seal with matt varnish after drying.
Oil Weathering:
Apply Burnt Sienna oil paint for realistic streaking effects.
Scratches and Dents:
Use Rhinox Hide for scratches, followed by Ice Yellow on the lower edges for a 3D effect.
Highlighting and Shading Trim:
Reapply Necro Gold, then blend with Vallejo Chrome for brighter highlights.
Use Wild Wood contrast paint for shading.
Main Structure Painting:
Stipple on Burnt Iron metallic colour.
Add depth with a Magos Purple wash, followed by a diluted Mournfang Brown wash.
Painting the Head and Lenses:
Start with a black base, then layer up highlights with German Grey and Dark Sea Grey.
Glaze over with Corvus Black to tone down and blend highlights.
Paint the lenses with Sotek Green and white highlights.
Finishing Touches:
Apply final weathering, varnishing, and any additional detailing as needed.
Richard’s Pro Tips:
Patience is key when airbrushing. Build up the layers gently for a more professional finish.
Experiment with brush strokes and blending to achieve your desired effect.
Each miniature is a canvas for creativity – don’t be afraid to add your own flair!
Always thin your paints for smoother application and a more refined look.
Take breaks! Detail work can be taxing on the eyes and hands.
More Free Video Tutorials
Free videos for logged in members – just sign up as a ‘friend’ to view and click any of the thumbs.To explore all of these, visit this page!
If you don’t have an account, please sign up here! The website currently has over 350 video tutorials, plus step by step guides and PDFs. You can explore more free videos with a free “freebies” membership, or take the plunge and become a full subscriber for full access.
If you’d prefer to support me on Patreon, please visit: https://www.patreon.com/RichardGray [...]
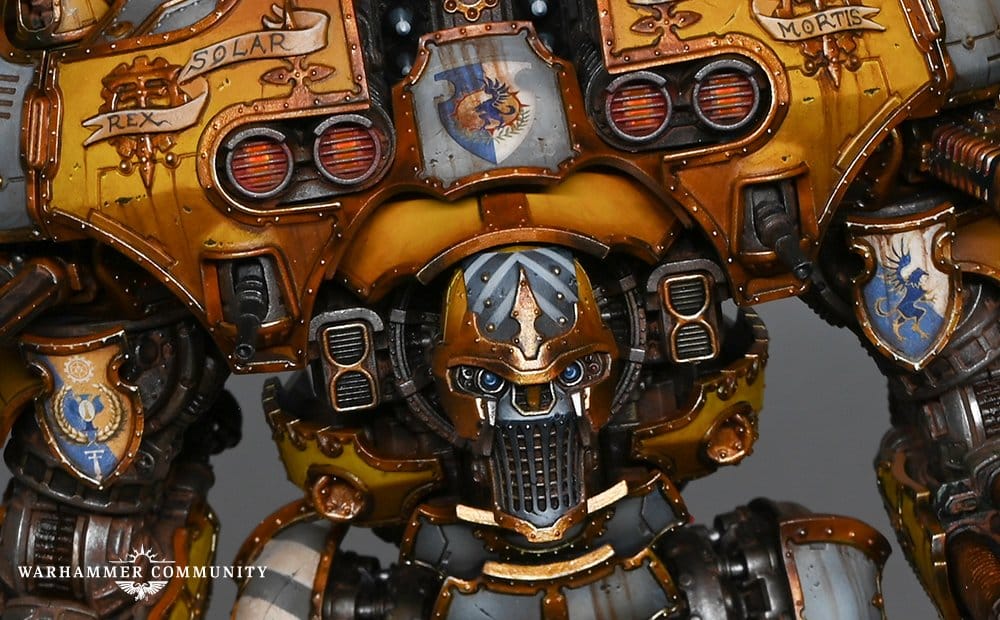
I was delighted to be interviewed by the Warhammer Community page, after painting up my Warhammer Titan!
There are interviews by three other painters, too – check it out here.
My interview is below!
Richard: I’m a huge fan of Adeptus Titanicus, so there was no doubt in my mind that I would be painting at least one (I’ve already ordered another!) of the new Warmaster Titans.
The kit is so well designed that it’s a joy to build. In particular, I was over the moon to see that the toes are separate pieces, so it’s now even easier to give your Titan a dynamic pose.
I decided to use an airbrush to paint the Warmaster because the kit is so big. The trim was probably the biggest hurdle, but I found that using Contrast paints to shade the metallics really helped the process.
Now I just need to paint a Legio Mortis Warmaster.
Learn how I painted him and my other Adeptus Titanicus bois by following my tutorials, online –
Videos Not Showing?
To view any of my paid tutorials, you need to be a member of the website – please click below to log in or join the site.
Not sure about joining just yet? Check out my Youtube for all my free tutorials or sign up as a free “friend” member on this site and visit the free videos page!
If you’d prefer to support me on Patreon, please visit: https://www.patreon.com/RichardGray [...]
I’ve been going mad painting trim for days! I was fortunate to be sent a pre-release version of the new Warmaster, so here it is in War Griffons colours, along with two long How to Paint an Adeptus Titanicus Warmaster videos, if you’d like to give some of the techniques a go!The magnets needed for the arms are 6mm x 2mm
How to Paint an Adeptus Titanicus Warmaster : Part One
All videos are recorded in HD 1080p or higher – use full screen for the full effect and let the video load completely.
For part one, the following paints were used: Vallejo: Neutral Grey, Pale Grey Blue, Heavy Gold Brown, German Grey, Metal Colour Gold, Metal Colour Burnt Iron, Chrome Games Workshop: Balor Brown, Phalanx Yellow, Mephiston Red, Fire Dragon Bright, Mournfang Brown, Athonian Camoshade, Contrast Black Templas, Contrast Snakebite Leather, Contrast Guilliman FleshP3: Morrow White Winsor And Newton: Burnt Umber Water Mixable Oil ColourScale 75: Victorian Brass, Dwarven Gold Micro Set Gloss and Matte Varnish
Top Tips: How to Paint an Adeptus Titanicus Warmaster
Start with a clean model: Remove mould lines and prepare the model for painting.Choose the right primer: Use a durable black primer, such as Badger Ultimate Primer Black.Dry brushing for a worn look: Dry brush the model with Vallejo Burnt Iron Metallic paint using a large, soft brush in circular motions.Achieve a grainy, worn appearance that highlights raised areas.Add weathering powder for a grimy effect:Mix aged rust Forge World weathering powder with water and apply to the model.Dry brush over it to create a metallic and grimy look, enhancing the weathering effect.Apply a wash for depth:Use a large brush to apply a wash like Athonian Camoshade or Agrax Earthshade to add depth to the model.Separate panels before applying wash for efficiency, especially if using an airbrush.Painting the trim:Paint the trim with Scale 75 Victorian Brass and give it a wash for added detail.Use Contrast Paint (Snakebite Leather) in the recesses to make the trim stand out.Shade the trim for realism:Choose a shade like Contrast Guilliman Flesh to shade the trim for a realistic effect.Consider using Contrast Snakebite Leather for a quicker alternative.Optional edge highlighting for shine:Optionally, use a lighter colour like Dwarven Gold for edge highlighting to add shine to the model.Weathering scratches:Paint weathering scratches using streaking techniques and consider variations in opacity.Drag thick streaks down and manipulate them with a damp brush for a natural look.Gloss varnish for a final touch:Apply gloss varnish by hand for a shinier finish, especially around the rim where transfers meet the armour panel.Glossier finishes enhance the overall weathered appearance.Weathering with oil wash:Apply a weathering wash using Heavy Gold Brown by Vallejo.Be mindful of visible circles around decals, as the pigment settles in those areas during the weathering process.Other tips:Save time by being a bit more sloppy with the initial wash before painting the yellow sections.Consider airbrushing the metallics to achieve a consistent look across the model.
How to Paint an Adeptus Titanicus Warmaster : Part Two
For part 2, the following paints were used:
Vallejo: Neutral Grey, Pale Grey Blue, Heavy Gold Brown, German Grey, Metal Colour Gold, Metal Colour Burnt Iron, Chrome Games Workshop: Balor Brown, Phalanx Yellow, Mephiston Red, Fire Dragon Bright, Mournfang Brown, Athonian Camoshade, Contrast Black Templas, Contrast Snakebite Leather, Contrast Guilliman Flesh P3: Morrow White Winsor And Newton: Burnt Umber Water Mixable Oil Colour Scale 75: Victorian Brass, Dwarven Gold Micro Set Gloss and Matte Varnish
Top Tips for Part 2:
Snakebite Leather Contrast Paint: Time to define that armour trim. Grab your Snakebite Leather and carefully trace around the trim. Keep it tidy, but don’t stress—messiness is part of the charm.
Victorian Brass (Scale 75):Now, let’s make that trim stand out. Spend some extra time if you fancy making it posh, but for a gaming piece, a wash or contrast colour works a treat.
Dry Brushing the Bodywork: Grab a dry brush and add shadows to those curves. Imperfections? Embrace them—it adds character!
Gun Barrel Detailing: Be gentle as you dry brush the gun barrel with Age Rust and Screaming Skull. Keep it realistic in scale, avoiding excessive height.
Rust Effects: Use German Grey or Dark Grey for the darker areas. Add rust effects using Void World Weathering Powders—both orange and age rust. Keep it real, considering the scale you’re working in.
Banner Strip: This is the intricate part. Thin your paint, use German Grey or Dark Grey, and take your time. If freehanding text feels daunting, decals are a viable option. Legibility is key—fancy text is cool, but make sure it’s readable.
Fixing Mistakes: Don’t panic if you mess up the lettering. You can fix it with the base colours on your wet palette. Cut into it with base colours for cleaner edges.
More Adeptus Titanicus and Titan Videos can be watched by clicking the thumbnails below!
If you don’t have an account, please sign up here! The website currently has over 350 video tutorials, plus step by step guides and PDFs. You can explore my free videos with a free “friend” membership, or take the plunge and become a full subscriber for full access.
If you’d prefer to support me on Patreon, please visit: https://www.patreon.com/RichardGray [...]

Here is the Warmaster Titan kit review, along with a 360 video of the model I painted!
Warmaster Titan Kit Review
If you don’t want to listen to me, (which is fine!), welcome to my detailed review of the new Warmaster Titan for Adeptus Titanicus. I was fortunate enough to receive a pre-release model, and in this Warmaster Titan Kit Video Review, I’ll not only share my thoughts on the model but also provide insights into the painting process.
Model Overview
The Warmaster Titan offers an array of features, including an assortment of weapons like melter cannons, turbo laser destructors, Vulcan mega bolters, missile launchers, and flamers. With three head options, you can tailor the appearance to suit the legion of your choice.
My Painting Tips:
Choosing Legion Colours: Select colours that align with your legion theme. Consistency is key for a visually cohesive and impressive result.
Detail Attention: Delve into the small details; this model boasts intricate components that can truly shine with careful painting.
Weapon Variety: Distinguish between weapon types with suitable paint variations to enhance the visual appeal of your Titan.
Head Selection: Carefully pick a head that complements your chosen legion theme, as it plays a significant role in defining the Titan’s overall appearance.
Poseability Magic: Make the most of the Titan’s poseability by removing any restricting tabs. Experiment with dynamic poses to add realism.
Magnetisation for Flexibility: Utilise 6×2 mm magnets for arm attachments, enabling easy weapon swaps and pose adjustments, adding a layer of flexibility.
What else can I do?
Card Organisation: Keep track of weapon stats with the included cards. Consider using an app for added convenience during gameplay.
Experimenting with Heads: Try experimenting with heads from other models for a unique touch, ensuring proportions align with your chosen legion theme.
So, in short?
The Warmaster Titan is a fantastic model, offering impressive detail and poseability. Take your time with the painting process, experiment with customisation options, and enjoy the journey of bringing this mighty Titan to life.
For a more immersive experience, don’t forget to watch my painting tutorials, where I walk you through the Warmaster Titan and share additional insights from my painting experience.
Paint your Titan with Related Tutorials!
Free Video Tutorials
Free videos (for logged in members – just sign up as a ‘friend’ to view and click any of the thumbs.To explore all of these, visit this page!
If you don’t have an account, please sign up here! The website currently has over 350 video tutorials, plus step by step guides and PDFs. You can explore more free videos with a free “freebies” membership, or take the plunge and become a full subscriber for full access.
If you’d prefer to support me on Patreon, please visit: https://www.patreon.com/RichardGray [...]
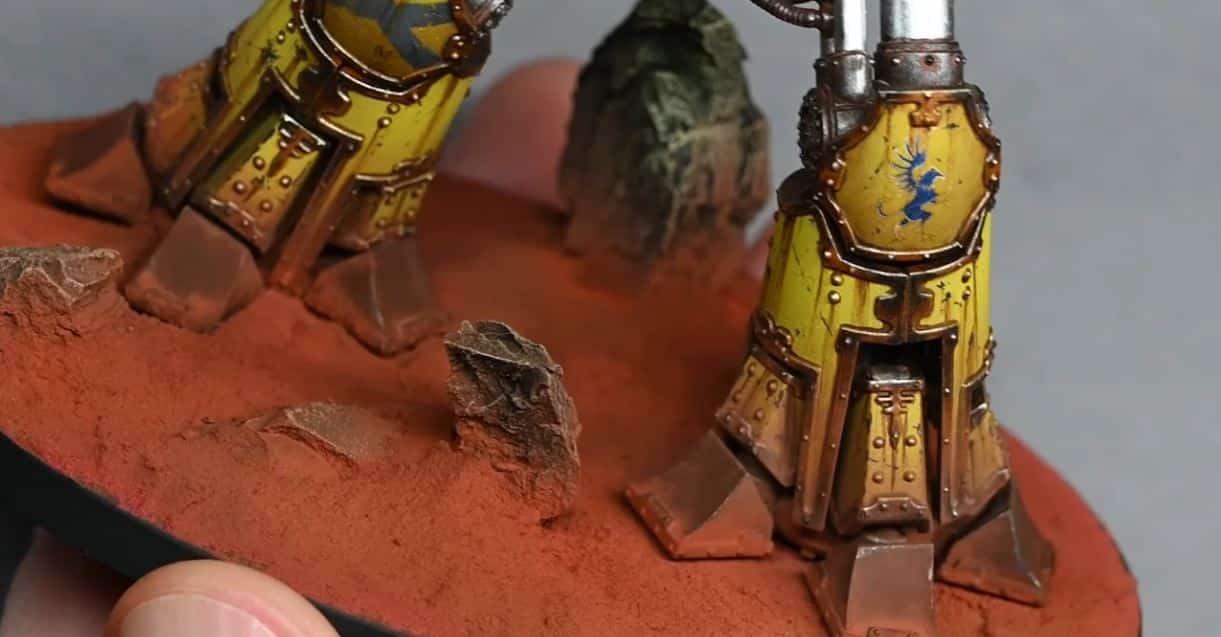
This video shows you how to create a Titan Martian Base, a Martian red landscape for your Adeptus Titanicus Titan, or for any large model you like, really!
Video Tutorial: Titan Martian Base
All videos are recorded in HD 1080p or higher – use full screen for the full effect and let the video load completely.
Paints and Materials Used
Fimo and Milliput: For making rock shapes.
Baking Soda: For creating the fine-grained surface texture.
Paints:
Scale 75’s Antares Red
Scale 75’s Red Leather (or similar Games Workshop red and brown colours)
Games Workshop’s Deathworld Forest
Games Workshop’s Ushabti Bone
Weathering Powders:
Forge World’s Aged Rust
Forge World’s Orange Rust
Matte Varnish: For sealing the base.
Tools:
Brushes for painting and dry brushing.
Sculpting tools or a flat surface for applying the baking soda mixture.
Airbrush for applying weathering powder (optional).
Other Materials:
Water: For mixing with weathering powders.
Super Glue: For securing rocks to the base.
Q-tip: Slightly damp, for cleaning up excess weathering powder.
Step by Step Guide
Preparing the Base: Start by placing your model on the base and arrange rocks around it. Use rocks made from a mixture of Fimo and Milliput, baked and then broken into shapes.
Creating the Surface: Mix baking soda (for fine texture), Scale 75’s Antares Red and Red Leather paint (or similar GW paints), and matte varnish to form a sticky, wet-looking substance. This creates the dusty, Martian surface.
Applying the Surface Mixture: Carefully apply the mixture to the base, ensuring it’s pushed up against the rocks. Use a large, slightly damp brush to stipple and smooth out the mixture, avoiding unnatural marks.
Using Cracking Paint: Apply a thin layer of Martian Ironearth cracking paint for subtle cracking effects. Ensure it’s not too thick to maintain the scale’s integrity.
Painting the Rocks: Once dry, paint the rocks with Vallejo Model Color Black or a similar black paint. Then dry brush with GW Deathworld Forest for initial colour, followed by Ushabti Bone for highlights.
Applying Weathering Powder: Mix Forge World Aged Rust and Orange Rust powder with a lot of water, and spray over the base using an airbrush. Focus on the lower parts of the model for a realistic effect. For manual application, use a large, soft brush.
Cleaning Up: After the weathering powder dries, use a slightly damp Q-tip to remove excess powder from the rocks and lower sections of the Titan, enhancing the details and textures.
Final Touches: Seal the base with a matte varnish to preserve the dusty look and reduce the brightness of the orange rust effect.
More Adeptus Titanicus
If you don’t have an account, please sign up here! The website currently has over 350 video tutorials with steps and tips, plus a selection of PDFs. If you are not sure about joining, you can explore my free videos with a free membership, or take the plunge and become a full subscriber for full access.
If you’d prefer to support me on Patreon, please visit: https://www.patreon.com/RichardGray [...]
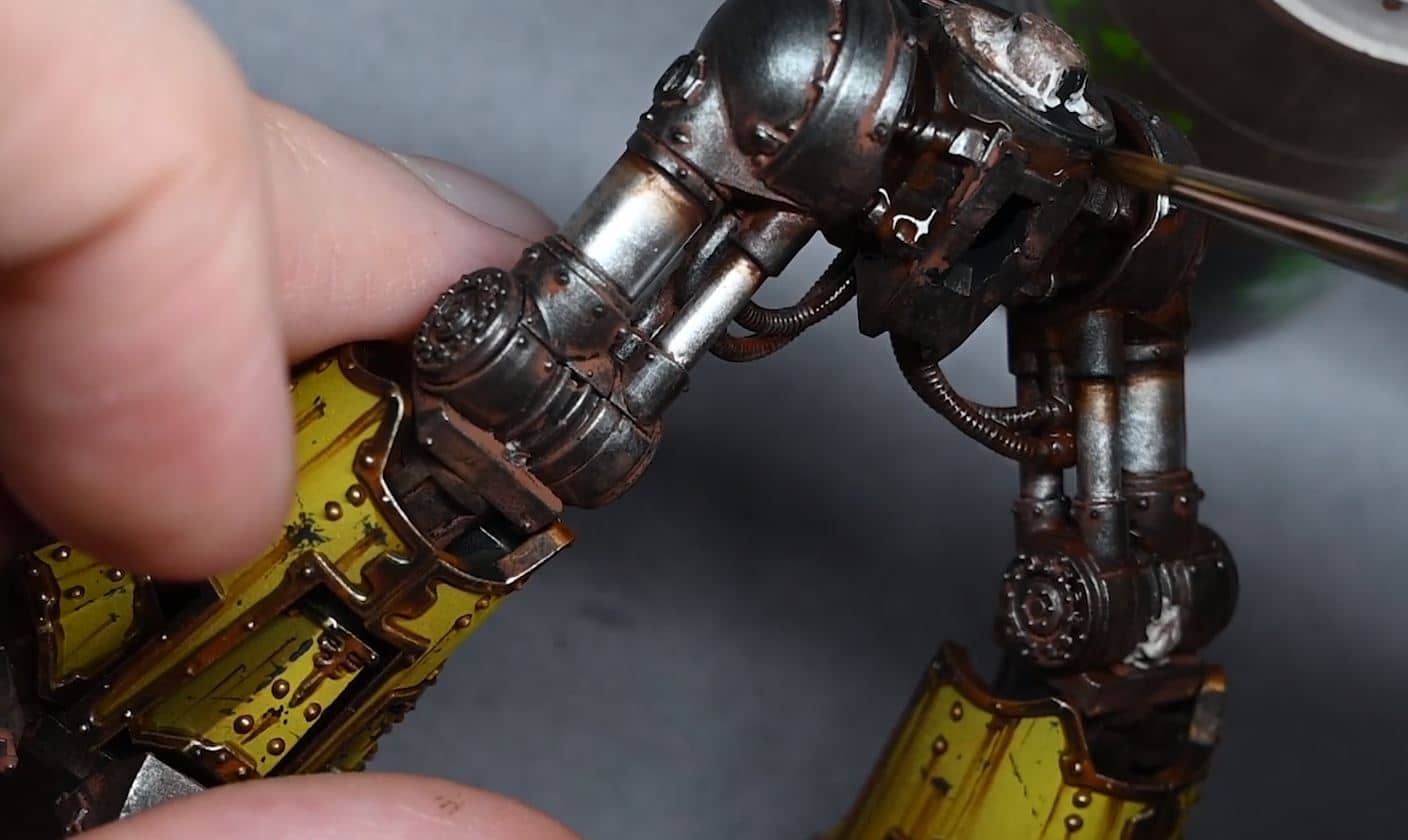
This video shows how to paint the metal and weathering effects on the legs of the Adeptus Titanicus Titan. Enhancing the metalwork, particularly the armour trim and skeletal structure, to achieves a detailed and realistic finish that looks fantastic on the battlefield. We’ll be using a mix of Games Workshop, Vallejo, and Forge World paints to bring our Titan to life.
Video: How to Paint Weathering and Metal on an Adeptus Titanicus Titan
All videos are recorded in HD 1080p or higher – use full screen for the full effect and let the video load completely.
Paints
Games Workshop:
Agrax Earthshade
Wyldwood (Contrast)
Contrast Aggaros Dunes
Forge World:
Aged Rust (Weathering Powder)
Vallejo Metal Colour (Airbrush Ready):
Victorian Brass (Scale 75 for an alternative base colour)
Magnesium
Gold
Chrome
Winsor & Newton:
Water Mixable Oil Colour Burnt Umber
Brushes
A fine detail brush for applying precise highlights and for controlled application of contrast paints and weathering powders.
A medium brush for applying base coats and larger areas of colour.
A soft, large brush for applying washes and for dusting off excess weathering powders.
I use the Artis Opus range of brushes, but any good quality brush is recommended.
Step by Step – Weathering and Metal on the Adeptus Titanicus Titan
Preparing the Armour Trim
Base Coat: Begin with a base coat of Scale 75 Victorian Brass over the trim. This provides a solid foundation for subsequent layers.
Initial Shading: Apply Contrast Aggaros Dunes over the Victorian Brass to introduce depth and shading to the trim. This step should have been completed in earlier stages of the model’s painting process.
Enhancing the Trim
Adding Depth: Use Games Workshop’s Wyldwood contrast paint to darken recesses and joints in the trim. The high contrast between the dark recesses and the metallic brass creates visual interest and depth. Apply the paint selectively to areas that would naturally accumulate shadow.
Highlighting: Vallejo Metal Colour Gold is used to highlight the edges of the trim. Due to its fluidity, it provides a smooth application but be mindful of its runniness. Lightly touch the edges with a fine brush to catch the raised areas.
Painting the Skeleton
Base Layer: Vallejo Metal Colour Magnesium serves as the base layer for the Titan’s skeletal structure. Its liquidity ensures it flows well into recesses but exercise caution to prevent pooling.
Weathering: Apply Forge World’s Aged Rust weathering powder mixed with water to the skeletal structure for a grimy, rusted effect. Focus on areas that would naturally collect dirt and rust, maintaining a balance to avoid obscuring details.
Sealing the Weathering: Once dry, seal the weathering with a mix of Agrax Earthshade. This reactivates and fixes the weathering powder, giving a durable and realistic rust effect.
Detailing Pistons and Metal Accents
Chrome Pistons: Vallejo Metal Colour Chrome is applied to pistons for a bright, reflective finish. Multiple thin layers may be needed for uniform coverage.
Oily Effects: Windsor and Newton’s Water Mixable Oil Colour Burnt Umber is used to simulate oil and grime on pistons and mechanical parts. Dilute with water for a manageable consistency and apply at joints and moving parts for a realistic oily effect.
Finishing Touches
Reichland Fleshshade Glaze: Optional, but can be used to add warmth to metal parts, particularly useful on brass or gold trims to simulate reflected light or heat staining.
Highlighting and Cleaning Up: After applying weathering and shading, go back to highlight edges and clean up any overspill with your base metallic colours. This step sharpens details and enhances the overall contrast of the model.
Techniques and Tips
Trim Detailing: Use the fine detail brush with Vallejo Metal Colour Gold to highlight the edges of the trim, applying the paint carefully to avoid spillage onto other areas.
Skeleton Base Layer: Apply Vallejo Metal Colour Magnesium with a medium brush, ensuring even coverage and avoiding pooling in recesses.
Weathering Powder Application: Mix Aged Rust with water in the well palette and apply with a large brush, targeting recesses and areas where rust would naturally accumulate.
Chrome Pistons: Use Vallejo Metal Colour Chrome, applying multiple thin layers as needed for a smooth, reflective finish.
Oily Effects: Dilute Winsor & Newton Water Mixable Oil Colour Burnt Umber with water and apply at the tops of pistons and around mechanical parts to simulate oil and grime.
Watch all the tutorials for my War Griffons Warlord!
War Griffons Warlord
A series of quick videos on the different techniques used on this model. These include the marble effect, the stripes, applying decals and weathering and metal.
Watch Now
Free Video Tutorials
Free videos for logged in members – just sign up as a ‘friend’ to view and click any of the thumbs.To explore all of these, visit this page!
If you don’t have an account, please sign up here! The website currently has over 350 video tutorials, plus step by step guides and PDFs. You can explore more free videos with a free “friend” membership, or take the plunge and become a full subscriber for full access.
If you’d prefer to support me on Patreon, please visit: https://www.patreon.com/RichardGray [...]
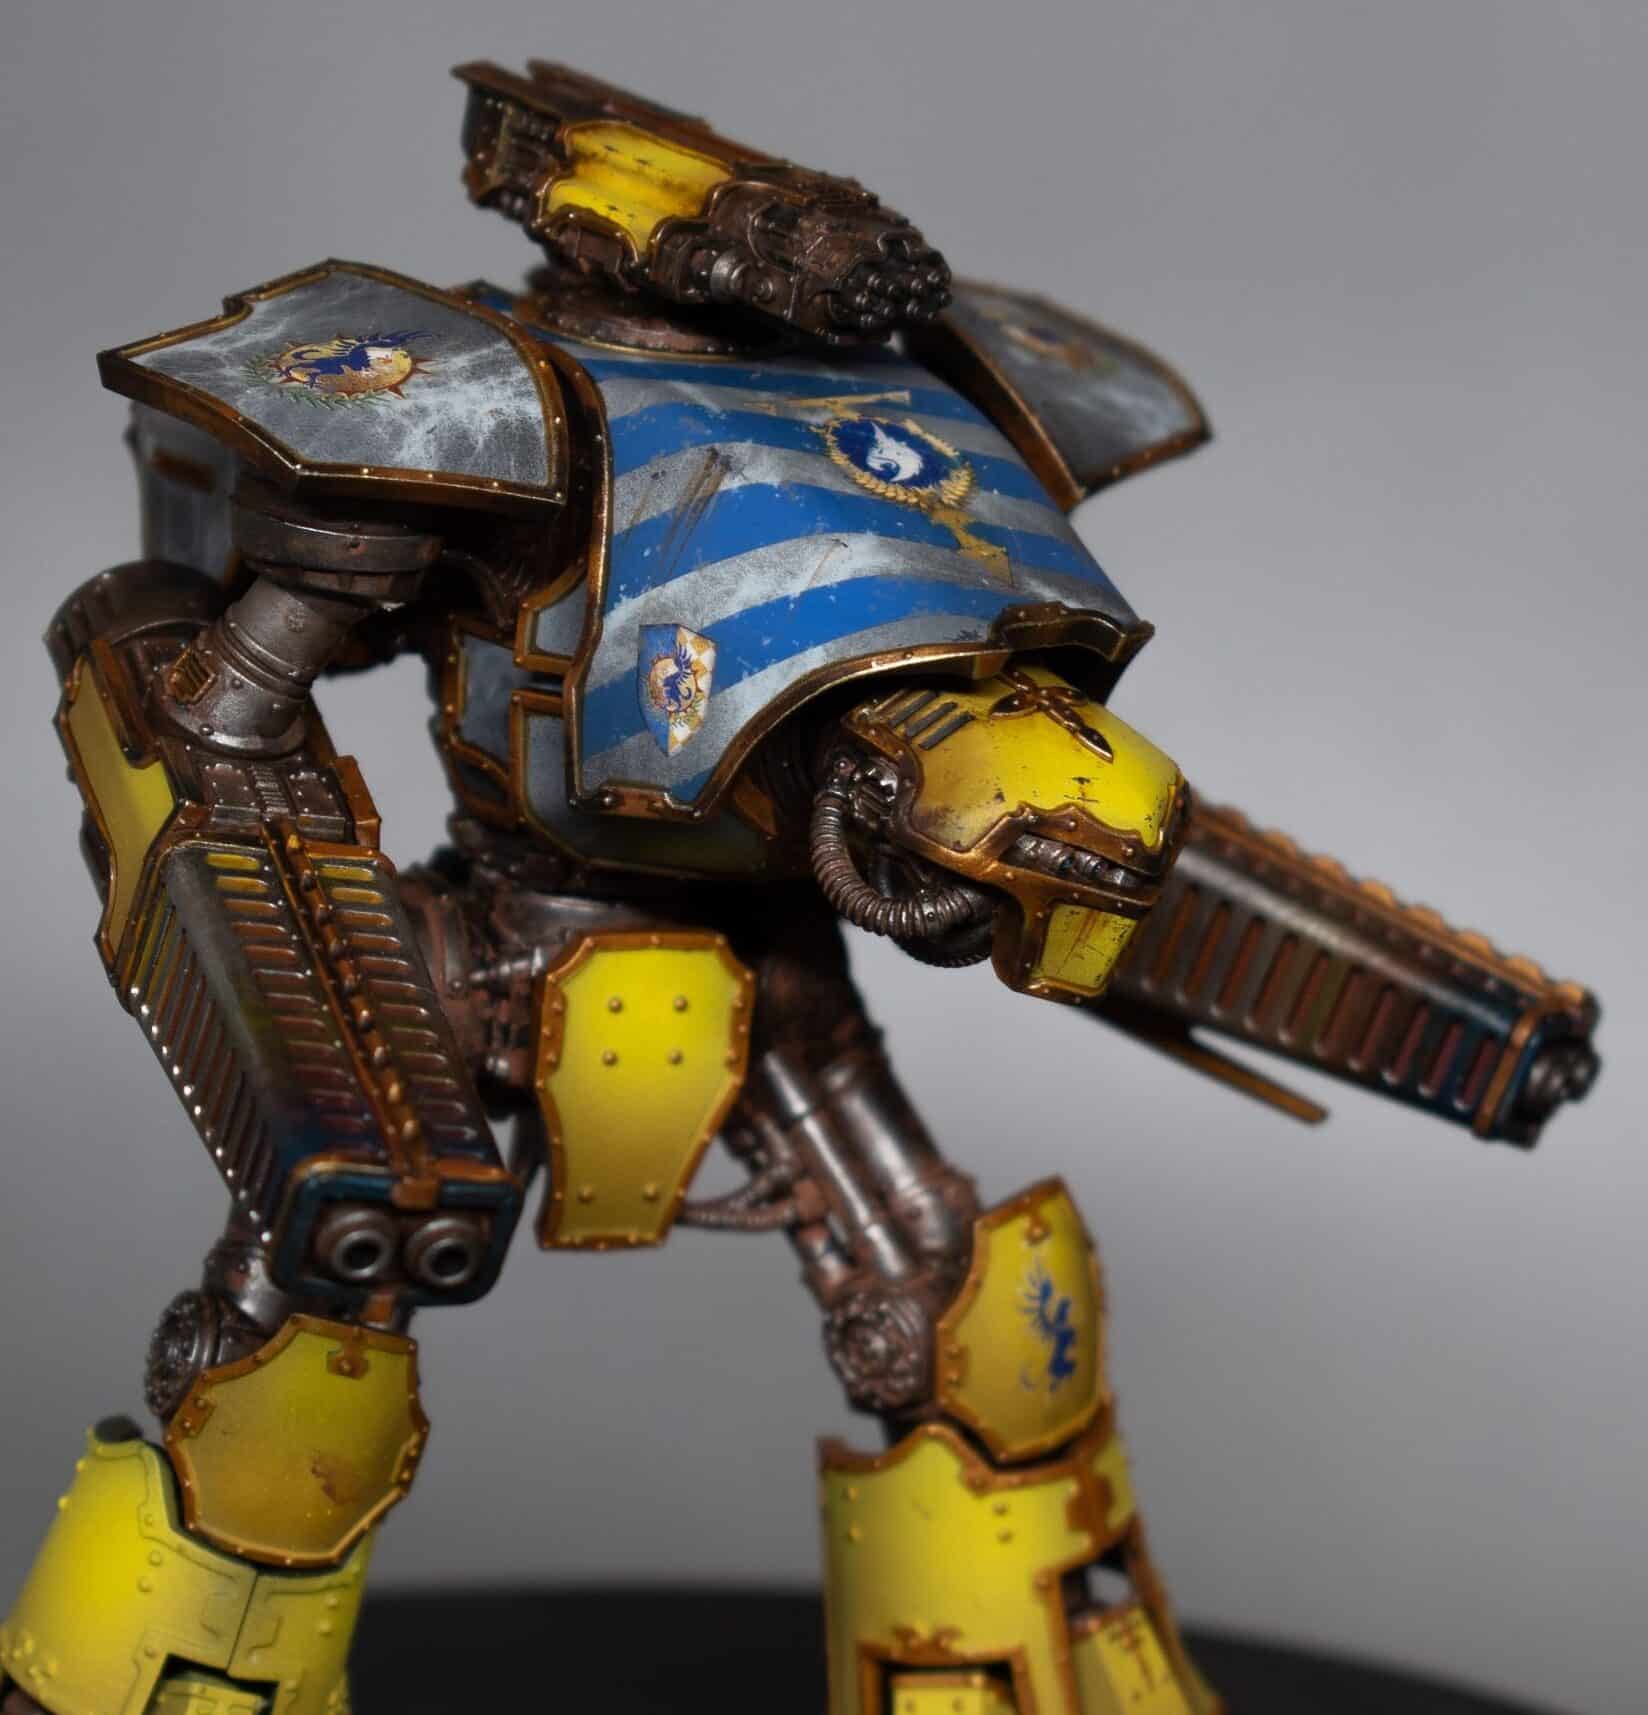
In this tutorial, we’ll cover how to achieve a dynamic heat bloom effect on a Melta Cannon for an Adeptus Titanicus Reaver Titan, specifically for the Legio Gryphonicus, also known as the War Griffins. This effect will simulate the intense heat generated by the weapon, using a gradient of colours to represent the heat bloom.
Video: How to Paint a Melta Cannon Heat Bloom
All videos are recorded in HD 1080p or higher – use full screen for the full effect and let the video load completely.
Materials Needed:
Airbrush and Thinner: For applying smooth gradients of colour.
Brushes: A fine detail brush for precise application and a dry brush for highlighting.
Paints:
Vallejo Metal Colour Magnesium (for the metallic base).
Vallejo Metal Colour Chrome (for highlighting metallic areas).
Scale 75 Victorian Brass (for trim detailing).
Games Workshop Contrast Paints: Iyanden Yellow, Magos Purple, Talassar Blue (for the heat effect).
Games Workshop Contrast Aggaros Dunes (for additional trim detailing).
Melta Cannon Step-by-Step Guide:
Base Coating the Weapon:
Begin by airbrushing the Melta weapon’s recesses with Averland Sunset, ensuring the weapon’s holes face directly towards the airbrush to prevent uneven shading. Don’t worry about overspray on the weapon casing; this will be covered later.
Adding Initial Heat Glow:
Switch to Troll Slayer Orange and apply over the Averland Sunset, creating a gradient effect from the weapon’s recesses outward. Ensure even coverage without tilting the airbrush to maintain consistency across the recesses.
Masking for Overspray:
To prevent overspray on adjacent yellow armour panels, use masking tape or modelling putty. This step is crucial for maintaining clean lines and avoiding accidental paint transfer.
Metallic Base Coat:
Paint the metallic parts of the weapon with Vallejo Metal Colour Magnesium, carefully avoiding the recesses to maintain the glow effect. This creates a solid base for subsequent detailing.
Trim Detailing:
Apply Scale 75 Victorian Brass to the weapon’s trim, followed by a coat of Games Workshop Contrast Aggaros Dunes to add depth and dimension to the detailing.
Heat Bloom Effect:
Begin the heat bloom effect by airbrushing Iyanden Yellow halfway along the Melta Cannon barrel, avoiding the recesses. Layer Magos Purple over the Iyanden Yellow, leaving some yellow visible for a blended effect. Finish with Talassar Blue, applying it over the Magos Purple but not covering all the previous layers, creating a transition from yellow to deep blue.
Highlighting and Finishing Touches:
Dry brush Vallejo Metal Colour Chrome on the non-painted metallic areas to enhance the metallic sheen. Carefully highlight the lower edges of the weapon with Chrome using a normal paintbrush, accentuating the heat bloom’s impact.
Final Assembly:
Once all painting is complete, remove any masking materials and assemble any remaining parts of the Titan, paying attention to aligning the heat bloom effects correctly.
This technique for painting a heat bloom on a Melta Cannon adds a visually striking element to your Adeptus Titanicus Titans, emphasizing the weapon’s power and the heat it generates. The use of contrast paints over a metallic base allows for a vibrant, dynamic effect that stands out on the battlefield
Watch all the tutorials for my War Griffons Warlord!
War Griffons Warlord
A series of quick videos on the different techniques used on this model. These include the marble effect, the stripes, applying decals and weathering.
Watch Now
If you don’t have an account, please sign up here! The website currently has over 350 video tutorials with steps and tips, plus a selection of PDFs. If you are not sure about joining, you can explore my free videos with a free membership, or take the plunge and become a full subscriber for full access.
If you’d prefer to support me on Patreon, please visit: https://www.patreon.com/RichardGray [...]
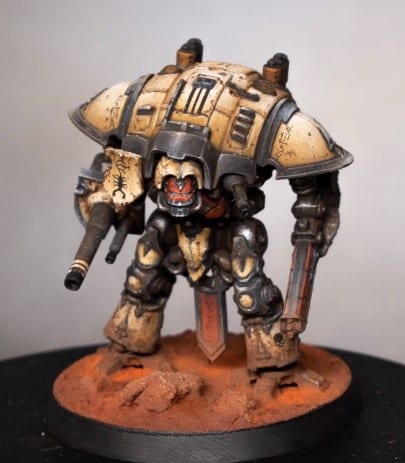
How to Paint a Mini Questoris Knight with all his tiny details, with tips on metal, weathering and using weathering powder.
Knights are the agile war machines of the Knightly houses, each one commanded by a single skilled scion. When the Titan Legions mass for war, they call upon their allied Knightly Houses to aid them, the Questoris Support Banners acting as scouts and skirmishers for their larger kin. Bristling with fearsome weapons and protected by shimmering shields, Imperial Knights are amongst the most terrifying military assets in the galaxy. Except these ones do seem very small when brushing the ankles of a Titan.
Read on to explore both video tutorials on How to Paint a Mini Questoris Knight, with all materials you need plus step by step guides.
Video: How to Paint a Mini Questoris Knight – Part One
This guide focuses on painting a knight from Adeptus Titanicus in the colours of House Malinax, laying the foundation with base painting and initial detailing before advancing to more complex techniques like weathering and decal application covered in the second part.
Materials Needed:
Base Paints: Games Workshop Balor Brown, Ushabti Bone, Ceramite White, Agrax Earthshade
Metallics: Vallejo Gun Metal
Additional: Fine detail brush, airbrush (optional for smoother base coats)
Steps:
Priming and Base Coating:
Priming: Start with a black primer to ensure deep shadows and a strong contrast base for metallic and armour parts.
Metallic Areas: Apply Vallejo Gun Metal over all metal areas. Once dry, wash these areas with Agrax Earthshade to add depth and shadow, providing a worn metallic look.
Armour Plates: Paint the knight’s armour panels with Balor Brown. This stage might require multiple thin coats for an even, opaque finish, especially over a black primer. Use an airbrush for quicker application on larger areas like the carapace.
Detailing:
Highlighting Armour: Gradually build up highlights on the armour using Ushabti Bone, focusing on raised edges and areas that would naturally catch the light. Ceramite White can be used for final sharp highlights or points of interest.
Cleaning Up: Use a fine detail brush to tidy up any overspill or to sharpen edges between different colours, ensuring the model’s details are crisp and clear.
Preparing for Further Detailing:
Applying Washes: To add depth and further define the armour panels, apply Agrax Earthshade strategically into recesses and around detail work. This step enhances the model’s textures and adds a realistic shadow effect.
Additional Colour Details: Decide on accent colours for smaller details such as the cockpit, weapon casings, or heraldry that will complement the knight’s primary colour scheme. This adds visual interest and character to your model.
Sealing the Model: Once satisfied with the base painting and initial detailing, consider applying a matte varnish to protect your work before moving on to advanced weathering techniques and decal application. This step is optional but recommended if you plan on handling the model frequently.
The focus at this stage is on building a solid and clean colour foundation, preparing the knight for the weathering and detailing stages that follow. Patience is key—take your time with each layer and ensure complete drying between steps to achieve the best results.
Video: How to Paint a Mini Questoris Knight – Part Two
Weathering, Decal Application, and Basing Guide
In this continuation of our painting guide, we’ll delve into the final steps to bring your House Malinax Adeptus Titanicus knight to life with vibrant colours, detailed weathering, decals application, and an engaging base.
Materials Needed:
Primary Paints: Games Workshop Mephiston Red, Evil Sunz Scarlet, Wild Rider Red, Fire Dragon Bright, Lothern Blue
Weathering Powders: Forge World Aged Rust, Orange Rust
Decal Solutions: Micro Sol, Micro Set
Additional: Winsor and Newton Burnt Umber Water Soluble Oil Paint
Base Materials: Baking Soda, Vallejo Charred Brown, and a red of your choice (e.g., Typhus Corrosion for a darker tone)
Varnishes: AKInteractive Matte and Ultra Matte
Steps:
Painting Details:
Head, Chest, and Chainsword: Paint these components with Mephiston Red for a rich, dark base. Utilize Evil Sunz Scarlet and Wild Rider Red for highlights, focusing on raised areas and edges to create depth. For the knight’s eyes, a dab of Lothern Blue accented with Fire Dragon Bright captures attention.
Black Trim: Highlight black areas with Vallejo’s German Grey, progressing towards lighter greys like Blue Grey and Pale Blue Grey towards the edges for a nuanced, realistic metal effect. This contrast against the bone-coloured armour emphasizes the knight’s details.
Applying Decals:
Preparation: Apply a gloss varnish to the areas where decals will be placed. This provides a smooth surface, minimizing air bubbles and silvering.
Decal Application: Soak your decals in water until they slide off the backing paper easily. Apply Micro Set to the model’s surface before positioning your decal. Once in place, use Micro Sol over the decal to soften it, allowing it to conform to the model’s contours. After drying, seal with a gloss varnish for protection and an even surface.
Matte Finish: Once the decals are sealed and the varnish is dry, apply an ultra matte varnish over the entire model to unify the sheen and protect your work.
Weathering:
Initial Weathering: Use a fine brush to apply tiny chips and scratches with Rhinox Hide, focusing on areas that would naturally see wear. Keep these marks extremely small to maintain the model’s scale.
Oil Weathering: Dilute Winsor and Newton Burnt Umber Water Soluble Oil Paint with water. Apply this mixture selectively around metallic parts and lower leg sections to simulate grime and wear. This step adds realism and depth to the knight.
Basing:
Texture: Mix baking soda with matte varnish and Vallejo Charred Brown (and a red of choice) to create a paste. Apply this to the base, ensuring coverage around any rocks or debris. This creates a textured ground effect.
Colouring: Airbrush Forge World Aged Rust weathering powder over the base and lightly onto the knight’s feet for cohesion between the model and its base.
Detailing: Lightly dry brush the rocks with Ushabti Bone for contrast against the rusted ground, and apply Orange Rust weathering powder in recesses for additional depth.
Final Touches:
Re-highlight metallics if needed to ensure they stand out against the weathered and mattified surfaces.
Consider adding small narrative elements to the base, like battlefield debris, to further the story of your knight’s battles.
This comprehensive guide should leave you with a beautifully detailed, weathered knight that stands out on the battlefield. Remember, the key to a great finish is patience and attention to detail, especially when working on weathering and basing to achieve a cohesive and realistic look.
Struggling with Decals?
How to Apply Forge World Decals and Weather Them
A beginners guide on how to apply Forge World decals and weather them so they look a natural part of the painting on your model. Painting and applying decals to your models adds significant details and realism, making it stand out during tabletop gaming. It’s also a lot easier than freehand! I still use decals a lot in my models, despite also enjoying freehand work.
Watch and Read Now
If you don’t have an account, please sign up here! The website currently has over 350 video tutorials with steps and tips, plus a selection of PDFs. If you are not sure about joining, you can explore my free videos with a free membership, or take the plunge and become a full subscriber for full access.
If you’d prefer to support me on Patreon, please visit: https://www.patreon.com/RichardGray [...]

A series of quick videos on how to paint a War Griffons Warlord Adeptus Titanicus Titan to game standard. This included marble effects, stripes, weathering and decals and more!
Scroll down to explore the videos in order, or use the quick links below to jumps to a technique or part of the model in particular:
Video – How to Paint a War Griffons Warlord : Marble EffectMaterials List:Marble Armour Step-by-Step Guide:Video – How to Paint a War Griffons Warlord : The StripesMaterials Needed:The Stripes Step by Step:Additional Tips:Video – How to Paint a War Griffons Warlord : Weathering and DecalsMaterials Needed:Steps:Preparing the Surface:How to Apply the Forge World Decals:Sealing the Decal:Weathering the Decal and Armour:Additional Tips:Video – How to Paint a War Griffons Warlord : Heat Bloom on Melta CannonMaterials Needed:Melta Cannon Step-by-Step Guide:Video – How to Paint a War Griffons Warlord : Weathering and Metal PaintsStep by Step – Weathering and Metal on the War Griffons WarlordPreparing the Armour TrimEnhancing the TrimPainting the SkeletonDetailing Pistons and Metal AccentsFinishing TouchesTechniques and TipsMore Titan Tutorials!
Video – How to Paint a War Griffons Warlord : Marble Effect
All videos are recorded in HD 1080p or higher – use full screen for the full effect and let the video load completely.
Materials List:
Airbrush: Essential for applying smooth base coats and gradients.
Hand disinfectant wipes or baby wipes: Used to create the marble effect.
Paints:
Vallejo Pale Grey Blue: For the initial base coat.
Vallejo Neutral Grey: To begin creating the marble effect.
Vallejo Dark Grey (German Grey): For adding darker veins to the marble.
Vallejo Heavy Goldbrown: Base colour for yellow armour sections.
Games Workshop Phalanx Yellow: For highlighting yellow armour sections.
Marble Armour Step-by-Step Guide:
Base Coat:
Begin by airbrushing Vallejo Pale Grey Blue onto the carapace of the Titan. This may require a few coats to achieve a smooth finish. The paint can be thinned a bit, but not excessively, to ensure good coverage without too much speckling.
Preparing the Wipe:
Take a hand disinfectant wipe or baby wipe and stretch it out so it’s slightly spread and thin. This texture will be transferred to the armour to create the marble effect.
Applying the Wipe:
Lay the stretched wipe over the armour part you’ve just painted. Ensure it’s not too densely applied; the idea is to leave some areas exposed more than others for a varied marble effect.
Adding Darker Tones:
Airbrush Vallejo Neutral Grey over the wipe-covered armour. Keep the airbrush pressure low to avoid displacing the wipe. Focus more on the edges and less on the centre to mimic natural shading.
Without completely covering the previous layer, lightly apply Vallejo Dark Grey in a few select areas to create the appearance of darker veins within the marble.
Revealing the Effect:
Carefully remove the wipe to reveal the marble effect beneath. You’ll find areas of light and dark grey creating a naturalistic marble pattern.
Cleaning Up:
After removing the wipe, there may be strands left on the model. Take your time to clean these off to avoid them becoming permanently attached in later steps.
Painting Yellow Armour Sections:
For Legio Gryphonicus’s iconic grey and yellow scheme, base coat the relevant armour sections with Vallejo Heavy Goldbrown. Highlight these areas with Games Workshop Phalanx Yellow to achieve a vibrant, contrasting look against the grey marble.
Video – How to Paint a War Griffons Warlord : The Stripes
This guide will take you through the process of painting and weathering the stripes to achieve a battle-worn effect, ensuring your titan stands out on the tabletop.
Materials Needed:
Scale 75 Victorian Brass (For the trim)
Tamiya Masking Tape (3mm strips recommended for precision)
Games Workshop Kantor Blue (For the base stripe colour)
Vallejo Ultramarine Blue (For highlighting the stripes)
Vallejo Neutral Grey (For weathering)
Vallejo Pale Grey Blue (For weathering)
Airbrush and airbrush thinner (Vallejo Airbrush Thinner recommended)
Fine detail brush for weathering
The Stripes Step by Step:
Prepare the Trim:
Begin by painting the trim of the carapace using Scale 75 Victorian Brass. This step should ideally be done after painting the stripes to avoid overspray, but if you prefer to paint it first, be prepared to touch it up later.
Masking for Stripes:
Apply Tamiya masking tape to the carapace to create the desired pattern for your stripes. Ensure the tape is firmly pressed down, especially near the edges and armour trim, to prevent paint from bleeding underneath.
Base Colour for Stripes:
Airbrush Games Workshop Kantor Blue over the masked areas. The paint should be thinned appropriately and applied in even coats to achieve an opaque finish. Be mindful of overspray on the trim.
Highlighting Stripes:
After the base colour dries, apply Vallejo Ultramarine Blue as a highlight. Focus on the raised edges and ridges to create a gradient effect, ensuring some Kantor Blue remains visible for contrast.
Removing Masking Tape:
Carefully peel off the masking tape to reveal crisp, clean stripes. This step is highly satisfying and reveals the neat lines that define the pattern.
Weathering the Stripes:
Using a fine detail brush, apply Vallejo Neutral Grey and Pale Grey Blue to simulate chips and wear on the stripes. Focus on areas that would naturally see more wear and tear, breaking up the clean edges of the stripes to create a more realistic, battle-worn look. Use the colours that match the underlying marble effect for a cohesive appearance.
Finishing Touches:
Optionally, go back over the trim with Victorian Brass to clean up any overspray from painting the stripes. This will ensure a neat and polished look.
Additional Tips:
The choice of stripe colour can vary; red or hazard striping are also effective options.
The weathering step is crucial for adding realism. Smaller, more concentrated damage marks enhance the scale effect, making the titan appear as a massive war machine.
Keep the weathering consistent with the overall wear on the rest of the titan for a unified appearance.
Video – How to Paint a War Griffons Warlord : Weathering and Decals
This step-by-step guide, designed to be beginner-friendly, will walk you through applying decals, adding a gloss finish for protection, and executing weathering techniques to give your titan a battle-worn appearance.
Materials Needed:
Vallejo Gloss Varnish
Water for softening decals
Micro Sol and Micro Set for decal application
Tamiya 3mm Masking Tape or equivalent
Games Workshop Kantor Blue
Vallejo Neutral Grey, Ultramarine Blue, and Pale Grey Blue for weathering
Games Workshop Matte Varnish
Fine detail brushes
Airbrush (optional for varnishing)
Forge World Decals for Legio Gryphonicus
Steps:
Preparing the Surface:
Apply Gloss Varnish: Begin by applying Vallejo Gloss Varnish to the areas where decals will be applied. This creates a smooth surface, reducing air pockets and imperfections. You can apply the varnish with a brush or an airbrush. If brushing, slightly dilute the varnish with water for easier application.
How to Apply the Forge World Decals:
Soften Decals in Water: Cut out your chosen decals and soak them in water until they easily slide off the backing paper. This typically takes a few minutes.
Apply Micro Sol: Place a small amount of Micro Sol on the model where the decal will be applied. This softener helps the decal conform to the model’s surface.
Position the Decal: Carefully slide the decal from the paper to the model. Use a soft brush to adjust its position accurately.
Remove Excess Water: Gently dab a soft, dry brush or a paper towel to remove any excess water and air bubbles beneath the decal.
Apply Micro Set: Once the decal is in place, apply Micro Set over it. This solution helps soften the decal further, allowing it to snuggle down into the model’s details. Let it dry thoroughly, ideally overnight. Don’t worry if the decal looks wrinkled at this stage; it will smooth out as it dries.
Sealing the Decal:
Apply Additional Gloss Varnish: After the decal has dried, apply another layer of gloss varnish over it using an airbrush for an even coat. This step helps to seal the decal and even out the surface. If necessary, apply 2-3 coats, allowing each to dry thoroughly.
Matte Varnish Finish: Once the gloss varnish is completely dry, apply a matte varnish over the entire model to give it a uniform, non-glossy finish. This also helps to further blend the edges of the decal into the model.
Weathering the Decal and Armour:
Weathering with Paint: Use Vallejo Neutral Grey and Pale Grey Blue to add weathering around the decals and on the armour. Use a fine detail brush to apply small chips and scratches, focusing on edges and areas that would naturally see more wear. This adds realism and depth to your titan.
Additional Weathering Techniques: For further realism, you can add streaks and rust effects using diluted paint or weathering powders. Apply these sparingly in areas where water and dirt would naturally accumulate and streak down the model’s surface.
Additional Tips:
Take your time with each step, especially when applying and positioning the decals.
Always allow each layer of varnish and paint to dry completely before proceeding to the next step.
Practice weathering techniques on a spare piece before applying them to your model to get a feel for the effect.
Video – How to Paint a War Griffons Warlord : Heat Bloom on Melta Cannon
Materials Needed:
Airbrush and Thinner: For applying smooth gradients of colour.
Brushes: A fine detail brush for precise application and a dry brush for highlighting.
Paints:
Vallejo Metal Colour Magnesium (for the metallic base).
Vallejo Metal Colour Chrome (for highlighting metallic areas).
Scale 75 Victorian Brass (for trim detailing).
Games Workshop Contrast Paints: Iyanden Yellow, Magos Purple, Talassar Blue (for the heat effect).
Games Workshop Contrast Aggaros Dunes (for additional trim detailing).
Melta Cannon Step-by-Step Guide:
Base Coating the Weapon:
Begin by airbrushing the Melta weapon’s recesses with Averland Sunset, ensuring the weapon’s holes face directly towards the airbrush to prevent uneven shading. Don’t worry about overspray on the weapon casing; this will be covered later.
Adding Initial Heat Glow:
Switch to Troll Slayer Orange and apply over the Averland Sunset, creating a gradient effect from the weapon’s recesses outward. Ensure even coverage without tilting the airbrush to maintain consistency across the recesses.
Masking for Overspray:
To prevent overspray on adjacent yellow armour panels, use masking tape or modelling putty. This step is crucial for maintaining clean lines and avoiding accidental paint transfer.
Metallic Base Coat:
Paint the metallic parts of the weapon with Vallejo Metal Colour Magnesium, carefully avoiding the recesses to maintain the glow effect. This creates a solid base for subsequent detailing.
Trim Detailing:
Apply Scale 75 Victorian Brass to the weapon’s trim, followed by a coat of Games Workshop Contrast Aggaros Dunes to add depth and dimension to the detailing.
Heat Bloom Effect:
Begin the heat bloom effect by airbrushing Iyanden Yellow halfway along the Melta Cannon barrel, avoiding the recesses. Layer Magos Purple over the Iyanden Yellow, leaving some yellow visible for a blended effect. Finish with Talassar Blue, applying it over the Magos Purple but not covering all the previous layers, creating a transition from yellow to deep blue.
Highlighting and Finishing Touches:
Dry brush Vallejo Metal Colour Chrome on the non-painted metallic areas to enhance the metallic sheen. Carefully highlight the lower edges of the weapon with Chrome using a normal paintbrush, accentuating the heat bloom’s impact.
Final Assembly:
Once all painting is complete, remove any masking materials and assemble any remaining parts of the Titan, paying attention to aligning the heat bloom effects correctly.
Video – How to Paint a War Griffons Warlord : Weathering and Metal
Paints
Games Workshop:
Agrax Earthshade
Wyldwood (Contrast)
Contrast Aggaros Dunes
Forge World:
Aged Rust (Weathering Powder)
Vallejo Metal Colour (Airbrush Ready):
Victorian Brass (Scale 75 for an alternative base colour)
Magnesium
Gold
Chrome
Winsor & Newton:
Water Mixable Oil Colour Burnt Umber
Step by Step – Weathering and Metal on the War Griffons Warlord
Preparing the Armour Trim
Base Coat: Begin with a base coat of Scale 75 Victorian Brass over the trim. This provides a solid foundation for subsequent layers.
Initial Shading: Apply Contrast Aggaros Dunes over the Victorian Brass to introduce depth and shading to the trim. This step should have been completed in earlier stages of the model’s painting process.
Enhancing the Trim
Adding Depth: Use Games Workshop’s Wyldwood contrast paint to darken recesses and joints in the trim. The high contrast between the dark recesses and the metallic brass creates visual interest and depth. Apply the paint selectively to areas that would naturally accumulate shadow.
Highlighting: Vallejo Metal Colour Gold is used to highlight the edges of the trim. Due to its fluidity, it provides a smooth application but be mindful of its runniness. Lightly touch the edges with a fine brush to catch the raised areas.
Painting the Skeleton
Base Layer: Vallejo Metal Colour Magnesium serves as the base layer for the Titan’s skeletal structure. Its liquidity ensures it flows well into recesses but exercise caution to prevent pooling.
Weathering: Apply Forge World’s Aged Rust weathering powder mixed with water to the skeletal structure for a grimy, rusted effect. Focus on areas that would naturally collect dirt and rust, maintaining a balance to avoid obscuring details.
Sealing the Weathering: Once dry, seal the weathering with a mix of Agrax Earthshade. This reactivates and fixes the weathering powder, giving a durable and realistic rust effect.
Detailing Pistons and Metal Accents
Chrome Pistons: Vallejo Metal Colour Chrome is applied to pistons for a bright, reflective finish. Multiple thin layers may be needed for uniform coverage.
Oily Effects: Windsor and Newton’s Water Mixable Oil Colour Burnt Umber is used to simulate oil and grime on pistons and mechanical parts. Dilute with water for a manageable consistency and apply at joints and moving parts for a realistic oily effect.
Finishing Touches
Reichland Fleshshade Glaze: Optional, but can be used to add warmth to metal parts, particularly useful on brass or gold trims to simulate reflected light or heat staining.
Highlighting and Cleaning Up: After applying weathering and shading, go back to highlight edges and clean up any overspill with your base metallic colours. This step sharpens details and enhances the overall contrast of the model.
Techniques and Tips
Trim Detailing: Use the fine detail brush with Vallejo Metal Colour Gold to highlight the edges of the trim, applying the paint carefully to avoid spillage onto other areas.
Skeleton Base Layer: Apply Vallejo Metal Colour Magnesium with a medium brush, ensuring even coverage and avoiding pooling in recesses.
Weathering Powder Application: Mix Aged Rust with water in the well palette and apply with a large brush, targeting recesses and areas where rust would naturally accumulate.
Chrome Pistons: Use Vallejo Metal Colour Chrome, applying multiple thin layers as needed for a smooth, reflective finish.
Oily Effects: Dilute Winsor & Newton Water Mixable Oil Colour Burnt Umber with water and apply at the tops of pistons and around mechanical parts to simulate oil and grime.
More Titan Tutorials!
If you don’t have an account, please sign up here! The website currently has over 350 video tutorials with steps and tips, plus a selection of PDFs. If you are not sure about joining, you can explore my free videos with a free membership, or take the plunge and become a full subscriber for full access.
If you’d prefer to support me on Patreon, please visit: https://www.patreon.com/RichardGray [...]
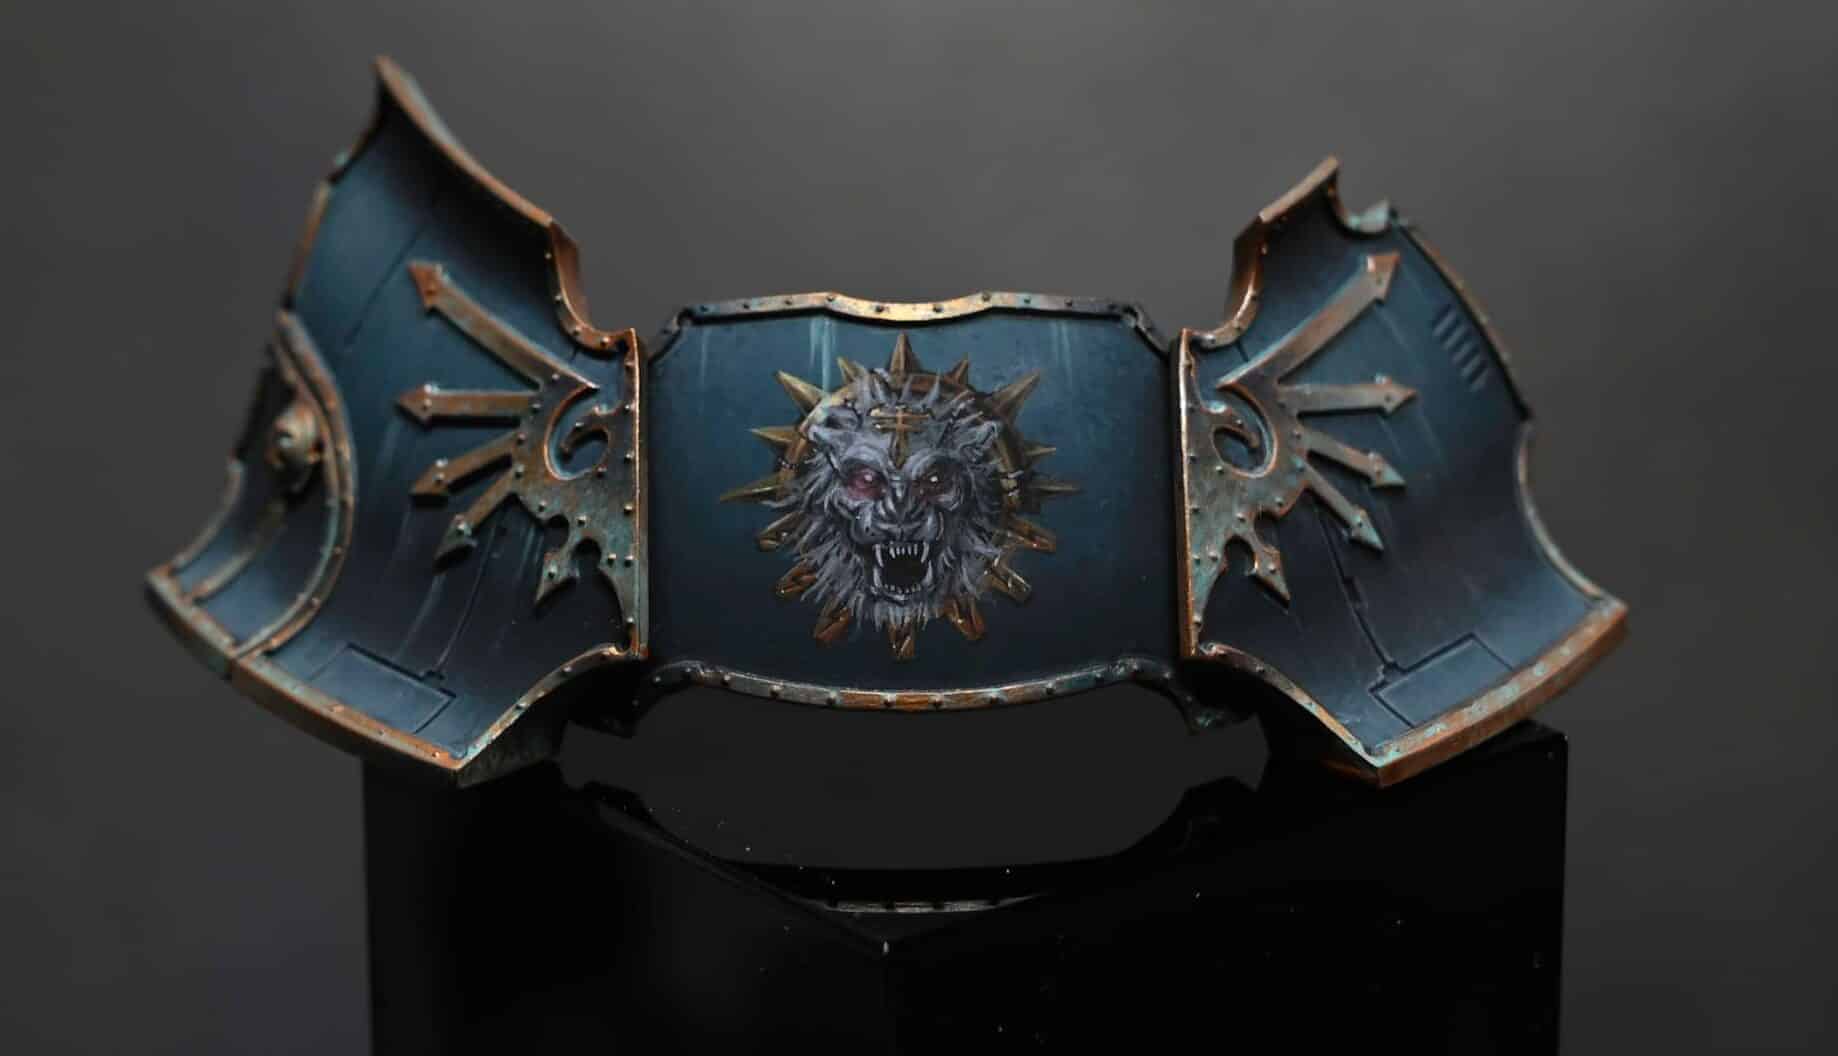
Welcome to this detailed guide on how to paint the Legio Sinister freehand symbol for a Warlord Titan. I will be using various Games Workshop and Vallejo paints to achieve a polished and striking look. This guide is suitable for intermediate to advanced hobbyists due to the precision required in freehand painting.
Video – Legio Sinister FreehandPaints UsedSteps and Tips for the Legio Sinister FreehandStep By Step Image GuideMore Freehand Tutorials on the WebsiteFree Video Tutorials
Video – Legio Sinister Freehand
All videos are recorded in HD 720p or higher – use full screen for the full effect and let the video load completely.
Paints Used
Vallejo Model Colour Black
Games Workshop Paints: Mechanicus Standard Grey, Slaanesh Grey, Grey Seer, Mephiston Red, Mournfang Brown, XV-88, Dorn Yellow, Screaming Skull
Steps and Tips for the Legio Sinister Freehand
Mapping Out the Position: Begin by using Vallejo Model Colour Black to roughly outline where the symbol will be placed. Start with a small circle at the centre, gradually expanding outwards. Include a line at the top of the curve to centralise the image.
Refining the Shape: Progressively enlarge the symbol, focusing on refining its shape. Paint an approximate circle with spikes extending outward. Ensure even distribution of the black paint to provide a solid base for subsequent layers.
Applying Initial Colours: Commence with Games Workshop’s Mournfang Brown, applying it as a foundation for the non-metallic parts of the symbol. Layer on XV-88 next, followed by Dorn Yellow, with a focus on the top-left for the lighting direction. Remember, moderate use of Dorn Yellow prevents oversaturation.
Adding Highlights: Employ Screaming Skull to introduce highlights. Be judicious in this step, concentrating on the top left to evoke a lustrous appearance. The XV-88 should remain the predominant colour for the metallic aspects.
Painting the Lion’s Face: Utilise a range of greys (Mechanicus Standard Grey, Slaanesh Grey, Grey Seer) to depict the lion’s face. Start with basic shapes, refining them progressively. Pay special attention to the eyes, nose, and mouth, building depth with shadows and highlights.
Detailing with Red: Apply a glaze of Mephiston Red for a subtle red glow around the eyes and other facial areas. This step enhances the lion’s fierce visage.
Adding Fur Details: Use greys to render fur details, commencing with darker shades and progressing to lighter highlights. Focus on creating a three-dimensional effect with varied brushstrokes.
Final Details: Paint the Titanicus symbol on the lion’s forehead using black as a base. Layer greys for the non-metallic metal effect, ensuring a thinner central line for a precise appearance. Use Dorn Yellow and Screaming Skull for the highest highlights, ensuring they are well-placed to create a realistic metallic sheen.
Refining and Adjusting: As you near completion, revisit areas that require refinement. This may include sharpening edges, deepening shadows, or enhancing highlights. The key is to achieve a balance between contrast and harmony in the symbol’s details.
Final Touches: Examine the overall piece for any last-minute adjustments. This might involve intensifying certain colours, smoothing transitions, or adding small details to bring the symbol to life. Ensure the lighting direction is consistent and the symbol stands out against the background.
Step By Step Image Guide
The team at Warhammer Community approached me for some tips on freehand and I created an article with step by step imagery for the tutorial above – to view it, visit:
Tips on Freehand – Step-By-Step Image Guide : Adeptus Titanicus
More Freehand Tutorials on the Website
Free Video Tutorials
Free videos for logged in members – just sign up as a ‘friend’ to view and click any of the thumbs.
If you don’t have an account, please sign up here! The website currently has over 350 video tutorials, plus step by step guides and PDFs. You can explore more free videos with a free “friend” membership, or take the plunge and become a full subscriber for full access.
If you’d prefer to support me on Patreon, please visit: https://www.patreon.com/RichardGray [...]
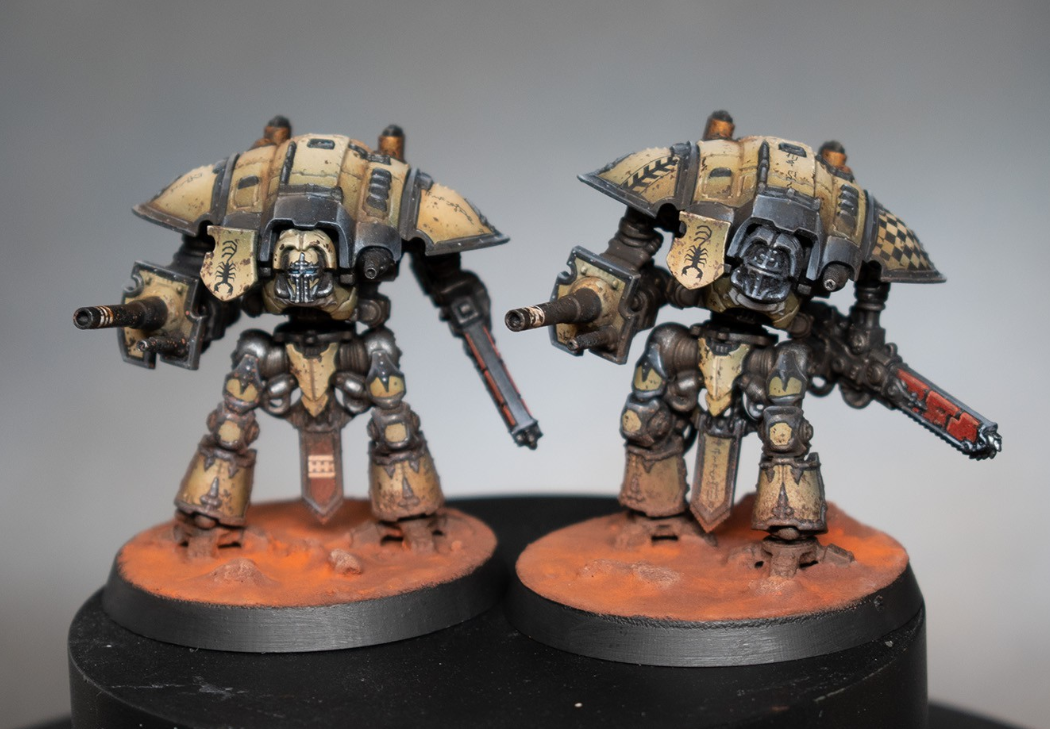
Discover the techniques to paint Adeptus Titanicus knights of House Malinax with this detailed guide. The PDF will walk you through the steps to achieve the stunning results as shown in the accompanying photographs.
What’s Covered in the How to Paint Adeptus Titanicus Knights Guide:
Materials and Paints: Learn about the specific paints and materials used in this project, including products from Games Workshop, Vallejo, Scale 75, and Forge World. This section provides a comprehensive list to ensure you have everything you need.
Model Preparation: Step-by-step instructions on cleaning the model, removing mould lines, drilling barrels, and priming. The guide emphasizes the importance of allowing the primer to set properly for at least 24 hours.
Airbrushing Techniques: Tips on using an airbrush to achieve smooth and even coverage with Balor Brown and Ushabti Bone, creating transitions and highlights that set the foundation for the detailed painting work.
Black Trim and Metal Areas: Detailed steps to paint the black trim and skeleton areas using Vallejo Black and Gunmetal Grey. The guide includes the use of Agrax Earthshade to add contrast and definition to the bone armour.
Highlighting and Blending: Techniques for highlighting the black trim with a series of greys and white, using a palette of carefully mixed colours. Learn how to blend transitions smoothly to achieve a professional finish.
Painting Details: Instructions for painting smaller details like windows, golden domes, and red areas using specific colours and highlights. This section includes methods to achieve a high-contrast, detailed appearance.
Applying Decals: A thorough walkthrough on applying decals, using Micro Set and Micro Sol for better adhesion and finish. The guide also covers the use of gloss varnish to prepare surfaces for decals and matte varnish to seal them.
Weathering Techniques: Tips on adding realistic weathering effects with Rhinox Hide, Forge World weathering powders, and Winsor & Newton Burnt Umber oil paint. Learn how to create a convincing look of wear and grime.
Basing the Model: Instructions for creating a detailed base using baking soda, matte varnish, paints, and weathering powders. The guide emphasizes creating a realistic ground effect and integrates the model with the base seamlessly.
Additional Features:
High-Quality Images: The guide includes high-resolution images to illustrate each step, providing clear visual references to help you achieve the best results.
Professional Tips: Benefit from Richard Gray’s expert tips and tricks to enhance your painting skills and improve your techniques.
Efficient Techniques: Learn faster methods to achieve professional results, such as using an airbrush for base layers and detailed highlighting techniques.
Transform your Adeptus Titanicus knights with this detailed guide. Each step is designed to help you achieve high-quality results, making your models stand out. Whether you’re preparing for tabletop gaming or creating display pieces, this guide will enhance your painting techniques and bring your knights to life.
Download the full guide on my website and start painting your Adeptus Titanicus knights today!
Please wait for the below to load, or alternatively download the guide here.
More Adeptus Titanicus Knights Tutorials!
If you don’t have an account, please sign up here! The website currently has over 350 video tutorials with steps and tips, plus a selection of PDFs. If you are not sure about joining, you can explore my free videos with a free membership, or take the plunge and become a full subscriber for full access.
If you’d prefer to support me on Patreon, please visit: https://www.patreon.com/RichardGray [...]

An Adeptus Titanicus Building Guide.
Please wait for the below Adeptus Titanicus Building PDF to load. Alternatively, you can download it here.
Building
More Adeptus Titanicus Tutorials to Explore! [...]
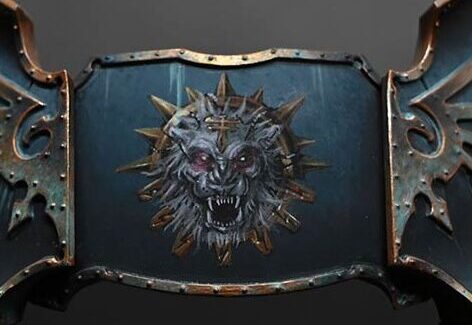
The team at Warhammer Community approached me for some tips on freehand, especially for Adeptus Titanicus. The whole interview unfortunately now has been removed from their website, but I’ve replicated it below.
Richard: As a massive fan of Adeptus Titanicus, I knew I had to have the Warlord-Sinister Psi-Titan as soon as I saw it. After I built the model, I realised I would have to figure out how to add the Legio Sinister icon to the shoulder pads. With no transfers available, this would make an ideal project to show my freehand process.
The first thing to do when you want to freehand is a little research and planning. It’s very tempting to jump straight in and wing it. What usually happens if you do is that you run out of space, get details wrong and wish you had a transfer! With this in mind I looked for artwork of the Legio Sinister icon and managed to find a nice, large image. This tends to be when the true horror hits that you have a very detailed, large image that you need to fit in to a teeny tiny area.
Before you get started on your freehand piece itself, paint the background armour panel completely. It’s much easier to paint it now rather than trying to get nice highlights and transitions around your carefully painted freehand.
The colours I’m going to use for the freehand are as follows: For the non-metallic metal (NMM) sections, I’ll use Rhinox Hide, Mournfang Brown, XV-88, Dorn Yellow, and Screaming Skull. For the lion itself I will be using Mechanicus Standard Grey, Slaanesh Grey, Grey Seer, Abaddon Black and Mephiston Red.
To get started, I first map out the shape and position of the freehand in black. Start in the centre and work your way outwards to allow you to make small corrections as you go. If you try painting the outline straight off there’s a good chance you’ll get the position wrong, and then it’s very hard to change! For the spikes just make small marks for each position to make sure they are spaced correctly. The reason for using black as a base colour is that it’s much easier to build up the highlight positions and use the black as shading, to keep your tonal contrast high. It also means you can use black to correct any mistakes you make.
Once the outline is complete it’s time to move on to the next layer – NMM trim. Start with Rhinox hide and make very large highlight blocks. Remember that the highlights will get smaller and smaller with each layer. I didn’t make a straight copy of the reference artwork, but rather made the lighting come from the top left. This made it look a bit more dramatic and allowed me to build stronger highlights and shadows.
Hard edges and curves reflect the light more strongly, so focus on those areas for the brighter highlights. After the Rhinox Hide, continue adding highlight layers with the remaining NMM colours in the order listed previously. Save the XV-88 for the finest edge highlights.
After all of the trim is painted it’s time to start on the lion. This is where things get tricky! You should have a black, round hole in the middle of the design. Roughly block in the shape of the lion face using Mechanicus Standard Grey. This allows you to get the positioning correct without going over any of the work you’ve just done.
Next begin refining the details of the face with Slaanesh Grey – be careful not to corrupt your Psi-Titan! Imagine the face as a 3D object and try to think where the highlights would naturally fall. I kept the light direction coming from the top left to match the trim.
Now it’s time to start painting the lion’s mane. This is the scary part as it goes over all of the NMM that you’ve carefully painted. I strongly recommend that you take your time and try to be selective with your positioning. Avoid covering the bright point in the top left, as this feature helps make the NMM look metallic and shiny.
I used watered down Mephiston Red to paint in the eye sockets, this makes the lion look extra angry. You should pick out the eyes in Grey Seer, plus any other details can be finished up in this step.
By this stage everything should be starting to come together. One thing I strongly recommend is to take photos of your piece, and look at those rather than the painted model. The freehand is so small that it’s easy to miss mistakes, but on an enlarged photograph, your mistakes will look massive (and terrible)! This might be a difficult step, but it will be much easier to correct your work.
Once the lion’s complete, it’s time for the symbol to be painted on the forehead. Again, start with black to block in the shape, then use the same colours for the NMM. As this area is so small, you don’t need to bother with Rhinox Hide.
Finally, take one last photograph to check everything on the model and then give the whole panel a coat of matte varnish. This will remove any variances in the finish and will make the freehand look like it’s a part of the armour panel.
I hope you liked my tips on freehand and if you’d like to learn more tips on freehand techniques from me, please scroll down to explore some videos, like the guide I created alongside this one, or explore the site!
I did a tutorial video alongside this guide, click below to view it!
Freehand Tutorials
If you don’t have an account, please sign up here! The website currently has over 350 video tutorials with steps and tips, plus a selection of PDFs. If you are not sure about joining, you can explore my free videos with a free membership, or take the plunge and become a full subscriber for full access.
If you’d prefer to support me on Patreon, please visit: https://www.patreon.com/RichardGray [...]

A bit more gaming stuff, in this case an Adeptus Titanicus Warhound for my Adeptus Titanicus army.
The Warhound Titan is a unique and fascinating beast within the Adeptus Titanicus arsenal. Unlike the towering Warlords and Reavers that rely on sheer firepower, the Warhound takes a different approach to battlefield dominance. This Scout Titan embodies speed, agility, and pack tactics, making it a valuable asset in the war-torn era of the Horus Heresy.
The Warhound’s sleek and dynamic design offers plenty of opportunities for creative painting. Consider incorporating your chosen Titan Legion’s heraldry, weathering effects to depict its battlescarred nature, and highlighting the intricate details of its weapons and armour – that’s something I love to do and you can explore in more detail in my tutorials below.
Explore some of the techniques I used when painting my Adeptus Titanicus Warhound in this downloadable PDF Guide.
PDF Guide – How to Paint a Direwolf Titan in Legion Mortis Colours
Learn how to paint a Direwolf Titan with me using Legio Mortis colours.
Read Now
Explore my Adeptus Titanicus Tutorials!
If you don’t have an account here on my website, please sign up here! I have over 350 video tutorials with steps and tips, plus a selection of PDFs. If you are not sure about joining, you can explore my free videos with a free membership, or take the plunge and become a full subscriber for full access.
If you’d prefer to support me on Patreon, please visit: https://www.patreon.com/RichardGray [...]
Titans
Dive into the latest step-by-step guide by Richard Gray, focusing on how to paint the Direwolf Titan in the iconic Legio Mortis colours. This comprehensive guide, complemented by an in-depth video tutorial, will help you achieve a professional, dramatic finish on your models.
What’s Inside the Guide?
Priming and Base Layer Techniques: Learn the essential steps to prepare your model for painting, ensuring a smooth, durable base.
Airbrushing Mastery: Discover tips for achieving seamless highlights and shading using an airbrush.
Detailed Painting Steps: Follow along with detailed instructions for painting red armour panels, black sections, and metallic trims.
Advanced Weathering Effects: Add depth and realism with expert weathering techniques, including oil washes and rust effects.
Decals and Final Touches: Perfect your model with tips on applying decals and adding the final touches that make your Direwolf Titan stand out.
Materials and Paints Used: The guide covers the essential paints and materials, including Games Workshop and Vallejo paints, Scale 75 metallics, and various weathering powders.
Exclusive Tips and Tricks: Richard shares his top tips for achieving smooth gradients, realistic weathering, and eye-catching highlights.
Ready to transform your Direwolf Titan? Make sure you are logged in and download the detailed PDF guide, below.
The PDF will load below (please allow a few mins for it to load!). You can also access it by clicking here.
Legio-Titan-June-2024
Looking for the video?
How to Paint a Direwolf Titan
Learn how to paint a Direwolf Titan with me using Legio Mortis colours. Follow along below with my full video tutorial, plus step-by-step instructions and specific techniques to help you achieve a striking finish with your model.
Watch Now
If you don’t have an account, please sign up here! The website currently has over 350 video tutorials with steps and tips, plus a selection of PDFs. If you are not sure about joining, you can explore my free videos with a free membership, or take the plunge and become a full subscriber for full access.
If you’d prefer to support me on Patreon, please visit: https://www.patreon.com/RichardGray [...]
Learn how to paint a Direwolf Titan with me using Legio Mortis colours. Follow along below with my full video tutorial, plus step-by-step instructions and specific techniques to help you achieve a striking finish with your model.Legio Mortis, also known as “The Death’s Heads,” is one of the most infamous Titan Legions in the Warhammer 40,000 universe. They are closely associated with the forces of Chaos, particularly after their fall to the dark powers during the Horus Heresy. This legion is renowned for its ruthless tactics and the fearsome appearance of its Titans, which often bear dark, menacing colours to instil fear in their enemies.
Video: How to Paint a Direwolf Titan Materials Needed:PDF GuideHow to Paint a Direwolf Titan Simple StepsPreparation and Base Coating:Highlighting:Shading:Secondary Colour Application:Detailing with Decals and Stripes:Metallics and Trims:Weathering and Final Touches:Engine Glow and Eye Effects:
Video: How to Paint a Direwolf Titan
Materials Needed:
Airbrush
Airbrush thinner (Tamia X20A or Vallejo Airbrush Thinner)
Paints:
Games Workshop: Mephiston Red, Wild Rider Red, Nuln Oil, Blood Angels Red (Contrast), Darkoath Flesh (Contrast), Wyldwood (Contrast), Daemonette Hide, Firedragon Bright
Vallejo: Neutral Grey, Metal Colour Burnt Iron, Metal Colour Chrome, Metal Colour Copper
Scale 75: Necro Gold
Winsor and Newton Oil Colour: Titanium White, Ivory Black, Burnt Sienna, Viridian Hue
Sansodor Thinner
Orange Weathering Powder (originally Forge World)
Brushes, including finer brushes for detailing
Masking tape for creating patterns
Matte and gloss varnish
Gloves (optional for handling)
PDF Guide
How to Paint a Direwolf Titan in Legion Mortis Colours
Learn how to paint a Direwolf Titan with me using Legio Mortis colours in this detailed PDF guide with photographs.
Read Now
How to Paint a Direwolf Titan
How to Paint a Direwolf Titan Simple Steps
Preparation and Base Coating:
Ensure your model is clean, primed, and ready for painting.
Using an airbrush, apply a smooth base coat of Mephiston Red across the entire model. No need for pre-shading or gradient effects at this stage.
Highlighting:
Mix Wild Rider Red with airbrush thinner to ensure a smooth flow.
Apply this mix to the curved surfaces of the armor to introduce vibrancy but maintain some of the darker Mephiston Red in the recesses and flat areas.
Adjust your airbrush to about 30 PSI, using a 0.4 needle for precision.
Shading:
Apply Nuln Oil with an airbrush into the deeper recesses and shaded areas to enhance the model’s depth and contrast.
Secondary Colour Application:
For areas meant to be black or darker, apply Daemonette Hide followed by strategic highlights using a lighter grey (like Vallejo Neutral Grey).
This creates a subtle contrast and adds visual interest.
Detailing with Decals and Stripes:
Apply decals as desired. For stripes, use masking tape to create even lines, then paint over with Neutral Grey and gradually lighten with mixes of P3 Morale White.
Metallics and Trims:
Paint metallic parts with Vallejo Metal Colours and highlight using Necro Gold for trims. Add depth with dark washes (like Wyldwood) and highlight with brighter gold paints.
Weathering and Final Touches:
Use oil paints mixed with thinner to create washes and filters over the model, focusing on metallic areas and edges.
Utilise weathering powders to simulate dirt and wear, especially on lower sections like legs and feet.
Seal your model with a matte or satin varnish to protect the paintwork and add a realistic finish.
Engine Glow and Eye Effects:
For glowing effects, such as the engine or eyes, use bright, vibrant colours like Firedragon Bright and layer up to a bright yellow or white at the highest points of light.
Additional How to Paint a Direwolf Titan Tips
Always keep your airbrush clean and free from clogs.
When using oils or weathering powders, allow ample drying time before handling.
Experiment with light and shadow by varying the intensity and location of highlights and shades.
Wear gloves to avoid smudging and leaving fingerprints on your painted model.
More Titan Tutorials!
If you don’t have an account here on my website, please sign up here! I have over 350 video tutorials in addition to the How to Paint a Direwolf Titan video above, with steps and tips, plus a selection of PDFs. If you are not sure about joining, you can explore my free videos with a free membership, or take the plunge and become a full subscriber for full access.
If you’d prefer to support me on Patreon, please visit: https://www.patreon.com/RichardGray [...]
In this guide, we’ll explore how to paint marble armour effect on the armour of an Adeptus Titanicus Legio Gryphonicus Titan.
This technique creates a visually striking pattern that mimics the speckled and veined appearance of marble, adding depth and interest to your miniature’s armour plating. The process is designed to be quick and straightforward and uses some unexpected materials!
Video – How to Paint a War Griffons Warlord with Marble Armour
All videos are recorded in HD 1080p or higher – use full screen for the full effect and let the video load completely.
Materials List:
Airbrush: Essential for applying smooth base coats and gradients.
Hand disinfectant wipes or baby wipes: Used to create the marble effect.
Paints:
Vallejo Pale Grey Blue: For the initial base coat.
Vallejo Neutral Grey: To begin creating the marble effect.
Vallejo Dark Grey (German Grey): For adding darker veins to the marble.
Vallejo Heavy Goldbrown: Base colour for yellow armour sections.
Games Workshop Phalanx Yellow: For highlighting yellow armour sections.
How to Paint Marble Armour Step-by-Step Guide:
Base Coat:
Begin by airbrushing Vallejo Pale Grey Blue onto the carapace of the Titan. This may require a few coats to achieve a smooth finish. The paint can be thinned a bit, but not excessively, to ensure good coverage without too much speckling.
Preparing the Wipe:
Take a hand disinfectant wipe or baby wipe and stretch it out so it’s slightly spread and thin. This texture will be transferred to the armour to create the marble effect.
Applying the Wipe:
Lay the stretched wipe over the armour part you’ve just painted. Ensure it’s not too densely applied; the idea is to leave some areas exposed more than others for a varied marble effect.
Adding Darker Tones:
Airbrush Vallejo Neutral Grey over the wipe-covered armour. Keep the airbrush pressure low to avoid displacing the wipe. Focus more on the edges and less on the centre to mimic natural shading.
Without completely covering the previous layer, lightly apply Vallejo Dark Grey in a few select areas to create the appearance of darker veins within the marble.
Revealing the Effect:
Carefully remove the wipe to reveal the marble armour effect beneath. You’ll find areas of light and dark grey creating a naturalistic marble pattern.
Cleaning Up:
After removing the wipe, there may be strands left on the model. Take your time to clean these off to avoid them becoming permanently attached in later steps.
Painting Yellow Armour Sections:
For Legio Gryphonicus’s iconic grey and yellow scheme, base coat the relevant armour sections with Vallejo Heavy Goldbrown. Highlight these areas with Games Workshop Phalanx Yellow to achieve a vibrant, contrasting look against the grey marble armour.
All of my War Griffons Warlord Tutorials
War Griffons Warlord
All of my series of quick videos on the different techniques used on this model. These include the marble effect, the stripes, applying decals and weathering.
Watch Now
If you don’t have an account, please sign up here! The website currently has over 350 video tutorials with steps and tips, plus a selection of PDFs. If you are not sure about joining, you can explore my free videos with a free membership, or take the plunge and become a full subscriber for full access.
If you’d prefer to support me on Patreon, please visit: https://www.patreon.com/RichardGray [...]
I’m excited to share my journey of painting the Warmaster Iconoclast Titan, a majestic model sent to me by Games Workshop. My focus is to highlight the crucial role of airbrushing in bringing this titan to life with the vibrant colours of the Legio Astorum, also known as the Warp Runners.
Watch the Video
The Importance of Airbrushing: Airbrushing is a game-changer in miniature painting, offering unparalleled smoothness and efficiency. It’s especially valuable when painting large models like the Iconoclast Titan, where traditional brushing might fall short. The fluidity of airbrush paints, like Vallejo’s Metal Color series, is perfect for both airbrushing and regular brushwork.
The following paints were used: Games Workshop: Night Lords Blue, Calgar Blue, Mephiston Red, Balor Brown, Hashut Copper, Yriel YellowVallejo: Dark Sea Grey, White, Metal Colour Burnt Iron, Metal Colour Gold, Metal Colour Chrome, Mecha Gloss VarnishScale 75: Necro GoldAmmo: Ultra-Matt Lucky VarnishWinsor and Newton: Sansodor mineral spirit, oil colour Black, oil colour Burnt Sienna Badger: Ultimate Primer Black
Initial Steps: Before diving into painting, it’s essential to prepare the model. I left off the armor plates of the titan to separately paint the skeleton with metallic colours and the armor panels with the distinctive Warp Runner scheme.
Airbrushing Techniques:
Base Coating: Starting with Vallejo’s Burnt Iron, I applied the base coat to the skeleton. Despite being formulated for airbrushing, its fluid nature worked well with a large, soft brush for a non-textured finish.
Detailing with Copper: For the hips, I used Games Workshop’s metallic colour, applying it straight from the pot. This step required multiple thin coats for a consistent finish.
Creating Verdigris Effects: I used oil paints to simulate the verdigris effect on the copper parts. Stippling the paint onto the model, I focused on crevices and rivets, where oxidation naturally occurs.
Oil Washes: An overall wash of oil paints, mixed with spirits, added depth to the metallic parts. This technique requires patience, as it’s essential to allow the wash to dry completely, typically 24 hours.
Highlighting with Chrome: Vallejo’s Chrome, another airbrush-focused paint, was used for highlights. Its liquid consistency demanded careful application to avoid flooding recessed areas.
Colouring the Armor Panels: The real challenge and joy of airbrushing came alive while painting the armor panels. I started with Night Lords Blue, followed by Macragge Blue, both thinned with Vallejo airbrush thinner. The process involved covering entire panels with the darker blue, then focusing on upper sections and curves for the lighter blue, creating a pleasing visual gradient.
Stripe and Flame Patterns: For detailed patterns like stripes and flames, I relied on masking techniques and freehand painting. Tamiya tape helped in creating crisp, clean lines for stripes, while freehanding flames allowed for a more organic and fitting look on the armor panels.
Applying Decals and Weathering: After the base colours and patterns, I applied decals for additional detailing. This step required a steady hand and patience, especially when dealing with folded decals. Weathering was achieved with oil paints, enhancing the realism of the titan.
Final Touches: Matte varnishing the model brought all elements together, providing a uniform look and protecting the paint job. For the trim, I chose to paint it with Scale 75’s Necro Gold, followed by weathering and sealing with a matte varnish.
Airbrushing the Iconoclast Titan was a rewarding experience, showcasing the versatility and efficiency of this painting method. The ability to layer colours, create gradients, and apply washes and weathering with ease made airbrushing an indispensable tool in my painting arsenal. Whether you’re a seasoned veteran or a beginner, incorporating airbrushing into your miniature painting can elevate your models to new heights.
More Free Video Tutorials
More free videos for logged in members – just sign up as a ‘friend’ to view and click any of the thumbs.To explore all of these, visit this page!
If you don’t have an account, please sign up here! The website currently has over 350 video tutorials, plus step by step guides and PDFs. You can explore more free videos with a free “freebies” membership, or take the plunge and become a full subscriber for full access.
If you’d prefer to support me on Patreon, please visit: https://www.patreon.com/RichardGray [...]
This free video shows how to paint a Warmaster Iconoclast Titan for the Legio Astorum (Warp Runners) from the Adeptus Titanicus game.
The following paints were used: Games Workshop: Night Lords Blue, Calgar Blue, Mephiston Red, Balor Brown, Hashut Copper, Yriel YellowVallejo: Dark Sea Grey, White, Metal Colour Burnt Iron, Metal Colour Gold, Metal Colour Chrome, Mecha Gloss VarnishScale 75: Necro GoldAmmo: Ultra-Matt Lucky VarnishWinsor and Newton: Sansodor mineral spirit, oil colour Black, oil colour Burnt Sienna Badger: Ultimate Primer Black
Steps to Follow on How to Paint a Warmaster Iconoclast Titan
Preparing the Model
Build the Model: Assemble your Warmaster Iconoclast Titan, leaving off the armour plates for separate painting. This allows easier access to the skeleton for painting in metallic colours.
Painting the Skeleton
Base Coat in Metallic: Start with Vallejo Metal Colour Burnt Iron applied with a large soft brush or a dry brush for a smooth metallic base on the skeleton.
Detailing with Copper: Use Games Workshop Hashut Copper for the hips and other details, applying multiple coats as necessary for even coverage. Thin with water if the paint is too thick.
Verdigris Effect: Mix oil paints on cardboard to create a light green verdigris colour. Stipple this onto the copper parts with an old brush, focusing on crevices and rivets. Thin with white spirit for a more natural effect.
Weathering the Metal
Oil Wash: Create an oil wash with black and burnt sienna oil paints thinned with mineral spirits. Apply over the entire metal skeleton, excluding verdigris areas, to add depth and an oily finish.
Highlighting: Highlight edges and raised details with Vallejo Metal Colour Chrome for a sharp contrast.
Painting the Armour Panels
Base Coat in Blue: Airbrush the panels with Games Workshop Night Lords Blue, followed by highlights with Calgar Blue focusing on upper sections and curves.
Detailing Stripes and Flames: For striped areas, use Tamiya masking tape and Vallejo Dark Sea Grey. For flames, start with Balor Brown as a base, building up to lighter tones and finally white for the hottest parts.
Applying Decals: Use Forge World or Games Workshop decals for additional detailing, sealing them with Microset or Microsol. I’ve put a link to another free video on how to do that, below!
Final Weathering: Apply oil washes for weathering effects, focusing on creating streaks and grime accumulation that fits with the battlefield-worn look.
How to Apply Forge World Decals and Weather Them
A beginners guide on how to apply Forge World decals and weather them so they look a natural part of the painting on your model. Painting and applying decals to your models adds significant details and realism, making it stand out during tabletop gaming. It’s also a lot easier than freehand! I still use decals a lot in my models, despite also enjoying freehand work.
Watch and Read Now
Finishing Touches
Painting Trim and Details: Use Scale 75 Necro Gold for gold trim, applying carefully around edges and details. For a brighter highlight, apply Vallejo Metal Colour Gold.
Matte Varnish: Seal the entire model with an ultra-matte varnish to tie together the different finishes and protect the paintwork.
Optional Ribbon Streamers: Create custom ribbon streamers from plastic card, painted and detailed to match the Titan’s colour scheme, adding dynamism and a personalised touch to your model.
Additional Tips
Always thin your paints to ensure smooth application and avoid obscuring fine details.
When working with oil paints for weathering, allow ample drying time between layers to prevent smudging.
Use a hairdryer to speed up drying times cautiously, avoiding too much heat on plastic parts.
Experiment with lighting and colour modulation on the armour panels for a dynamic appearance.
If you don’t have an account, please sign up here! The website currently has over 350 video tutorials with steps and tips, plus a selection of PDFs. If you are not sure about joining, you can explore my free videos with a free membership, or take the plunge and become a full subscriber for full access.
If you’d prefer to support me on Patreon, please visit: https://www.patreon.com/RichardGray [...]
This video tutorial shows How to Paint a Legio Fureans Reaver (Tiger Eyes) from the Adeptus Titanicus game. I’ve done it as a gaming piece, but I’ll be doing a Warlord for a potential Golden Demon entry.
All videos are recorded in HD 1080p or higher – use full screen for the full effect and let the video load completely. You can also click the little “cog” and change the speed of the video, if I am going too fast (or slow!).
Materials and Paints:
Paints from Games Workshop (Yriel Yellow, Flash Gitz Yellow, Mournfang Brown, XV-88, Magos Purple Contrast, Technical Stormshield, Corvus Black, Sotek Green, Rhinox Hide), Vallejo (Dark Sea Grey, German Grey, Black, Metal Colour Burnt Iron, Metal Colour Chrome, Ice Yellow, White), and Scale 75 (Necro Gold).
Oil Colours: Winsor and Newton’s Sansodor mineral spirit, Black, and Burnt Sienna.
Primer: Badger Ultimate Primer in Black.
Airbrush: Infinity CR Plus, set at about 30-35 PSI.
Additional Tools: Mixing cups, a selection of brushes and a magnifying headset.
Step-by-Step Guide:
Priming: Start with a base coat of black primer.
Airbrushing the Carapace:
Dilute Yriel Yellow with Vallejo airbrush thinner. Apply several coats for a solid finish.
Optionally, start with a base of XV-88 for a quicker yellow hue.
Add depth with Mournfang Brown in recessed areas.
Reapply Yriel Yellow for a smooth blend.
Highlight the edges with Flash Gitz Yellow.
Mix a bit of Mournfang Brown with Yriel Yellow for a gentler transition.
Trim Painting:
Apply Necro Gold, thinned down to about a 50/50 mix with water.
Add depth with a wash of Aggrex Earthshade.
Detailing with Black Flames:
Hand-paint black flames using Model Color Black. Start with simple S-curves, then refine.
Applying Decals:
Apply a gloss varnish, then the decals with microset.
Seal with matt varnish after drying.
Oil Weathering:
Apply Burnt Sienna oil paint for realistic streaking effects.
Scratches and Dents:
Use Rhinox Hide for scratches, followed by Ice Yellow on the lower edges for a 3D effect.
Highlighting and Shading Trim:
Reapply Necro Gold, then blend with Vallejo Chrome for brighter highlights.
Use Wild Wood contrast paint for shading.
Main Structure Painting:
Stipple on Burnt Iron metallic colour.
Add depth with a Magos Purple wash, followed by a diluted Mournfang Brown wash.
Painting the Head and Lenses:
Start with a black base, then layer up highlights with German Grey and Dark Sea Grey.
Glaze over with Corvus Black to tone down and blend highlights.
Paint the lenses with Sotek Green and white highlights.
Finishing Touches:
Apply final weathering, varnishing, and any additional detailing as needed.
Richard’s Pro Tips:
Patience is key when airbrushing. Build up the layers gently for a more professional finish.
Experiment with brush strokes and blending to achieve your desired effect.
Each miniature is a canvas for creativity – don’t be afraid to add your own flair!
Always thin your paints for smoother application and a more refined look.
Take breaks! Detail work can be taxing on the eyes and hands.
More Free Video Tutorials
Free videos for logged in members – just sign up as a ‘friend’ to view and click any of the thumbs.To explore all of these, visit this page!
If you don’t have an account, please sign up here! The website currently has over 350 video tutorials, plus step by step guides and PDFs. You can explore more free videos with a free “freebies” membership, or take the plunge and become a full subscriber for full access.
If you’d prefer to support me on Patreon, please visit: https://www.patreon.com/RichardGray [...]
This video shows you how to create a Titan Martian Base, a Martian red landscape for your Adeptus Titanicus Titan, or for any large model you like, really!
Video Tutorial: Titan Martian Base
All videos are recorded in HD 1080p or higher – use full screen for the full effect and let the video load completely.
Paints and Materials Used
Fimo and Milliput: For making rock shapes.
Baking Soda: For creating the fine-grained surface texture.
Paints:
Scale 75’s Antares Red
Scale 75’s Red Leather (or similar Games Workshop red and brown colours)
Games Workshop’s Deathworld Forest
Games Workshop’s Ushabti Bone
Weathering Powders:
Forge World’s Aged Rust
Forge World’s Orange Rust
Matte Varnish: For sealing the base.
Tools:
Brushes for painting and dry brushing.
Sculpting tools or a flat surface for applying the baking soda mixture.
Airbrush for applying weathering powder (optional).
Other Materials:
Water: For mixing with weathering powders.
Super Glue: For securing rocks to the base.
Q-tip: Slightly damp, for cleaning up excess weathering powder.
Step by Step Guide
Preparing the Base: Start by placing your model on the base and arrange rocks around it. Use rocks made from a mixture of Fimo and Milliput, baked and then broken into shapes.
Creating the Surface: Mix baking soda (for fine texture), Scale 75’s Antares Red and Red Leather paint (or similar GW paints), and matte varnish to form a sticky, wet-looking substance. This creates the dusty, Martian surface.
Applying the Surface Mixture: Carefully apply the mixture to the base, ensuring it’s pushed up against the rocks. Use a large, slightly damp brush to stipple and smooth out the mixture, avoiding unnatural marks.
Using Cracking Paint: Apply a thin layer of Martian Ironearth cracking paint for subtle cracking effects. Ensure it’s not too thick to maintain the scale’s integrity.
Painting the Rocks: Once dry, paint the rocks with Vallejo Model Color Black or a similar black paint. Then dry brush with GW Deathworld Forest for initial colour, followed by Ushabti Bone for highlights.
Applying Weathering Powder: Mix Forge World Aged Rust and Orange Rust powder with a lot of water, and spray over the base using an airbrush. Focus on the lower parts of the model for a realistic effect. For manual application, use a large, soft brush.
Cleaning Up: After the weathering powder dries, use a slightly damp Q-tip to remove excess powder from the rocks and lower sections of the Titan, enhancing the details and textures.
Final Touches: Seal the base with a matte varnish to preserve the dusty look and reduce the brightness of the orange rust effect.
More Adeptus Titanicus
If you don’t have an account, please sign up here! The website currently has over 350 video tutorials with steps and tips, plus a selection of PDFs. If you are not sure about joining, you can explore my free videos with a free membership, or take the plunge and become a full subscriber for full access.
If you’d prefer to support me on Patreon, please visit: https://www.patreon.com/RichardGray [...]
This video shows how to paint the metal and weathering effects on the legs of the Adeptus Titanicus Titan. Enhancing the metalwork, particularly the armour trim and skeletal structure, to achieves a detailed and realistic finish that looks fantastic on the battlefield. We’ll be using a mix of Games Workshop, Vallejo, and Forge World paints to bring our Titan to life.
Video: How to Paint Weathering and Metal on an Adeptus Titanicus Titan
All videos are recorded in HD 1080p or higher – use full screen for the full effect and let the video load completely.
Paints
Games Workshop:
Agrax Earthshade
Wyldwood (Contrast)
Contrast Aggaros Dunes
Forge World:
Aged Rust (Weathering Powder)
Vallejo Metal Colour (Airbrush Ready):
Victorian Brass (Scale 75 for an alternative base colour)
Magnesium
Gold
Chrome
Winsor & Newton:
Water Mixable Oil Colour Burnt Umber
Brushes
A fine detail brush for applying precise highlights and for controlled application of contrast paints and weathering powders.
A medium brush for applying base coats and larger areas of colour.
A soft, large brush for applying washes and for dusting off excess weathering powders.
I use the Artis Opus range of brushes, but any good quality brush is recommended.
Step by Step – Weathering and Metal on the Adeptus Titanicus Titan
Preparing the Armour Trim
Base Coat: Begin with a base coat of Scale 75 Victorian Brass over the trim. This provides a solid foundation for subsequent layers.
Initial Shading: Apply Contrast Aggaros Dunes over the Victorian Brass to introduce depth and shading to the trim. This step should have been completed in earlier stages of the model’s painting process.
Enhancing the Trim
Adding Depth: Use Games Workshop’s Wyldwood contrast paint to darken recesses and joints in the trim. The high contrast between the dark recesses and the metallic brass creates visual interest and depth. Apply the paint selectively to areas that would naturally accumulate shadow.
Highlighting: Vallejo Metal Colour Gold is used to highlight the edges of the trim. Due to its fluidity, it provides a smooth application but be mindful of its runniness. Lightly touch the edges with a fine brush to catch the raised areas.
Painting the Skeleton
Base Layer: Vallejo Metal Colour Magnesium serves as the base layer for the Titan’s skeletal structure. Its liquidity ensures it flows well into recesses but exercise caution to prevent pooling.
Weathering: Apply Forge World’s Aged Rust weathering powder mixed with water to the skeletal structure for a grimy, rusted effect. Focus on areas that would naturally collect dirt and rust, maintaining a balance to avoid obscuring details.
Sealing the Weathering: Once dry, seal the weathering with a mix of Agrax Earthshade. This reactivates and fixes the weathering powder, giving a durable and realistic rust effect.
Detailing Pistons and Metal Accents
Chrome Pistons: Vallejo Metal Colour Chrome is applied to pistons for a bright, reflective finish. Multiple thin layers may be needed for uniform coverage.
Oily Effects: Windsor and Newton’s Water Mixable Oil Colour Burnt Umber is used to simulate oil and grime on pistons and mechanical parts. Dilute with water for a manageable consistency and apply at joints and moving parts for a realistic oily effect.
Finishing Touches
Reichland Fleshshade Glaze: Optional, but can be used to add warmth to metal parts, particularly useful on brass or gold trims to simulate reflected light or heat staining.
Highlighting and Cleaning Up: After applying weathering and shading, go back to highlight edges and clean up any overspill with your base metallic colours. This step sharpens details and enhances the overall contrast of the model.
Techniques and Tips
Trim Detailing: Use the fine detail brush with Vallejo Metal Colour Gold to highlight the edges of the trim, applying the paint carefully to avoid spillage onto other areas.
Skeleton Base Layer: Apply Vallejo Metal Colour Magnesium with a medium brush, ensuring even coverage and avoiding pooling in recesses.
Weathering Powder Application: Mix Aged Rust with water in the well palette and apply with a large brush, targeting recesses and areas where rust would naturally accumulate.
Chrome Pistons: Use Vallejo Metal Colour Chrome, applying multiple thin layers as needed for a smooth, reflective finish.
Oily Effects: Dilute Winsor & Newton Water Mixable Oil Colour Burnt Umber with water and apply at the tops of pistons and around mechanical parts to simulate oil and grime.
Watch all the tutorials for my War Griffons Warlord!
War Griffons Warlord
A series of quick videos on the different techniques used on this model. These include the marble effect, the stripes, applying decals and weathering and metal.
Watch Now
Free Video Tutorials
Free videos for logged in members – just sign up as a ‘friend’ to view and click any of the thumbs.To explore all of these, visit this page!
If you don’t have an account, please sign up here! The website currently has over 350 video tutorials, plus step by step guides and PDFs. You can explore more free videos with a free “friend” membership, or take the plunge and become a full subscriber for full access.
If you’d prefer to support me on Patreon, please visit: https://www.patreon.com/RichardGray [...]
In this tutorial, we’ll cover how to achieve a dynamic heat bloom effect on a Melta Cannon for an Adeptus Titanicus Reaver Titan, specifically for the Legio Gryphonicus, also known as the War Griffins. This effect will simulate the intense heat generated by the weapon, using a gradient of colours to represent the heat bloom.
Video: How to Paint a Melta Cannon Heat Bloom
All videos are recorded in HD 1080p or higher – use full screen for the full effect and let the video load completely.
Materials Needed:
Airbrush and Thinner: For applying smooth gradients of colour.
Brushes: A fine detail brush for precise application and a dry brush for highlighting.
Paints:
Vallejo Metal Colour Magnesium (for the metallic base).
Vallejo Metal Colour Chrome (for highlighting metallic areas).
Scale 75 Victorian Brass (for trim detailing).
Games Workshop Contrast Paints: Iyanden Yellow, Magos Purple, Talassar Blue (for the heat effect).
Games Workshop Contrast Aggaros Dunes (for additional trim detailing).
Melta Cannon Step-by-Step Guide:
Base Coating the Weapon:
Begin by airbrushing the Melta weapon’s recesses with Averland Sunset, ensuring the weapon’s holes face directly towards the airbrush to prevent uneven shading. Don’t worry about overspray on the weapon casing; this will be covered later.
Adding Initial Heat Glow:
Switch to Troll Slayer Orange and apply over the Averland Sunset, creating a gradient effect from the weapon’s recesses outward. Ensure even coverage without tilting the airbrush to maintain consistency across the recesses.
Masking for Overspray:
To prevent overspray on adjacent yellow armour panels, use masking tape or modelling putty. This step is crucial for maintaining clean lines and avoiding accidental paint transfer.
Metallic Base Coat:
Paint the metallic parts of the weapon with Vallejo Metal Colour Magnesium, carefully avoiding the recesses to maintain the glow effect. This creates a solid base for subsequent detailing.
Trim Detailing:
Apply Scale 75 Victorian Brass to the weapon’s trim, followed by a coat of Games Workshop Contrast Aggaros Dunes to add depth and dimension to the detailing.
Heat Bloom Effect:
Begin the heat bloom effect by airbrushing Iyanden Yellow halfway along the Melta Cannon barrel, avoiding the recesses. Layer Magos Purple over the Iyanden Yellow, leaving some yellow visible for a blended effect. Finish with Talassar Blue, applying it over the Magos Purple but not covering all the previous layers, creating a transition from yellow to deep blue.
Highlighting and Finishing Touches:
Dry brush Vallejo Metal Colour Chrome on the non-painted metallic areas to enhance the metallic sheen. Carefully highlight the lower edges of the weapon with Chrome using a normal paintbrush, accentuating the heat bloom’s impact.
Final Assembly:
Once all painting is complete, remove any masking materials and assemble any remaining parts of the Titan, paying attention to aligning the heat bloom effects correctly.
This technique for painting a heat bloom on a Melta Cannon adds a visually striking element to your Adeptus Titanicus Titans, emphasizing the weapon’s power and the heat it generates. The use of contrast paints over a metallic base allows for a vibrant, dynamic effect that stands out on the battlefield
Watch all the tutorials for my War Griffons Warlord!
War Griffons Warlord
A series of quick videos on the different techniques used on this model. These include the marble effect, the stripes, applying decals and weathering.
Watch Now
If you don’t have an account, please sign up here! The website currently has over 350 video tutorials with steps and tips, plus a selection of PDFs. If you are not sure about joining, you can explore my free videos with a free membership, or take the plunge and become a full subscriber for full access.
If you’d prefer to support me on Patreon, please visit: https://www.patreon.com/RichardGray [...]
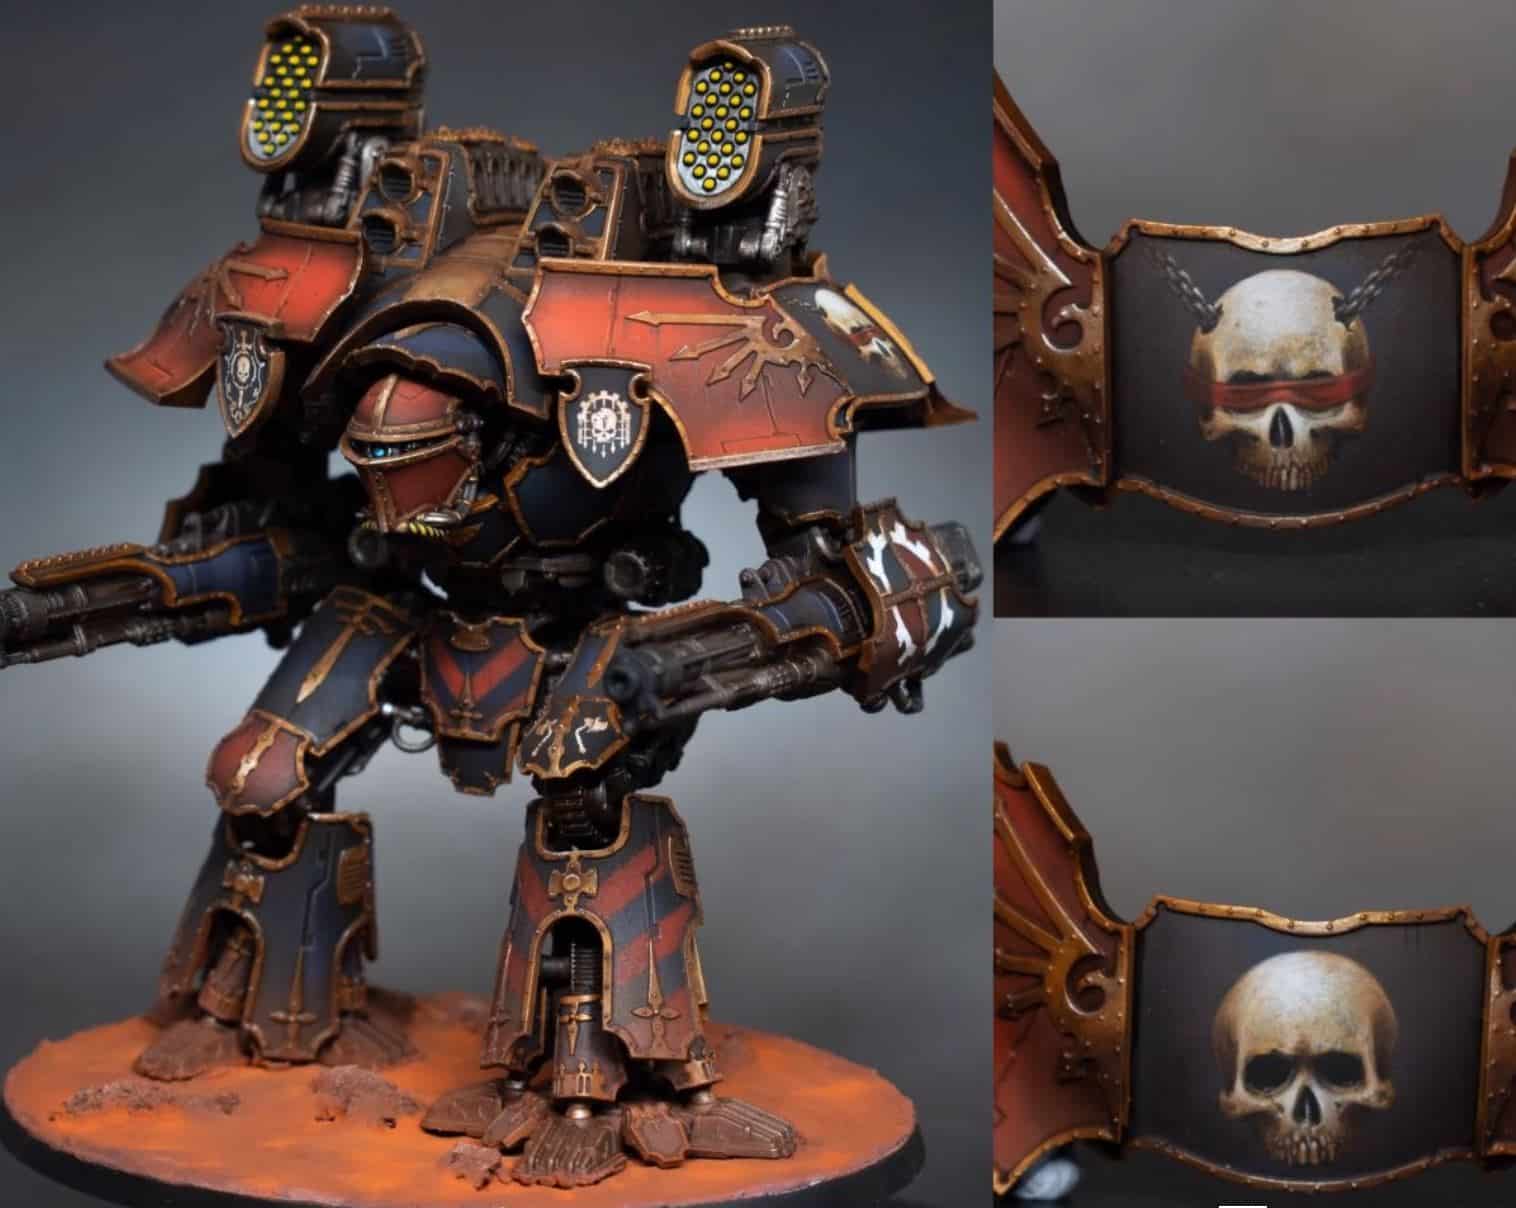
A tutorial on how to freehand paint a skull onto a clear surface, in this case the shoulder of a Titan.
All videos are recorded in HD 1080p or higher – use full screen for the full effect and let the video load completely.
Materials Required
Your miniature for the freehand to be painted on! Mine is a Warlord Titan,
Brushes (various sizes, including a size 0 for fine details)
Vallejo Model Color Black
Games Workshop paints: Rhinox Hide, Ceramite White, Balor Brown, Ushabti Bone, Mephiston Red, Wild Rider Red
Vallejo paints: Pale Grey Blue, Dark Sea Grey
Step 1: Preparing the Area
Begin with a flat area on your model. Make sure it is clean and free of any mould lines, dirt or grease.
Apply a black primer base, then airbrush layers of grey, a glaze of purple, and grey again to create a dynamic background.
Step 2: Sketching the Freehand Design
Start by blocking in the rough shape of a skull in the centre. Use Vallejo Model Color Black for strong coverage and a matte finish. Ensure the initial shape is smaller so you can adjust the size as needed without difficulty.
Step 3: Adding Details as You Freehand Paint a Skull
Add the eye sockets and nose hole, focusing on making the skull slightly asymmetrical to add interest.
Use Rhinox Hide to block in shadows and define the shape of the skull, especially around the cheekbones and beneath the eye sockets.
Step 4: Refining the Skull
Gradually build up the skull’s details using a mix of Balor Brown and Ushabti Bone. This process involves adding highlights and shadows to create depth and texture.
Pay attention to the top-down lighting, ensuring the highlights and shadows correspond to this light source.
Step 5: Painting the Blindfold and Chains
Paint the blindfold using Mephiston Red, ensuring it wraps realistically around the contours of the skull.
For the chains, start with Vallejo Model Color Black to outline the shapes, then use Pale Grey Blue and Dark Sea Grey to add highlights and shadows, creating a metallic look.
Step 6: Finishing Touches
Use Ceramite White for the highest highlights, focusing on areas like the forehead and teeth to enhance the skull’s dimensional effect.
Apply small amounts of shading and texture throughout the skull to refine its appearance.
Step 7: Adding Atmospheric Effects
To give the skull a darker, moodier feel, consider using a water mixable oil color like burnt umber around the edges and in the recesses. This step is optional but can add a significant impact to the final look.
Remember, the key to successful miniature painting, especially when dealing with freehand designs, lies in patience, practice, and attention to detail.
More Freehand Tutorials
If you don’t have an account, please sign up here! The website currently has over 350 video tutorials with steps and tips, plus a selection of PDFs. If you are not sure about joining, you can explore my free videos with a free membership, or take the plunge and become a full subscriber for full access.
If you’d prefer to support me on Patreon, please visit: https://www.patreon.com/RichardGray [...]
A series of quick videos on how to paint a War Griffons Warlord Adeptus Titanicus Titan to game standard. This included marble effects, stripes, weathering and decals and more!
Scroll down to explore the videos in order, or use the quick links below to jumps to a technique or part of the model in particular:
Video – How to Paint a War Griffons Warlord : Marble EffectMaterials List:Marble Armour Step-by-Step Guide:Video – How to Paint a War Griffons Warlord : The StripesMaterials Needed:The Stripes Step by Step:Additional Tips:Video – How to Paint a War Griffons Warlord : Weathering and DecalsMaterials Needed:Steps:Preparing the Surface:How to Apply the Forge World Decals:Sealing the Decal:Weathering the Decal and Armour:Additional Tips:Video – How to Paint a War Griffons Warlord : Heat Bloom on Melta CannonMaterials Needed:Melta Cannon Step-by-Step Guide:Video – How to Paint a War Griffons Warlord : Weathering and Metal PaintsStep by Step – Weathering and Metal on the War Griffons WarlordPreparing the Armour TrimEnhancing the TrimPainting the SkeletonDetailing Pistons and Metal AccentsFinishing TouchesTechniques and TipsMore Titan Tutorials!
Video – How to Paint a War Griffons Warlord : Marble Effect
All videos are recorded in HD 1080p or higher – use full screen for the full effect and let the video load completely.
Materials List:
Airbrush: Essential for applying smooth base coats and gradients.
Hand disinfectant wipes or baby wipes: Used to create the marble effect.
Paints:
Vallejo Pale Grey Blue: For the initial base coat.
Vallejo Neutral Grey: To begin creating the marble effect.
Vallejo Dark Grey (German Grey): For adding darker veins to the marble.
Vallejo Heavy Goldbrown: Base colour for yellow armour sections.
Games Workshop Phalanx Yellow: For highlighting yellow armour sections.
Marble Armour Step-by-Step Guide:
Base Coat:
Begin by airbrushing Vallejo Pale Grey Blue onto the carapace of the Titan. This may require a few coats to achieve a smooth finish. The paint can be thinned a bit, but not excessively, to ensure good coverage without too much speckling.
Preparing the Wipe:
Take a hand disinfectant wipe or baby wipe and stretch it out so it’s slightly spread and thin. This texture will be transferred to the armour to create the marble effect.
Applying the Wipe:
Lay the stretched wipe over the armour part you’ve just painted. Ensure it’s not too densely applied; the idea is to leave some areas exposed more than others for a varied marble effect.
Adding Darker Tones:
Airbrush Vallejo Neutral Grey over the wipe-covered armour. Keep the airbrush pressure low to avoid displacing the wipe. Focus more on the edges and less on the centre to mimic natural shading.
Without completely covering the previous layer, lightly apply Vallejo Dark Grey in a few select areas to create the appearance of darker veins within the marble.
Revealing the Effect:
Carefully remove the wipe to reveal the marble effect beneath. You’ll find areas of light and dark grey creating a naturalistic marble pattern.
Cleaning Up:
After removing the wipe, there may be strands left on the model. Take your time to clean these off to avoid them becoming permanently attached in later steps.
Painting Yellow Armour Sections:
For Legio Gryphonicus’s iconic grey and yellow scheme, base coat the relevant armour sections with Vallejo Heavy Goldbrown. Highlight these areas with Games Workshop Phalanx Yellow to achieve a vibrant, contrasting look against the grey marble.
Video – How to Paint a War Griffons Warlord : The Stripes
This guide will take you through the process of painting and weathering the stripes to achieve a battle-worn effect, ensuring your titan stands out on the tabletop.
Materials Needed:
Scale 75 Victorian Brass (For the trim)
Tamiya Masking Tape (3mm strips recommended for precision)
Games Workshop Kantor Blue (For the base stripe colour)
Vallejo Ultramarine Blue (For highlighting the stripes)
Vallejo Neutral Grey (For weathering)
Vallejo Pale Grey Blue (For weathering)
Airbrush and airbrush thinner (Vallejo Airbrush Thinner recommended)
Fine detail brush for weathering
The Stripes Step by Step:
Prepare the Trim:
Begin by painting the trim of the carapace using Scale 75 Victorian Brass. This step should ideally be done after painting the stripes to avoid overspray, but if you prefer to paint it first, be prepared to touch it up later.
Masking for Stripes:
Apply Tamiya masking tape to the carapace to create the desired pattern for your stripes. Ensure the tape is firmly pressed down, especially near the edges and armour trim, to prevent paint from bleeding underneath.
Base Colour for Stripes:
Airbrush Games Workshop Kantor Blue over the masked areas. The paint should be thinned appropriately and applied in even coats to achieve an opaque finish. Be mindful of overspray on the trim.
Highlighting Stripes:
After the base colour dries, apply Vallejo Ultramarine Blue as a highlight. Focus on the raised edges and ridges to create a gradient effect, ensuring some Kantor Blue remains visible for contrast.
Removing Masking Tape:
Carefully peel off the masking tape to reveal crisp, clean stripes. This step is highly satisfying and reveals the neat lines that define the pattern.
Weathering the Stripes:
Using a fine detail brush, apply Vallejo Neutral Grey and Pale Grey Blue to simulate chips and wear on the stripes. Focus on areas that would naturally see more wear and tear, breaking up the clean edges of the stripes to create a more realistic, battle-worn look. Use the colours that match the underlying marble effect for a cohesive appearance.
Finishing Touches:
Optionally, go back over the trim with Victorian Brass to clean up any overspray from painting the stripes. This will ensure a neat and polished look.
Additional Tips:
The choice of stripe colour can vary; red or hazard striping are also effective options.
The weathering step is crucial for adding realism. Smaller, more concentrated damage marks enhance the scale effect, making the titan appear as a massive war machine.
Keep the weathering consistent with the overall wear on the rest of the titan for a unified appearance.
Video – How to Paint a War Griffons Warlord : Weathering and Decals
This step-by-step guide, designed to be beginner-friendly, will walk you through applying decals, adding a gloss finish for protection, and executing weathering techniques to give your titan a battle-worn appearance.
Materials Needed:
Vallejo Gloss Varnish
Water for softening decals
Micro Sol and Micro Set for decal application
Tamiya 3mm Masking Tape or equivalent
Games Workshop Kantor Blue
Vallejo Neutral Grey, Ultramarine Blue, and Pale Grey Blue for weathering
Games Workshop Matte Varnish
Fine detail brushes
Airbrush (optional for varnishing)
Forge World Decals for Legio Gryphonicus
Steps:
Preparing the Surface:
Apply Gloss Varnish: Begin by applying Vallejo Gloss Varnish to the areas where decals will be applied. This creates a smooth surface, reducing air pockets and imperfections. You can apply the varnish with a brush or an airbrush. If brushing, slightly dilute the varnish with water for easier application.
How to Apply the Forge World Decals:
Soften Decals in Water: Cut out your chosen decals and soak them in water until they easily slide off the backing paper. This typically takes a few minutes.
Apply Micro Sol: Place a small amount of Micro Sol on the model where the decal will be applied. This softener helps the decal conform to the model’s surface.
Position the Decal: Carefully slide the decal from the paper to the model. Use a soft brush to adjust its position accurately.
Remove Excess Water: Gently dab a soft, dry brush or a paper towel to remove any excess water and air bubbles beneath the decal.
Apply Micro Set: Once the decal is in place, apply Micro Set over it. This solution helps soften the decal further, allowing it to snuggle down into the model’s details. Let it dry thoroughly, ideally overnight. Don’t worry if the decal looks wrinkled at this stage; it will smooth out as it dries.
Sealing the Decal:
Apply Additional Gloss Varnish: After the decal has dried, apply another layer of gloss varnish over it using an airbrush for an even coat. This step helps to seal the decal and even out the surface. If necessary, apply 2-3 coats, allowing each to dry thoroughly.
Matte Varnish Finish: Once the gloss varnish is completely dry, apply a matte varnish over the entire model to give it a uniform, non-glossy finish. This also helps to further blend the edges of the decal into the model.
Weathering the Decal and Armour:
Weathering with Paint: Use Vallejo Neutral Grey and Pale Grey Blue to add weathering around the decals and on the armour. Use a fine detail brush to apply small chips and scratches, focusing on edges and areas that would naturally see more wear. This adds realism and depth to your titan.
Additional Weathering Techniques: For further realism, you can add streaks and rust effects using diluted paint or weathering powders. Apply these sparingly in areas where water and dirt would naturally accumulate and streak down the model’s surface.
Additional Tips:
Take your time with each step, especially when applying and positioning the decals.
Always allow each layer of varnish and paint to dry completely before proceeding to the next step.
Practice weathering techniques on a spare piece before applying them to your model to get a feel for the effect.
Video – How to Paint a War Griffons Warlord : Heat Bloom on Melta Cannon
Materials Needed:
Airbrush and Thinner: For applying smooth gradients of colour.
Brushes: A fine detail brush for precise application and a dry brush for highlighting.
Paints:
Vallejo Metal Colour Magnesium (for the metallic base).
Vallejo Metal Colour Chrome (for highlighting metallic areas).
Scale 75 Victorian Brass (for trim detailing).
Games Workshop Contrast Paints: Iyanden Yellow, Magos Purple, Talassar Blue (for the heat effect).
Games Workshop Contrast Aggaros Dunes (for additional trim detailing).
Melta Cannon Step-by-Step Guide:
Base Coating the Weapon:
Begin by airbrushing the Melta weapon’s recesses with Averland Sunset, ensuring the weapon’s holes face directly towards the airbrush to prevent uneven shading. Don’t worry about overspray on the weapon casing; this will be covered later.
Adding Initial Heat Glow:
Switch to Troll Slayer Orange and apply over the Averland Sunset, creating a gradient effect from the weapon’s recesses outward. Ensure even coverage without tilting the airbrush to maintain consistency across the recesses.
Masking for Overspray:
To prevent overspray on adjacent yellow armour panels, use masking tape or modelling putty. This step is crucial for maintaining clean lines and avoiding accidental paint transfer.
Metallic Base Coat:
Paint the metallic parts of the weapon with Vallejo Metal Colour Magnesium, carefully avoiding the recesses to maintain the glow effect. This creates a solid base for subsequent detailing.
Trim Detailing:
Apply Scale 75 Victorian Brass to the weapon’s trim, followed by a coat of Games Workshop Contrast Aggaros Dunes to add depth and dimension to the detailing.
Heat Bloom Effect:
Begin the heat bloom effect by airbrushing Iyanden Yellow halfway along the Melta Cannon barrel, avoiding the recesses. Layer Magos Purple over the Iyanden Yellow, leaving some yellow visible for a blended effect. Finish with Talassar Blue, applying it over the Magos Purple but not covering all the previous layers, creating a transition from yellow to deep blue.
Highlighting and Finishing Touches:
Dry brush Vallejo Metal Colour Chrome on the non-painted metallic areas to enhance the metallic sheen. Carefully highlight the lower edges of the weapon with Chrome using a normal paintbrush, accentuating the heat bloom’s impact.
Final Assembly:
Once all painting is complete, remove any masking materials and assemble any remaining parts of the Titan, paying attention to aligning the heat bloom effects correctly.
Video – How to Paint a War Griffons Warlord : Weathering and Metal
Paints
Games Workshop:
Agrax Earthshade
Wyldwood (Contrast)
Contrast Aggaros Dunes
Forge World:
Aged Rust (Weathering Powder)
Vallejo Metal Colour (Airbrush Ready):
Victorian Brass (Scale 75 for an alternative base colour)
Magnesium
Gold
Chrome
Winsor & Newton:
Water Mixable Oil Colour Burnt Umber
Step by Step – Weathering and Metal on the War Griffons Warlord
Preparing the Armour Trim
Base Coat: Begin with a base coat of Scale 75 Victorian Brass over the trim. This provides a solid foundation for subsequent layers.
Initial Shading: Apply Contrast Aggaros Dunes over the Victorian Brass to introduce depth and shading to the trim. This step should have been completed in earlier stages of the model’s painting process.
Enhancing the Trim
Adding Depth: Use Games Workshop’s Wyldwood contrast paint to darken recesses and joints in the trim. The high contrast between the dark recesses and the metallic brass creates visual interest and depth. Apply the paint selectively to areas that would naturally accumulate shadow.
Highlighting: Vallejo Metal Colour Gold is used to highlight the edges of the trim. Due to its fluidity, it provides a smooth application but be mindful of its runniness. Lightly touch the edges with a fine brush to catch the raised areas.
Painting the Skeleton
Base Layer: Vallejo Metal Colour Magnesium serves as the base layer for the Titan’s skeletal structure. Its liquidity ensures it flows well into recesses but exercise caution to prevent pooling.
Weathering: Apply Forge World’s Aged Rust weathering powder mixed with water to the skeletal structure for a grimy, rusted effect. Focus on areas that would naturally collect dirt and rust, maintaining a balance to avoid obscuring details.
Sealing the Weathering: Once dry, seal the weathering with a mix of Agrax Earthshade. This reactivates and fixes the weathering powder, giving a durable and realistic rust effect.
Detailing Pistons and Metal Accents
Chrome Pistons: Vallejo Metal Colour Chrome is applied to pistons for a bright, reflective finish. Multiple thin layers may be needed for uniform coverage.
Oily Effects: Windsor and Newton’s Water Mixable Oil Colour Burnt Umber is used to simulate oil and grime on pistons and mechanical parts. Dilute with water for a manageable consistency and apply at joints and moving parts for a realistic oily effect.
Finishing Touches
Reichland Fleshshade Glaze: Optional, but can be used to add warmth to metal parts, particularly useful on brass or gold trims to simulate reflected light or heat staining.
Highlighting and Cleaning Up: After applying weathering and shading, go back to highlight edges and clean up any overspill with your base metallic colours. This step sharpens details and enhances the overall contrast of the model.
Techniques and Tips
Trim Detailing: Use the fine detail brush with Vallejo Metal Colour Gold to highlight the edges of the trim, applying the paint carefully to avoid spillage onto other areas.
Skeleton Base Layer: Apply Vallejo Metal Colour Magnesium with a medium brush, ensuring even coverage and avoiding pooling in recesses.
Weathering Powder Application: Mix Aged Rust with water in the well palette and apply with a large brush, targeting recesses and areas where rust would naturally accumulate.
Chrome Pistons: Use Vallejo Metal Colour Chrome, applying multiple thin layers as needed for a smooth, reflective finish.
Oily Effects: Dilute Winsor & Newton Water Mixable Oil Colour Burnt Umber with water and apply at the tops of pistons and around mechanical parts to simulate oil and grime.
More Titan Tutorials!
If you don’t have an account, please sign up here! The website currently has over 350 video tutorials with steps and tips, plus a selection of PDFs. If you are not sure about joining, you can explore my free videos with a free membership, or take the plunge and become a full subscriber for full access.
If you’d prefer to support me on Patreon, please visit: https://www.patreon.com/RichardGray [...]
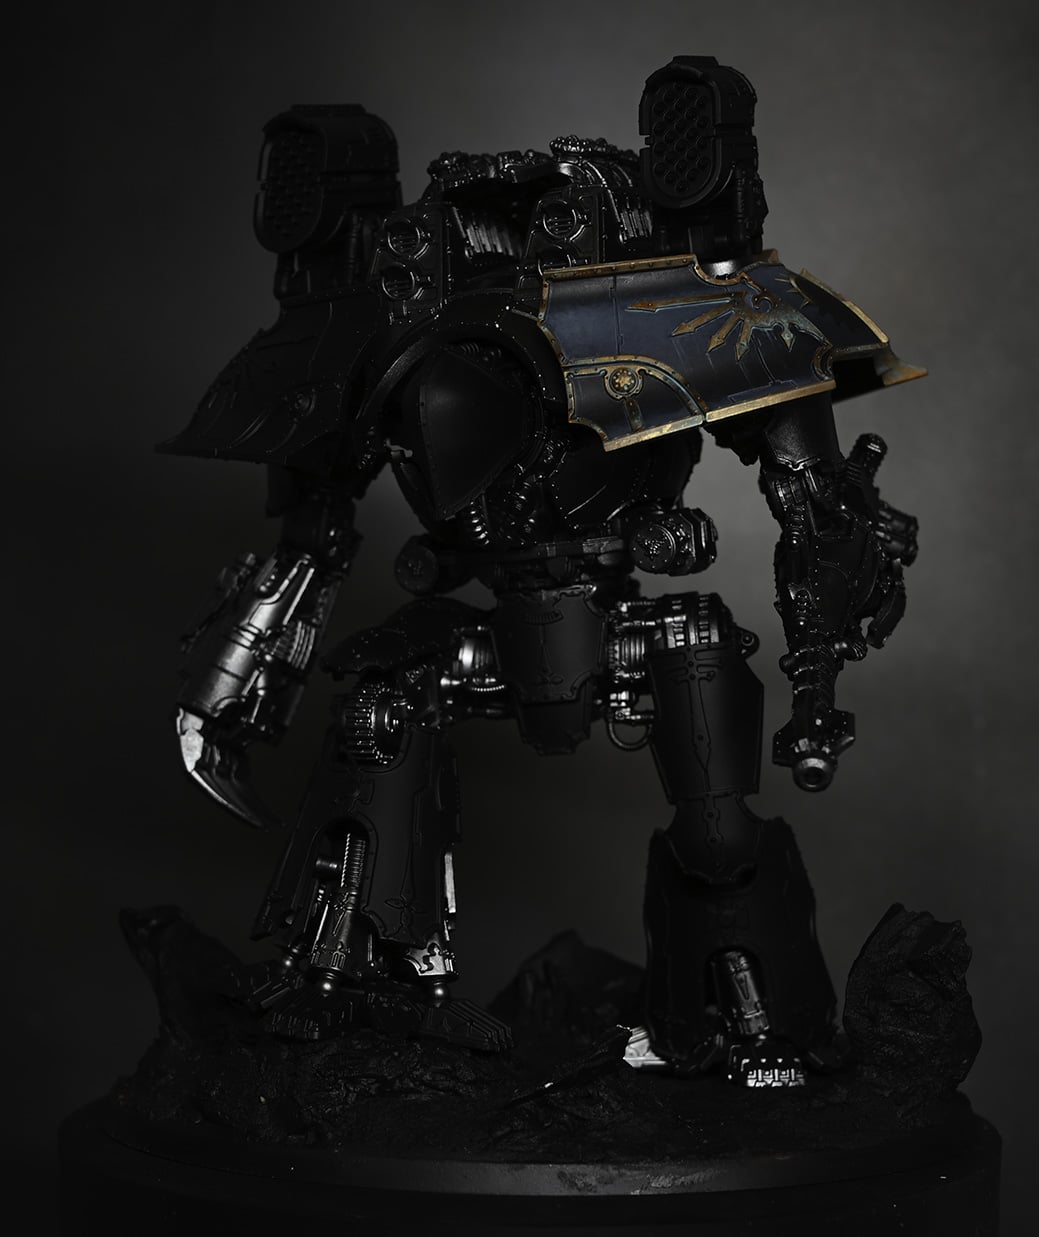
Learn how to paint Titan Armour and Trim for the Forge World Adeptus Titanicus Warlord-Sinister Psi-Titan with my video and guide below. Or, keep scrolling for my freehand guide.
Video: How to Paint Titan Armour and Trim
All videos are recorded in HD 1080p or higher – use full screen for the full effect and let the video load completely.
Materials Needed:
Paintbrushes (stippling brush, size 4 brush)Wet palettePaints: Mechanicus Standard Grey, Corvus Black, Grey Seer, Incubi Darkness, Abaddon Black, Darkoath Flesh (Contrast), Victorian Brass (Scale 75)Water potKitchen roll or tissue paper
Step 1: Priming:Ensure that your miniature model is primed with black primer. This provides a solid base for the subsequent layers of paint.
Step 2: Base Layer:Start by applying Corvus Black to the entire armour panel using a large stippling brush.Use Mechanicus Standard Grey to apply a watered-down layer over the black, focusing on creating a gradient effect from top to bottom.Gradually introduce Grey Seer at the very top of the panel to simulate light hitting the surface. Be mindful of the direction of light for a realistic effect
Step 3: Glazing:Prepare glazes by mixing Incubi Darkness and Abaddon Black with water on your wet palette.Apply Incubi Darkness glaze over the highlighted areas, gradually blending it into the shadows. Use long, vertical strokes for a smooth finish.Follow up with Abaddon Black glaze, concentrating on the shadowed areas to enhance depth and contrast. Be cautious not to apply too much and avoid getting it on the highlighted areas.
Step 4: Metal TrimPaint the metal trim using Victorian Brass, covering all the trim carefully.Optionally, add verdigris effects by applying Nihilakh Oxide or a similar greenish paint to create a weathered appearance.
Step 5: Shading and Detailing:Use Darkoath Flesh (Contrast) or a brown ink to shade certain areas of the metal trim, focusing on adding depth and texture.Highlight the edges of the trim with Victorian Brass to define the shape and add contrast.
Step 6: Final Touches:Blend the shaded areas on the metal trim to create a cohesive look, ensuring a natural transition between colours.Add streaking effects with Nihilakh Oxide or a watered-down paint to simulate weathering and oxidation.
Step 7: Finishing:Allow the paint to dry completely before handling the Psi-Titan.Admire your finished masterpiece and prepare for the next steps in the series, which will cover freehand symbol painting.
For the Freehand, visit this link for the step-by-step tutorial with guide:
Legio Sinister Freehand on the Adeptus Titanicus Warlord Titan
A guide on how to paint the freehand Legio Sinister on the Adeptus Titanicus Warlord Titan.
Watch Now
Step By Step Image Guide
The team at Warhammer Community approached me for some tips on freehand and I created an article with step by step imagery for the tutorial above – to view it, visit:
Tips on Freehand – Step-By-Step Image Guide : Adeptus Titanicus
If you don’t have an account here on my website, please sign up here! I have over 350 video tutorials with steps and tips, plus a selection of PDFs. If you are not sure about joining, you can explore my free videos with a free membership, or take the plunge and become a full subscriber for full access.
If you’d prefer to support me on Patreon, please visit: https://www.patreon.com/RichardGray [...]
Tor
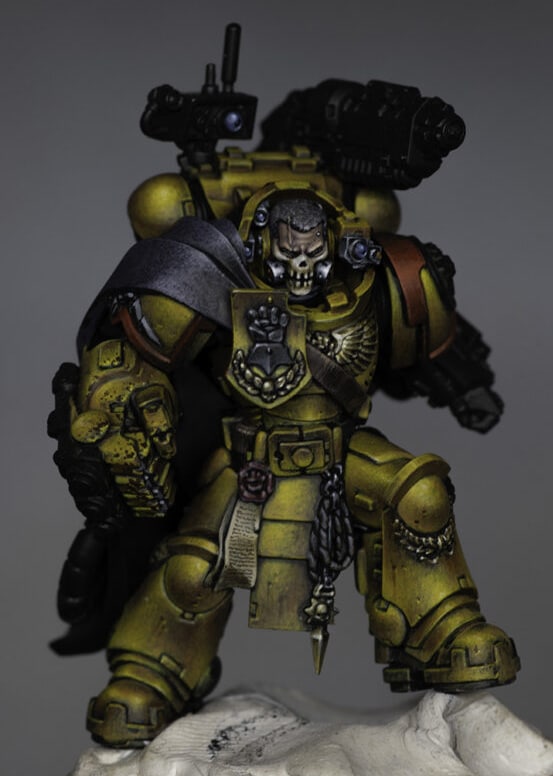
Tor Garadon is the Imperial Fists’ longest serving Battle Company Captain, an unstoppable warrior in whom the lessons of the Primarch have been distilled to their most punishing form.
For all of the tutorials on how I painted Tor Garadon, please follow the link below! Or, scroll down for just the leather and details video and step-by-step guide with paints:
Tor Garadon
A series of videos on how I painted him, including details on the head and leather parts.
Watch Now
Video: How to Paint Tor Garadon Leather, Chest Eagle NMM, Red Shoulder Trim
This video covers the techniques for painting the leather details, non-metallic metal (NMM) effects on the chest eagle and other adornments, the red shoulder trim, and the blue lenses.
Materials Needed
Base Paints: Rhinox Hide, Macragge Blue, Mephiston Red.
Highlight Paints: Cadian Fleshtone, Mournfang Brown, Hoeth Blue, Baharroth Blue, Wild Rider Red, Evil Sunz Scarlet.
Specialty Paints: Vallejo Japanese Uniform, English Uniform, Ice Yellow, Ivory; P3 Morrow White.
Brushes: A selection ranging from fine detail to medium size.
Other: Wet palette, water for thinning paints, paper towel for blotting.
Tor Garadon Leather Details
Base Layer: Apply Rhinox Hide to the leather areas for a rich, dark brown base.
Weathering and Texture: Using Cadian Fleshtone, paint crack marks and weathering on the leather to simulate wear. Focus these marks more towards the edges and keep them parallel but slightly varied in angle for a natural look.
Shading and Depth: Mix a bit of Rhinox Hide into your Cadian Fleshtone on a wet palette and go back over your weathering marks to soften and blend them into the leather, enhancing depth.
Non-Metallic Metal (NMM) Chest Eagle
Base Colours: Start with Vallejo English Uniform as your base for the gold NMM areas.
Building Up Highlights: Layer Vallejo Japanese Uniform over the base, focusing on the upper left areas of the eagle to mimic a light source coming from that direction.
Bright Highlights: Add Vallejo Ice Yellow for the brighter highlights, concentrating on areas that would catch the most light.
Final Highlights: Use Vallejo Ivory and P3 Morrow White for the brightest points of light on the eagle, such as the tips of feathers or central areas closest to the perceived light source.
Red Shoulder Trim
Base Coat: Paint the shoulder trim with Mephiston Red, ensuring a solid, even base layer.
First Highlights: Apply Evil Sunz Scarlet to the upper portions of the trim where light would naturally hit.
Final Highlights: Use Wild Rider Red for the brightest highlights, applying it sparingly to maintain the red’s saturation and avoid it looking pink or orange.
Blue Lenses
Base Layer: Start with Macragge Blue, painting a dome shape on the lens, leaving some of the base black visible for depth.
Adding Depth: Layer Hoeth Blue over the Macragge Blue, focusing on the top left side to start building the reflective look.
Brighter Highlights: Apply Baharroth Blue in a smaller area than the Hoeth Blue, enhancing the sense of reflection.
Final Touches: Add a tiny dot of P3 Morrow White in the top left corner of the lens to simulate a pinpoint reflection of light.
If you don’t have an account here on my website, please sign up here! I have over 350 video tutorials with steps and tips, plus a selection of PDFs. If you are not sure about joining, you can explore my free videos with a free membership.
If you’d prefer to support me on Patreon, please visit: https://www.patreon.com/RichardGray [...]

Learn how to paint Tor Garadon with my step-by-step video tutorials and guides, below! But who is he? Well, Tor Garadon is the Imperial Fists’ longest serving Battle Company Captain, an unstoppable warrior in whom the lessons of the Primarch have been distilled to their most punishing form. Tested on a thousand worlds, he is a master of the battlefield, and an unyielding bulwark against those who would oppose Mankind!
Here are a series of videos on how I painted him, including his yellow armour, details on the head and leather parts.
Video: How to Paint Tor Garadon Part One – Yellow Armour
In this session, we’ll focus on achieving a unique, gritty yellow armour that stands out with its weathered and textured appearance.
All videos are recorded in HD 1080p or higher – use full screen for the full effect and let the video load completely.
Materials Needed
Paints: Balor Brown, Yriel Yellow, Flash Gitz Yellow, Mournfang Brown, Screaming Skull (all from Games Workshop).
Tools: Fine detail brush, standard painting brush, wet palette.
Preparation
Model Preparation: Begin by assembling Tor Garadon. For a more menacing look, consider a head swap; the Reavers box set offers a skull face mask option that fits well.
Priming: Prime the model black. This will provide a strong contrast for the yellow armour and allow for effective shadowing.
Base Coating
Apply Balor Brown: Start with Balor Brown as your base. This colour, despite not being a vibrant yellow, offers excellent opacity for layering. Use the brush to apply the paint in a squiggling motion, creating a base texture for the armour. Focus on the areas that will be highlighted, leaving some black primer visible for natural shadows.
Layering and Texturing
Building Up Layers: Gradually build up layers with Yriel Yellow, focusing on highlight areas. This process requires patience as Yriel Yellow has lower opacity. Ensure each layer is thin to avoid paint build-up.
Enhance with Flash Gitz Yellow: For the brightest areas of the armour, such as edges and raised sections, apply Flash Gitz Yellow sparingly. This further defines the armour’s details and gives a sense of depth.
Weathering and Detailing
Mournfang Brown for Shadows: To add warmth and prevent the yellow from looking washed out, glaze Mournfang Brown into the deepest recesses and shadowed areas. This technique prevents the yellow from turning greenish in the shadows.
Chipping Effect: With a very fine brush, apply Rhinox Hide to simulate chips and scratches on the armour. Vary the size and placement of these chips to create a realistic weathered look. Focus on areas that would logically receive the most wear, such as edges and protrusions.
Highlighting Chips: Use a mix of Yriel Yellow and Screaming Skull to highlight the edges of the chips. This step adds dimension and makes the damage appear more realistic.
Screaming Skull for Extreme Highlights: Apply Screaming Skull very sparingly to the most prominent edges and details to make them pop. Be cautious with this step to maintain the armour’s yellow integrity.
Final Touches
Review and Adjust: Examine the model for any areas that may need more definition or correction. Use Balor Brown to smooth out any overly bright sections or to reintegrate areas that have become too saturated with highlights.
Texture and Depth: Continue to use the squiggling technique with Balor Brown and Yriel Yellow to add texture and depth, focusing on ensuring the armour looks worn but still distinctively yellow.
Video: How to Paint Tor Garadon Head
This guide will concentrate on painting the head, specifically the face and face mask.
Materials Needed
Paints: Games Workshop’s Balor Brown, Morghast Bone, Screaming Skull, Khorne Red, Cadian Fleshtone, Kislev Flesh; Vallejo’s Pale Grey Blue, Neutral Grey; P3’s Morrow White.
Brushes: A range of sizes from fine detail to standard.
Accessories: Model holder (optional for ease), wet palette.
Preparation
Head Preparation: Assemble Tor Garadon’s head. This guide utilises an alternative head from the easy-to-build Reaver squad for a more menacing look.
Priming: The head should already be primed and the areas representing his “earmuffs” painted yellow as per the armour painting guide in Part 1.
Painting the Base Layers
Face: Start with Khorne Red as the base layer for the skin. Ensure the paint is slightly watered down for even coverage. A couple of coats may be needed. Focus on neatness to avoid extra clean-up later.
Hair: Apply Eshin Grey for the hair, thinned to a consistency thinner than single cream. This will be built up in layers to create texture. Focus on making the hairline more opaque and allow the colour to fade out towards the back of the head.
Detailing and Texturing
Skin Highlights: Use Cadian Fleshtone to highlight the prominent features of the face. Since Space Marine faces often have a scowling expression, pick out these details to emphasise his grimace. Apply Kislev Flesh for higher highlights, adding a bit of white to the Kislev Flesh for the most prominent areas.
Hair Detailing: To add depth and volume to the hair, use Skavenblight Dinge, followed by Dawnstone, focusing on the texture and ensuring the front of the hair is the brightest.
Painting the Eyes
Base: Use an off-white, such as Vallejo’s Pale Grey Blue, for the whites of the eyes. This choice helps make the final white dot stand out more.
Pupils: Carefully add a black dot to represent the iris and pupil. Given the size and recessed nature of the eyes, this step requires precision.
Reflection: Add a tiny dot of Morrow White to each eye to simulate reflection. Ensure both dots are symmetrically placed for a natural look.
Face Mask and Filters
Base Colour: Start with Balor Brown, identical to the armour’s base, for the face mask.
Bone Texture: Layer Morghast Bone followed by Screaming Skull for the bony parts of the face mask. Concentrate on achieving a natural bone colour, distinct from both the flesh tones and the yellow of the armour.
Filters: Paint the filters using Vallejo’s Neutral Grey, adding reflective highlights with Pale Grey Blue and Morrow White for a metallic effect.
Final Touches
Clean-Up and Adjustments: Revisit any areas that require tidying up, especially around the intricate parts like the eyes and the edges of the face mask.
Reflection and Shine: For areas intended to look reflective or shiny, such as the filters, ensure the contrast between light and dark is pronounced. Utilise glazes to smooth out transitions if necessary.
Video: How to Paint Tor Garadon Leather, Chest Eagle NMM, Red Shoulder Trim
This segment will cover the techniques for painting the leather details, non-metallic metal (NMM) effects on the chest eagle and other adornments, the red shoulder trim, and the blue lenses.
Materials Needed
Base Paints: Rhinox Hide, Macragge Blue, Mephiston Red.
Highlight Paints: Cadian Fleshtone, Mournfang Brown, Hoeth Blue, Baharroth Blue, Wild Rider Red, Evil Sunz Scarlet.
Specialty Paints: Vallejo Japanese Uniform, English Uniform, Ice Yellow, Ivory; P3 Morrow White.
Brushes: A selection ranging from fine detail to medium size.
Other: Wet palette, water for thinning paints, paper towel for blotting.
Leather Details
Base Layer: Apply Rhinox Hide to the leather areas for a rich, dark brown base.
Weathering and Texture: Using Cadian Fleshtone, paint crack marks and weathering on the leather to simulate wear. Focus these marks more towards the edges and keep them parallel but slightly varied in angle for a natural look.
Shading and Depth: Mix a bit of Rhinox Hide into your Cadian Fleshtone on a wet palette and go back over your weathering marks to soften and blend them into the leather, enhancing depth.
Non-Metallic Metal (NMM) Chest Eagle
Base Colours: Start with Vallejo English Uniform as your base for the gold NMM areas.
Building Up Highlights: Layer Vallejo Japanese Uniform over the base, focusing on the upper left areas of the eagle to mimic a light source coming from that direction.
Bright Highlights: Add Vallejo Ice Yellow for the brighter highlights, concentrating on areas that would catch the most light.
Final Highlights: Use Vallejo Ivory and P3 Morrow White for the brightest points of light on the eagle, such as the tips of feathers or central areas closest to the perceived light source.
Red Shoulder Trim
Base Coat: Paint the shoulder trim with Mephiston Red, ensuring a solid, even base layer.
First Highlights: Apply Evil Sunz Scarlet to the upper portions of the trim where light would naturally hit.
Final Highlights: Use Wild Rider Red for the brightest highlights, applying it sparingly to maintain the red’s saturation and avoid it looking pink or orange.
Blue Lenses
Base Layer: Start with Macragge Blue, painting a dome shape on the lens, leaving some of the base black visible for depth.
Adding Depth: Layer Hoeth Blue over the Macragge Blue, focusing on the top left side to start building the reflective look.
Brighter Highlights: Apply Baharroth Blue in a smaller area than the Hoeth Blue, enhancing the sense of reflection.
Final Touches: Add a tiny dot of P3 Morrow White in the top left corner of the lens to simulate a pinpoint reflection of light.
Video: How to Paint Tor Garadon Imperial Fist Soft Textured Cloak
How to paint Tor Garadon’s cloak with a focus on creating a wool-like texture that contrasts with the hard surface of the armour.
Materials Required
Paints: Vallejo German Grey, Vallejo Neutral Grey, P3 Morrow White, Games Workshop Naggaroth Night.
Brushes: A small brush, preferably a 0 or 00 with a slightly worn tip for stippling.
Mixing the Colours
Prepare your palette: Place Vallejo German Grey and Neutral Grey on your palette. Create a gradient of mixes from pure German Grey to pure Neutral Grey in several steps. I recommend a ratio of 3:1 (German Grey to Neutral Grey) for the first mix, a 50/50 mix, and then a transition to pure Neutral Grey.
Base Coating
Initial Coating: Start with your 50/50 mix of German Grey and Neutral Grey, applying it loosely to the cloak. Focus on creating texture right from the base layer, using a dabbing motion rather than striving for a smooth finish.
Building Texture and Highlights
Creating Texture: With the cloak base ready, switch to pure Neutral Grey to start stippling. Use a light touch to create dots, focusing on areas that would naturally catch more light, such as the top and front of the shoulder. Keep your paint at a creamy consistency for clear dot marks.
Enhancing the Texture: Continue stippling by using lighter mixes towards the highlight areas. You should be creating a texture that contrasts with the smoother surfaces of the armour, suggesting a fabric-like material. Remember, the key to this technique is patience and a multitude of tiny dots to build up the texture gradually.
Final Highlights and Glazing
Adding Depth: Mix a small amount of P3 Morrow White into your Neutral Grey for the brightest highlights. Apply this sparingly to the very tops of the folds where the light would be strongest.
Glazing for Colour and Softness: Thin down some Naggaroth Night significantly with water (about 7 or 8 parts water to 1 part paint). Apply this glaze over the cloak to tint the grey slightly purple, enhancing the cloak’s appearance while softening the stippling effect. This glaze will unify the texture, blend the stippled dots, and add a subtle colour that contrasts beautifully with Tor Garadon’s yellow armour.
Key Tips
Stippling Technique: Ensure your brush is not overly loaded with paint to avoid large, unsightly dots. Aim for a multitude of small, controlled applications to build up the texture.
Glazing: Be mindful not to over-apply the Naggaroth Night glaze. The goal is to add a subtle hue and soften the stippling rather than to recolour the cloak.
Brush Care: A slightly worn brush is ideal for stippling as it prevents overly sharp dots that can look unnatural for this texture.
If you don’t have an account here on my website, please sign up here! I have over 350 video tutorials with steps and tips, plus a selection of PDFs. If you are not sure about joining, you can explore my free videos with a free membership.
If you’d prefer to support me on Patreon, please visit: https://www.patreon.com/RichardGray [...]
Morgok

I love the look of this model and had to create some tutorials on how to paint Morgok from Morgoks Crushas! Morgok and his mob of Ironjawz brutes once hunted down and fought the greatest prey they could find amongst Ghur’s trackless wastes. Whether they ran down spiny nephrodiles or fought the storm-warriors of Sigmar, Morgok’s Krushas sought the mightiest trophies in the name of their bellicose deity, Gorkamorka.
Scroll down to explore the how to paint Morgok tutorials in order, or choose from the contents below if you’d like to skip to a specific part of the model.
Video – How to Paint Morgok: Part One (Face, Teeth and Armour)Materials and PaintsStep-by-Step GuideVideo – How to Paint Morgok: SwordMaterials and PaintsStep-by-Step GuideVideo – How to Paint Morgok: Hair and LeatherMaterials and PaintsStep-by-Step GuideVideo – How to Paint Morgok: Final PartMaterials and PaintsStep-by-Step Guide
Video – How to Paint Morgok: Part One (Face, Teeth and Armour)
Materials and Paints
Paints:
Games Workshop:
Mournfang Brown
Morghast Bone
Screaming Skull
Flash Gitz Yellow
Cadian Fleshtone
Bugman’s Glow
Vallejo:
Neutral Grey
Pale Grey Blue
Heavy Black Green
P3:
Morrow White
Brushes and Tools:
Fine Detail Brushes: Essential for precise work, especially for facial details, scratches, and armour highlights.
Larger Brushes: For basecoating and applying initial layers. A medium-size brush is suitable for most areas.
Wet Palette: To keep your paints hydrated and workable, especially important for blending and layering.
Water Cup: For rinsing brushes and thinning paints.
Paper Towels or Cloth: For brush cleaning and drying.
Additional Materials:
Black Primer: To prime the model before painting.
Blue Tack by Bostik: Useful for temporarily attaching parts like the head and chest, making them easier to handle while painting.
Mixing Tray or Palette: For mixing paints and creating custom shades.
Light Source: A lamp or natural light to observe how light and shadow play on the model, which guides highlighting and shading.
Hairdryer (Optional): Can be used to speed up the drying process between layers.
Step-by-Step Guide
Priming: Start by priming Morgok in black. Keep the head and chest separate for ease of painting.
Basecoat – Skin: Use Vallejo Heavy Black Green, thinned down (about 50% water). Apply several thin layers for a smooth, dark green base.
Basecoat – Armour: Apply Vallejo Neutral Grey, also thinned down. This sets the stage for non-metallic black iron armour.
Layering – Armour: With the same grey, build up layers, focusing on the armor’s texture and dents. Use the tip of your brush to pick out details and create a rough, worn look.
Highlighting – Skin: Switch to Bugman’s Glow from Games Workshop for the skin. Paint details like creases and scratches directly, without a transition from the green. This creates high contrast and makes highlighting easier.
Refining Highlights – Skin: Use Cadian Fleshtone for smaller, more precise highlights. Focus on the upper edges and fine details. This stage adds more depth and texture to the skin.
Eyes: Paint the eyes with Flash Gitz Yellow. A simple blob will suffice, as we’re not aiming for competition standard.
Directional Lighting: Think about how light hits the model. Highlight areas like the head and raised shoulder more to create depth.
Final Highlights – Skin: Use Screaming Skull for the final highlights on the face. Apply it sparingly and precisely, refining the detail work.
Layering – Armour: Introduce Vallejo Pale Grey Blue for further layers on the armour. Create a scratched, worn look by building up layers and focusing on edges and imperfections.
Teeth – Basecoat: Start with Mournfang Brown, applying it evenly while leaving gaps between teeth.
Teeth – Highlighting: Use Morghast Bone for highlighting. Remember, for the upper teeth, highlight near the gums, and for the lower teeth, highlight the tips.
Teeth – Final Highlights: Add final highlights with P3 Morrow White on the very tips of the bottom teeth and near the gums of the top teeth.
Additional Armour Work: Return to the armour, adding more highlights and refining the look with both Neutral Grey and Pale Grey Blue.
Video – How to Paint Morgok: Sword
Materials and Paints
The following paints were used: Games Workshop: Mournfang Brown, Troll Slayer Orange Vallejo: Neutral Grey, Pale Grey Blue, Black P3: Morrow White (Any white is fine)
Step-by-Step Guide
Painting Morgok’s sword to achieve a heavily weathered, non-metallic metal (NMM) look involves creating high contrast and emphasizing sculpted details. Here’s a step-by-step guide:
Preparing Your Palette: On your wet palette, lay out Vallejo Neutral Grey, Pale Grey Blue, Black, Games Workshop Mournfang Brown, Troll Slayer Orange, and P3 Morrow White (or any suitable white).
Assessing the Sword: Observe the sword’s chunky and battered appearance, with its distinct shapes. Your goal is to emphasise these aspects rather than aiming for smooth transitions.
Basecoat Application: Begin with Vallejo Neutral Grey as your base. Bear in mind, the blade’s flatter part will be darker, while the cutting edge should be lighter, creating a striking contrast.
Layer Enhancement: Progress to Vallejo Pale Grey Blue, concentrating on the brighter sections of the blade, particularly on the curve before it flattens.
Detailing with Fine Scratches: Utilise the tip of your brush to apply tiny, scratchy marks across the blade. Vary their sizes, but keep them diminutive to accentuate the worn effect.
Highlighting with White: Employ P3 Morrow White to highlight the lower edges of these scratches. This approach lends a three-dimensional look, simulating actual dents.
Creating a Shine: Utilise a stippling technique with Neutral Grey, Pale Grey Blue, and White to form a shine spot, bridging the cutting edge with the flat part of the blade. This spot should be roughly circular, yet not perfectly so, to imitate the diffusion of light.
Rust and Grime Addition: With Mournfang Brown, stipple on rust and grime, concentrating on the crevices and recesses to add texture and augment the weathered appearance.
Altering Highlight Transitions: If necessary, reposition the main highlight towards the middle of the flat side of the blade for enhanced contrast and detail accommodation.
Scratch Enhancement: Return to the cutting edge to add more pronounced scratches, extending from the edge to the flat. Accentuate their central points with White to mimic light reflecting off imperfections.
Rust Intensification with Troll Slayer Orange: Enhance the rust hue using Troll Slayer Orange. Its superb translucency allows for the gradual build-up of vibrant, saturated highlights.
Final Adjustments: Re-examine the entire blade, adding final details and adjusting contrasts to ensure that the rust, grime, and highlights are well-balanced and realistic.
Throughout your painting, focus on maintaining the sharp contrast between light and dark areas while enhancing the textured appearance of the sword. The objective is to achieve a realistic, weathered metallic look that complements the robust, worn style of Morgok’s sword.
Video – How to Paint Morgok: Hair and Leather
Materials and Paints
The following paints were used: Games Workshop: Abaddon Black, Mepthiston Red, Evil Suns Scarlet, XV-88, Balor Brown, Dryad Bark, Rhinox Hide, Troll Slayer Orange Vallejo: Pale Grey Blue, Black
Step-by-Step Guide
Painting the hair and leather on Morgok, the Orruk leader from Morgok’s Krushas, involves several steps to achieve a vivid and realistic look. Here’s a clear and concise guide:
Hair Basecoat: Mix Mephiston Red with a bit of Abaddon Black (approximately 2 parts Mephiston Red to 1 part Abaddon Black). Apply this mixture to the hair, noting that it appears redder when wet but dries to a browner shade.
Leather Basecoat: Use Dryad Bark for the leather parts. This serves as a base for further detailing and shading.
Hair Highlighting: Begin highlighting the hair with plain Mephiston Red. This creates a bright and vibrant effect when wet but darkens upon drying. Ensure even coverage, avoiding too much contrast in the crevices.
Building Hair Texture: Continue to build the hair’s texture by using Evil Sunz Scarlet. Focus on large strands and upward-facing hair sections. This stage is about setting the overall light volume.
Refining Hair Highlights: Mix Evil Sunz Scarlet with Pale Grey Blue (about 2 parts Evil Sunz Scarlet to 1 part Pale Grey Blue). Apply this mix for the final hair highlights, focusing on edges and keeping the highlights consistent and directional.
Adjusting Leather Colour: If you find the leather too desaturated, glaze it with Rhinox Hide and then Troll Slayer Orange to add depth and richness. This step is adjustable based on personal preference.
Detailing Leather: Start detailing the leather with XV-88, focusing on vertical scratchy marks and blending them into the base colour. This mimics a worn leather texture.
Enhancing Leather Texture: Use Balor Brown for further texture on the leather. Apply thin lines to mimic cracks and wear, focusing on the lighter areas for highlights.
Leather Shadowing: Mix Balor Brown with a bit of black (Vallejo Black or similar) and apply this to the shadowed areas of the leather. This step adds depth and contrast.
Leather Final Highlights: For the highest highlights on the leather, use pure Pale Grey Blue. Apply sparingly and focus on areas where light would naturally hit the most.
Glazing for Depth: Finally, apply a glaze of Rhinox Hide over the leather to unify the colours and tones. This also helps in blending the highlights into the base colour.
Remember to let each layer dry before applying the next, and adjust the intensity of your highlights and shadows to match the overall look you desire for Morgok. The aim is to create a vibrant, detailed, and realistic appearance for both the hair and leather parts of the miniature.
Video – How to Paint Morgok: Final Part
Materials and Paints
The following paints were used: Games Workshop: Cadian Fleshtone, Balor Brown, Morghast Bone, Kantor Blue, XV-88 (Or Balor Brown mixed with black), Rhinox Hide Vallejo: Neutral Grey, Pale Grey Blue P3: Morrow White
Step-by-Step Guide
To finish painting Morgok from Morgok’s Krushas, focusing on the kill trophies and final touches to the armour, here’s a step-by-step guide:
Painting the Trophy Heads:
Basecoat: Start with Vallejo Neutral Grey to outline highlight areas. This grey base helps to convey the deceased look of the heads.
Highlighting: Apply Cadian Fleshtone, which appears pinkish on the palette but turns pale when applied. Mix it with two parts water to one part paint for translucency, allowing underlying grey to show. This creates a dehydrated, mummified look. Focus on prominent features like cheekbones, forehead, upper lip, and nose.
Adding Cool Tones: Use Kantor Blue, heavily diluted (about four parts water to one paint), to add a cold, lifeless tone to the flesh. Be cautious as it’s strong and can overpower other colours. Apply sparingly and touch up with Cadian Fleshtone where needed.
Painting the Hair:
Basecoat: Use Rhinox Hide for a dark base.
Detailing: Apply a mix of Balor Brown and black (or XV-88) for the texture. Water down slightly for a smoother finish. Follow with Morghast Bone for finer details and strands. Apply these colours in thin lines to represent the texture of the hair.
Painting the Skull:
Basecoat: Apply Balor Brown over black primer. Don’t aim for a smooth finish; a bit of messiness adds to the worn look.
Highlighting: Use Morghast Bone for highlights, focusing on raised areas like the brow. This creates the effect of a weathered, unpolished skull.
Final Touches to the Armour:
Secondary Bounce Highlights: Use Neutral Grey for less bright areas, ensuring the main highlights are brighter. Apply these highlights on areas like the underside of the armour, keeping in mind the light source and overall weathered look.
Refining Highlights: Use Pale Grey Blue and Morrow White for hard edges and minor details. Apply Morrow White sparingly to maintain focus on the model’s main areas.
Adding Rust and Grime:
Base Layer: Start with Mournfang Brown for rust and grime, focusing on areas like the belt.
Secondary Layer: Apply Troll Slayer Orange for a more saturated rust effect. This colour is strong; use it carefully to avoid overpowering other elements.
Glazing for Cohesion:
Mixing the Glaze: Create a glaze with Abaddon Black, diluting it heavily (approximately five parts water to one part paint).
Application: Apply the glaze carefully to mid-tones and shadows, avoiding the brightest highlights. This unifies the armour’s look, enhancing shadows and reducing the intensity of mid-tones for a cohesive finish.
Throughout the process, maintain a balance between detail and the overall look of the model. The aim is to create a realistic, battle-worn appearance with attention to the finer details, especially on the trophy heads and armour
If you don’t have an account, please sign up here! The website currently has over 350 video tutorials with steps and tips, plus a selection of PDFs. If you are not sure about joining, you can explore my free videos with a free membership, or take the plunge and become a full subscriber for full access.
If you’d prefer to support me on Patreon, please visit: https://www.patreon.com/RichardGray [...]
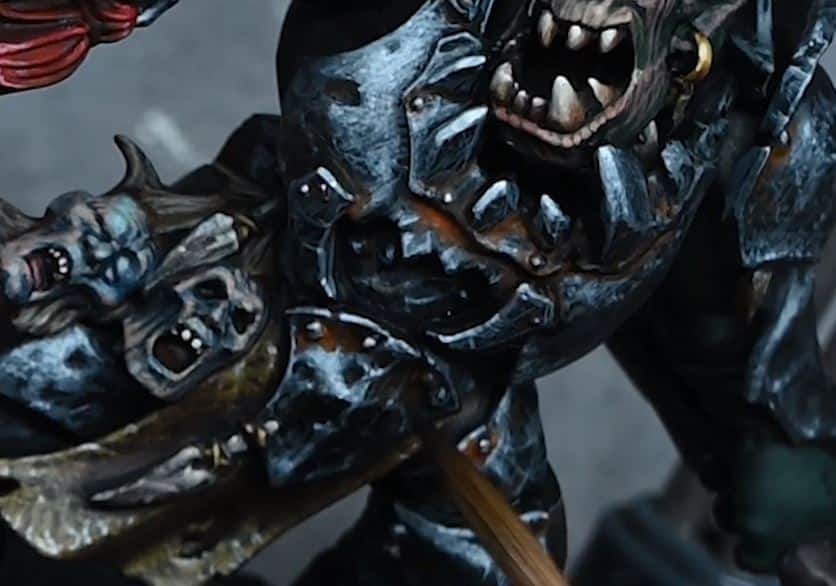
The final painting Morgok video, with kill trophies, highlights, cloth, leather and just those lovely finishing touches.
Video – Kill trophies, highlights, cloth, leather and more on Morgok!
Materials and Paints
The following paints were used: Games Workshop: Cadian Fleshtone, Balor Brown, Morghast Bone, Kantor Blue, XV-88 (Or Balor Brown mixed with black), Rhinox Hide Vallejo: Neutral Grey, Pale Grey Blue P3: Morrow White
Step-by-Step Guide
To finish painting Morgok from Morgok’s Krushas, focusing on the kill trophies and final touches to the armour, here’s a step-by-step guide:
Painting the Trophy Heads:
Basecoat: Start with Vallejo Neutral Grey to outline highlight areas. This grey base helps to convey the deceased look of the heads.
Highlighting: Apply Cadian Fleshtone, which appears pinkish on the palette but turns pale when applied. Mix it with two parts water to one part paint for translucency, allowing underlying grey to show. This creates a dehydrated, mummified look. Focus on prominent features like cheekbones, forehead, upper lip, and nose.
Adding Cool Tones: Use Kantor Blue, heavily diluted (about four parts water to one paint), to add a cold, lifeless tone to the flesh. Be cautious as it’s strong and can overpower other colours. Apply sparingly and touch up with Cadian Fleshtone where needed.
Painting the Hair:
Basecoat: Use Rhinox Hide for a dark base.
Detailing: Apply a mix of Balor Brown and black (or XV-88) for the texture. Water down slightly for a smoother finish. Follow with Morghast Bone for finer details and strands. Apply these colours in thin lines to represent the texture of the hair.
Painting the Skull:
Basecoat: Apply Balor Brown over black primer. Don’t aim for a smooth finish; a bit of messiness adds to the worn look.
Highlighting: Use Morghast Bone for highlights, focusing on raised areas like the brow. This creates the effect of a weathered, unpolished skull.
Final Touches to the Armour:
Secondary Bounce Highlights: Use Neutral Grey for less bright areas, ensuring the main highlights are brighter. Apply these highlights on areas like the underside of the armour, keeping in mind the light source and overall weathered look.
Refining Highlights: Use Pale Grey Blue and Morrow White for hard edges and minor details. Apply Morrow White sparingly to maintain focus on the model’s main areas.
Adding Rust and Grime:
Base Layer: Start with Mournfang Brown for rust and grime, focusing on areas like the belt.
Secondary Layer: Apply Troll Slayer Orange for a more saturated rust effect. This colour is strong; use it carefully to avoid overpowering other elements.
Glazing for Cohesion:
Mixing the Glaze: Create a glaze with Abaddon Black, diluting it heavily (approximately five parts water to one part paint).
Application: Apply the glaze carefully to mid-tones and shadows, avoiding the brightest highlights. This unifies the armour’s look, enhancing shadows and reducing the intensity of mid-tones for a cohesive finish.
Throughout the process, maintain a balance between detail and the overall look of the model. The aim is to create a realistic, battle-worn appearance with attention to the finer details, especially on the trophy heads and armour.
Morgok from Morgok’s Krushas – All Videos
Painting Morgok from Morgoks Crushas
Morgok and his mob of Ironjawz brutes once hunted down and fought the greatest prey they could find amongst Ghur’s trackless wastes. Whether they ran down spiny nephrodiles or fought the storm-warriors of Sigmar, Morgok’s Krushas sought the mightiest trophies in the name of their bellicose deity, Gorkamorka.
Here is the full series of videos on how I painted him!
Watch Now
If you don’t have an account, please sign up here! The website currently has over 350 video tutorials with steps and tips, plus a selection of PDFs. If you are not sure about joining, you can explore my free videos with a free membership, or take the plunge and become a full subscriber for full access.
If you’d prefer to support me on Patreon, please visit: https://www.patreon.com/RichardGray [...]

The latest video for Morgok, from Morgok’s Krushas. This video features how to paint the hair and leather.
Video – How to Paint Morgok: Hair and Leather
Materials and Paints
The following paints were used: Games Workshop: Abaddon Black, Mepthiston Red, Evil Suns Scarlet, XV-88, Balor Brown, Dryad Bark, Rhinox Hide, Troll Slayer Orange Vallejo: Pale Grey Blue, Black
Step-by-Step Guide
Painting the hair and leather on Morgok, the Orruk leader from Morgok’s Krushas, involves several steps to achieve a vivid and realistic look. Here’s a clear and concise guide:
Hair Basecoat: Mix Mephiston Red with a bit of Abaddon Black (approximately 2 parts Mephiston Red to 1 part Abaddon Black). Apply this mixture to the hair, noting that it appears redder when wet but dries to a browner shade.
Leather Basecoat: Use Dryad Bark for the leather parts. This serves as a base for further detailing and shading.
Hair Highlighting: Begin highlighting the hair with plain Mephiston Red. This creates a bright and vibrant effect when wet but darkens upon drying. Ensure even coverage, avoiding too much contrast in the crevices.
Building Hair Texture: Continue to build the hair’s texture by using Evil Sunz Scarlet. Focus on large strands and upward-facing hair sections. This stage is about setting the overall light volume.
Refining Hair Highlights: Mix Evil Sunz Scarlet with Pale Grey Blue (about 2 parts Evil Sunz Scarlet to 1 part Pale Grey Blue). Apply this mix for the final hair highlights, focusing on edges and keeping the highlights consistent and directional.
Adjusting Leather Colour: If you find the leather too desaturated, glaze it with Rhinox Hide and then Troll Slayer Orange to add depth and richness. This step is adjustable based on personal preference.
Detailing Leather: Start detailing the leather with XV-88, focusing on vertical scratchy marks and blending them into the base colour. This mimics a worn leather texture.
Enhancing Leather Texture: Use Balor Brown for further texture on the leather. Apply thin lines to mimic cracks and wear, focusing on the lighter areas for highlights.
Leather Shadowing: Mix Balor Brown with a bit of black (Vallejo Black or similar) and apply this to the shadowed areas of the leather. This step adds depth and contrast.
Leather Final Highlights: For the highest highlights on the leather, use pure Pale Grey Blue. Apply sparingly and focus on areas where light would naturally hit the most.
Glazing for Depth: Finally, apply a glaze of Rhinox Hide over the leather to unify the colours and tones. This also helps in blending the highlights into the base colour.
Remember to let each layer dry before applying the next, and adjust the intensity of your highlights and shadows to match the overall look you desire for Morgok. The aim is to create a vibrant, detailed, and realistic appearance for both the hair and leather parts of the miniature.
Morgok from Morgok’s Krushas – All Videos
Painting Morgok from Morgoks Crushas
Morgok and his mob of Ironjawz brutes once hunted down and fought the greatest prey they could find amongst Ghur’s trackless wastes. Whether they ran down spiny nephrodiles or fought the storm-warriors of Sigmar, Morgok’s Krushas sought the mightiest trophies in the name of their bellicose deity, Gorkamorka.
Here is the full series of videos on how I painted him!
Watch Now
If you don’t have an account, please sign up here! The website currently has over 350 video tutorials with steps and tips, plus a selection of PDFs. If you are not sure about joining, you can explore my free videos with a free membership, or take the plunge and become a full subscriber for full access.
If you’d prefer to support me on Patreon, please visit: https://www.patreon.com/RichardGray [...]
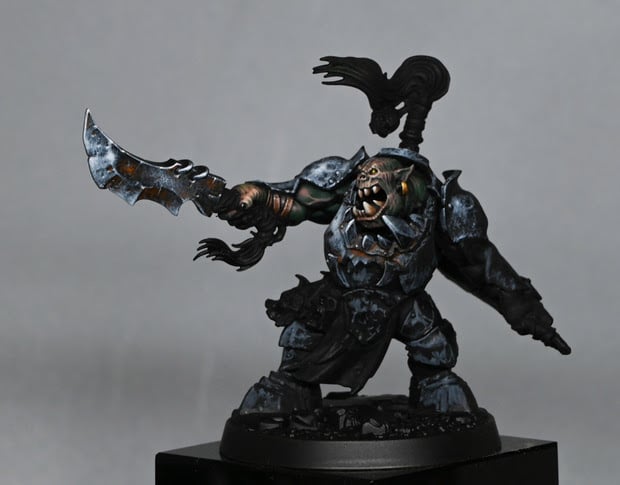
Below is the latest video for Morgok from Morgok’s Krushas, this time looking at how to paint the heavily weathered Morgok NMM sword.
Video – How to Paint Morgok NMM: Sword
All videos are recorded in HD 1080p or higher – use full screen for the full effect and let the video load completely.
Materials and Paints
The following paints were used: Games Workshop: Mournfang Brown, Troll Slayer Orange Vallejo: Neutral Grey, Pale Grey Blue, Black P3: Morrow White (Any white is fine)
Step-by-Step Guide
Painting Morgok’s sword to achieve a heavily weathered, non-metallic metal (NMM) look involves creating high contrast and emphasizing sculpted details. Here’s a step-by-step guide:
Preparing Your Palette: On your wet palette, lay out Vallejo Neutral Grey, Pale Grey Blue, Black, Games Workshop Mournfang Brown, Troll Slayer Orange, and P3 Morrow White (or any suitable white).
Assessing the Sword: Observe the sword’s chunky and battered appearance, with its distinct shapes. Your goal is to emphasise these aspects rather than aiming for smooth transitions.
Basecoat Application: Begin with Vallejo Neutral Grey as your base. Bear in mind, the blade’s flatter part will be darker, while the cutting edge should be lighter, creating a striking contrast.
Layer Enhancement: Progress to Vallejo Pale Grey Blue, concentrating on the brighter sections of the blade, particularly on the curve before it flattens.
Detailing with Fine Scratches: Utilise the tip of your brush to apply tiny, scratchy marks across the blade. Vary their sizes, but keep them diminutive to accentuate the worn effect.
Highlighting with White: Employ P3 Morrow White to highlight the lower edges of these scratches. This approach lends a three-dimensional look, simulating actual dents.
Creating a Shine: Utilise a stippling technique with Neutral Grey, Pale Grey Blue, and White to form a shine spot, bridging the cutting edge with the flat part of the blade. This spot should be roughly circular, yet not perfectly so, to imitate the diffusion of light.
Rust and Grime Addition: With Mournfang Brown, stipple on rust and grime, concentrating on the crevices and recesses to add texture and augment the weathered appearance.
Altering Highlight Transitions: If necessary, reposition the main highlight towards the middle of the flat side of the blade for enhanced contrast and detail accommodation.
Scratch Enhancement: Return to the cutting edge to add more pronounced scratches, extending from the edge to the flat. Accentuate their central points with White to mimic light reflecting off imperfections.
Rust Intensification with Troll Slayer Orange: Enhance the rust hue using Troll Slayer Orange. Its superb translucency allows for the gradual build-up of vibrant, saturated highlights.
Final Adjustments: Re-examine the entire blade, adding final details and adjusting contrasts to ensure that the rust, grime, and highlights are well-balanced and realistic.
Throughout your painting, focus on maintaining the sharp contrast between light and dark areas while enhancing the textured appearance of the sword. The objective is to achieve a realistic, weathered metallic look that complements the robust, worn style of Morgok’s sword and the Morgok NMM on the rest of the model.
Morgok from Morgok’s Krushas – All Videos
Painting Morgok from Morgoks Crushas
Morgok and his mob of Ironjawz brutes once hunted down and fought the greatest prey they could find amongst Ghur’s trackless wastes. Whether they ran down spiny nephrodiles or fought the storm-warriors of Sigmar, Morgok’s Krushas sought the mightiest trophies in the name of their bellicose deity, Gorkamorka.
Here is the full series of videos on how I painted him!
Watch Now
If you don’t have an account, please sign up here! The website currently has over 350 video tutorials with steps and tips, plus a selection of PDFs. If you are not sure about joining, you can explore my free videos with a free membership, or take the plunge and become a full subscriber for full access.
If you’d prefer to support me on Patreon, please visit: https://www.patreon.com/RichardGray [...]
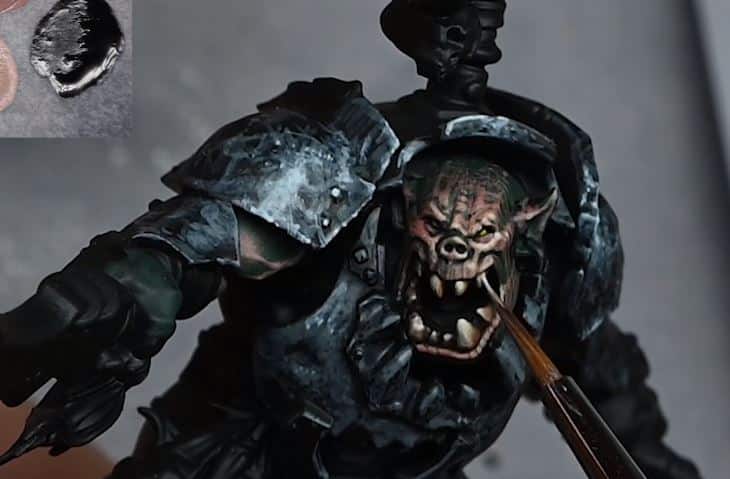
Taking a quick from more serious painting to have some fun with my first ever Orruk! This guy is Morgok the Orruk from Morgok’s Krushas, an Underworld warband.
I’ve gone for a slightly different colour of skin to regular orruks. This was achieved using Vallejo Heavy Black Green, Bugman’s Glow, Cadian Fleshtone, Screaming Skull!
Video – Morgok the Orruk: Face, Teeth and Armour
Materials and Paints
Paints:
Games Workshop:
Mournfang Brown
Morghast Bone
Screaming Skull
Flash Gitz Yellow
Cadian Fleshtone
Bugman’s Glow
Vallejo:
Neutral Grey
Pale Grey Blue
Heavy Black Green
P3:
Morrow White
Brushes and Tools:
Fine Detail Brushes: Essential for precise work, especially for facial details, scratches, and armour highlights.
Larger Brushes: For basecoating and applying initial layers. A medium-size brush is suitable for most areas.
Wet Palette: To keep your paints hydrated and workable, especially important for blending and layering.
Water Cup: For rinsing brushes and thinning paints.
Paper Towels or Cloth: For brush cleaning and drying.
Additional Materials:
Black Primer: To prime the model before painting.
Blue Tack by Bostik: Useful for temporarily attaching parts like the head and chest, making them easier to handle while painting.
Mixing Tray or Palette: For mixing paints and creating custom shades.
Light Source: A lamp or natural light to observe how light and shadow play on the model, which guides highlighting and shading.
Hairdryer (Optional): Can be used to speed up the drying process between layers.
Step-by-Step Guide
Priming: Start by priming Morgok the Orruk in black. Keep the head and chest separate for ease of painting.
Basecoat – Skin: Use Vallejo Heavy Black Green, thinned down (about 50% water). Apply several thin layers for a smooth, dark green base.
Basecoat – Armour: Apply Vallejo Neutral Grey, also thinned down. This sets the stage for non-metallic black iron armour.
Layering – Armour: With the same grey, build up layers, focusing on the armor’s texture and dents. Use the tip of your brush to pick out details and create a rough, worn look.
Highlighting – Skin: Switch to Bugman’s Glow from Games Workshop for the skin. Paint details like creases and scratches directly, without a transition from the green. This creates high contrast and makes highlighting easier.
Refining Highlights – Skin: Use Cadian Fleshtone for smaller, more precise highlights. Focus on the upper edges and fine details. This stage adds more depth and texture to the skin.
Eyes: Paint the eyes with Flash Gitz Yellow. A simple blob will suffice, as we’re not aiming for competition standard.
Directional Lighting: Think about how light hits the model. Highlight areas like the head and raised shoulder more to create depth.
Final Highlights – Skin: Use Screaming Skull for the final highlights on the face. Apply it sparingly and precisely, refining the detail work.
Layering – Armour: Introduce Vallejo Pale Grey Blue for further layers on the armour. Create a scratched, worn look by building up layers and focusing on edges and imperfections.
Teeth – Basecoat: Start with Mournfang Brown, applying it evenly while leaving gaps between teeth.
Teeth – Highlighting: Use Morghast Bone for highlighting. Remember, for the upper teeth, highlight near the gums, and for the lower teeth, highlight the tips.
Teeth – Final Highlights: Add final highlights with P3 Morrow White on the very tips of the bottom teeth and near the gums of the top teeth.
Additional Armour Work: Return to the armour, adding more highlights and refining the look with both Neutral Grey and Pale Grey Blue.
All videos are recorded in HD 1080p or higher – use full screen for the full effect and let the video load completely.
Morgok the Orruk from Morgok’s Krushas – All Videos
Painting Morgok from Morgoks Crushas
Morgok the Orruk and his mob of Ironjawz brutes once hunted down and fought the greatest prey they could find amongst Ghur’s trackless wastes. Whether they ran down spiny nephrodiles or fought the storm-warriors of Sigmar, Morgok’s Krushas sought the mightiest trophies in the name of their bellicose deity, Gorkamorka.
Here is the full series of videos on how I painted him!
Watch Now
If you don’t have an account, please sign up here! The website currently has over 350 video tutorials with steps and tips, plus a selection of PDFs. If you are not sure about joining, you can explore my free videos with a free membership, or take the plunge and become a full subscriber for full access.
If you’d prefer to support me on Patreon, please visit: https://www.patreon.com/RichardGray [...]
Custodian Guard
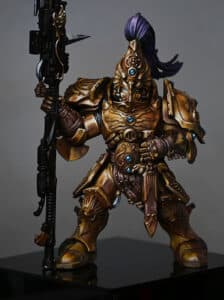
Unlock the secrets to painting non-metallic metal (NMM) with this comprehensive Custodian Guard NMM Metal PDF focused on achieving stunning armour effects for your Custodian Guard model. This tutorial breaks down the NMM technique, allowing you to create realistic metallic surfaces without using metallic paints.
What’s Covered in the Guide:
Introduction to NMM: Understand the fundamentals of the non-metallic metal technique, its benefits, and challenges. Learn how to control lighting and reflections to achieve a consistent and believable metallic effect.
Materials and Paints Needed:Primers: Black Primer (Any)Vallejo: English Uniform (GW XV-88), Heavy Goldbrown (GW Balor Brown), Ice Yellow (GW Dorn Yellow)Games Workshop: Mournfang Brown, Rhinox Hide (optional), Doombull Brown (optional)Other Essentials: White paint (Any), Black paint (Any)
Model Preparation: Learn how to properly prime your model, and when to assemble components to ensure easy access for painting. Tips for using putty to hold the model together during the painting process.
Base Coating: Start with a base coat of Doombull Brown applied with an airbrush (optional) to enrich the colours of the armour. Alternatively, stick with the black primer for a higher contrast effect.
Highlighting Techniques: Step-by-step instructions on how to layer and blend highlights using English Uniform, Heavy Goldbrown, and Ice Yellow. Emphasis on highlight placement, using lighting references, and understanding primary and secondary highlights.
Detailing and Refinement: Focus on refining the highlights and shadows with precise brush strokes. Learn how to add detailed reflections and nuanced colours to enhance the realism of your NMM.
Glazing for Smooth Transitions: Use glazes of Mournfang Brown and Rhinox Hide to enrich the colours, soften transitions, and blend highlights seamlessly. Techniques for avoiding dulling down the brightest areas and maintaining high contrast.
Final Touches: Tips for adding the final bright highlights with white paint, ensuring they are applied sparingly to maintain the metallic effect. Additional guidance on reviewing and adjusting the overall lighting and reflections to achieve a cohesive look.
Additional Features in the Custodian Guard NMM Metal PDF:
High-quality images: The guide is filled with high-resolution images illustrating each step, providing clear visual references to help you achieve the best results.
Professional tips: Benefit from my years of experience with insights and techniques to enhance your painting skills and improve your outcomes.
Flexibility and adaptation: The tutorial is designed to be flexible, allowing you to adapt the techniques to different models and projects, ensuring you can achieve stunning NMM effects across your collection.
My Custodian Guard NMM tutorial is perfect for hobbyists seeking to master the non-metallic metal technique. With detailed instructions, professional tips, and high-quality visuals, you’ll learn to create realistic, eye-catching metallic effects on your models.
Download the full guide below and elevate your miniature painting with the NMM technique today!
If the guide doesn’t appear, follow this link to download!:
https://richardgraycreations.com/wp-content/uploads/2020/05/CustodesGuide.pdf
Paints used:
The gold I used for this was Game Color 151 – Heavy Goldbrown by Vallejo – you can order it here.
Other paints include:
Vallejo : English Uniform
Vallejo : Ice Yellow
Games Workshop Citadel Base : Rhinox Hide and Doombull Brown
Non brand paints include black primer (any is fine), and white and black paints.
Tools:
Artist Opus Brushes
Rathcore Minature Grip
Everlasting Wet Pallete
More of my latest tutorials:
If you don’t have an account here on my website, please sign up here! I have over 350 video tutorials with steps and tips, plus a selection of PDFs. If you are not sure about joining, you can explore my free videos with a free membership, or take the plunge and become a full subscriber for full access.
If you’d prefer to support me on Patreon, please visit: https://www.patreon.com/RichardGray [...]
Learn how to paint a Custodian Guard with NMM (Non-Metallic Metal), with my comprehensive video tutorial and step by step guide.
Video: How to Paint a Custodian Guard (NMM Gold)
This method emphasises building up from a dark base to bright highlights, creating a rich, impactful non-metallic metal effect. Each step builds on the previous, gradually enhancing the model’s detail and contrast.
Materials and Paints
Primer: Black
Base Coat for Armour: Doombull Brown (Airbrushing is optional but hand painting is recommended for precision)
Main Paints:
Vallejo Heavy Goldbrown (alternative: Games Workshop’s Balor Brown with a dab of Mournfang Brown for warmth)
Vallejo Ice Yellow
Games Workshop Mournfang Brown, Ahriman Blue, Xereus Purple, Fulgrim Pink, Bugman’s Glow, Cadian Fleshtone, Ushabti Bone
Vallejo White, Pale Blue Grey, Neutral Grey, Black
Brushes: Various sizes for detail work
Palette: Wet palette recommended
Step-by-Step Guide
Armour
Prime the model in black. Optionally, airbrush or hand paint Doombull Brown focusing on the armoured panels to establish a base layer. Hand painting allows for more control and avoids covering unwanted areas.
Base Layer: Apply Vallejo Heavy Goldbrown across the armour. This requires multiple layers to achieve an opaque finish. Let each layer dry before applying the next to build a solid base.
Highlighting: Start adding highlights by mixing Heavy Goldbrown with Vallejo Ice Yellow for a mid-tone highlight. Focus these highlights where the light naturally hits based on a top-left light source. This creates a dramatic high contrast look.
Final Highlights: Pure Ice Yellow is used for the brightest points of the armour. This step significantly brightens the gold but reduces the yellow warmth. To counteract this, apply a thin glaze of Mournfang Brown over the mid-tones to reintroduce warmth.
Details: Use the NMM technique to highlight finer details like filigree and crevices, maintaining the light direction consistency. The key is to leave dark areas and create a sharp contrast between light and shadow for a metallic effect.
Hair
Base Coat: Apply Xereus Purple, followed by layers of Fulgrim Pink mixed with a bit of Ahriman Blue for a vibrant purple shade.
Highlights: Gradually lighten the purple with more Fulgrim Pink towards the edges and raised areas to simulate light reflection.
Leather and Gloves
Base Coat: Start with Bugman’s Glow, adding texture by applying in a scratchy manner.
Shading and Highlights: Layer up with Cadian Fleshtone and Ushabti Bone, focusing on creating texture and volume without making the material look metallic.
Gems and Eyes
Base Coat: Use Ahriman Blue, diluting slightly for a smooth application.
Highlights: Add small amounts of white to Ahriman Blue for higher highlights, finishing with a dot of pure white for the sparkle effect.
Spear Blade
Base Coat: Neutral Grey, applied to mimic light reflections.
Highlights: Gradually lighten with Ice Yellow, focusing on edges and areas where light would naturally hit, finishing with pure white for the sharpest highlights.
A PDF version of this How to Paint a Custodian Guard tutorial is at:
Warhammer Custodian Guard NMM (Non-Metallic Metal) PDF Guide
Latest Video Tutorials:
If you don’t have an account here on my website, please sign up here! I have over 350 video tutorials with steps and tips, plus a selection of PDFs. If you are not sure about joining, you can explore my free videos with a free membership.
If you’d prefer to support me on Patreon, please visit: https://www.patreon.com/RichardGray [...]
Warcry
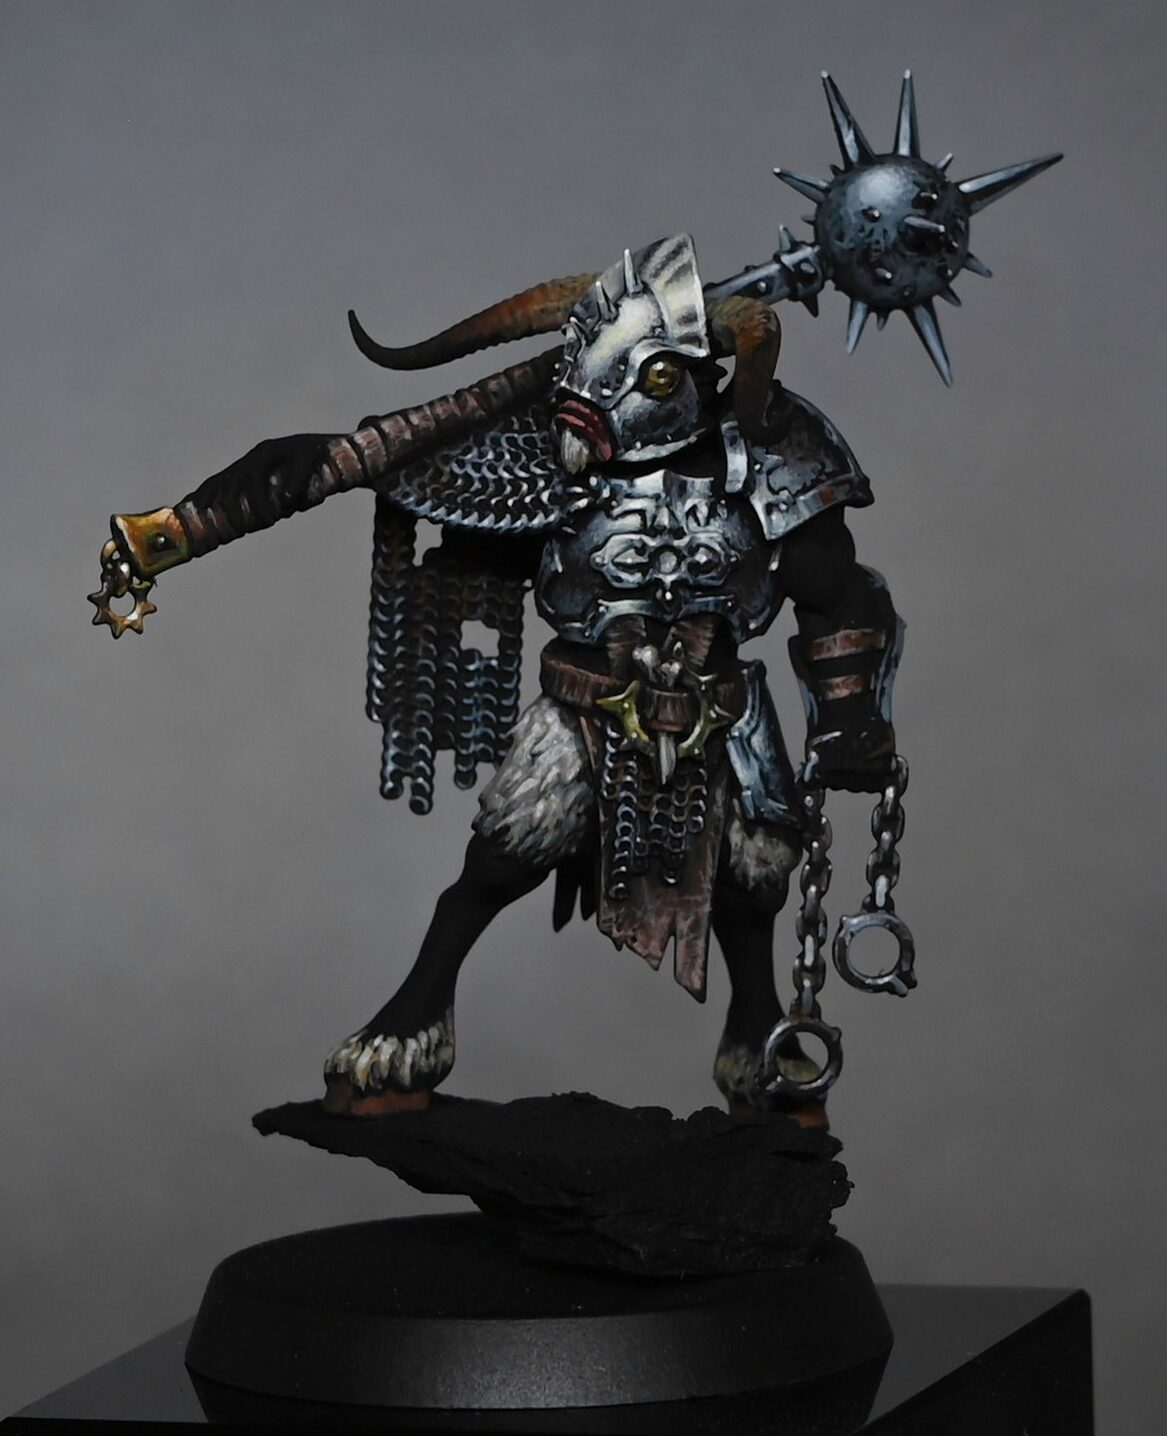
This three-part video series and step-by-step text guides the process of painting a Warcry Spire Tyrants Bestigor Destroyer, aiming to achieve a high tabletop standard with a painterly finish reminiscent of Frank Frazetta’s work. We will use a desaturated colour palette to create sharp contrasts and detailed texture.
Video: How to Paint a Warcry Spire Tyrants Bestigor Destroyer Part One
We’ll start with the basics and gradually add complexity and depth to the miniature.
All videos are recorded in HD 720p or higher – use full screen for the full effect and let the video load completely.
Paints and Materials Needed
Paints
Games Workshop:
Rhinox Hide
Mournfang Brown
Zandri Dust
Mephiston Red (for minor details)
Vallejo:
Golden Olive
Neutral Grey
Pale Grey Blue
Heavy Bluegrey
Heavy Sienna
Black
Ivory
Ice Yellow
White
Brushes
A worn-out brush (for dry brushing and applying rough textures, I’ve used a size 0 but worn to not retain a fine point)
A detail brush with a somewhat intact tip (a size 00 or finer based on the description)
A larger brush for applying varnish (essential for applying the matte varnish evenly)
Basing Materials
Milliput
Fimo (These two are mixed and then baked to create lightweight rock-like structures for the base)
Additional Supplies
Black primer (for base coating the miniature)
Wet palette (for keeping paints moist and workable)
Baking equipment (for curing the Milliput and Fimo mix)
Ultra Matte Varnish (AK Interactive recommended for the final protective and matte finish)
Lamp (used for understanding how light naturally falls on the miniature to guide painting)
Materials and Preparation
Base Material: For the rock surface the model stands on, mix Milliput and Fimo, then bake for about 30 minutes. This method creates a lightweight and easy-to-shape base compared to natural slate.
Wet Palette Preparation: Prepare your wet palette with desaturated colours, focusing mainly on greys and browns. The standout colour will be Heavy Gold Brown, with Mephiston Red added later for minor details.
Painting Steps
Prime the Model: Begin by priming your model with a black primer to ensure subsequent colours stand out.
Base Coating: Start blocking in the main colours and highlights on the armour using Neutral Grey. This will serve as the foundational layer for further detailing.
Grey Tones for Armour: Utilize a range of greys (Black, Neutral Grey, Heavy Blue Grey, and Pale Grey Blue) to build up the tones on the armour. You can mix black and white to achieve similar grey tones if specific colours are unavailable.
Applying Texture and Highlights
While the initial armour highlights might appear rough, this method adds character and texture, essential for achieving a grimdark aesthetic. Focus the lighting from above and slightly to the left, mimicking natural light.
For non-metallic metal (NMM) effects, adjust the light reflections based on the desired material finish rather than relying solely on the lamp’s natural light.
Detailing with Colour
Incorporate Golden Olive for areas you want to hint at green without overpowering the model, building upon this with Heavy Gold Brown for metallic parts.
Use Rhinox Hide and Heavy Sienna for leather details, applying the paint in thin layers to build texture and depth gradually.
Enhancing Textures
Utilize a worn brush for techniques like dry brushing on chainmail, focusing on capturing the texture without needing a perfect finish.
The key is to build up the model’s features layer by layer, focusing on light direction and textural contrasts.
Refining and Adding Highlights
Progressively refine the model by adding Ice Yellow and Ivory highlights to areas that catch the most light, enhancing the model’s dimensional appearance.
Pay attention to focal points such as the helmet and weaponry, which benefit from additional detailing to draw the eye.
Chainmail and Metallic Textures
Apply subtle highlights to the chainmail and metallic surfaces to simulate light reflection, giving the impression of different materials.
Balance is crucial; ensure that upward-facing edges receive stronger highlights than those facing downwards to maintain a realistic light effect.
Eyes and Small Details
The eyes can be painted effectively with a combination of Heavy Sienna, Heavy Gold Brown, Ice Yellow, and a dot of Ivory for the reflective point. This combination quickly brings life to the model’s gaze.
Video: How to Paint a Warcry Spire Tyrants Bestigor Destroyer Part Two
In this continuation of the Bestigore Destroyer painting tutorial, we focus on refining the non-metallic metal (NMM) effects on the armour and making the helmet a prominent focal point.
Materials Needed:
Paints: Rhinox Hide, Mournfang Brown, Zandri Dust, Cadian Fleshtone, Mephiston Red (Games Workshop); Golden Olive, Neutral Grey, Pale Grey Blue, Heavy Bluegrey, Heavy Sienna, Black, Ivory, Ice Yellow, White, Heavy Goldbrown (Vallejo).
Brushes: A fine detail brush for stippling and precise highlights, and a larger brush for broader strokes and base coats.
Other: Wet palette, water for thinning paints, a good light source.
Helmet Refinement
Begin with Heavy Bluegrey to enhance the helmet. Apply it carefully, almost like stippling, focusing on increasing the brightness and making the helmet stand out.
Balancing Colours
Use a combination of Heavy Bluegrey, Pale Grey Blue, and Ice Yellow to adjust the warmth and coldness of the metallic effect. Remember, Ice Yellow adds warmth, while the greys cool down and temper the yellow, ensuring the helmet doesn’t look overly yellow or cold.
Creating Focal Points
The goal is to make the helmet catch more light than the rest of the model, suggesting a dramatic light source, like a sunbeam breaking through clouds.
Mace Detailing
Apply a stylized NMM effect to the mace, focusing on making it look metallic without directly replicating a mirror-like finish. Emphasize primary light sources with bright highlights and use the shape of the object to guide the placement of these highlights.
Adding Colour with Mephiston Red and Cadian Fleshtone
Introduce spot colours such as Mephiston Red for the lips, toned down with Cadian Fleshtone to add interest without making it look like lipstick. This step breaks up the desaturated colours and draws attention to the face.
Fur Detailing
Revisit the Zandri Dust base on the fur, applying it to raised areas and using Ivory for highlights. Apply Neutral Grey to add texture and depth, making the yellow tones stand out more against the grey, creating a fluffy appearance.
Leather and Cloth Detailing
Use Rhinox Hide, Mournfang Brown, and Heavy Sienna for the leather and cloth, paying attention to light sources and shapes. For the loincloth, focus highlights along edges to mimic wear and tear.
Final Touches
Go back and refine areas such as the mace and armour, ensuring they match the brightness and detail level of the helmet. Adjust any areas that need more colour or contrast to maintain focus on the helmet as the primary focal point.
Video: How to Paint a Warcry Spire Tyrants Bestigor Destroyer Part Three
In this final installment, we will complete our Warcry Spire Tyrants Bestigor Destroyer by painting the skin, horns, and finishing the base. The goal is to achieve a painterly finish reminiscent of Frank Frazetta’s work, focusing on desaturated colours and sharp contrasts.
Paints Used
Paints: Rhinox Hide, Mournfang Brown, Zandri Dust, Cadian Fleshtone, Mephiston Red, Ushabti Bone (Games Workshop); Golden Olive, Neutral Grey, Pale Grey Blue, Heavy Bluegrey, Heavy Sienna, Black, Ivory, Ice Yellow, White, Heavy Goldbrown (Vallejo); AK Interactive Ultra Matte Varnish.
Painting Skin
Base Colours: Start with Heavy Sienna, focusing on highlight areas to create texture while keeping the skin dark. Do not cover the entire skin; allow some black areas to remain for contrast.
Layering: Apply Heavy Grey on top of Heavy Sienna, blending them to smooth the transition. Then, use Zandri Dust for final highlights, creating a desaturated, almost colourless finish that complements the overall tone of the model.
Painting Horns
Base Layer: Use the same colours as previously used for the fur—Mournfang Brown, Rhinox Hide, and Zandri Dust—to block in the basic gradients.
Detailing: With Heavy Sienna, add texture and highlights towards the tips of the horns. Layer Zandri Dust and finally, Ivory for the brightest points and edges, maintaining a rough, textured look to enhance the painterly style.
Balance and Contrast: Add small amounts of Heavy Sienna at the base of the horns for a subtle colour variation. Focus on achieving a balance between the desaturated colours and the highlighted areas to draw attention to the head.
Finishing the Base
Colour Application: Using Neutral Grey, Heavy Sienna, and Zandri Dust, paint the base to match the model’s colour scheme. Focus highlights around the front foot to create a point of interest and use Ushabti Bone for dry brushing to pick out texture.
Details and Texture: Glaze the base with thinned Neutral Grey to blend colours and deepen shadows subtly. Dry brush with Ushabti Bone to highlight the texture of the rock and sand, mimicking natural light and adding depth.
Final Touches: Apply small amounts of flock and static grass to introduce life and contrast to the base, enhancing the model’s dynamic appearance on the battlefield.
More of my latest videos:
If you don’t have an account here on my website, please sign up here! I have over 350 video tutorials with steps and tips, plus a selection of PDFs. If you are not sure about joining, you can explore my free videos with a free membership, or take the plunge and become a full subscriber for full access.
If you’d prefer to support me on Patreon, please visit: https://www.patreon.com/RichardGray [...]
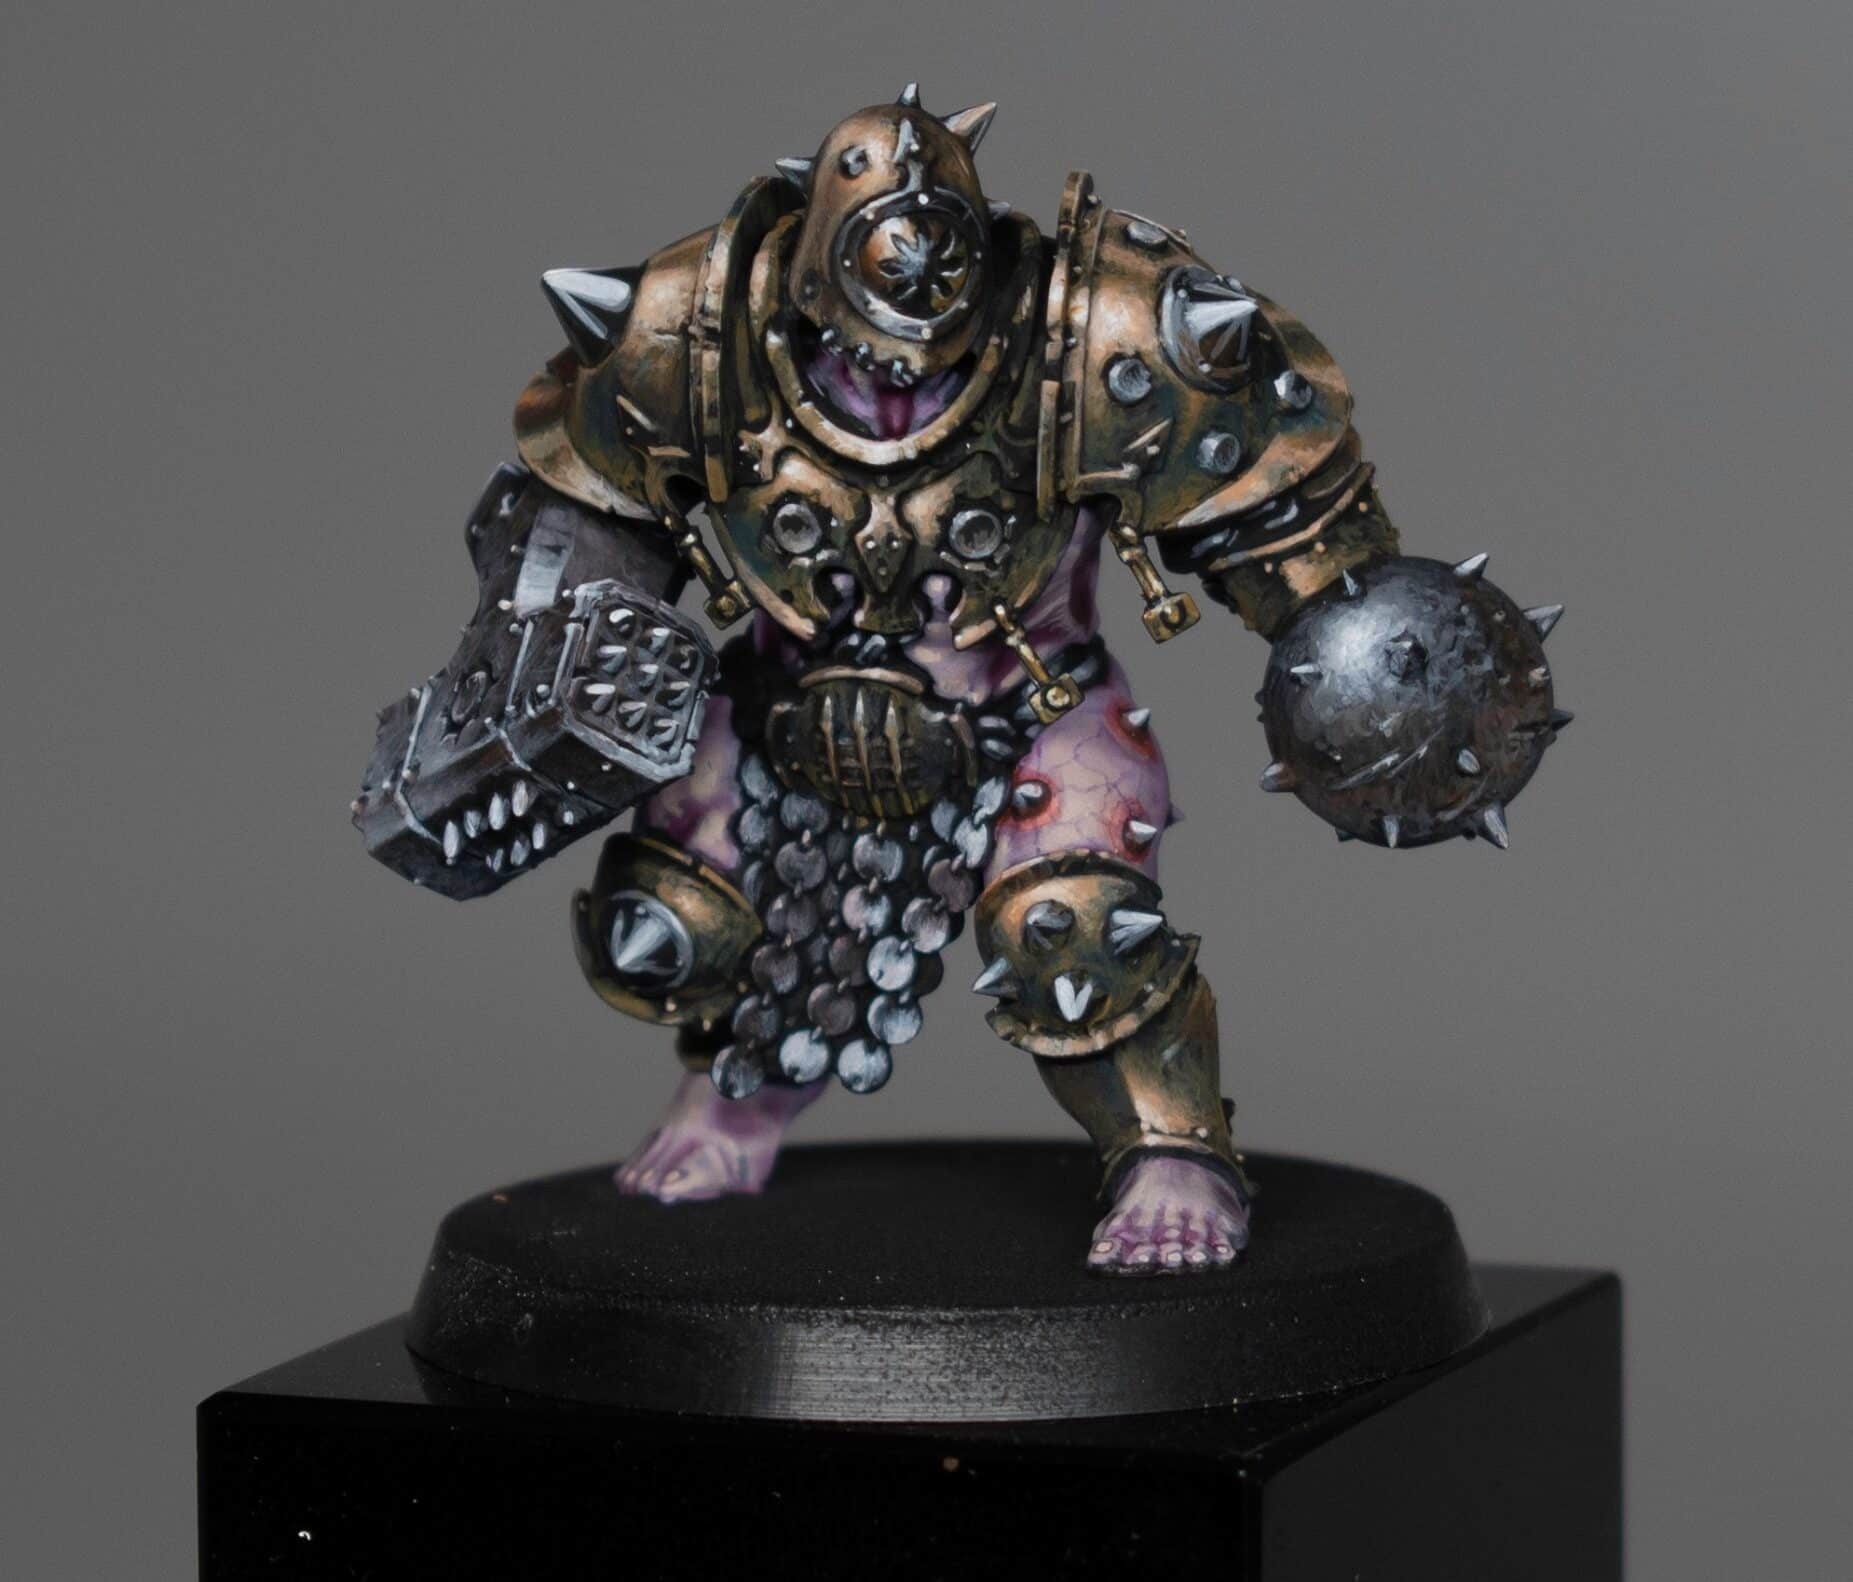
Guides on how to paint Ogor Breacher of the Iron Golems Warcy Warband including non metallic metal and veiny skin.
Part One – How to Paint Ogor Breacher NMM Armour
The following paints were used: Games Workshop: Rhinox Hide, XV-88, Balor Brown, Cadian Fleshtone, Flayed one Flesh, Incubi Darkness, Morghast Bone.Vallejo: Neutral Grey (Mechanicus Standard Grey), Pale Blue Grey (Blue Horror) P3: Morrow White (White Scar)
Step-by-Step: How to Paint Ogor Breacher NMM Armour
Step 1: Prepare the Model – Ensure that the model’s mould lines are removed, it’s glued together, and primed black.
Step 2: Gather Your Paints – Have the above paints ready on a wet palette:
Step 3: Apply XV 88- Using XV 88, roughly block in the primary highlight points on the copper armour. Apply the paint thinly, allowing the black primer to show through for a worn and battered look.
Step 4: Embrace the Roughness – Don’t worry about smooth coats; let the blockiness show through for texture. Use thin layers of paint and apply quickly, catching parts like spikes and edges.
Step 5: Control Your Brush – Ensure your paintbrush isn’t overloaded. You want thin layers for easy correction and a controlled application.
Step 6: Follow the Model’s Shape – Apply highlights following the shape of the armour. If it’s a curved area, let the marks squiggle around, creating a chaotic yet textured look.
Step 7: Consider Light Source – Use a lamp as a light source to observe how light hits the model. Apply highlights with your paint where the light catches, focusing more on upper areas like shoulders and head.
Step 8: Adjust and Blend – Go back and forth between colours, adjusting and blending as needed. XV 88 and Cadian Fleshtone can be used to thicken layers and blend with each other.
Step 9: Add Secondary Highlights – Introduce Rhinox Hide as a secondary highlight, focusing on areas like shoulders. Use it to enhance texture and tone down any excess pinkness.
Step 10: Maintain Consistency – Ensure that highlights align across the model. Trim, rivets, and spikes should follow the same light direction for a cohesive look.
Step 11: Introduce Metallic Elements – Paint steel elements like spikes separately later to maintain expressive brush marks. The spikes add a reflective, shiny quality to emphasize highlights on the armour.
Step 12: Use Glazes – Apply glazes of Morghast Bone and Balor Brown to soften transitions and add subtle weathering. Adjust as needed for colour balance and reflection.
Step 13: Final Highlights – For the final highlights, use P3 Morrow White Base on primary highlight areas. Emphasize the main light source and knock back highlights in shadowed areas.
Step 14: Judge by Eye – Continuously judge the model by eye and make adjustments. Consider warmth, tone, and saturation to achieve a realistic and dynamic non-metallic copper effect.
Part Two – How to Paint Ogor Breacher NMM Steel
The following paints were used: Vallejo: Neutral Grey (Mechanicus Standard Grey), Pale Blue Grey (Blue Horror) Games Workshop: Rhinox Hide, Mournfang Brown, Abaddon Black P3: Morrow White (White Scar)
All videos are recorded in HD 720p or higher – use full screen for the full effect and let the video load completely.
Step-by-Step: How to Paint Ogor Breacher NMM Steel
Prepare Your Materials – Ensure you have the necessary paints ready to go! You’ll also need a variety of brushes, including a slightly worn-out one for creating rough textures.
Block in the Light Points – Use Neutral Gray to identify and block in the main light points on the weapons and metal discs. Refer to the primary light source from the armour painting in Part 1.Create Texture on the Metal Discs – Focus on the metal discs, using a blunt-tipped brush to create rough, non-smooth textures. Emphasise dents and scratches to give the impression of a well-used surface.Build Up Highlight – Gradually build up highlights with Neutral Gray, especially on upward-facing discs. Use the lamp’s light to guide where the light would naturally catch, such as shoulders, head, chest, kneecaps, and the top of the ball.Add Pale Blue Grey for Translucency – Introduce Pale Blue Grey to add translucency to the highlights. Concentrate on the central highlight, allowing the paint to thin as it reaches the edges, creating a transition.Incorporate Morrow White for Secondary Highlights – Use Morrow White for secondary highlights on the brightest discs. Be mindful of where the light hits the most, and create a pattern to enhance the non-metallic look.Glaze with Mournfang Brown for Weathering – Dilute Mournfang Brown and apply it as a glaze to add weathering effects. Create chaotic scratches and imperfections on the surface, avoiding a repetitive pattern for a more natural appearance.Hammer Painting – Apply Neutral Gray to the hammer’s curved areas, taking advantage of the brush’s worn tip to capture the curve. This creates a shiny effect and allows for a darker edge next to the armour.Highlight Hammer Spikes – Use Pale Blue Grey to highlight spikes on the hammer, ensuring high contrast. Concentrate on the top part of the curve for a realistic shiny effect.Intensify Highlights with Morrow White – Further intensify highlights with Morrow White, focusing on the brightest areas. Keep layering to achieve an opaque white, preventing the underlying gray from dulling the shine.Glaze for Depth – Apply a glaze of Mournfang Brown to add depth and enhance the contrast between highlights and shadows. Be selective in the application, aiming for a chaotic pattern for a weathered look.Final Touches – Continuously refine highlights, making them as bright as possible to stand out on the tabletop. Pay attention to tonal contrast, as the clear distinction between black and white creates a striking effect in the final model.
Part Three – How to Paint Ogor Breacher Skin
The following paints were used: Games Workshop: Kislev Flesh, Magos Purple (Contrast), Contrast Medium, Dechala Lilac, Naggaroth Night, Skavenblight Dinge, Mephiston Red P3: Morrow White (White Scar)
Step-by-Step: How to Paint Skin
Primer Application – Apply a black primer to the entire model, ensuring good coverage.Use a thin layer of Chaos Black for the model’s skin, allowing it to dry between coats.Base Coat – Mix equal parts of Dechala Lilac and Kislev Flesh to create a base coat.Apply the base coat over the skin, focusing on highlight points.Use a watery mix to achieve a translucent effect, building up with 3-4 coats for a solid finish.Purple Wash – Apply a 50/50 mix of Magos Purple (Contrast) and Contrast Medium for a wash over the skin. Ensure an even coverage, allowing it to enhance the details and settle into recesses.Highlighting – Mix Dechala Lilac and Kislev Flesh (50/50) for highlighting.Apply highlights on areas catching the light, focusing on upper edges like triceps and lats.Use a thin layer for a translucent effect, building up to create smooth transitions.Enhancing Details – Use contrast paint details to enhance recesses and shadows.Adjust the amount of paint based on the direction of light, creating realistic shadows.Vein Detailing – Mix Naggaroth Night and white for vein detailing.Apply veins on areas where they are likely to be more visible, such as upper back and thighs.Use a thin layer for a faded look, adding realism to the skin.Glazing – Apply glazes with Mephiston Red, heavily watered down (9 parts water to 1 part paint), for a warm, desaturated effect. Test the glaze on a surface before applying it to the model.Final Touches – Add reflections using a neutral gray or blue-gray, focusing on small areas like rivets.Glaze with white to achieve the desired level of contrast and smoothness.Spend additional time on glazing for a display-level finish if desired.Note: – Consider adding additional layers for smoother transitions in a display-level model. – Experiment with colours to achieve contrasting effects, keeping in mind the coluor wheel. – Be mindful of shadows and lighting when highlighting and detailing different areas. – Practice on smaller surfaces or test models to perfect techniques before applying them to the main model.
More of my latest tutorials:
Videos Not Showing?
To view any of my paid tutorials, you need to be a member of the website – please click below to log in or join the site.
Not sure about joining just yet? Check out my Youtube for all my free tutorials. [...]
Fabius Bile

Learn how to paint Fabius Bile Torture Tools in this comprehensive video and guide. Watch the video on how I created the glass effect of Fabius Biles’ vials of suspicious liquids and shining non-metallic metals on his torture instruments!
Video Tutorial – Fabius Bile Torture Tools
All videos are recorded in HD 1080p or higher – use full screen for the full effect and let the video load completely.
Paints and Materials:
Paints for Torture Tools:
Greys for Metal Tools:
Vallejo Dark Grey
Vallejo Neutral Grey
Vallejo Pale Grey Blue
Optional: Black and White (for mixing various greys if specific greys are not available)
Highlighting:
P3 Morrow White (for the highest points of highlights)
Paints for Glass Canisters:
Ahriman Blue (Games Workshop) – Base color for liquid in canisters.
White (P3 Morrow White recommended) – For mixing with Ahriman Blue to create gradients and highlights.
Paints for Red Liquid in Canisters:
Mephiston Red (Games Workshop) – Base color for red liquid.
Wildrider Red (Games Workshop) – Mid highlight for red liquid.
Lugganath Orange (Games Workshop) – Bright highlight for red liquid.
Paints for Torture Tools:
Dark Grey (Vallejo recommended) – Base color for torture tools.
Neutral Grey (Vallejo recommended) – For mid-tones on torture tools.
Pale Grey Blue (Vallejo recommended) – For highlights on torture tools.
Black and White (Vallejo Black and P3 Morrow White recommended) – For mixing custom shades of grey.
Additional Materials:
Fine-tip Brushes (e.g., size 00 Artificer brush) for detailed painting.
A palette for mixing paints (wet palette recommended).
Water for thinning paints.
Kitchen roll or paper towel for brush cleaning and paint control.
Optional:
Incubi Darkness (Games Workshop) – For glazing and adjusting tones, especially in the liquid canisters.
How to Paint Fabius Bile Tutorials
Videos Not Showing?
To view any of my paid tutorials, you need to be a member of the website – please click below to log in or join the site.
Not sure about joining just yet? Check out my Youtube for all my free tutorials or sign up as a free “friend” member on this site and visit the free videos page!
If you’d prefer to support me on Patreon, please visit: https://www.patreon.com/RichardGray [...]
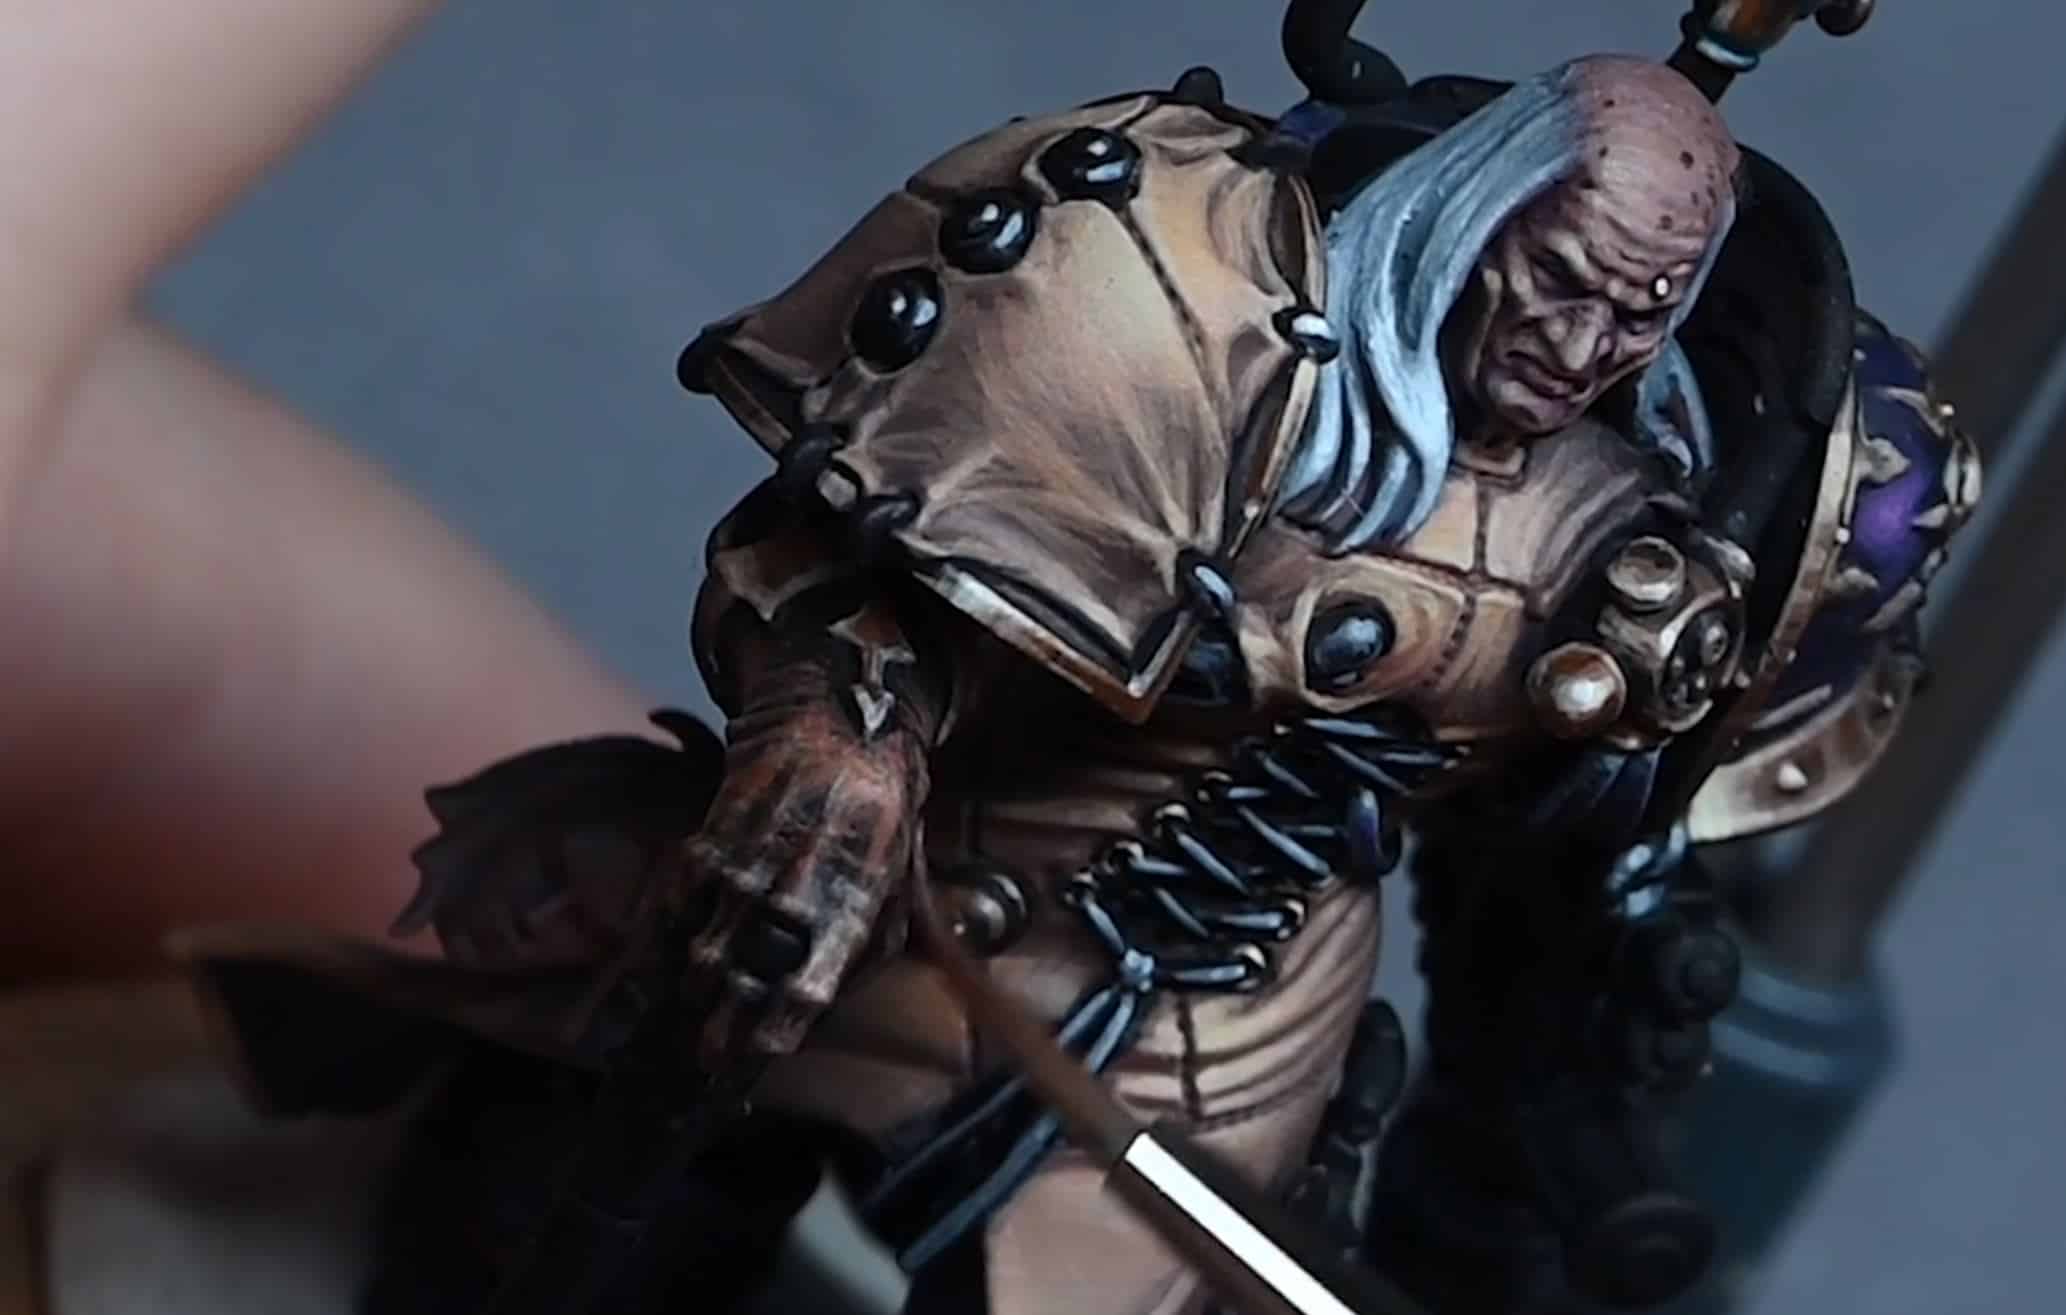
For something a bit quicker than Master Lazarus, I’ve been working on how to paint Fabius Bile, Aka ‘The Spider’. I love the model and think it’s a great update to the original. For my version I’ve added a bit more hair and thinned his nose a little.Read on for a series of tutorials for him, from head and hair, his grisly skin cloak, to glass vials!
Quick Jump to:
How to Paint Fabius Bile Part 1: Head and HairPaints And Materials Used:Step by Step – How to Paint Fabius Bile Head and HairHow to Paint Fabius Bile Part 2: Skin CloakPaints UsedStep by Step – How to Paint Fabius Skin CloakHow to Paint Fabius Bile Part 3 – Non-metallic metal (NMM) trim, skin cloak.Paints UsedStep by Step – How to Paint NMM Trim and CloakHow to Paint Fabius Bile Part 4 : Glass and VialsPaints UsedStep by Step – How to Paint Glass Vials and Torture ToolsTorture ToolsGlass Canisters with LiquidVideos Not Showing?
How to Paint Fabius Bile Part 1: Head and Hair
This video is part 1 in a series of how to paint Fabius Bile and focuses on his head and hair.
All videos are recorded in HD 1080p or higher – use full screen for the full effect and let the video load completely.
Paints And Materials Used:
Brushes:
Size 00 Artis Opus Brush
Size 1 Artis Opus Brush
(Any additional sizes used for specific details)
Paints:
Games Workshop: Cadian Fleshtone, Screaming Skull, Naggaroth Night, Mephiston Red, Rhinox Hide Vallejo: Neutral Grey P3: Morrow White
Airbrush Supplies (If Used):
Airbrush and Compressor
Airbrush Thinner
Vallejo White Ink (for priming if mentioned)
Other Materials:
Wet Palette (for mixing and thinning paints)
Water Container (for rinsing brushes)
Paper Towels or Cloth (for brush cleaning and drying)
Scalpel or Hobby Knife (for model preparation)
Green Stuff or Modelling Putty (for any sculpting or modifications mentioned)
Fine Sandpaper or Files (for model cleaning and preparation)
Primer (Black, if airbrush not used for priming)
Step by Step – How to Paint Fabius Bile Head and Hair
Preparing the Model
The model is primed in black.
Airbrush a base coat of Buckman’s Glow on the skin.
Hair Base Coat
Paint the hair with Neutral Grey (Vallejo) to cover any overspray and provide a good base for subsequent layers.
Skin Tones
Create a palette with various mixtures of Cadian Fleshtone and Screaming Skull (both Games Workshop), with small amounts of Naggaroth Night for darker shades.
Apply the darkest mix (about 50/50 Cadian Fleshtone and Naggaroth Night) to the face’s shaded areas, such as temples and eye sockets.
Gradually build up lighter tones, focusing on the left side of the face where the light naturally falls.
Eyes
Paint the whites of the eyes with Pale Grey.
Add a black dot for the pupil. Optionally, you can add a smaller coloured dot and then a smaller black dot within it for iris details.
Blending and Highlighting
Continuously blend and reapply highlights as the paint dries and its true colour and translucency become apparent.
Use thin layers and ensure the brush is not overloaded with paint.
Hair Detailing
Start adding hair details with Pale Grey Blue (P3), followed by Morrow White.
Keep the brush strokes vertical and follow the hair’s natural flow.
Concentrate more white towards the top of the head and edges of the hair for highlights.
Lips:
Paint the lips with Mephiston Red (Games Workshop) for a base.
Lightly overlay with flesh tones, leaving some red visible for natural variation.
Finishing Touches:
Add liver spots using Rhinox Hide (Games Workshop), then soften them with flesh tones.
How to Paint Fabius Bile Part 2: Skin Cloak
Paints Used
Games Workshop: Bugman’s Glow, Cadian Fleshtone, Kislev Flesh, Ushabti Bone, Mournfang Brown Vallejo: Ice Yellow
Step by Step – How to Paint Fabius Skin Cloak
Base Coat for Skin Cloak:
Prime the skin cloak with Bugman’s Glow using an airbrush or by hand.
Paint all the small areas in black for clear distinction.
Applying Cadian Fleshtone:
Use Cadian Fleshtone for the base layer.
Focus on creating skin stretches and creases, rather than a smooth finish.
Utilize the paint’s opacity to create natural highlights and detailed creases.
Adding Kislev Flesh:
Apply Kislev Flesh for lighter tones, adding more detail and refinement to the skin cloak.
Pay attention to the lighting direction and highlight the creases accordingly, focusing more towards the front of the model for depth.
Ushabti Bone Highlights:
Use Ushabti Bone for the highest highlights.
Be cautious not to overpower the face’s focal point. Keep highlights lighter on the face and more subtle on the cloak.
Painting NMM Trim on Shoulder Pads:
Prepare a transition from Mournfang Brown to Ice Yellow, including mid-tones.
Apply Mournfang Brown as the base.
Gradually build up to lighter tones using mixed shades, finishing with Ice Yellow for the brightest highlights.
Focus on creating a metallic effect through high contrast.
Painting Purple Armor:
Start with a base of Naggaroth Night over a black primer.
Use a stippling technique for a semi-gloss finish.
Gradually build up lighter shades, transitioning from Naggaroth Night to Xereus Purple, Emperor’s Children, and a mix with P3 Morrow White for the brightest areas.
Focus on creating a cylindrical highlight on the leg armor, with bounce highlights at the bottom.
Finishing Touches:
Ensure consistent thinness in the paint application.
Add small details and corrections as needed.
Use the stippling and blending techniques to create texture and a natural look.
How to Paint Fabius Bile Part 3 – Non-metallic metal (NMM) trim, skin cloak.
Paints Used
Games Workshop: Cadian Fleshtone, Kislev Flesh, Ushabti Bone, Corvus Black, Skavenblight Dinge, Rhinox Hide, Mournfang Brown, Ahriman Blue (weathering effect)
Vallejo: Ice Yellow, Heavy Goldbrown
P3: Morrow White
Step by Step – How to Paint NMM Trim and Cloak
Non-Metallic Metal (NMM) Trim (Legs and Feet):
Base colours: Vallejo Ice Yellow and Games Workshop Mournfang Brown.
Create a tonal range by mixing these two colours in varying ratios for intermediate shades.
Focus on achieving bright highlights on the trim, matching them with existing armour highlights.
For areas in shadow (like the other leg under the cloak), use the same colours but do not highlight as brightly.
Skin Cloak (Lower Half):
Gloves:
Base with Games Workshop Rhinox Hide.
Layer with Bugman’s Glow, focusing on worn areas and adding texture.
Add fine details and creases, considering the natural folding and stretching of the material.
Skulls on Backpack:
Base with Rhinox Hide.
Use Vallejo Heavy Goldbrown, Mournfang Brown, and Ice Yellow for highlighting.
Work with rapid transitions to simulate a shiny surface.
Paint each tooth of the skulls individually, brightening the front teeth more.
Non-Metallic Weathering on Trim:
Use Games Workshop Ahriman Blue for a verdigris effect.
Apply in recesses to simulate natural weathering.
Final Touches:
Use P3 Morrow White for the brightest highlights.
Apply selectively, mainly on larger highlight areas for a shiny effect.
Use Games Workshop Cadian Fleshtone for adding soft creases. These should be subtle, with a lower contrast compared to the upper cloak.
Glaze with Games Workshop Corvus Black and Skavenblight Dinge to deepen the shadows and enrich the tones.
Remember to align the highlights with the lighting on the rest of the model.
How to Paint Fabius Bile Part 4 : Glass and Vials
Paints Used
Games Workshop: Ahriman Blue, Mephiston Red, Wildrider Red, Lugganath Orange Vallejo: Dark Grey, Neutral Grey, Pale Grey Blue P3: Morrow White
Step by Step – How to Paint Glass Vials and Torture Tools
Torture Tools
Base Layer:Start with a base of dark grey (e.g., Vallejo Dark Grey). You can mix black and white for various greys if specific greys are not available.Cover most of each tool in at least a mid-grey, leaving dark sections for contrast and reflections.
Detailing:Use neutral grey (Vallejo Neutral Grey) to add highlights and define the tools’ shapes. Ensure not to go into recesses to preserve the tools’ shape.For cylindrical sections, add multiple highlight points for realism.Use a fine-tip brush (like a size 00 Artificer brush) for precision.
Highlights:Apply a lighter grey (Vallejo Pale Grey Blue or a mix of neutral grey and pale grey blue) for brighter highlights.
Focus on areas where light would naturally hit, creating a shiny metallic appearance.
Glass Canisters with Liquid
Base Layer for Blue Liquid:Use Ahriman Blue to paint a solid line around the middle of the canister.Paint downward from the line to the bottom and upward towards the top, creating a gradient.
Creating the Liquid Effect:Mix Ahriman Blue with a small amount of white to lighten the colour.Paint this lighter blue to enhance the liquid effect, focusing on the bottom and creating a subtle gradient towards the top.
Adding Details:Add small dots within the liquid to represent bubbles. Use a mix of Ahriman Blue and white for a reflective shine on the canister, transitioning from this mix to pure white at the top.
Red Liquid Variant:Repeat the same process as the blue liquid, starting with Mephiston Red.Progress to Wildrider Red and Lugganath Orange for the gradient and bubble effects.Use the same technique for the reflective shine.
Throughout the painting process, maintain consistent lighting and reflection effects to create a realistic look. The application of highlights and the gradient effect in the liquid are key to achieving a believable metallic and glass appearance. Remember to use thin layers and smooth transitions for a polished finish.
What will you paint next? :
Videos Not Showing?
To view any of my paid tutorials, you need to be a member of the website – please click below to log in or join the site.
Not sure about joining just yet? Check out my Youtube for all my free tutorials or sign up as a free “friend” member on this site and visit the free videos page!
If you’d prefer to support me on Patreon, please visit: https://www.patreon.com/RichardGray [...]