


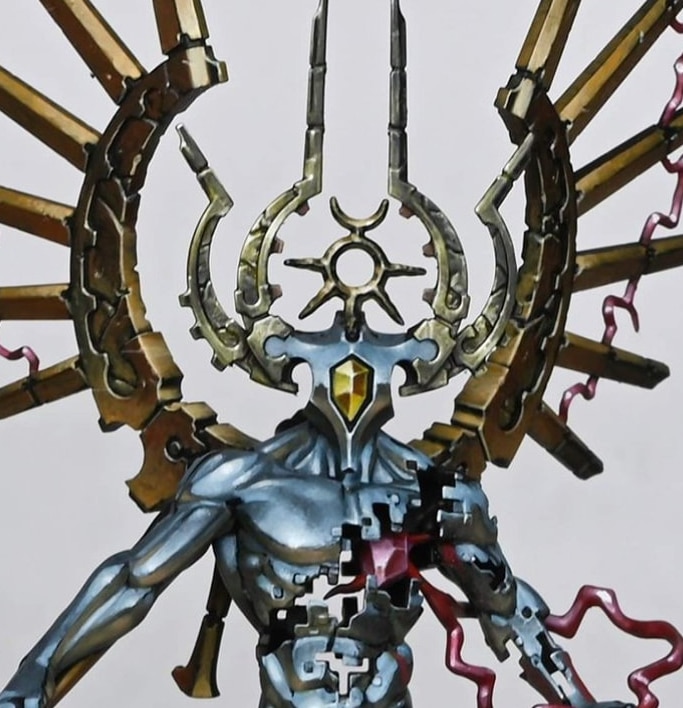
Here are my step by step guides on how to paint SENMM on a Void Dragon, sculpted by Darren Latham. It’s such a beautiful model!
I’ve simplified it from the original sculpt, so no tail, less lightning and I modified the head a little. I wanted a different effect for the NMM so I went for SENMM and am pretty happy with how it turned out.
For those who don’t know, SENMM just means Sky Earth Non Metallic Metal. You may remember that old White Dwarf magazines used a similar look on their title text.
In these tutorials, we’re aiming to achieve a stunning chrome effect, also known as sky-earth non-metallic metal (NMM), which mimics the appearance of reflective metal without using metallic paints.
Video: Part One – How to Paint SENMM
All videos are recorded in HD 1080p or higher – use full screen for the full effect and let the video load completely.
- Primer: Black
- Vallejo Paints: Pastel Blue, Pale Blue Grey, Heavy Grey, Heavy Skintone, Black
- P3 Paint: Morrow White
- Tools: A wet palette, fine detail brushes, and a lamp to observe light direction
Step-by-Step Process on How to Paint SENMM:
1. Priming
Begin by priming the Void Dragon model with a black primer. Ensure a uniform coat for a solid foundation.
2. Base Layer for Chrome Effect
- Sky Colours: Start with Vallejo Pastel Blue. Apply this colour on areas that would naturally catch the light from above. Expect to apply multiple layers to achieve an opaque finish due to the light colour over a dark primer.
- Earth Colours: Use a mix of Heavy Grey and Heavy Skintone for parts that reflect the ground. Keep these colours desaturated to maintain the grim dark aesthetic of the Necron range.
3. Refining Highlights and Shadows
- Highlight Blocks: Use a lamp to identify where light naturally falls on the model. Initially, create large blocks of highlight with Pastel Blue for sky reflection and Heavy Grey for ground reflection.
- Desaturation: Mix Pastel Blue with a small amount of Black to create darker, desaturated shades for shaded areas. This technique ensures the model does not appear too vibrant, preserving the grim atmosphere.
4. Detailing
- Focus on refining the chrome effect by adding gradients and transitions between the light and dark areas. The key is to simulate the mirror-like reflective quality of chrome.
- Incorporate subtle variations in the earth tones by adding more Black into Heavy Grey for deeper shadows. Utilize Heavy Skintone to add warmth to the earth reflections, contrasting with the cool sky reflections.
- Paint edges and fine lines with Pale Blue Grey and Morrow White to highlight sharp features and enhance the model’s reflective quality.
5. Final Adjustments
- Revisit areas needing sharper contrast or more pronounced highlights. Use Morrow White sparingly to accentuate the brightest points where light directly hits the model.
- Adjust the intensity of the earth tones where necessary, using Rhinox Hide to deepen shadows or reinforce the model’s texture.
Video: Part Two – How to Paint SENMM
All videos are recorded in HD 1080p or higher – use full screen for the full effect and let the video load completely.
Materials and Paints
- Vallejo Paints: Pastel Blue, Heavy Grey, Heavy Skintone, Black, Ice Yellow, English Uniform, Japanese Uniform
- Games Workshop Paints: Morghast Bone, Screaming Skull, Flash Gitz Yellow, Doombull Brown
- P3 Paint: Morrow White
- Tools: A wet palette, fine detail brushes, a lamp for proper lighting
Refining the Sky Earth Non Metallic Metal Chrome Effect
- Mix Your Paints: On your wet palette, prepare a gradient of Pastel Blue mixed with varying amounts of Black to create desaturated shades. For earth tones, mix Heavy Grey with Black for a subtle, greenish hue.
- Apply Subtle Highlights: Using the mixed shades, refine the chrome effect by adding nuanced highlights and shadows, emphasizing the model’s curvature and angles to mimic reflective metal.
Painting the Gem
- Base Layer: Start with Doombull Brown as a base for the gem. Ensure a smooth application but avoid filling the crevices to maintain depth.
- Build the Yellow: Layer Ice Yellow and then Flash Gitz Yellow, focusing the latter towards the bottom right to simulate light passing through the gem.
- Create a Gradient: Mix Ice Yellow and Flash Gitz Yellow (50/50) for a mid-tone. Apply carefully to build a transition from light to dark within the gem facets.
- Finishing Touches: Use Morrow White for the brightest points, emphasizing the light reflection and giving the gem a sparkling appearance.
Detailing the Horns
- Initial Layers: Begin with English Uniform as the base. If coverage is poor, consider using XV88 for a more opaque application.
- Add Depth with Japanese Uniform: Apply Japanese Uniform for the mid-tones, enhancing the texture and volume of the horns.
- Highlighting: Progressively highlight towards Morghast Bone and Screaming Skull for the raised edges and details, mimicking light reflection and texture.
- Final Highlights: Use Morrow White sparingly for the most pronounced edges and tips, creating a sharp contrast and focus on the texture.
Techniques and Tips
- Layering and Blending: Carefully layer and blend your paints, especially when working on the Sky Earth Non Metallic Metal chrome effect and gem. The transition from dark to light should be smooth, without harsh lines.
- Texture and Detail: Emphasize texture by using a stippling technique for the horns and rougher areas, contrasting the smooth, reflective surfaces of the chrome body.
- Light Direction: Always consider the source and direction of light when applying highlights and shadows, ensuring consistency across the model.
- Patience and Precision: Take your time with each step, especially when refining details and working on smaller sections like the gem and horns.
Glossary of Terms:
- Primer: A base layer of paint applied to the model to improve the adhesion of subsequent layers of paint. Primers are typically applied in neutral colours to ensure that the colours applied on top are vibrant and true to their hue.
- Chrome Effect: A painting technique used to mimic the appearance of reflective metal surfaces without using metallic paints. Achieved through strategic placement of light and dark colours to simulate reflections.
- Sky-Earth Non-Metallic Metal (NMM): A specific type of non-metallic metal painting technique wherein the painted object reflects the sky above and the earth below, creating a realistic metallic effect.
- Wet Palette: A tool used by painters to keep acrylic paints moist during the painting process. It consists of a container with a layer of water underneath a porous paper sheet, on which the paint is placed.
- Opacity: The measure of transparency or coverage provided by a paint. High opacity means the paint is less transparent and covers the underlayer well.
- Desaturation: The process of reducing the intensity of a colour by adding grey or the colour’s complement, making it less vivid and more neutral.
- Highlight: The application of lighter colours to the raised areas of a model to simulate the effect of light naturally hitting those surfaces.
- Shadow: The use of darker colours in recessed areas to create the illusion of depth and to emphasise the contours of the model.
- Gradient: A smooth transition between colours, often used to create a realistic lighting effect on miniatures.
- Edge Highlighting: A technique where the very edges of the model are painted with a lighter colour to make them stand out, simulating the way light would reflect off sharp edges.
- Stippling: A painting technique that involves applying small dots of paint to build up colour and texture.
- Glazing: A method of applying a thin, transparent layer of paint over another, allowing the colours below to show through. This technique is used to subtly adjust the tone, shade, or colour of the surface.
- Translucency: The quality of allowing light, but not detailed images, to pass through; semi-transparent. In painting, it refers to the application of thin layers of paint that let the underlying colour or primer show through.
- Dry Brushing: A technique in which a paintbrush is lightly dipped in paint, wiped off until almost dry, and then lightly brushed over the model. This highlights raised surfaces.
- Blending: A technique used to create a smooth transition between two or more colours on the model’s surface.
If you don’t have an account, please sign up here! The website currently has over 350 video tutorials with steps and tips, plus a selection of PDFs. If you are not sure about joining, you can explore my free videos with a free membership, or take the plunge and become a full subscriber for full access.


If you’d prefer to support me on Patreon, please visit: https://www.patreon.com/RichardGray