


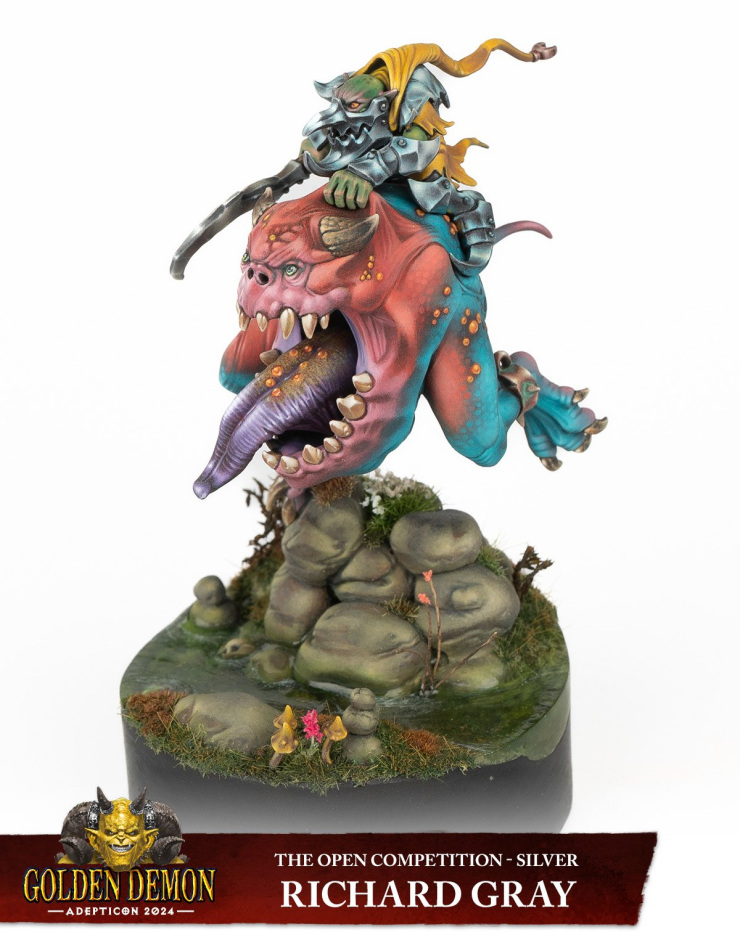
These videos show how to paint my Golden Demon winning Loonboss Knight on a Giant Cave Squig, with tips on NMM armour, woodgrain, banners, freehand and more. Scroll down to look at all the how to paint a Loonboss knight tutorials in order, or use the links below to quickly jump to a part of him, or a technique.
Techniques and Approaches – What do I mean?
- Non-Metallic Metal (NMM): A painting technique used to simulate the appearance of metal without using metallic paints, relying on grey tones and colours reflecting the environment.
- Layering: Building up colour and intensity through multiple thin layers.
- Glazing: Applying a transparent layer of paint to adjust colour intensity and tone.
- Highlighting: Adding lighter colours to raised areas to simulate the effect of light hitting the surface.
- Shading: Applying darker colours to recesses to create depth and contrast.
Materials
- A range of fine detail brushes for precise paint application. I use the Artist Opus range, but any quality brush designed for miniature painting can be used.
- A larger brush for base coating and applying glazes is also useful, especially for larger areas or when working with thin glazes.
- Blu-tack/white tack: Used for temporarily attaching parts of the model for easy handling and painting.
- Wet palette: Essential for keeping paints moist and workable, especially important for blending and glazing techniques.
- Water or a medium for thinning paints: Essential for achieving the smooth, thin layers required for detailed miniature painting.
- Mixing surface or palette: For mixing custom paint colours and dilutions.
- Reference materials: Such as photographs of knights and armour.
Video: Loonboss Armour and Yellow Robe
All videos are recorded in HD 1080p or higher – use full screen for the full effect and let the video load completely.
Paints
Games Workshop (Citadel)
- XV-88: Used as a base colour for the yellow robe.
- Balor Brown: Applied for layering on the robe.
- Yriel Yellow: Used for bright highlights on the robe.
- Flash Gits Yellow: For the final highlights on the robe to enhance vibrancy.
- Sotek Green: Used for reflective highlights on the armour.
- Mephiston Red: Applied for reflections and details.
- Mournfang Brown: For shading and adding depth to the yellow robe.
Vallejo
- Neutral Grey: Used as the base colour for the armour.
- Pale Grey Blue: Mixed with other colours for highlights on the armour.
P3 (Privateer Press)
- Morrow White: Mixed with Vallejo’s Pale Grey Blue for armour highlights.
Preparing the Model
- Initial Setup: The model is mounted using white tack (a type of white blu tack) to easily handle and paint hard-to-reach areas. The arms are not glued to allow for painting underneath and around them.
Painting the Armour (Non-Metallic Metal Technique)
- Base Coat with Vallejo Neutral Grey: Start by painting the armour with Vallejo Neutral Grey to lay down the initial highlights and shadows. This stage is rough, focusing on the placement of light and dark areas to simulate metallic reflection.
- Reflections and Highlights: Add reflections to the armour using colours from the model’s surroundings, such as Sotek Green for areas close to the squig and Mephiston Red for areas near red elements. This step involves carefully applying the paint to avoid damaging adjacent finished areas.
- Enhancing the Metallic Effect: Use a mix of Vallejo Pale Grey Blue, P3 Morrow White, and a tiny amount of yellow to create a pale green for the top-facing highlights. This mix creates a subtle colour variation that enhances the metallic sheen without resorting to pure white, which is reserved for the brightest reflection points.
- Refining Highlights and Shadows: Continue to refine the highlights and shadows, ensuring that the armour’s upper surfaces reflect more light and the lower surfaces remain darker, mimicking the effect of light coming from above. Smooth blending and correct highlight placement are crucial for a convincing NMM effect.
- Final Adjustments: Add the highest points of reflection using a light blue steel colour, moving away from the mixed colours previously used. This simplifies the process while maintaining the desired effect.
Painting the Yellow Robe
- Base Coat with XV-88: Apply a base coat of XV-88, which serves as a foundation for building up the yellow colour. Yellow paints often have poor coverage, so starting with a solid base is important.
- Shading: Use Mournfang Brown to add depth to the shadows of the robe. This colour introduces warmth and contrast, making the subsequent yellow layers stand out more.
- Layering: Apply layers of Balor Brown, focusing on the upward-facing sections and creases to create volume and shape in the fabric.
- Brightening with Yriel Yellow: Use Yriel Yellow to highlight the raised areas and creases further, enhancing the vibrancy and contrast of the robe. This step may require multiple layers due to the translucency of yellow paint.
- Final Highlights with Flash Gits Yellow: Add the brightest highlights with Flash Gits Yellow, concentrating on the most prominent parts of the robe to achieve a vibrant, sunlit effect. Keep these highlights limited to ensure the robe maintains its rich yellow colour.
- Inking for Vibrancy (Optional): If additional vibrancy is needed, a yellow ink can be glazed over the painted areas to enrich the colour without affecting the underlying detail and shading.
Video: Armour and Banner with Freehand
Materials Needed:
- Paints:
- Games Workshop: Balor Brown, Yriel Yellow, Flash Gits Yellow, Temple Guard Blue, Mephiston Red, Mournfang Brown, Rhinox Hide, Borghast Bone, Neutral Grey, Black
- Vallejo: Pale Grey Blue
- P3: Morrow White
- Other Materials: Plastic from a model clam pack for the pennant, green stuff for attachment, heat gun for shaping the pennant, model holder (optional for comfort), wet palette, water for thinning paints.
Steps to Paint the Armour:
- Enhancing Reflections: Begin by using Yriel Yellow to stipple on the lower reflections of the armour, focusing above the yellow skirt. This technique involves using very small, controlled marks to blend the paint without creating noticeable dots. Aim for a subtle blend rather than a harsh stipple effect.
- Mixing Colours: If you previously mixed colours such as Blue Horror with Uriel Yellow for specific shades, consider simplifying this process by sticking with a basic light blue for upward-facing areas. This approach minimises time spent on mixing while achieving a similar visual effect.
Steps to Create and Paint the Pennant:
- Creating the Pennant: Cut a piece of plastic from a model clam pack into a long triangle shape. Attach it to the spear of the Goblin using green stuff, ensuring it has a realistic attachment point. Sand and prime it black before beginning to paint.
- Shaping the Pennant: After priming, use a heat gun to carefully bend the pennant into a dynamic, swirling shape that suggests movement. Act quickly as the plastic cools and sets rapidly.
- Base Coating: Apply a base coat of Neutral Grey across the pennant. This provides a better surface for the following colours than a black base would, reducing the number of coats needed for opaque coverage.
- Applying the Main Colours: Start painting the pennant with the primary colours of your design. For this tutorial, we use a triadic colour scheme of purple, turquoise (Temple Guard Blue), and yellow. Apply the colours in blocks or patterns as desired, ensuring smooth, even coverage.
- Freehand Details: Add freehand designs such as checkered patterns or symbols in contrasting colours. Paint these designs directly onto the pennant, adjusting the size and shape as necessary to fit the flowing fabric’s contours.
- Finishing Touches: Use fine detail work to clean up any edges or to add highlights and shading to the freehand designs. This step brings depth and vibrancy to the pennant, making it stand out.
Video: Lance NMM (Non Metallic Metal)
Materials Needed:
- Paints:
- Games Workshop: Balor Brown, Yriel Yellow, Flash Gits Yellow, Mournfang Brown, Rhinox Hide, Baharroth Blue, Blue Horror
- Vallejo: Neutral Grey, Black
Steps to Paint the Armour:
- Base Coat: Begin with Vallejo Neutral Grey as a base coat. This colour provides a solid foundation for building up to the desired metallic effect.
- Enhancing the Metallic Look: Apply Baharroth Blue and Blue Horror to introduce subtle blue reflections, simulating the sky’s reflection on the armour. These colours add depth and vibrancy, making the armour appear more dynamic.
- Adding Highlights: Use P3 Morrow White for the brightest highlights, focusing on the edges and raised areas of the armour to mimic light reflecting off a shiny surface. Be careful with the application to ensure these highlights enhance the metallic effect without overpowering the blue tones.
- Detailing with Rhinox Hide: Apply Rhinox Hide in selected areas to create depth and contrast, especially around the rivets and in crevices where dirt and grime would naturally accumulate.
Steps to Paint the Lance/Spear Tip:
- Rough Texture Base: Start with a base coat of Neutral Grey, applied in a rough, stippled fashion to create texture. This approach simulates a worn, hammered metal rather than a smooth, polished finish.
- Adding Depth with Rhinox Hide: Use Rhinox Hide to darken areas and add rust effects, enhancing the lance’s worn and used appearance. Apply the paint in patches to create a natural variation in texture and colour.
- Highlighting Edges: With P3 Morrow White, highlight the edges and any raised details on the lance to accentuate its shape and texture. The contrast between the rusted areas and these highlights will give the lance a realistic metallic appearance.
- Creating Contrast with Baharroth Blue and Blue Horror: Introduce slight blue tinges using Baharroth Blue and Blue Horror to suggest environmental reflections on the lance, adding to the realism of the metal.
Video: Woodgrain on the Lance
Materials List:
- Primer: Black
- Base Paints: Doombull Brown
- Detailing Paints: XV-88, Zandri Dust, Morghast Bone
- Glazing Paints: Mournfang Brown, Abaddon Black
- Brushes: Fine tip brushes for detailed line work.
Step-by-Step Guide:
- Prepare Your Model:
- Start with a model primed in black. If the primer has been left for a long time and developed a shiny, hard surface that repels paint, consider applying a coat of matte varnish to improve paint adhesion.
- Base Coat:
- Apply a base coat of Doombull Brown. This colour might require multiple layers for full coverage, especially over a black primer. Allow each layer to dry thoroughly before applying the next.
- Initial Wood Grain Detailing:
- Using XV-88, begin painting the wood grain. Start with stylised curls and knots, especially on larger, flat surfaces for visual interest. Ensure these lines are somewhat thick to allow for later highlighting without losing the initial detail.
- Consider the Wood’s Shape:
- When drawing straight lines or adding to the wood grain pattern, follow the contours of the wood. Avoid straight lines that ignore the wood’s curvature, as this can look unnatural. The goal is to mimic natural wood grain, which follows the shape of the piece.
- Highlighting:
- Begin highlighting with Zandri Dust, focusing on making these lines thinner and more refined than the initial XV-88 lines. Highlight selectively, emphasising areas that would naturally catch more light and leaving others darker to create depth.
- Final Highlights:
- Use Morghast Bone for the final highlights, again focusing on thin, delicate lines to accentuate the wood grain’s details. This step adds further depth and realism to the wood effect.
- Glazing:
- Mix Mournfang Brown with water to create a glaze (approximately 1 part paint to 6 parts water, though adjust based on your preference and paint consistency). Apply this glaze selectively to tone down the brightness of the highlights and unify the wood grain effect. Glaze more heavily near the lance tip and where the hand grips the wood to create natural shading.
- Optionally, add a glaze of Abaddon Black in the deepest recesses or where additional shading is needed to enhance the depth further.
- Final Touches:
- After glazing, you might find some lines or details need redefining or adjusting. Use the same detailed approach with XV-88, Zandri Dust, and Morghast Bone to fine-tune the wood grain effect.
- Assessment and Adjustment:
- Once the glazes have dried, assess the overall effect. If necessary, reapply highlights or glazes to achieve the desired depth and realism. The goal is to have a richly detailed wood texture that looks natural and varied.
Additional Tips:
- Thin Lines: Practice achieving very thin lines for detailing and highlighting. The quality of these lines greatly contributes to the realism of the wood grain effect.
- Glazing Technique: Mastery of glazing is crucial for this technique. Glazes should be thin enough to allow underlying details to show through while unifying the overall appearance.
- Patience and Layers: Building up the wood grain effect requires patience and multiple layers. Allow each layer to dry thoroughly before proceeding to the next.
- Reference Images: Having a reference image of real wood grain can be incredibly helpful for understanding how to simulate the look on your model.
Video: Banner Weathering
Materials and Paints:
- Black Primer: For initial model preparation.
- Weathering Paints:
- Rhinox Hide
- XV-88
- Zandri Dust
- Morghast Bone
- Screaming Skull
- Fine Detail Brushes: For precise application of weathering.
- Matte Varnish: Optional, if paint adherence is an issue on previously primed areas.
Step-by-Step Guide:
- Initial Observation:
- Note any areas where paint adherence is poor, potentially due to oils or prolonged primer exposure. Apply a matte varnish coat if necessary to improve paint stickiness.
- Base Weathering Layer:
- Start with Rhinox Hide to apply the initial, broad weathering strokes. This layer sets the stage for depth and adds a first layer of grime. Apply in a seemingly haphazard manner, focusing on areas that would naturally accumulate dirt and wear.
- Building Up Weathering:
- Progressively use lighter browns, starting from XV-88 to Zandri Dust, then Morghast Bone, and finally Screaming Skull. Each successive layer should cover a smaller area than the last, creating a gradual transition from the darkest weathered areas to the lightest. The key is to create a detailed and layered effect that adds realism to the banner.
- Technique for Application:
- Use the tip of your brush for controlled application, keeping your strokes small and deliberate. As you move to lighter colours, your marks should become finer, simulating the detailed texture of weathered fabric.
- Highlight and Define:
- With Morghast Bone and Screaming Skull, focus on edges and high points where wear and tear would naturally highlight the banner. These colours also help to desaturate and blend the weathering with the rest of the banner, softening the overall effect.
- Glazing for Cohesion:
- Mix Screaming Skull with water to create a thin glaze. This step unifies the weathered effect, blending the layers together and ensuring that the weathering doesn’t overpower the underlying details of the banner. Apply sparingly over the weathered areas, paying attention not to obscure the detailed freehand work beneath.
- Final Adjustments:
- Revisit any areas that may require additional definition or where the weathering may have obscured too much detail. Use a fine brush to reapply base colours or add final highlights where necessary.
- Assessment:
- Step back and assess the overall effect. The weathering should add character and age to the banner without diminishing the vibrancy of the underlying colours or the clarity of the freehand details.
- Protect Your Work:
- Consider applying a protective varnish to seal the model and protect the weathering from handling and transport, especially important for competition pieces!
Additional Tips:
- Subtlety is Key: Weathering should enhance, not detract. Aim for a realistic look that suggests wear rather than overwhelming the piece.
- Consistency in Lighting: Ensure the highlighted areas of weathering are consistent with the light source affecting the entire model for a cohesive look.
- Patience and Layers: Build up the weathering gradually. Rushing can lead to a muddled effect that lacks depth.
Video : Loonboss NMM Sickle
Materials Needed
Paints
- Vallejo Paints
- German Grey
- Neutral Grey
- Dark Blue Pale
- Ice Yellow
- Games Workshop Paints
- Mournfang Brown
- Abaddon Black
- P3 Paints
- Morrow White
Brushes
- Artis Opus Size 00 brush, slightly worn for a softer tip. The worn tip is preferred for certain techniques like stippling and creating softer marks.
NMM Sickle – Step-by-Step Guide
Initial Blocking of Colours:
Start by blocking in a few grey colours on the sickle. Use Vallejo’s German Grey as the first colour, then transition to Neutral Grey. This stage is about establishing the basic shape and light direction of the sickle.
Considering the Angle:
Remember to consider how the Loonboss will hold the sickle. The angle of the sickle will impact the position of the reflections. The brightest highlight point should be at the top curve of the sickle.
Detailing the Surface:
Pay attention to the texture of the sickle. It should appear chunky and uneven, typical of goblin craftsmanship. Use the undulations on the blade’s surface to add interest and realism.
Mixing Colours on the Wet Palette:
Prepare a wet palette with a range of colours. Include variations of grey, both warm and cool tones. For instance, mix German Grey with Neutral Grey in different proportions. Also include Dark Blue Pale (a greenish-blue tone), Ice Yellow, and White. These colours will be used for creating various shades and highlights.
Creating Highlights and Texture:
Work on the shine points using a stippling effect. This technique helps create softer edges for the highlights, making the blending process easier. Gradually refine these highlights to make them smoother and cleaner.
Refining with Glazes:
Begin glazing with Mournfang Brown, watered down significantly (about 5-6 parts water to 1 part paint). This adds subtle colour and helps blend different tones together. It also imparts a slightly rusty look without adding texture.
Adding Details and Final Highlights:
Continue to add finer details and highlights using the prepared paints. Focus on the sharp edge of the sickle, adding subtle reflections. Use a combination of Abaddon Black and Morrow White for the final highlights and shadows.
Final Touches:
Keep refining the sickle, focusing on smoothing out transitions and ensuring the contrast between light and dark areas is pronounced. This step might require going back and forth between different shades to achieve a highly polished look.
Need to paint his trusty Squig steed?
How to Paint a Giant Cave Squig
A really fun experience playing with colour and texture! These videos show I created this bright little fellow.
If you don’t have an account, please sign up here! The website currently has over 350 video tutorials with steps and tips, plus a selection of PDFs. If you are not sure about joining, you can explore my free videos with a free membership, or take the plunge and become a full subscriber for full access.


If you’d prefer to support me on Patreon, please visit: https://www.patreon.com/RichardGray