


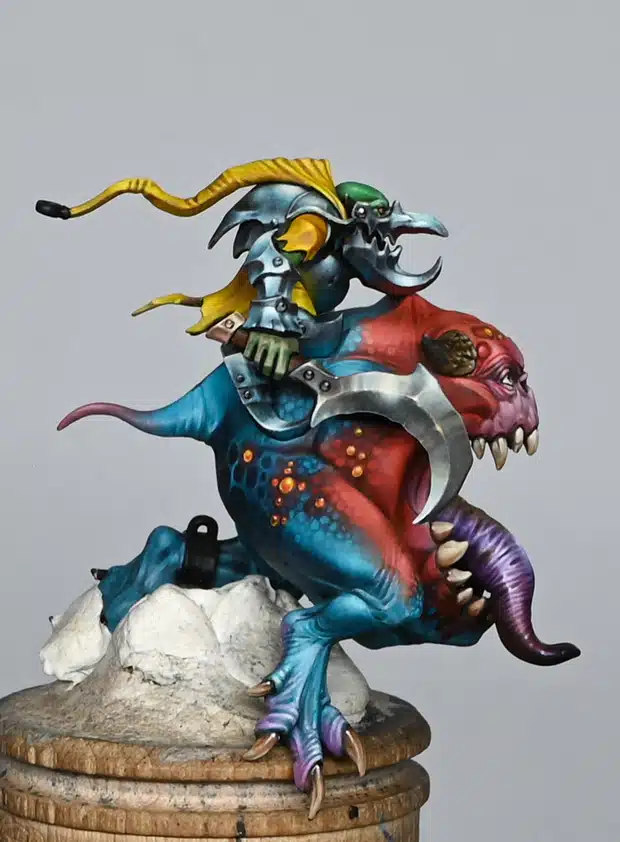
I’ve really enjoyed working on this model – it’s been a really fun experience playing with colour and texture, both on the Squig and the goblin armour! This set of tutorials was aimed specifically at preparing this model for the Golden Demon competition – you can read about how I did here.
Scroll down to explore all the how to paint a giant cave squig videos in order, along with step-by-step instructions, paints and materials, or you can quick-jump to a stage by clicking on the below appropriate contents:
Video: How to Paint a Giant Cave Squig Part One
This tutorial sets the foundation for painting a Loonboss on Giant Squig, focusing on building up from a solid base to intricate highlights and detailed textures.
Materials Needed:
- Model: Loonboss on Giant Squig (with slight modifications as described)
- Primer: Black
- Paints:
- Reds: Mephiston Red, Evil Sunz Scarlet, Wild Rider Red, Fire Dragon Bright
- Blues: Ahriman Blue, Temple Guard Blue, Baharroth Blue, Blue Horror
- Brushes: A worn-out Size 1 brush for base work and finer brushes for detail work. I use the Artist Opus range of brushes.
- Palette: Wet palette recommended for mixing and diluting paints
- Varnish: Matte varnish (optional, for primer issues)
Step by Step Guide
Model Preparation
- Use green stuff to fill any gaps. Sand down for smoothness.
- Apply a black primer to the entire model to ensure a uniform starting surface.
Base Painting
Use an older, worn-out brush for this base work. Save your finer, more expensive brushes for detailed work to come!
- Red Areas: Start with Mephiston Red, applying it broadly across areas intended to be red. This stage is about coverage rather than perfection. Ensure your brush strokes follow the musculature and contours of the model for a more natural appearance.
- Blue Areas: Proceed with Ahriman Blue for the blue sections, following the same principle of letting your brushwork complement the model’s sculpted details.
Initial Highlights
- Begin highlighting the red and blue areas to start building up depth. Use Evil Sunz Scarlet for red areas, focusing on raised sections and aspects that would catch the light.
- For blue areas, use Temple Guard Blue to highlight, again focusing on raised details and textures.
Additional Colour and Highlights
- Introduce Wild Rider Red and Fire Dragon Bright for further highlights on the red areas. These colours will add vibrancy and depth, but be mindful of maintaining the red’s saturation.
- Continue with Baharroth Blue and Blue Horror for blue highlights, aiming for a smooth transition between hues.
- After applying initial highlights, begin glazing with thinned Mephiston Red over the red areas to enhance saturation and blend the highlights seamlessly.
- Similarly, glaze with Ahriman Blue over the blue areas, pulling the paint towards the base colour to avoid muddying the transitions.
- With the base colours and initial highlights established, start refining the details. This includes adding very fine highlights and beginning the process of detailing textures and features not sculpted onto the model.
Video: How to Paint a Giant Cave Squig Part Two
This section dives deeper into adding intricacies and adjustments to the model’s face and integrating additional colours.
Materials Needed:
- Paints: Ahriman Blue, Temple Guard Blue, Baharroth Blue, Mephiston Red, Wild Rider Red, Yriel Yellow, Pink Horror, Emperor’s Children, Fulgrim Pink, Incubi Darkness
Step-by-Step Guide:
Adding Pink to the Face
- Initial Layer: Begin with Emperor’s Children, focusing on the gums and transitioning gently into the red areas of the face. This stage doesn’t require perfect smoothness but aim for a natural transition from the red of the squig’s body to the pink of its face.
- Highlighting: Use Fulgrim Pink for highlighting. Since these paints are light and somewhat translucent, they allow for the underpainting to influence their final appearance, contributing to a more integrated look.
- Blending: Employ Pink Horror to bridge between Emperor’s Children and Fulgrim Pink, enhancing the depth and complexity of the face.
Modifying the Gum Line
- Paint the gum line and inner mouth with a base of Emperor’s Children, moving towards Fulgrim Pink for highlights. Adjust the opacity by adding white to Fulgrim Pink if needed, but be cautious of maintaining the pink’s vibrancy.
Detailing and Texture
- Utilise Emperor’s Children and Fulgrim Pink to create detailed textures around the mouth and face, applying paint in small, controlled strokes. This technique is time-consuming but offers significant control over the model’s final appearance.
Revisiting and Glazing the Red Areas
- Reapply glazes of Mephiston Red over the red areas to enhance saturation and integrate the new pink areas into the overall colour scheme. This step is crucial for maintaining the vibrancy of the red while blending it seamlessly with the newly added pinks.
Adjusting Blue Highlights and Transitions
- Avoid using Macragge Blue as it can create an unwanted tonal jump. Instead, focus on Ahriman Blue and blend with Incubi Darkness for darker spots, ensuring smoother transitions between the blue and red areas.
- Continuously assess your work, adding final touches like glazes to unify and smooth out the colour transitions. Use Incubi Darkness to tone down overly bright blues and integrate them better into the model’s overall colour scheme.
Video: How to Paint a Giant Cave Squig Part Three
In this third video we focus on refining the blending of the model’s spots and the detailing the tongue with a rich, dynamic purple hue.
Paints Needed:
- Base Paints: Naggaroth Night, Abaddon Black
- Highlight Paints: Mephiston Red, Evil Sunz Scarlet, Wild Rider Red, Fulgrim Pink, Ushabti Bone
Step-by-Step Guide:
Preparing Glazes and Base Coats
- Mix Glazes: Prepare glazes of Mephiston Red and Ushabti Bone on your wet palette. These will be used to unify the colour tones across both red and blue sections of the model, ensuring consistent lighting and tonality.
- Base Coat for the Tongue: Apply a base coat of Naggaroth Night to the tongue. This may require several layers to achieve an opaque finish over the black primer, especially within the mouth’s interior, which can be challenging to paint.
Enhancing the Model with Glazes
- Applying Red Glazes: Use the Mephiston Red glaze over both the red and blue areas of the model, including the spots on the legs. This step introduces a slight purplish tone to the blue areas and enriches the red sections.
- Applying Ushabti Bone Glaze: Glaze over both the red and blue sections with Ushabti Bone to harmonise the highlight tones across the model. This subtle addition of a yellow tint to the blue areas ensures the lighting is consistent across the model.
Detailing the Tongue
- Creating a Gradient: Mix varying shades of Naggaroth Night with Abaddon Black to create a gradient on the wet palette, from pure Naggaroth Night to a 50/50 mix with Abaddon Black, and finally, to pure Abaddon Black.
- Applying the Gradient: Start with Naggaroth Night at the base of the tongue, blending into the darker mixes as you move towards the tip. This creates a visually interesting transition from the purple base to a dark, almost black tip.
- Stippling and Highlighting: Utilise stippling techniques with Fulgrim Pink mixed with Morrow White to create fine, detailed lines along the tongue, mimicking natural texture. Focus these highlights more towards the base and middle of the tongue, allowing for a smooth transition to the darker tip.
- Refining Details: Add further highlights by mixing Fulgrim Pink with more Morrow White, focusing on the most raised areas and textures to enhance the tongue’s dimensional appearance.
Final Touches
- Adjusting the Highlights: Revisit areas that require more definition or where the transitions between colours need softening. Use the prepared glazes to blend these areas seamlessly.
- Glazing for Depth: Apply a final glaze of Mephiston Red towards the tip of the tongue to deepen the colour, ensuring not to overshadow the highlights previously applied.
Video: How to Paint a Giant Cave Squig Part Four – Teeth and Horns
Paints Required
- Paints: Citadel’s Deathclaw Brown, Morghast Bone, Screaming Skull, Rhinox Hide, Abaddon Black, and Seraphim Sepia
Painting the Teeth
- Base Layer: Start with Deathclaw Brown to paint the teeth. Thin your paint adequately to ensure smooth application and avoid clumps. It might require multiple coats to achieve a solid base.
- Smooth Finish: Aim for a smooth, shiny finish rather than the textured, ridge-heavy look commonly seen. Use real-life references like a lion’s teeth for a more natural effect.
- Adding Depth: Once the base layer is complete and dry, apply Seraphim Sepia wash to add depth and a natural gradient to the teeth. This step enhances the realism by simulating natural colouration and shadowing.
- Highlighting: Use Morghast Bone to highlight the teeth, focusing on the tips and any prominent ridges or defects for added realism. Ensure the paint is dragged downwards towards the tips to mimic natural light reflection.
- Final Highlights: Apply Screaming Skull carefully to the very tips and raised details of the teeth. This step is crucial for adding a subtle sheen to them. The key here is restraint to maintain the natural look.
- Glazing: Mix a glaze of Screaming Skull to soften the transitions between Morghast Bone and Screaming Skull, enhancing the smooth gradient effect.
Painting the Horns
- Base Coat: Apply Rhinox Hide up to the point where the horn meets the body. This darker base will help create a gradient effect towards the tip.
- Building Up: Layer Deathclaw Brown over the Rhinox Hide, again focusing on dragging the paint towards the base of the horn where it connects to the body.
- Detailing: With a fine brush, add lines along the horn with Deathclaw Brown to simulate texture. These lines should follow the natural curvature of the horn.
- Enhancing Texture: Apply Morghast Bone to highlight these texture lines, following the same paths to maintain consistency.
- Highest Highlights: Use Screaming Skull to highlight the very beginnings of each texture line, enhancing the detail work and creating a sharper contrast.
- Blending Edges: Glaze with Rhinox Hide towards the tip of the horn to soften the transition between the base and the painted texture lines.
- Final Touches: Apply Abaddon Black to glaze and reinforce the dark tip of the horn, followed by targeted highlights with Morghast Bone and Screaming Skull to accentuate the light catching the edges and textures.
Video: How to Paint a Giant Cave Squig – Updated Horns
Materials Needed:
- Miniature: Giant Cave Squig (previously painted for Golden Demon Chicago 2019)
- Paints: Vallejo Model Color Black, Games Workshop’s Mournfang Brown, XV-88, Baelor Brown, Morghast Bone, Screaming Skull, and P3’s Morrow White
- Brushes: Size 00 Artist Opus brush or similar fine detail brush
- Miscellaneous: Water for thinning paints, a palette, and kitchen roll or similar for dabbing excess paint
Step by Step Guide
Base Preparation: Begin by overpainting the previously painted horns with Vallejo Model Color Black to blank them out and provide a uniform base for the new texture. While pure black horns offer a striking contrast against the Squig’s red body, we aim for a detailed finish.
Initial Texturing: Apply Mournfang Brown using a stippling and scribbling technique. The paint should be thinned to about a 50/50 mix with water, allowing for gel-like consistency. This step lays down the foundation for the texture, creating the initial depth.
Building Up Texture: Progress to XV-88, maintaining the stippling method but with a focus on refining the texture. This lighter brown will start to make the texture more pronounced. Again, keep the paint mix similar to the first step and use very little paint on the brush for precise application.
Enhancing Details: Introduce Baelor Brown to accentuate the textures further. Look for natural shapes and imperfections formed by the previous layers and enhance them. Focus the detailing towards where the horn meets the head, as this area should be the brightest due to the lighting.
Highlighting: Use Morghast Bone to begin the highlighting process, following the textured patterns you’ve established. Screaming Skull is then applied for finer highlights, focusing on the most raised parts of the texture to simulate light reflection.
Final Highlights and Refinement: The last paint used is Morrow White for the brightest highlights. These should be used sparingly, only on the very tips and edges where light would naturally be strongest. Water down the paint more for this step to ensure a soft application that blends well with the underlying colours.
Additional Tips:
- Paint Consistency: Mastering the consistency of your paint is crucial for this technique. Experiment on a palette to find the right balance between water and paint for each layer.
- Brush Control: Use the very tip of your fine detail brush for all applications. This ensures precision and prevents the paint from flooding the model’s details.
- Layering: Build the texture gradually. It’s easier to add more layers than to correct overly heavy ones.
Now you need to paint the Loonboss on top! Follow the link below to watch those tutorials:
Loonboss on Giant Cave Squig – Golden Demon 2024 Silver Demon Winner!
The Squig needed a Knight, so here’s my shiny NMM fellow, with tips on the banner, woodgrain, NMM and more.
If you don’t have an account, please sign up here! The website currently has over 350 video tutorials with steps and tips, plus a selection of PDFs. If you are not sure about joining, you can explore my free videos with a free membership, or take the plunge and become a full subscriber for full access.


If you’d prefer to support me on Patreon, please visit: https://www.patreon.com/RichardGray