


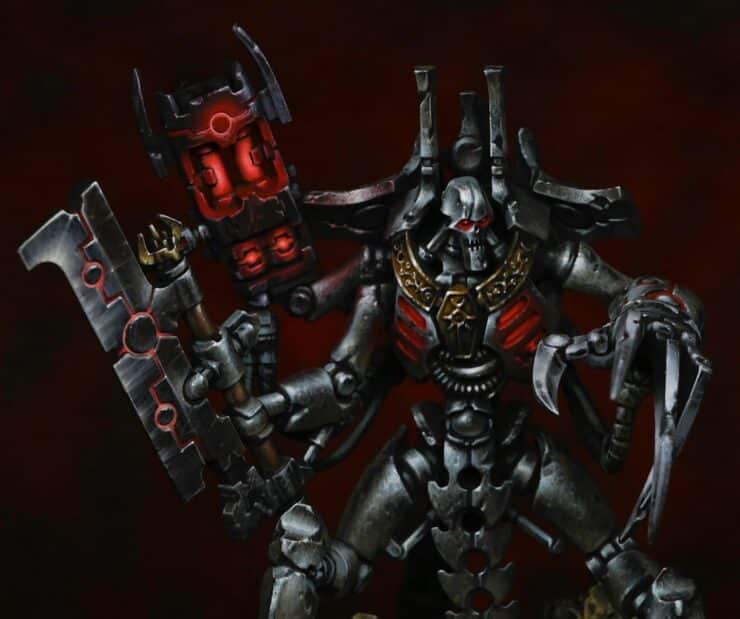
A set of videos on how to paint a Skorpekh Lord from the Indomitus boxed set from Games Workshop. With NMM (Non-metallic metal) and red OSL. Read on to explore the tutorials in order, or quick jump using the contents below!
Video – How to Paint Skorpekh Lord Part One
Paints and Materials Needed
Paints:
- Vallejo Paints:
- Black
- Dark Grey
- Heavy Grey
- Deep Blue Pale
- P3 Paints:
- Morrow White (Alternatively, you can choose your preferred white paint)
Brushes:
- Fine Detail Brush: For intricate work and precise highlights, a Size 00 brush is recommended. This will allow you to apply the smaller, more detailed marks needed for the final highlights and finer details.
- Standard Brush: A Size 0 or 1 brush for the broader strokes and layering. This will be useful for the initial application of the 50/50 mix of Dark Grey and Heavy Grey, and for applying the Heavy Grey.
Step-by-Step Guide
Step 1: Preparation
- Assemble and prime your Skorpekh Lord. Note that the model is push-fit, so keeping parts separate for detailed painting can be tricky. However, assembling it fully then painting is possible and can yield great results.
Step 2: Establishing Base Tones
- Start by applying a mix of Vallejo Dark Grey and Heavy Grey (mixed in a 50/50 ratio). This mix is your foundation for mapping out light points on the model. Apply it roughly to create texture, aiming for a grungy look.
Step 3: Adding Depth with Heavy Grey
- Use Vallejo Heavy Grey to add depth. This grey has a slight green tint, enhancing the contrast with later red elements. Apply it over the initial mix, enhancing the textured, worn effect.
Step 4: Working with Blue Tones
- Introduce Vallejo Deep Blue Pale to your palette. Apply this to areas you want to emphasise as reflecting the sky, adding a colder, metallic feel.
- Create a 50/50 mix of Deep Blue Pale and White (P3 Morrow White or your choice of white) for lighter highlights. Apply these to the most raised and prominent areas, following the form of the model.
Step 5: Finishing with White Highlights
- Use pure white paint for the final highlights. Focus on the smallest and brightest light points. This step requires precision – use a fine brush and aim for small, deliberate marks.
Step 6: Considerations During Painting
- Align your brushstrokes with the armour’s shape. Vary your marks to reflect different levels of wear and tear.
- Use a smaller brush (I used Artist Opus size 0 or 00) for finer details, especially as you work towards smaller, more precise highlights.
- Be mindful of the light source. Understand how it interacts with the model to guide your placement of primary and secondary highlights.
Step 7: Refinement and Detailing
- As you progress, refine the details. Ensure that areas like the head and weapons stand out.
- Adjust your brushwork to enhance the model’s intricate features, adding depth and dimension.
Video – How to Paint Skorpekh Lord Part Two
Paints and Materials Needed
Paints:
- Games Workshop: Mournfang Brown, Mephiston Red, Wildrider Red
- Vallejo: English Uniform, Japanese Uniform, Ice Yellow, Neutral Grey, Dark Grey
Step-by-Step Guide
- Golden Necklace:
- Start with Vallejo English Uniform. Focus on specific areas, leaving sides dark to create a light-shining effect. This technique helps avoid a flat, overly contrasted appearance and maintains a gold-like hue.
- Progress to Vallejo Japanese Uniform, highlighting details while considering the light reflecting from surrounding metal.
- Use Vallejo Ice Yellow for final highlights. Place dots and dashes on hard edges and corners, simulating imperfections and dents in the metal.
- Eyes:
- Begin with Mephiston Red from Games Workshop.
- Layer Wildrider Red, adding a little Ice Yellow for higher highlights. Be cautious not to make the eyes too pinkish. Adjust the red glow to achieve a sinister, darker tone.
- Blade:
- Use Vallejo Neutral Grey and Dark Grey as base colors.
- Mix Neutral Grey with Ice Yellow, creating two mixes: one with a 2:1 ratio and another with more Ice Yellow.
- Apply the mixes to the blade, starting with larger brushstrokes and gradually decreasing the size for finer details. Follow the blade’s curve with your brushstrokes.
- Add Vallejo Ice Yellow with Neutral Grey for the final highlights. Apply with a delicate touch to maintain the metal’s weathered appearance.
- For added realism, place tiny dots and lines using Vallejo Ice Yellow and Neutral Grey mix, simulating scratches and imperfections.
- Rod on Weapon Handle:
- Glaze the rod with Mournfang Brown, diluted with water (approximately 4 parts water to 1 part paint). Apply over the metallic colors previously painted, creating a brass-like effect.
- Final Details and Touch-ups:
- Go back and refine any areas as needed. Be especially careful with the sharp edge of the blade to maintain a clean, bright highlight.
- Adjust any colors or highlights to ensure consistency and realism across the model.
- Finishing Touches:
- Once satisfied with the painting, you can apply a matte varnish to reduce any unwanted shine from the paint, enhancing the model’s overall appearance.
If you don’t have an account, please sign up here! The website currently has over 350 video tutorials with steps and tips, plus a selection of PDFs. If you are not sure about joining, you can explore my free videos with a free membership, or take the plunge and become a full subscriber for full access.


If you’d prefer to support me on Patreon, please visit: https://www.patreon.com/RichardGray