


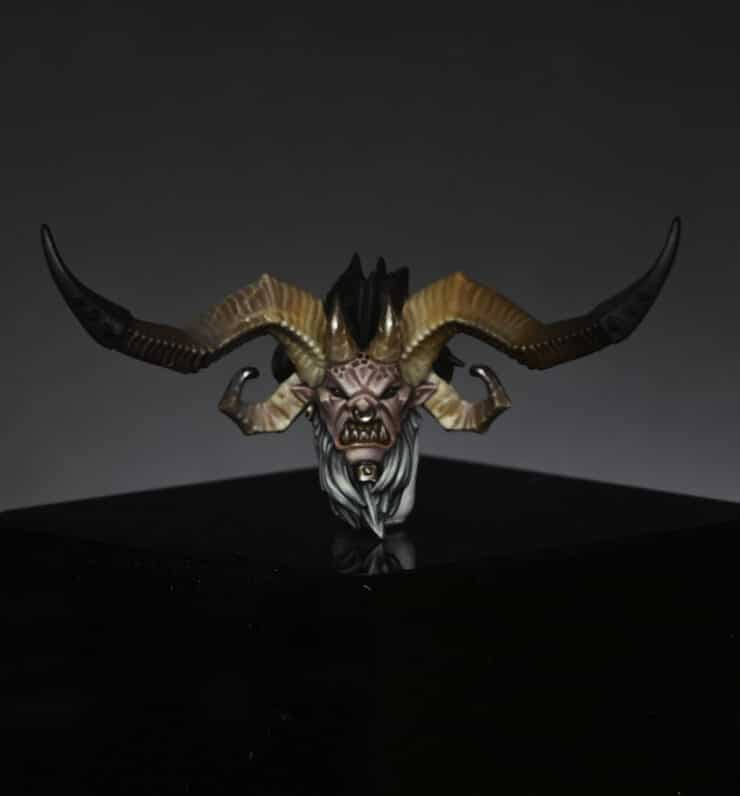
This video and guide shows how to paint an Ogroid head, (an Ogriod Theridon) which includes skin, horns, eyes, fur and other details.
Video: How to Paint an Ogroid Theridon Head
This video is currently hidden. To unlock it and view, please join the website and log in.
Materials Used
- Paints from Games Workshop:
- Bugman’s Glow
- Screaming Skull
- Ushabti Bone
- Morghast Bone
- Hobgrot Hide
- XV-88
- Mournfang Brown
- Rhinox Hide
- Death Korps Drab
- Evil Sunz Scarlet
- Nuln Oil
- Balor Brown
- Paints from Vallejo:
- Ice Yellow
- Black
- P3:
- Morrow White
Step-by-Step Guide
Base Coating:
- Begin with a base coat of Bugman’s Glow, applied with an airbrush for efficiency, though hand painting is also acceptable.
Painting Horns:
- Start with Screaming Skull, transitioning through Ushabti Bone, Morghast Bone, Hobgrot Hide, XV-88, Mournfang Brown, and finish with Rhinox Hide.
- Remember to use multiple coats for a smoother finish.
- Apply a thick glaze of watered-down Mournfang Brown for deeper colour in recesses and blending.
Highlighting Horns:
- Use a lighter shade such as Morghast Bone, Ushabti Bone, or Screaming Skull for highlighting.
- Gradually increase the brightness, moving towards smaller areas.
- Add a final touch of white (e.g., Morrow White) for the brightest spots.
Painting the Face:
- Start with a base of Bugman’s Glow.
- Highlight using a mix of Bugman’s Glow and Ice Yellow, increasing Ice Yellow content for brighter highlights.
- Use a mix of Bugman’s Glow and a small amount of Rhinox Hide for shadows.
Painting Eyes:
- Base the whites of the eyes with an off-white colour.
- Paint the irises with Evil Sunz Scarlet.
- Use Vallejo Black for pupils, ensuring they’re higher up in the eye.
- Add a tiny white dot for reflection.
Spots on the Forehead:
- Start with Rhinox Hide, gradually mixing in Bugman’s Glow for lighter spots lower down the face.
- Ensure the paint is thick enough to create a solid, opaque mark.
Teeth:
- Base coat with Bugman’s Glow, washed with Nuln Oil.
- Edge highlight with Hobgrot Hide.
- Apply a glaze of thinned Evil Sunz Scarlet at the gum line.
- Further highlight with a lighter bone colour (e.g., Ushabti Bone).
Beard:
- Base coat with Death Korps Drab.
- Apply successive highlights, adding Ice Yellow to the base colour for each stage.
- Focus on creating a smooth, flowing texture.
Metallic Clasp on Beard:
- Start with a base of XV-88.
- Apply progressive highlights using lighter shades and Ice Yellow.
- Add a touch of Mournfang Brown for warmth.
- Finish with a bright dot of white for shine.
Notes:
- For smoother paint applications, use a wet palette.
- Consistently thin your paints, particularly for glazes and highlights.
- Brush choice can vary based on preference; smaller brushes offer more control for fine details.
- Ensure a consistent light source for realistic highlights and shadows.
- Adjust the paint consistency and application technique based on the texture you’re painting (e.g., smooth for horns, diffused for fur).
More Ogroid Tutorials
Ogroid
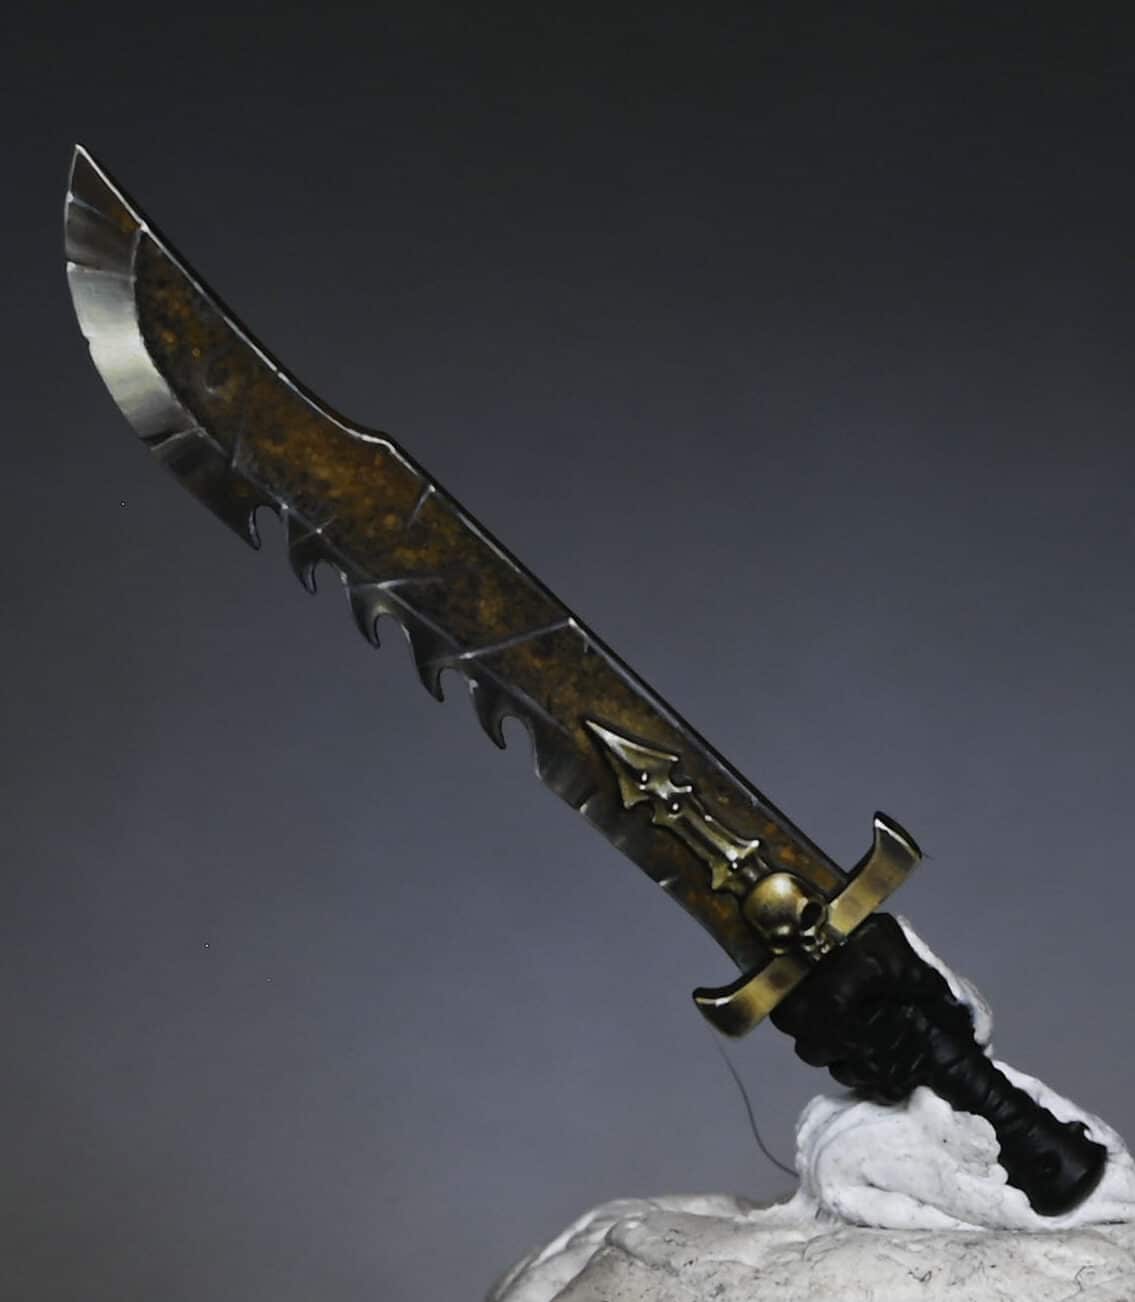
This video and guide shows how to paint an Ogroid sword with NMM (non-metallic metal) and rusty effects.
(Apologies for the dog hair)
Video : How to Paint an Ogroid Sword with NMM and Rust
All videos are recorded in HD 1080p or higher – use full screen for the full effect and let the video load completely. You can also click the little “cog” and change the speed of the video, if I am going too fast (or slow!)
Paints and Materials
Paints
Games Workshop:
Mournfang Brown
Troll Slayer Orange
Fire Dragon Bright
Rhinox Hide
Vallejo:
Ice Yellow
Black
German Grey
Neutral Grey
Pure White (Mecha Color)
Brushes
A range of brushes were used, including but not limited to:
A fine detail brush (such as a size 0 or 00), used for detailed work and fine highlights.
A larger brush (like a size 2), which can be useful for broader strokes and glazing.
Other Materials
Blue Tack: Used to temporarily attach the sword to the model for assessing lighting and highlight placement.
Wet Palette: Essential for mixing and maintaining paint consistency.
Water: For thinning paints, essential for techniques like glazing and stippling.
Step-by-Step
Basecoat and Shades:
Start with a neutral grey, darkened slightly with black.
Create a gradient of greys by mixing German Grey with Neutral Grey, and then adding Ice Yellow for various shades. This creates a series of warm greys for highlights.
Use a wet palette to mix and maintain the paint consistency.
Highlighting the Blade:
Focus on creating a main shine spot on the curved part of the blade, as this area naturally catches more light.
Add random reflections down the blade. Over-highlight initially as you will glaze over these later to reduce their intensity.
Remember that the flat of the blade will be rusty, so avoid highlighting this area.
Adding Details:
Paint distinct blocks of highlights or reflections on the blade, especially around the curved section.
Start with darker greys and layer up to lighter ones, finishing with Pure White for the brightest spots.
Use vertical brush strokes for control and consistency.
Rust Effects on the Blade:
Stipple Mournfang Brown over the flat of the blade for a textured rust effect. Be random and uneven in your application.
Layer Troll Slayer Orange over this, focusing on specific patches for an uneven and realistic rust effect.
Optionally, use Fire Dragon Bright for the brightest rust highlights.
Refining and Adding Scratches:
Add scratches and chips using a mixture of Neutral Grey and Ice Yellow.
Apply these details sparingly and randomly to avoid patterns.
For added depth, add a line of a darker colour (like Rhinox Hide) above some of the scratches.
Finishing Touches:
Make final adjustments to the highlights and rust effects.
Use glazing techniques to soften transitions and blend colours seamlessly.
Be cautious with the use of white; too much can detract from the warm effect.
More tutorials to explore!
If you don’t have an account, please sign up here! The website currently has over 350 video tutorials with steps and tips, plus a selection of PDFs. If you are not sure about joining, you can explore my free videos with a free membership, or take the plunge and become a full subscriber for full access.
If you’d prefer to support me on Patreon, please visit: https://www.patreon.com/RichardGray [...]

This video and guide shows how to paint an Ogroid head, (an Ogriod Theridon) which includes skin, horns, eyes, fur and other details.
Video: How to Paint an Ogroid Theridon Head
Materials Used
Paints from Games Workshop:
Bugman’s Glow
Screaming Skull
Ushabti Bone
Morghast Bone
Hobgrot Hide
XV-88
Mournfang Brown
Rhinox Hide
Death Korps Drab
Evil Sunz Scarlet
Nuln Oil
Balor Brown
Paints from Vallejo:
Ice Yellow
Black
P3:
Morrow White
Step-by-Step Guide
Base Coating:
Begin with a base coat of Bugman’s Glow, applied with an airbrush for efficiency, though hand painting is also acceptable.
Painting Horns:
Start with Screaming Skull, transitioning through Ushabti Bone, Morghast Bone, Hobgrot Hide, XV-88, Mournfang Brown, and finish with Rhinox Hide.
Remember to use multiple coats for a smoother finish.
Apply a thick glaze of watered-down Mournfang Brown for deeper colour in recesses and blending.
Highlighting Horns:
Use a lighter shade such as Morghast Bone, Ushabti Bone, or Screaming Skull for highlighting.
Gradually increase the brightness, moving towards smaller areas.
Add a final touch of white (e.g., Morrow White) for the brightest spots.
Painting the Face:
Start with a base of Bugman’s Glow.
Highlight using a mix of Bugman’s Glow and Ice Yellow, increasing Ice Yellow content for brighter highlights.
Use a mix of Bugman’s Glow and a small amount of Rhinox Hide for shadows.
Painting Eyes:
Base the whites of the eyes with an off-white colour.
Paint the irises with Evil Sunz Scarlet.
Use Vallejo Black for pupils, ensuring they’re higher up in the eye.
Add a tiny white dot for reflection.
Spots on the Forehead:
Start with Rhinox Hide, gradually mixing in Bugman’s Glow for lighter spots lower down the face.
Ensure the paint is thick enough to create a solid, opaque mark.
Teeth:
Base coat with Bugman’s Glow, washed with Nuln Oil.
Edge highlight with Hobgrot Hide.
Apply a glaze of thinned Evil Sunz Scarlet at the gum line.
Further highlight with a lighter bone colour (e.g., Ushabti Bone).
Beard:
Base coat with Death Korps Drab.
Apply successive highlights, adding Ice Yellow to the base colour for each stage.
Focus on creating a smooth, flowing texture.
Metallic Clasp on Beard:
Start with a base of XV-88.
Apply progressive highlights using lighter shades and Ice Yellow.
Add a touch of Mournfang Brown for warmth.
Finish with a bright dot of white for shine.
Notes:
For smoother paint applications, use a wet palette.
Consistently thin your paints, particularly for glazes and highlights.
Brush choice can vary based on preference; smaller brushes offer more control for fine details.
Ensure a consistent light source for realistic highlights and shadows.
Adjust the paint consistency and application technique based on the texture you’re painting (e.g., smooth for horns, diffused for fur).
More Ogroid Tutorials
If you don’t have an account, please sign up here! The website currently has over 350 video tutorials with steps and tips, plus a selection of PDFs. If you are not sure about joining, you can explore my free videos with a free membership, or take the plunge and become a full subscriber for full access.
If you’d prefer to support me on Patreon, please visit: https://www.patreon.com/RichardGray [...]
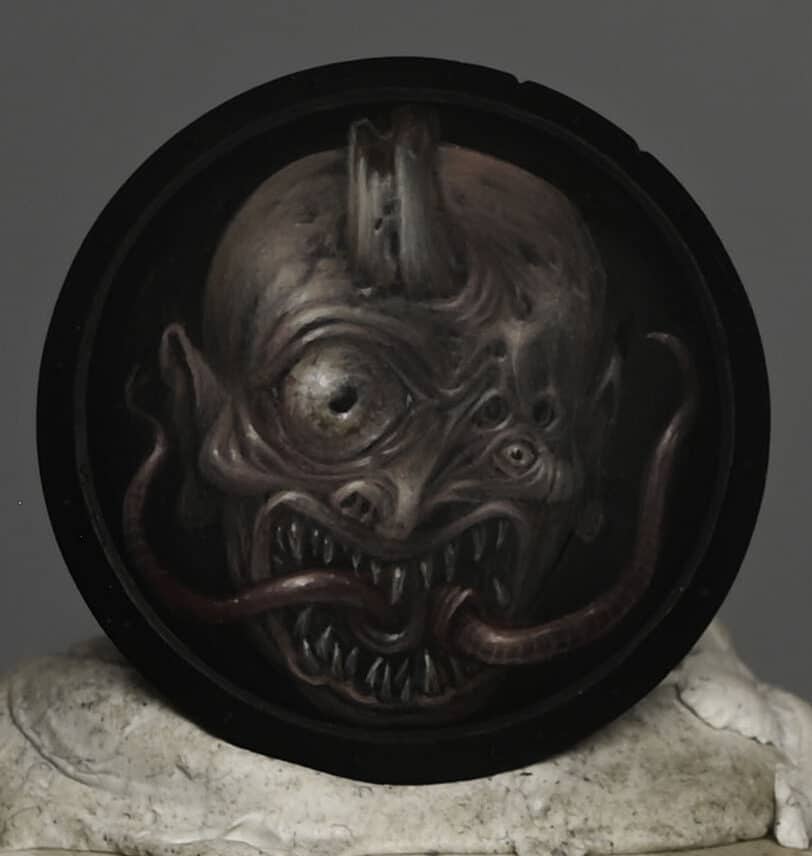
These videos show how to a paint a Nurgle shield with freehand for an Ogroid from the Slaves to Darkness army box.The freehand is if a Nurgle Plaguebearer head and is intended as a potential Golden Demon entry.
Scroll down to explore the tutorials and steps in order, or click the below to quick jump to a technique or section.
Video One: How to Paint a Nurgle Shield with FreehandPaints and Materials UsedPaintsBrushesOther MaterialsStep-by-Step Guide: PreparationBase PaintingFreehand SketchingRefining and DetailingFinal TouchesImportant NotesVideo Two: How to Paint the Shield Shine and NMM TrimPaints and Materials UsedPaintsBrushesOther MaterialsStep-by-Step GuidePreparing the PalettePainting the ShinePainting the NMM TrimFinal TouchesImportant NotesMore Freehand Tutorials to Explore
Video One: How to Paint a Nurgle Shield with Freehand
Paints and Materials Used
Paints
Games Workshop Paints:
Rhinox Hide
Bugman’s Glow
Mournfang Brown
Morghast Bone
Deathworld Forest
Yriel Yellow
Khorne Red
Ushabti Bone
Vallejo Paints:
Black
Ice Yellow
P3 Paint:
Morrow White
Brushes
Artist Opus:
Size 00 brushes (both a newer brush for finer details and an older brush for blending)
Other Materials
Wet Palette: To keep paints moist and workable.
Scalpel: For removing details from the shield.
Sandpaper: For smoothing the shield after using the scalpel.
Primer: Ultimate primer (specifically thinned with X20A for this project).
Mixing Water: For thinning paints on the palette.
Matte Varnish: To even out the surface and finish of the paint job.
Step-by-Step Guide:
Preparation
Prep the Nurgle Shield with Freehand: Remove intricate details from the shield using a scalpel and sand it slightly. Keep some battle damage for authenticity, if you wish.
Prime the Shield: Use Ultimate primer, thinned with X20A, applied in 4-5 thin coats.
Base Painting
Wet Palette Setup: Prepare a wet palette with the following Games Workshop colours: Ice Yellow, Bugman’s Glow, Rhinox Hide, Mournfang Brown, Morghast Bone, Deathworld Forest, Yriel Yellow, Khorne Red, and Ushabti Bone. Also, have Vallejo Black and P3 Morrow White ready.
Mixing Colours: Create various mixes of these colours on the palette, adjusting with water for a thinner consistency (approximately 50/50).
Freehand Sketching
Initial Sketch: Start sketching the Nurgle face on the shield using Bugman’s Glow. This doesn’t have to be symmetrical or realistic.
Adding Details: Gradually add more details like eyes, horns, and facial deformations using the mixed colours. Use Rhinox Hide for shading.
Background Technique: Use Vallejo Black as a ‘rubber’ to tweak and correct the sketch as needed.
Refining and Detailing
Light and Shadow: Use the lighter and darker mixes to create depth, focusing on the facial features. Ensure a balance between highlights and shadows.
Adding Texture: Pay attention to the direction of brushstrokes to replicate skin texture and facial creases.
Final Touches
Metallic Effects: For a Golden Demon entry, ensure to incorporate light volumes and reflective effects on the shield, as well as on the freehand.
Glazing: You may need to glaze over the freehand to integrate it with the shield’s overall shine and metallic effect.
Varnishing: Finish the shield with a matte varnish to even out different paint finishes.
Important Notes
Brush Technique: Use the very tip of your brush for detailed work. Switch between an older brush for blending and a newer one for sharp details.
Colour Importance: While exact colour mixes are flexible, ensure to maintain the overall desaturated, moody look characteristic of Nurgle.
Patience and Layers: Build up the image with multiple thin layers, allowing for smooth transitions and a detailed finish.
Personal Style: Remember, this guide is a base. Feel free to adjust and experiment according to your style.
Video Two: How to Paint the Shield Shine and NMM Trim
Paints and Materials Used
Paints
Vallejo Paints:
Black
German Grey
Neutral Grey
Ice Yellow
White
Games Workshop Paints:
Mournfang Brown
Brushes
Size 00 Brush: Ideal for detailed work and fine textures. Used for most of the work including the shine and trim.
Size 2 Brush: Used for broader strokes and glazing, especially over larger areas.
Other Materials
Wet Palette: To keep the paints moist and workable.
Lamp: For observing how natural light falls on the model, crucial for accurate highlight placement.
Blu Tack or Similar Adhesive: To temporarily attach the shield to the model for correct angle assessment.
Step-by-Step Guide
Preparing the Palette
Setup Wet Palette: Prepare a wet palette with Vallejo Black, German Grey, Neutral Grey, Ice Yellow, White, and Games Workshop Mournfang Brown. Create a gradient of grey shades from black to white, mixing in Ice Yellow and White with Neutral Grey for various mid-tones.
Painting the Shine
Analyzing Light Direction: Position the model under a lamp to observe natural light fall. This will guide the placement of the shine.
Initial Highlights: Start with a Neutral Grey or a mix of Neutral Grey and German Grey to block in the primary highlight areas on the shield.
Building Up Layers: Gradually increase the brightness of the highlights, focusing on the top left as the primary light source. Remember, the paint will appear brighter when wet and duller when dry.
Textured Effect: Use scratchy and stipple brushstrokes with minimal paint for a textured shine effect. Use the very tip of your brush.
Bounce Highlight: Add a bounce highlight at the bottom of the shield, reflecting light from the ground. This should be less bright than the primary highlight. Use a watered-down Mournfang Brown for a glaze over this area.
Painting the NMM Trim
Blocking in Highlights: Use Neutral Grey to block in primary highlights on the trim, focusing on the top area.
Adding Variation: Create a variety of light grey blocks along the trim, ensuring they get darker and more spaced out as they move away from the top highlight.
Refining Highlights: Gradually add lighter tones, culminating in white for the brightest parts. Ensure these highlights align with the shield’s central highlight.
Detailing Scratches: Use white to pick out tiny dots on sculpted scratches for added realism and depth.
Bounce Highlight on Trim: Similar to the shield, add a less intense bounce highlight at the bottom of the trim.
Final Touches
Glazing: Apply a thin glaze of Mournfang Brown over certain areas for colour integration and smooth transitions.
Detail Checks: Make any necessary adjustments to neaten the highlights and ensure consistency in lighting and texture across the shield and trim.
Important Notes
Consistency and Control: Maintain a good balance in paint consistency – not too thick for opaque marks and not too watery to avoid spreading.
Brush Technique: Always pull the brush towards yourself for control and precision, especially important when working near the freehand area.
Learning and Experimentation: Remember, this technique is both challenging and rewarding. Don’t be afraid to experiment and learn from the process.
These guides should provide a clear roadmap to achieving a high-standard finish for your freehand on shields, suitable for display or competition. Remember, practice and patience are key to mastering these techniques and don’t be afraid to do your own thing and add your own personal touch or style to your freehand!
More Freehand Tutorials to Explore
If you don’t have an account, please sign up here! The website currently has over 350 video tutorials with steps and tips, plus a selection of PDFs. If you are not sure about joining, you can explore my free videos with a free membership, or take the plunge and become a full subscriber for full access.
If you’d prefer to support me on Patreon, please visit: https://www.patreon.com/RichardGray [...]
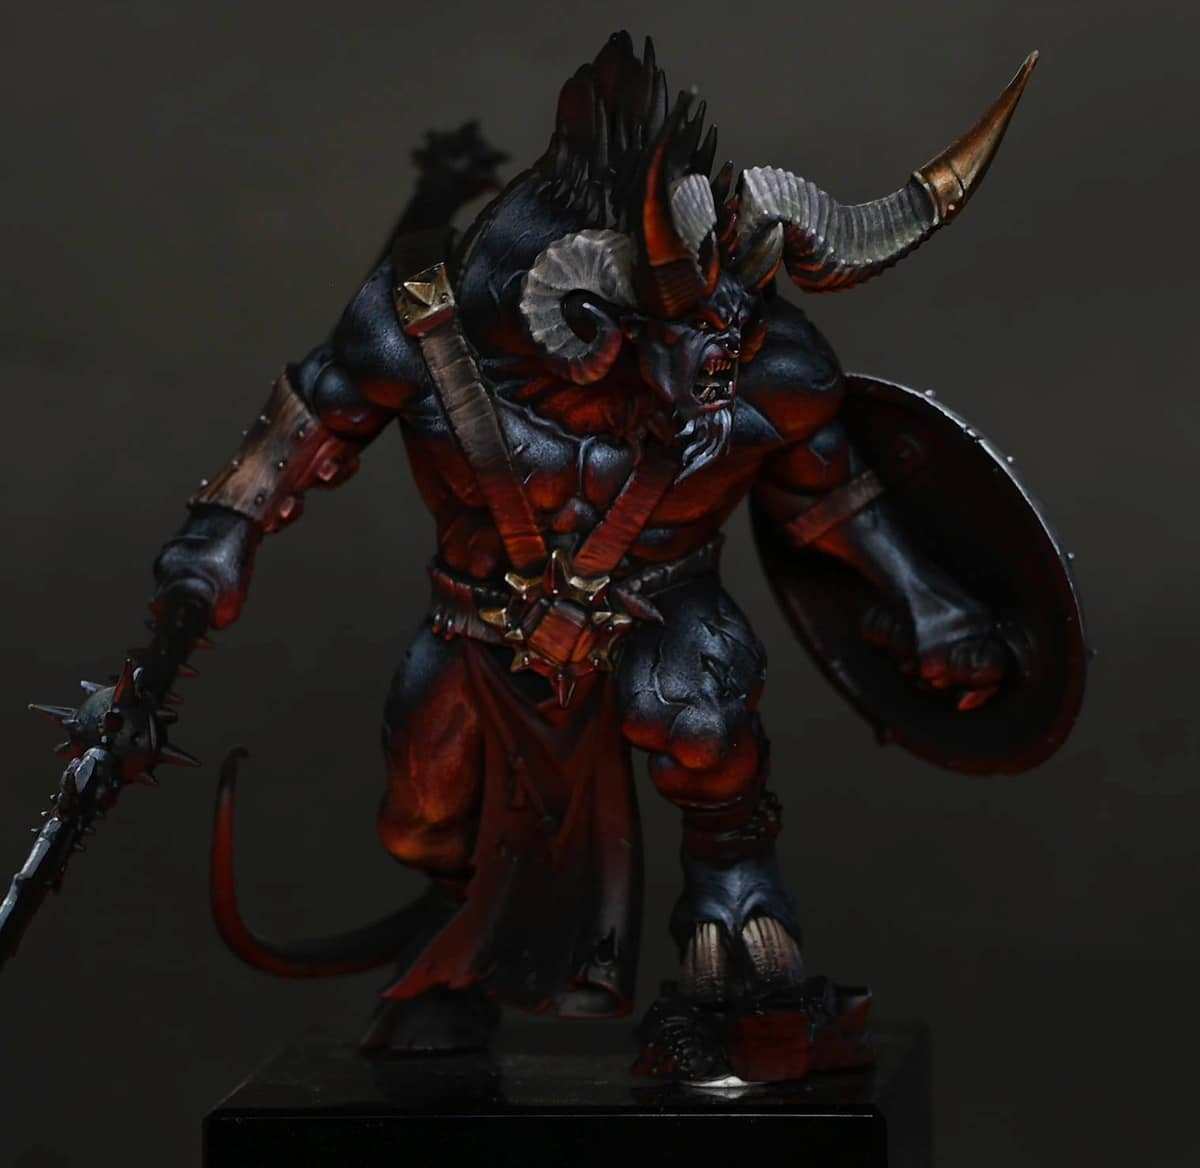
A selection of detailed how to paint an Ogroid Myrmidon videos including red OSL, NMM, fur effect, horns and freehand on his shield.
Myrmidons are masters of the Varanspire’s fighting pits, and have spent decades mastering the gladiatorial arts. In battle, they lead those who seek to join the Everchosen’s legions, for to impress a Myrmidon is to be marked for glory.
Scroll this page to explore the Ogroid Myrmidon videos in order, or click on the below contents to jump to a specific part of the model or technique:
Video: Ogroid Myrmidon Face and HornsMaterials Needed:PreparationPainting the HornsPainting the NMM Gold TipsPainting the FaceFinishing TouchesVideo: Ogroid Myrmidon SkinMaterials NeededStep-by-Step Guide to Ogroid Myrmidon SkinVideo: Ogroid Myrmidon Armour and MusclesMaterials Needed:Painting the Leather ArmourHighlighting Black SkinVideo: Scorpion Freehand First StepsMaterials Needed and PreparationPainting the Ogroid Myrmidon Shield’s BackgroundStarting the Scorpion FreehandVideo: Scorpion Freehand Refinement and DetailsAdditional Materials:What do These Techniques Mean?:Paints:Rendering the ScorpionWeathering the Ogroid Myrmidon Shield
All videos are recorded in HD 1080p or higher – use full screen for the full effect and let the video load completely.
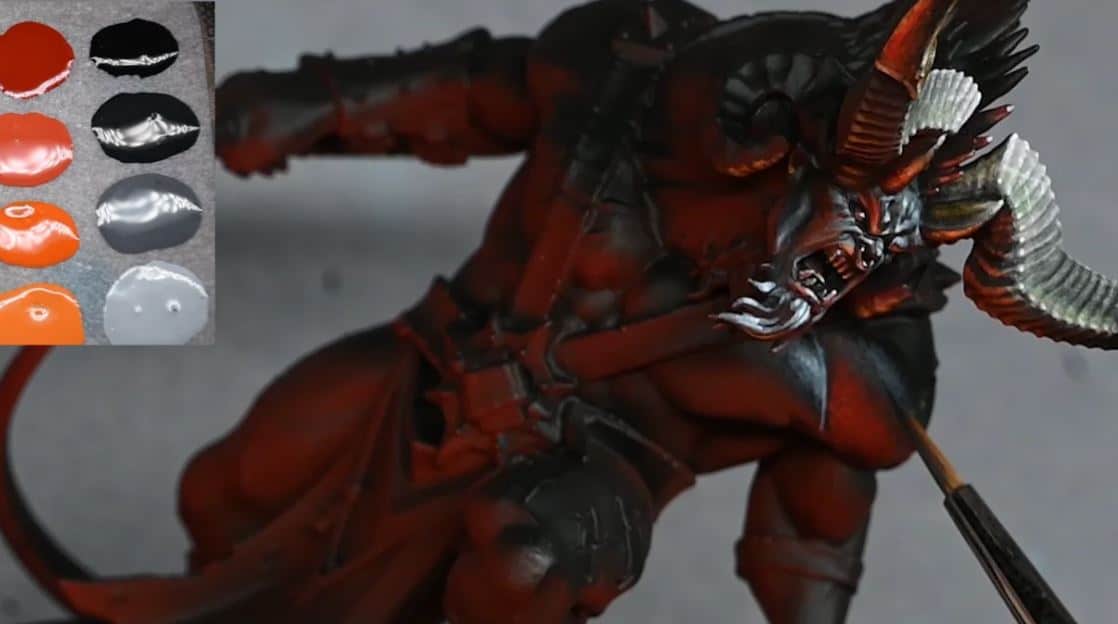
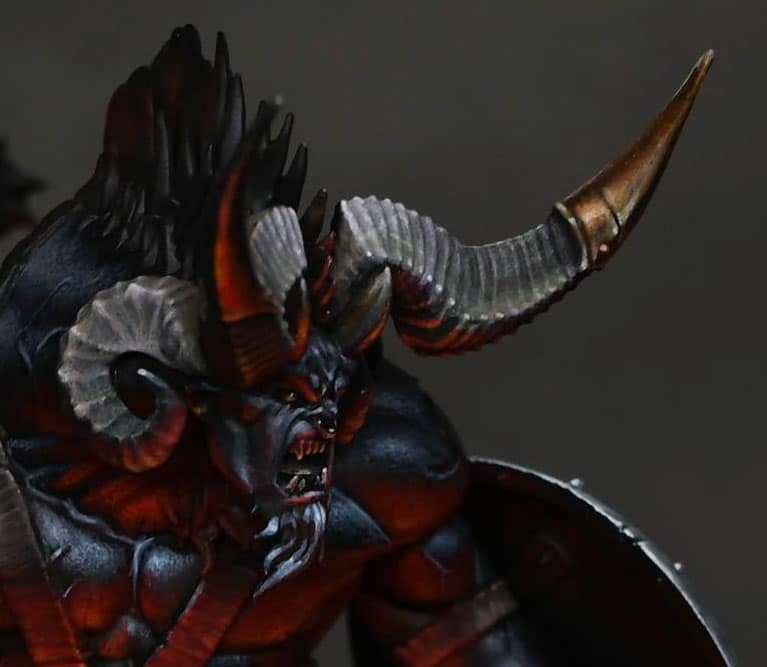
Video: Ogroid Myrmidon Face and Horns
This video shows how to paint the face and horns along with the NMM golden horn tips.
Materials Needed:
Primer: Black
Base Colours: Mephiston Red (GW), Zandri Dust (GW), English Uniform (Vallejo)
Highlights and Shadows: Wild Rider Red (GW), Troll Slayer Orange (GW), Firedragon Bright (GW), Neutral Grey (Vallejo), Pale Grey Blue (Vallejo), Japanese Uniform (Vallejo), Ice Yellow (Vallejo), White (Vallejo), Heavy Warm Grey (Vallejo), Heavy Skintone (Vallejo)
Glazes and Details: Mournfang Brown (GW), Corvus Black (GW)
Airbrush (optional for underside glow effect)
Preparation
Priming: Begin with a black primer for deep shadows and to prepare the model for painting.
Underglow Effect: Optionally, apply Mephiston Red thinned down with an airbrush (or manually) for an underside glow. This step is not essential but helps to establish the mood and lighting direction for the model.
Painting the Horns
Base Layer: Apply a base coat of Rhinox Hide (GW) on the horns, focusing on a rough texture to highlight the weathered appearance.
Adding Texture: Use Zandri Dust (GW) to build the texture on the horns, applying it unevenly to create a worn look.
Highlighting: Mix Zandri Dust with lighter shades such as Heavy Warm Grey and Heavy Skintone (Vallejo) for highlights, concentrating lighter colours towards the centre of the horns and darker shades towards the tips.
Refining Texture: Return with Rhinox Hide to deepen the shadows in textured areas, using a fine brush to emphasise details and the rough texture.
Glazing: Employ thin glazes of Mournfang Brown and Corvus Black sparingly to blend and soften transitions.
Painting the NMM Gold Tips
Base Colours: Start with English Uniform (Vallejo) for the metallic areas’ base.
Building up Metallics: Progress from Japanese Uniform to Ice Yellow (Vallejo), highlighting edges and raised areas to simulate gold reflection.
Final Highlights: Use White (Vallejo) for the sharpest highlights on edges and high points to mimic metal shine.
Glazing for Depth: Apply glazes of Mournfang Brown to deepen and enrich the gold, being careful not to cover the brightest highlights.
Painting the Face
Base Layer for Skin: Use Neutral Grey (Vallejo) for the skin, avoiding areas catching the underglow.
Adding Shadows and Highlights: Apply Pale Grey Blue (Vallejo) for highlights on raised areas like the brow, nose, and cheeks, maintaining the glowing effect in recesses.
Detailing and Refining: Deepen shadows and define features with Corvus Black (GW), enhancing skin texture and facial details with fine highlights of Pale Grey Blue and White (Vallejo).
Adjusting the Underglow: Touch up the underglow with Mephiston Red, Wild Rider Red, and Troll Slayer Orange (GW) to ensure it complements the overall painting, adjusting intensity accordingly.
Finishing Touches
Adjusting Highlights: Reassess highlights and shadows, ensuring they align with the desired atmosphere and light source.
Details: Focus on small details like teeth and eyes, applying light and shadow principles for emphasis.
Glazing: Use glazes to smooth transitions and adjust colour saturation where needed, particularly on the horns and face to unify the piece.
Video: Ogroid Myrmidon Skin
This guide will focus on achieving a textured ogroid skin effect with top-down highlights and red underlighting, alongside a detailed approach to creating a realistic muscle definition. We’ll be using a mix of Vallejo and Games Workshop paints to achieve this effect.
Materials Needed
Vallejo Paints: Black, Dark Grey, Neutral Grey, Pale Grey Blue
Games Workshop Paints: Mephiston Red, Evil Sunz Scarlet, Wild Rider Red, Troll Slayer Orange, Fire Dragon Bright
Size 0 Artist Opus Brush (preferably a newer one for fine stippling)
A wet palette
Water for thinning paints
Step-by-Step Guide to Ogroid Myrmidon Skin
Step 1: Base Coating
Begin by base coating the skin of your Ogroid Myrmidon with Mephiston Red to prepare for the red underlighting. This will serve as the base for our stippling technique later on.
Step 2: Stippling Technique Introduction
For the skin’s texture, we’re going to use a stippling technique. This involves applying tiny dots of paint to create a textured appearance. Start with Vallejo Dark Grey and a touch of Neutral Grey, using a fairly new brush for precise dot application. The goal is to create very fine dots, so remember to apply very light pressure to avoid creating larger, triangular marks.
Step 3: Adding Red Underlighting
Switch to Games Workshop’s Evil Sunz Scarlet, stippling over the red base layer to begin creating the underlighting effect. This will initially appear very bright but will dull down as it dries. Layer over with Mephiston Red to help blend and soften the transition.
Step 4: Top-Down Highlights
For the top-down highlights, use a gradient from Dark Grey to Pale Grey Blue, progressing from darkest to lightest as you move up the model. This mimics natural lighting, emphasizing the muscle contours and giving the skin a realistic depth. Remember, the highlights should reflect where natural light would hit the model, focusing on the tops of curves and muscle peaks.
Step 5: Fine-Tuning Highlights and Shadows
As you apply your highlights, consider the model’s anatomy. Paint sharp lines of Pale Grey Blue in the recesses between muscles, such as between the pectorals and deltoids, to accentuate the definition. Use the light from your lamp as a guide to ensure consistency in your highlighting.
Step 6: Red and Orange Highlights
For the lower parts of the muscles, closer to the model’s base, switch to the warmer tones on your palette: Wild Rider Red, Troll Slayer Orange, and Fire Dragon Bright. Apply these colours opposite to the top-down lighting, focusing on areas that would be illuminated from below. This step may require patience due to the translucency of reds and oranges, necessitating multiple layers for a solid appearance.
Step 7: Blending and Correcting
If any areas stand out too much or the transitions between colours are too stark, revisit them with intermediary shades to blend them more naturally. Stippling allows for easy correction; simply overlay with the appropriate colour to soften and integrate any harsh lines or spots.
Step 8: Final Touches to the Skin
After completing the stippling, examine the model for any areas that may need additional work. Adjust the intensity of the highlights and shadows as necessary, ensuring that the focal points, such as the face and upper torso, are the brightest and most detailed areas.
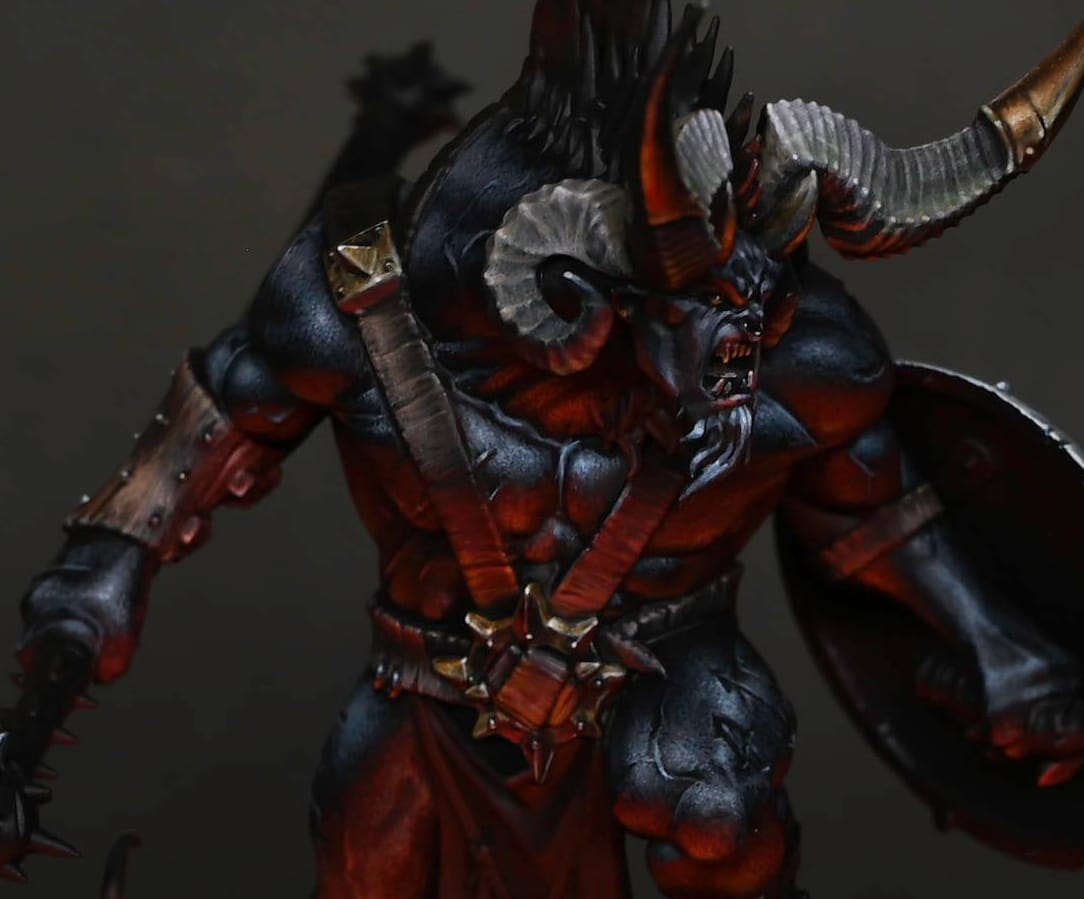
Video: Ogroid Myrmidon Armour and Muscles
All videos are recorded in HD 720p or higher – use full screen for the full effect and let the video load completely.
Materials Needed:
Games Workshop Paints: Rhinox Hide, Mournfang Brown, Cadian Fleshtone, Morghast Bone, Abaddon Black, Wild Rider Red, Fire Dragon Bright, Corvus Black
Vallejo Paints: Pale Grey Blue, Neutral Grey, Dark Grey, Black
A wet palette for mixing and thinning paints
Fine detail brushes
Water for thinning paints
Painting the Leather Armour
Base Layer: Start with a base layer of Rhinox Hide. This dark brown serves as a foundation, offering a subtle brown hue. Apply multiple coats if necessary, but remember, the subsequent layers will add depth and detail.
Mixing for Texture: Create a 50/50 mix of Rhinox Hide and Cadian Fleshtone on your wet palette. This mix will serve as the primary texture colour for the leather.
Applying Texture: Use the 50/50 mix to start adding texture to the leather. Focus on long, vertical, slightly erratic strokes to mimic the natural wear and tear of leather. Pay attention to the armour’s sculpted details, like studs and indentations, to guide your texturing.
Adding Highlights: Gradually lighten the texture by incorporating more Cadian Fleshtone and Morghast Bone into your mixes. Apply these lighter tones to areas that would naturally catch the light, enhancing the texture and giving the leather a more three-dimensional appearance.
Glazing for Depth: Once you’re satisfied with the texture, use a glaze of Mournfang Brown and Abaddon Black to tone down the highlights and integrate the textures, adding depth and richness to the leather. This step unifies the various layers of texture and colour.
Highlighting Black Skin
Preparing Your Palette: On your wet palette, arrange Vallejo paints from Dark Grey to Pale Grey Blue, including mixed shades for smoother transitions. Thin these paints more than usual to avoid building up too thick a layer with the stippling technique.
Stippling Technique: Begin stippling with Dark Grey, gradually transitioning through the greys to Pale Grey Blue for the highlights. Stippling involves applying numerous tiny dots to build up texture and colour depth. This technique is particularly effective for creating a nuanced, textured appearance on the skin.
Attention to Lighting: When applying your highlights, consider the model’s primary viewing angle and the imaginary light source. Focus your highlights on areas that would naturally be illuminated, like the tops of muscles, while keeping the base skin tone visible in shadowed areas.
Refining Highlights: Use glazes of Abaddon Black and Corvus Black to soften and blend the stippled highlights, ensuring they contribute to the model’s overall appearance without overpowering the base skin tone. These glazes help integrate the highlights and create a cohesive look.
Final Touches: Revisit any areas that may require additional highlights or adjustments, enhancing the model’s dimensional appearance. Pay special attention to achieving a balance between the highlighted areas and the overall dark tone of the skin.
Video: Scorpion Freehand First Steps
This first part of the tutorial covers the preparation and beginning stages of scorpion freehand painting on the Ogroid Myrmidon’s shield
Materials Needed and Preparation
Primer: Black
Base Colours: XV-88, Mournfang Brown, Zandri Dust, Morghast Bone (All Games Workshop)
Detailing: Model Colour Black (Vallejo)
Tools: Scalpel, fine-grit sandpaper, large and fine brushes, wet palette
Preparing the Shield: Remove the model’s original shield detail using a scalpel and fine-grit sandpaper to create a smooth surface for freehand painting. This process ensures a flat canvas for your artwork.
Priming: Prime the entire model, including the shield, in black to provide a uniform base coat. If desired, apply an underglow effect with Mephiston Red using an airbrush on the model’s underside for atmospheric lighting.
Painting the Ogroid Myrmidon Shield’s Background
Base Layer: Start by applying XV-88 in multiple thin layers to achieve an opaque finish. Mix approximately one part water to one part paint, using a fairly large brush for broad strokes. Patience is key; allow each layer to dry thoroughly.
Blending: While the XV-88 base is still workable, begin blending Mournfang Brown from the bottom of the shield upwards. This technique creates a gradient effect that adds depth to the shield’s background.
Highlighting and Texture: Use Zandri Dust and Morghast Bone to introduce highlights, particularly focusing on the top of the shield where light naturally hits. This process also starts to introduce the worn, textured look desired for the shield.
Brush Techniques: To achieve a smoother blend and avoid harsh brush marks, employ cross-hatching and other texturing techniques with your brush. This approach will help create a more natural transition between colours.
Glazing for Smoothness: After the initial layering and texturing, apply glazes of the same colours (XV-88, Mournfang Brown, Zandri Dust, Morghast Bone) diluted with water (about six or seven parts water to one part paint). Glazing helps smooth out transitions and enrich the colour depth.
Starting the Scorpion Freehand
Design Placement: Before starting the scorpion freehand, consider the shield’s round shape and ensure your design aligns properly with the model’s orientation. Use the back of the shield as a reference to determine the top and bottom.
Sketching the Design: With Model Colour Black, begin sketching your scorpion freehand design. For this tutorial, a scorpion motif is used. Start with basic shapes and outlines, keeping the lines thin and manageable. This stage is about laying down the design’s foundation, so precision is more important than coverage.
Refining the Design: Gradually thicken and refine the outlines of your scorpion freehand design, paying close attention to symmetry and proportion. Adjust the thickness of the lines to create depth and interest.
Correcting Mistakes: If you make any errors or wish to adjust the design, you can cover mistakes with the base colours (XV-88, Mournfang Brown, Zandri Dust, Morghast Bone). This step may require reapplying glazes to blend the corrections into the background.
Video: Scorpion Freehand Refinement and Details
Looking at rendering the freehand scorpion to achieve a three-dimensional appearance and then weathering the shield for a battle-worn look.
Additional Materials:
A wet palette to keep paints hydrated and to mix custom colours.
Fine grit sandpaper for smoothing the shield surface after modifications.
A scalpel or hobby knife for removing details from the shield.
Water container for rinsing brushes.
Paper towels or a clean cloth for brush drying and paint removal.
Mixing palette for creating custom colours and diluting paints for glazing.
Hairdryer (optional) for speeding up the drying process between layers.
Sponge (optional, not used but mentioned) for creating textured weathering effects.
What do These Techniques Mean?:
Pointillism and Stippling: For creating textured effects on the scorpion’s carapace.
Glazing: Thin layers of paint applied to subtly shift colours or blend transitions.
Fine Detail Work: Using the very tip of a fine brush to outline and add intricate details to the scorpion.
Weathering: Applying chips, scratches, and wear to both the scorpion and the shield’s surface to create a battle-worn look.
Paints:
Games Workshop (Citadel):
Mournfang Brown
XV-88
Zandri Dust
Morghast Bone
Naggaroth Night
Khorne Red
Corax White (for mixing and creating lighter tones)
Vallejo:
Neutral Grey
Dark Grey
Warm Grey
Pale Grey Blue
Model Colour Black (for outlining and fine details)
P3 (Privateer Press):
Morrow White
Iyanden Yellow (mentioned as a substitute for Iosen Green for brighter effect)
Rendering the Scorpion
Base Layer: Begin with Neutral Grey for stippling and pointillism across the scorpion, creating texture and initial shadows. This technique simulates the scorpion’s shiny carapace.
Changing Techniques: Partway through, you might find the style needs adjustment to better represent the scorpion on a smaller scale. While aiming for realism, ensure the final look is visually appealing on the model.
Colour Palette Adjustment: Add Warm Grey and Pale Grey Blue to introduce subtle tonal variations, enhancing the scorpion’s three-dimensional appearance.
Highlighting: Use Morrow White sparingly for the highest highlights, focusing on areas like the pincers, the body segments, and the stinger to emphasize their importance and shininess.
Colour Glazing: Apply thin glazes of Naggaroth Night and Iyanden Yellow (substituted for Iosen Green for a brighter effect) to add colour depth without overpowering the grey tones. This step subtly alters the scorpion’s colour while maintaining its overall grey appearance.
Weathering the Ogroid Myrmidon Shield
Preparation: Use the base colours (Mournfang Brown, XV-88, Zandri Dust, Morghast Bone) to match the weathering effects to the shield’s underlying tones.
Technique: Apply small, opaque marks with Dark Grey and Neutral Grey to simulate chips and wear, focusing on areas that would naturally receive more damage. Use a fine brush for precision.
Detailing: Enhance the weathering with thin lines and stippling, simulating scratches and abrasions. This creates a realistic effect of battle damage across the shield, including over the scorpion design.
Integration: To integrate the scorpion with the shield’s weathered look, apply thin glazes of Mournfang Brown over the entire design. This unifies the scorpion with the shield’s background, softening contrasts and blending the freehand work into the overall shield design.
Colour Highlights: For areas requiring correction or emphasis, use the shield’s base colours, adjusted one shade lighter, to subtly highlight edges and details, ensuring the scorpion remains the focal point.
If you don’t have an account, please sign up here! The website currently has over 350 video tutorials with steps and tips, plus a selection of PDFs. If you are not sure about joining, you can explore my free videos with a free membership, or take the plunge and become a full subscriber for full access.
If you’d prefer to support me on Patreon, please visit: https://www.patreon.com/RichardGray [...]
This tutorial video and step-by-step guide shows how to paint the textured ogroid skin and red glow of the Ogroid Myrmidon from Games Workshop.
Video: How to Paint Ogroid Skin
This guide will focus on achieving a textured ogroid skin effect with top-down highlights and red underlighting, alongside a detailed approach to creating a realistic muscle definition. We’ll be using a mix of Vallejo and Games Workshop paints to achieve this effect.
Materials Needed:
Vallejo Paints: Black, Dark Grey, Neutral Grey, Pale Grey Blue
Games Workshop Paints: Mephiston Red, Evil Sunz Scarlet, Wild Rider Red, Troll Slayer Orange, Fire Dragon Bright
Size 0 Artist Opus Brush (preferably a newer one for fine stippling)
A wet palette
Water for thinning paints
Step-by-Step Guide to Ogroid Skin
Step 1: Base Coating
Begin by base coating the skin of your Ogroid Myrmidon with Mephiston Red to prepare for the red underlighting. This will serve as the base for our stippling technique later on.
Step 2: Stippling Technique Introduction
For the skin’s texture, we’re going to use a stippling technique. This involves applying tiny dots of paint to create a textured appearance. Start with Vallejo Dark Grey and a touch of Neutral Grey, using a fairly new brush for precise dot application. The goal is to create very fine dots, so remember to apply very light pressure to avoid creating larger, triangular marks.
Step 3: Adding Red Underlighting
Switch to Games Workshop’s Evil Sunz Scarlet, stippling over the red base layer to begin creating the underlighting effect. This will initially appear very bright but will dull down as it dries. Layer over with Mephiston Red to help blend and soften the transition.
Step 4: Top-Down Highlights
For the top-down highlights, use a gradient from Dark Grey to Pale Grey Blue, progressing from darkest to lightest as you move up the model. This mimics natural lighting, emphasizing the muscle contours and giving the skin a realistic depth. Remember, the highlights should reflect where natural light would hit the model, focusing on the tops of curves and muscle peaks.
Step 5: Fine-Tuning Highlights and Shadows
As you apply your highlights, consider the model’s anatomy. Paint sharp lines of Pale Grey Blue in the recesses between muscles, such as between the pectorals and deltoids, to accentuate the definition. Use the light from your lamp as a guide to ensure consistency in your highlighting.
Step 6: Red and Orange Highlights
For the lower parts of the muscles, closer to the model’s base, switch to the warmer tones on your palette: Wild Rider Red, Troll Slayer Orange, and Fire Dragon Bright. Apply these colors opposite to the top-down lighting, focusing on areas that would be illuminated from below. This step may require patience due to the translucency of reds and oranges, necessitating multiple layers for a solid appearance.
Step 7: Blending and Correcting
If any areas stand out too much or the transitions between colors are too stark, revisit them with intermediary shades to blend them more naturally. Stippling allows for easy correction; simply overlay with the appropriate color to soften and integrate any harsh lines or spots.
Step 8: Final Touches
After completing the stippling, examine the model for any areas that may need additional work. Adjust the intensity of the highlights and shadows as necessary, ensuring that the focal points, such as the face and upper torso, are the brightest and most detailed areas.
This painting technique, while time-consuming, results in a strikingly realistic and textured skin effect for your Ogroid Myrmidon, emphasizing the muscular definition and adding depth with the red underlighting. The key to this method is patience and layering, allowing each layer to dry and building up the texture gradually. Good luck!
More Ogroid? Click below! :
If you don’t have an account, please sign up here! The website currently has over 350 video tutorials with steps and tips, plus a selection of PDFs. If you are not sure about joining, you can explore my free videos with a free membership, or take the plunge and become a full subscriber for full access.
If you’d prefer to support me on Patreon, please visit: https://www.patreon.com/RichardGray [...]
Guide on how to paint the distinctive lighting effects, horns and NMM (non metallic metal) on the Ogroids head.
To watch all of my tutorials for him on one page, follow the link below:
Ogroid Myrmidon
A selection of detailed videos including red OSL, NMM, fur effect, horns and freehand on his shield.
Watch Now
Video Tutorial: Ogroid Head, Horns and NMM
Materials Needed to Paint the Ogroid Head, Horns and NMM:
Primer: Black
Base Colours: Mephiston Red (GW), Zandri Dust (GW), English Uniform (Vallejo)
Highlights and Shadows: Wild Rider Red (GW), Troll Slayer Orange (GW), Firedragon Bright (GW), Neutral Grey (Vallejo), Pale Grey Blue (Vallejo), Japanese Uniform (Vallejo), Ice Yellow (Vallejo), White (Vallejo), Heavy Warm Grey (Vallejo), Heavy Skintone (Vallejo)
Glazes and Details: Mournfang Brown (GW), Corvus Black (GW)
Airbrush (optional for underside glow effect)
Preparation
Priming: Begin with a black primer for deep shadows and to prepare the model for painting.
Underglow Effect: Optionally, apply Mephiston Red thinned down with an airbrush (or manually) for an underside glow. This step is not essential but helps to establish the mood and lighting direction for the model.
Painting the Horns
Base Layer: Apply a base coat of Rhinox Hide (Games Workshop) on the horns, focusing on a rough texture to highlight the weathered appearance.
Adding Texture: Use Zandri Dust (Games Workshop) to build the texture on the horns, applying it unevenly to create a worn look.
Highlighting: Mix Zandri Dust with lighter shades such as Heavy Warm Grey and Heavy Skintone (Vallejo) for highlights, concentrating lighter colours towards the centre of the horns and darker shades towards the tips.
Refining Texture: Return with Rhinox Hide to deepen the shadows in textured areas, using a fine brush to emphasise details and the rough texture.
Glazing: Employ thin glazes of Mournfang Brown and Corvus Black sparingly to blend and soften transitions.
Painting the NMM Gold Tips
Base Colours: Start with English Uniform (Vallejo) for the metallic areas’ base.
Building up Metallics: Progress from Japanese Uniform to Ice Yellow (Vallejo), highlighting edges and raised areas to simulate gold reflection.
Final Highlights: Use White (Vallejo) for the sharpest highlights on edges and high points to mimic metal shine.
Glazing for Depth: Apply glazes of Mournfang Brown to deepen and enrich the gold, being careful not to cover the brightest highlights.
Painting the Face
Base Layer for Skin: Use Neutral Grey (Vallejo) for the skin, avoiding areas catching the underglow.
Adding Shadows and Highlights: Apply Pale Grey Blue (Vallejo) for highlights on raised areas like the brow, nose, and cheeks, maintaining the glowing effect in recesses.
Detailing and Refining: Deepen shadows and define features with Corvus Black (GW), enhancing skin texture and facial details with fine highlights of Pale Grey Blue and White (Vallejo).
Adjusting the Underglow: Touch up the underglow with Mephiston Red, Wild Rider Red, and Troll Slayer Orange (GW) to ensure it complements the overall painting, adjusting intensity accordingly.
Finishing Touches
Adjusting Highlights: Reassess highlights and shadows, ensuring they align with the desired atmosphere and light source.
Details: Focus on small details like teeth and eyes, applying light and shadow principles for emphasis.
Glazing: Use glazes to smooth transitions and adjust colour saturation where needed, particularly on the horns and face to unify the piece.
More Ogroid Videos can be viewed below:
If you don’t have an account here on my website, please sign up here! I have over 350 video tutorials with steps and tips, plus a selection of PDFs. If you are not sure about joining, you can explore my free videos with a free membership, or take the plunge and become a full subscriber for full access.
If you’d prefer to support me on Patreon, please visit: https://www.patreon.com/RichardGray [...]
Guide on how to paint the armour and muscles on the Warcry Ogroid Myrmidon, with video tutorials, paints and steps to follow.
Video: Warcry Ogroid Myrmidon Armour and Muscles
All videos are recorded in HD 720p or higher – use full screen for the full effect and let the video load completely.
Materials Needed
Games Workshop Paints: Rhinox Hide, Mournfang Brown, Cadian Fleshtone, Morghast Bone, Abaddon Black, Wild Rider Red, Fire Dragon Bright, Corvus Black
Vallejo Paints: Pale Grey Blue, Neutral Grey, Dark Grey, Black
A wet palette for mixing and thinning paints
Fine detail brushes
Water for thinning paints
Painting the Leather Armour
Base Layer: Start with a base layer of Rhinox Hide. This dark brown serves as a foundation, offering a subtle brown hue. Apply multiple coats if necessary, but remember, the subsequent layers will add depth and detail.
Mixing for Texture: Create a 50/50 mix of Rhinox Hide and Cadian Fleshtone on your wet palette. This mix will serve as the primary texture colour for the leather.
Applying Texture: Use the 50/50 mix to start adding texture to the leather. Focus on long, vertical, slightly erratic strokes to mimic the natural wear and tear of leather. Pay attention to the armour’s sculpted details, like studs and indentations, to guide your texturing.
Adding Highlights: Gradually lighten the texture by incorporating more Cadian Fleshtone and Morghast Bone into your mixes. Apply these lighter tones to areas that would naturally catch the light, enhancing the texture and giving the leather a more three-dimensional appearance.
Glazing for Depth: Once you’re satisfied with the texture, use a glaze of Mournfang Brown and Abaddon Black to tone down the highlights and integrate the textures, adding depth and richness to the leather. This step unifies the various layers of texture and colour.
Highlighting Black Skin
Preparing Your Palette: On your wet palette, arrange Vallejo paints from Dark Grey to Pale Grey Blue, including mixed shades for smoother transitions. Thin these paints more than usual to avoid building up too thick a layer with the stippling technique.
Stippling Technique: Begin stippling with Dark Grey, gradually transitioning through the greys to Pale Grey Blue for the highlights. Stippling involves applying numerous tiny dots to build up texture and colour depth. This technique is particularly effective for creating a nuanced, textured appearance on the skin.
Attention to Lighting: When applying your highlights, consider the model’s primary viewing angle and the imaginary light source. Focus your highlights on areas that would naturally be illuminated, like the tops of muscles, while keeping the base skin tone visible in shadowed areas.
Refining Highlights: Use glazes of Abaddon Black and Corvus Black to soften and blend the stippled highlights, ensuring they contribute to the model’s overall appearance without overpowering the base skin tone. These glazes help integrate the highlights and create a cohesive look.
Final Touches: Revisit any areas that may require additional highlights or adjustments, enhancing the model’s dimensional appearance. Pay special attention to achieving a balance between the highlighted areas and the overall dark tone of the skin.
Video: Warcry Ogroid Myrmidon Skin
This guide will focus on achieving a textured ogroid skin effect with top-down highlights and red underlighting, alongside a detailed approach to creating a realistic muscle definition. We’ll be using a mix of Vallejo and Games Workshop paints to achieve this effect.
Materials Needed:
Vallejo Paints: Black, Dark Grey, Neutral Grey, Pale Grey Blue
Games Workshop Paints: Mephiston Red, Evil Sunz Scarlet, Wild Rider Red, Troll Slayer Orange, Fire Dragon Bright
Size 0 Artist Opus Brush (preferably a newer one for fine stippling)
A wet palette
Water for thinning paints
Step-by-Step Guide to Ogroid Myrmidon Skin
Step 1: Base Coating
Begin by base coating the skin of your Warcry Ogroid Myrmidon with Mephiston Red to prepare for the red underlighting. This will serve as the base for our stippling technique later on.
Step 2: Stippling Technique Introduction
For the skin’s texture, we’re going to use a stippling technique. This involves applying tiny dots of paint to create a textured appearance. Start with Vallejo Dark Grey and a touch of Neutral Grey, using a fairly new brush for precise dot application. The goal is to create very fine dots, so remember to apply very light pressure to avoid creating larger, triangular marks.
Step 3: Adding Red Underlighting
Switch to Games Workshop’s Evil Sunz Scarlet, stippling over the red base layer to begin creating the underlighting effect. This will initially appear very bright but will dull down as it dries. Layer over with Mephiston Red to help blend and soften the transition.
Step 4: Top-Down Highlights
For the top-down highlights, use a gradient from Dark Grey to Pale Grey Blue, progressing from darkest to lightest as you move up the model. This mimics natural lighting, emphasizing the muscle contours and giving the skin a realistic depth. Remember, the highlights should reflect where natural light would hit the model, focusing on the tops of curves and muscle peaks.
Step 5: Fine-Tuning Highlights and Shadows
As you apply your highlights, consider the model’s anatomy. Paint sharp lines of Pale Grey Blue in the recesses between muscles, such as between the pectorals and deltoids, to accentuate the definition. Use the light from your lamp as a guide to ensure consistency in your highlighting.
Step 6: Red and Orange Highlights
For the lower parts of the muscles, closer to the model’s base, switch to the warmer tones on your palette: Wild Rider Red, Troll Slayer Orange, and Fire Dragon Bright. Apply these colours opposite to the top-down lighting, focusing on areas that would be illuminated from below. This step may require patience due to the translucency of reds and oranges, necessitating multiple layers for a solid appearance.
Step 7: Blending and Correcting
If any areas stand out too much or the transitions between colours are too stark, revisit them with intermediary shades to blend them more naturally. Stippling allows for easy correction; simply overlay with the appropriate colour to soften and integrate any harsh lines or spots.
Step 8: Final Touches to the Skin
After completing the stippling, examine the model for any areas that may need additional work. Adjust the intensity of the highlights and shadows as necessary.
All Videos on How to Paint an Warcry Ogroid
Warcry Ogroid Myrmidon
A selection of detailed videos including red OSL, NMM, fur effect, horns and freehand on his shield.
Watch Now
Warcry Ogroid Myrmidon Shield
Guides on how to paint the Warcry Ogroid Myrmidon shield.
Watch Now
If you don’t have an account, please sign up here! The website currently has over 350 video tutorials with steps and tips, plus a selection of PDFs. If you are not sure about joining, you can explore my free videos with a free membership, or take the plunge and become a full subscriber for full access.
If you’d prefer to support me on Patreon, please visit: https://www.patreon.com/RichardGray [...]
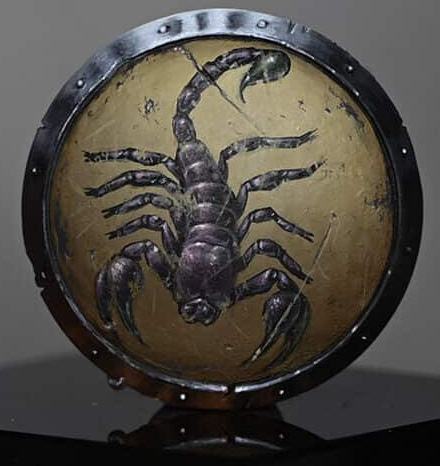
Video guides and step-by-steps on how to paint the Warcry Ogroid Myrmidon shield with this Scorpion Freehand.
Video: Scorpion Freehand First Steps
This first part of the tutorial covers the preparation and beginning stages of scorpion freehand painting on the Ogroid Myrmidon’s shield
Materials Needed:
Primer: Black
Base Colours: XV-88, Mournfang Brown, Zandri Dust, Morghast Bone (All Games Workshop)
Detailing: Model Colour Black (Vallejo)
Tools: Scalpel, fine-grit sandpaper, large and fine brushes, wet palette
Preparation:
Preparing the Shield: Remove the model’s original shield detail using a scalpel and fine-grit sandpaper to create a smooth surface for freehand painting. This process ensures a flat canvas for your artwork.
Priming: Prime the entire model, including the shield, in black to provide a uniform base coat. If desired, apply an underglow effect with Mephiston Red using an airbrush on the model’s underside for atmospheric lighting.
Painting the Shield’s Background:
Base Layer: Start by applying XV-88 in multiple thin layers to achieve an opaque finish. Mix approximately one part water to one part paint, using a fairly large brush for broad strokes. Patience is key; allow each layer to dry thoroughly.
Blending: While the XV-88 base is still workable, begin blending Mournfang Brown from the bottom of the shield upwards. This technique creates a gradient effect that adds depth to the shield’s background.
Highlighting and Texture: Use Zandri Dust and Morghast Bone to introduce highlights, particularly focusing on the top of the shield where light naturally hits. This process also starts to introduce the worn, textured look desired for the shield.
Brush Techniques: To achieve a smoother blend and avoid harsh brush marks, employ cross-hatching and other texturing techniques with your brush. This approach will help create a more natural transition between colours.
Glazing for Smoothness: After the initial layering and texturing, apply glazes of the same colours (XV-88, Mournfang Brown, Zandri Dust, Morghast Bone) diluted with water (about six or seven parts water to one part paint). Glazing helps smooth out transitions and enrich the colour depth.
Starting the Scorpion Freehand:
Design Placement: Before starting the scorpion freehand, consider the shield’s round shape and ensure your design aligns properly with the model’s orientation. Use the back of the shield as a reference to determine the top and bottom.
Sketching the Design: With Model Colour Black, begin sketching your scorpion freehand design. For this tutorial, a scorpion motif is used. Start with basic shapes and outlines, keeping the lines thin and manageable. This stage is about laying down the design’s foundation, so precision is more important than coverage.
Refining the Design: Gradually thicken and refine the outlines of your scorpion freehand design, paying close attention to symmetry and proportion. Adjust the thickness of the lines to create depth and interest.
Correcting Mistakes: If you make any errors or wish to adjust the design, you can cover mistakes with the base colours (XV-88, Mournfang Brown, Zandri Dust, Morghast Bone). This step may require reapplying glazes to blend the corrections into the background.
Video: Scorpion Freehand Refinement and Details
Looking at rendering the freehand scorpion to achieve a three-dimensional appearance and then weathering the shield for a battle-worn look.
Additional Materials:
A wet palette to keep paints hydrated and to mix custom colours.
Fine grit sandpaper for smoothing the shield surface after modifications.
A scalpel or hobby knife for removing details from the shield.
Water container for rinsing brushes.
Paper towels or a clean cloth for brush drying and paint removal.
Mixing palette for creating custom colours and diluting paints for glazing.
Hairdryer (optional) for speeding up the drying process between layers.
Sponge (optional, not used but mentioned) for creating textured weathering effects.
What do These Techniques Mean?:
Pointillism and Stippling: For creating textured effects on the scorpion’s carapace.
Glazing: Thin layers of paint applied to subtly shift colours or blend transitions.
Fine Detail Work: Using the very tip of a fine brush to outline and add intricate details to the scorpion.
Weathering: Applying chips, scratches, and wear to both the scorpion and the shield’s surface to create a battle-worn look.
Paints:
Games Workshop (Citadel):
Mournfang Brown
XV-88
Zandri Dust
Morghast Bone
Naggaroth Night
Khorne Red
Corax White (for mixing and creating lighter tones)
Vallejo:
Neutral Grey
Dark Grey
Warm Grey
Pale Grey Blue
Model Colour Black (for outlining and fine details)
P3 (Privateer Press):
Morrow White
Iyanden Yellow (mentioned as a substitute for Iosen Green for brighter effect)
Rendering the Scorpion
Base Layer: Begin with Neutral Grey for stippling and pointillism across the scorpion, creating texture and initial shadows. This technique simulates the scorpion’s shiny carapace.
Changing Techniques: Partway through, you might find the style needs adjustment to better represent the scorpion on a smaller scale. While aiming for realism, ensure the final look is visually appealing on the model.
Colour Palette Adjustment: Add Warm Grey and Pale Grey Blue to introduce subtle tonal variations, enhancing the scorpion’s three-dimensional appearance.
Highlighting: Use Morrow White sparingly for the highest highlights, focusing on areas like the pincers, the body segments, and the stinger to emphasize their importance and shininess.
Colour Glazing: Apply thin glazes of Naggaroth Night and Iyanden Yellow (substituted for Iosen Green for a brighter effect) to add colour depth without overpowering the grey tones. This step subtly alters the scorpion’s colour while maintaining its overall grey appearance.
Weathering the Shield
Preparation: Use the base colours (Mournfang Brown, XV-88, Zandri Dust, Morghast Bone) to match the weathering effects to the shield’s underlying tones.
Technique: Apply small, opaque marks with Dark Grey and Neutral Grey to simulate chips and wear, focusing on areas that would naturally receive more damage. Use a fine brush for precision.
Detailing: Enhance the weathering with thin lines and stippling, simulating scratches and abrasions. This creates a realistic effect of battle damage across the shield, including over the scorpion design.
Integration: To integrate the scorpion with the shield’s weathered look, apply thin glazes of Mournfang Brown over the entire design. This unifies the scorpion with the shield’s background, softening contrasts and blending the freehand work into the overall shield design.
Colour Highlights: For areas requiring correction or emphasis, use the shield’s base colours, adjusted one shade lighter, to subtly highlight edges and details, ensuring the scorpion remains the focal point.
How to Paint an Ogroid from Games Workshop – Step-by-step guides:
Ogroid Myrmidon
A selection of detailed videos including red OSL, NMM, fur effect, horns and freehand on his shield.
Watch Now
More Freehand Tutorials
If you don’t have an account, please sign up here! The website currently has over 350 video tutorials with steps and tips, plus a selection of PDFs. If you are not sure about joining, you can explore my free videos with a free membership, or take the plunge and become a full subscriber for full access.
If you’d prefer to support me on Patreon, please visit: https://www.patreon.com/RichardGray [...]
If you don’t have an account, please sign up here! The website currently has over 350 video tutorials with steps and tips, plus a selection of PDFs. If you are not sure about joining, you can explore my free videos with a free membership, or take the plunge and become a full subscriber for full access.


If you’d prefer to support me on Patreon, please visit: https://www.patreon.com/RichardGray