


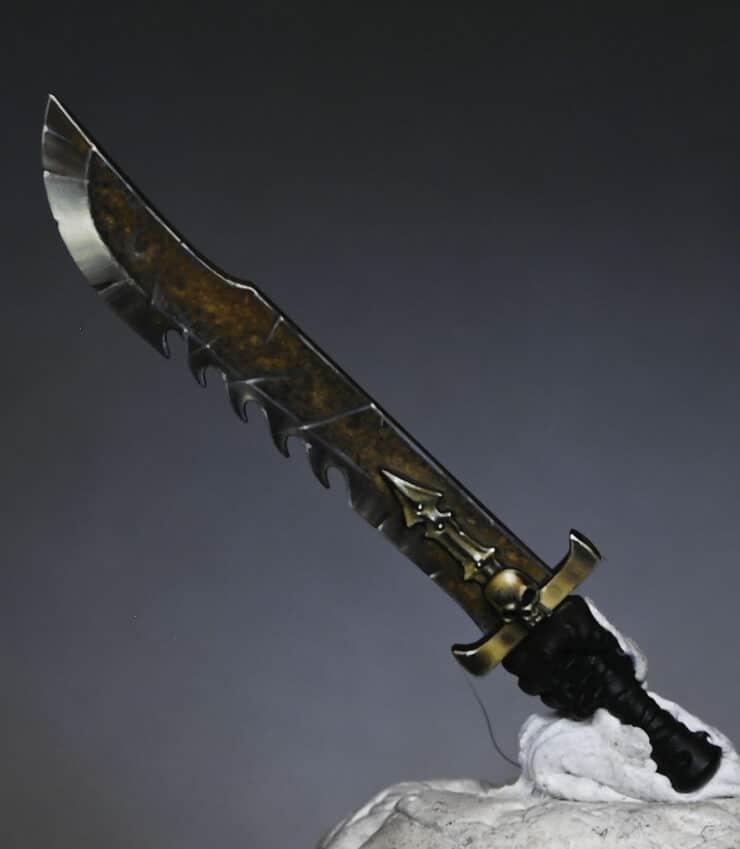
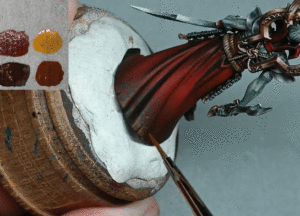
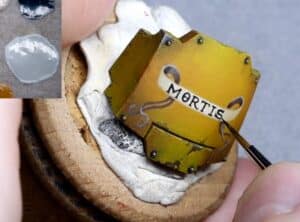
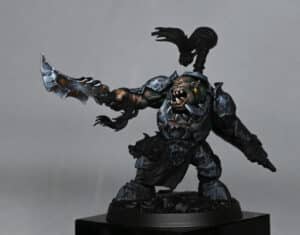
This video and guide shows how to paint an Ogroid sword with NMM (non-metallic metal) and rusty effects.
(Apologies for the dog hair)
Video : How to Paint an Ogroid Sword with NMM and Rust
This video is currently hidden. To unlock it and view, please join the website and log in.
Paints and Materials
Paints
- Games Workshop:
- Mournfang Brown
- Troll Slayer Orange
- Fire Dragon Bright
- Rhinox Hide
- Vallejo:
- Ice Yellow
- Black
- German Grey
- Neutral Grey
- Pure White (Mecha Color)
Brushes
- A range of brushes were used, including but not limited to:
- A fine detail brush (such as a size 0 or 00), used for detailed work and fine highlights.
- A larger brush (like a size 2), which can be useful for broader strokes and glazing.
Other Materials
- Blue Tack: Used to temporarily attach the sword to the model for assessing lighting and highlight placement.
- Wet Palette: Essential for mixing and maintaining paint consistency.
- Water: For thinning paints, essential for techniques like glazing and stippling.
Step-by-Step
- Basecoat and Shades:
- Start with a neutral grey, darkened slightly with black.
- Create a gradient of greys by mixing German Grey with Neutral Grey, and then adding Ice Yellow for various shades. This creates a series of warm greys for highlights.
- Use a wet palette to mix and maintain the paint consistency.
- Highlighting the Blade:
- Focus on creating a main shine spot on the curved part of the blade, as this area naturally catches more light.
- Add random reflections down the blade. Over-highlight initially as you will glaze over these later to reduce their intensity.
- Remember that the flat of the blade will be rusty, so avoid highlighting this area.
- Adding Details:
- Paint distinct blocks of highlights or reflections on the blade, especially around the curved section.
- Start with darker greys and layer up to lighter ones, finishing with Pure White for the brightest spots.
- Use vertical brush strokes for control and consistency.
- Rust Effects on the Blade:
- Stipple Mournfang Brown over the flat of the blade for a textured rust effect. Be random and uneven in your application.
- Layer Troll Slayer Orange over this, focusing on specific patches for an uneven and realistic rust effect.
- Optionally, use Fire Dragon Bright for the brightest rust highlights.
- Refining and Adding Scratches:
- Add scratches and chips using a mixture of Neutral Grey and Ice Yellow.
- Apply these details sparingly and randomly to avoid patterns.
- For added depth, add a line of a darker colour (like Rhinox Hide) above some of the scratches.
- Finishing Touches:
- Make final adjustments to the highlights and rust effects.
- Use glazing techniques to soften transitions and blend colours seamlessly.
- Be cautious with the use of white; too much can detract from the warm effect.
More tutorials to explore!
Rust Grime and Weathering


This video shows how to paint a Grimdark Grimy Death Guard for the Horus Heresy. The model is a new MKIII plastic marine and is painted in the Grimdark style to try and capture the weight and brutal nature of the armour.
The following paints were used:Games Workshop: Balor Brown, Morghast Bone, Screaming Skull, Mephiston Red, Wildrider Red, Yriel Yellow, Contrast Darkoath Flesh, Contrast Medium, Rhinox Hide, Agrax Earthshade Vallejo: Heavy Blackgreen, Ice Yellow P3: Morrow White (Any white will do) Kimera Colours: Black (Any black will do) Pro Acryl: Light Bronze Metallic, Rich Gold Metallic
Top Grimdark Grimy Death Guard Tips!:
Prepare Your Palette: Utilize a wet palette to maintain paint hydration.For the initial dry brushing, use Balor Brown from Games Workshop on a wet palette.Choose the Right Brush:Select a small dry brush, like the Artis Opus dry brush, for the stippling technique.Stippling Technique:Diverge from traditional dry brushing; instead, stipple the paint onto the model.Aim for a disheveled, grimy, and weathered appearance.Start with Balor Brown, advancing to lighter hues like Morghast Bone, Screaming Skull, and Yriel Yellow for a textured effect.Application Method:Stipple the paint directly onto the model, concentrating on armour panels.Rotate the model as you paint to ensure each section dries before revisiting.Focus on hitting the model face-on with the brush to create a textured, dotty buildup.Chipping Effect:For chipping effects, use Rhinox Hide with a sponge chipping technique.Contemplate hand-painting some scratches for added detail.Accentuating Details:Employ a fine brush for details like scratches and chips.Highlight specific armour panels for added depth.Contrast and Weathering:Apply Darkoath Flesh contrast paint mixed with contrast medium to unify the your Grimdark Grimy Death Guard.Experiment with adding more brightness by layering appropriately watered-down contrast paints.Highlighting and Shadows:
Highlight edges using Morrow White from P3.Contemplate applying washes like Agrax Earthshade to blend highlights and shadows.Use Ice Yellow from Vallejo for specific details, building up the colour gradually.Fine-Tune Highlights:Use a finer brush to refine highlights and correct any over-spill.Introduce Agrax Earthshade for added depth in recessed areas.Final Touches:Experiment with Wildrider Red and Mephiston Red from Games Workshop for added details.Apply a matte varnish to seal the paint job.Consider adding additional details to your Grimdark Grimy Death Guard like basing with textures and powders.
If you don’t have an account, please sign up here! The website currently has over 350 video tutorials with steps and tips, plus tips and PDFs. If you are not sure about joining, you can explore my free videos with a free “freebies” membership, or take the plunge and become a full subscriber for full access.
If you’d prefer to support me on Patreon, please visit: https://www.patreon.com/RichardGray [...]
A series on how to paint a Nurgle Sorcerer from the Death Guard. It will be painted in preparation for Golden Demon!
Quick Jump to:
Bellyplate
Plaguecaster Head
Rotten Belly
NMM Bronze Trim
Nurgle Ribbons and Text
Smoke and Flies
How to Paint a Nurgle Sorcerer: Part One – Belly Plate
In this video you will learn how to paint the belly plate with texture and corruption.
Materials Needed:
Nurgle Sorcerer Miniature from the Spaceman Hero Set
Brushes: Various sizes, including a size two for broad strokes and size zero zero for details
Paints (Games Workshop): Death Guard Green, Balor Brown, Morghast Bone, Ushabti Bone, Screaming Skull, Dark Reaper, Mournfang Brown
Paint (P3): Morrow White
Step 1: Base Coating
Start by applying a base coat of Death Guard Green, thinned with about one and a half parts water to one part paint, using a size two brush for a smooth, thin layer.
Add warmth to the colour with a layer of Balor Brown, applying it in a similar manner to maintain texture.
Step 2: Building Texture
Gradually build up the texture using Morghast Bone. Focus on creating a stippling effect, allowing the green to show through. This creates a transition and adds depth to the plate.
Continue to refine the texture, making the marks finer as you move towards the front of the belly plate, where the light would be strongest.
Step 3: Shadow and Highlight
Paint a distinct line of Dark Reaper down the middle of the belly plate, creating a shadow effect. This divides the plate visually, with a lighter left side and a darker right side.
Progressively lighten the left side of the belly plate, moving up through Ushabti Bone to Screaming Skull, and finally to Morrow White for the brightest highlights.
Step 4: Detailing and Corruption
Using Dark Reaper, begin to add corruption effects. Look for shapes in the texture and expand them into blob-like, corrupt markings.
Over these Dark Reaper blobs, lightly stipple with Morghast Bone to create a sense of corruption protruding from the armour.
For areas that require softer transitions or less intensity, mix Death Guard Green with Morghast Bone for a subtler effect.
Step 5: Refinement and Contrast
Continuously refine the texture and highlights, ensuring the lightest points are at the front of the belly plate.
Add Mephiston Red, thinned heavily, around the edges of the belly plate for a corrupted, wound-like appearance. Blend this in carefully to maintain the integrity of the armour texture.
Step 6: Final Touches
Add finishing touches, such as more precise highlights using Morrow White, especially along the top edges and where the light would naturally be strongest.
Adjust the texture and shading as needed to create a balanced, cohesive look that conveys both corruption and the Nurgle aesthetic.
How to Paint a Nurgle Sorcerer: Part Two – NMM Bronze Trim with Verdigris
The video focuses on the bronze NMM trim and verdigris weathering.
Materials Needed:
Paints:
Games Workshop: Mournfang Brown, Rhinox Hide, XV-88, Balor Brown, Sotek Green, Sybarite Green
Vallejo: Ice Yellow
P3: Morrow White
Brushes: Fine detail brushes (sizes 00 and 2 recommended)
Steps:
1. Base Layer
Paint: Mournfang Brown
Application: Apply a base layer of Mournfang Brown over the areas you want to paint the bronze trim. This layer doesn’t have to be perfectly even; it serves as a foundation.
2. First Highlights
Paint: XV-88
Application: Start applying XV-88 to highlight the raised areas. These highlights should be broad at this stage, as we’ll refine them later.
3. Second Highlights
Paint: Balor Brown
Application: Now, apply Balor Brown to enhance the highlights. Focus on the top edges and areas where light naturally hits.
4. Mixed Highlights
Paint: Mix of Balor Brown and Ice Yellow
Application: Mix Balor Brown with a small amount of Ice Yellow to create a lighter shade. Apply this to the highest points of the highlighted areas for a more intense shine.
5. Brightest Highlights
Paint: P3 Morrow White
Application: Using Morrow White, apply the brightest highlights. These should be on the most raised edges where the light would be strongest.
6. Shading
Paints: Mournfang Brown, Rhinox Hide
Application: Use Mournfang Brown and Rhinox Hide to add shadows and depth. Focus on recessed areas and where the trim meets other parts of the model.
7. Verdigris Effect Base
Paint: Mix of Sybarite Green and a tiny bit of Sotek Green
Application: Thin this mix with water (approx. 2:1 ratio of water to paint) and apply it selectively in recesses and crevices for a weathered look.
8. Lighter Verdigris
Paint: Sybarite Green mixed with a bit of white
Application: Lighten the verdigris effect in some areas for variation. Remember, less is more – don’t cover all the verdigris base layer.
9. Final Adjustments
Technique: Glazing and Smoothing
Application: If necessary, use a glazing technique with the lighter colours to smooth out transitions and add final touches to the highlights.
10. Clean Up
Action: Tidy any overspill or mistakes with appropriate base colours.
Tips:
Consistency: Keep your paint at the right consistency. For NMM, a slightly thicker mix is preferred for stronger colours, but ensure it’s still flowable.
Lighting: Pay attention to the overall lighting of your model. Highlights should be consistent with the light source.
Brush Care: Be mindful of your brushes. Use a separate brush for mixing paints to preserve the tips of your detail brushes.
Patience: Take your time with each step, and let layers dry before applying the next.
How to Paint a Nurgle Sorcerer: Part Three – Plaguecaster Head
How to paint the head, which includes the red hood and chain mask.
Materials Needed:
Paints:
Games Workshop: Khorne Red, Mephiston Red, Bugman’s Glow, Mournfang Brown, Trollslayer Orange, Sotek Green
Vallejo: Black
P3: Morrow White
Brushes: Size 00 and 2 Artist Opus Brushes
Palette: For mixing and diluting paints
Water pot
Steps:
1. Base Colour for the Hood
Paint: Mix of Khorne Red and Black
Application: Apply a base layer of this mix to the hood. Ensure no pure Khorne Red is used; the mix should always include black to desaturate the colour.
2. Adding Highlights
Paints: Various mixes of Khorne Red with Black and White
Application: Create a gradient of shades by mixing Khorne Red with varying amounts of Black and White. Use these mixes to highlight the hood, focusing on the raised areas and textures.
3. Texturing the Hood
Technique: Texture Painting
Application: With a size 00 brush, apply textures using the lighter shades. Focus on creating a worn and weathered look. Balance the textures; don’t overdo them.
4. Chain Mask Detailing
Paint: Neutral Grey and White
Application: Start with Neutral Grey to pick out the chain links. Progressively add White to the mix for highlighting, focusing on the lower edges and curves of each chain link.
5. Glazing the Hood
Paint: Mephiston Red
Application: Dilute Mephiston Red significantly (approx. 4:1 water to paint ratio). Use this glaze to unify the hood’s colour, applying it more in the shadows and less on the highlights.
6. Skin Tones
Paint: Bugman’s Glow with Black and Grey
Application: For the skin, start with Bugman’s Glow mixed with Black and Grey to desaturate. Add White for highlights, focusing on chin, lips, and facial details.
7. Worm and Pustules
Paint: Sotek Green, Mournfang Brown, Trollslayer Orange, Ice Yellow
Application: Paint the worm coming out of the head in Sotek Green. For pustules, use Mournfang Brown for the base, add Trollslayer Orange for mid-tones, and highlight with Ice Yellow.
8. Final Adjustments
Action: Make any necessary tweaks to ensure all elements are coherent and well-blended.
Tips:
Dilution is Key: Ensure paints are correctly diluted, especially lighter colours, to avoid a chalky texture.
Layering: Build up the highlights gradually, allowing each layer to dry before applying the next.
Focus on Details: Spend time on the head as it’s a focal point, especially for a competition piece like Golden Demon.
Brush Care: Use newer, sharper brushes for fine details and textures, saving older brushes for broader strokes and glazing.
How to Paint a Nurgle Sorcerer: Part Four – Nurgle Ribbons and Text
Materials Needed:
Paints:
Games Workshop: XV-88, Morghast Bone, Screaming Skull, Mephiston Red, Rhinox Hide
Vallejo: Neutral Grey
Kimera Colours: Black
Brushes: Size 00 and 3 S (Standard) and M (Miniature) Brushes
Palette: For mixing paints
Water pot
Steps:
1. Base Layer
Paint: XV-88
Application: Start by applying XV-88 as a base layer on the ribbons. Use a size 3 S brush for quick coverage, being careful not to touch the paint while it’s wet to avoid patchiness.
2. Adding Depth
Paint: Morghast Bone
Application: Apply Morghast Bone, focusing on the upward-facing curves and leaving recesses and downward-facing sections in the darker base colour. This step starts to bring out the ribbon’s flow and texture.
3. Highlighting
Paint: Screaming Skull
Application: Now switch to a size 00 brush and use Screaming Skull to pick out the raised details and edges. This lighter colour enhances the texture and gives the ribbons more dimension.
4. Freehand Detailing
Paint: Mephiston Red
Application: Using the size 00 brush, add Nurgle symbols and letters as freehand details. These should be evenly spaced and varied in size for a more natural look. Remember, these don’t need to be perfect as they’re meant to mimic hand-drawn symbols.
5. Text Simulation
Paint: Mephiston Red
Application: Create a text effect using small dots and dashes with Mephiston Red. This simulates handwriting and adds intricate detail to the ribbons. Aim for varied mark-making to avoid a repetitive pattern.
6. Weathering and Shading
Paint: Neutral Grey and Rhinox Hide
Application: Thin down Neutral Grey and Rhinox Hide for glazing. Apply Neutral Grey to shadows and Rhinox Hide to recesses and edges for a dirty, weathered look.
7. Final Touches
Paint: Black (Kimera Colours)
Application: Finally, use thinned black paint to refine the freehand details and text. This step enhances contrast and makes the red details stand out more effectively against the ribbon’s base colour.
Tips:
Consistency: Ensure the right consistency of paint for detailed work, especially for the text. It should flow easily but not be too runny.
Brush Angle: Adjust the brush angle according to the ribbon’s curvature to maintain consistent pressure and mark size.
Layering: Build up colours gradually, allowing layers to dry before applying the next.
Freehand Techniques: Practice freehand techniques separately before applying them to the model to gain confidence.
Detail Focus: Concentrate on the details but remember the overall look. Imperfections can add character, especially for Nurgle-themed models.
How to Paint a Nurgle Sorcerer: Part Five – Rotten Belly and Maggots
Materials Needed:
Paints:
Games Workshop: Bugman’s Glow, Khorne Red, Balor Brown, Morghast Bone, Screaming Skull
Vallejo: Ice Yellow, Neutral Grey
Brushes: Sizes 0 and 3 S (Standard) and M (Miniature) Brushes
Palette: For mixing paints
Water pot
Steps:
1. Base Layer for Rotten Belly
Paint: Bugman’s Glow mixed with Neutral Grey
Technique: Apply this mix to the fleshy areas, avoiding the maggots. This creates an ill-looking skin tone. Initially, use a larger brush, then switch to a size 0 for more detailed work.
2. Adding Depth
Paint: Khorne Red (watered down)
Technique: Apply in the recesses to create a shaded effect and to separate the skin from the armor. This stage is about defining the texture and contours of the belly.
3. Flesh Highlights
Paint: Same base mix (Bugman’s Glow and Neutral Grey) with added Ice Yellow
Technique: Highlight the raised areas and ridges of the flesh, focusing on light sourcing. The addition of Ice Yellow gives a sickly hue, enhancing the rotten look.
4. Painting the Maggots
Paint: Khorne Red
Technique: Paint each maggot, ensuring the red is in the recesses but not covering the entire maggot. Aim for precision to keep the maggots distinct from the skin.
5. Highlighting Maggots
Stage 1: Balor Brown for the first highlight, focusing on the segments but avoiding recesses.
Stage 2: Morghast Bone for the second highlight, applied more selectively.
Final Highlight: Screaming Skull, targeting the most raised segments for a final pop of brightness.
6. Final Touches
Paint: Watered-down Khorne Red
Technique: Apply as a light wash/glaze to add a gory effect, enhancing the realism of the maggots burrowing in and out of the flesh.
Tips:
Consistency and Dilution: Adjust paint dilution based on the step. More watered-down paint is suitable for shading and glazing.
Light Source Alignment: Ensure highlights align with the light source established in other parts of the model.
Texture Focus: Pay attention to the texture of the flesh and maggots, using the paint to enhance the model’s sculpted details.
Clean Up: If you overstep with the paint, go back with the original colour to tidy up any mistakes.
Layering: Build up the colour gradually, allowing layers to dry before applying the next.
Detail Work: Smaller brushes are crucial for the intricate detailing required, especially on the maggots.
How to Paint a Nurgle Sorcerer: Part Six – Smoke and Flies
Materials Needed:
Paints:
Pro Acryl: Grey Blue, Pale Yellow (Alternatively, opt for Games Workshop’s Sotek Green and Ice Yellow)
Games Workshop: Sotek Green, Daemonette Hide, Khorne Red, Balor Brown, Morghast Bone, Screaming Skull
Vallejo: Black (or Kimera Colours: Black)
P3: Morrow White
Brushes: Assorted sizes for varied details
Palette: For mixing paints
Water pot
Steps:
1. Smoke Effect
Paints: Grey Blue, Pale Yellow (or Sotek Green and Ice Yellow)
Technique: Start with Grey Blue, blending into the smoke areas. Gradually introduce Pale Yellow (or Ice Yellow) to lighten and add variation. Employ greys for shadowy areas.
2. Refining the Smoke
Technique: Concentrate on the creases and fine details. Use stippling to introduce texture, imitating particles and spores. Emphasise raised areas and curves with highlights. Apply glazes to soften and blend stippling for a natural look. (Note – I messed up the smoke in this video, I will be revisiting it!)
3. Maggots
Base Colour: Khorne Red
Highlight: Balor Brown for segments.
Technique: Apply red judiciously, avoiding recesses. Use Balor Brown highlights on segments to create dimension.
4. Flies
Base Colour: A blend of Chimera Black and Ice Yellow for a dark grey.
Highlight: Incrementally add more Ice Yellow for highlights. Focus on wing edges and eyes for detail.
Final Touches: Add tiny dots of Ice Yellow for highlights to enhance the glossy appearance.
5. Additional Details
Technique: Employ various mixes of Daemonette Hide and Ice Yellow for wing highlights. For the flies, focus on segmenting and crafting a realistic, shiny texture.
Eggs: Paint with Balor Brown, then add a dot and line of Screaming Skull for luminosity.
Tips:
Layering: Build up the smoke colour progressively, allowing layers to dry before adding the next.
Texture Emphasis: Pay close attention to the texture in the smoke, using stippling to add depth and a lifelike appearance.
Light Source Consistency: Ensure highlights on maggots and flies align with the light source established in other parts of the model.
Detailing: Utilise smaller brushes for intricate work, especially on the flies and maggots.
Glazing: Use glazing techniques to blend and soften the stippled texture on the smoke.
More Nurgle Videos…
If you don’t have an account, please sign up here! The website currently has over 350 video tutorials with steps and tips plus a selection of detailed PDFs. If you are not sure about joining, you can explore my free videos with a free membership, or take the plunge and become a full subscriber for full access.
If you’d prefer to support me on Patreon, please visit: https://www.patreon.com/RichardGray [...]
This video shows how to paint a cracked leather scabbard, in this case a sword, with lots of detail for a very realistic and worn effect. I also go through a full list of materials and paints that you need in the copy below.
Video Tutorial: How to Paint a Cracked Leather Scabbard
All videos are recorded in HD 1080p or higher – use full screen for the full effect and let the video load completely. Click the cog icon to choose speed, if I’m too fast or slow!
Materials and Paints
Paints:
Rhinox Hide (Games Workshop) – A dark brown paint used as the base color for the leather.
Bugman’s Glow (Games Workshop) – A flesh-toned paint used for creating mid-tones and highlights on the leather.
White (P3 Morrow White) – Used for mixing with Bugman’s Glow to create lighter shades for finer highlights.
Brushes:
Fine Detail Brush – A high-quality, fine-tipped brush, such as a size 0 or 00, is essential for painting the very fine lines that simulate the cracks in the leather. The brush used in the video is my favourite, the size 00 Artis Opus brush.
Additional Materials:
Water – For thinning the paints. The consistency of the paint should be around 50% water to 50% paint, with a slight adjustment for environmental factors like heat.
Wet Palette – To keep the paints hydrated and workable for longer periods. It’s particularly useful for mixing and maintaining the consistency of thinned paints.
Kitchen Roll or Paper Towel – Used for dabbing the brush to remove excess paint or water. It’s important to change the paper regularly to avoid degradation and particles sticking to the brush.
Painting Handle or Holder (optional) – To comfortably hold and manipulate the model while painting. I use Rathcore painting handles.
Step by Step Guide to Paint a Cracked Leather Scabbard
1. Preparation:
Ensure the scabbard on the model (in this case, Cado Ezechiar) is clean and ready for painting.
2. Base Coat:
Start by covering the entire scabbard area with Rhinox Hide (Games Workshop). Apply a couple of coats for even coverage but don’t worry about perfect opacity.
3. Mixing Paints:
Prepare your palette with a progression of mixes:
Rhinox Hide mixed with a small amount of Bugman’s Glow (GW).
Pure Bugman’s Glow, thinned slightly with water.
Bugman’s Glow mixed with a small amount of white (P3 Morrow White), and then a mix with more white added.
4. Detailing with a Fine Brush:
Use a thin brush, like a size 0 or 00, ensuring it has a very sharp tip for fine detailing.
Begin with the Rhinox Hide and Bugman’s Glow mix. Paint very fine, wiggly lines across the scabbard, simulating cracks in the leather. The lines should be more concentrated on the left side where the light hits, but include some on the right side too.
Turn the model as needed for comfort and accuracy but check the marks in the correct orientation to ensure they look natural.
Remember, the paint consistency should be about 50:50 water to paint, perhaps slightly more water for better flow.
5. Building Highlights:
Progress to using straight Bugman’s Glow. Go over some of the previous lines and add new ones. Ensure that some of the initial finer lines remain visible beneath.
Focus on making the edges and areas with supposed more wear brighter.
You can create deeper scratches by painting over the previous lines, adding detail and depth.
6. Correcting and Enhancing:
If any lines are too thick or dense, use Rhinox Hide to adjust them. You can also enhance them by extending the lines and creating additional features.
Remember, each line or mark should be distinct and avoid uniform patterns.
7. Final Highlights:
Use the mix of Bugman’s Glow and white for the brightest highlights. Apply these sparingly and focus on making them as small and fine as possible.
Adjust the intensity of your highlights by removing excess paint from the brush before application.
8. Glazing for Depth:
To bring the whole effect together and add depth, apply a glaze of Mournfang Brown (GW) over the entire area. This step also helps soften the texture and make it more refined.
You can go back with Rhinox Hide into darker recesses if needed, to adjust the contrast and depth.
9. Final Touches:
Add more detail and glaze as needed to achieve the desired depth and realism in the leather texture. Be mindful of over-glazing, which can dilute the detail work.
10. Review and Adjust:
Continuously review your work and adjust as necessary to ensure a realistic and varied leather texture. Each step can be refined or corrected to achieve the desired effect.
Technique Tips:
Consistency in paint mixture is crucial for achieving the fine lines necessary for the cracked leather effect.
Regularly maintaining the brush’s fine tip is essential for detailed work.
Turning the model upside down can facilitate easier brush strokes, but always check the work in its correct orientation.
Glazing with thinned paint helps unify the painted area and add depth to the texture.
Remember, the key to this technique is patience and precision. The fine details make the difference, so take your time with each step to achieve a convincing cracked leather effect.
More vampires? Sure!
If you don’t have an account, please sign up here! The website currently has over 350 video tutorials with steps and tips, plus a selection of PDFs. If you are not sure about joining, you can explore my free videos with a free membership, or take the plunge and become a full subscriber for full access.
If you’d prefer to support me on Patreon, please visit: https://www.patreon.com/RichardGray [...]
This is just a quick video showing how to paint dirt on the bottom of a red robe. This technique is useful for cloaks and other types of cloth that might be on your models that you want to look like they’ve been dragged across the ground behind them, too!
Video: How to Paint Dirt on a Robe
Paints Required
Games Workshop: Rhinox Hide, Mournfang Brown, Balor Brown
Preparing to Paint
Begin with Rhinox Hide: Apply at the very bottom of the robe. This colour blends well with the red robe, creating a subtle effect. As you move upwards, make the application more visible with small dots and splotches. This creates an impression of staining.
Adding Depth with Mournfang Brown
Switch to Mournfang Brown: This shade gives depth to the weathering effect. Initially, it might seem light but it darkens as it dries. If you find it too strong, you can tone it down with Rhinox Hide to soften the effect. The key here is to balance the intensity, ensuring it doesn’t overpower the base colour of the robe.
Finishing Touches with Balor Brown
Finalise with Balor Brown: This is a strong colour, so apply it cautiously. It’s significantly different from the previous colours and can make a bold impact. Focus on the very bottom of the robe, gradually building up a denser application of paint. Be mindful of areas near the highlights, such as near the foot of the robe at the front. Here, you might need to add more Balor Brown to counteract the brighter red tones.
General Tips for an Authentic Effect
Strive for unevenness: Avoid symmetrical or uniform patterns. Some areas should appear dirtier than others for a realistic effect.
Control the paint consistency: Aim for a 50/50 mix of paint to water for optimal flow and control. This consistency allows you to work for an extended period without creating a heavy texture.
Use a smaller brush: A smaller brush gives you more control, especially for creating uneven, chaotic patterns. Avoid pressing too hard to prevent large, unintended marks.
Adjust for mistakes: If you apply too much paint, quickly rub it off with your finger. For smears, stipple over them with a bit of Rhinox Hide to create interesting marks.
More vampires? Sure!
If you don’t have an account, please sign up here! The website currently has over 350 video tutorials with steps and tips, plus a selection of PDFs. If you are not sure about joining, you can explore my free videos with a free membership, or take the plunge and become a full subscriber for full access.
If you’d prefer to support me on Patreon, please visit: https://www.patreon.com/RichardGray [...]
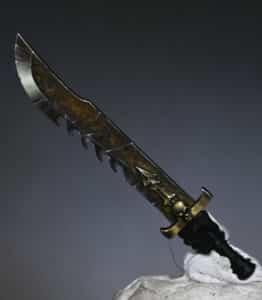
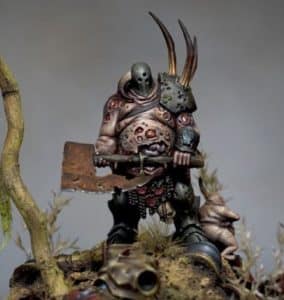
This video and guide shows how to paint an Ogroid sword with NMM (non-metallic metal) and rusty effects.
(Apologies for the dog hair)
Video : How to Paint an Ogroid Sword with NMM and Rust
All videos are recorded in HD 1080p or higher – use full screen for the full effect and let the video load completely. You can also click the little “cog” and change the speed of the video, if I am going too fast (or slow!)
Paints and Materials
Paints
Games Workshop:
Mournfang Brown
Troll Slayer Orange
Fire Dragon Bright
Rhinox Hide
Vallejo:
Ice Yellow
Black
German Grey
Neutral Grey
Pure White (Mecha Color)
Brushes
A range of brushes were used, including but not limited to:
A fine detail brush (such as a size 0 or 00), used for detailed work and fine highlights.
A larger brush (like a size 2), which can be useful for broader strokes and glazing.
Other Materials
Blue Tack: Used to temporarily attach the sword to the model for assessing lighting and highlight placement.
Wet Palette: Essential for mixing and maintaining paint consistency.
Water: For thinning paints, essential for techniques like glazing and stippling.
Step-by-Step
Basecoat and Shades:
Start with a neutral grey, darkened slightly with black.
Create a gradient of greys by mixing German Grey with Neutral Grey, and then adding Ice Yellow for various shades. This creates a series of warm greys for highlights.
Use a wet palette to mix and maintain the paint consistency.
Highlighting the Blade:
Focus on creating a main shine spot on the curved part of the blade, as this area naturally catches more light.
Add random reflections down the blade. Over-highlight initially as you will glaze over these later to reduce their intensity.
Remember that the flat of the blade will be rusty, so avoid highlighting this area.
Adding Details:
Paint distinct blocks of highlights or reflections on the blade, especially around the curved section.
Start with darker greys and layer up to lighter ones, finishing with Pure White for the brightest spots.
Use vertical brush strokes for control and consistency.
Rust Effects on the Blade:
Stipple Mournfang Brown over the flat of the blade for a textured rust effect. Be random and uneven in your application.
Layer Troll Slayer Orange over this, focusing on specific patches for an uneven and realistic rust effect.
Optionally, use Fire Dragon Bright for the brightest rust highlights.
Refining and Adding Scratches:
Add scratches and chips using a mixture of Neutral Grey and Ice Yellow.
Apply these details sparingly and randomly to avoid patterns.
For added depth, add a line of a darker colour (like Rhinox Hide) above some of the scratches.
Finishing Touches:
Make final adjustments to the highlights and rust effects.
Use glazing techniques to soften transitions and blend colours seamlessly.
Be cautious with the use of white; too much can detract from the warm effect.
More tutorials to explore!
If you don’t have an account, please sign up here! The website currently has over 350 video tutorials with steps and tips, plus a selection of PDFs. If you are not sure about joining, you can explore my free videos with a free membership, or take the plunge and become a full subscriber for full access.
If you’d prefer to support me on Patreon, please visit: https://www.patreon.com/RichardGray [...]
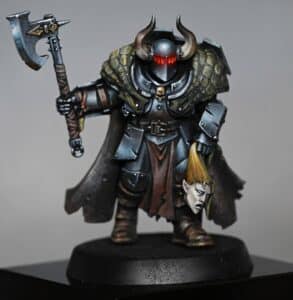
These videos show how to paint Cado Ezechiar, one of the vampire models from Games Workshop. He was painted as a part of my Golden Demon entry for 2024!
There are a lot of fun techniques I used on Cado, from his pitted, slightly worn armour, to his cloth undershirt, cape and some weathered leather. Read on to explore the tutorials in order, or click below to explore each part.
Video Part One – Armour and Red ClothPaints UsedPreparationBlocking in ColoursPainting the ArmourEnhancing Texture and ColourVideo Part Two – Leather Belt and Pouch, the NMM Gold Dragon on his chest and his Black Cape with WeatheringPaints UsedStep-by-Step GuideLeather DetailsNMM Gold DragonBlack CapeVideo Part Three – How to Paint a Vampire HeadMaterials ListHow to Paint a Vampire Head Painting GuidePreparationBase CoatingLayering and DetailingAdditional TipsVideo Part Four – How to Paint his Cracked Leather ScabbardMaterials and PaintsStep by Step Guide to Paint a Cracked Leather ScabbardLeather Technique TipsVideos Not Showing?
Video Part One – Armour and Red Cloth
All videos are recorded in HD 1080p or higher – use full screen for the full effect and let the video load completely. You can also click the little “cog” and change the speed of the video, if I am going too fast (or slow!).
Paints Used
Games Workshop: Mournfang Brown, Corvus Black Vallejo: Ice Yellow, Neutral Grey, German GreyP3: Morrow White
Preparation
Priming: The model should already be primed black. Imperfections in the primer’s coverage are not a concern, as all surfaces will be covered with paint.
Blocking in Colours
Base Coating: Start by blocking in base colours for efficiency and to prevent having to meticulously paint near completed areas later. Use Rhinox Hide for leather parts and German Grey (or a dark grey made by mixing black and white) for armour sections. This step is about laying down foundational colours and reacquainting yourself with the painting process.
Painting the Armour
Initial Armour Layer: Apply a base layer of German Grey across all armour parts. This step establishes a dark base for building up the texture and highlights that will follow.
Adding Texture and Base Highlights: Switch to Neutral Grey to begin adding texture and lighting effects to the armour. This involves creating scratch-like marks to simulate corrosion and wear, enhancing the model’s detailed sculpting. A size 00 brush is recommended for fine control and detail work.
Building Highlights: Gradually lighten the armour by adding more Neutral Grey, and then lighten further by mixing in Ice Yellow with Neutral Grey. The goal is to create a gradient of highlights leading to the brightest points of the armour. The addition of Ice Yellow introduces warmth to the grey, adding visual interest.
Final Highlights: Use P3 Morrow White for the final highlights. Apply this sparingly to the most raised areas and points where light would naturally be the strongest. The white should be watered down significantly to ensure a smooth application.
Enhancing Texture and Colour
Glazing for Depth: Mix a glaze using Mournfang Brown and apply it to shadow areas and recesses to add depth and warmth to the armour. Follow up with Corvus Black for deepening the shadows further. These glazes help unify the texture and add complexity to the finish.
Adjustments and Finishing Touches: Continuously assess the model as you paint, especially when transitioning between different sections or colours. Ensure that the lighting and colours are cohesive across the model to maintain the unit’s unified appearance.
Video Part Two – Leather Belt and Pouch, the NMM Gold Dragon on his chest and his Black Cape with Weathering
Paints Used
Games Workshop: Rhinox Hide, Mournfang Brown, Fire Dragon Bright, XV-88, Balor Brown Vallejo: Dark Grey, Ice Yellow
Step-by-Step Guide
Leather Details
Base Coat: Start with Rhinox Hide as the base for all leather parts, which was applied in the previous painting session.
Initial Highlights: Using Mournfang Brown, begin blocking in the details on the belt and pouch using a size 00 brush. Focus on applying the paint with the tip of the brush, even when filling larger areas, to maintain precision and control.
Adding Texture: With the same brush, enhance the leather texture by applying additional highlights with a mixture of Mournfang Brown and Fire Dragon Bright. The Fire Dragon Bright will lighten the colour but may also increase the paint’s translucency, requiring multiple layers for full opacity.
Further Highlights: Introduce Ice Yellow into the mix for the next set of highlights, focusing on the most illuminated areas like the top of the pouch and the sides of the belt that are exposed to light. Use a delicate touch to add fine details and texture, simulating the natural wear and tear on the leather.
NMM Gold Dragon
Base Layer: Use XV-88 as your base colour for the dragon emblem. Carefully outline the shape, leaving black lines between the details to create depth and contrast.
Building Up Colour: Gradually add Balor Brown to the XV-88, focusing on areas where light would naturally hit the emblem. Consider the curvature and form of the dragon to place your highlights thoughtfully, enhancing the 3D effect.
Final Highlights: Mix in Ice Yellow with your base colours to brighten the highest points of the emblem. Apply these highlights sparingly to areas like the brow, nose tip, and the edges of the dragon heads to achieve a metallic shine. Optionally, add a dot of pure white at the very brightest points for maximum impact.
Black Cape
Initial Layering: Prime the cape black and then apply Vallejo Dark Grey, thinned with water (approximately 60% water to 40% paint), to start building up the layers. Aim for smooth, gradual transitions, focusing on the creases and raised areas of the cape.
Highlighting: Incrementally mix Ice Yellow into the Dark Grey for the highlights. Apply these to the edges and folds of the cape where the light naturally hits, ensuring that the highlights are concentrated towards the top of the folds to emphasise the flow and texture of the fabric.
Weathering: Using Rhinox Hide, begin stippling the lower edges of the cape to simulate mud and grime build-up. Progressively add Mournfang Brown and then Balor Brown into your mix, focusing the lighter, more detailed stippling towards the very bottom to create a realistic weathered effect. Avoid making this look too uniform; natural wear and variety in the marks will enhance the realism.
Video Part Three – How to Paint a Vampire Head
All videos are recorded in HD 1080p or higher – use full screen for the full effect and let the video load completely. You can also click the little “cog” and change the speed of the video, if I am going too fast (or slow!).
Materials List
Paints:
Games Workshop: Cadian Fleshtone, Mephiston Red, Evil Sunz Scarlet
Vallejo: Neutral Grey, German Grey
P3: Morrow White (or any white paint)
Brushes:
Size 2 Round Brush (for broad applications)
Size 00 Round Brush (for detailed work)
Other Materials:
Wet Palette (to keep paints moist and workable)
Water Pot (for cleaning brushes)
Mixing Palette (for mixing custom paint shades)
Blue Tack (for temporarily attaching components)
Metal Rod (for holding the model while painting)
Super Glue (for assembly adjustments)
How to Paint a Vampire Head Painting Guide
Preparation
Modify and Assemble: Modify the hair of the model to prevent it from touching the face, allowing for easier access when painting. This involves careful cutting, reattaching, and positioning of the hair components.
Priming: Prime the model with a neutral primer to ensure paint adhesion and colour accuracy.
Base Coating
Apply Base Colours: Begin with a base coat of Cadian Fleshtone for the skin, applying it thinly (around a 1.5:1 ratio of water to paint) using a size 2 brush for a smooth layer. For the hair, use Neutral Grey as the base.
Layering and Detailing
Layering: Employ both a size 2 brush for general work and a 00 brush for fine details. Gradually build up the skin tones, focusing on creating dramatic lighting by highlighting facial features and leaving recesses darker. Mix Cadian Fleshtone with white for various highlight shades.
Eyes and Teeth Detailing: For the eyes, utilise Mephiston Red and Evil Sunz Scarlet for a glowing effect. For the teeth, mix Cadian Fleshtone with white to achieve a natural bone colour, steering clear of pure white to maintain realism.
Hair: Paint the hair in layers, starting with Neutral Grey, then adding white for highlights. Adjust shading and highlighting to reflect texture and colour accurately.
Shadows and Highlights: Use German Grey for deep shadows to add depth, especially around the eyes and under facial features. Use mixtures of Cadian Fleshtone with white and grey to refine the face’s appearance, enhancing the transition from light to shadow.
Final Touches: Add fine highlights with a mix of the lightest skin tone and a bit of white, focusing on areas where light naturally hits. Use a fine brush for precision, ensuring smooth transitions between light and dark areas.
Additional Tips
Brush Care: Always wet your brush before starting to paint, even if it appears clean, to ensure smooth paint flow.
Lighting Effects: When painting, consider how light interacts with the model’s features. This helps in achieving a more natural and realistic appearance, even with dramatic lighting.
Colour Mixing: Don’t be limited by paint names. Understand that all paints are just colours, and creative mixing can achieve the desired effect, such as using skin tone mixes for teeth to avoid too stark a contrast.
Video Part Four – How to Paint his Cracked Leather Scabbard
All videos are recorded in HD 1080p or higher – use full screen for the full effect and let the video load completely. Click the cog icon to choose speed, if I’m too fast or slow!
Materials and Paints
Paints:
Rhinox Hide (Games Workshop) – A dark brown paint used as the base color for the leather.
Bugman’s Glow (Games Workshop) – A flesh-toned paint used for creating mid-tones and highlights on the leather.
White (P3 Morrow White) – Used for mixing with Bugman’s Glow to create lighter shades for finer highlights.
Brushes:
Fine Detail Brush – A high-quality, fine-tipped brush, such as a size 0 or 00, is essential for painting the very fine lines that simulate the cracks in the leather. The brush used in the video is my favourite, the size 00 Artis Opus brush.
Additional Materials:
Water – For thinning the paints. The consistency of the paint should be around 50% water to 50% paint, with a slight adjustment for environmental factors like heat.
Wet Palette – To keep the paints hydrated and workable for longer periods. It’s particularly useful for mixing and maintaining the consistency of thinned paints.
Kitchen Roll or Paper Towel – Used for dabbing the brush to remove excess paint or water. It’s important to change the paper regularly to avoid degradation and particles sticking to the brush.
Painting Handle or Holder (optional) – To comfortably hold and manipulate the model while painting. I use Rathcore painting handles.
Step by Step Guide to Paint a Cracked Leather Scabbard
1. Preparation:
Ensure the scabbard on the model (in this case, Cado Ezechiar) is clean and ready for painting.
2. Base Coat:
Start by covering the entire scabbard area with Rhinox Hide (Games Workshop). Apply a couple of coats for even coverage but don’t worry about perfect opacity.
3. Mixing Paints:
Prepare your palette with a progression of mixes:
Rhinox Hide mixed with a small amount of Bugman’s Glow (GW).
Pure Bugman’s Glow, thinned slightly with water.
Bugman’s Glow mixed with a small amount of white (P3 Morrow White), and then a mix with more white added.
4. Detailing with a Fine Brush:
Use a thin brush, like a size 0 or 00, ensuring it has a very sharp tip for fine detailing.
Begin with the Rhinox Hide and Bugman’s Glow mix. Paint very fine, wiggly lines across the scabbard, simulating cracks in the leather. The lines should be more concentrated on the left side where the light hits, but include some on the right side too.
Turn the model as needed for comfort and accuracy but check the marks in the correct orientation to ensure they look natural.
Remember, the paint consistency should be about 50:50 water to paint, perhaps slightly more water for better flow.
5. Building Highlights:
Progress to using straight Bugman’s Glow. Go over some of the previous lines and add new ones. Ensure that some of the initial finer lines remain visible beneath.
Focus on making the edges and areas with supposed more wear brighter.
You can create deeper scratches by painting over the previous lines, adding detail and depth.
6. Correcting and Enhancing:
If any lines are too thick or dense, use Rhinox Hide to adjust them. You can also enhance them by extending the lines and creating additional features.
Remember, each line or mark should be distinct and avoid uniform patterns.
7. Final Highlights:
Use the mix of Bugman’s Glow and white for the brightest highlights. Apply these sparingly and focus on making them as small and fine as possible.
Adjust the intensity of your highlights by removing excess paint from the brush before application.
8. Glazing for Depth:
To bring the whole effect together and add depth, apply a glaze of Mournfang Brown (GW) over the entire area. This step also helps soften the texture and make it more refined.
You can go back with Rhinox Hide into darker recesses if needed, to adjust the contrast and depth.
9. Final Touches:
Add more detail and glaze as needed to achieve the desired depth and realism in the leather texture. Be mindful of over-glazing, which can dilute the detail work.
10. Review and Adjust:
Continuously review your work and adjust as necessary to ensure a realistic and varied leather texture. Each step can be refined or corrected to achieve the desired effect.
Leather Technique Tips
Consistency in paint mixture is crucial for achieving the fine lines necessary for the cracked leather effect.
Regularly maintaining the brush’s fine tip is essential for detailed work.
Turning the model upside down can facilitate easier brush strokes, but always check the work in its correct orientation.
Glazing with thinned paint helps unify the painted area and add depth to the texture.
Remember, the key to this technique is patience and precision. The fine details make the difference, so take your time with each step to achieve a convincing cracked leather effect.
Videos Not Showing?
To view any of my paid tutorials, you need to be a member of the website – please click below to log in or join the site.
Not sure about joining just yet? Check out my Youtube for all my free tutorials or sign up as a free “friend” member on this site and visit the Freebies video page! [...]
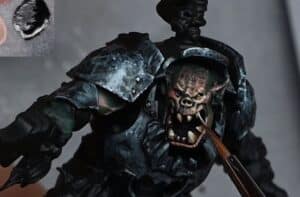
In this tutorial, we’re diving into the wonderfully grim world of Nurgle as we explore how to bring the Rotbringer Sorcerer from Age of Sigmar to life with vivid detail. Whether you’re a seasoned painter or just starting out, this step-by-step guide will equip you with techniques and tips to get going.
Video: How to Paint a Rotbringer Sorcerer – Part One:
All videos are recorded in HD 1080p or higher – use full screen for the full effect and let the video load completely. You can also click the little “cog” and change the speed of the video, if I am going too fast (or slow!).
Video: How to Paint a Rotbringer Sorcerer – Part Two
Materials and Paints
Primer: Badger’s Ultimate Primer Black
Games Workshop Paints: Mephiston Red, Balor Brown, Yriel Yellow, Mournfang Brown, Corvus Black, Bugman’s Glow, Cadian Fleshtone, Morghast Bone, Screaming Skull, Trollslayer Orange, Rhinox Hide, Skeleton Horde Contrast
Vallejo Paints: Basalt Grey, Ice Yellow, Neutral Grey, Pale Grey Blue (optional)
P3 Paints: Morrow White
Step-by-Step Guide to the Rotbringer Sorceror:
Preparation and Priming: Fully assemble your Rotbringer Sorcerer and prime it with a black primer. For easier access to intricate areas, consider leaving the arm that holds the scythe detached during priming.
Base Coating: Apply base coats using Mournfang Brown for wooden elements and Basalt Grey for the cloak and scythe blade. Bugman’s Glow is ideal for flesh areas. Apply these base coats roughly, aiming for coverage rather than precision.
Skin Tones: Enhance skin areas with Bugman’s Glow, providing a rosy, dark flesh tone. Progress with Cadian Fleshtone for highlights, ensuring to thin your paints for a smooth finish.
Wood and Metal Detailing: Utilise Balor Brown for initial wood highlights, transitioning to Mournfang Brown for added depth. For metallic areas like the scythe blade, start with Rhinox Hide, building up to Neutral Grey mixed with white for higher highlights. Create rust effects using Trollslayer Orange.
Shading: Employ Corvus Black, adequately thinned, to add depth through shading across the model, focusing on recesses and shadowed areas.
Detail Enhancement: Use Screaming Skull for edge highlights and detail work on scrolls and similar features. Maintain thin paint layers for refinement.
Textures and Freehand Elements: Incorporate freehand elements like Nurgle symbols using Mephiston Red. Apply textures such as rust and wood grain using stippling techniques with Trollslayer Orange for rust and Morghast Bone for wood grain.
Verdigris Effect: On copper elements, create a verdigris effect with Sotek Green mixed with white. Apply this judiciously to areas that would naturally show oxidation, steering clear of bright highlights.
Candle Flames: Paint candle flames using Yriel Yellow, adding Trollslayer Orange to the tips. Blend these colours for a realistic flame appearance.
Model Basing: Prepare a base that complements the model, using a mix of sand, poly filler, and paint it with XV-88, Morghast Bone, and weathering powder. Introduce grass patches for added realism.
Final Adjustments: Revisit the Rotbringer Sorcerer for any last highlights or corrections. Use a precise brush for fine details, ensuring the paint consistency is suitable.
Model Sealing: Once satisfied with the painting, apply a matte varnish to protect your work.
Tips:
Thin your paints for smoother layers and better control.
Utilise an older brush for base coating and a newer, finer brush for detailed work.
Regularly assess your work from a distance for adjustments.
Experiment with light placement for dynamic highlighting and shadowing effects on your Rotbringer Sorceror.
Initial layers don’t need perfection as they will be layered over with more detail.
Show it off!
As you progress, feel free to adapt and tweak techniques to suit your style. Good luck! When you’ve finished, why not pop into our Discord and show it off to other website members? 🙂
More Nurgle Tutorials
More Free Video Tutorials
Free videos for logged in members – just sign up as a ‘friend’ to view and click any of the thumbs.To explore all of these, visit this page!
If you don’t have an account, please sign up here! The website currently has over 350 video tutorials, plus step by step guides and PDFs. You can explore more free videos with a free “freebies” membership, or take the plunge and become a full subscriber for full access.
If you’d prefer to support me on Patreon, please visit: https://www.patreon.com/RichardGray [...]
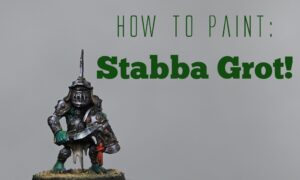
The most powerful model from the Age of Sigmar Dominion box!
I thought it was time that I painted the most powerful model from the new Age of Sigmar Dominion box! It’s the mighty Stab-Grot!
Materials Required:
Stab Grot miniature, fully assembled and primed with Scale 75 Surface Black Primer
Paints: Games Workshop (Mournfang Brown, Rhinox Hide, Cadian Fleshtone, Ushabti Bone, Firedragon Bright, Daemonette Hide, Sotek Green, XV-88, Moot Green, Mephiston Red, Evil Sunz Scarlet), Vallejo (Ice Yellow, Black, Neutral Grey, White, German Grey, Pale Grey Blue)
Brushes, including a fine detail brush (size 00 recommended)
Painting Process:
Base Layers: Begin with Vallejo German Grey, applying it to the armoured parts using a scratchy technique. Concentrate on lighter points where light naturally falls (shoulder, forearm), but ensure even coverage.
Adding Tones: Apply Daemonette Hide for a subtle hint of colour. Use the same method as with German Grey but in smaller areas, allowing the underlying grey to show through for texture.
Highlights and Shading: Combine Pale Grey Blue and Daemonette Hide for highlights. Aim for a grimy, non-polished metal appearance. Use white sparingly to highlight edges and dents.
Skin Tones: Start with Sotek Green, progressively adding Moot Green and white for highlights. Focus on creating soft transitions with diluted paint for a realistic skin effect.
Leather Details: Base with Rhinox Hide, then layer with XV-88 and Cadian Fleshtone, concentrating on edges and scratches. Use watered-down Mournfang Brown for a glazing effect, softening the highlights.
Red Cloth: Base with Mephiston Red, layering for opacity. Highlight with Evil Sunz Scarlet, careful not to overdo it to preserve the red’s vibrancy.
Final Touches: Add final details such as rust on the blade with Mournfang Brown and scratches with Ice Yellow. Remember, moderation is key for a realistic weathered look.
Tips for Success:
Pay attention to natural light fall for realistic highlights and shadows.
Use a scratchy technique for armour to create texture and a weathered appearance.
Thin your paints for smoother transitions, especially on the skin.
Avoid over-highlighting reds to prevent a pink or orange shade.
Patience and attention to detail are vital for a small, detailed model like Stab Grot.
Free Video Tutorials
Free videos for logged in members – just sign up as a ‘friend’ to view and click any of the thumbs.To explore all of these, visit this page!
If you don’t have an account, please sign up here! The website currently has over 350 video tutorials, plus step by step guides and PDFs. You can explore more free videos with a free “freebies” membership, or take the plunge and become a full subscriber for full access.
If you’d prefer to support me on Patreon, please visit: https://www.patreon.com/RichardGray [...]
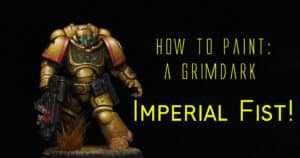
This video shows the whole process of how to paint a Grimdark Imperial Fist for Warhammer 40,000, plus a step by step text guide.
Tool and Paints
The following paints were used:
Games Workshop: Mephiston Red, Wild Rider Red, Cadian Fleshtone, Ushabti Bone, Yriel Yellow, Sotek Green, Balor Brown, XV-88
Vallejo: Neutral Grey, Ice Yellow, Black, (Metal Colour Magnesium)
P3: Morrow White (Any brand of white is fine)
Scale 75: Dwarven Gold, Neco Gold
Winsor & Newton: Oil Colour: Burnt Sienna, Black, Sansodoor solvent
Step by Step Guide : How to Paint a Grimdark Imperial Fist
Step 1: Base Coating with XV-88
Start with a model primed in black and assembled (except for head and backpack).
Use XV88 paint directly from the pot and scrunch it onto a piece of paper towel.
Stipple the paint onto the model with a large brush to cover all armour panels.
Stab the marine harshly with the stippling brush to create texture.
Don’t worry about getting paint on other parts; focus on covering armour panels thoroughly.
Step 2: Adding Baylor Brown Highlights
Switch to a smaller brush for precision.
Use Balor Brown paint and continue stippling, focusing on areas with prominent curves (shoulder pads, backpack, head).
Highlight the model by emphasizing the curves for a top-down lighting effect.
Step 3: Airbrushing with Yriel Yellow and Ice Yellow
Thin Yriel Yellow paint with airbrush thinner in a wet palette.
Apply a thin coat with an airbrush, blending and smoothing the texture.
Use Ice Yellow with the airbrush to highlight specific metal areas (gun, joints, recesses).
Step 4: Red Trim with Mephiston Red
Paint the trim on the marine in red using Mephiston Red paint.
Avoid painting directly from the pot; thin the paint with water to achieve the right consistency.
Focus on essential highlights rather than painting every edge.
Step 5: Final Highlights and Stippling
Use worn-out brushes for final highlights, adding details to areas with texture or leftover stippling.
Stipple lightly to blend and enhance highlights.
Step 6: Weathering with Sotek Green and Verdigris
Apply Sotek Green for verdigris weathering on the chest piece.
Water down the paint and run it into recesses for a weathered effect.
Step 7: Apply Decals and Micro Set
Glue the head on to avoid wobbly head issues.
Apply decals using Micro Set for adhesion.
Skip Micro Sol; Micro Set alone is sufficient for shaping decals.
Step 8: Oil Wash with Agrax Earthshade
Thin Agrax Earthshade with some Sansodor to create a wash.
Apply the wash generously over the model, allowing it to settle in recesses.
Wipe off excess if needed.
Step 9: Final Touches and Stippling
Stipple over highlights again to clean up and enhance contrast.
Use Metal Colour Magnesium paint on lower areas (shin, foot) for a dirty, textured effect.
Focus on making the knee pad stand out and eliminating unwanted highlights.
Step 10: Eyes and Final Details
Paint eyes with a mix of Sotek Green and Metal Colour Magnesium for a glowing effect.
Add final details as needed, keeping the overall grimy and weathered appearance.
Free Video Tutorials
More free videos for logged in members – just sign up as a ‘friend’ to view and click any of the thumbs.To explore all of these, visit this page!
If you don’t have an account, please sign up here! The website currently has over 350 video tutorials, plus step by step guides and PDFs. You can explore more free videos with a free “freebies” membership, or take the plunge and become a full subscriber for full access.
If you’d prefer to support me on Patreon, please visit: https://www.patreon.com/RichardGray [...]
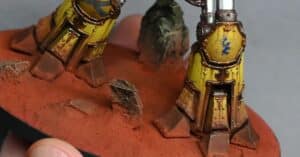
This video shows you how to create a Titan Martian Base, a Martian red landscape for your Adeptus Titanicus Titan, or for any large model you like, really!
Video Tutorial: Titan Martian Base
All videos are recorded in HD 1080p or higher – use full screen for the full effect and let the video load completely.
Paints and Materials Used
Fimo and Milliput: For making rock shapes.
Baking Soda: For creating the fine-grained surface texture.
Paints:
Scale 75’s Antares Red
Scale 75’s Red Leather (or similar Games Workshop red and brown colours)
Games Workshop’s Deathworld Forest
Games Workshop’s Ushabti Bone
Weathering Powders:
Forge World’s Aged Rust
Forge World’s Orange Rust
Matte Varnish: For sealing the base.
Tools:
Brushes for painting and dry brushing.
Sculpting tools or a flat surface for applying the baking soda mixture.
Airbrush for applying weathering powder (optional).
Other Materials:
Water: For mixing with weathering powders.
Super Glue: For securing rocks to the base.
Q-tip: Slightly damp, for cleaning up excess weathering powder.
Step by Step Guide
Preparing the Base: Start by placing your model on the base and arrange rocks around it. Use rocks made from a mixture of Fimo and Milliput, baked and then broken into shapes.
Creating the Surface: Mix baking soda (for fine texture), Scale 75’s Antares Red and Red Leather paint (or similar GW paints), and matte varnish to form a sticky, wet-looking substance. This creates the dusty, Martian surface.
Applying the Surface Mixture: Carefully apply the mixture to the base, ensuring it’s pushed up against the rocks. Use a large, slightly damp brush to stipple and smooth out the mixture, avoiding unnatural marks.
Using Cracking Paint: Apply a thin layer of Martian Ironearth cracking paint for subtle cracking effects. Ensure it’s not too thick to maintain the scale’s integrity.
Painting the Rocks: Once dry, paint the rocks with Vallejo Model Color Black or a similar black paint. Then dry brush with GW Deathworld Forest for initial colour, followed by Ushabti Bone for highlights.
Applying Weathering Powder: Mix Forge World Aged Rust and Orange Rust powder with a lot of water, and spray over the base using an airbrush. Focus on the lower parts of the model for a realistic effect. For manual application, use a large, soft brush.
Cleaning Up: After the weathering powder dries, use a slightly damp Q-tip to remove excess powder from the rocks and lower sections of the Titan, enhancing the details and textures.
Final Touches: Seal the base with a matte varnish to preserve the dusty look and reduce the brightness of the orange rust effect.
More Adeptus Titanicus
If you don’t have an account, please sign up here! The website currently has over 350 video tutorials with steps and tips, plus a selection of PDFs. If you are not sure about joining, you can explore my free videos with a free membership, or take the plunge and become a full subscriber for full access.
If you’d prefer to support me on Patreon, please visit: https://www.patreon.com/RichardGray [...]
I created some shiny (and then grimy!) non metallic metal copper on my Maggotkin of Nurgle, which I then weathered with distinctive green verdigris. This is how I did it in a series of step by step guides and videos on NMM copper.
How to Paint NMM Copper – Part One
Paints and Materials
Brush Size and Type:
Don’t use a tiny detail brush for the entire process. Instead, a slightly larger, older brush is preferred. My older brush has a worn tip, which is thicker than a new brush and allows for better paint control and blending.
An old, well-used brush is good for this type of painting. The worn tip of an older brush can make blending easier.
Paints Used
Games Workshop: Doombull Brown, Golden Yellow (old colour; find a modern equivalent if needed)
Scale 75: Ice Yellow, Salmon Pink, Black Red
Black and White paint (any preferred brand)
Step-by-Step Guide
Understanding Copper NMM:
Remember, copper NMM aims to create a metallic effect without using metallic paints. Copper is essentially pink in hue, similar to skin tones, with brown for shadows and a hint of sand yellow.
Preparation of Palette:
On your wet palette, blend all the colours together into one smear. This is because copper has a lot of subtleties in colouring. Start with Doombull Brown and mix in Black Red from Scale 75. If you don’t have Black Red, mix black and red to achieve a dark, reddish brown.
Creating the Base Colour:
For the darker areas of copper, you want something a bit more red. Along your paint smear on the palette, integrate colours that become more yellow and orange. Use Golden Yellow and Ice Yellow for this purpose. Add Salmon Pink at the very end for highlights.
Applying the Base Layer:
Before starting the video, paint the whole model (or the part you’re working on) with Doombull Brown. This creates an easier starting point for the copper effect.
Mixing on the Model:
You’ll be mixing the paint directly on the model, working quickly. This method is different but effective for creating copper NMM. Apply the colours and quickly determine where the highlights will be. The idea is to get lighter colours down first as a base to work from.
Developing the Effect:
Start blending in reflections and refining the look. Add lighter colours and work on creating smooth transitions and contrast. Remember, smooth transitions and good contrast are key in NMM painting.
Refining the Details:
As you progress, you’ll refine the copper effect by using thinner paint and increasing contrast. Use Salmon Pink for the higher highlights and blend it in for a smooth transition.
Final Touches:
Towards the end, focus on refining the paint with continual glazes until it looks smooth and metallic. You might need to make slight adjustments to the highlights and shadows. Add black, turned into a glaze, at the bottom of the shoulder pad to increase contrast.
Final Overview:
The final piece should showcase a refined copper NMM effect with smooth transitions, proper contrasts, and a realistic metallic look.
How to Paint NMM Copper Greeny Verdigris Effect
Paints and Materials
Games Workshop Sybarite Green
P3 Morrow White (or your preferred white paint)
Step-by-Step Guide
Understanding Verdigris:
Verdigris is a patina that forms on copper, brass, or bronze when exposed to air or seawater over time. This guide aims to create a more realistic effect, where verdigris covers larger areas rather than just around rivets and crevices.
Creating Verdigris Tones:
You will mix Sybarite Green with Morrow White to create three stages of verdigris tones:
First Stage: Pure Sybarite Green.
Second Stage: A mix of half Sybarite Green and half Morrow White.
Third Stage: Mostly Morrow White with a tint of Sybarite Green.
Applying the First Layer:
Start with the pure Sybarite Green. Apply it by gently dabbing it onto the model. The goal is to create a patchy texture rather than smooth streaks.
This layer should cover most of the area, but try to maintain the shades and shine of the underlying metallic paint.
Mid-tone Application:
Next, apply the second stage mix (half Sybarite Green, half Morrow White). This should be used more sparingly than the first layer.
Focus on applying this mix to darker areas and recesses. You want to maintain visibility of the copper NMM base, so apply it carefully and artistically.
Adding Highlights:
For the final layer, use the lightest mix (mostly Morrow White with a hint of Sybarite Green). This is like a reverse highlight, working best in shadows to create contrast.
Apply this very selectively, as it can quickly cover the base layers. It should go into the deepest recesses and lower curved areas where verdigris would naturally accumulate.
Final Touches:
Remember, verdigris should have an uneven, patchy appearance. It should not be smooth or uniformly applied like rust.
Check your work against reference images to ensure a natural look.
Finishing Up:
After applying all three stages, your model should exhibit a realistic verdigris effect over the copper. The underlying NMM copper should still be visible, contributing to the overall realism.
Gallery – Click to view larger
More NMM Tutorials to Explore!
If you don’t have an account, please sign up here! The website currently has over 350 video tutorials with steps and tips, plus a selection of PDFs. If you are not sure about joining, you can explore my free videos with a free membership, or take the plunge and become a full subscriber for full access.
If you’d prefer to support me on Patreon, please visit: https://www.patreon.com/RichardGray [...]
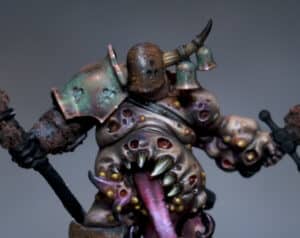
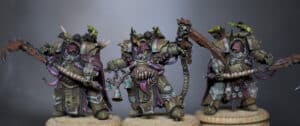
A series of tutorials on how I painted my set of Golden Demon winning Deathguard Deathshroud Bodyguard! This includes nurgly armour, weathering, rust, metals, tentacles, freehand and more!
Quick note here – these are some of my earliest tutorial videos, so are not of the same quality as my current tutorials visually and sound-wise. My apologies for this.Richard
Scroll down to explore the tutorials in order, or quick-jump to a segment by clicking on one of the items below:
Video: Deathguard Deathshroud Bodyguard Green ArmourMaterials and Paints UsedStep by Step GuideVideo: Deathguard Deathshroud Bodyguard Armour DetailMaterials and Paints UsedStep by Step GuideVideo: Deathguard Deathshroud Bodyguard Pink TentaclesMaterials and Paints UsedStep by Step GuideVideo: Deathguard Deathshroud Bodyguard Copper CanisterMaterials and Paints UsedStep by Step GuideVideo: Deathguard Deathshroud Bodyguard Red CloakMaterials and Paints UsedStep by Step GuideVideo: Deathguard Deathshroud Bodyguard Cloak FreehandMaterials and Paints UsedStep by Step GuideVideo: Deathguard Deathshroud Bodyguard Cloak Freehand RefinementMaterials and Paints UsedStep by Step GuideMore Deathshroud TutorialsLots More Deathguard Video Tutorials!
Video: Deathguard Deathshroud Bodyguard Green Armour
All videos are recorded in HD 1080p or higher – use full screen for the full effect and let the video load completely.
Materials and Paints Used
Games Workshop: Elysian Green, Nurgling Green, Rhinox Hide
Additional paints for mixing and shading: Pine Oxide, Loden Gree
Step by Step Guide
Paint Preparation: Gather your paints – Legion Green, Pine Oxide, Loden Green, and Rhinox Hide. Mix these to create five different shades ranging from light to dark for various transitions.
Base Coat: Start with a base coat of pure Legion Green. This will be your foundation colour.
Shading: Begin shading the lower belly area and other parts where shadows naturally fall. Use a mixture of Legion Green and Rhinox Hide for this. Remember, at this stage, the transitions don’t need to be perfect.
Wet Blending: Apply the shading using a wet blending technique. This involves placing one colour and, before it dries, adding another colour to blend on the model. It’s a rough, quick blending to position the shadows and shapes.
Highlighting: For highlighting, mix Legion Green with Megan Green. Start applying highlights to areas where light naturally hits, like the upper sections of the model.
Refining Transitions: As you progress, refine your transitions and shadows for a more polished and detailed look.
Final Highlights: Use pure Nurgling Green for the final highlight stage. This adds a brighter touch to the highest points where light would be most intense.
Detailing: Add finer details, like light reflections and texture variations, as needed to enhance the realism of the armour.
Additional Techniques: If desired, use glazes or additional layers to further refine the shading and highlighting.
Video: Deathguard Deathshroud Bodyguard Armour Detail
Materials and Paints Used
Games Workshop: Elysian Green, Nurgling Green, Mournfang Brown, Rhinox Hide Forge World: Gal Vorbak Red (use Games Workshop Khorne Red with a tiny amount of blue for a similar colour)
Step by Step Guide
Initial Shading: Start by shading the lower leg using a mix of Elysian Green and Rhinox Hide. This forms the base for the subsequent layers.
Layering with Pine Oxide: Apply Pine Oxide in layers. This is a form of light layering, where the paint is applied thinly, almost like working with glazes but slightly thicker.
Blending Techniques: Employ wet blending by quickly layering the paint. This helps in merging the layers smoothly, ensuring a subtle transition of colours.
Stippling with Mournfang Brown: Use Mournfang Brown for stippling effects. This is done by applying small dots to create texture and depth.
Refining Highlights: Add highlights using a finer brush. Highlight the lower edges of the leg where light naturally catches but avoid highlighting the upper edges to maintain a natural look.
Fixing Imperfections: If any area becomes too dark, use the in-between transitions to correct it. This involves mixing paint directly on the model, which can help in hiding mistakes.
Applying Red Glazes: Use a heavily watered-down Evil Sunz Scarlet (or a similar red glaze) to add subtle tones and enhance contrast.
Streaking for Battle Damage: For bullet holes or battle-damaged areas, create streaking effects using Mournfang Brown and Rhinox Hide, depicting the gunk running down from the damage.
Final Touches: Add final details and weathering to complete the look of the armour. This includes additional stippling and refining the contrast between light and shadow areas.
Video: Deathguard Deathshroud Bodyguard Pink Tentacles
Materials and Paints Used
Games Workshop: Emperor’s Children, Rhinox Hide, Evil Sunz Scarlet
Vallejo: Model Colour Black (Alternatively, Games Workshop black can be used)
P3: Morrow White (Alternatively, Games Workshop white can be used)
Step by Step Guide
Base Colour: Start with a base of Emperor’s Children pink.
Shading: Apply Rhinox Hide for shading. Paint the tip of the tentacle black for contrast.
Blending: Blend Rhinox Hide mixed with Emperor’s Children down from the black tip to create a smooth transition.
Detailing: Using straight Emperor’s Children, add line details to the tentacle, going beyond the sculpted segments for more intricacy.
Highlighting: Focus on the middle area of the tentacle with a mix of Emperor’s Children and Morrow White. This creates a focal point and simulates light catching the tentacle.
Final Touches: For light reflections, use a lighter pink or white. Add a glaze of Evil Sunz Scarlet for depth and contrast.
Video: Deathguard Deathshroud Bodyguard Copper Canister
This technique will give you a realistic copper effect using a simplified palette.
Materials and Paints Used
Games Workshop: Doombull Brown, Cadian Fleshtone Vallejo: Ice Yellow
Step by Step Guide
Base Coat: Start with a base coat of Doombull Brown.
Mixing Colours: Create a palette with five shades by mixing Doombull Brown, Cadian Fleshtone, and Ice Yellow in different proportions.
Highlighting: Apply the mix of Doombull Brown and Cadian Fleshtone across the upper curve for initial highlights. Adjust the position of the highlight by observing the model under light.
Refining: Blend the colours for smooth transitions. Use finer brushes for detailed areas and to keep dark lines sharp.
Final Highlights: Use a mixture of Cadian Fleshtone and Ice Yellow for brighter highlights. Add small touches of pure Ice Yellow for the brightest points.
Artificial Reflections: Paint reflections and detail lines that may not naturally occur but enhance the metallic effect. Look as photographs of copper items for references to help you with this.
Finishing Touches: Adjust and refine the highlights and shadows, ensuring a balance between realism and aesthetic appeal.
Video: Deathguard Deathshroud Bodyguard Red Cloak
This process results in a textured, worn cloak suitable for a Death Shroud Terminator, using a simple but effective painting technique.
Materials and Paints Used
Gal Vorbak Red (Forge World) Cadian Fleshtone (Games Workshop) Eldandil Violet (Scalecolour Fantasy)
Step by Step Guide
Base Coat: Start with Gal Vorbak Red as the primary colour.
Detailing and Texture: Use Cadian Fleshtone for adding highlights and texture, creating a worn and mouldy appearance.
Shading: Apply Eldandil Violet for shading in the recesses, enhancing depth and wear.
Glazing with Evil Sunz Scarlet: Use it as a glaze to add warmth to the cloak.
Refining Texture: Focus on cross-hatching movements to build texture, emphasizing the worn look.
Final Touches: Add further glazes and highlights to refine the texture and depth, tailoring the effect to your desired level of detail.
Video: Deathguard Deathshroud Bodyguard Cloak Freehand
Materials and Paints Used
The following paints were used:Games Workshop: Rhinox Hide Vallejo: Heavy Brown, Cork Brown, Ice Yellow, Black P3: Battlefield Brown *Note, Morrow White was not actually used in this video, but is used in part 2.
Step by Step Guide
Preparation: I used a test model to experiment with my design concept. This approach allows you to refine the freehand pattern before applying it to the main models.
Base Colours: Apply Vallejo Heavy Brown as a foundational colour. Enhance the base with Cork Brown for a richer texture. Use Rhinox Hide to outline the design, ensuring the lines are crisp and distinct.
Detailing: Carefully mark the eye sockets with black paint, paying attention to the cloak’s folds. These details will add depth and character to the freehand design.
Highlighting: Utilize Ice Yellow for highlights. This step involves blending the highlights with the base colors to achieve a natural, integrated look. The highlights should accentuate the topography of the cloak and enhance the freehand design.
Shading: Use Battlefield Brown to deepen the shadows and add complexity to the design. This shade will create a more dynamic and realistic appearance on the cloak.
Finishing Touches: Review the entire design, making final adjustments for consistency and balance. Focus on refining the freehand artwork, ensuring it harmonizes with the cloak’s texture and the overall theme of the model.
Video: Deathguard Deathshroud Bodyguard Cloak Freehand Refinement
Materials and Paints Used
The following paints were used: Games Workshop: Cadian Fleshtone, Pallid Wych Flesh, Bugman’s Glow, Rhinox Hide, Loren Forest, Nurgling Green, Vallejo: Ice Yellow, Cork Brown, Black, Neutral Grey, Pale Grey Blue, Heavy Brown P3: Battlefield Brown, Morrow White
Step by Step Guide
Base Preparation: Start by painting a rough base of fleshy shapes using Cadian Fleshtone. This initial layer doesn’t need to be perfect or smooth.
Detailing Ears and Face: Add ears to distinguish the image from a skull, creating a more zombie-like face. Use Kadeem Flesh Tone for this step.
Sketching Flesh and Bone: Sketch out areas where flesh appears torn or missing, revealing bone underneath. This technique enhances the undead appearance and integrates the existing skull highlights.
Adding White Highlights: Use Pallid Wych Flesh to accentuate bone areas, making them stand out from the flesh tone.
Painting the Eyes: Employ Neutral Grey, followed by Pale Grey Blue for the eyes. Add white dots in the center and top left corner of each eye for a lifelike effect.
Mouth and Teeth Details: Refine the mouth and teeth using Rhinox Hide and Ice Yellow for highlights. Focus on defining the teeth shapes and adding depth to the mouth.
Adding Texture to Flesh: Use Bugman’s Glow and other flesh tones to create textured, worn skin. Apply these tones in layers, allowing the underlying skull details to peek through.
Final Touches: Finish by adding fine details and additional highlights to enhance the depth and realism of the freehand design.
The key to this process is building up the layers gradually, refining the details as you go, and ensuring the highlights and shadows work together to create a realistic, three-dimensional appearance.
More Deathshroud Tutorials
How to Paint Deathshroud ArmourDeathshroud Scythe Handle WrappingDeathshroud Terminator Cloak FreehandHorn Painting Guide
Lots More Deathguard Video Tutorials!
If you don’t have an account, please sign up here! The website currently has over 350 video tutorials with steps and tips, plus a selection of PDFs. If you are not sure about joining, you can explore my free videos with a free membership, or take the plunge and become a full subscriber for full access.
If you’d prefer to support me on Patreon, please visit: https://www.patreon.com/RichardGray [...]
This video shows how to paint the metal and weathering effects on the legs of the Adeptus Titanicus Titan. Enhancing the metalwork, particularly the armour trim and skeletal structure, to achieves a detailed and realistic finish that looks fantastic on the battlefield. We’ll be using a mix of Games Workshop, Vallejo, and Forge World paints to bring our Titan to life.
Video: How to Paint Weathering and Metal on an Adeptus Titanicus Titan
All videos are recorded in HD 1080p or higher – use full screen for the full effect and let the video load completely.
Paints
Games Workshop:
Agrax Earthshade
Wyldwood (Contrast)
Contrast Aggaros Dunes
Forge World:
Aged Rust (Weathering Powder)
Vallejo Metal Colour (Airbrush Ready):
Victorian Brass (Scale 75 for an alternative base colour)
Magnesium
Gold
Chrome
Winsor & Newton:
Water Mixable Oil Colour Burnt Umber
Brushes
A fine detail brush for applying precise highlights and for controlled application of contrast paints and weathering powders.
A medium brush for applying base coats and larger areas of colour.
A soft, large brush for applying washes and for dusting off excess weathering powders.
I use the Artis Opus range of brushes, but any good quality brush is recommended.
Step by Step – Weathering and Metal on the Adeptus Titanicus Titan
Preparing the Armour Trim
Base Coat: Begin with a base coat of Scale 75 Victorian Brass over the trim. This provides a solid foundation for subsequent layers.
Initial Shading: Apply Contrast Aggaros Dunes over the Victorian Brass to introduce depth and shading to the trim. This step should have been completed in earlier stages of the model’s painting process.
Enhancing the Trim
Adding Depth: Use Games Workshop’s Wyldwood contrast paint to darken recesses and joints in the trim. The high contrast between the dark recesses and the metallic brass creates visual interest and depth. Apply the paint selectively to areas that would naturally accumulate shadow.
Highlighting: Vallejo Metal Colour Gold is used to highlight the edges of the trim. Due to its fluidity, it provides a smooth application but be mindful of its runniness. Lightly touch the edges with a fine brush to catch the raised areas.
Painting the Skeleton
Base Layer: Vallejo Metal Colour Magnesium serves as the base layer for the Titan’s skeletal structure. Its liquidity ensures it flows well into recesses but exercise caution to prevent pooling.
Weathering: Apply Forge World’s Aged Rust weathering powder mixed with water to the skeletal structure for a grimy, rusted effect. Focus on areas that would naturally collect dirt and rust, maintaining a balance to avoid obscuring details.
Sealing the Weathering: Once dry, seal the weathering with a mix of Agrax Earthshade. This reactivates and fixes the weathering powder, giving a durable and realistic rust effect.
Detailing Pistons and Metal Accents
Chrome Pistons: Vallejo Metal Colour Chrome is applied to pistons for a bright, reflective finish. Multiple thin layers may be needed for uniform coverage.
Oily Effects: Windsor and Newton’s Water Mixable Oil Colour Burnt Umber is used to simulate oil and grime on pistons and mechanical parts. Dilute with water for a manageable consistency and apply at joints and moving parts for a realistic oily effect.
Finishing Touches
Reichland Fleshshade Glaze: Optional, but can be used to add warmth to metal parts, particularly useful on brass or gold trims to simulate reflected light or heat staining.
Highlighting and Cleaning Up: After applying weathering and shading, go back to highlight edges and clean up any overspill with your base metallic colours. This step sharpens details and enhances the overall contrast of the model.
Techniques and Tips
Trim Detailing: Use the fine detail brush with Vallejo Metal Colour Gold to highlight the edges of the trim, applying the paint carefully to avoid spillage onto other areas.
Skeleton Base Layer: Apply Vallejo Metal Colour Magnesium with a medium brush, ensuring even coverage and avoiding pooling in recesses.
Weathering Powder Application: Mix Aged Rust with water in the well palette and apply with a large brush, targeting recesses and areas where rust would naturally accumulate.
Chrome Pistons: Use Vallejo Metal Colour Chrome, applying multiple thin layers as needed for a smooth, reflective finish.
Oily Effects: Dilute Winsor & Newton Water Mixable Oil Colour Burnt Umber with water and apply at the tops of pistons and around mechanical parts to simulate oil and grime.
Watch all the tutorials for my War Griffons Warlord!
War Griffons Warlord
A series of quick videos on the different techniques used on this model. These include the marble effect, the stripes, applying decals and weathering and metal.
Watch Now
Free Video Tutorials
Free videos for logged in members – just sign up as a ‘friend’ to view and click any of the thumbs.To explore all of these, visit this page!
If you don’t have an account, please sign up here! The website currently has over 350 video tutorials, plus step by step guides and PDFs. You can explore more free videos with a free “freebies” membership, or take the plunge and become a full subscriber for full access.
If you’d prefer to support me on Patreon, please visit: https://www.patreon.com/RichardGray [...]
A video on how I painted up this friendly little Great Unclean One Nurgling! In this comprehensive guide, we’ll learn essential techniques such as layering, blending, washing, and highlighting, all aimed at bringing the detailed Nurgling model to vivid life.
Video: How to Paint a Great Unclean One Nurgling
Paints and Materials Used
Games Workshop Paints:
Cadian Fleshtone
Rhinox Hide
Kislev Flesh
Ceramite White
Yriel Yellow
Emperor’s Children
Celestra Grey
Skavenblight Dinge
Lothern Blue
Cybarite Green
Abaddon Black
Mournfang Brown
Ushabti Bone
Zamesi Desert
Agrax Earthshade (for wash)
Scale 75 Paints:
Kalahari Orange
Mars Orange
Vallejo Paints:
Model Colour Black
Ice Yellow
Brushes:
In the tutorial I mention using a new size 1 brush with a fine point, ideal for both general painting and fine details. A good point for precision work and the brush I was using was an Artist Opus brush!
An older, rough brush is used for applying the Scale 75 paints to create a rusty texture on the chain.
Step-by-Step Guide
Step 1: Base Colours for Skin
Begin with a base of Cadian Fleshtone on the skin. Create a palette with three colour mixtures: pure Cadian Fleshtone, a 50/50 mix of Cadian Fleshtone and Rhinox Hide, and a mixture mostly of Rhinox Hide with a small amount of Cadian Fleshtone.
Step 2: Painting Shadows
Start with the darkest mixture (mostly Rhinox Hide) to paint creases, dark areas, and shadows. The approach here doesn’t need to be very neat; it’s more about laying down the dark tones.
Step 3: Mid-tone Shading
Use the mid-tone mixture for most of the shading. Avoid painting over areas that will be highlighted later, like the chest and middle of the belly.
Step 4: Blending and Refining
As you proceed, switch between mixtures for blending, often without washing the brush. This method helps create quick transitions. Focus on darkening areas around the edges where the Nurgling touches Rotigus for shadow effects.
Step 5: Teeth and Boils
For the teeth, apply a quick wash of Agrax Earthshade to outline and define them. Then, start refining the shading and blending, particularly with the mid-tone shade.
Step 6: Final Skin Highlights
The final skin highlights won’t be Cadian Fleshtone but a brighter colour. However, use Cadian Fleshtone initially to get all shadows in place, creating transitions where the darkest shadows show through beneath lighter layers.
Step 7: Eyes and Pupils
Paint the eye with Yriel Yellow for a strong, vibrant colour. Then, use Vallejo Model Colour Black to paint the pupil, ensuring it looks forward and round.
Step 8: Smoke Effect
Base the smoke with Lothern Blue, then use Cybarite Green mixed with a little Abaddon Black. Highlight the inner recesses of the smoke with a mixture of Lothern Blue and Ceramite White, getting lighter towards the start of the smoke.
Step 9: Rusty Chain
Use Scale 75 Kalahari Orange and Mars Orange for a rusty look. Apply with a rough brush for a patchy appearance. Highlight with Skavenblight Dinge, Celestra Grey, and a touch of Ushabti Bone on the raised edges to mimic worn metal.
Step 10: Copper Smoke Dispenser
Paint with Mournfang Brown, highlighting with Cadian Fleshtone mixed with Ice Yellow, focusing on raised edges facing upwards. Use Lothern Blue for the verdigris effect, concentrating on the recesses for a corroded look.
Step 11: Horns and Tentacles
Start horns with Mournfang Brown, blending into Abaddon Black towards the tip. Highlight with Skavenblight Dinge and Celestra Grey. For tentacles, use a base of Emperor’s Children mixed with a small amount of Ushabti Bone, adding horizontal lines along each tentacle. Highlight with a brighter mix of Emperor’s Children and Ceramite White, focusing on the central area.
Remember, the key to this process is layering and blending, creating smooth transitions between colours.
More Nurgle Tutorials!
If you don’t have an account, please sign up here! The website currently has over 350 video tutorials with steps and tips, plus a selection of PDFs. If you are not sure about joining, you can explore my free videos with a free membership, or take the plunge and become a full subscriber for full access.
If you’d prefer to support me on Patreon, please visit: https://www.patreon.com/RichardGray [...]
Abaddon’s shoulder pad! I filled in the V shape on the eye with greenstuff so I could freehand over the…
Please login to view this content at https://richardgraycreations.com/login/ [...]
A guide on creating a series of effects on the Plague God’s chosen servants, the Maggotkin of Nurgle, with rusty weapons, grimy copper armour and general Nurgle weathering techniques!
Keep scrolling to explore the tutorials in order, or click on one of the links below to quickly jump to an a specific effect!
Video – Maggotkin of Nurgle Diseased Skin Part OnePaints UsedStep by Step GuideVideo – Maggotkin of Nurgle Diseased Skin Part TwoPaints and Materials UsedStep by Step GuideVideo – Maggotkin of Nurgle Diseased Skin Part ThreePaints and Materials UsedStep by Step GuideVideo: How to Create a Nurgle Rusty SwordMaterials Needed:Step-by-Step Guide:How to Paint NMM CopperPaints and MaterialsStep-by-Step GuideHow to Paint NMM Copper Greeny Verdigris EffectPaints and MaterialsStep-by-Step GuideMore Nurgle Tutorials!
Video – Maggotkin of Nurgle Diseased Skin Part One
Paints Used
Games Workshop ‘Cadian Fleshtone’: For the base coat and blending.
Scale 75 ‘Black Leather’: Used for initial detailing and creating depth in the skin.
Games Workshop ‘Pallid Wych Flesh’: Mixed with Cadian Fleshtone for highlights.
Games Workshop ‘Rhinox Hide’: Diluted for defining skin defects and recesses.
Step by Step Guide
Base Coat: Begin by applying a base coat of Games Workshop’s ‘Cadian Fleshtone’ to your model. Make sure this coat is even and covers any black primer fully.
Adding Detail: Next, use Scale 75 ‘Black Leather’ for initial detailing. This paint has a softer finish, ideal for skin textures. Apply it more like a wash, targeting recessed areas to create depth. The goal here is to start developing a diseased skin look.
Blending Techniques: While the ‘Black Leather’ is still wet, blend in additional ‘Cadian Fleshtone’. This stage can be a bit messy; the aim is to create a base for further refinement, not perfection.
Highlight Focal Points: Consider where you want to draw the eye. Focus on areas like the centre of the chest and the top of the belly, which naturally lead the viewer’s gaze towards the head.
Wet Blending: Continue mixing ‘Cadian Fleshtone’ with ‘Black Leather’ directly on the model. This wet blending creates a smoother transition between light and dark areas.
Highlighting: Mix ‘Cadian Fleshtone’ with varying levels of ‘Pallid Wych Flesh’ on your palette. Use this mixture to introduce lighter colours for highlighting, enhancing the diseased skin effect.
Detailing Shadows and Highlights: Focus on skin creases and folds, adding highlights to create an illusion of shadow. At this stage, precise brushwork isn’t crucial.
Skin Defects: For holes in the skin, use a watered-down ‘Rhinox Hide’. It dries lighter than it appears when wet, perfect for defining recesses.
Overall Balance: Regularly step back to view the whole model, ensuring a balanced look. Work on the entire model rather than focusing on individual sections.
Refining Colours: Keep refining by alternating between shadows and highlights. Adjust as needed for the desired effect.
Final Highlights: For the final touches, use ‘Pallid Wych Flesh’ to highlight key areas and make them stand out.
Model Handling: Use a model holder to prevent oils from your skin affecting the paint job. I use Rathcore model holders.
Video – Maggotkin of Nurgle Diseased Skin Part Two
Paints and Materials Used
Games Workshop Paints:
‘Cadian Fleshtone’: Used for base coating and blending.
‘Rhinox Hide’: Applied for deeper shading and detailing.
‘Pallid Wych Flesh’: Utilised for highlighting.
‘Skavenblight Dinge’: Employed for glazing and desaturating the skin tone.
‘Balor Brown’: Added for warmth in certain areas, enhancing the diseased look.
‘Evil Sunz Scarlet’: Used after initial issues with red tones, particularly for open sores.
Scale 75 Paints:
‘Eldandil Violet’: Mentioned for specific details and effects.
Step by Step Guide
Setting the Scene: To begin with, I’ve already completed some preliminary work on the model. This includes filling in the teeth and tongue, which helps define the overall look. It’s important to get your contrasts right from the start.
Introducing Additional Colours: In this session, I’m introducing a few extra colours compared to the previous video. I’ve got a purple for bruising and decay around wounds. This adds depth and a sense of realism to the skin.
Consistency Check: A quick note on the consistency of the paints – it’s crucial for the glazes. You’ll notice I’m using Games Workshop paints like ‘Cadian Fleshtone’, ‘Rhinox Hide’, and ‘Pallid Wych Flesh’, as well as ‘Skavenblight Dinge’ and ‘Balor Brown’. I’ve also got Scale 75 ‘Eldandil Violet’ for some specific detailing.
The Painting Process: The techniques I’m employing here are very similar to what I’ve done in the past – lots of layers, plenty of back-and-forth with highlighting, adding and taking away paint to blend it all seamlessly. It’s a slow process, but it yields great results.
Focus on Glazing: A key aspect of this session is glazing. I’m using ‘Skavenblight Dinge’ quite a bit. It’s excellent on skin, helping to blend colours together and desaturate the skin tone, giving it a slightly dead look, fitting for a Nurgle warrior.
Applying Highlights: When painting the highlights, especially as they get brighter, it’s important to focus on the model’s focal points. For this model, the focal points are the top of the belly and the middle of the chest, directing the viewer’s eyes towards the head.
Addressing the Red Tones: I initially had some trouble with the red paint for the open sores, which turned out almost orange and then pink. After some trial and error, I switched to Games Workshop ‘Evil Sunz Scarlet’, which provided the consistency and colour I was looking for.
Creating Contrast with Gloss: To enhance the contrast between the skin and wounds, I’m going to apply a gloss varnish over the red areas. This not only enriches the colour but also differentiates the wounds from the matte finish of the skin.
Additional Skin Techniques: While focusing on the skin, it’s a good practice to work on other areas of the model too. This helps to show off the skin more effectively in context.
Next Steps: In the coming parts, I’ll be working on more specific areas like the custom shoulder pad and weapons. I’m planning to paint these in a rust effect for a cohesive look.
Video – Maggotkin of Nurgle Diseased Skin Part Three
Paints and Materials Used
Games Workshop Paints:
‘Cadian Fleshtone’: Used for base layers and blending.
‘Pallid Wych Flesh’: Applied for fine highlighting.
‘Rhinox Hide’: Utilised for deeper shadows and details.
‘Mournfang Brown’: Employed for additional detailing and shading.
‘Skavenblight Dinge’: Used for desaturating and blending.
‘Balor Brown’: Mixed for glazing and adding warmth.
Scale 75 Paint:
‘Eldandil Violet’: Used for specific detailing and effects.
Step by Step Guide
Palette Setup: We’re continuing with the same colours as before. The skin tones are a mix of Games Workshop’s ‘Cadian Fleshtone’ and ‘Pallid Wych Flesh’. The top colour is pure ‘Cadian Fleshtone’, and the bottom is pure ‘Pallid Wych Flesh’. The middle two are various mixtures to create smooth transitions.
Consistency and Control: For shadows and details, I’m using ‘Rhinox Hide’ and ‘Mournfang Brown’, slightly thicker than usual to make positive marks quickly. I also have Scale 75’s ‘Eldandil Violet’ for specific details.
Glazing Techniques: The glazes are made with ‘Cadian Fleshtone’ and ‘Balor Brown’. When turning ‘Cadian Fleshtone’ into a glaze, be aware the pigment separates, appearing yellow. This separation is essential to understand when glazing, as it affects how the colour appears on the model.
Desaturation with ‘Skavenblight Dinge’: To tone down the vibrancy of ‘Cadian Fleshtone’ in areas, I’m using ‘Skavenblight Dinge’. This creates a contrast between rotten and healthy-looking skin, allowing for more controlled desaturation.
Refinement through Minimal Paint: The focus here is on making tiny, precise marks. I’m using very little paint on the brush, ensuring smooth, controlled application. It’s a time-consuming process, but necessary for display-level quality.
Highlighting with ‘Pallid Wych Flesh’: Use this sparingly for the highest points of highlight. Too much can overwhelm the subtlety of the transitions. It’s almost like adding glimmers of light without using pure white.
Brush Selection: For the finer details on the belly, I’ve switched to a size 0 Broken Toad brush, allowing for even smaller, more precise marks.
Creating Shadows and Depth: I’m using ‘Rhinox Hide’ to accentuate shadows, especially in areas like the folds of flesh. This helps separate shapes and adds depth to the skin.
Balancing Colour and Contrast: I’m continually adjusting the balance between the healthy and necrotic flesh. This involves layering ‘Cadian Fleshtone’ over darker areas to create a striking contrast.
Vein Detailing: For the veins, I’m using a purple paint, thinned down for precision. This is applied over the flesh and then glazed over to create the illusion of veins beneath the skin.
Final Touches: I’m adding small details and refining the transitions. This includes highlighting around wounds and pustules to make them stand out and add to the overall diseased appearance.
Finishing the Skin: The final step involves going over the skin one last time, ensuring every detail is as sharp and refined as possible. This is crucial for achieving a high-quality finish suitable for display or competition.
Video: How to Create a Nurgle Rusty Sword
Materials Needed:
Baking Soda
Matte Varnish
Old brushes
Orange Paint (For this example, we’ll use Scale 75 Kalahari Orange, but any solid orange paint will do)
Step-by-Step Guide:
Mixing the Rust Effect:
Begin by creating your rust mixture. You’ll need to combine baking soda, matte varnish, and orange paint. The exact colour of the orange paint isn’t crucial, but a solid orange like Scale 75 Kalahari Orange is recommended for authenticity.
Mix these ingredients together. You don’t need any specialised tools for mixing; anything you have to hand will suffice.
Adjusting Consistency:
The mixture might appear a bit dry initially. If it’s too clumpy, thin it down with more varnish. Remember, the more varnish you add, the stronger and more hard-wearing the mixture becomes. This also helps to seal the baking soda against any acidic elements.
Aim for an intense, well-bound mixture. It should dry lighter in colour, so don’t be alarmed by the initial appearance.
Application on the Model:
Use an old brush for application; this mixture isn’t kind to brushes. An older, slightly worn brush is ideal.
Apply the mixture to the desired areas of your model. It’s a somewhat passive process; you don’t have to be overly precise. The mixture will be akin to a psyche in gel, so aim for an uneven surface. Too thin an application will just look like spread-out grains.
Focus on clumping the mixture slightly for a more realistic rust effect. If applied too thinly, it won’t have the desired impact.
Creating Texture:
After applying, use a stippling technique with your brush to spread out the grains at the edges. This helps to soften the transition from the rusted areas to the clean areas of the model.
Continue dabbing at the mixture to spread it and create a texture that resembles rust accumulating on the blade or other parts of the model.
Final Touches:
Once applied, the mixture might look a bit smooth, but don’t worry. As it dries, it will gain a more defined, grainy rust-like texture.
To enhance the effect, you can apply a very watered-down coat of a darker paint, like Rhinox Hide, after the rust mixture has dried.
Finishing Up:
Allow your model to dry completely. Once dry, you should see a realistic rust effect, adding depth and character to your piece.
How to Paint NMM Copper
Paints and Materials
Brush Size and Type:
Don’t use a tiny detail brush for the entire process. Instead, a slightly larger, older brush is preferred. My older brush has a worn tip, which is thicker than a new brush and allows for better paint control and blending.
An old, well-used brush is good for this type of painting. The worn tip of an older brush can make blending easier.
Paints Used
Games Workshop: Doombull Brown, Golden Yellow (old colour; find a modern equivalent if needed)
Scale 75: Ice Yellow, Salmon Pink, Black Red
Black and White paint (any preferred brand)
Step-by-Step Guide
Understanding Copper NMM:
Remember, copper NMM aims to create a metallic effect without using metallic paints. Copper is essentially pink in hue, similar to skin tones, with brown for shadows and a hint of sand yellow.
Preparation of Palette:
On your wet palette, blend all the colours together into one smear. This is because copper has a lot of subtleties in colouring. Start with Doombull Brown and mix in Black Red from Scale 75. If you don’t have Black Red, mix black and red to achieve a dark, reddish brown.
Creating the Base Colour:
For the darker areas of copper, you want something a bit more red. Along your paint smear on the palette, integrate colours that become more yellow and orange. Use Golden Yellow and Ice Yellow for this purpose. Add Salmon Pink at the very end for highlights.
Applying the Base Layer:
Before starting the video, paint the whole model (or the part you’re working on) with Doombull Brown. This creates an easier starting point for the copper effect.
Mixing on the Model:
You’ll be mixing the paint directly on the model, working quickly. This method is different but effective for creating copper NMM. Apply the colours and quickly determine where the highlights will be. The idea is to get lighter colours down first as a base to work from.
Developing the Effect:
Start blending in reflections and refining the look. Add lighter colours and work on creating smooth transitions and contrast. Remember, smooth transitions and good contrast are key in NMM painting.
Refining the Details:
As you progress, you’ll refine the copper effect by using thinner paint and increasing contrast. Use Salmon Pink for the higher highlights and blend it in for a smooth transition.
Final Touches:
Towards the end, focus on refining the paint with continual glazes until it looks smooth and metallic. You might need to make slight adjustments to the highlights and shadows. Add black, turned into a glaze, at the bottom of the shoulder pad to increase contrast.
Final Overview:
The final piece should showcase a refined copper NMM effect with smooth transitions, proper contrasts, and a realistic metallic look.
How to Paint NMM Copper Greeny Verdigris Effect
Paints and Materials
Games Workshop Sybarite Green
P3 Morrow White (or your preferred white paint)
Step-by-Step Guide
Understanding Verdigris:
Verdigris is a patina that forms on copper, brass, or bronze when exposed to air or seawater over time. This guide aims to create a more realistic effect, where verdigris covers larger areas rather than just around rivets and crevices.
Creating Verdigris Tones:
You will mix Sybarite Green with Morrow White to create three stages of verdigris tones:
First Stage: Pure Sybarite Green.
Second Stage: A mix of half Sybarite Green and half Morrow White.
Third Stage: Mostly Morrow White with a tint of Sybarite Green.
Applying the First Layer:
Start with the pure Sybarite Green. Apply it by gently dabbing it onto the model. The goal is to create a patchy texture rather than smooth streaks.
This layer should cover most of the area, but try to maintain the shades and shine of the underlying metallic paint.
Mid-tone Application:
Next, apply the second stage mix (half Sybarite Green, half Morrow White). This should be used more sparingly than the first layer.
Focus on applying this mix to darker areas and recesses. You want to maintain visibility of the copper NMM base, so apply it carefully and artistically.
Adding Highlights:
For the final layer, use the lightest mix (mostly Morrow White with a hint of Sybarite Green). This is like a reverse highlight, working best in shadows to create contrast.
Apply this very selectively, as it can quickly cover the base layers. It should go into the deepest recesses and lower curved areas where verdigris would naturally accumulate.
Final Touches:
Remember, verdigris should have an uneven, patchy appearance. It should not be smooth or uniformly applied like rust.
Check your work against reference images to ensure a natural look.
Finishing Up:
After applying all three stages, your model should exhibit a realistic verdigris effect over the copper. The underlying NMM copper should still be visible, contributing to the overall realism.
More Nurgle Tutorials!
If you don’t have an account, please sign up here! The website currently has over 350 video tutorials with steps and tips, plus a selection of PDFs. If you are not sure about joining, you can explore my free videos with a free membership, or take the plunge and become a full subscriber for full access.
If you’d prefer to support me on Patreon, please visit: https://www.patreon.com/RichardGray [...]
How to Paint a Mini Questoris Knight with all his tiny details, with tips on metal, weathering and using weathering powder.
Knights are the agile war machines of the Knightly houses, each one commanded by a single skilled scion. When the Titan Legions mass for war, they call upon their allied Knightly Houses to aid them, the Questoris Support Banners acting as scouts and skirmishers for their larger kin. Bristling with fearsome weapons and protected by shimmering shields, Imperial Knights are amongst the most terrifying military assets in the galaxy. Except these ones do seem very small when brushing the ankles of a Titan.
Read on to explore both video tutorials on How to Paint a Mini Questoris Knight, with all materials you need plus step by step guides.
Video: How to Paint a Mini Questoris Knight – Part One
This guide focuses on painting a knight from Adeptus Titanicus in the colours of House Malinax, laying the foundation with base painting and initial detailing before advancing to more complex techniques like weathering and decal application covered in the second part.
Materials Needed:
Base Paints: Games Workshop Balor Brown, Ushabti Bone, Ceramite White, Agrax Earthshade
Metallics: Vallejo Gun Metal
Additional: Fine detail brush, airbrush (optional for smoother base coats)
Steps:
Priming and Base Coating:
Priming: Start with a black primer to ensure deep shadows and a strong contrast base for metallic and armour parts.
Metallic Areas: Apply Vallejo Gun Metal over all metal areas. Once dry, wash these areas with Agrax Earthshade to add depth and shadow, providing a worn metallic look.
Armour Plates: Paint the knight’s armour panels with Balor Brown. This stage might require multiple thin coats for an even, opaque finish, especially over a black primer. Use an airbrush for quicker application on larger areas like the carapace.
Detailing:
Highlighting Armour: Gradually build up highlights on the armour using Ushabti Bone, focusing on raised edges and areas that would naturally catch the light. Ceramite White can be used for final sharp highlights or points of interest.
Cleaning Up: Use a fine detail brush to tidy up any overspill or to sharpen edges between different colours, ensuring the model’s details are crisp and clear.
Preparing for Further Detailing:
Applying Washes: To add depth and further define the armour panels, apply Agrax Earthshade strategically into recesses and around detail work. This step enhances the model’s textures and adds a realistic shadow effect.
Additional Colour Details: Decide on accent colours for smaller details such as the cockpit, weapon casings, or heraldry that will complement the knight’s primary colour scheme. This adds visual interest and character to your model.
Sealing the Model: Once satisfied with the base painting and initial detailing, consider applying a matte varnish to protect your work before moving on to advanced weathering techniques and decal application. This step is optional but recommended if you plan on handling the model frequently.
The focus at this stage is on building a solid and clean colour foundation, preparing the knight for the weathering and detailing stages that follow. Patience is key—take your time with each layer and ensure complete drying between steps to achieve the best results.
Video: How to Paint a Mini Questoris Knight – Part Two
Weathering, Decal Application, and Basing Guide
In this continuation of our painting guide, we’ll delve into the final steps to bring your House Malinax Adeptus Titanicus knight to life with vibrant colours, detailed weathering, decals application, and an engaging base.
Materials Needed:
Primary Paints: Games Workshop Mephiston Red, Evil Sunz Scarlet, Wild Rider Red, Fire Dragon Bright, Lothern Blue
Weathering Powders: Forge World Aged Rust, Orange Rust
Decal Solutions: Micro Sol, Micro Set
Additional: Winsor and Newton Burnt Umber Water Soluble Oil Paint
Base Materials: Baking Soda, Vallejo Charred Brown, and a red of your choice (e.g., Typhus Corrosion for a darker tone)
Varnishes: AKInteractive Matte and Ultra Matte
Steps:
Painting Details:
Head, Chest, and Chainsword: Paint these components with Mephiston Red for a rich, dark base. Utilize Evil Sunz Scarlet and Wild Rider Red for highlights, focusing on raised areas and edges to create depth. For the knight’s eyes, a dab of Lothern Blue accented with Fire Dragon Bright captures attention.
Black Trim: Highlight black areas with Vallejo’s German Grey, progressing towards lighter greys like Blue Grey and Pale Blue Grey towards the edges for a nuanced, realistic metal effect. This contrast against the bone-coloured armour emphasizes the knight’s details.
Applying Decals:
Preparation: Apply a gloss varnish to the areas where decals will be placed. This provides a smooth surface, minimizing air bubbles and silvering.
Decal Application: Soak your decals in water until they slide off the backing paper easily. Apply Micro Set to the model’s surface before positioning your decal. Once in place, use Micro Sol over the decal to soften it, allowing it to conform to the model’s contours. After drying, seal with a gloss varnish for protection and an even surface.
Matte Finish: Once the decals are sealed and the varnish is dry, apply an ultra matte varnish over the entire model to unify the sheen and protect your work.
Weathering:
Initial Weathering: Use a fine brush to apply tiny chips and scratches with Rhinox Hide, focusing on areas that would naturally see wear. Keep these marks extremely small to maintain the model’s scale.
Oil Weathering: Dilute Winsor and Newton Burnt Umber Water Soluble Oil Paint with water. Apply this mixture selectively around metallic parts and lower leg sections to simulate grime and wear. This step adds realism and depth to the knight.
Basing:
Texture: Mix baking soda with matte varnish and Vallejo Charred Brown (and a red of choice) to create a paste. Apply this to the base, ensuring coverage around any rocks or debris. This creates a textured ground effect.
Colouring: Airbrush Forge World Aged Rust weathering powder over the base and lightly onto the knight’s feet for cohesion between the model and its base.
Detailing: Lightly dry brush the rocks with Ushabti Bone for contrast against the rusted ground, and apply Orange Rust weathering powder in recesses for additional depth.
Final Touches:
Re-highlight metallics if needed to ensure they stand out against the weathered and mattified surfaces.
Consider adding small narrative elements to the base, like battlefield debris, to further the story of your knight’s battles.
This comprehensive guide should leave you with a beautifully detailed, weathered knight that stands out on the battlefield. Remember, the key to a great finish is patience and attention to detail, especially when working on weathering and basing to achieve a cohesive and realistic look.
Struggling with Decals?
How to Apply Forge World Decals and Weather Them
A beginners guide on how to apply Forge World decals and weather them so they look a natural part of the painting on your model. Painting and applying decals to your models adds significant details and realism, making it stand out during tabletop gaming. It’s also a lot easier than freehand! I still use decals a lot in my models, despite also enjoying freehand work.
Watch and Read Now
If you don’t have an account, please sign up here! The website currently has over 350 video tutorials with steps and tips, plus a selection of PDFs. If you are not sure about joining, you can explore my free videos with a free membership, or take the plunge and become a full subscriber for full access.
If you’d prefer to support me on Patreon, please visit: https://www.patreon.com/RichardGray [...]
Two videos on how to paint weathered armour plate, complete with rust, scratches and chips and a simple freehand banner. You won’t need an airbrush for this tutorial.
Video: Part One – Armour and Weathering
Materials and Paints Needed
Games Workshop Paints: Balor Brown, Yriel Yellow, Mournfang Brown, Rhinox Hide
Vallejo Paints: Neutral Grey, Pale Grey Blue, White
Brushes: Large dry brush (or makeup brush), fine detail brush, glazing brush (size 4 or similar)
Accessories: Water for thinning paints, kitchen towel for wiping brushes, well palette
Preparing the Model
Clean and prime your Redemptor Dreadnought model. A light grey or white primer is recommended for bright colours like yellow.
Base Coating with Stippling Technique
Mix Balor Brown with water in a roughly 50/50 ratio. This will be your base layer.
Stipple Balor Brown onto the armour panels using a large, round, flat brush. Aim for gentle touches to build up the texture without creating pronounced, three-dimensional brush marks. Allow the paint to dry fully before adding more layers. This creates a worn, battlefield-ready appearance.
Glazing for Colour Depth
Create glazes in your well palette by mixing Mournfang Brown and Yriel Yellow separately with water, using about 6-7 parts water to 1 part paint.
Apply Mournfang Brown glaze to shade areas, starting from lighter areas and moving the brush towards darker regions. This adds warmth to the shadows.
Apply Yriel Yellow glaze over the entire panel, focusing more paint towards the centre for a vibrant effect. Ensure to remove excess paint from your brush to avoid pooling.
Chipping for Weathered Effect
Use Rhinox Hide with a fine detail brush to create chipping along the edges of the armour panels where wear would naturally occur. Remember, less is more; avoid overdoing it with lines and crosses.
Highlight the lower edge of each chip with Yriel Yellow to simulate the armour’s wear and tear, making the chips stand out more against the base layers.
Detailing and Finishing Touches
Rivets: Paint each rivet with a dot of Pale Grey Blue on the top left and a tiny line on the bottom right to simulate light reflection.
Metal Exposure: Use Neutral Grey to paint areas where the metal beneath the yellow paint would show through, particularly around chips and edges. This technique helps redefine the model’s shape and adds dimensionality to the weathering.
Final Highlights: Add a final touch by placing a small dot of White on the most prominent parts of the chips and rivets to enhance the reflective effect.
Video: Part Two – Freehand Banner
Materials and Paints Needed:
Games Workshop Paints: Baneblade Brown, Rhinox Hide, Morghast Bone, Screaming Skull, Balor Brown
Vallejo Paints: Model Colour Black
Brushes: A smaller brush for initial sketching and detailing, and a larger brush for smoother finishes on larger sections.
Other Supplies: Water for thinning paints, a palette for mixing, and kitchen towel for wiping off excess paint.
Preparing the Banner:
Base Layer with Morghast Bone: Begin by sketching the basic shape of the banner on the shoulder pad using Morghast Bone. This step involves creating the outline and filling in the banner. For larger sections, use a larger brush to achieve a smoother finish.
Refining Edges: Use a smaller brush to refine the edges and the trailing ends of the banner. Aim for a shape that complements the space available on the shoulder pad, keeping in mind the overall design and avoiding overly stubby ends.
Applying Shadow with Baneblade Brown and Rhinox Hide Mix: Mix approximately 50/50 Baneblade Brown and Rhinox Hide to create a shadow colour. Apply this mixture to add depth and shadow to the banner, especially along the edges and the banner’s folds.
Highlight with Screaming Skull: To highlight the main body of the banner and give it a three-dimensional appearance, apply Screaming Skull, focusing on the central and raised areas. This step brings out the details and makes the banner stand out.
Painting the Text:
Sketching Text with Vallejo Model Colour Black: Using a fine detail brush and Vallejo Model Colour Black, begin sketching the text onto the banner. Start with basic shapes for letters and focus on spacing. The chosen word for this tutorial is “MORTIS.”
Refining Letters: Once the basic spacing and shape are down, refine each letter for clarity and style. Adjust the thickness of the lines and add any stylistic flourishes to match the desired font. Consistency in line weight and style across all letters is crucial for readability.
Correcting and Sharpening Edges: Use Morghast Bone and Screaming Skull to correct any overshoots or to sharpen the edges of the letters. This step allows for cleaner lines and more precise letter shapes.
Final Touches:
Weathering: To integrate the text and banner naturally with the rest of the model, apply weathering. Use Balor Brown to simulate chipped paint and wear on the banner and text. This step adds realism and character to the model.
Applying Filters: A filter of heavily diluted Mournfang Brown and Yriel Yellow can be applied over the entire freehand work. This unifies the colours, softens the contrast, and gives the banner and text a worn look, blending them seamlessly with the model’s overall weathered appearance.
More Free Video Tutorials
More Free videos are available for for logged in members – just sign up as a ‘friend’ to view and click any of the thumbs.To explore all of these, visit this page!
If you don’t have an account, please sign up here! The website currently has over 350 video tutorials, plus step by step guides and PDFs. You can explore more free videos with a free membership, or take the plunge and become a full subscriber for full access.
If you’d prefer to support me on Patreon, please visit: https://www.patreon.com/RichardGray [...]
A series of quick videos on how to paint a War Griffons Warlord Adeptus Titanicus Titan to game standard. This included marble effects, stripes, weathering and decals and more!
Scroll down to explore the videos in order, or use the quick links below to jumps to a technique or part of the model in particular:
Video – How to Paint a War Griffons Warlord : Marble EffectMaterials List:Marble Armour Step-by-Step Guide:Video – How to Paint a War Griffons Warlord : The StripesMaterials Needed:The Stripes Step by Step:Additional Tips:Video – How to Paint a War Griffons Warlord : Weathering and DecalsMaterials Needed:Steps:Preparing the Surface:How to Apply the Forge World Decals:Sealing the Decal:Weathering the Decal and Armour:Additional Tips:Video – How to Paint a War Griffons Warlord : Heat Bloom on Melta CannonMaterials Needed:Melta Cannon Step-by-Step Guide:Video – How to Paint a War Griffons Warlord : Weathering and Metal PaintsStep by Step – Weathering and Metal on the War Griffons WarlordPreparing the Armour TrimEnhancing the TrimPainting the SkeletonDetailing Pistons and Metal AccentsFinishing TouchesTechniques and TipsMore Titan Tutorials!
Video – How to Paint a War Griffons Warlord : Marble Effect
All videos are recorded in HD 1080p or higher – use full screen for the full effect and let the video load completely.
Materials List:
Airbrush: Essential for applying smooth base coats and gradients.
Hand disinfectant wipes or baby wipes: Used to create the marble effect.
Paints:
Vallejo Pale Grey Blue: For the initial base coat.
Vallejo Neutral Grey: To begin creating the marble effect.
Vallejo Dark Grey (German Grey): For adding darker veins to the marble.
Vallejo Heavy Goldbrown: Base colour for yellow armour sections.
Games Workshop Phalanx Yellow: For highlighting yellow armour sections.
Marble Armour Step-by-Step Guide:
Base Coat:
Begin by airbrushing Vallejo Pale Grey Blue onto the carapace of the Titan. This may require a few coats to achieve a smooth finish. The paint can be thinned a bit, but not excessively, to ensure good coverage without too much speckling.
Preparing the Wipe:
Take a hand disinfectant wipe or baby wipe and stretch it out so it’s slightly spread and thin. This texture will be transferred to the armour to create the marble effect.
Applying the Wipe:
Lay the stretched wipe over the armour part you’ve just painted. Ensure it’s not too densely applied; the idea is to leave some areas exposed more than others for a varied marble effect.
Adding Darker Tones:
Airbrush Vallejo Neutral Grey over the wipe-covered armour. Keep the airbrush pressure low to avoid displacing the wipe. Focus more on the edges and less on the centre to mimic natural shading.
Without completely covering the previous layer, lightly apply Vallejo Dark Grey in a few select areas to create the appearance of darker veins within the marble.
Revealing the Effect:
Carefully remove the wipe to reveal the marble effect beneath. You’ll find areas of light and dark grey creating a naturalistic marble pattern.
Cleaning Up:
After removing the wipe, there may be strands left on the model. Take your time to clean these off to avoid them becoming permanently attached in later steps.
Painting Yellow Armour Sections:
For Legio Gryphonicus’s iconic grey and yellow scheme, base coat the relevant armour sections with Vallejo Heavy Goldbrown. Highlight these areas with Games Workshop Phalanx Yellow to achieve a vibrant, contrasting look against the grey marble.
Video – How to Paint a War Griffons Warlord : The Stripes
This guide will take you through the process of painting and weathering the stripes to achieve a battle-worn effect, ensuring your titan stands out on the tabletop.
Materials Needed:
Scale 75 Victorian Brass (For the trim)
Tamiya Masking Tape (3mm strips recommended for precision)
Games Workshop Kantor Blue (For the base stripe colour)
Vallejo Ultramarine Blue (For highlighting the stripes)
Vallejo Neutral Grey (For weathering)
Vallejo Pale Grey Blue (For weathering)
Airbrush and airbrush thinner (Vallejo Airbrush Thinner recommended)
Fine detail brush for weathering
The Stripes Step by Step:
Prepare the Trim:
Begin by painting the trim of the carapace using Scale 75 Victorian Brass. This step should ideally be done after painting the stripes to avoid overspray, but if you prefer to paint it first, be prepared to touch it up later.
Masking for Stripes:
Apply Tamiya masking tape to the carapace to create the desired pattern for your stripes. Ensure the tape is firmly pressed down, especially near the edges and armour trim, to prevent paint from bleeding underneath.
Base Colour for Stripes:
Airbrush Games Workshop Kantor Blue over the masked areas. The paint should be thinned appropriately and applied in even coats to achieve an opaque finish. Be mindful of overspray on the trim.
Highlighting Stripes:
After the base colour dries, apply Vallejo Ultramarine Blue as a highlight. Focus on the raised edges and ridges to create a gradient effect, ensuring some Kantor Blue remains visible for contrast.
Removing Masking Tape:
Carefully peel off the masking tape to reveal crisp, clean stripes. This step is highly satisfying and reveals the neat lines that define the pattern.
Weathering the Stripes:
Using a fine detail brush, apply Vallejo Neutral Grey and Pale Grey Blue to simulate chips and wear on the stripes. Focus on areas that would naturally see more wear and tear, breaking up the clean edges of the stripes to create a more realistic, battle-worn look. Use the colours that match the underlying marble effect for a cohesive appearance.
Finishing Touches:
Optionally, go back over the trim with Victorian Brass to clean up any overspray from painting the stripes. This will ensure a neat and polished look.
Additional Tips:
The choice of stripe colour can vary; red or hazard striping are also effective options.
The weathering step is crucial for adding realism. Smaller, more concentrated damage marks enhance the scale effect, making the titan appear as a massive war machine.
Keep the weathering consistent with the overall wear on the rest of the titan for a unified appearance.
Video – How to Paint a War Griffons Warlord : Weathering and Decals
This step-by-step guide, designed to be beginner-friendly, will walk you through applying decals, adding a gloss finish for protection, and executing weathering techniques to give your titan a battle-worn appearance.
Materials Needed:
Vallejo Gloss Varnish
Water for softening decals
Micro Sol and Micro Set for decal application
Tamiya 3mm Masking Tape or equivalent
Games Workshop Kantor Blue
Vallejo Neutral Grey, Ultramarine Blue, and Pale Grey Blue for weathering
Games Workshop Matte Varnish
Fine detail brushes
Airbrush (optional for varnishing)
Forge World Decals for Legio Gryphonicus
Steps:
Preparing the Surface:
Apply Gloss Varnish: Begin by applying Vallejo Gloss Varnish to the areas where decals will be applied. This creates a smooth surface, reducing air pockets and imperfections. You can apply the varnish with a brush or an airbrush. If brushing, slightly dilute the varnish with water for easier application.
How to Apply the Forge World Decals:
Soften Decals in Water: Cut out your chosen decals and soak them in water until they easily slide off the backing paper. This typically takes a few minutes.
Apply Micro Sol: Place a small amount of Micro Sol on the model where the decal will be applied. This softener helps the decal conform to the model’s surface.
Position the Decal: Carefully slide the decal from the paper to the model. Use a soft brush to adjust its position accurately.
Remove Excess Water: Gently dab a soft, dry brush or a paper towel to remove any excess water and air bubbles beneath the decal.
Apply Micro Set: Once the decal is in place, apply Micro Set over it. This solution helps soften the decal further, allowing it to snuggle down into the model’s details. Let it dry thoroughly, ideally overnight. Don’t worry if the decal looks wrinkled at this stage; it will smooth out as it dries.
Sealing the Decal:
Apply Additional Gloss Varnish: After the decal has dried, apply another layer of gloss varnish over it using an airbrush for an even coat. This step helps to seal the decal and even out the surface. If necessary, apply 2-3 coats, allowing each to dry thoroughly.
Matte Varnish Finish: Once the gloss varnish is completely dry, apply a matte varnish over the entire model to give it a uniform, non-glossy finish. This also helps to further blend the edges of the decal into the model.
Weathering the Decal and Armour:
Weathering with Paint: Use Vallejo Neutral Grey and Pale Grey Blue to add weathering around the decals and on the armour. Use a fine detail brush to apply small chips and scratches, focusing on edges and areas that would naturally see more wear. This adds realism and depth to your titan.
Additional Weathering Techniques: For further realism, you can add streaks and rust effects using diluted paint or weathering powders. Apply these sparingly in areas where water and dirt would naturally accumulate and streak down the model’s surface.
Additional Tips:
Take your time with each step, especially when applying and positioning the decals.
Always allow each layer of varnish and paint to dry completely before proceeding to the next step.
Practice weathering techniques on a spare piece before applying them to your model to get a feel for the effect.
Video – How to Paint a War Griffons Warlord : Heat Bloom on Melta Cannon
Materials Needed:
Airbrush and Thinner: For applying smooth gradients of colour.
Brushes: A fine detail brush for precise application and a dry brush for highlighting.
Paints:
Vallejo Metal Colour Magnesium (for the metallic base).
Vallejo Metal Colour Chrome (for highlighting metallic areas).
Scale 75 Victorian Brass (for trim detailing).
Games Workshop Contrast Paints: Iyanden Yellow, Magos Purple, Talassar Blue (for the heat effect).
Games Workshop Contrast Aggaros Dunes (for additional trim detailing).
Melta Cannon Step-by-Step Guide:
Base Coating the Weapon:
Begin by airbrushing the Melta weapon’s recesses with Averland Sunset, ensuring the weapon’s holes face directly towards the airbrush to prevent uneven shading. Don’t worry about overspray on the weapon casing; this will be covered later.
Adding Initial Heat Glow:
Switch to Troll Slayer Orange and apply over the Averland Sunset, creating a gradient effect from the weapon’s recesses outward. Ensure even coverage without tilting the airbrush to maintain consistency across the recesses.
Masking for Overspray:
To prevent overspray on adjacent yellow armour panels, use masking tape or modelling putty. This step is crucial for maintaining clean lines and avoiding accidental paint transfer.
Metallic Base Coat:
Paint the metallic parts of the weapon with Vallejo Metal Colour Magnesium, carefully avoiding the recesses to maintain the glow effect. This creates a solid base for subsequent detailing.
Trim Detailing:
Apply Scale 75 Victorian Brass to the weapon’s trim, followed by a coat of Games Workshop Contrast Aggaros Dunes to add depth and dimension to the detailing.
Heat Bloom Effect:
Begin the heat bloom effect by airbrushing Iyanden Yellow halfway along the Melta Cannon barrel, avoiding the recesses. Layer Magos Purple over the Iyanden Yellow, leaving some yellow visible for a blended effect. Finish with Talassar Blue, applying it over the Magos Purple but not covering all the previous layers, creating a transition from yellow to deep blue.
Highlighting and Finishing Touches:
Dry brush Vallejo Metal Colour Chrome on the non-painted metallic areas to enhance the metallic sheen. Carefully highlight the lower edges of the weapon with Chrome using a normal paintbrush, accentuating the heat bloom’s impact.
Final Assembly:
Once all painting is complete, remove any masking materials and assemble any remaining parts of the Titan, paying attention to aligning the heat bloom effects correctly.
Video – How to Paint a War Griffons Warlord : Weathering and Metal
Paints
Games Workshop:
Agrax Earthshade
Wyldwood (Contrast)
Contrast Aggaros Dunes
Forge World:
Aged Rust (Weathering Powder)
Vallejo Metal Colour (Airbrush Ready):
Victorian Brass (Scale 75 for an alternative base colour)
Magnesium
Gold
Chrome
Winsor & Newton:
Water Mixable Oil Colour Burnt Umber
Step by Step – Weathering and Metal on the War Griffons Warlord
Preparing the Armour Trim
Base Coat: Begin with a base coat of Scale 75 Victorian Brass over the trim. This provides a solid foundation for subsequent layers.
Initial Shading: Apply Contrast Aggaros Dunes over the Victorian Brass to introduce depth and shading to the trim. This step should have been completed in earlier stages of the model’s painting process.
Enhancing the Trim
Adding Depth: Use Games Workshop’s Wyldwood contrast paint to darken recesses and joints in the trim. The high contrast between the dark recesses and the metallic brass creates visual interest and depth. Apply the paint selectively to areas that would naturally accumulate shadow.
Highlighting: Vallejo Metal Colour Gold is used to highlight the edges of the trim. Due to its fluidity, it provides a smooth application but be mindful of its runniness. Lightly touch the edges with a fine brush to catch the raised areas.
Painting the Skeleton
Base Layer: Vallejo Metal Colour Magnesium serves as the base layer for the Titan’s skeletal structure. Its liquidity ensures it flows well into recesses but exercise caution to prevent pooling.
Weathering: Apply Forge World’s Aged Rust weathering powder mixed with water to the skeletal structure for a grimy, rusted effect. Focus on areas that would naturally collect dirt and rust, maintaining a balance to avoid obscuring details.
Sealing the Weathering: Once dry, seal the weathering with a mix of Agrax Earthshade. This reactivates and fixes the weathering powder, giving a durable and realistic rust effect.
Detailing Pistons and Metal Accents
Chrome Pistons: Vallejo Metal Colour Chrome is applied to pistons for a bright, reflective finish. Multiple thin layers may be needed for uniform coverage.
Oily Effects: Windsor and Newton’s Water Mixable Oil Colour Burnt Umber is used to simulate oil and grime on pistons and mechanical parts. Dilute with water for a manageable consistency and apply at joints and moving parts for a realistic oily effect.
Finishing Touches
Reichland Fleshshade Glaze: Optional, but can be used to add warmth to metal parts, particularly useful on brass or gold trims to simulate reflected light or heat staining.
Highlighting and Cleaning Up: After applying weathering and shading, go back to highlight edges and clean up any overspill with your base metallic colours. This step sharpens details and enhances the overall contrast of the model.
Techniques and Tips
Trim Detailing: Use the fine detail brush with Vallejo Metal Colour Gold to highlight the edges of the trim, applying the paint carefully to avoid spillage onto other areas.
Skeleton Base Layer: Apply Vallejo Metal Colour Magnesium with a medium brush, ensuring even coverage and avoiding pooling in recesses.
Weathering Powder Application: Mix Aged Rust with water in the well palette and apply with a large brush, targeting recesses and areas where rust would naturally accumulate.
Chrome Pistons: Use Vallejo Metal Colour Chrome, applying multiple thin layers as needed for a smooth, reflective finish.
Oily Effects: Dilute Winsor & Newton Water Mixable Oil Colour Burnt Umber with water and apply at the tops of pistons and around mechanical parts to simulate oil and grime.
More Titan Tutorials!
If you don’t have an account, please sign up here! The website currently has over 350 video tutorials with steps and tips, plus a selection of PDFs. If you are not sure about joining, you can explore my free videos with a free membership, or take the plunge and become a full subscriber for full access.
If you’d prefer to support me on Patreon, please visit: https://www.patreon.com/RichardGray [...]
I’ve been busy painting things I can’t show off yet, but I managed to sneak in a little time for…
Please login to view this content at https://richardgraycreations.com/login/ [...]
The final painting Morgok video, with kill trophies, highlights, cloth, leather and just those lovely finishing touches.
Video – Kill trophies, highlights, cloth, leather and more on Morgok!
Materials and Paints
The following paints were used: Games Workshop: Cadian Fleshtone, Balor Brown, Morghast Bone, Kantor Blue, XV-88 (Or Balor Brown mixed with black), Rhinox Hide Vallejo: Neutral Grey, Pale Grey Blue P3: Morrow White
Step-by-Step Guide
To finish painting Morgok from Morgok’s Krushas, focusing on the kill trophies and final touches to the armour, here’s a step-by-step guide:
Painting the Trophy Heads:
Basecoat: Start with Vallejo Neutral Grey to outline highlight areas. This grey base helps to convey the deceased look of the heads.
Highlighting: Apply Cadian Fleshtone, which appears pinkish on the palette but turns pale when applied. Mix it with two parts water to one part paint for translucency, allowing underlying grey to show. This creates a dehydrated, mummified look. Focus on prominent features like cheekbones, forehead, upper lip, and nose.
Adding Cool Tones: Use Kantor Blue, heavily diluted (about four parts water to one paint), to add a cold, lifeless tone to the flesh. Be cautious as it’s strong and can overpower other colours. Apply sparingly and touch up with Cadian Fleshtone where needed.
Painting the Hair:
Basecoat: Use Rhinox Hide for a dark base.
Detailing: Apply a mix of Balor Brown and black (or XV-88) for the texture. Water down slightly for a smoother finish. Follow with Morghast Bone for finer details and strands. Apply these colours in thin lines to represent the texture of the hair.
Painting the Skull:
Basecoat: Apply Balor Brown over black primer. Don’t aim for a smooth finish; a bit of messiness adds to the worn look.
Highlighting: Use Morghast Bone for highlights, focusing on raised areas like the brow. This creates the effect of a weathered, unpolished skull.
Final Touches to the Armour:
Secondary Bounce Highlights: Use Neutral Grey for less bright areas, ensuring the main highlights are brighter. Apply these highlights on areas like the underside of the armour, keeping in mind the light source and overall weathered look.
Refining Highlights: Use Pale Grey Blue and Morrow White for hard edges and minor details. Apply Morrow White sparingly to maintain focus on the model’s main areas.
Adding Rust and Grime:
Base Layer: Start with Mournfang Brown for rust and grime, focusing on areas like the belt.
Secondary Layer: Apply Troll Slayer Orange for a more saturated rust effect. This colour is strong; use it carefully to avoid overpowering other elements.
Glazing for Cohesion:
Mixing the Glaze: Create a glaze with Abaddon Black, diluting it heavily (approximately five parts water to one part paint).
Application: Apply the glaze carefully to mid-tones and shadows, avoiding the brightest highlights. This unifies the armour’s look, enhancing shadows and reducing the intensity of mid-tones for a cohesive finish.
Throughout the process, maintain a balance between detail and the overall look of the model. The aim is to create a realistic, battle-worn appearance with attention to the finer details, especially on the trophy heads and armour.
Morgok from Morgok’s Krushas – All Videos
Painting Morgok from Morgoks Crushas
Morgok and his mob of Ironjawz brutes once hunted down and fought the greatest prey they could find amongst Ghur’s trackless wastes. Whether they ran down spiny nephrodiles or fought the storm-warriors of Sigmar, Morgok’s Krushas sought the mightiest trophies in the name of their bellicose deity, Gorkamorka.
Here is the full series of videos on how I painted him!
Watch Now
If you don’t have an account, please sign up here! The website currently has over 350 video tutorials with steps and tips, plus a selection of PDFs. If you are not sure about joining, you can explore my free videos with a free membership, or take the plunge and become a full subscriber for full access.
If you’d prefer to support me on Patreon, please visit: https://www.patreon.com/RichardGray [...]
Two video tutorials on how to paint the Blissful One from The Unmade – fast and brutally effective fighters with the power to turn anyone who gets in their way into particularly grimdark coleslaw.
Video: Blissful One from The Unmade – Part One
This tutorial will guide you through the initial steps of painting the Blissful One from The Unmade Warband, focusing on establishing base colours, highlighting, and creating contrast. We’ll start with a model that has been assembled and primed in black.
Materials and Paints Needed:
Primer: Black
Base Paints: Games Workshop Mephiston Red, Cadian Fleshtone, Blue Horror, Morghast Bone, Skavenblight Dinge, Ogryn Camo; Vallejo Neutral Grey, Ice Yellow; P3 Morrow White
Step-by-Step Guide to The Blissful One – Part One:
Glue and Prime: Assemble your Blissful One from The Unmade and prime it in black. Bear in mind, this model is quite fragile, so handle it with care during both assembly and painting.
Hood Painting: Start with the hood using Blue Horror. Due to the black primer, multiple layers will be needed to achieve an opaque and neat finish. The hood features intricate folds, excellent for practising highlighting and creating depth.
Skin Mask and Model’s Skin: Apply Cadian Fleshtone to the flayed skin, including the face mask on the belt and the model’s own skin. Start with a patchy application; this allows you to gradually build up texture and depth.
Red Cloth: Use Mephiston Red for the cloth parts of the model. With the dark undercoat, the red will appear quite dark initially but can be brightened through subsequent layering.
Non-Metallic Metals (NMM): For weapons and metallic details, begin with Neutral Grey. Block in areas that catch the most light, using the weapons’ curves as a guide. NMM techniques rely on creating metal illusions through strategic light and dark colour placement, not metallic paints.
Skull and Bone Details: Utilise Morghast Bone for skulls and bones on the Blissful One. This base will be lightened up to white in areas catching the most light.
Highlighting and Adding Depth:
Highlight strongly lit areas with Ice Yellow and Morrow White, such as top edges and curves.
Apply Neutral Grey and Blue Horror to build the NMM effect on weapons and the halo-like accessory.
Skavenblight Dinge and Ogryn Camo can add contrast and deepen shadows when blended into base colours.
Rust Effects: To add realism and age, mix brown and orange shades for rust effects on metallic areas.
Finishing Touches: Continually assess the model for areas needing more depth or brightness. Use glazing techniques with thinned paint to smooth transitions and enhance the look.
Additional Tips:
Layering: Gradually build up colours, especially when working from a dark undercoat for smooth transitions and rich colours.
Directional Highlighting: Maintain light source consistency across the model to reinforce its three-dimensional aspect.
Texture and Contrast: Leverage the model’s texture for your brushwork and colour placement, using the creases in cloth and skin details as guides.
Video: Blissful One from The Unmade – Part Two
We delve further into detailing and finalizing our Blissful One miniature, focusing on leather, flesh, metallics, and final touches.
Materials and Paints Required:
Base Paints: Games Workshop Mephiston Red, Cadian Fleshtone, Blue Horror, Morghast Bone, Skavenblight Dinge, Ogryn Camo, Naggaroth Night, Fire Dragon Bright, Yriel Yellow; Vallejo Neutral Grey, Ice Yellow, Black, Pale Blue Grey; P3 Morrow White, Iosen Green
Fine Detail Brush
Wet Palette
Step-by-Step Guide to the Blissful One – Part Two:
Leather Straps:
Start with Cadian Fleshtone on the leather straps across the chest. Apply sparingly over the black to maintain the dark leather look. Focus on edges and use light touches to create texture and highlight simultaneously.
For the leg leather, begin with Rhinox Hide for a base, leaving some black to show through for shadows. Layer with Cadian Fleshtone for texture and detail, similar to the chest straps, but avoid Ice Yellow to keep it less bright than the chest.
Skin and Flesh:
Layer the living skin with Cadian Fleshtone, aiming for an opaque finish. Use Wraithbone to highlight and add definition to scarring, blending with Naggaroth Night for a subtle, wounded appearance.
For dead skin areas, enhance the rotted look with Ogryn Camo and desaturate with Pale Blue Grey and Skavenblight Dinge. Glaze recesses with Naggaroth Night to deepen the rot effect without overpowering the flesh tone.
Non-Metallic Metals:
Continue with Neutral Grey, Ice Yellow, and Vallejo Black for metallic areas. Apply with a focus on the light source direction, using Ice Yellow for highlights. Add texture and variation with small, detailed brushstrokes.
For rust effects on metallics, use Fire Dragon Bright in recesses and around details for a worn look. Blend with Rhinox Hide or Mournfang Brown to adjust the saturation and achieve a realistic rust appearance.
Freehand Details:
Add simple freehand designs, such as chaos stars, on the ribbons or other appropriate areas. Use a very fine brush and thin paint, keeping the designs neat and proportional to the model’s scale.
Paint glowing eyes on skulls or masks with Iosen Green, highlighting towards the centre with Yriel Yellow for a luminous effect. Avoid overdoing the glow to keep it subtle and realistic.
Final Touches:
Revisit any areas needing refinement or additional highlights. Use the fine detail brush to ensure precision, especially on freehand details and facial features.
Seal the model with a matte varnish to protect your work and reduce any unwanted shine from glossier paints.
Additional Tips:
Detailing Leather: When painting leather, remember that less is more. Use the base black colour to your advantage for shadows and texture.
Skin Tones: For living skin, ensure a healthy glow by avoiding desaturated colours in highlight areas. For dead or rotted skin, desaturation helps convey decay.
Metallics: Non-metallic metal painting requires patience and a good understanding of light. Don’t rush these areas and use reference images if necessary.
Final Checks: Before considering the miniature complete, review it under different light sources to catch any inconsistencies or missed spots.
If you don’t have an account and can’t see the videos, please sign up here! The website currently has over 350 video tutorials with steps and tips, plus a selection of PDFs. If you are not sure about joining, you can explore my free videos with a free membership, or take the plunge and become a full subscriber for full access.
If you’d prefer to support me on Patreon, please visit: https://www.patreon.com/RichardGray [...]
Below is the latest video for Morgok from Morgok’s Krushas, this time looking at how to paint the heavily weathered Morgok NMM sword.
Video – How to Paint Morgok NMM: Sword
All videos are recorded in HD 1080p or higher – use full screen for the full effect and let the video load completely.
Materials and Paints
The following paints were used: Games Workshop: Mournfang Brown, Troll Slayer Orange Vallejo: Neutral Grey, Pale Grey Blue, Black P3: Morrow White (Any white is fine)
Step-by-Step Guide
Painting Morgok’s sword to achieve a heavily weathered, non-metallic metal (NMM) look involves creating high contrast and emphasizing sculpted details. Here’s a step-by-step guide:
Preparing Your Palette: On your wet palette, lay out Vallejo Neutral Grey, Pale Grey Blue, Black, Games Workshop Mournfang Brown, Troll Slayer Orange, and P3 Morrow White (or any suitable white).
Assessing the Sword: Observe the sword’s chunky and battered appearance, with its distinct shapes. Your goal is to emphasise these aspects rather than aiming for smooth transitions.
Basecoat Application: Begin with Vallejo Neutral Grey as your base. Bear in mind, the blade’s flatter part will be darker, while the cutting edge should be lighter, creating a striking contrast.
Layer Enhancement: Progress to Vallejo Pale Grey Blue, concentrating on the brighter sections of the blade, particularly on the curve before it flattens.
Detailing with Fine Scratches: Utilise the tip of your brush to apply tiny, scratchy marks across the blade. Vary their sizes, but keep them diminutive to accentuate the worn effect.
Highlighting with White: Employ P3 Morrow White to highlight the lower edges of these scratches. This approach lends a three-dimensional look, simulating actual dents.
Creating a Shine: Utilise a stippling technique with Neutral Grey, Pale Grey Blue, and White to form a shine spot, bridging the cutting edge with the flat part of the blade. This spot should be roughly circular, yet not perfectly so, to imitate the diffusion of light.
Rust and Grime Addition: With Mournfang Brown, stipple on rust and grime, concentrating on the crevices and recesses to add texture and augment the weathered appearance.
Altering Highlight Transitions: If necessary, reposition the main highlight towards the middle of the flat side of the blade for enhanced contrast and detail accommodation.
Scratch Enhancement: Return to the cutting edge to add more pronounced scratches, extending from the edge to the flat. Accentuate their central points with White to mimic light reflecting off imperfections.
Rust Intensification with Troll Slayer Orange: Enhance the rust hue using Troll Slayer Orange. Its superb translucency allows for the gradual build-up of vibrant, saturated highlights.
Final Adjustments: Re-examine the entire blade, adding final details and adjusting contrasts to ensure that the rust, grime, and highlights are well-balanced and realistic.
Throughout your painting, focus on maintaining the sharp contrast between light and dark areas while enhancing the textured appearance of the sword. The objective is to achieve a realistic, weathered metallic look that complements the robust, worn style of Morgok’s sword and the Morgok NMM on the rest of the model.
Morgok from Morgok’s Krushas – All Videos
Painting Morgok from Morgoks Crushas
Morgok and his mob of Ironjawz brutes once hunted down and fought the greatest prey they could find amongst Ghur’s trackless wastes. Whether they ran down spiny nephrodiles or fought the storm-warriors of Sigmar, Morgok’s Krushas sought the mightiest trophies in the name of their bellicose deity, Gorkamorka.
Here is the full series of videos on how I painted him!
Watch Now
If you don’t have an account, please sign up here! The website currently has over 350 video tutorials with steps and tips, plus a selection of PDFs. If you are not sure about joining, you can explore my free videos with a free membership, or take the plunge and become a full subscriber for full access.
If you’d prefer to support me on Patreon, please visit: https://www.patreon.com/RichardGray [...]
Taking a quick from more serious painting to have some fun with my first ever Orruk! This guy is Morgok the Orruk from Morgok’s Krushas, an Underworld warband.
I’ve gone for a slightly different colour of skin to regular orruks. This was achieved using Vallejo Heavy Black Green, Bugman’s Glow, Cadian Fleshtone, Screaming Skull!
Video – Morgok the Orruk: Face, Teeth and Armour
Materials and Paints
Paints:
Games Workshop:
Mournfang Brown
Morghast Bone
Screaming Skull
Flash Gitz Yellow
Cadian Fleshtone
Bugman’s Glow
Vallejo:
Neutral Grey
Pale Grey Blue
Heavy Black Green
P3:
Morrow White
Brushes and Tools:
Fine Detail Brushes: Essential for precise work, especially for facial details, scratches, and armour highlights.
Larger Brushes: For basecoating and applying initial layers. A medium-size brush is suitable for most areas.
Wet Palette: To keep your paints hydrated and workable, especially important for blending and layering.
Water Cup: For rinsing brushes and thinning paints.
Paper Towels or Cloth: For brush cleaning and drying.
Additional Materials:
Black Primer: To prime the model before painting.
Blue Tack by Bostik: Useful for temporarily attaching parts like the head and chest, making them easier to handle while painting.
Mixing Tray or Palette: For mixing paints and creating custom shades.
Light Source: A lamp or natural light to observe how light and shadow play on the model, which guides highlighting and shading.
Hairdryer (Optional): Can be used to speed up the drying process between layers.
Step-by-Step Guide
Priming: Start by priming Morgok the Orruk in black. Keep the head and chest separate for ease of painting.
Basecoat – Skin: Use Vallejo Heavy Black Green, thinned down (about 50% water). Apply several thin layers for a smooth, dark green base.
Basecoat – Armour: Apply Vallejo Neutral Grey, also thinned down. This sets the stage for non-metallic black iron armour.
Layering – Armour: With the same grey, build up layers, focusing on the armor’s texture and dents. Use the tip of your brush to pick out details and create a rough, worn look.
Highlighting – Skin: Switch to Bugman’s Glow from Games Workshop for the skin. Paint details like creases and scratches directly, without a transition from the green. This creates high contrast and makes highlighting easier.
Refining Highlights – Skin: Use Cadian Fleshtone for smaller, more precise highlights. Focus on the upper edges and fine details. This stage adds more depth and texture to the skin.
Eyes: Paint the eyes with Flash Gitz Yellow. A simple blob will suffice, as we’re not aiming for competition standard.
Directional Lighting: Think about how light hits the model. Highlight areas like the head and raised shoulder more to create depth.
Final Highlights – Skin: Use Screaming Skull for the final highlights on the face. Apply it sparingly and precisely, refining the detail work.
Layering – Armour: Introduce Vallejo Pale Grey Blue for further layers on the armour. Create a scratched, worn look by building up layers and focusing on edges and imperfections.
Teeth – Basecoat: Start with Mournfang Brown, applying it evenly while leaving gaps between teeth.
Teeth – Highlighting: Use Morghast Bone for highlighting. Remember, for the upper teeth, highlight near the gums, and for the lower teeth, highlight the tips.
Teeth – Final Highlights: Add final highlights with P3 Morrow White on the very tips of the bottom teeth and near the gums of the top teeth.
Additional Armour Work: Return to the armour, adding more highlights and refining the look with both Neutral Grey and Pale Grey Blue.
All videos are recorded in HD 1080p or higher – use full screen for the full effect and let the video load completely.
Morgok the Orruk from Morgok’s Krushas – All Videos
Painting Morgok from Morgoks Crushas
Morgok the Orruk and his mob of Ironjawz brutes once hunted down and fought the greatest prey they could find amongst Ghur’s trackless wastes. Whether they ran down spiny nephrodiles or fought the storm-warriors of Sigmar, Morgok’s Krushas sought the mightiest trophies in the name of their bellicose deity, Gorkamorka.
Here is the full series of videos on how I painted him!
Watch Now
If you don’t have an account, please sign up here! The website currently has over 350 video tutorials with steps and tips, plus a selection of PDFs. If you are not sure about joining, you can explore my free videos with a free membership, or take the plunge and become a full subscriber for full access.
If you’d prefer to support me on Patreon, please visit: https://www.patreon.com/RichardGray [...]
Here I show you how to create a Nurgle Rusty Sword in this simple but very effective way! You can use it to create a rusty effect on your Nurgle weapons, or on armour.
Video: How to Create a Nurgle Rusty Sword
Materials Needed:
Baking Soda
Matte Varnish
Old brushes
Orange Paint (For this example, we’ll use Scale 75 Kalahari Orange, but any solid orange paint will do)
Step-by-Step Guide:
Mixing the Rust Effect:
Begin by creating your rust mixture. You’ll need to combine baking soda, matte varnish, and orange paint. The exact colour of the orange paint isn’t crucial, but a solid orange like Scale 75 Kalahari Orange is recommended for authenticity.
Mix these ingredients together. You don’t need any specialised tools for mixing; anything you have to hand will suffice.
Adjusting Consistency:
The mixture might appear a bit dry initially. If it’s too clumpy, thin it down with more varnish. Remember, the more varnish you add, the stronger and more hard-wearing the mixture becomes. This also helps to seal the baking soda against any acidic elements.
Aim for an intense, well-bound mixture. It should dry lighter in colour, so don’t be alarmed by the initial appearance.
Application on the Model:
Use an old brush for application; this mixture isn’t kind to brushes. An older, slightly worn brush is ideal.
Apply the mixture to the desired areas of your model. It’s a somewhat passive process; you don’t have to be overly precise. The mixture will be akin to a psyche in gel, so aim for an uneven surface. Too thin an application will just look like spread-out grains.
Focus on clumping the mixture slightly for a more realistic rust effect. If applied too thinly, it won’t have the desired impact.
Creating Texture:
After applying, use a stippling technique with your brush to spread out the grains at the edges. This helps to soften the transition from the rusted areas to the clean areas of the model.
Continue dabbing at the mixture to spread it and create a texture that resembles rust accumulating on the blade or other parts of the model.
Final Touches:
Once applied, the mixture might look a bit smooth, but don’t worry. As it dries, it will gain a more defined, grainy rust-like texture.
To enhance the effect, you can apply a very watered-down coat of a darker paint, like Rhinox Hide, after the rust mixture has dried.
Finishing Up:
Allow your model to dry completely. Once dry, you should see a realistic rust effect, adding depth and character to your piece.
More Tutorials on Rust, Grime and Weathering
If you don’t have an account, please sign up here! The website currently has over 350 video tutorials with steps and tips, plus a selection of PDFs. If you are not sure about joining, you can explore my free videos with a free membership, or take the plunge and become a full subscriber for full access.
If you’d prefer to support me on Patreon, please visit: https://www.patreon.com/RichardGray [...]
My latest tutorials, this time on how to paint a Chaos Warrior! He is a part of my small Slaves to Darkness army, but ultimately this is a failure as it took me too long to paint him. I need something that looks good while ideally taking not much longer than an hour, but this was just over 3. Follow my tutorials below for a fast(ish) way to paint to this standard.
To start, you will need to assemble and clean up the model (for a handy guide on this, go here) then prime it black.
Video – How to Paint a Chaos Warrior – Part One
Paints Needed
Vallejo Paints: Neutral Grey, Dark Grey, Black, White, Pale Grey Blue, Ice Yellow, Heavy Sienna, and Heavy Gold Brown.
Base Coating
Primary Highlights: Start with Vallejo Dark Grey to block in the primary highlight points, taking into consideration how light naturally hits the model. This won’t be perfectly accurate due to the differences between metal and plastic, but it provides a solid starting point. Remember, areas like kneecaps that face downwards will receive less light.
Adding Depth and Highlights
Further Highlights: Using Neutral Grey, create the second “band” of highlights. These should be more confined than those highlighted with Dark Grey, allowing the undercoat to be visible.
For areas you plan to render vibrant later (such as eyes), it’s acceptable to roughly block them in now. Adjustments and definitive colours, like red for eyes, can be added subsequently.
Non-Metallic Metal (NMM) Techniques
Flat Surfaces: For the Chaos Warrior’s flat armour surfaces, like the thighs or wrist guards, avoid intricate sky-like patterns due to their complexity. Instead, focus on simple yet effective highlighting to suggest metallicity.
Refining Highlights
With Pale Grey Blue, apply it to areas like the helmet for more pronounced non-metallic metal effects. Adjustments, especially around the face mask for glow effects or additional detailing, can be made as needed.
Detailing and Texturing
Use a mix of the greys and white to highlight edges and create texture across the armour. For cylindrical surfaces, such as the forearm guard, ensure the highlight mirrors the shape’s curvature. This step is crucial for adding realism and depth to your model.
Shield and Back Details
Although the back of the model may not be the focal point, it’s important to maintain consistency in quality. Apply similar highlighting techniques to the shield, adjusting for the light source being from the front. Use Corvus Black (or a similar dark grey) for glazing and smoothing transitions.
The Eight-Pointed Star of Chaos
Begin with a base of Heavy Sienna, accenting edges with Heavy Gold Brown and Ice Yellow for a rich, golden tone. Exercise restraint with Ice Yellow to preserve the gold’s richness. For added authenticity, make the edges irregular to suggest wear.
This guide covers the essentials for achieving a tabletop standard Chaos Warrior. The second part of this series (below) will explore further detailing and final touches to bring your Chaos Warrior to life.
Video – How to Paint a Chaos Warrior – Part Two
Having previously focused on non-metallic metal (NMM) armour, we will now delve into painting the more colourful aspects of the miniature. Unfortunately, due to technical difficulties, some early steps won’t be visually documented, but I’ll guide you through the process!
Paints Needed
Games Workshop Paints: Doombull Brown, Evil Sunz Scarlet, Wild Rider Red, Mephiston Red, Baharroth Blue, Corvus Black, Deathworld Forest, Ushabti Bone, Rhinox Hide.
Vallejo Paints: Heavy Sienna, Neutral Grey. Use Cadian Fleshtone as an alternative to Natural Flesh.
Painting the Cloak
Base Coat: Begin with Deathworld Forest for the cloak, aiming for a forest green shade. The paint may need to be thicker due to its poor coverage, so adjust the consistency to about 1:1 paint to water ratio for better application.
Highlighting: Utilize Heavy Gold Brown to pick out edges and folds in the cloak, remembering the light direction must match the rest of the model. Aim for a textured look by not being overly neat with your highlights.
Enhancing Details
Further Highlights: Apply Ice Yellow sparingly to the most raised parts of the cloak for maximum light exposure, concentrating on creating focal points that draw the eye towards the head.
Texturing: For texture and detail on parts like the cloak’s scales, a combination of the base and highlight paints, applied in a stippling fashion, can add visual interest without overwhelming the miniature.
Painting the Elf Trophy
Skin Tones: Vallejo Natural Flesh (or Cadian Fleshtone) works well for the elf’s skin, focusing on lighter applications on raised areas like cheeks and forehead. Add a wash of Neutral Grey for shadows to give the skin an unhealthy pallor fitting for a trophy.
Hair Detail: Heavy Gold Brown is perfect for the elf’s hair, creating a vibrant contrast. Apply in streaks to simulate hair texture, focusing on lighter touches towards the roots where the Chaos Warrior grips the hair.
Leather and Cloth
Loincloth and Boots: Start with Rhinox Hide as a base for both the loincloth and boots, adding layers of Doombull Brown and Heavy Sienna for depth and highlighting. Keep the boots darker to draw less attention, focusing brightness and detail higher up on the model.
Texture and Highlights: Apply Neutral Grey and Ushabti Bone for final highlights on leather parts, using a technique similar to dry brushing but with a slightly wet brush for more control and subtlety.
Final Touches
Eyes Glow: For the glowing eyes effect, start with a base of Evil Sunz Scarlet, adding Wild Rider Red for brightness in the centre, followed by a glaze of Mephiston Red around the sockets to suggest glow.
Unified Lighting: To unify the model under a consistent light source, glaze Baharroth Blue and Corvus Black strategically across the model. Blue glazes on highlights simulate a cool light source, while black glazes enhance shadows and recesses.
Videos Not Showing?
To view any of my paid tutorials, you need to be a member of the website – please click below to log in or join the site.
Not sure about joining just yet? Check out my Youtube for all my free tutorials or sign up as a free “friend” member on this site and visit the Freebies video page!
If you’d prefer to support me on Patreon, please visit: https://www.patreon.com/RichardGray [...]
Tips and a video on how to weather a banner – or anything, really! For my Loonboss Knight on a Giant Cave Squig, I originally created a banner pennant from scratch, which I freehanded then weathered to look a bit more grimy and in-keeping with the model. Here is how!
Video: How to Weather a Banner
Materials and Paints:
Black Primer: For initial model preparation.
Weathering Paints:
Rhinox Hide
XV-88
Zandri Dust
Morghast Bone
Screaming Skull
Fine Detail Brushes: For precise application of weathering.
Matte Varnish: Optional, if paint adherence is an issue on previously primed areas.
Step-by-Step Guide:
Note any areas where the paint hasn’t stuck well to your surface, potentially due to oils or prolonged primer exposure. Apply a matte varnish coat if necessary to improve paint stickiness.
Start with Rhinox Hide to apply the initial, broad weathering strokes. This layer sets the stage for depth and adds a first layer of grime. Apply in a seemingly haphazard manner, focusing on areas that would naturally accumulate dirt and wear.
Building Up Weathering:Progressively use lighter browns, starting from XV-88 to Zandri Dust, then Morghast Bone, and finally Screaming Skull. Each successive layer should cover a smaller area than the last, creating a gradual transition from the darkest weathered areas to the lightest. The key is to create a detailed and layered effect that adds realism to the banner.
Technique for Application:Use the tip of your brush for controlled application, keeping your strokes small and deliberate. As you move to lighter colours, your marks should become finer, simulating the detailed texture of weathered fabric.
Highlight and Define:With Morghast Bone and Screaming Skull, focus on edges and high points where wear and tear would naturally highlight the banner. These colours also help to desaturate and blend the weathering with the rest of the banner, softening the overall effect.
Glazing for Cohesion:Mix Screaming Skull with water to create a thin glaze. This step unifies the weathered effect, blending the layers together and ensuring that the weathering doesn’t overpower the underlying details of the banner. Apply sparingly over the weathered areas, paying attention not to obscure the detailed freehand work beneath.
Final Adjustments:Revisit any areas that may require additional definition or where the weathering may have obscured too much detail. Use a fine brush to reapply base colours or add final highlights where necessary.
Assessment:Step back and assess the overall effect. The weathering should add character and age to the banner without diminishing the vibrancy of the underlying colours or the clarity of the freehand details.
Protect Your Work:Consider applying a protective varnish to seal the model and protect the weathering from handling and transport, especially important for competition pieces!
Additional Tips:
Subtlety is Key: Weathering should enhance, not detract. Aim for a realistic look that suggests wear rather than overwhelming the piece.
Consistency in Lighting: Ensure the highlighted areas of weathering are consistent with the light source affecting the entire model for a cohesive look.
Patience and Layers: Build up the weathering gradually and allow each layer to dry. Rushing can lead to a muddled effect that lacks depth.
More tips on weathering, rust and grime!
If you don’t have an account here on my website, please sign up here! I have over 350 video tutorials with steps and tips, plus a selection of PDFs. If you are not sure about joining, you can explore my free videos with a free membership, or take the plunge and become a full subscriber for full access.
If you’d prefer to support me on Patreon, please visit: https://www.patreon.com/RichardGray [...]
An Adeptus Titanicus Knights Guide.
Please wait for the below to load, or alternatively download the guide here.
More Adeptus Titanicus Tutorials!
If you don’t have an account, please sign up here! The website currently has over 350 video tutorials with steps and tips, plus a selection of PDFs. If you are not sure about joining, you can explore my free videos with a free membership, or take the plunge and become a full subscriber for full access.
If you’d prefer to support me on Patreon, please visit: https://www.patreon.com/RichardGray [...]
Rusty Rusty Chainmail Painting Guide – PDF Tutorial
How to paint rusty chain mail for Nurgle!
Please allow the below PDF to load if you want to view in the webpage. Alternatively, you can download it here.
Rusty-Chain-Mail-Guide-1
More Nurgle Tutorials
If you don’t have an account, please sign up here! The website currently has over 350 video tutorials with steps and tips, plus a selection of PDFs. If you are not sure about joining, you can explore my free videos with a free membership, or take the plunge and become a full subscriber for full access.
If you’d prefer to support me on Patreon, please visit: https://www.patreon.com/RichardGray [...]
Rusty Axe Guide Guide PDF Tutorial How to paint and create texture for a rusty axe for a Nurgle Lord…
Please login to view this content at https://richardgraycreations.com/login/ [...]
If you don’t have an account, please sign up here! The website currently has over 350 video tutorials with steps and tips, plus a selection of PDFs. If you are not sure about joining, you can explore my free videos with a free membership, or take the plunge and become a full subscriber for full access.


If you’d prefer to support me on Patreon, please visit: https://www.patreon.com/RichardGray