


These videos show how to paint Cado Ezechiar, one of the vampire models from Games Workshop. He was painted as a part of my Golden Demon entry for 2024!
There are a lot of fun techniques I used on Cado, from his pitted, slightly worn armour, to his cloth undershirt, cape and some weathered leather. Read on to explore the tutorials in order, or click below to explore each part.
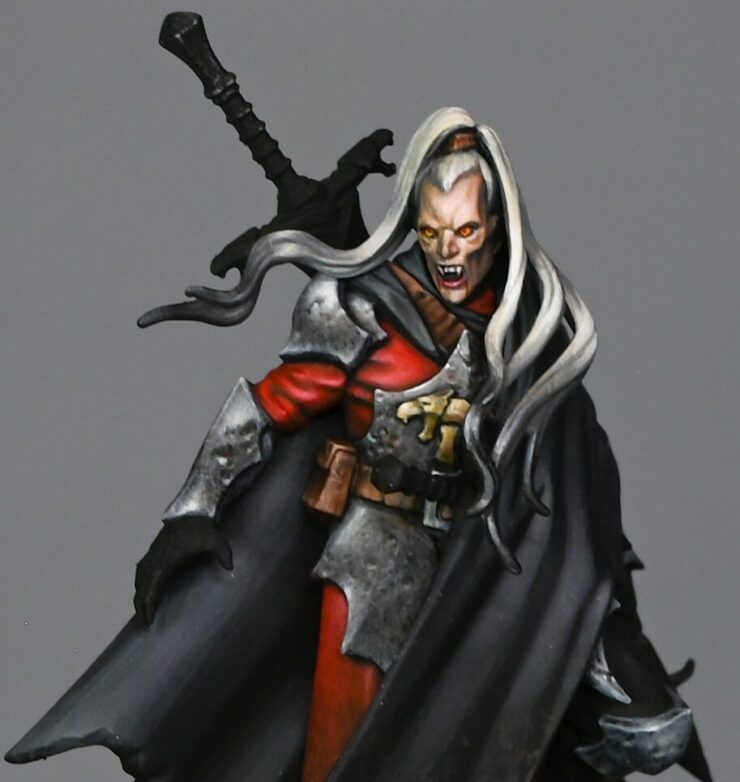
Video Part One – Armour and Red Cloth
Paints Used
Games Workshop: Mournfang Brown, Corvus Black
Vallejo: Ice Yellow, Neutral Grey, German Grey
P3: Morrow White
Preparation
Priming: The model should already be primed black. Imperfections in the primer’s coverage are not a concern, as all surfaces will be covered with paint.
Blocking in Colours
Base Coating: Start by blocking in base colours for efficiency and to prevent having to meticulously paint near completed areas later. Use Rhinox Hide for leather parts and German Grey (or a dark grey made by mixing black and white) for armour sections. This step is about laying down foundational colours and reacquainting yourself with the painting process.
Painting the Armour
Initial Armour Layer: Apply a base layer of German Grey across all armour parts. This step establishes a dark base for building up the texture and highlights that will follow.
Adding Texture and Base Highlights: Switch to Neutral Grey to begin adding texture and lighting effects to the armour. This involves creating scratch-like marks to simulate corrosion and wear, enhancing the model’s detailed sculpting. A size 00 brush is recommended for fine control and detail work.
Building Highlights: Gradually lighten the armour by adding more Neutral Grey, and then lighten further by mixing in Ice Yellow with Neutral Grey. The goal is to create a gradient of highlights leading to the brightest points of the armour. The addition of Ice Yellow introduces warmth to the grey, adding visual interest.
Final Highlights: Use P3 Morrow White for the final highlights. Apply this sparingly to the most raised areas and points where light would naturally be the strongest. The white should be watered down significantly to ensure a smooth application.
Enhancing Texture and Colour
Glazing for Depth: Mix a glaze using Mournfang Brown and apply it to shadow areas and recesses to add depth and warmth to the armour. Follow up with Corvus Black for deepening the shadows further. These glazes help unify the texture and add complexity to the finish.
Adjustments and Finishing Touches: Continuously assess the model as you paint, especially when transitioning between different sections or colours. Ensure that the lighting and colours are cohesive across the model to maintain the unit’s unified appearance.
Video Part Two – Leather Belt and Pouch, the NMM Gold Dragon on his chest and his Black Cape with Weathering
Paints Used
Games Workshop: Rhinox Hide, Mournfang Brown, Fire Dragon Bright, XV-88, Balor Brown
Vallejo: Dark Grey, Ice Yellow
Step-by-Step Guide
Leather Details
Base Coat: Start with Rhinox Hide as the base for all leather parts, which was applied in the previous painting session.
Initial Highlights: Using Mournfang Brown, begin blocking in the details on the belt and pouch using a size 00 brush. Focus on applying the paint with the tip of the brush, even when filling larger areas, to maintain precision and control.
Adding Texture: With the same brush, enhance the leather texture by applying additional highlights with a mixture of Mournfang Brown and Fire Dragon Bright. The Fire Dragon Bright will lighten the colour but may also increase the paint’s translucency, requiring multiple layers for full opacity.
Further Highlights: Introduce Ice Yellow into the mix for the next set of highlights, focusing on the most illuminated areas like the top of the pouch and the sides of the belt that are exposed to light. Use a delicate touch to add fine details and texture, simulating the natural wear and tear on the leather.
NMM Gold Dragon
Base Layer: Use XV-88 as your base colour for the dragon emblem. Carefully outline the shape, leaving black lines between the details to create depth and contrast.
Building Up Colour: Gradually add Balor Brown to the XV-88, focusing on areas where light would naturally hit the emblem. Consider the curvature and form of the dragon to place your highlights thoughtfully, enhancing the 3D effect.
Final Highlights: Mix in Ice Yellow with your base colours to brighten the highest points of the emblem. Apply these highlights sparingly to areas like the brow, nose tip, and the edges of the dragon heads to achieve a metallic shine. Optionally, add a dot of pure white at the very brightest points for maximum impact.
Black Cape
Initial Layering: Prime the cape black and then apply Vallejo Dark Grey, thinned with water (approximately 60% water to 40% paint), to start building up the layers. Aim for smooth, gradual transitions, focusing on the creases and raised areas of the cape.
Highlighting: Incrementally mix Ice Yellow into the Dark Grey for the highlights. Apply these to the edges and folds of the cape where the light naturally hits, ensuring that the highlights are concentrated towards the top of the folds to emphasise the flow and texture of the fabric.
Weathering: Using Rhinox Hide, begin stippling the lower edges of the cape to simulate mud and grime build-up. Progressively add Mournfang Brown and then Balor Brown into your mix, focusing the lighter, more detailed stippling towards the very bottom to create a realistic weathered effect. Avoid making this look too uniform; natural wear and variety in the marks will enhance the realism.
Video Part Three – How to Paint a Vampire Head
Materials List
Paints:
- Games Workshop: Cadian Fleshtone, Mephiston Red, Evil Sunz Scarlet
- Vallejo: Neutral Grey, German Grey
- P3: Morrow White (or any white paint)
Brushes:
- Size 2 Round Brush (for broad applications)
- Size 00 Round Brush (for detailed work)
Other Materials:
- Wet Palette (to keep paints moist and workable)
- Water Pot (for cleaning brushes)
- Mixing Palette (for mixing custom paint shades)
- Blue Tack (for temporarily attaching components)
- Metal Rod (for holding the model while painting)
- Super Glue (for assembly adjustments)
How to Paint a Vampire Head Painting Guide
Preparation
Modify and Assemble: Modify the hair of the model to prevent it from touching the face, allowing for easier access when painting. This involves careful cutting, reattaching, and positioning of the hair components.
Priming: Prime the model with a neutral primer to ensure paint adhesion and colour accuracy.
Base Coating
Apply Base Colours: Begin with a base coat of Cadian Fleshtone for the skin, applying it thinly (around a 1.5:1 ratio of water to paint) using a size 2 brush for a smooth layer. For the hair, use Neutral Grey as the base.
Layering and Detailing
Layering: Employ both a size 2 brush for general work and a 00 brush for fine details. Gradually build up the skin tones, focusing on creating dramatic lighting by highlighting facial features and leaving recesses darker. Mix Cadian Fleshtone with white for various highlight shades.
Eyes and Teeth Detailing: For the eyes, utilise Mephiston Red and Evil Sunz Scarlet for a glowing effect. For the teeth, mix Cadian Fleshtone with white to achieve a natural bone colour, steering clear of pure white to maintain realism.
Hair: Paint the hair in layers, starting with Neutral Grey, then adding white for highlights. Adjust shading and highlighting to reflect texture and colour accurately.
Shadows and Highlights: Use German Grey for deep shadows to add depth, especially around the eyes and under facial features. Use mixtures of Cadian Fleshtone with white and grey to refine the face’s appearance, enhancing the transition from light to shadow.
Final Touches: Add fine highlights with a mix of the lightest skin tone and a bit of white, focusing on areas where light naturally hits. Use a fine brush for precision, ensuring smooth transitions between light and dark areas.
Additional Tips
Brush Care: Always wet your brush before starting to paint, even if it appears clean, to ensure smooth paint flow.
Lighting Effects: When painting, consider how light interacts with the model’s features. This helps in achieving a more natural and realistic appearance, even with dramatic lighting.
Colour Mixing: Don’t be limited by paint names. Understand that all paints are just colours, and creative mixing can achieve the desired effect, such as using skin tone mixes for teeth to avoid too stark a contrast.
Video Part Four – How to Paint his Cracked Leather Scabbard
Materials and Paints
Paints:
- Rhinox Hide (Games Workshop) – A dark brown paint used as the base color for the leather.
- Bugman’s Glow (Games Workshop) – A flesh-toned paint used for creating mid-tones and highlights on the leather.
- White (P3 Morrow White) – Used for mixing with Bugman’s Glow to create lighter shades for finer highlights.
Brushes:
- Fine Detail Brush – A high-quality, fine-tipped brush, such as a size 0 or 00, is essential for painting the very fine lines that simulate the cracks in the leather. The brush used in the video is my favourite, the size 00 Artis Opus brush.
Additional Materials:
- Water – For thinning the paints. The consistency of the paint should be around 50% water to 50% paint, with a slight adjustment for environmental factors like heat.
- Wet Palette – To keep the paints hydrated and workable for longer periods. It’s particularly useful for mixing and maintaining the consistency of thinned paints.
- Kitchen Roll or Paper Towel – Used for dabbing the brush to remove excess paint or water. It’s important to change the paper regularly to avoid degradation and particles sticking to the brush.
- Painting Handle or Holder (optional) – To comfortably hold and manipulate the model while painting. I use Rathcore painting handles.
Step by Step Guide to Paint a Cracked Leather Scabbard
1. Preparation:
- Ensure the scabbard on the model (in this case, Cado Ezechiar) is clean and ready for painting.
2. Base Coat:
- Start by covering the entire scabbard area with Rhinox Hide (Games Workshop). Apply a couple of coats for even coverage but don’t worry about perfect opacity.
3. Mixing Paints:
- Prepare your palette with a progression of mixes:
- Rhinox Hide mixed with a small amount of Bugman’s Glow (GW).
- Pure Bugman’s Glow, thinned slightly with water.
- Bugman’s Glow mixed with a small amount of white (P3 Morrow White), and then a mix with more white added.
4. Detailing with a Fine Brush:
- Use a thin brush, like a size 0 or 00, ensuring it has a very sharp tip for fine detailing.
- Begin with the Rhinox Hide and Bugman’s Glow mix. Paint very fine, wiggly lines across the scabbard, simulating cracks in the leather. The lines should be more concentrated on the left side where the light hits, but include some on the right side too.
- Turn the model as needed for comfort and accuracy but check the marks in the correct orientation to ensure they look natural.
- Remember, the paint consistency should be about 50:50 water to paint, perhaps slightly more water for better flow.
5. Building Highlights:
- Progress to using straight Bugman’s Glow. Go over some of the previous lines and add new ones. Ensure that some of the initial finer lines remain visible beneath.
- Focus on making the edges and areas with supposed more wear brighter.
- You can create deeper scratches by painting over the previous lines, adding detail and depth.
6. Correcting and Enhancing:
- If any lines are too thick or dense, use Rhinox Hide to adjust them. You can also enhance them by extending the lines and creating additional features.
- Remember, each line or mark should be distinct and avoid uniform patterns.
7. Final Highlights:
- Use the mix of Bugman’s Glow and white for the brightest highlights. Apply these sparingly and focus on making them as small and fine as possible.
- Adjust the intensity of your highlights by removing excess paint from the brush before application.
8. Glazing for Depth:
- To bring the whole effect together and add depth, apply a glaze of Mournfang Brown (GW) over the entire area. This step also helps soften the texture and make it more refined.
- You can go back with Rhinox Hide into darker recesses if needed, to adjust the contrast and depth.
9. Final Touches:
- Add more detail and glaze as needed to achieve the desired depth and realism in the leather texture. Be mindful of over-glazing, which can dilute the detail work.
10. Review and Adjust:
- Continuously review your work and adjust as necessary to ensure a realistic and varied leather texture. Each step can be refined or corrected to achieve the desired effect.
Leather Technique Tips
- Consistency in paint mixture is crucial for achieving the fine lines necessary for the cracked leather effect.
- Regularly maintaining the brush’s fine tip is essential for detailed work.
- Turning the model upside down can facilitate easier brush strokes, but always check the work in its correct orientation.
- Glazing with thinned paint helps unify the painted area and add depth to the texture.
Remember, the key to this technique is patience and precision. The fine details make the difference, so take your time with each step to achieve a convincing cracked leather effect.
Videos Not Showing?
To view any of my paid tutorials, you need to be a member of the website – please click below to log in or join the site.


Not sure about joining just yet? Check out my Youtube for all my free tutorials or sign up as a free “friend” member on this site and visit the Freebies video page!