


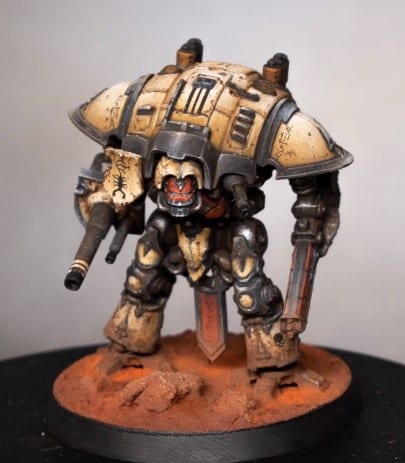
How to Paint a Mini Questoris Knight with all his tiny details, with tips on metal, weathering and using weathering powder.
Knights are the agile war machines of the Knightly houses, each one commanded by a single skilled scion. When the Titan Legions mass for war, they call upon their allied Knightly Houses to aid them, the Questoris Support Banners acting as scouts and skirmishers for their larger kin. Bristling with fearsome weapons and protected by shimmering shields, Imperial Knights are amongst the most terrifying military assets in the galaxy. Except these ones do seem very small when brushing the ankles of a Titan.
Read on to explore both video tutorials on How to Paint a Mini Questoris Knight, with all materials you need plus step by step guides.
Video: How to Paint a Mini Questoris Knight – Part One
This guide focuses on painting a knight from Adeptus Titanicus in the colours of House Malinax, laying the foundation with base painting and initial detailing before advancing to more complex techniques like weathering and decal application covered in the second part.
Materials Needed:
- Base Paints: Games Workshop Balor Brown, Ushabti Bone, Ceramite White, Agrax Earthshade
- Metallics: Vallejo Gun Metal
- Additional: Fine detail brush, airbrush (optional for smoother base coats)
Steps:
Priming and Base Coating:
- Priming: Start with a black primer to ensure deep shadows and a strong contrast base for metallic and armour parts.
- Metallic Areas: Apply Vallejo Gun Metal over all metal areas. Once dry, wash these areas with Agrax Earthshade to add depth and shadow, providing a worn metallic look.
- Armour Plates: Paint the knight’s armour panels with Balor Brown. This stage might require multiple thin coats for an even, opaque finish, especially over a black primer. Use an airbrush for quicker application on larger areas like the carapace.
Detailing:
- Highlighting Armour: Gradually build up highlights on the armour using Ushabti Bone, focusing on raised edges and areas that would naturally catch the light. Ceramite White can be used for final sharp highlights or points of interest.
- Cleaning Up: Use a fine detail brush to tidy up any overspill or to sharpen edges between different colours, ensuring the model’s details are crisp and clear.
Preparing for Further Detailing:
- Applying Washes: To add depth and further define the armour panels, apply Agrax Earthshade strategically into recesses and around detail work. This step enhances the model’s textures and adds a realistic shadow effect.
- Additional Colour Details: Decide on accent colours for smaller details such as the cockpit, weapon casings, or heraldry that will complement the knight’s primary colour scheme. This adds visual interest and character to your model.
- Sealing the Model: Once satisfied with the base painting and initial detailing, consider applying a matte varnish to protect your work before moving on to advanced weathering techniques and decal application. This step is optional but recommended if you plan on handling the model frequently.
The focus at this stage is on building a solid and clean colour foundation, preparing the knight for the weathering and detailing stages that follow. Patience is key—take your time with each layer and ensure complete drying between steps to achieve the best results.
Video: How to Paint a Mini Questoris Knight – Part Two
Weathering, Decal Application, and Basing Guide
In this continuation of our painting guide, we’ll delve into the final steps to bring your House Malinax Adeptus Titanicus knight to life with vibrant colours, detailed weathering, decals application, and an engaging base.
Materials Needed:
- Primary Paints: Games Workshop Mephiston Red, Evil Sunz Scarlet, Wild Rider Red, Fire Dragon Bright, Lothern Blue
- Weathering Powders: Forge World Aged Rust, Orange Rust
- Decal Solutions: Micro Sol, Micro Set
- Additional: Winsor and Newton Burnt Umber Water Soluble Oil Paint
- Base Materials: Baking Soda, Vallejo Charred Brown, and a red of your choice (e.g., Typhus Corrosion for a darker tone)
- Varnishes: AKInteractive Matte and Ultra Matte
Steps:
Painting Details:
- Head, Chest, and Chainsword: Paint these components with Mephiston Red for a rich, dark base. Utilize Evil Sunz Scarlet and Wild Rider Red for highlights, focusing on raised areas and edges to create depth. For the knight’s eyes, a dab of Lothern Blue accented with Fire Dragon Bright captures attention.
- Black Trim: Highlight black areas with Vallejo’s German Grey, progressing towards lighter greys like Blue Grey and Pale Blue Grey towards the edges for a nuanced, realistic metal effect. This contrast against the bone-coloured armour emphasizes the knight’s details.
Applying Decals:
- Preparation: Apply a gloss varnish to the areas where decals will be placed. This provides a smooth surface, minimizing air bubbles and silvering.
- Decal Application: Soak your decals in water until they slide off the backing paper easily. Apply Micro Set to the model’s surface before positioning your decal. Once in place, use Micro Sol over the decal to soften it, allowing it to conform to the model’s contours. After drying, seal with a gloss varnish for protection and an even surface.
- Matte Finish: Once the decals are sealed and the varnish is dry, apply an ultra matte varnish over the entire model to unify the sheen and protect your work.
Weathering:
- Initial Weathering: Use a fine brush to apply tiny chips and scratches with Rhinox Hide, focusing on areas that would naturally see wear. Keep these marks extremely small to maintain the model’s scale.
- Oil Weathering: Dilute Winsor and Newton Burnt Umber Water Soluble Oil Paint with water. Apply this mixture selectively around metallic parts and lower leg sections to simulate grime and wear. This step adds realism and depth to the knight.
Basing:
- Texture: Mix baking soda with matte varnish and Vallejo Charred Brown (and a red of choice) to create a paste. Apply this to the base, ensuring coverage around any rocks or debris. This creates a textured ground effect.
- Colouring: Airbrush Forge World Aged Rust weathering powder over the base and lightly onto the knight’s feet for cohesion between the model and its base.
- Detailing: Lightly dry brush the rocks with Ushabti Bone for contrast against the rusted ground, and apply Orange Rust weathering powder in recesses for additional depth.
Final Touches:
- Re-highlight metallics if needed to ensure they stand out against the weathered and mattified surfaces.
- Consider adding small narrative elements to the base, like battlefield debris, to further the story of your knight’s battles.
This comprehensive guide should leave you with a beautifully detailed, weathered knight that stands out on the battlefield. Remember, the key to a great finish is patience and attention to detail, especially when working on weathering and basing to achieve a cohesive and realistic look.
Struggling with Decals?
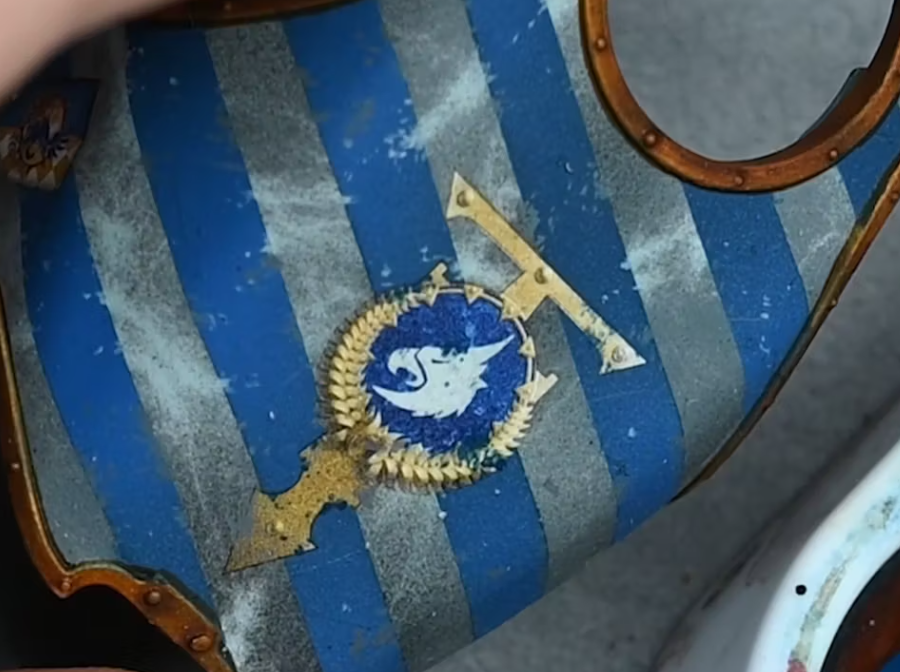
How to Apply Forge World Decals and Weather Them
A beginners guide on how to apply Forge World decals and weather them so they look a natural part of the painting on your model. Painting and applying decals to your models adds significant details and realism, making it stand out during tabletop gaming. It’s also a lot easier than freehand! I still use decals a lot in my models, despite also enjoying freehand work.
If you don’t have an account, please sign up here! The website currently has over 350 video tutorials with steps and tips, plus a selection of PDFs. If you are not sure about joining, you can explore my free videos with a free membership, or take the plunge and become a full subscriber for full access.


If you’d prefer to support me on Patreon, please visit: https://www.patreon.com/RichardGray