


Two video tutorials on how to paint the Blissful One from The Unmade – fast and brutally effective fighters with the power to turn anyone who gets in their way into particularly grimdark coleslaw.
Video: Blissful One from The Unmade – Part One
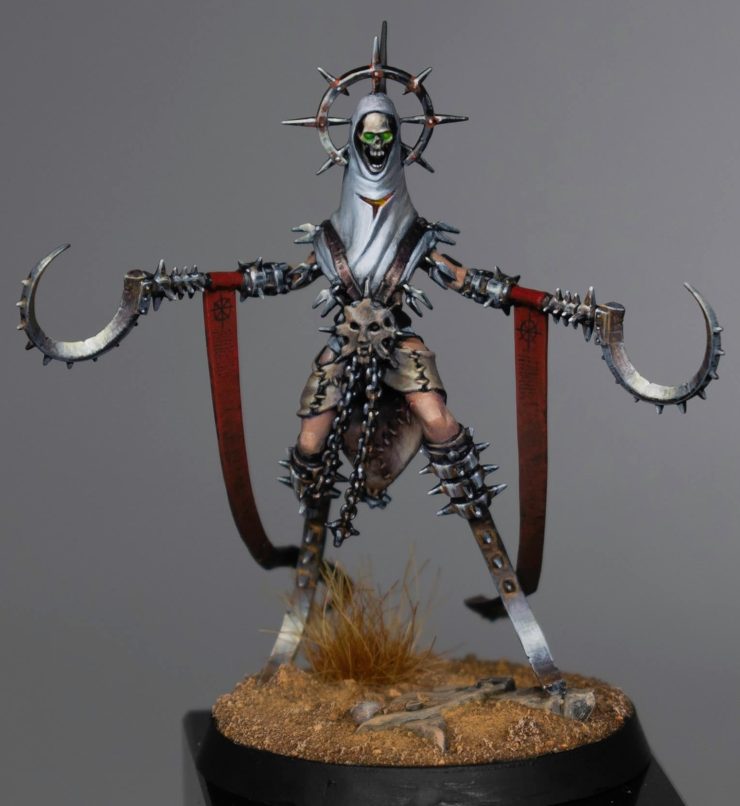
This tutorial will guide you through the initial steps of painting the Blissful One from The Unmade Warband, focusing on establishing base colours, highlighting, and creating contrast. We’ll start with a model that has been assembled and primed in black.
Materials and Paints Needed:
- Primer: Black
- Base Paints: Games Workshop Mephiston Red, Cadian Fleshtone, Blue Horror, Morghast Bone, Skavenblight Dinge, Ogryn Camo; Vallejo Neutral Grey, Ice Yellow; P3 Morrow White
Step-by-Step Guide to The Blissful One – Part One:
- Glue and Prime: Assemble your Blissful One from The Unmade and prime it in black. Bear in mind, this model is quite fragile, so handle it with care during both assembly and painting.
- Hood Painting: Start with the hood using Blue Horror. Due to the black primer, multiple layers will be needed to achieve an opaque and neat finish. The hood features intricate folds, excellent for practising highlighting and creating depth.
- Skin Mask and Model’s Skin: Apply Cadian Fleshtone to the flayed skin, including the face mask on the belt and the model’s own skin. Start with a patchy application; this allows you to gradually build up texture and depth.
- Red Cloth: Use Mephiston Red for the cloth parts of the model. With the dark undercoat, the red will appear quite dark initially but can be brightened through subsequent layering.
- Non-Metallic Metals (NMM): For weapons and metallic details, begin with Neutral Grey. Block in areas that catch the most light, using the weapons’ curves as a guide. NMM techniques rely on creating metal illusions through strategic light and dark colour placement, not metallic paints.
- Skull and Bone Details: Utilise Morghast Bone for skulls and bones on the Blissful One. This base will be lightened up to white in areas catching the most light.
- Highlighting and Adding Depth:
- Highlight strongly lit areas with Ice Yellow and Morrow White, such as top edges and curves.
- Apply Neutral Grey and Blue Horror to build the NMM effect on weapons and the halo-like accessory.
- Skavenblight Dinge and Ogryn Camo can add contrast and deepen shadows when blended into base colours.
- Rust Effects: To add realism and age, mix brown and orange shades for rust effects on metallic areas.
- Finishing Touches: Continually assess the model for areas needing more depth or brightness. Use glazing techniques with thinned paint to smooth transitions and enhance the look.
Additional Tips:
- Layering: Gradually build up colours, especially when working from a dark undercoat for smooth transitions and rich colours.
- Directional Highlighting: Maintain light source consistency across the model to reinforce its three-dimensional aspect.
- Texture and Contrast: Leverage the model’s texture for your brushwork and colour placement, using the creases in cloth and skin details as guides.
Video: Blissful One from The Unmade – Part Two
We delve further into detailing and finalizing our Blissful One miniature, focusing on leather, flesh, metallics, and final touches.
Materials and Paints Required:
- Base Paints: Games Workshop Mephiston Red, Cadian Fleshtone, Blue Horror, Morghast Bone, Skavenblight Dinge, Ogryn Camo, Naggaroth Night, Fire Dragon Bright, Yriel Yellow; Vallejo Neutral Grey, Ice Yellow, Black, Pale Blue Grey; P3 Morrow White, Iosen Green
- Fine Detail Brush
- Wet Palette
Step-by-Step Guide to the Blissful One – Part Two:
- Leather Straps:
- Start with Cadian Fleshtone on the leather straps across the chest. Apply sparingly over the black to maintain the dark leather look. Focus on edges and use light touches to create texture and highlight simultaneously.
- For the leg leather, begin with Rhinox Hide for a base, leaving some black to show through for shadows. Layer with Cadian Fleshtone for texture and detail, similar to the chest straps, but avoid Ice Yellow to keep it less bright than the chest.
- Skin and Flesh:
- Layer the living skin with Cadian Fleshtone, aiming for an opaque finish. Use Wraithbone to highlight and add definition to scarring, blending with Naggaroth Night for a subtle, wounded appearance.
- For dead skin areas, enhance the rotted look with Ogryn Camo and desaturate with Pale Blue Grey and Skavenblight Dinge. Glaze recesses with Naggaroth Night to deepen the rot effect without overpowering the flesh tone.
- Non-Metallic Metals:
- Continue with Neutral Grey, Ice Yellow, and Vallejo Black for metallic areas. Apply with a focus on the light source direction, using Ice Yellow for highlights. Add texture and variation with small, detailed brushstrokes.
- For rust effects on metallics, use Fire Dragon Bright in recesses and around details for a worn look. Blend with Rhinox Hide or Mournfang Brown to adjust the saturation and achieve a realistic rust appearance.
- Freehand Details:
- Add simple freehand designs, such as chaos stars, on the ribbons or other appropriate areas. Use a very fine brush and thin paint, keeping the designs neat and proportional to the model’s scale.
- Paint glowing eyes on skulls or masks with Iosen Green, highlighting towards the centre with Yriel Yellow for a luminous effect. Avoid overdoing the glow to keep it subtle and realistic.
- Final Touches:
- Revisit any areas needing refinement or additional highlights. Use the fine detail brush to ensure precision, especially on freehand details and facial features.
- Seal the model with a matte varnish to protect your work and reduce any unwanted shine from glossier paints.
Additional Tips:
- Detailing Leather: When painting leather, remember that less is more. Use the base black colour to your advantage for shadows and texture.
- Skin Tones: For living skin, ensure a healthy glow by avoiding desaturated colours in highlight areas. For dead or rotted skin, desaturation helps convey decay.
- Metallics: Non-metallic metal painting requires patience and a good understanding of light. Don’t rush these areas and use reference images if necessary.
- Final Checks: Before considering the miniature complete, review it under different light sources to catch any inconsistencies or missed spots.
If you don’t have an account and can’t see the videos, please sign up here! The website currently has over 350 video tutorials with steps and tips, plus a selection of PDFs. If you are not sure about joining, you can explore my free videos with a free membership, or take the plunge and become a full subscriber for full access.


If you’d prefer to support me on Patreon, please visit: https://www.patreon.com/RichardGray