


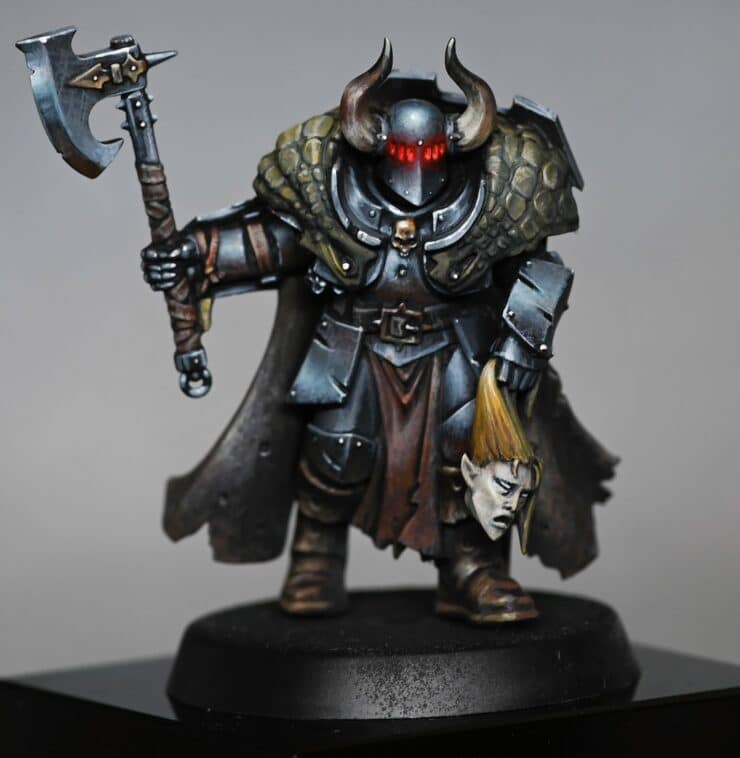
My latest tutorials, this time on how to paint a Chaos Warrior! He is a part of my small Slaves to Darkness army, but ultimately this is a failure as it took me too long to paint him. I need something that looks good while ideally taking not much longer than an hour, but this was just over 3. Follow my tutorials below for a fast(ish) way to paint to this standard.
To start, you will need to assemble and clean up the model (for a handy guide on this, go here) then prime it black.
Video – How to Paint a Chaos Warrior – Part One
Paints Needed
Vallejo Paints: Neutral Grey, Dark Grey, Black, White, Pale Grey Blue, Ice Yellow, Heavy Sienna, and Heavy Gold Brown.
Base Coating
- Primary Highlights: Start with Vallejo Dark Grey to block in the primary highlight points, taking into consideration how light naturally hits the model. This won’t be perfectly accurate due to the differences between metal and plastic, but it provides a solid starting point. Remember, areas like kneecaps that face downwards will receive less light.
Adding Depth and Highlights
- Further Highlights: Using Neutral Grey, create the second “band” of highlights. These should be more confined than those highlighted with Dark Grey, allowing the undercoat to be visible.
- For areas you plan to render vibrant later (such as eyes), it’s acceptable to roughly block them in now. Adjustments and definitive colours, like red for eyes, can be added subsequently.
Non-Metallic Metal (NMM) Techniques
- Flat Surfaces: For the Chaos Warrior’s flat armour surfaces, like the thighs or wrist guards, avoid intricate sky-like patterns due to their complexity. Instead, focus on simple yet effective highlighting to suggest metallicity.
Refining Highlights
- With Pale Grey Blue, apply it to areas like the helmet for more pronounced non-metallic metal effects. Adjustments, especially around the face mask for glow effects or additional detailing, can be made as needed.
Detailing and Texturing
- Use a mix of the greys and white to highlight edges and create texture across the armour. For cylindrical surfaces, such as the forearm guard, ensure the highlight mirrors the shape’s curvature. This step is crucial for adding realism and depth to your model.
Shield and Back Details
- Although the back of the model may not be the focal point, it’s important to maintain consistency in quality. Apply similar highlighting techniques to the shield, adjusting for the light source being from the front. Use Corvus Black (or a similar dark grey) for glazing and smoothing transitions.
The Eight-Pointed Star of Chaos
- Begin with a base of Heavy Sienna, accenting edges with Heavy Gold Brown and Ice Yellow for a rich, golden tone. Exercise restraint with Ice Yellow to preserve the gold’s richness. For added authenticity, make the edges irregular to suggest wear.
This guide covers the essentials for achieving a tabletop standard Chaos Warrior. The second part of this series (below) will explore further detailing and final touches to bring your Chaos Warrior to life.
Video – How to Paint a Chaos Warrior – Part Two
Having previously focused on non-metallic metal (NMM) armour, we will now delve into painting the more colourful aspects of the miniature. Unfortunately, due to technical difficulties, some early steps won’t be visually documented, but I’ll guide you through the process!
Paints Needed
- Games Workshop Paints: Doombull Brown, Evil Sunz Scarlet, Wild Rider Red, Mephiston Red, Baharroth Blue, Corvus Black, Deathworld Forest, Ushabti Bone, Rhinox Hide.
- Vallejo Paints: Heavy Sienna, Neutral Grey. Use Cadian Fleshtone as an alternative to Natural Flesh.
Painting the Cloak
Base Coat: Begin with Deathworld Forest for the cloak, aiming for a forest green shade. The paint may need to be thicker due to its poor coverage, so adjust the consistency to about 1:1 paint to water ratio for better application.
Highlighting: Utilize Heavy Gold Brown to pick out edges and folds in the cloak, remembering the light direction must match the rest of the model. Aim for a textured look by not being overly neat with your highlights.
Enhancing Details
Further Highlights: Apply Ice Yellow sparingly to the most raised parts of the cloak for maximum light exposure, concentrating on creating focal points that draw the eye towards the head.
Texturing: For texture and detail on parts like the cloak’s scales, a combination of the base and highlight paints, applied in a stippling fashion, can add visual interest without overwhelming the miniature.
Painting the Elf Trophy
Skin Tones: Vallejo Natural Flesh (or Cadian Fleshtone) works well for the elf’s skin, focusing on lighter applications on raised areas like cheeks and forehead. Add a wash of Neutral Grey for shadows to give the skin an unhealthy pallor fitting for a trophy.
Hair Detail: Heavy Gold Brown is perfect for the elf’s hair, creating a vibrant contrast. Apply in streaks to simulate hair texture, focusing on lighter touches towards the roots where the Chaos Warrior grips the hair.
Leather and Cloth
Loincloth and Boots: Start with Rhinox Hide as a base for both the loincloth and boots, adding layers of Doombull Brown and Heavy Sienna for depth and highlighting. Keep the boots darker to draw less attention, focusing brightness and detail higher up on the model.
Texture and Highlights: Apply Neutral Grey and Ushabti Bone for final highlights on leather parts, using a technique similar to dry brushing but with a slightly wet brush for more control and subtlety.
Final Touches
Eyes Glow: For the glowing eyes effect, start with a base of Evil Sunz Scarlet, adding Wild Rider Red for brightness in the centre, followed by a glaze of Mephiston Red around the sockets to suggest glow.
Unified Lighting: To unify the model under a consistent light source, glaze Baharroth Blue and Corvus Black strategically across the model. Blue glazes on highlights simulate a cool light source, while black glazes enhance shadows and recesses.
Videos Not Showing?
To view any of my paid tutorials, you need to be a member of the website – please click below to log in or join the site.


Not sure about joining just yet? Check out my Youtube for all my free tutorials or sign up as a free “friend” member on this site and visit the Freebies video page!
If you’d prefer to support me on Patreon, please visit: https://www.patreon.com/RichardGray
With only six colours?! Love these videos