


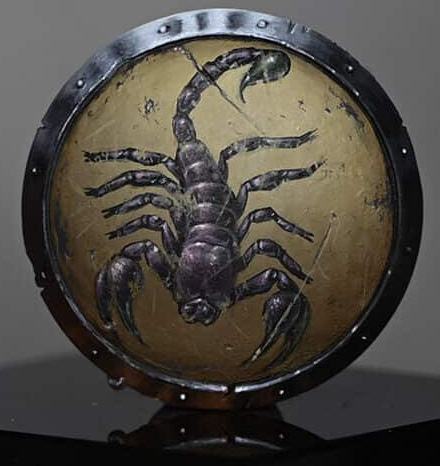
Video guides and step-by-steps on how to paint the Warcry Ogroid Myrmidon shield with this Scorpion Freehand.
Video: Scorpion Freehand First Steps
This first part of the tutorial covers the preparation and beginning stages of scorpion freehand painting on the Ogroid Myrmidon’s shield
Materials Needed:
- Primer: Black
- Base Colours: XV-88, Mournfang Brown, Zandri Dust, Morghast Bone (All Games Workshop)
- Detailing: Model Colour Black (Vallejo)
- Tools: Scalpel, fine-grit sandpaper, large and fine brushes, wet palette
Preparation:
- Preparing the Shield: Remove the model’s original shield detail using a scalpel and fine-grit sandpaper to create a smooth surface for freehand painting. This process ensures a flat canvas for your artwork.
- Priming: Prime the entire model, including the shield, in black to provide a uniform base coat. If desired, apply an underglow effect with Mephiston Red using an airbrush on the model’s underside for atmospheric lighting.
Painting the Shield’s Background:
- Base Layer: Start by applying XV-88 in multiple thin layers to achieve an opaque finish. Mix approximately one part water to one part paint, using a fairly large brush for broad strokes. Patience is key; allow each layer to dry thoroughly.
- Blending: While the XV-88 base is still workable, begin blending Mournfang Brown from the bottom of the shield upwards. This technique creates a gradient effect that adds depth to the shield’s background.
- Highlighting and Texture: Use Zandri Dust and Morghast Bone to introduce highlights, particularly focusing on the top of the shield where light naturally hits. This process also starts to introduce the worn, textured look desired for the shield.
- Brush Techniques: To achieve a smoother blend and avoid harsh brush marks, employ cross-hatching and other texturing techniques with your brush. This approach will help create a more natural transition between colours.
- Glazing for Smoothness: After the initial layering and texturing, apply glazes of the same colours (XV-88, Mournfang Brown, Zandri Dust, Morghast Bone) diluted with water (about six or seven parts water to one part paint). Glazing helps smooth out transitions and enrich the colour depth.
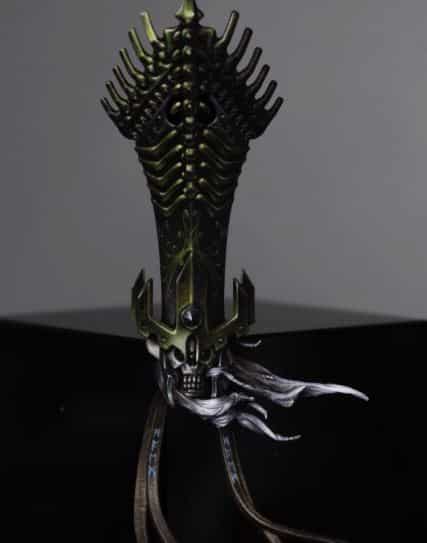
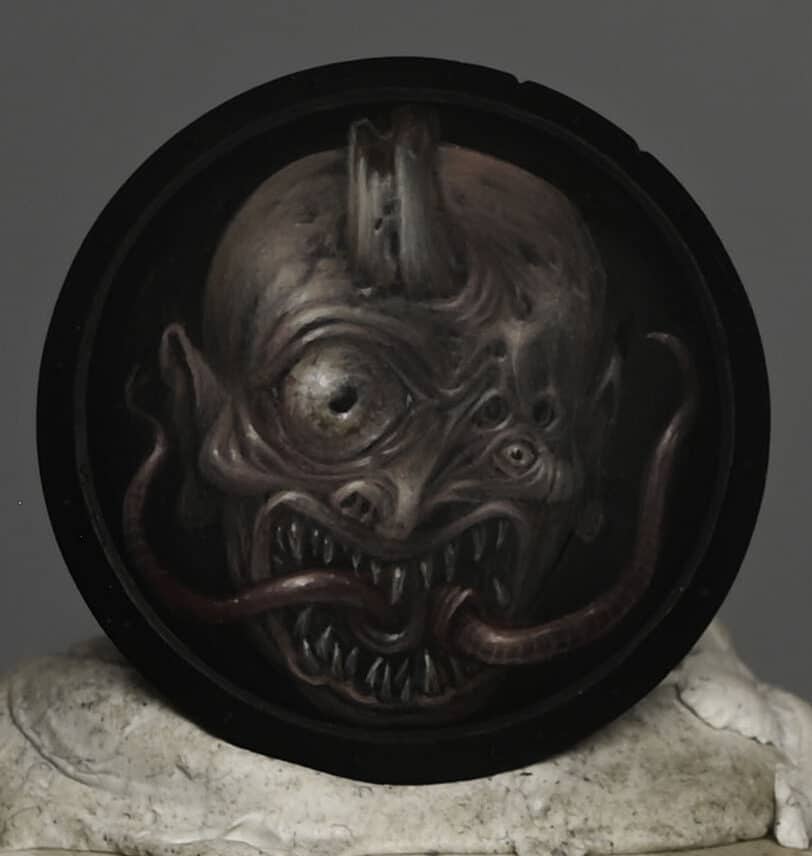
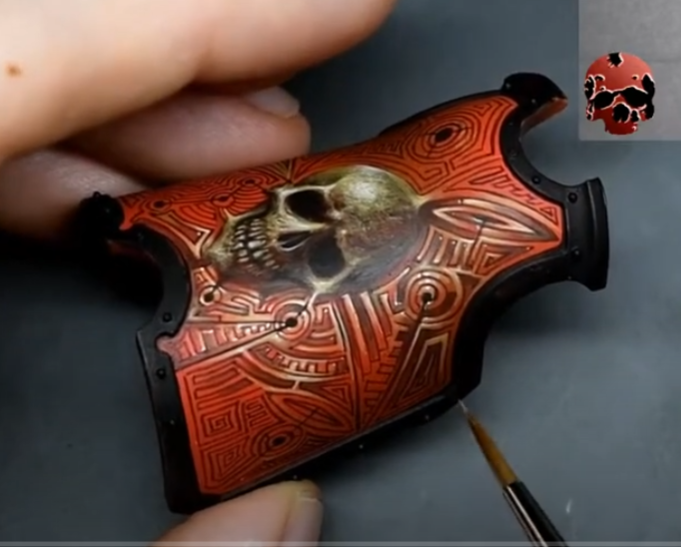
Starting the Scorpion Freehand:
- Design Placement: Before starting the scorpion freehand, consider the shield’s round shape and ensure your design aligns properly with the model’s orientation. Use the back of the shield as a reference to determine the top and bottom.
- Sketching the Design: With Model Colour Black, begin sketching your scorpion freehand design. For this tutorial, a scorpion motif is used. Start with basic shapes and outlines, keeping the lines thin and manageable. This stage is about laying down the design’s foundation, so precision is more important than coverage.
- Refining the Design: Gradually thicken and refine the outlines of your scorpion freehand design, paying close attention to symmetry and proportion. Adjust the thickness of the lines to create depth and interest.
- Correcting Mistakes: If you make any errors or wish to adjust the design, you can cover mistakes with the base colours (XV-88, Mournfang Brown, Zandri Dust, Morghast Bone). This step may require reapplying glazes to blend the corrections into the background.
Video: Scorpion Freehand Refinement and Details
Looking at rendering the freehand scorpion to achieve a three-dimensional appearance and then weathering the shield for a battle-worn look.
Additional Materials:
- A wet palette to keep paints hydrated and to mix custom colours.
- Fine grit sandpaper for smoothing the shield surface after modifications.
- A scalpel or hobby knife for removing details from the shield.
- Water container for rinsing brushes.
- Paper towels or a clean cloth for brush drying and paint removal.
- Mixing palette for creating custom colours and diluting paints for glazing.
- Hairdryer (optional) for speeding up the drying process between layers.
- Sponge (optional, not used but mentioned) for creating textured weathering effects.
What do These Techniques Mean?:
- Pointillism and Stippling: For creating textured effects on the scorpion’s carapace.
- Glazing: Thin layers of paint applied to subtly shift colours or blend transitions.
- Fine Detail Work: Using the very tip of a fine brush to outline and add intricate details to the scorpion.
- Weathering: Applying chips, scratches, and wear to both the scorpion and the shield’s surface to create a battle-worn look.
Paints:
Games Workshop (Citadel):
- Mournfang Brown
- XV-88
- Zandri Dust
- Morghast Bone
- Naggaroth Night
- Khorne Red
- Corax White (for mixing and creating lighter tones)
Vallejo:
- Neutral Grey
- Dark Grey
- Warm Grey
- Pale Grey Blue
- Model Colour Black (for outlining and fine details)
P3 (Privateer Press):
- Morrow White
- Iyanden Yellow (mentioned as a substitute for Iosen Green for brighter effect)
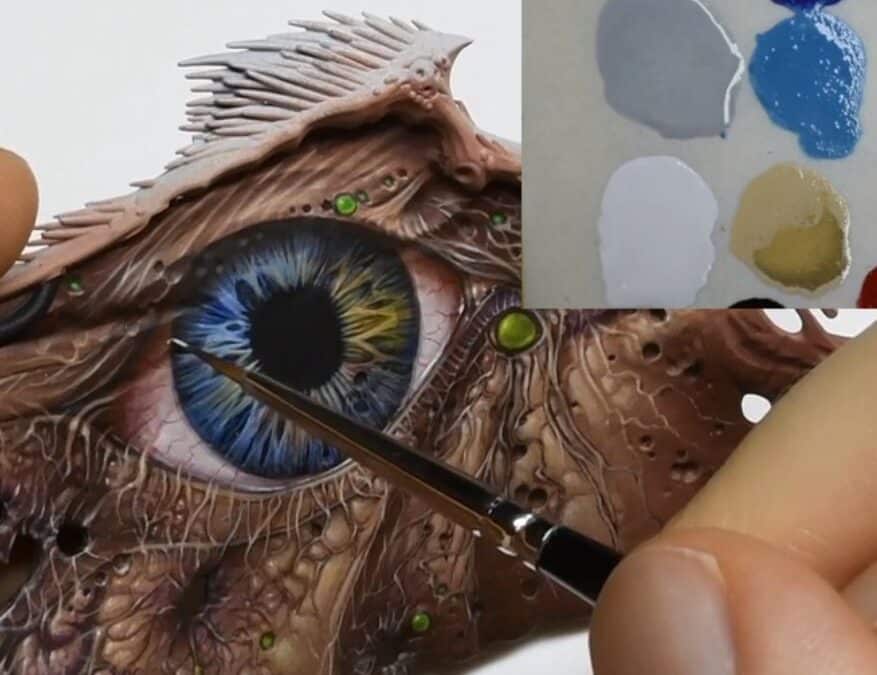
Rendering the Scorpion
- Base Layer: Begin with Neutral Grey for stippling and pointillism across the scorpion, creating texture and initial shadows. This technique simulates the scorpion’s shiny carapace.
- Changing Techniques: Partway through, you might find the style needs adjustment to better represent the scorpion on a smaller scale. While aiming for realism, ensure the final look is visually appealing on the model.
- Colour Palette Adjustment: Add Warm Grey and Pale Grey Blue to introduce subtle tonal variations, enhancing the scorpion’s three-dimensional appearance.
- Highlighting: Use Morrow White sparingly for the highest highlights, focusing on areas like the pincers, the body segments, and the stinger to emphasize their importance and shininess.
- Colour Glazing: Apply thin glazes of Naggaroth Night and Iyanden Yellow (substituted for Iosen Green for a brighter effect) to add colour depth without overpowering the grey tones. This step subtly alters the scorpion’s colour while maintaining its overall grey appearance.
Weathering the Shield
- Preparation: Use the base colours (Mournfang Brown, XV-88, Zandri Dust, Morghast Bone) to match the weathering effects to the shield’s underlying tones.
- Technique: Apply small, opaque marks with Dark Grey and Neutral Grey to simulate chips and wear, focusing on areas that would naturally receive more damage. Use a fine brush for precision.
- Detailing: Enhance the weathering with thin lines and stippling, simulating scratches and abrasions. This creates a realistic effect of battle damage across the shield, including over the scorpion design.
- Integration: To integrate the scorpion with the shield’s weathered look, apply thin glazes of Mournfang Brown over the entire design. This unifies the scorpion with the shield’s background, softening contrasts and blending the freehand work into the overall shield design.
- Colour Highlights: For areas requiring correction or emphasis, use the shield’s base colours, adjusted one shade lighter, to subtly highlight edges and details, ensuring the scorpion remains the focal point.
How to Paint an Ogroid from Games Workshop – Step-by-step guides:
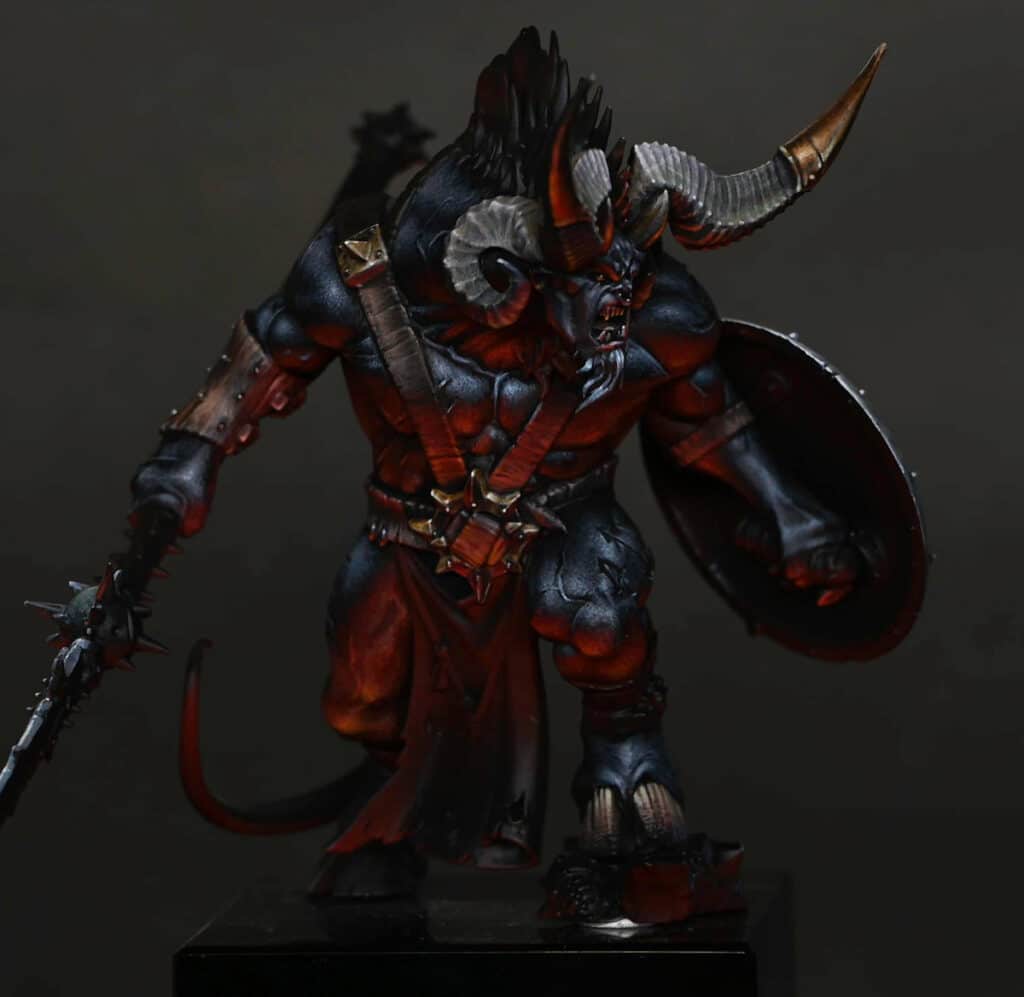
Ogroid Myrmidon
A selection of detailed videos including red OSL, NMM, fur effect, horns and freehand on his shield.
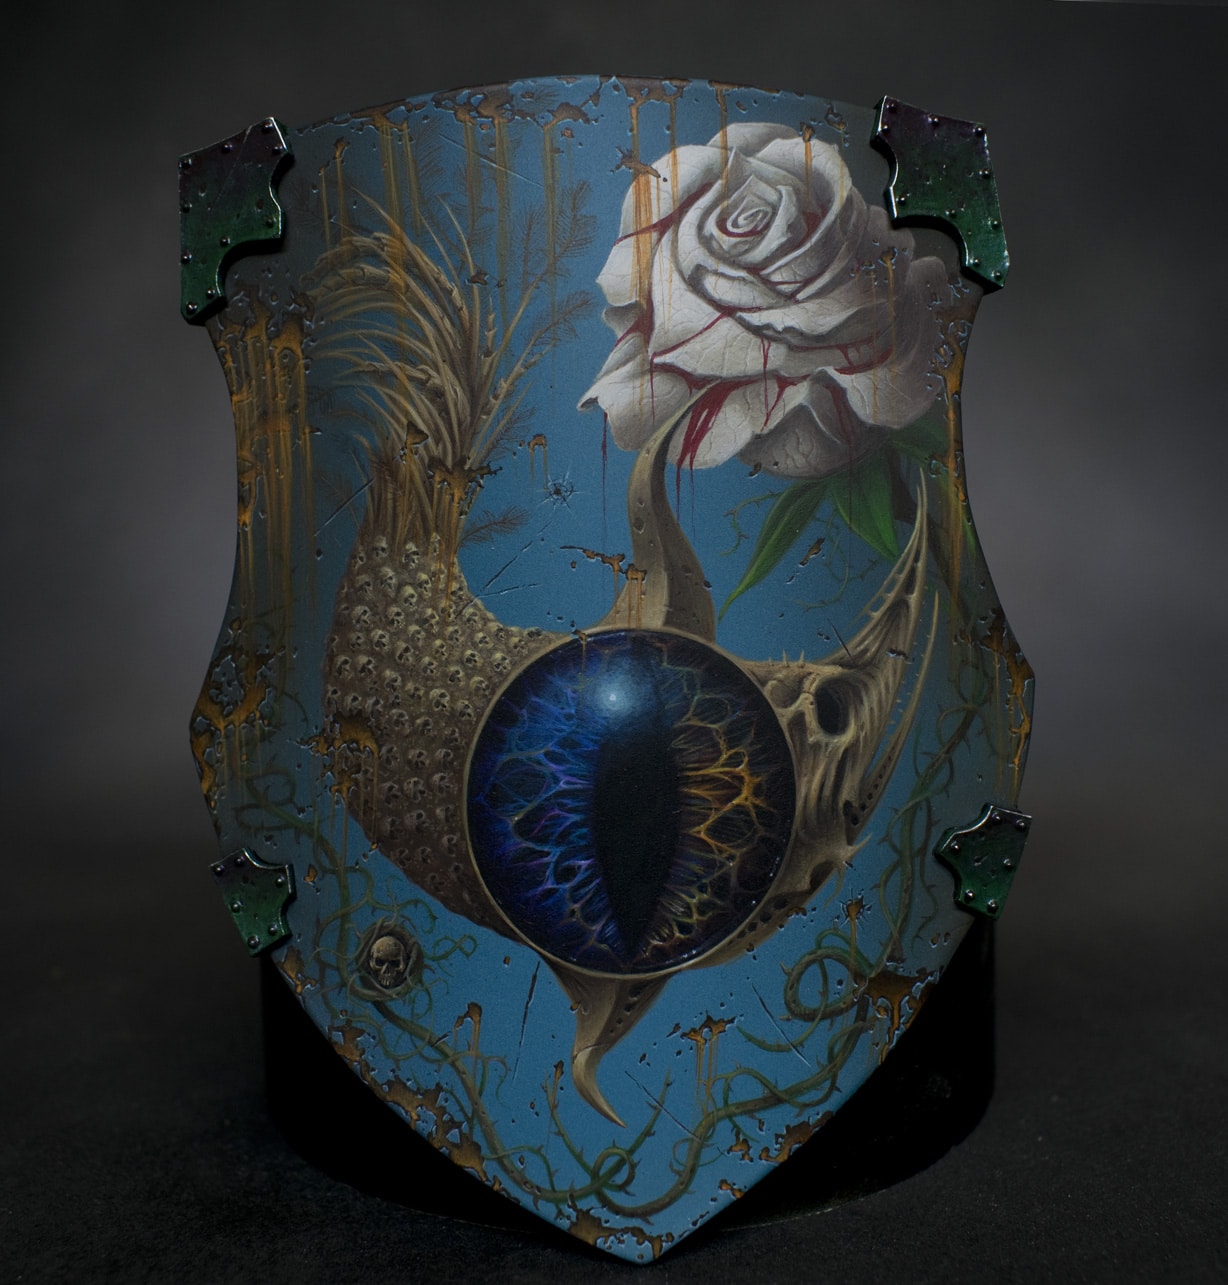
More Freehand Tutorials


If you don’t have an account, please sign up here! The website currently has over 350 video tutorials with steps and tips, plus a selection of PDFs. If you are not sure about joining, you can explore my free videos with a free membership, or take the plunge and become a full subscriber for full access.


If you’d prefer to support me on Patreon, please visit: https://www.patreon.com/RichardGray