


My detailed how to paint the Nagash helmet tutorials, with videos plus step by step guide and tips with full paints used.
Video – How to Paint the Nagash Helmet Part One
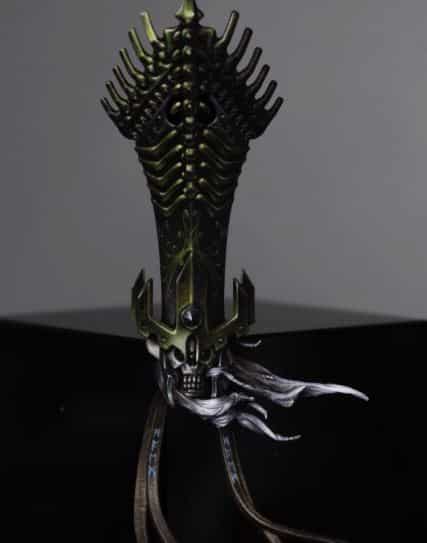
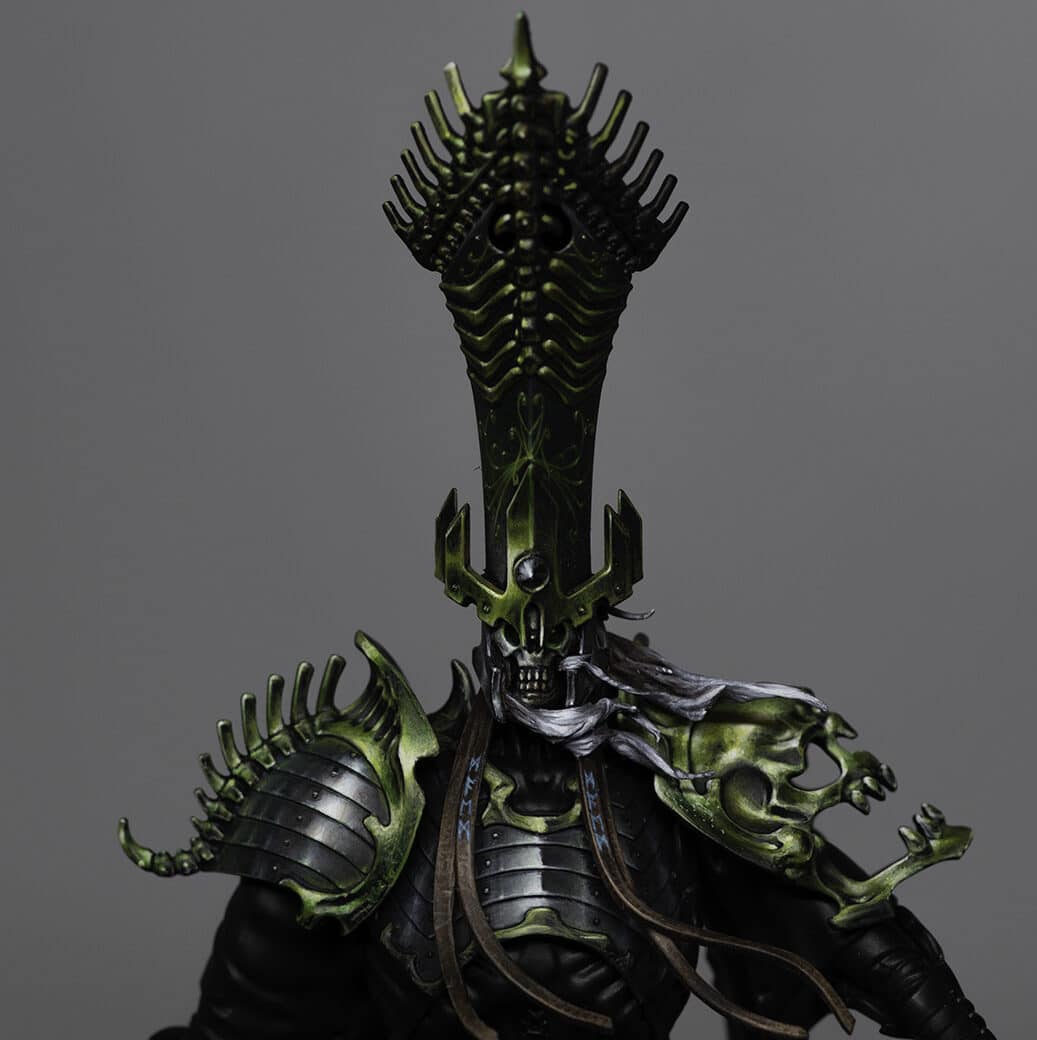
In this tutorial, we’ll focus on painting the metallic areas of Nagash, specifically the head. The colours used for this tutorial are a bit different from the standard, and in the video I discuss techniques in more detail to achieve a textured, refined finish.
Paints and Materials Used
Paints
- Vallejo:
- English Uniform (VX-88)
- Golden Olive (Elysian Green mixed with Yriel Yellow)
- Yellow Green (Dorn Yellow mixed with Moot Green)
- Ice Yellow (Dorn Yellow)
- Ivory (Screaming Skull)
- Games Workshop:
- Rhinox Hide
- Abaddon Black
- Naggaroth Night (for future use)
Brushes
- Fine detail brush (suitable for intricate work and small highlights)
- Medium-sized brush (for larger areas and base coating)
- Wet palette (to keep paints fresh and workable)
Other Materials
- Wet palette
- Green stuff (for sculpting additional details, if desired)
- Painting lamp (for consistent lighting during the painting process)
- Miniature holder (for ease of handling and painting)
Steps and Tips on How to Paint the Nagash Helmet
Prepare the Model: Ensure your miniature is assembled and primed appropriately for painting. I’ve used a black primer for my Nagash.
Block in the Base Colour: Start by blocking in the main highlights using Vallejo’s English Uniform (VX-88). Apply this colour where you want the primary light source to hit, focusing on a top-left orientation.
Be mindful not to make the colour too opaque; a slight texture is desirable for the metallic effect.
Understanding Colour Choices: The choice of metallic colours doesn’t have to be conventional. For this model, I went for a dark and moody theme inspired by the artwork of Nagash.
My chosen metallic shades include Golden Olive, Yellow Green, and Ice Yellow from Vallejo, along with Rhinox Hide and Abaddon Black from Games Workshop.
Building Layers of Colour: Use Golden Olive to build layers on top of the English Uniform, focusing on areas that require additional depth and shading.
The opacity of Vallejo paints allows for strong, defined marks, ideal for creating small details and textures.
Creating Texture and Depth: With each layer, gradually introduce lighter shades such as Yellow Green and Ice Yellow to enhance highlights and add dimension to the metallic surfaces.
Keep in mind the direction of light and focus on maintaining a balance between light and shadow.
Understanding Volume and Light: Highlighting metallic surfaces requires understanding how light interacts with volume. Unlike standard blending techniques, aim for distinct contrasts between light and shadow. Make sure you consider how light reflects off different surfaces, creating highlights and shadows of varying intensities. I like to use lots of real-life references of metal to study as I paint.
Achieving a Moody Atmosphere: For an undead character like Nagash, aim for a dark, desaturated overall appearance. Use strong, small highlights strategically to draw attention to focal points.
Avoid smooth blending; purposefully textured painting adds depth and character to the model.
Experimenting with Glazing Techniques
Experiment with glazing techniques to blend colours seamlessly and soften transitions between different areas of the model.
Glazing allows for subtle colour adjustments and can help unify the overall color scheme, creating a harmonious visual effect.
Video – How to Paint the Nagash Helmet Part Two
In this part, we’ll focus on painting the skull face, hair, and bone structures atop the hat.
Paints
Vallejo Model Colour: English Uniform (VX-88), Golden Olive (Elysian Green mixed with Yriel Yellow), Yellow Green (Dorn Yellow mixed with Moot Green), Ice Yellow (Dorn Yellow), Ivory (Screaming Skull), Neutral Grey (Mechanicus Standard Grey), Pale Grey Blue (Grey Seer mixed with Blue Horror)
Games Workshop: Rhinox Hide, Warpstone Green Contrast, Deathclaw Brown
P3: Morrow White
Steps and Tips on How to Paint the Nagash Helmet (Part Two)
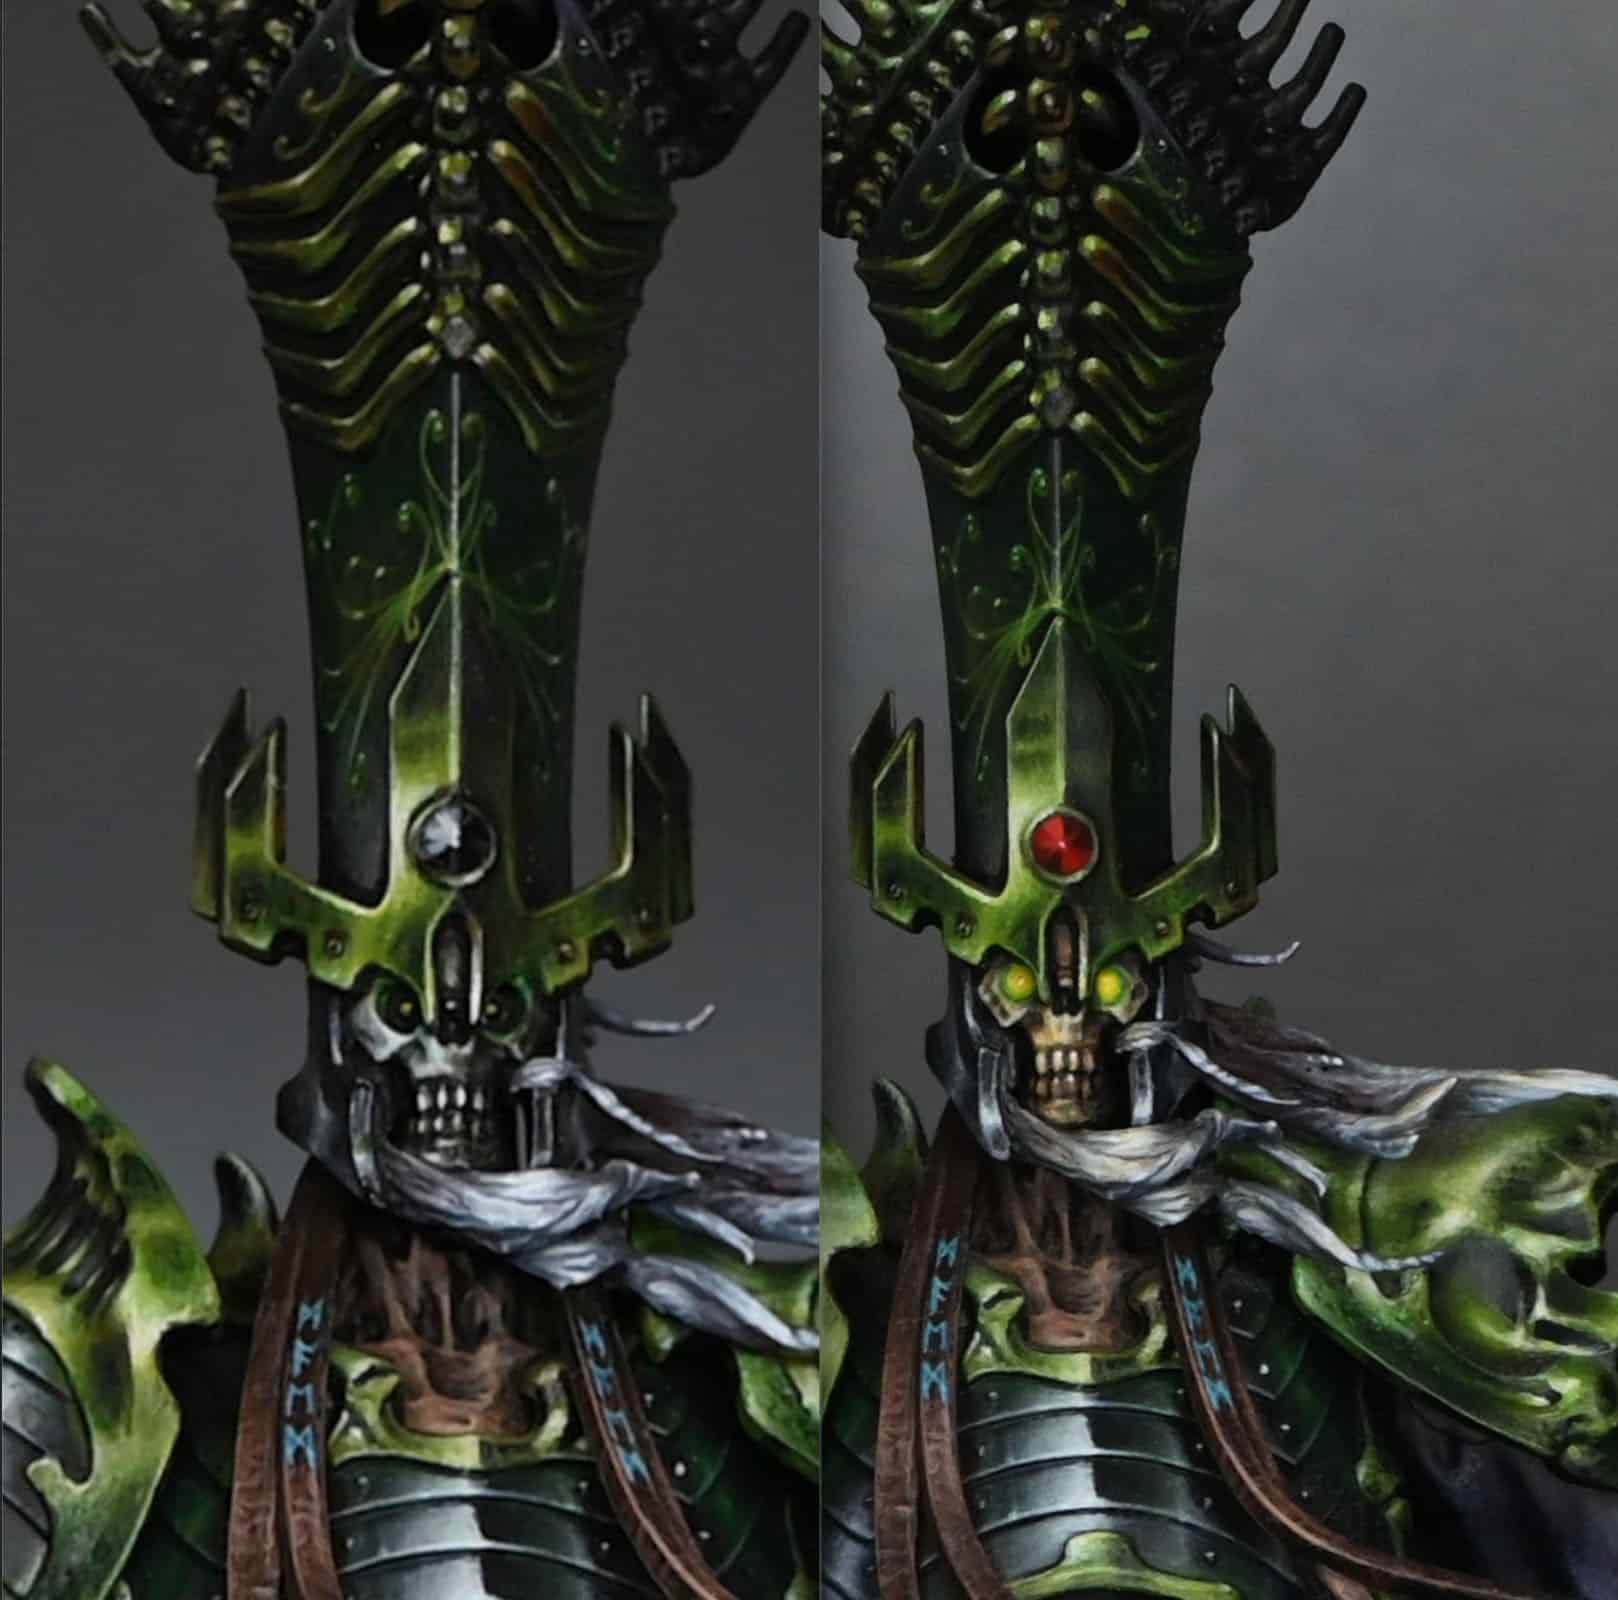
Paint the Bone Structures: Using Vallejo’s English Uniform (VX-88), begin by painting the bone structures on top of the hat. Focus on picking out the highlights, keeping in mind the top-left orientation of the light source. Apply the paint carefully to emphasize the edges and contours of the bones.
Enhance the Bone Texture: Utilise Golden Olive (a mix of Elysian Green and Yriel Yellow) to add depth and shading to the bone structures. Concentrate on areas that require additional definition, such as the joints and sockets. Remember to maintain a balance between light and shadow to create a realistic, textured effect.
Add Highlights: With Yellow Green (a mix of Dorn Yellow and Moot Green), further highlight the bone structures, focusing on the areas where light would naturally hit. Pay attention to the left-hand side of the model to create a stronger contrast and emphasise the lighting direction.
Refine the Highlights: Using Ice Yellow (Dorn Yellow), continue to build up the highlights on the bone structures, especially on the left-hand side. Gradually increase the brightness of the highlights towards the center of the model to draw attention to focal points.
Adjusting with Rhinox Hide: If necessary, use Rhinox Hide to refine any areas where you’ve made mistakes or to add depth to the shadows. The translucency of this paint allows for easy blending and adjustment while maintaining a natural look.
Painting the Skull Face: For the skull face, start with Deathclaw Brown, focusing on creating a weathered, textured appearance. Apply the paint in a rough, uneven manner to mimic the natural wear and tear of ancient bones.
Highlighting the Skull: Gradually add highlights to the skull using Morghast Bone. Concentrate the highlights towards the left-hand side of the face to maintain consistency with the overall lighting scheme. Ensure the highlights stand out against the darker base colour to create depth and dimension.
Adding Detail to the Eyes: Use a small amount of Morghast Bone to pick out the details around the eyes, emphasising the cheekbones and brow ridge. Be mindful of the sculpted eye sockets and adjust the highlights accordingly to enhance the overall appearance.
Painting the Hair: Begin painting the hair with Neutral Grey, focusing on the large, clumpy strands. Keep the highlights towards the top side of the hair to simulate light hitting the surface. Apply the paint in a rough, textured manner to achieve a realistic look.
Adding Texture to the Hair: Continue to build up the texture of the hair using Pale Grey Blue. Emphasize the highlights on the top side of the hair while leaving the underside darker to create depth and volume.
Refining the Highlights: Using Morrow White sparingly, refine the highlights on the hair strands to add contrast and dimension. Focus on the areas closest to the face to draw attention to the focal points.
Video – How to Paint the Nagash Freehand Swirls/Filigree
Paints
Vallejo: English Uniform (VX-88), Golden Olive (Elysian Green mixed with Yriel Yellow), Yellow Green (Dorn Yellow mixed with Moot Green), Ivory (Screaming Skull), Neutral Grey (Mechanicus Standard Grey), Pale Grey Blue (Grey Seer mixed with Blue Horror)
Games Workshop: Warpstone Green Contrast, Abaddon Black
P3: Morrow White
Tips for the Freehand Filigree
Base Coat: Apply a base coat of Vallejo English Uniform (VX-88) to start the filigree on the Nagash hat. Ensure even coverage and allow it to dry completely.
Highlighting with Yellow-Green: Mix Vallejo Yellow Green (Dorn Yellow mixed with Moot Green) with a small amount of white to increase opacity. Use a fine tip brush to apply highlights to what would be the raised areas of the filigree. Focus on creating sharp lines and highlights to enhance the detail.
Adding Ivory Highlight Dots: Using Vallejo Ivory (Screaming Skull), create small highlight dots on the filigree. These dots should be strategically placed on curves and extreme curve points to simulate shine and reflectivity. Ensure consistency in placement for a cohesive look.
Enhancing Contrast with Black: With Games Workshop Abaddon Black, carefully outline the filigree details to enhance contrast and definition. Use a fine tip brush and steady hand to create clean lines and borders.
Glazing with Warpstone Green Contrast: Thin Games Workshop Warpstone Green Contrast with water (about two parts water to one part paint) to create a glaze. Apply the glaze over the filigree to enhance shading and highlights.
Final Touches: Use P3 Morrow White to add final highlights to the filigree, focusing on the most raised and reflective areas. Ensure consistency and restraint with the white highlights to avoid overpowering the overall effect.
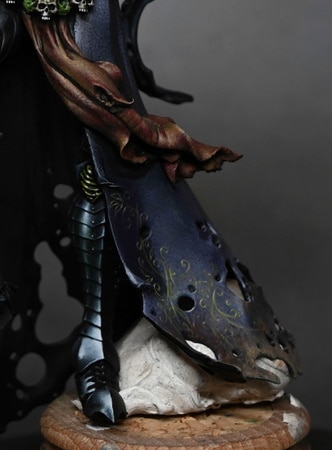
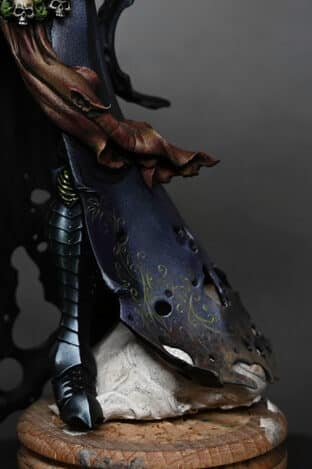
Video – How to Paint the Nagash Helmet Leather Strips and Runes
By following these steps and techniques, you can effectively paint leather strips and runes on your Nagash (or any other model, really!) adding depth, texture, and character.
Paints
Games Workshop: Rhinox Hide, Mournfang Brown, Cadian Fleshtone, Temple Guard Blue, Barroth Blue.
Step and Tips on How to Paint the Nagash Helmet Leather Strips and Runes
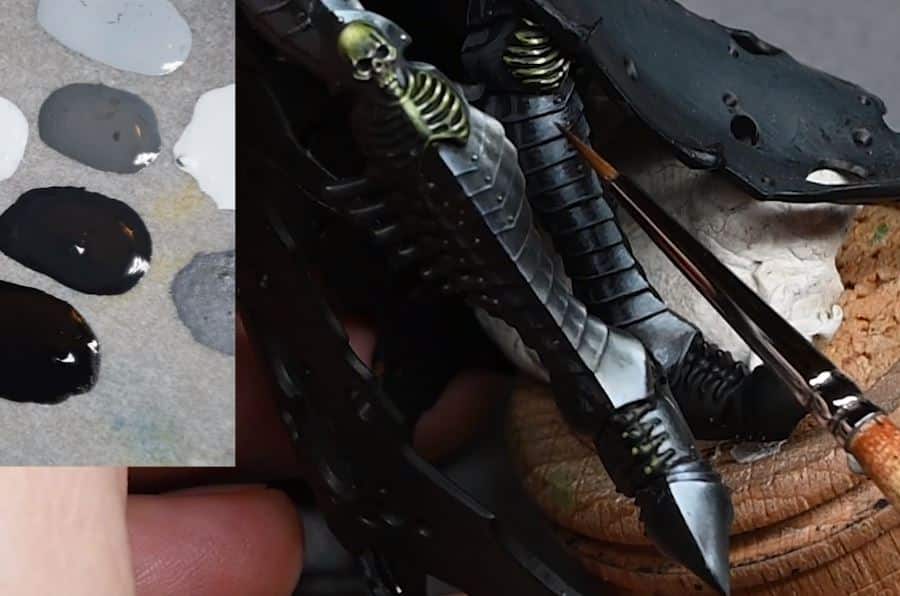
Base Coat: Ensure that the leather strips on the Nagash helmet are properly primed with black primer. Once primed, apply a base coat of Games Workshop Mournfang Brown to the leather strips. This will serve as the foundation for the leather texture.
Highlighting with Mournfang Brown: Using Games Workshop Mournfang Brown, begin highlighting the curves and raised areas of the leather strips. Apply the paint in a textured manner, focusing on creating depth and dimension to simulate the appearance of weathered leather. Don’t worry about perfect blending; imperfections add to the realism.
Layering with Cadian Fleshtone: Next, switch to Games Workshop Cadian Fleshtone and continue highlighting the leather strips. Apply this paint more sparingly, focusing on the most raised areas and curves to enhance the texture. The tonal contrast between Mournfang Brown and Cadian Fleshtone will create depth and visual interest.
Glazing with Rhinox Hide: Thin Games Workshop Rhinox Hide with water to create a glaze. Apply the glaze over the highlighted areas to tone down the highlights and add depth to the leather texture. Focus on applying the glaze in the shadowed areas and along the edges of the leather strips for a realistic look.
Painting Runes: Using Games Workshop Temple Guard Blue and Barroth Blue, paint the runes onto the leather strips. Ensure that the runes are clearly visible and neatly painted. Use a fine tip brush and steady hand to create clean lines and shapes. Less is more; avoid overcrowding the leather strips with too many runes to maintain balance.
Touching Up: Review the painted leather strips and runes, making any necessary touch-ups or adjustments. Ensure consistency in highlighting placement and rune design throughout the miniature model.
For all of my Nagash Tutorials in one place, go here

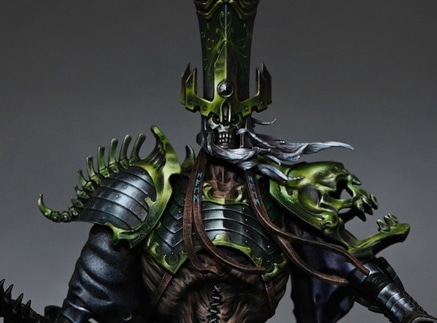
Nagash, Supreme Lord of the Undead
Nagash, Supreme Lord of the Undead is the father of necromancy. I created a series of detailed tutorials on how I painted him.
Explore More Nagash Technique Tutorials
If you don’t have an account here on my website, please sign up here! I have over 350 video tutorials with steps and tips, plus a selection of PDFs. If you are not sure about joining, you can explore my free videos with a free membership, or take the plunge and become a full subscriber for full access.


If you’d prefer to support me on Patreon, please visit: https://www.patreon.com/RichardGray