


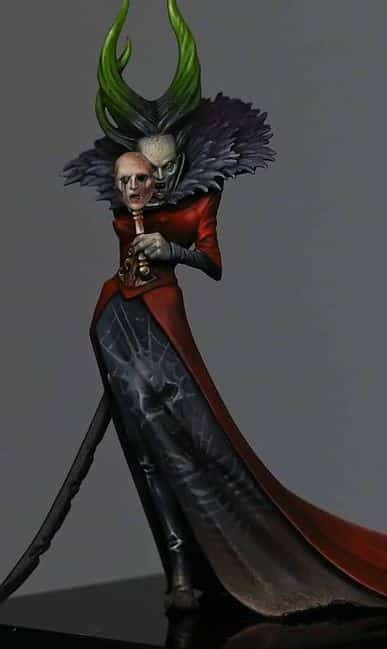
In one of my previous videos I did a pattern on the dress for Lady Annika, The Thirsting Blade, but decided I wanted to change it to something a little bit creepier. Here is how to paint the Lady Annika Freehand Skull that replaced it! It includes tips on folds and how I did the weathering at the bottom of the cloth. Plus, I’ve also been working on her boots!
Scroll to watch these tutorials with complete paints and materials used, and step-by-step tip
Video: How to Paint the Lady Annika Freehand Skull
Materials Needed
- Primer: Black (if you started with a black primer base).
- Base Paints: Vallejo Black, German Grey, Neutral Grey, Dark Sea Grey.
- Highlight Paints: 50/50 mix of Neutral Grey and Dark Sea Grey.
- Weathering Paints: Vallejo Heavy Grey (appears green), Games Workshop Rhinox Hide, Cadian Fleshtone, Monfang Brown.
- Fine Detail Brushes
- Wet Palette
- Reference Image: A realistic skull from a science book (or the Internet!) for accuracy.
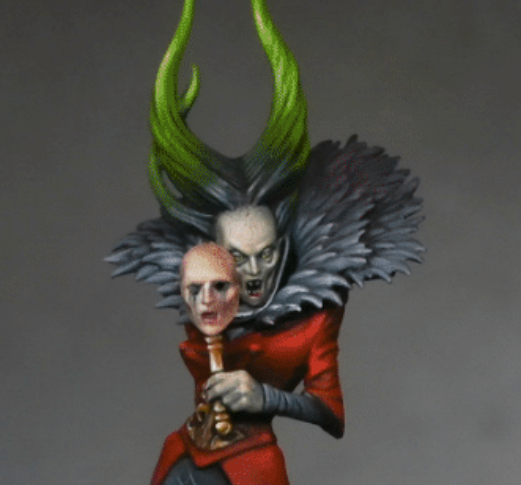
Design Sketching: Sketch the skull design lightly on the skirt. Consider the folds and curves of the fabric; your design must follow these contours to look natural. The skull should be positioned considering the fabric’s folds, especially around tricky areas like deep creases or hard lines.
Base Painting: Using Vallejo Black as your darkest shade, begin blocking in the skull and its surroundings. Gradually build up the mid-tones using German Grey and Neutral Grey. For highlights, use a 50/50 mix of Neutral Grey and Dark Sea Grey. Keep the contrast lower than other elements (like the boots) to ensure the skirt’s design doesn’t overpower the miniature’s other focal points.
Adding Details: Focus on defining the skull’s features, adjusting for the fabric’s folds. Use your mixed greys to paint in the finer details, such as the teeth and eye sockets, considering the underlying fabric’s shape and the skull’s anatomy. For the headdress, spikes, and cobweb details, apply the same grey tones, ensuring they blend seamlessly into the skull.
Final Highlights and Shadows: Revisit the highlights and shadows, emphasizing the skull’s curvature and the fabric’s texture. Use the lighter greys to enhance the design’s three-dimensionality, paying special attention to areas that catch the light or recede into shadow.
Weathering: Start with Rhinox Hide, diluted significantly with water. Apply it to the lower third of the skirt, building up layers until you achieve a subtle, brown tint. Follow with Monfang Brown for a richer tone, focusing more intensely at the very bottom. This creates a gradient effect, simulating dirt accumulation.
Final Touches: Use a mix of the weathering colours to add texture and depth to the weathered area, mimicking the appearance of mud or dust caught in the fabric’s texture. This step enhances the realism of your miniature, grounding it in its environment.
Review and Adjust : Examine your work closely, making any necessary adjustments to the weathering to ensure a natural transition from the painted design to the simulated dirt. If needed, glaze over parts of the skull or weathering with thinned paint to adjust the contrast or saturation.
Video: How to Paint Lady Annikas Boots
Painting shiny leather boots requires patience and attention to detail. By carefully building up highlights, adjusting them as needed, and using techniques like stippling and glazing, you can achieve a realistic leather effect that stands out. The key to success is experimenting with light and shadow to create depth and texture that mimics real leather.
Materials Needed to Paint Lady Annikas Boots:
- Vallejo Paints: Black, Neutral Grey
- P3 Paint: Morrow White (or any white paint)
- Wet palette
- Fine detail brushes (sizes 0 and 00 recommended)
- Kitchen roll or paper towel
- Lamp for highlighting guidance
Preparation and Painting Process:
Prepare Your Palette: On your wet palette, mix a variety of greys using Black from Vallejo, Neutral Grey from Vallejo, and P3 Morrow White. The goal is to create a spectrum of grey shades. You can adjust the quantities to get lighter or darker shades as needed.
Base Coating: Start with a base coat of Neutral Grey on the boots. You can adjust the shade by mixing in either more black or white to darken or lighten the grey, respectively. This base coat serves as the foundation for building up highlights and shadows.
Highlight Mapping: Using a slightly lighter grey, begin mapping out where the highlights on the boots will be. Don’t worry about being too precise; the goal is to identify where light naturally hits the boots. Use a lamp to observe how light interacts with the surface and mimic this on the model. Remember, we aim for a shiny leather look, so some highlights will be exaggerated.
Adjusting Highlights: If you over-highlight, it’s fine. You’ll refine these highlights later in the process. The key is to create contrast and depth, making the boots appear shiny. Lady Annika’s slender design means space is limited, so choose your highlight areas wisely, focusing on making them visible from the primary viewing angle.
Glazing and Fine Tuning: Once you’re satisfied with the highlight placement, it’s time to blend and smooth out the transitions. This is where the stippling technique comes into play. Dilute your paint with water (around a 50:50 ratio, but adjust as necessary for a finer stipple) and gently apply to the edges of highlights to create a gradual transition.
Glaze over the boots with a thin layer of black to enrich the colour and add depth. This will also help to knock back any over-highlighted areas, ensuring they blend seamlessly into the overall finish.
Reflective Highlights: For added realism, incorporate some reflective highlights. These should be small and placed strategically to mimic how light reflects off a shiny surface. Use the brightest grey or even white for these highlights but apply them sparingly.
Final Adjustments: Review the model under different angles and lighting conditions. You might need to go back and adjust some highlights or shadows to ensure the boots look good from all perspectives. The goal is for the boots to have a high contrast, shiny appearance, indicative of leather.
Finishing Touches: As a final step, use glazing to unify all the elements. A thin glaze of black can help to tie together the highlights and shadows, making the transition between them smoother and more natural. This step also adds a satin finish to the boots, enhancing the leather effect.
For all the videos on how I painted Lady Annika, the Thirsting Blade, in one place, follow this link!:
Lady Annika, The Thirsting Blade
Golden Demon Entry – Lady Annika’s thirst for blood is legendary, even amongst the Soulblight vampires! I really enjoyed painting her and made a few tweaks to the model.
If you don’t have an account, please sign up here! The website currently has over 350 video tutorials with steps and tips, plus a selection of PDFs. If you are not sure about joining, you can explore my free videos with a free membership, or take the plunge and become a full subscriber for full access.


If you’d prefer to support me on Patreon, please visit: https://www.patreon.com/RichardGray