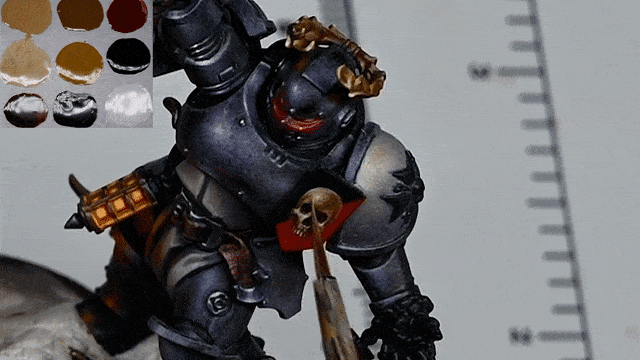
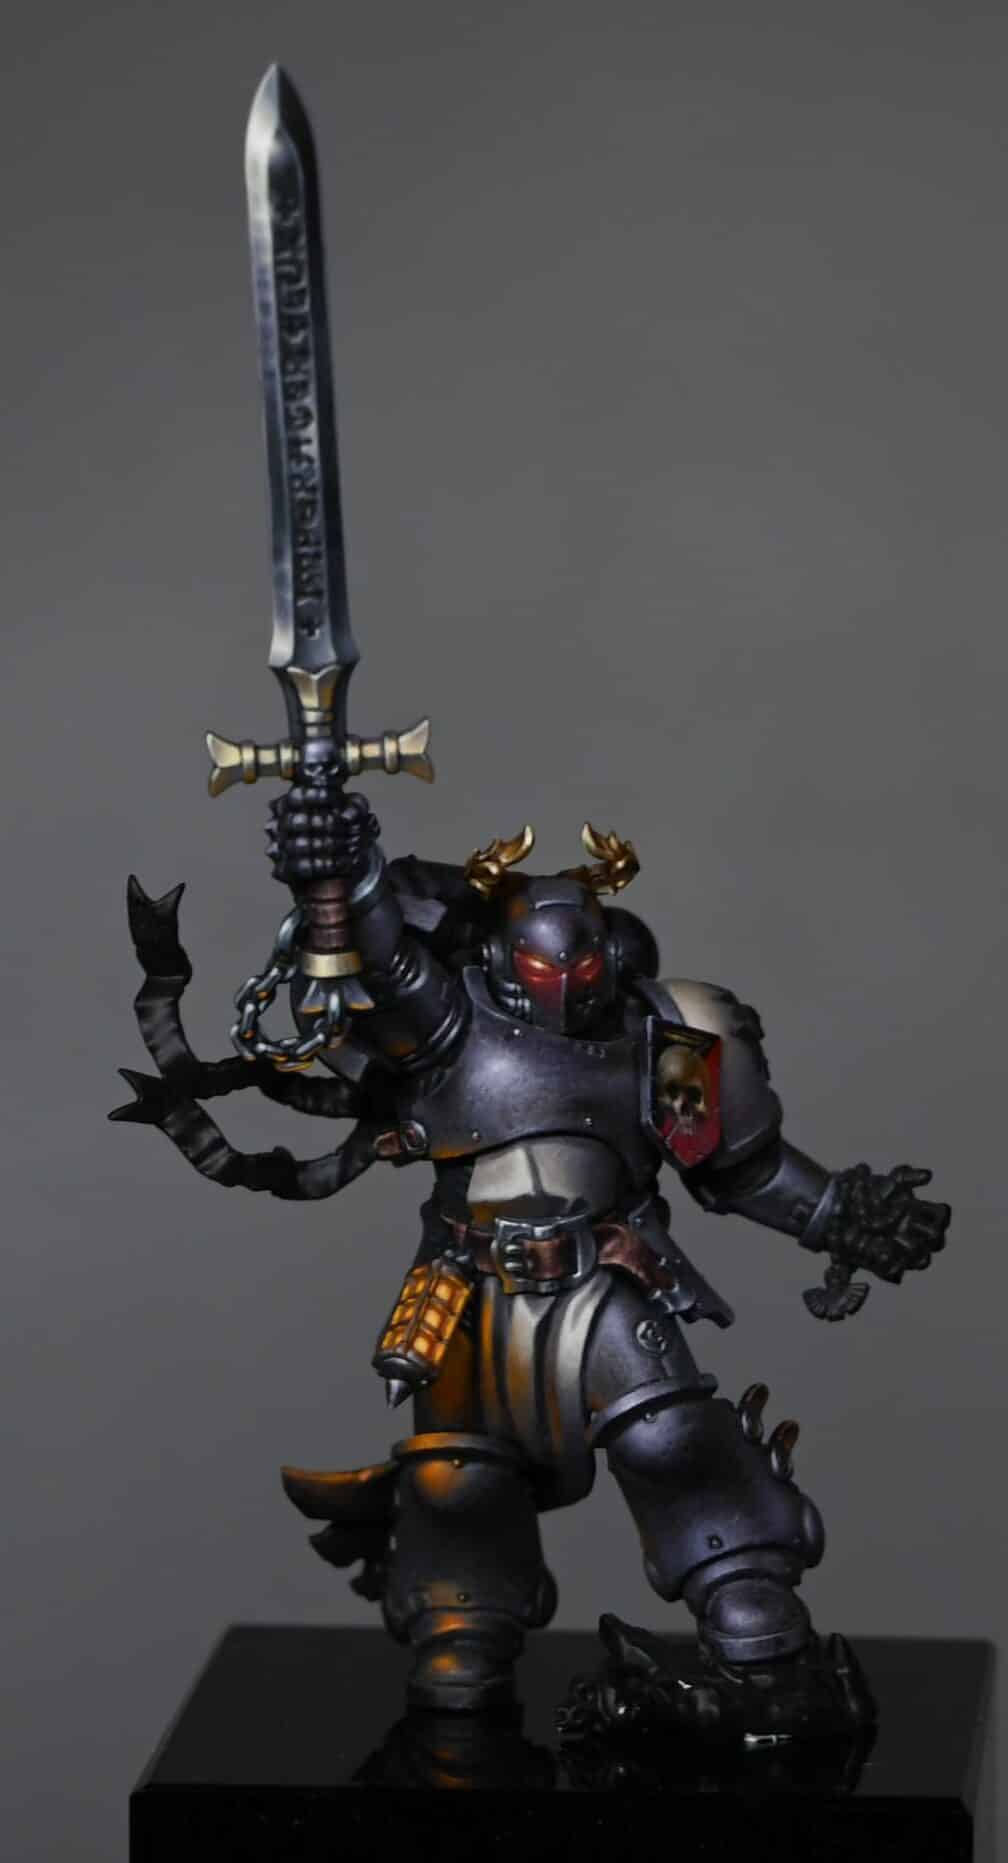
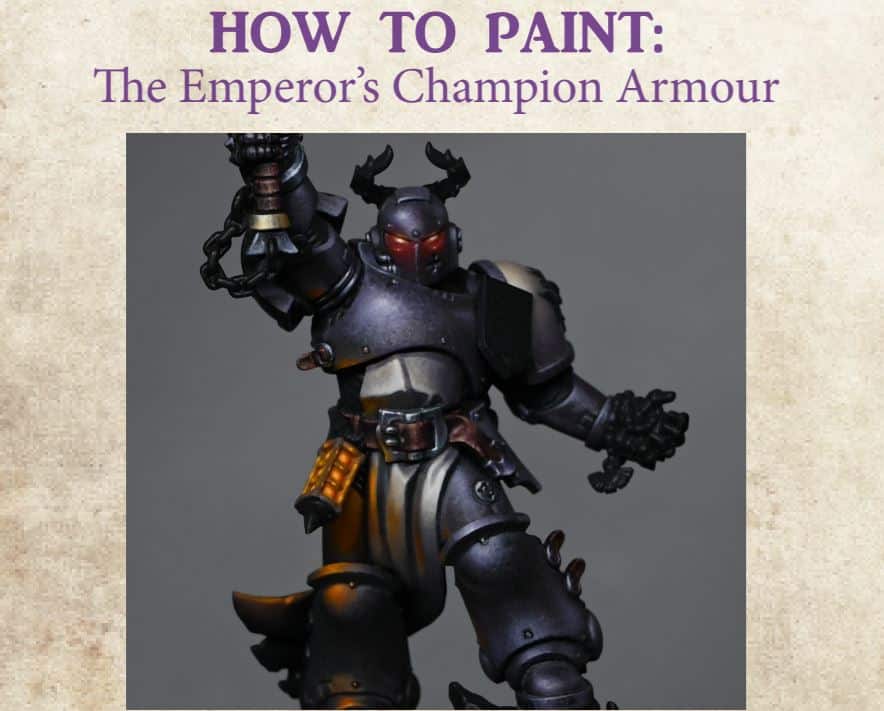
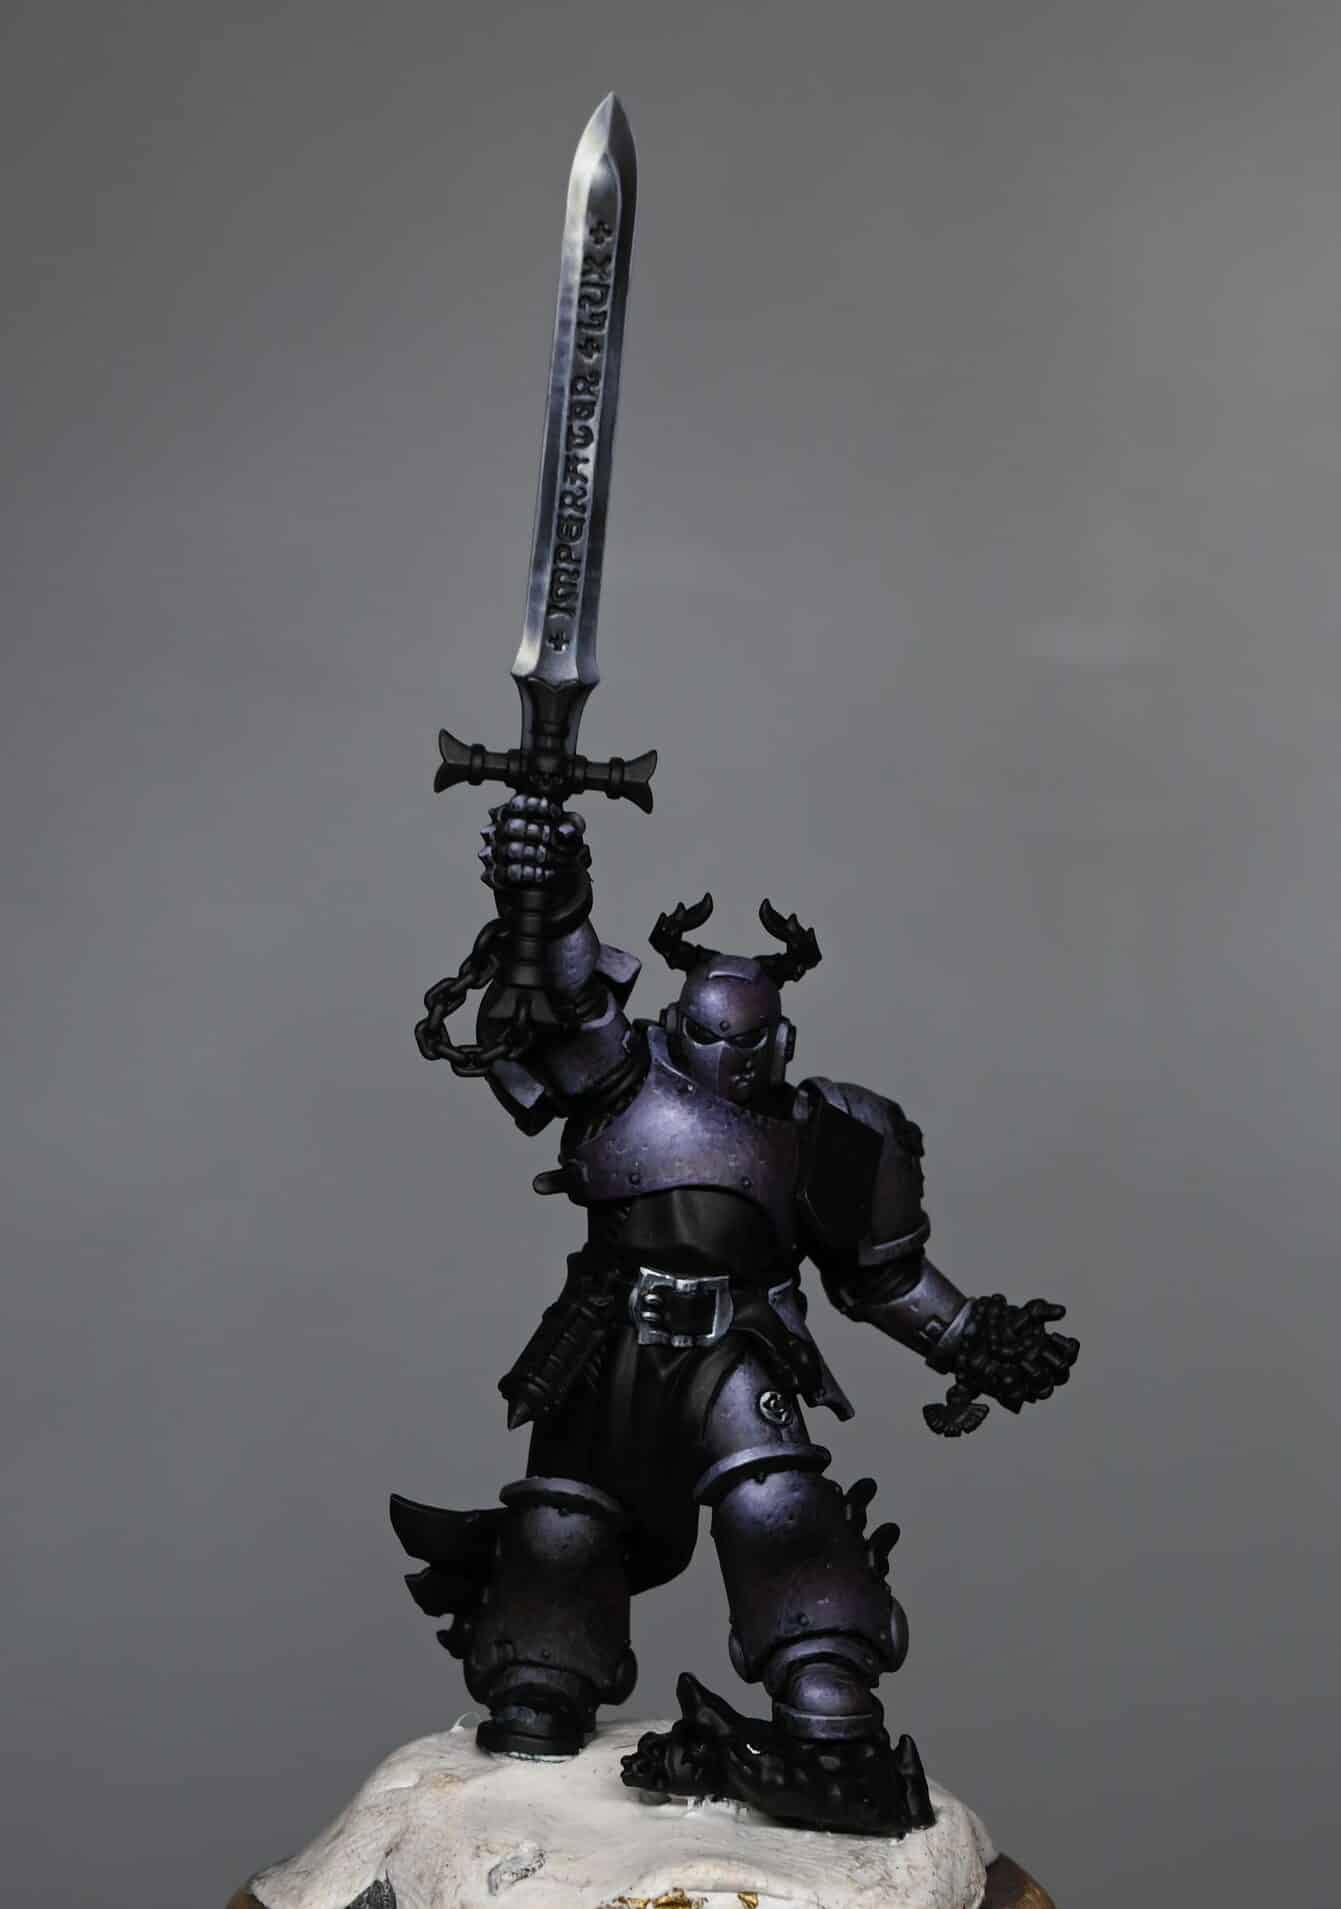
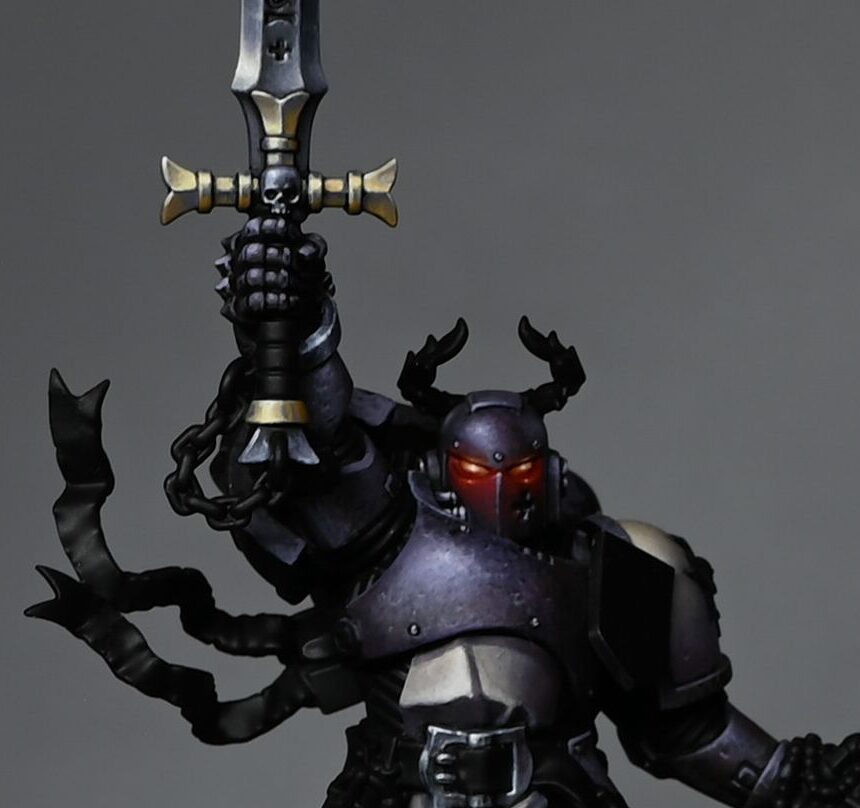
A selection of tutorial videos with step by step text guides and full paints, following my Emperor’s Champion! Videos include his black armour, NMM sword and gold hilt, cloth, leather belt and OSL eyes and lamp! Read on to explore them in order of painting, or use the below contents to quickly jump to a step, part or technique.
Video Tutorial : How to Paint the Emperor’s Champion Black ArmourMaterials NeededStep-by-Step GuideVideo Tutorial : Sword NMM (Non-Metallic Metal)Materials NeededStep-by-Step GuideVideo Tutorial : Bright Gold Sword Hilt NMMMaterials NeededStep-by-Step GuideVideo Tutorial : OSL Glowing Red EyesMaterials NeededStep-by-Step GuideVideo Tutorial : Cloth TabardMaterials NeededStep-by-Step GuideVideo Tutorial : OSL Lamp GlowMaterials NeededStep-by-Step GuideVideo Tutorial : Leather BeltMaterials NeededStep-by-Step GuideVideo Tutorial : Helmet and NMM Golden WreathMaterials NeededStep-by-Step GuideVideo Tutorial : Non Metallic Metal Chains with OSL ReflectionsMaterials NeededStep-by-Step Guide Base Coating with Neutral GreyVideo Tutorial : Tiny Freehand SkullMaterials NeededStep-by-Step GuideExplore more step-by-step Character Tutorials!
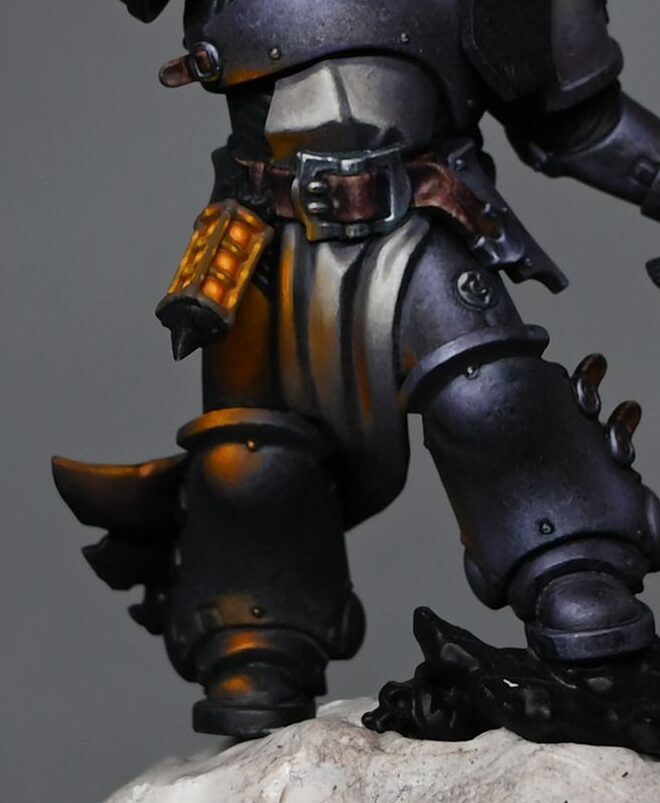
Video Tutorial : How to Paint the Emperor’s Champion Black Armour
All videos are recorded in HD 1080p or higher – use full screen for the full effect and let the video load completely. You can also click the little “cog” and change the speed of the video, if I am going too fast (or slow!).
Materials Needed
Games Workshop: Daemonette Hide, Xereus Purple, Rhinox Hide, Corvus Black
Vallejo: Model Colour Black (or any black paint)
P3: Morrow White (or any white paint)
Ultimate Primer by Badger (or equivalent)
A wet palette
Brushes including a large brush for glazing
Step-by-Step Guide
Base Coat:
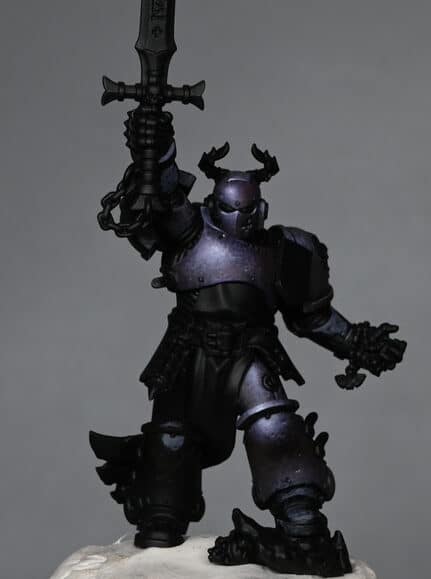
Prime the Emperors Champion black. Note: The head and backpack are temporarily attached for easy removal during painting.
Prepare your wet palette with Daemonette Hide, a mix of Daemonette Hide and white, a further lightened mix, Rhinox Hide, Vallejo Black, and P3 Morrow White.
Layering and Highlighting:
Start with Daemonette Hide. Use scratchy, loose brushwork to create a worn look.
Gradually layer using the mixed shades on the wet palette. Aim for translucency with each layer, creating depth and a battered appearance.
Focus on areas where light naturally hits, like the chest and the forward-facing leg.
Add white highlights sparingly for focal points like the head and chest.
Glazing for Depth and Tone:
Mix glazes of Corvus Black, Rhinox Hide, and Xereus Purple using a ratio of approximately 5-6 parts water to 1 part paint.
Apply the glazes, starting from mid-tones to shadows, to blend and soften the texture. Primarily use Xereus Purple, but incorporate Rhinox Hide and Corvus Black to vary the tones and reduce the purple dominance.
Avoid covering the brightest highlights with glaze to maintain contrast.
Refining Details:
For added depth, highlight the lower edges of darker marks with a mix of Daemonette Hide and a small amount of white. This creates the illusion of dents and wear on the armour.
Continuously evaluate the balance between light and shadow, adjusting with glazes and highlights as needed.
Finishing Touches:
Assemble the head and backpack onto the Emperor’s Champion and make any final adjustments to ensure the light placement and tones are cohesive.
Remember to keep the armour’s texture visible through the glazes for a realistic, worn effect.
Additional Notes:
The key to this technique is creating a translucent layering effect, building up the appearance of worn, battered armour.
This approach offers flexibility and forgiveness in brush strokes, making it suitable for varying skill levels.
Video Tutorial : Sword NMM (Non-Metallic Metal)
Materials Needed
Games Workshop: Daemonette Hide
Vallejo: Model Colour Black, Ice Yellow
P3: Morrow White (or any white paint)
Step-by-Step Guide
Base and Colour Prep:
Prime the sword black. Optionally, add a layer of black paint over the primer for consistency.
Prepare a wet palette with the following colours: Daemonette Hide, Vallejo Black, a mix of Daemonette Hide and Black with varying ratios for transitions, Ice Yellow, and P3 Morrow White.
Initial Layering:
Start with a mixture closer to a 50/50 blend of Daemonette Hide and Black.
For areas needing darker transitions, use the mix with more Black. This gives you control over the intensity of the shades.
Highlight Placement:
The primary highlights should mimic the light source. If using a lamp, observe how light naturally hits the sword.
Add secondary reflections randomly, focusing on making the sword look interesting and balanced. These are typically placed on the left-hand side as small lines.
Building Up Highlights:
Use the mix of Daemonette Hide and Ice Yellow for the initial highlights. The paint should be thin (around 50/50 or 60/40 water to paint ratio) to ensure smoothness and buildable layers.
Focus on the curve at the top of the sword for a strong, bright highlight, and add extra highlights down the blade.
Adjust the opaqueness by layering the same colour; more layers in a spot will increase opacity and create a highlight effect.
Adding White Highlights:
White is used at the end to add the highest points of light. Be conservative; too much white can desaturate the colour and reduce contrast.
Apply white sparingly to the most prominent areas of the sword, like the tip and edges, to create a glare effect.
Edge Highlights:
Edge highlighting is crucial for a realistic metallic look. Use slightly thicker paint for sharp, clean lines.
Highlight both the sharp edge and the inner flat edge of the sword. Keep the paint on the right-hand side darker to maintain the light source consistency.
Final Touches:
Add final highlights and refine the edges. Ensure that the transitions are smooth and the bright areas are prominent.
The sword should have a different material appearance from the armour, achieved by the hints of Ice Yellow and the light volume (size of the highlights).
Notes:
The key to NMM (Non-Metallic Metal) is creating the illusion of reflectivity through strategic highlights and shadows.
Adjust the number of transition steps between colours based on your preference and desired smoothness of the gradient.
Always remember to thin your paints for smoother application and better control over the blending.
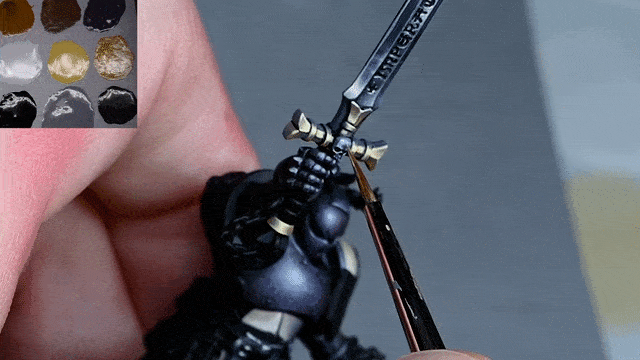
Video Tutorial : Bright Gold Sword Hilt NMM
Materials Needed
Games Workshop: Daemonette Hide, Balor Brown
Vallejo: Ice Yellow
P3: Morrow White (or any suitable white paint)
Step-by-Step Guide
Base Coat:
Cover the entire hilt and any adjacent parts to be gold with Daemonette Hide. This creates a unified base and sets the foundation for the purple hues in the gold.
Highlight Mapping and Layering:
Begin blocking in highlights using a 50/50 mix of Balor Brown and Daemonette Hide.
For areas that will be brighter, skip the plain Balor Brown and proceed directly to a 50/50 mix of Balor Brown and Ice Yellow.
Focus on the bands and edges of the hilt for highlighting, considering where the light would naturally hit.
Detailing and Shadowing:
Add Balor Brown to the downward-facing elements as bounce highlights, but ensure the purple undertone remains visible in the shadows.
Adjust the placement of highlights, especially on the flared sections of the hilt. Ensure that highlights are placed towards the middle flat sections and not on the top sections.
Refining Highlights:
Gradually build up highlights, transitioning from the Balor Brown and Daemonette Hide mixture to the Balor Brown and Ice Yellow mix.
Ensure that these highlights are opaque for a stronger non-metallic metal effect.
Final Highlights:
Add Ice Yellow for the brightest points, focusing on the top of the hilt and areas that would catch the most light.
Add edge highlights using Ice Yellow, particularly on the curves and upper edges of the hilt’s bands.
Skull Detailing:
Paint the skull (if present) using a mix of Daemonette Hide and white for a light grey-purple tone.
Highlight the upper edges and features of the skull, such as the eye sockets and teeth, for definition.
Finishing Touches:
Use white paint for the final brightest points on the hilt and skull.
Ensure a smooth transition from the previous highlight layers to the white to maintain a realistic metallic look.
Additional Notes:
The goal is to create a bright, reflective gold appearance with subtle purple undertones, matching the overall scheme of the Emperor’s Champion.
The paint should be thinned to ensure smooth layering and avoid a chalky finish, especially with lighter colours like Ice Yellow.
Repeated layers and careful placement of highlights are key to achieving the desired non-metallic metal effect.
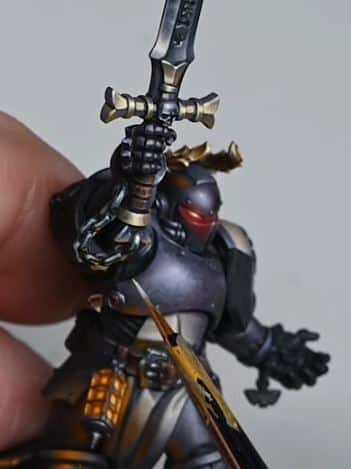
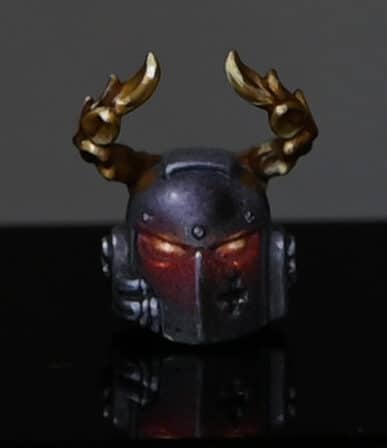
Video Tutorial : OSL Glowing Red Eyes
Materials Needed
Paints: Games Workshop Mephiston Red, Troll Slayer Orange, Yriel Yellow; P3 Morrow White
A fine brush suitable for detailed work
A wet palette (optional but helpful)
Water for thinning paints
Step-by-Step Guide
Initial Red Base: Start by applying a base coat of Mephiston Red. Ensure to fill in the entire eye area, including recesses and the upwards-facing section of the mask. It’s essential to cover all parts uniformly.
Creating a Colour Gradient:
Mix Troll Slayer Orange with Yriel Yellow on your palette.
Add a bit of Morrow White to get a lighter shade, resembling Ice Yellow.
You should have a gradient from Mephiston Red to a light orange-yellow on your palette.
Applying the Gradient:
Begin with the darkest colour (Mephiston Red) and apply it to the entire eye area.
Progressively apply lighter shades (the orange-yellow mix) towards the center of the eye. Each time you go up a shade, paint from the back to the middle and from the front to the middle of the eye. This technique ensures the middle part of the eye is the brightest, creating a natural transition.
Highlighting the Eyes:
The center of the eye should be the focal point. You might want to place the brightest highlight slightly forward in the eye to mimic the position of an iris.
For the final highlight, use a small dot of Morrow White at the brightest part.
Glazing for Effect:
Create a thin glaze with Mephiston Red (mix with water, approximately 4-5 parts water to 1 part paint).
Apply this glaze around the eye area, ensuring it blends into the surrounding areas of the helmet. This step enhances the red glow effect.
Final Touches:
Optionally, add a highlight on the lower edge of the protruding face mask, aligning it with the highest highlight point in the middle of the eye.
If desired, soften or adjust this reflection with more red glaze.
Finishing Up:
Once you are satisfied with the glow and highlights, give it a final inspection. Make any necessary adjustments to ensure a consistent and vibrant look.
Key Points to Remember
Ensure smooth transitions between shades for a natural gradient.
The placement of highlights is crucial for achieving a realistic glowing effect.
Video Tutorial : Cloth Tabard
Materials Needed
Paints: Games Workshop Daemonette Hide, Rhinox Hide, Morghast Bone, Ushabti Bone, Screaming Skull; P3 Morrow White
A fine brush for detailed work
A wet palette (optional but useful)
Water for thinning paints
Step-by-Step Guide
Base Colour: Begin by applying Daemonette Hide as the base colour. This will be the foundation for further layers, so ensure even coverage.
Creating a Gradient:
In the top right of your palette, place Daemonette Hide.
Next to it, mix Daemonette Hide with Morghast Bone, increasing the amount of Morghast Bone in subsequent mixes. You’ll create a gradient from Daemonette Hide to a lighter bone colour.
In the middle of the palette, place Morghast Bone.
Add white to Morghast Bone for a lighter shade. Alternatively, use Ushabti Bone and Screaming Skull for similar effects.
Applying the Gradient:
Start with your darkest shade (Daemonette Hide) and gradually layer up to the lighter shades, moving towards the areas where light would naturally hit the tabard.
Focus on maintaining a subtle purple tone while building up to the bone highlights.
Highlighting:
Be cautious with white. Reserve pure white for the final, brightest highlights.
Ensure that the highlights align with the light source, creating realistic folds and shadows.
Shading:
Mix Daemonette Hide with Rhinox Hide for your shadow colour.
Apply this mix to areas like the underside of folds or where the tabard curls behind the knee, following the cloth’s shape.
Refining Highlights and Shadows:
Layer up the highlights, gradually moving to the lightest tones.
Use the shadow mix to enhance depth and realism, especially under armour edges or in creases.
Glazing (Optional):
For a smoother finish, consider glazing. Mix a light shade (like Screaming Skull) with water (around 4 or 5 parts water to 1 part paint).
Apply glazes towards the highlights, ensuring smooth transitions.
Final Touches:
Examine your work for consistency in light and shadow.
Make any final adjustments to ensure the tabard’s texture and colouring match the overall model, including other elements like shoulder pads.
Key Points to Remember
The gradual build-up of layers from dark to light is crucial.
Use white sparingly for the final highlights to avoid desaturating the colours.
Pay attention to the light direction for a convincing and atmospheric effect.
Video Tutorial : OSL Lamp Glow
Materials Needed
The following paints were used:Games Workshop: Troll Slayer Orange, Yriel Yellow Vallejo: Neutral Grey P3: Morrow White
Step-by-Step Guide
Colour Preparation:On your palette, prepare a range of colours using the four base paints. Mix Neutral Grey with Troll Slayer Orange to create varying shades. Create gradients with Troll Slayer Orange and Yriel Yellow, adjusting the ratios to get different shades. For the brightest highlights, mix Yriel Yellow with a small amount of Morrow White. You may need additional intermediate mixes for more seamless transitions.
Base Coating the Lantern: Begin by applying a mix of Neutral Grey and Troll Slayer Orange to the lantern. Make sure this base coat reaches all crevices and covers the area evenly.
Blocking in Light Placement: Commence painting the light effect on the model, starting close to the lantern. The closer to the lantern, the brighter the light should be. Utilise lighter shades as you get nearer to the light source.
Building Up Layers: Gradually add layers, moving from the darker mixes to the lighter shades as you approach the lamp. This technique creates a gradual and natural lighting effect. The light’s intensity should decrease as it moves away from the lamp.
Highlighting: For the most intense highlights, use the brightest mix of Yriel Yellow and Morrow White. Apply this sparingly, concentrating on the areas closest to the lamp where the light would be most intense.
Adjusting Opacity and Consistency: Thin the paint more than usual to achieve a translucent effect; about one and a half parts water to one part paint is a good ratio. Nevertheless, for the final stage highlights, use slightly thicker paint to make these areas stand out.
Creating a Natural Glow: Avoid leaving black lines or creating high contrast near the light source, as this can appear unnatural. Strive for a soft, diffused glow around the lamp, reflecting how real-life light sources often have a less defined edge due to their brightness and interaction with the surroundings.
Painting Over Armour and Cloth: When applying paint over different textures, such as armour or the tabard, ensure the paint is thin enough to form a glaze, thus preserving the underlying detail. Multiple layers of thinned paint will be required to achieve the desired intensity, leading to smoother transitions.
Working with Textured Surfaces: The proximity of the light source to the armour will naturally reduce the texture effect. Adjust your approach accordingly, aiming for a smoother finish in these areas.
Light Placement and Realism: Accurately tracing the light from the lamp onto the model is crucial. Visualise a direct line from the lamp to the armour and align your highlights along this line. Parts of the lamp, like the spike and top section, don’t emit light and will cast shadows, affecting where you place highlights.
Final Adjustments: Towards the end of the process, you may need to revisit and adjust the intensity of the highlights, especially near the lamp, to ensure they’re suitably bright. Balance the realism of the light placement with the dramatic effect you’re aiming for, using your judgement.
Video Tutorial : Leather Belt
Materials Needed
The following paints were used:Games Workshop: Rhinox Hide, Mournfang Brown, Bugman’s Glow, Cadian Fleshtone, Morghast Bone, Xereus Purple
Step-by-Step Guide
Base Coat:
Start by applying Rhinox Hide to the entire leather belt. This step doesn’t involve highlighting; just aim for an opaque, even coverage.
Applying Mournfang Brown:
Next, use Mournfang Brown to begin adding a textured effect. At this stage, the texture won’t be very visible due to the closeness in shade to Rhinox Hide. Focus on getting the colour down in highlight areas.
When holding the model under a lamp, observe where the light hits, especially on the creases of the belt. This will guide you on where to place your highlights.
Bugman’s Glow for Texture:
Move on to Bugman’s Glow, which will make the texture more prominent. This colour is significantly lighter, so apply it carefully to avoid a pinkish hue.
Use the very tip of your brush to apply Bugman’s Glow, focusing on the raised textures and avoiding recesses. The aim is to create a worn, cracked leather effect. Be sure to pick out the highlight in the crease of the belt as mentioned earlier.
Cadian Fleshtone Highlights:
Use Cadian Fleshtone to highlight further. Pay attention to areas like the edges of the belt and around any buckles or metal tags. Apply the paint in thin lines and small dots to accentuate the texture and curvature of the belt.
Morghast Bone for Final Highlights:
For the final highlights, apply Morghast Bone sparingly. Focus on the very brightest parts, such as sharp edges closest to the light source. Be careful not to overapply, as this colour can desaturate the brown and give a whitish appearance.
Adding Purple Hue:
If you’re following the purple theme of the model, glaze with Xereus Purple, diluted to about four parts water to one part paint.
Apply the glaze over the highlighted areas but be cautious not to turn the belt too purple. The aim is to subtly incorporate the purple tone, tying it in with the overall theme of the model.
Finishing Touches:
Once the glaze dries, you might want to reapply the final bright highlights to enhance contrast and make the texture stand out more.
Video Tutorial : Helmet and NMM Golden Wreath
Materials Needed
The following paints were used:Games Workshop: Mournfang Brown, XV-88, Balor Brown, Rhinox Hide, Corax BlackVallejo: Ice YellowP3: Morrow White (Any White will do)
Step-by-Step Guide
Base Coating the Wreath:
Begin with a base coat of Mournfang Brown over the laurel wreath to establish a rich, dark brown foundation.
Applying the First Highlight (XV-88):
Apply the first highlight using XV-88. Focus on the central parts of the curved leaves, creating a bowl shape on each. Avoid covering the entire leaf; maintain a dark rim around the highlight.
Adding Detail with Balor Brown:
Proceed to Balor Brown for the second stage of highlighting. This colour will provide a more yellow tone, crucial for the gold effect. Apply it over the XV-88 areas but in a smaller scope to enhance the contrast.
Correcting Mistakes with Rhinox Hide:
Use Rhinox Hide to fix any mistakes or overspills from the previous colours. It’s darker and provides better coverage for corrections.
Enhancing Highlights with Ice Yellow:
For bright highlights, use Ice Yellow, but apply it sparingly to avoid losing the yellow hue of the gold. Focus on the most prominent parts of the leaves where light would naturally hit the strongest.
Creating Reflections on Armour:
Using the same colours, paint reflections of the gold wreath onto the helmet’s armour. Keep these reflections subtler than the actual wreath, reflecting the dark nature of the armour.
Final Touches and Increasing Contrast:
Use Abaddon Black and Corvus Black to deepen shadows and increase contrast on the armour and the wreath. This step is crucial for enhancing the shiny, reflective quality of the metal.
Add tiny dots of Morrow White to the brightest points for added sharpness and focus.
Refining the Look:
Stipple the reflections carefully and don’t extend the highlights too much to maintain realism. The reflections should appear as subtle, controlled glimpses of light on the dark armour.
Glazing with Black:
For the final refinement, glaze over the reflections with a watered-down mix of Corvus Black to dull them slightly, ensuring they complement the armour’s colour.
Video Tutorial : Non Metallic Metal Chains with OSL Reflections
Materials Needed
The following paints were used:Games Workshop: Troll Slayer Orange, Yriel YellowVallejo: Neutral GreyP3: Morrow White (Any White will do)
Step-by-Step GuideBase Coating with Neutral Grey
Start by applying Vallejo Neutral Grey to the chain. This colour represents the primary light source hitting the chain from above. Paint thin lines on the upper edges of each chain link, leaving a black gap in the middle for contrast.
Painting Chain Link Variations:
Keep in mind that each chain link will have different edges facing upwards due to the looping nature of the chain from the wrist to the sword. Some links near the wrist may not catch any light, while others will have different lengths of edges illuminated.
Creating High Contrast:
To achieve the shiny, reflective look, ensure that the black gaps in the chain links are clear and distinct. This creates the impression of light hitting the chain from two sides, enhancing the shiny effect.
Adding OSL Reflections with Troll Slayer Orange:
Begin painting the lower reflections, which are light from the lamp, using Troll Slayer Orange. This paint is quite translucent, so it may require multiple layers for opacity. Use a slightly thicker mix (around one and a half parts paint to one part water) for solid lines.
Applying Yriel Yellow:
Overlay the Troll Slayer Orange with Yriel Yellow to enhance the OSL effect. Don’t completely cover the orange; leave some visible at the sides to simulate the orange glow from the lamp.
Increasing Contrast with Neutral Grey Mixes:
Mix Neutral Grey with white to create various shades of light grey. Use these mixes to paint the brighter highlights on the chain, focusing on the upper edges. This step significantly increases the contrast, making the chain look more reflective.
Final Highlights with Morrow White:
Apply Morrow White for the final, brightest highlights. Concentrate on the most curved parts of the chain links, where light would be most intense. Avoid over-applying white on flat surfaces to keep the reflections realistic.
Finishing Touches:
Ensure that the reflections and highlights work cohesively to create a high-contrast, reflective appearance. The goal is to make the chain look shiny and metallic, with clear light reflections from both the primary light source and the lamp.
Video Tutorial : Tiny Freehand Skull
Materials Needed
The following paints were used:Games Workshop: XV-88, Balor Brown, Morghast Bone, Screaming Skull, Rhinox Hide, Mournfang Brown, Mephiston RedVallejo: BlackP3: Morrow White (Any White will do)
Step-by-Step Guide
Preparing the Shield Start with the tilt shield painted black. Use Mephiston Red to create a dividing line across the shield for a more knightly appearance and to provide a base for the freehand skull.Blocking in the Skull with XV-88 Use XV-88 to block in a rough lightbulb shape for the skull. Start smaller than needed, allowing room for adjustments. Focus on getting the skull centrally placed.
Defining Eye and Nose Sockets Paint rough placements for the eye and nose sockets with a darker colour like Rhinox Hide. It’s okay if these aren’t perfect; they can be refined later.
Adjusting and Refining Details Use XV-88 to adjust and refine the shape of the skull, especially the eye sockets. Pay attention to symmetry and expression.
Shading with Rhinox Hide Thin down Rhinox Hide to apply subtle shading, enhancing the depth and texture of the skull. Focus on areas like brow ridges and cheekbones.
Adding Highlights with Balor Brown Move to Balor Brown for the first stage of highlights. This should be done carefully to define key areas of the skull without overwhelming the small scale.
Further Highlights with Morghast Bone and Screaming Skull Continue highlighting with Morghast Bone and Screaming Skull. These lighter colours bring out the details and add dimension to the skull.
Detailing Teeth and Final Touches Paint the teeth, focusing on the front two as key features. Remember, at this scale, not all teeth need to be defined individually. Use the darker colours (like Rhinox Hide) to refine and adjust the shape and expression of the skull. Add final bright highlights with P3 Morrow White or similar, focusing on the most prominent parts of the skull.
Painting a Halo (Optional) For additional flair, paint a small halo around the skull using Balor Brown and adding highlights with lighter colours, finishing with a dot of white for reflection.
Finishing the Shield Once the skull is complete, use the armour colours to finish the shield’s background. This step includes weathering and adding transitions to blend the skull into the rest of the model.
If you don’t have an account, please sign up here! The website currently has over 350 video tutorials with steps and tips, plus a selection of PDFs. If you are not sure about joining, you can explore my free videos with a free membership, or take the plunge and become a full subscriber for full access.
If you’d prefer to support me on Patreon, please visit: https://www.patreon.com/RichardGray
Explore more step-by-step Character Tutorials! [...]