


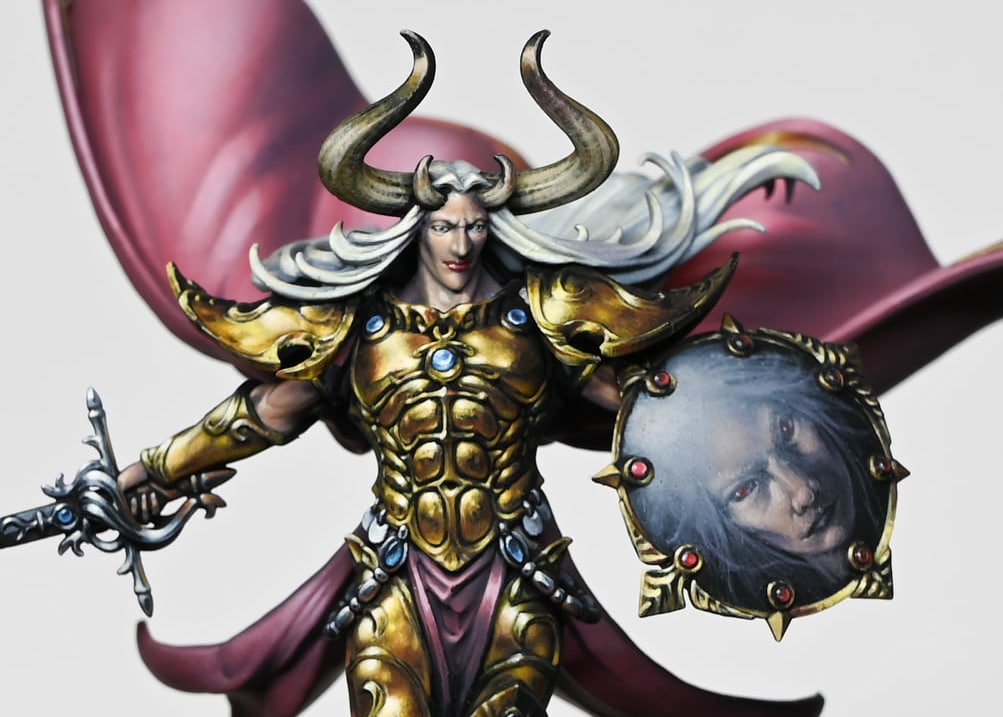
Here is a close up of the freehand on the shield I painted for Sigvald the Magnificent! It was quite a fun piece, right up until adding the light at the end when it got a bit stressful! Read on for my tutorial videos on how I painted it, with step by step tips and full paints list.
How to Paint: Shield and Freehand
The following paints were used:
Games Workshop: Daemonette Hide, Cadian Fleshtone,
Vallejo: Black, Ice Yellow
How to Paint: Shield and Freehand Part Two
The following paints were used:
Games Workshop: Daemonette Hide, Cadian Fleshtone, Mephiston Red
Vallejo: Black, Ice Yellow, Pale Grey blue
P3: Morrow White
Top Tips: Shield and Freehand
Wet Palette Preparation: Begin with a wet palette to keep your paints hydrated.
Utilise a variety of colours, including Daemonette Hide, Daemonette Hide and Flesh Tone mix, Cadian Fleshtone, Cadian Fleshtone mixed with Ice Yellow, and Ice Yellow.
Base Work and Background: Commence by roughly blocking in the main shapes for the shield freehand. Don’t worry about perfection at this stage.
Use a flat black background to provide a canvas for your work.
Freehand Technique: When painting freehand, it’s recommended to start with a messy application, focusing on getting the shapes in the right place.
Consider the androgynous nature of the face and add subtle demonic elements.
Work on defining features like cheekbones, eyes, and forehead gradually.
Lighting Considerations: Plan for top-left lighting and be mindful of how it interacts with the background and the freehand.
Avoid pre-painting the background shine to maintain consistency when adding lighting later.
Refinement Process: Refine the face by adjusting shapes and proportions as you progress.
Pay attention to the texture and subtleties in the paintwork, allowing for variations and imperfections.
Use reference images of faces and lighting to enhance realism.
Layering and Thinning Paint: Thin your paints to ensure smooth layering, especially as you’ll be applying multiple layers.
Experiment with thinning ratios, but generally, aim for about one and a half to two times water to one part paint.
Brush Techniques: Utilise different brushes for specific tasks. A newer brush for softer marks and an older one for larger, softer applications.
Pay attention to the size of the brush tip for finer details.
Adding Subtle Details: Introduce subtle details by lifting the brush to create dots where the paint is thinner, adding character to the piece.
Experiment with depositing tiny dots of paint to create texture and shadows.
Shading and Shadow Definition: Use darker colours like Daemonette Hide mixed with black for shadow definition.
Consider the natural shadowing on curved surfaces, like the bottom of the chin.
Final Touches and Tweaks: Continuously refine and tweak elements while the paint is still wet.
Use excess paint dots to your advantage by pushing them around to achieve desired effects.
Have you got a Sigvald to paint? Follow my full Sigvald the Magnificent painting guide:
How to Paint Sigvald the Magnificent with NMM
All of the tutorials for Sigvald the Magnificent, including how to paint NMM (gold) armour, face and horns, freehand shield, NMM silver sword and hilt and more!
If you don’t have an account, please sign up here! The website currently has over 350 video tutorials with steps and tips, plus a selection of PDFs. If you are not sure about joining, you can explore my free videos with a free membership, or take the plunge and become a full subscriber for full access.


If you’d prefer to support me on Patreon, please visit: https://www.patreon.com/RichardGray