


Guide on how to paint the armour and muscles on the Warcry Ogroid Myrmidon, with video tutorials, paints and steps to follow.
Video: Warcry Ogroid Myrmidon Armour and Muscles
All videos are recorded in HD 720p or higher – use full screen for the full effect and let the video load completely.
Materials Needed
- Games Workshop Paints: Rhinox Hide, Mournfang Brown, Cadian Fleshtone, Morghast Bone, Abaddon Black, Wild Rider Red, Fire Dragon Bright, Corvus Black
- Vallejo Paints: Pale Grey Blue, Neutral Grey, Dark Grey, Black
- A wet palette for mixing and thinning paints
- Fine detail brushes
- Water for thinning paints
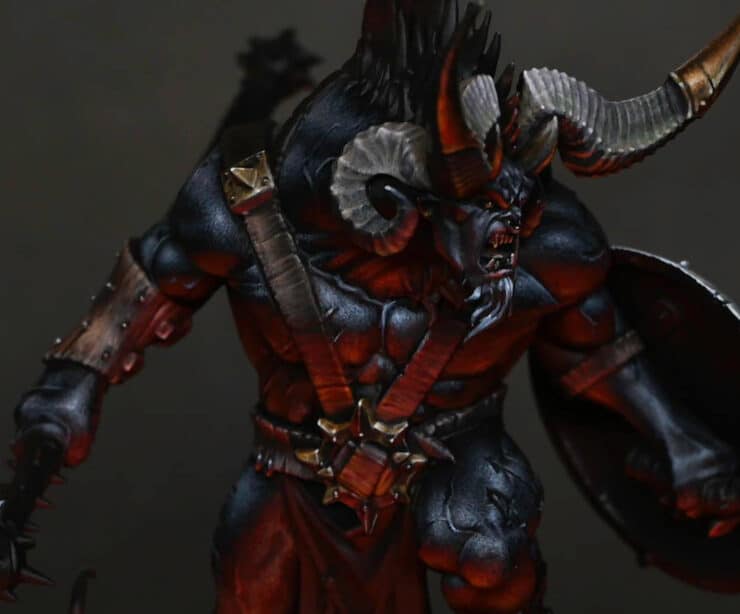
Painting the Leather Armour
- Base Layer: Start with a base layer of Rhinox Hide. This dark brown serves as a foundation, offering a subtle brown hue. Apply multiple coats if necessary, but remember, the subsequent layers will add depth and detail.
- Mixing for Texture: Create a 50/50 mix of Rhinox Hide and Cadian Fleshtone on your wet palette. This mix will serve as the primary texture colour for the leather.
- Applying Texture: Use the 50/50 mix to start adding texture to the leather. Focus on long, vertical, slightly erratic strokes to mimic the natural wear and tear of leather. Pay attention to the armour’s sculpted details, like studs and indentations, to guide your texturing.
- Adding Highlights: Gradually lighten the texture by incorporating more Cadian Fleshtone and Morghast Bone into your mixes. Apply these lighter tones to areas that would naturally catch the light, enhancing the texture and giving the leather a more three-dimensional appearance.
- Glazing for Depth: Once you’re satisfied with the texture, use a glaze of Mournfang Brown and Abaddon Black to tone down the highlights and integrate the textures, adding depth and richness to the leather. This step unifies the various layers of texture and colour.
Highlighting Black Skin
- Preparing Your Palette: On your wet palette, arrange Vallejo paints from Dark Grey to Pale Grey Blue, including mixed shades for smoother transitions. Thin these paints more than usual to avoid building up too thick a layer with the stippling technique.
- Stippling Technique: Begin stippling with Dark Grey, gradually transitioning through the greys to Pale Grey Blue for the highlights. Stippling involves applying numerous tiny dots to build up texture and colour depth. This technique is particularly effective for creating a nuanced, textured appearance on the skin.
- Attention to Lighting: When applying your highlights, consider the model’s primary viewing angle and the imaginary light source. Focus your highlights on areas that would naturally be illuminated, like the tops of muscles, while keeping the base skin tone visible in shadowed areas.
- Refining Highlights: Use glazes of Abaddon Black and Corvus Black to soften and blend the stippled highlights, ensuring they contribute to the model’s overall appearance without overpowering the base skin tone. These glazes help integrate the highlights and create a cohesive look.
- Final Touches: Revisit any areas that may require additional highlights or adjustments, enhancing the model’s dimensional appearance. Pay special attention to achieving a balance between the highlighted areas and the overall dark tone of the skin.
Video: Warcry Ogroid Myrmidon Skin
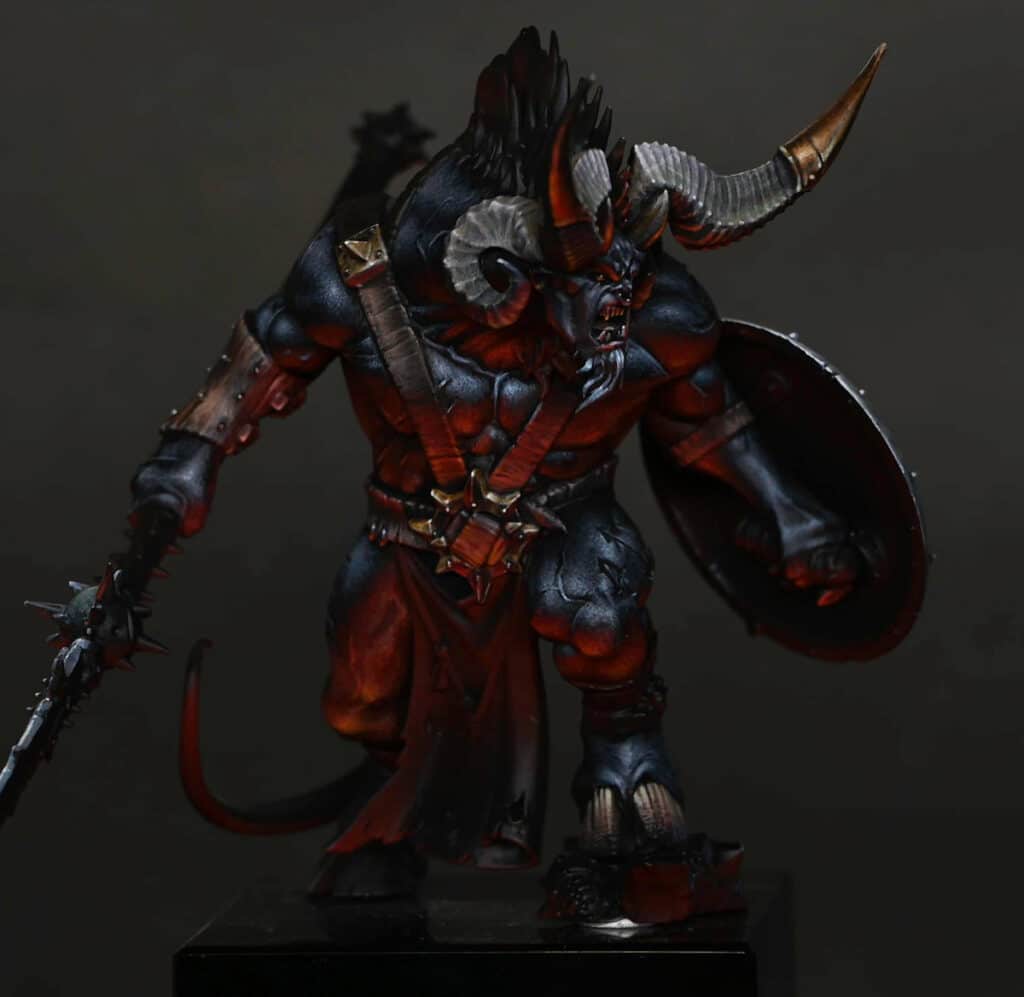
This guide will focus on achieving a textured ogroid skin effect with top-down highlights and red underlighting, alongside a detailed approach to creating a realistic muscle definition. We’ll be using a mix of Vallejo and Games Workshop paints to achieve this effect.
Materials Needed:
- Vallejo Paints: Black, Dark Grey, Neutral Grey, Pale Grey Blue
- Games Workshop Paints: Mephiston Red, Evil Sunz Scarlet, Wild Rider Red, Troll Slayer Orange, Fire Dragon Bright
- Size 0 Artist Opus Brush (preferably a newer one for fine stippling)
- A wet palette
- Water for thinning paints
Step-by-Step Guide to Ogroid Myrmidon Skin
Step 1: Base Coating
Begin by base coating the skin of your Warcry Ogroid Myrmidon with Mephiston Red to prepare for the red underlighting. This will serve as the base for our stippling technique later on.
Step 2: Stippling Technique Introduction
For the skin’s texture, we’re going to use a stippling technique. This involves applying tiny dots of paint to create a textured appearance. Start with Vallejo Dark Grey and a touch of Neutral Grey, using a fairly new brush for precise dot application. The goal is to create very fine dots, so remember to apply very light pressure to avoid creating larger, triangular marks.
Step 3: Adding Red Underlighting
Switch to Games Workshop’s Evil Sunz Scarlet, stippling over the red base layer to begin creating the underlighting effect. This will initially appear very bright but will dull down as it dries. Layer over with Mephiston Red to help blend and soften the transition.
Step 4: Top-Down Highlights
For the top-down highlights, use a gradient from Dark Grey to Pale Grey Blue, progressing from darkest to lightest as you move up the model. This mimics natural lighting, emphasizing the muscle contours and giving the skin a realistic depth. Remember, the highlights should reflect where natural light would hit the model, focusing on the tops of curves and muscle peaks.
Step 5: Fine-Tuning Highlights and Shadows
As you apply your highlights, consider the model’s anatomy. Paint sharp lines of Pale Grey Blue in the recesses between muscles, such as between the pectorals and deltoids, to accentuate the definition. Use the light from your lamp as a guide to ensure consistency in your highlighting.
Step 6: Red and Orange Highlights
For the lower parts of the muscles, closer to the model’s base, switch to the warmer tones on your palette: Wild Rider Red, Troll Slayer Orange, and Fire Dragon Bright. Apply these colours opposite to the top-down lighting, focusing on areas that would be illuminated from below. This step may require patience due to the translucency of reds and oranges, necessitating multiple layers for a solid appearance.
Step 7: Blending and Correcting
If any areas stand out too much or the transitions between colours are too stark, revisit them with intermediary shades to blend them more naturally. Stippling allows for easy correction; simply overlay with the appropriate colour to soften and integrate any harsh lines or spots.
Step 8: Final Touches to the Skin
After completing the stippling, examine the model for any areas that may need additional work. Adjust the intensity of the highlights and shadows as necessary.
All Videos on How to Paint an Warcry Ogroid
Warcry Ogroid Myrmidon
A selection of detailed videos including red OSL, NMM, fur effect, horns and freehand on his shield.
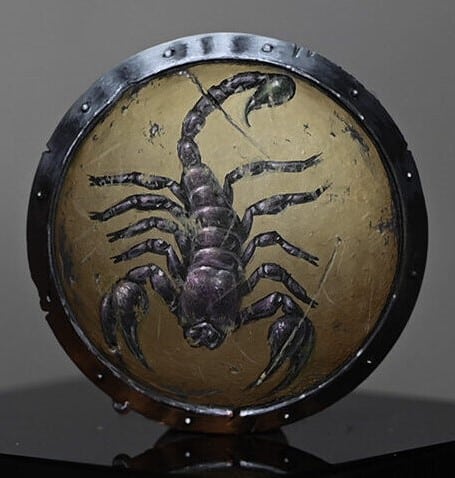
Warcry Ogroid Myrmidon Shield
Guides on how to paint the Warcry Ogroid Myrmidon shield.
If you don’t have an account, please sign up here! The website currently has over 350 video tutorials with steps and tips, plus a selection of PDFs. If you are not sure about joining, you can explore my free videos with a free membership, or take the plunge and become a full subscriber for full access.


If you’d prefer to support me on Patreon, please visit: https://www.patreon.com/RichardGray