


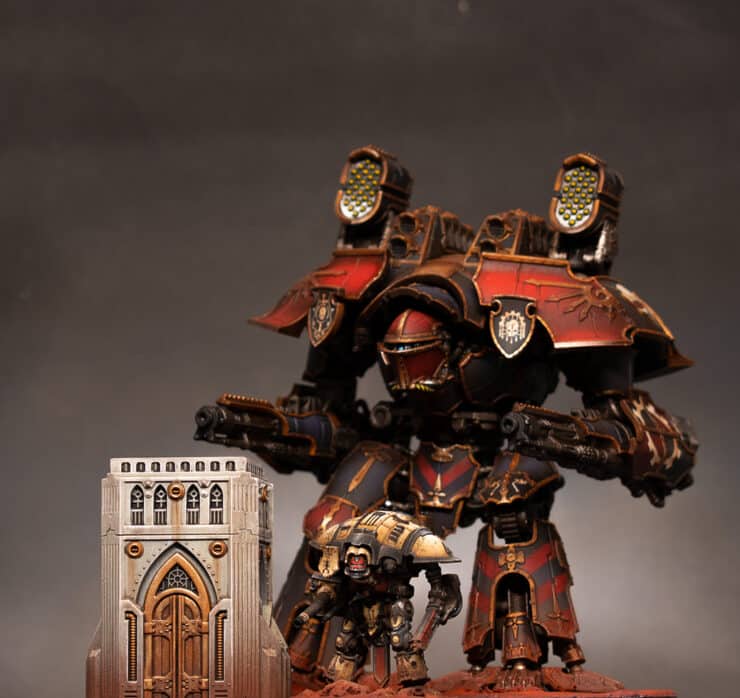
An Adeptus Titanicus Building Guide.
This PDF guide is currently hidden. To unlock it and view, please join the website and log in.
More Adeptus Titanicus Tutorials to Explore!
Adeptus Titanicus
In this guide, we’ll explore how to paint marble armour effect on the armour of an Adeptus Titanicus Legio Gryphonicus Titan.
This technique creates a visually striking pattern that mimics the speckled and veined appearance of marble, adding depth and interest to your miniature’s armour plating. The process is designed to be quick and straightforward and uses some unexpected materials!
Video – How to Paint a War Griffons Warlord with Marble Armour
All videos are recorded in HD 1080p or higher – use full screen for the full effect and let the video load completely.
Materials List:
Airbrush: Essential for applying smooth base coats and gradients.
Hand disinfectant wipes or baby wipes: Used to create the marble effect.
Paints:
Vallejo Pale Grey Blue: For the initial base coat.
Vallejo Neutral Grey: To begin creating the marble effect.
Vallejo Dark Grey (German Grey): For adding darker veins to the marble.
Vallejo Heavy Goldbrown: Base colour for yellow armour sections.
Games Workshop Phalanx Yellow: For highlighting yellow armour sections.
How to Paint Marble Armour Step-by-Step Guide:
Base Coat:
Begin by airbrushing Vallejo Pale Grey Blue onto the carapace of the Titan. This may require a few coats to achieve a smooth finish. The paint can be thinned a bit, but not excessively, to ensure good coverage without too much speckling.
Preparing the Wipe:
Take a hand disinfectant wipe or baby wipe and stretch it out so it’s slightly spread and thin. This texture will be transferred to the armour to create the marble effect.
Applying the Wipe:
Lay the stretched wipe over the armour part you’ve just painted. Ensure it’s not too densely applied; the idea is to leave some areas exposed more than others for a varied marble effect.
Adding Darker Tones:
Airbrush Vallejo Neutral Grey over the wipe-covered armour. Keep the airbrush pressure low to avoid displacing the wipe. Focus more on the edges and less on the centre to mimic natural shading.
Without completely covering the previous layer, lightly apply Vallejo Dark Grey in a few select areas to create the appearance of darker veins within the marble.
Revealing the Effect:
Carefully remove the wipe to reveal the marble armour effect beneath. You’ll find areas of light and dark grey creating a naturalistic marble pattern.
Cleaning Up:
After removing the wipe, there may be strands left on the model. Take your time to clean these off to avoid them becoming permanently attached in later steps.
Painting Yellow Armour Sections:
For Legio Gryphonicus’s iconic grey and yellow scheme, base coat the relevant armour sections with Vallejo Heavy Goldbrown. Highlight these areas with Games Workshop Phalanx Yellow to achieve a vibrant, contrasting look against the grey marble armour.
All of my War Griffons Warlord Tutorials
War Griffons Warlord
All of my series of quick videos on the different techniques used on this model. These include the marble effect, the stripes, applying decals and weathering.
Watch Now
If you don’t have an account, please sign up here! The website currently has over 350 video tutorials with steps and tips, plus a selection of PDFs. If you are not sure about joining, you can explore my free videos with a free membership, or take the plunge and become a full subscriber for full access.
If you’d prefer to support me on Patreon, please visit: https://www.patreon.com/RichardGray [...]
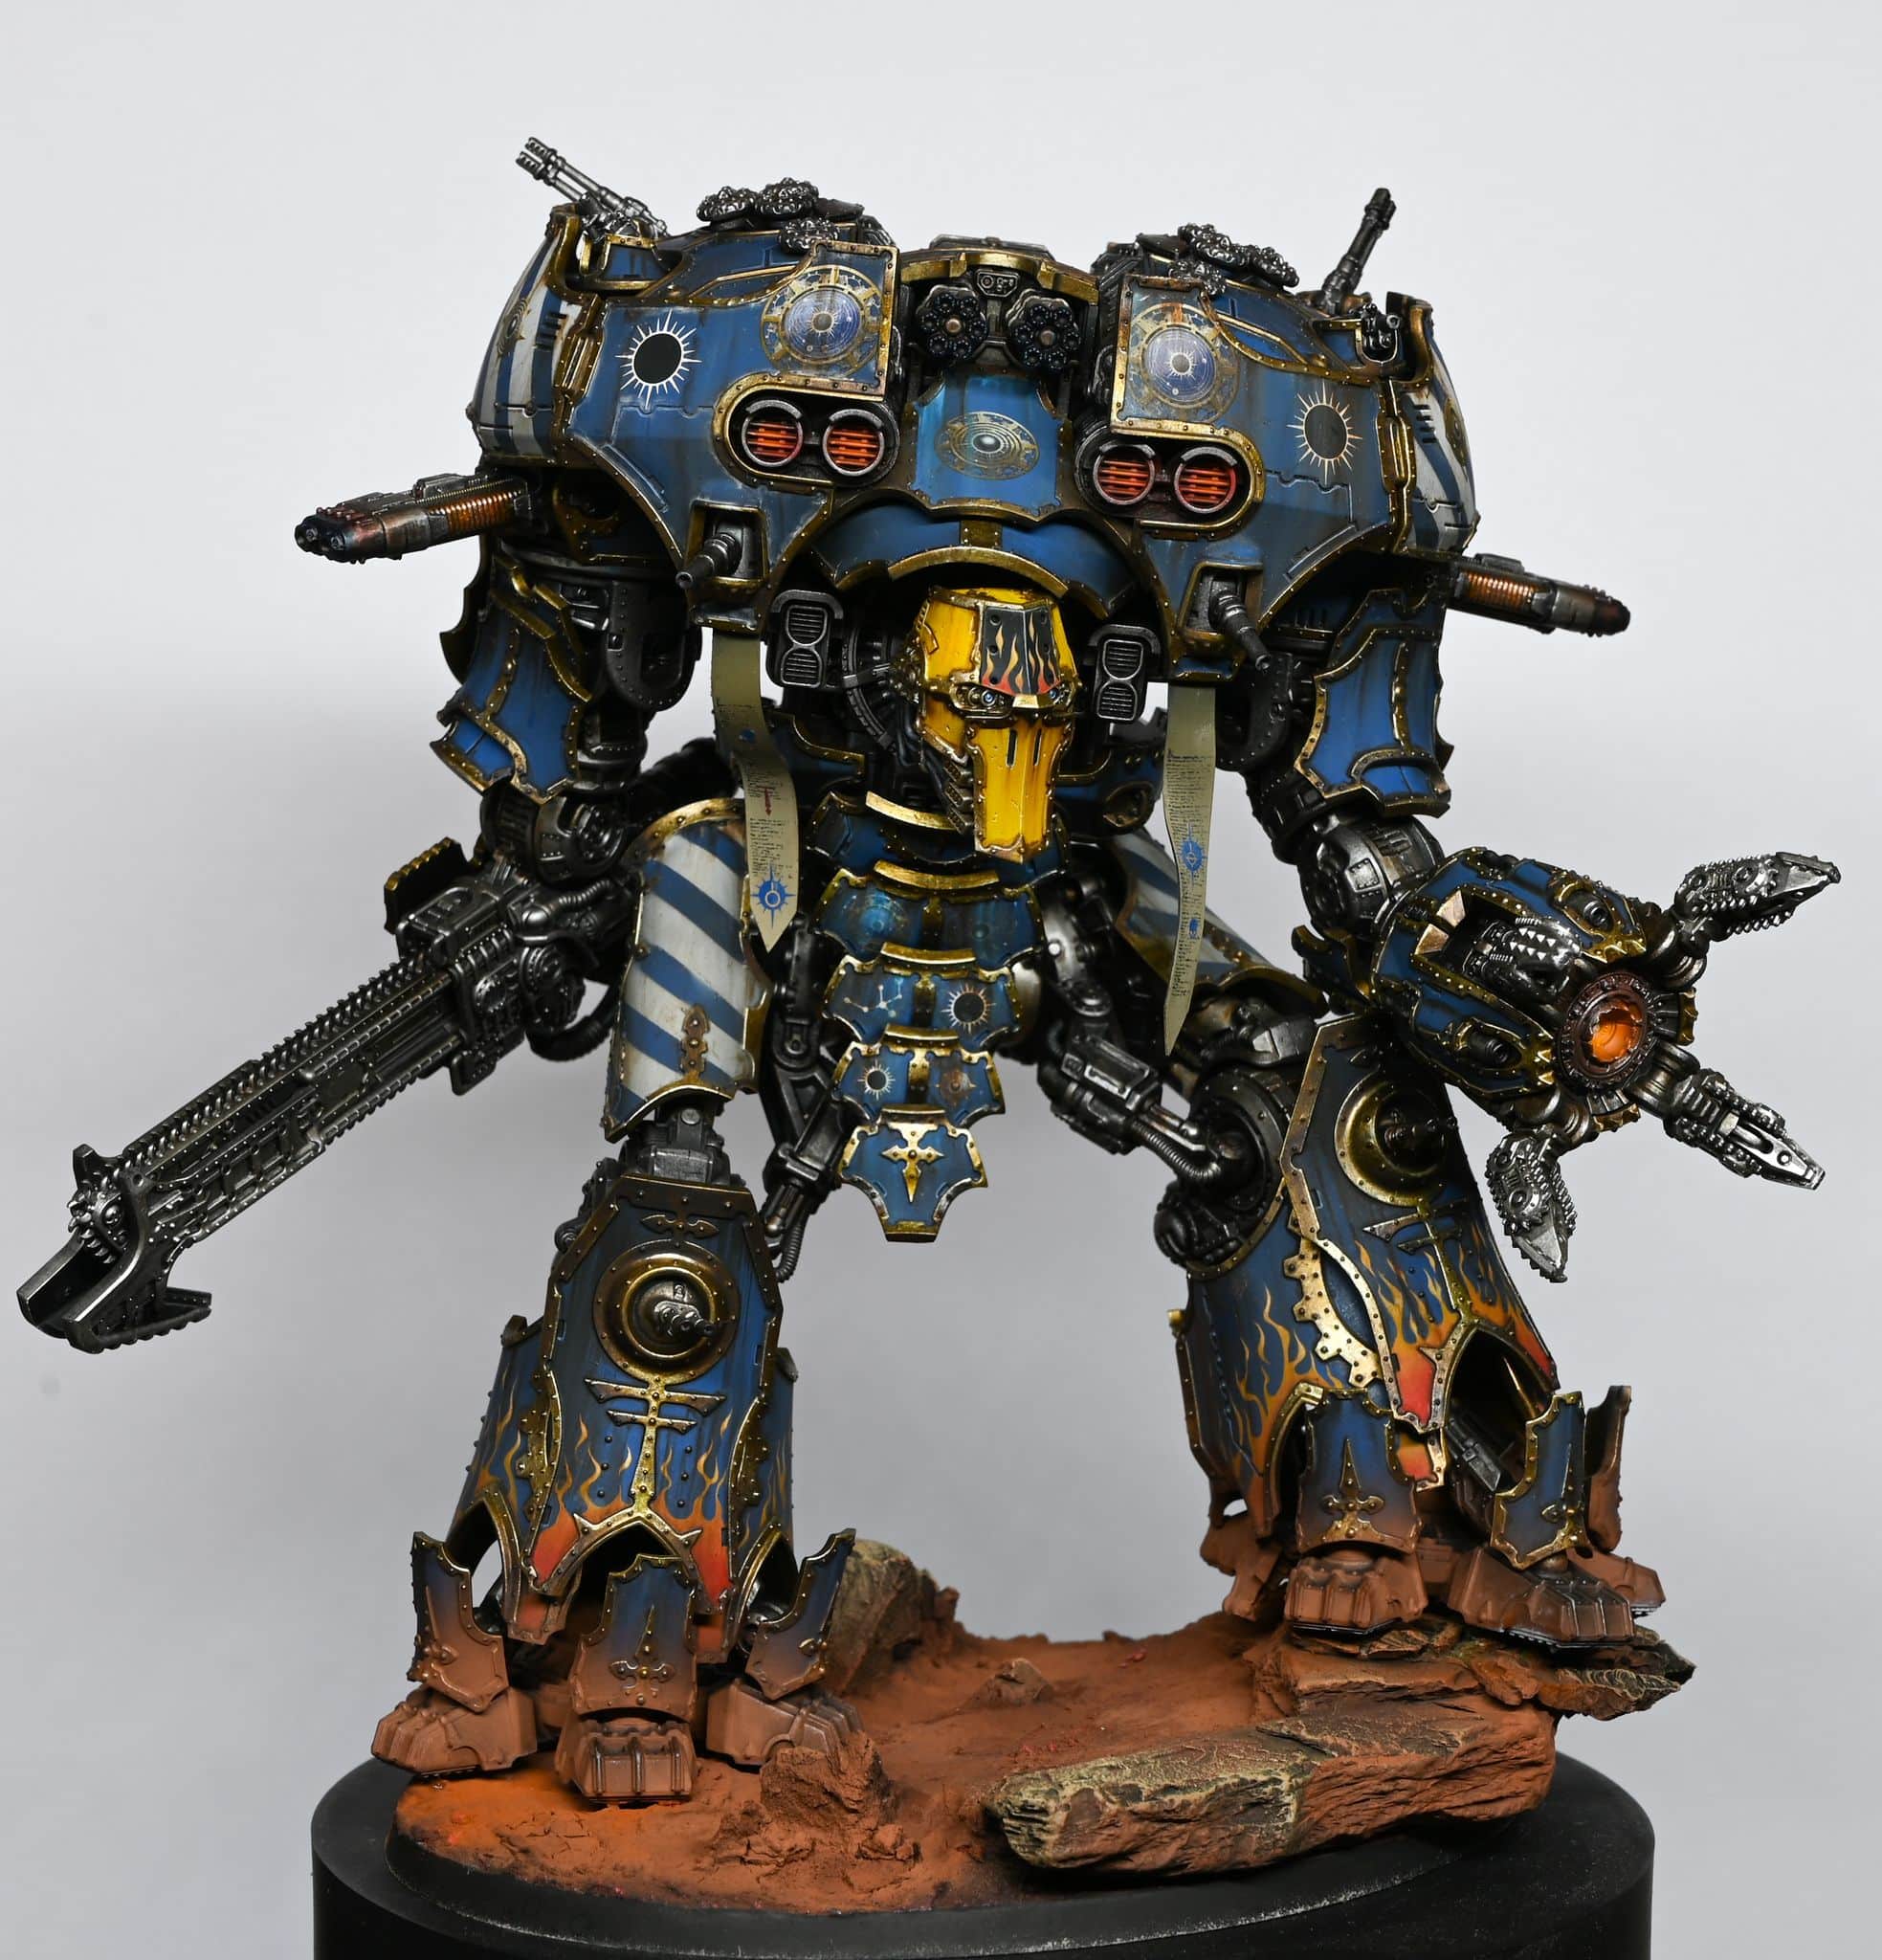
I’m excited to share my journey of painting the Warmaster Iconoclast Titan, a majestic model sent to me by Games Workshop. My focus is to highlight the crucial role of airbrushing in bringing this titan to life with the vibrant colours of the Legio Astorum, also known as the Warp Runners.
Watch the Video
The Importance of Airbrushing: Airbrushing is a game-changer in miniature painting, offering unparalleled smoothness and efficiency. It’s especially valuable when painting large models like the Iconoclast Titan, where traditional brushing might fall short. The fluidity of airbrush paints, like Vallejo’s Metal Color series, is perfect for both airbrushing and regular brushwork.
The following paints were used: Games Workshop: Night Lords Blue, Calgar Blue, Mephiston Red, Balor Brown, Hashut Copper, Yriel YellowVallejo: Dark Sea Grey, White, Metal Colour Burnt Iron, Metal Colour Gold, Metal Colour Chrome, Mecha Gloss VarnishScale 75: Necro GoldAmmo: Ultra-Matt Lucky VarnishWinsor and Newton: Sansodor mineral spirit, oil colour Black, oil colour Burnt Sienna Badger: Ultimate Primer Black
Initial Steps: Before diving into painting, it’s essential to prepare the model. I left off the armor plates of the titan to separately paint the skeleton with metallic colours and the armor panels with the distinctive Warp Runner scheme.
Airbrushing Techniques:
Base Coating: Starting with Vallejo’s Burnt Iron, I applied the base coat to the skeleton. Despite being formulated for airbrushing, its fluid nature worked well with a large, soft brush for a non-textured finish.
Detailing with Copper: For the hips, I used Games Workshop’s metallic colour, applying it straight from the pot. This step required multiple thin coats for a consistent finish.
Creating Verdigris Effects: I used oil paints to simulate the verdigris effect on the copper parts. Stippling the paint onto the model, I focused on crevices and rivets, where oxidation naturally occurs.
Oil Washes: An overall wash of oil paints, mixed with spirits, added depth to the metallic parts. This technique requires patience, as it’s essential to allow the wash to dry completely, typically 24 hours.
Highlighting with Chrome: Vallejo’s Chrome, another airbrush-focused paint, was used for highlights. Its liquid consistency demanded careful application to avoid flooding recessed areas.
Colouring the Armor Panels: The real challenge and joy of airbrushing came alive while painting the armor panels. I started with Night Lords Blue, followed by Macragge Blue, both thinned with Vallejo airbrush thinner. The process involved covering entire panels with the darker blue, then focusing on upper sections and curves for the lighter blue, creating a pleasing visual gradient.
Stripe and Flame Patterns: For detailed patterns like stripes and flames, I relied on masking techniques and freehand painting. Tamiya tape helped in creating crisp, clean lines for stripes, while freehanding flames allowed for a more organic and fitting look on the armor panels.
Applying Decals and Weathering: After the base colours and patterns, I applied decals for additional detailing. This step required a steady hand and patience, especially when dealing with folded decals. Weathering was achieved with oil paints, enhancing the realism of the titan.
Final Touches: Matte varnishing the model brought all elements together, providing a uniform look and protecting the paint job. For the trim, I chose to paint it with Scale 75’s Necro Gold, followed by weathering and sealing with a matte varnish.
Airbrushing the Iconoclast Titan was a rewarding experience, showcasing the versatility and efficiency of this painting method. The ability to layer colours, create gradients, and apply washes and weathering with ease made airbrushing an indispensable tool in my painting arsenal. Whether you’re a seasoned veteran or a beginner, incorporating airbrushing into your miniature painting can elevate your models to new heights.
More Free Video Tutorials
More free videos for logged in members – just sign up as a ‘friend’ to view and click any of the thumbs.To explore all of these, visit this page!
If you don’t have an account, please sign up here! The website currently has over 350 video tutorials, plus step by step guides and PDFs. You can explore more free videos with a free “freebies” membership, or take the plunge and become a full subscriber for full access.
If you’d prefer to support me on Patreon, please visit: https://www.patreon.com/RichardGray [...]
This free video shows how to paint a Warmaster Iconoclast Titan for the Legio Astorum (Warp Runners) from the Adeptus Titanicus game.
The following paints were used: Games Workshop: Night Lords Blue, Calgar Blue, Mephiston Red, Balor Brown, Hashut Copper, Yriel YellowVallejo: Dark Sea Grey, White, Metal Colour Burnt Iron, Metal Colour Gold, Metal Colour Chrome, Mecha Gloss VarnishScale 75: Necro GoldAmmo: Ultra-Matt Lucky VarnishWinsor and Newton: Sansodor mineral spirit, oil colour Black, oil colour Burnt Sienna Badger: Ultimate Primer Black
Steps to Follow on How to Paint a Warmaster Iconoclast Titan
Preparing the Model
Build the Model: Assemble your Warmaster Iconoclast Titan, leaving off the armour plates for separate painting. This allows easier access to the skeleton for painting in metallic colours.
Painting the Skeleton
Base Coat in Metallic: Start with Vallejo Metal Colour Burnt Iron applied with a large soft brush or a dry brush for a smooth metallic base on the skeleton.
Detailing with Copper: Use Games Workshop Hashut Copper for the hips and other details, applying multiple coats as necessary for even coverage. Thin with water if the paint is too thick.
Verdigris Effect: Mix oil paints on cardboard to create a light green verdigris colour. Stipple this onto the copper parts with an old brush, focusing on crevices and rivets. Thin with white spirit for a more natural effect.
Weathering the Metal
Oil Wash: Create an oil wash with black and burnt sienna oil paints thinned with mineral spirits. Apply over the entire metal skeleton, excluding verdigris areas, to add depth and an oily finish.
Highlighting: Highlight edges and raised details with Vallejo Metal Colour Chrome for a sharp contrast.
Painting the Armour Panels
Base Coat in Blue: Airbrush the panels with Games Workshop Night Lords Blue, followed by highlights with Calgar Blue focusing on upper sections and curves.
Detailing Stripes and Flames: For striped areas, use Tamiya masking tape and Vallejo Dark Sea Grey. For flames, start with Balor Brown as a base, building up to lighter tones and finally white for the hottest parts.
Applying Decals: Use Forge World or Games Workshop decals for additional detailing, sealing them with Microset or Microsol. I’ve put a link to another free video on how to do that, below!
Final Weathering: Apply oil washes for weathering effects, focusing on creating streaks and grime accumulation that fits with the battlefield-worn look.
How to Apply Forge World Decals and Weather Them
A beginners guide on how to apply Forge World decals and weather them so they look a natural part of the painting on your model. Painting and applying decals to your models adds significant details and realism, making it stand out during tabletop gaming. It’s also a lot easier than freehand! I still use decals a lot in my models, despite also enjoying freehand work.
Watch and Read Now
Finishing Touches
Painting Trim and Details: Use Scale 75 Necro Gold for gold trim, applying carefully around edges and details. For a brighter highlight, apply Vallejo Metal Colour Gold.
Matte Varnish: Seal the entire model with an ultra-matte varnish to tie together the different finishes and protect the paintwork.
Optional Ribbon Streamers: Create custom ribbon streamers from plastic card, painted and detailed to match the Titan’s colour scheme, adding dynamism and a personalised touch to your model.
Additional Tips
Always thin your paints to ensure smooth application and avoid obscuring fine details.
When working with oil paints for weathering, allow ample drying time between layers to prevent smudging.
Use a hairdryer to speed up drying times cautiously, avoiding too much heat on plastic parts.
Experiment with lighting and colour modulation on the armour panels for a dynamic appearance.
If you don’t have an account, please sign up here! The website currently has over 350 video tutorials with steps and tips, plus a selection of PDFs. If you are not sure about joining, you can explore my free videos with a free membership, or take the plunge and become a full subscriber for full access.
If you’d prefer to support me on Patreon, please visit: https://www.patreon.com/RichardGray [...]
This video looks at how to paint a tiny Thunderhawk Gunship. I painted it in anticipation for the new Legions Imperialis, but is from Aeronautica Imperialis as both scales are the same and the model will be used for the new game.
Paints and Materials
Games Workshop: Sotek Green, Imperial Fist (Contrast), Rhinox Hide, Yriel Yellow, Corvus Black Vallejo: German Grey, Black Winsor and Newton: Burnt Sienna (series 1 oil paint), Black, Sansodoor mineral spirit Vallejo: Mecha Varnish Gloss, Mecha Varnish Matt, Metal Burnt IronP3: Morrow White (Any White will do) Micro Set
Steps to Paint a Tiny Thunderhawk Gunship
Preparing the Model
Start by assembling the model, priming it black, and giving it a base coat of Corn Red. This initial red layer helps in avoiding a grimy, olive drab look when applying yellow over black.
Airbrushing White
Spray the model with white paint (P3 Morrow White thinned with Vallejo airbrush thinner), creating a light-dark-light modulation effect. This step adds contrast and sets the stage for the yellow layer.
Applying Yellow
Coat the model with Imperial Fist yellow contrast paint. You can also use yellow ink for a similar effect. This step enhances the pre-shading effect done with the white.
Decals and Varnishing
Apply gloss varnish (Vallejo Mecha gloss varnish) to create a smooth surface for decal application. Place the decals, using Microset for better adhesion, and leave to dry. Post drying, cover the model with another layer of gloss varnish.
Metallics and Matte Varnishing
Paint the metallic parts of the model while waiting for the decals to dry. Following this, cover the entire model with a coat of matte varnish. This helps even out the model’s look and prepares it for oil washes. If you want a cleaner appearance for your model, apply a gloss varnish before panel lining.
Canopy and Windows
Block in the windows on the canopy with black. Paint the frames and windows with Sotek Green, gradually adding white to create lighter shades. For a more varied look, paint each panel differently to suggest varied light reflections.
Detailing and Chipping
Carefully apply chipping effects using Rhinox Hide. Focus on the edges and areas where wear would naturally occur. For a more three-dimensional look, highlight the lower edges of the chips with a mix of Yriel Yellow and white.
Oil Wash for Panel Lining
Mix Burnt Sienna and Black oil paints with Sansodor mineral spirit to create an oil wash. Carefully apply this wash to the panel lines. This step adds depth and a weathered look to the model.
Final Touches
Finish by edge highlighting the details using a mix of Yriel Yellow and white. This brings out the model’s features and adds depth to its appearance.
Show it off!
As you progress, feel free to adapt and tweak techniques to suit your style. Good luck! When you’ve finished, why not pop into our Discord and show it off to other website members? 🙂
Explore more Legions Imperialis Tutorials
If you don’t have an account, please sign up here! The website currently has over 350 video tutorials with steps and tips, plus a selection of PDFs. If you are not sure about joining, you can explore my free videos with a free membership, or take the plunge and become a full subscriber for full access.
If you’d prefer to support me on Patreon, please visit: https://www.patreon.com/RichardGray [...]
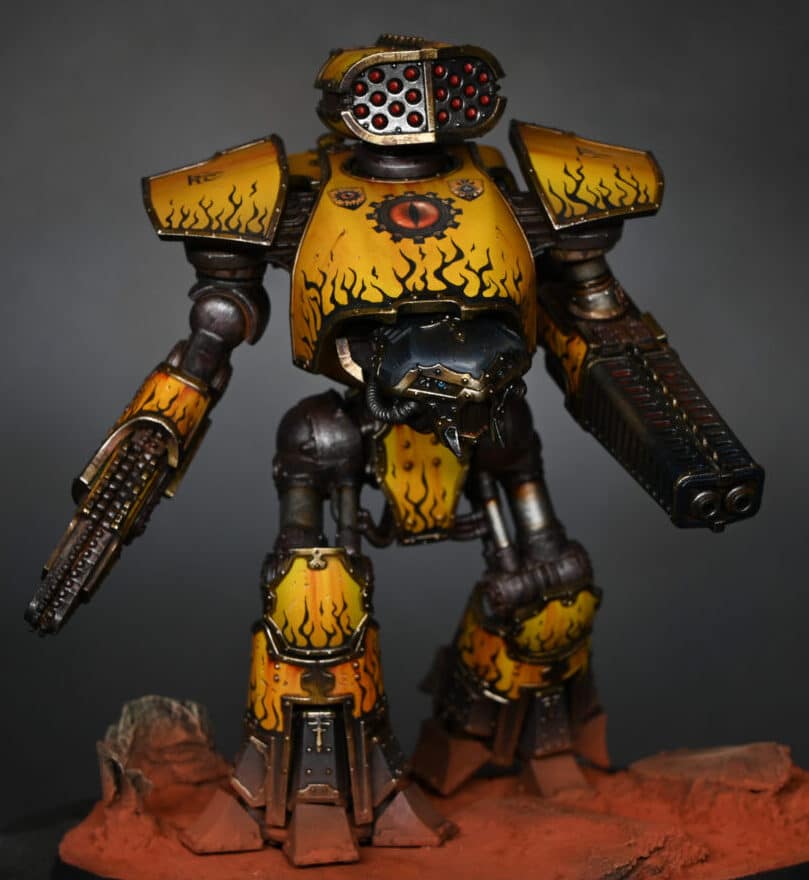
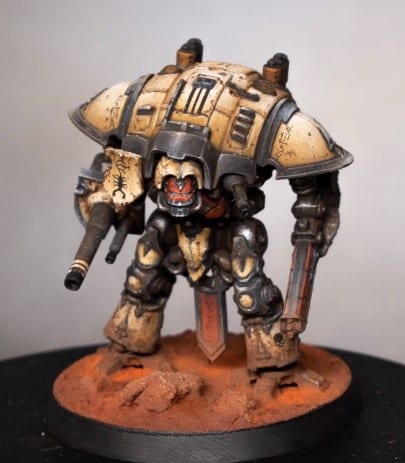
My lovely wife got me a reaver titan for my birthday, so I thought I’d have a bash at painting it up for the Legio Fureans. I’ve done it as a gaming piece, but I’ll be doing a Warlord for a potential Golden Demon entry!
You can watch a tutorial video on how I painted my Legio Fureans Reaver, plus a list of the paints I used and a step-by-step written guide with tips by following this link:
Video Tutorial: How to Paint a Legio Fureans Reaver
There will be another video for Be’lakor next, plus a video for painting a Space Marine head.
I’ve started work on painting Black Templars for gaming, in a similar fashion to the Imperial Fists and Ultramarines videos I have done.
Make sure you are logged in to view my video content. If you can’t access that page, sign up as a “Friend” – it’s completely free, plus you get to watch the below videos, too!
Free Video Tutorials
Free videos for logged in members – just sign up as a ‘friend’ to view and click any of the thumbs.To explore all of these, visit this page!
If you don’t have an account, please sign up here! The website currently has over 350 video tutorials, plus step by step guides and PDFs. You can explore more free videos with a free “freebies” membership, or take the plunge and become a full subscriber for full access.
If you’d prefer to support me on Patreon, please visit: https://www.patreon.com/RichardGray [...]
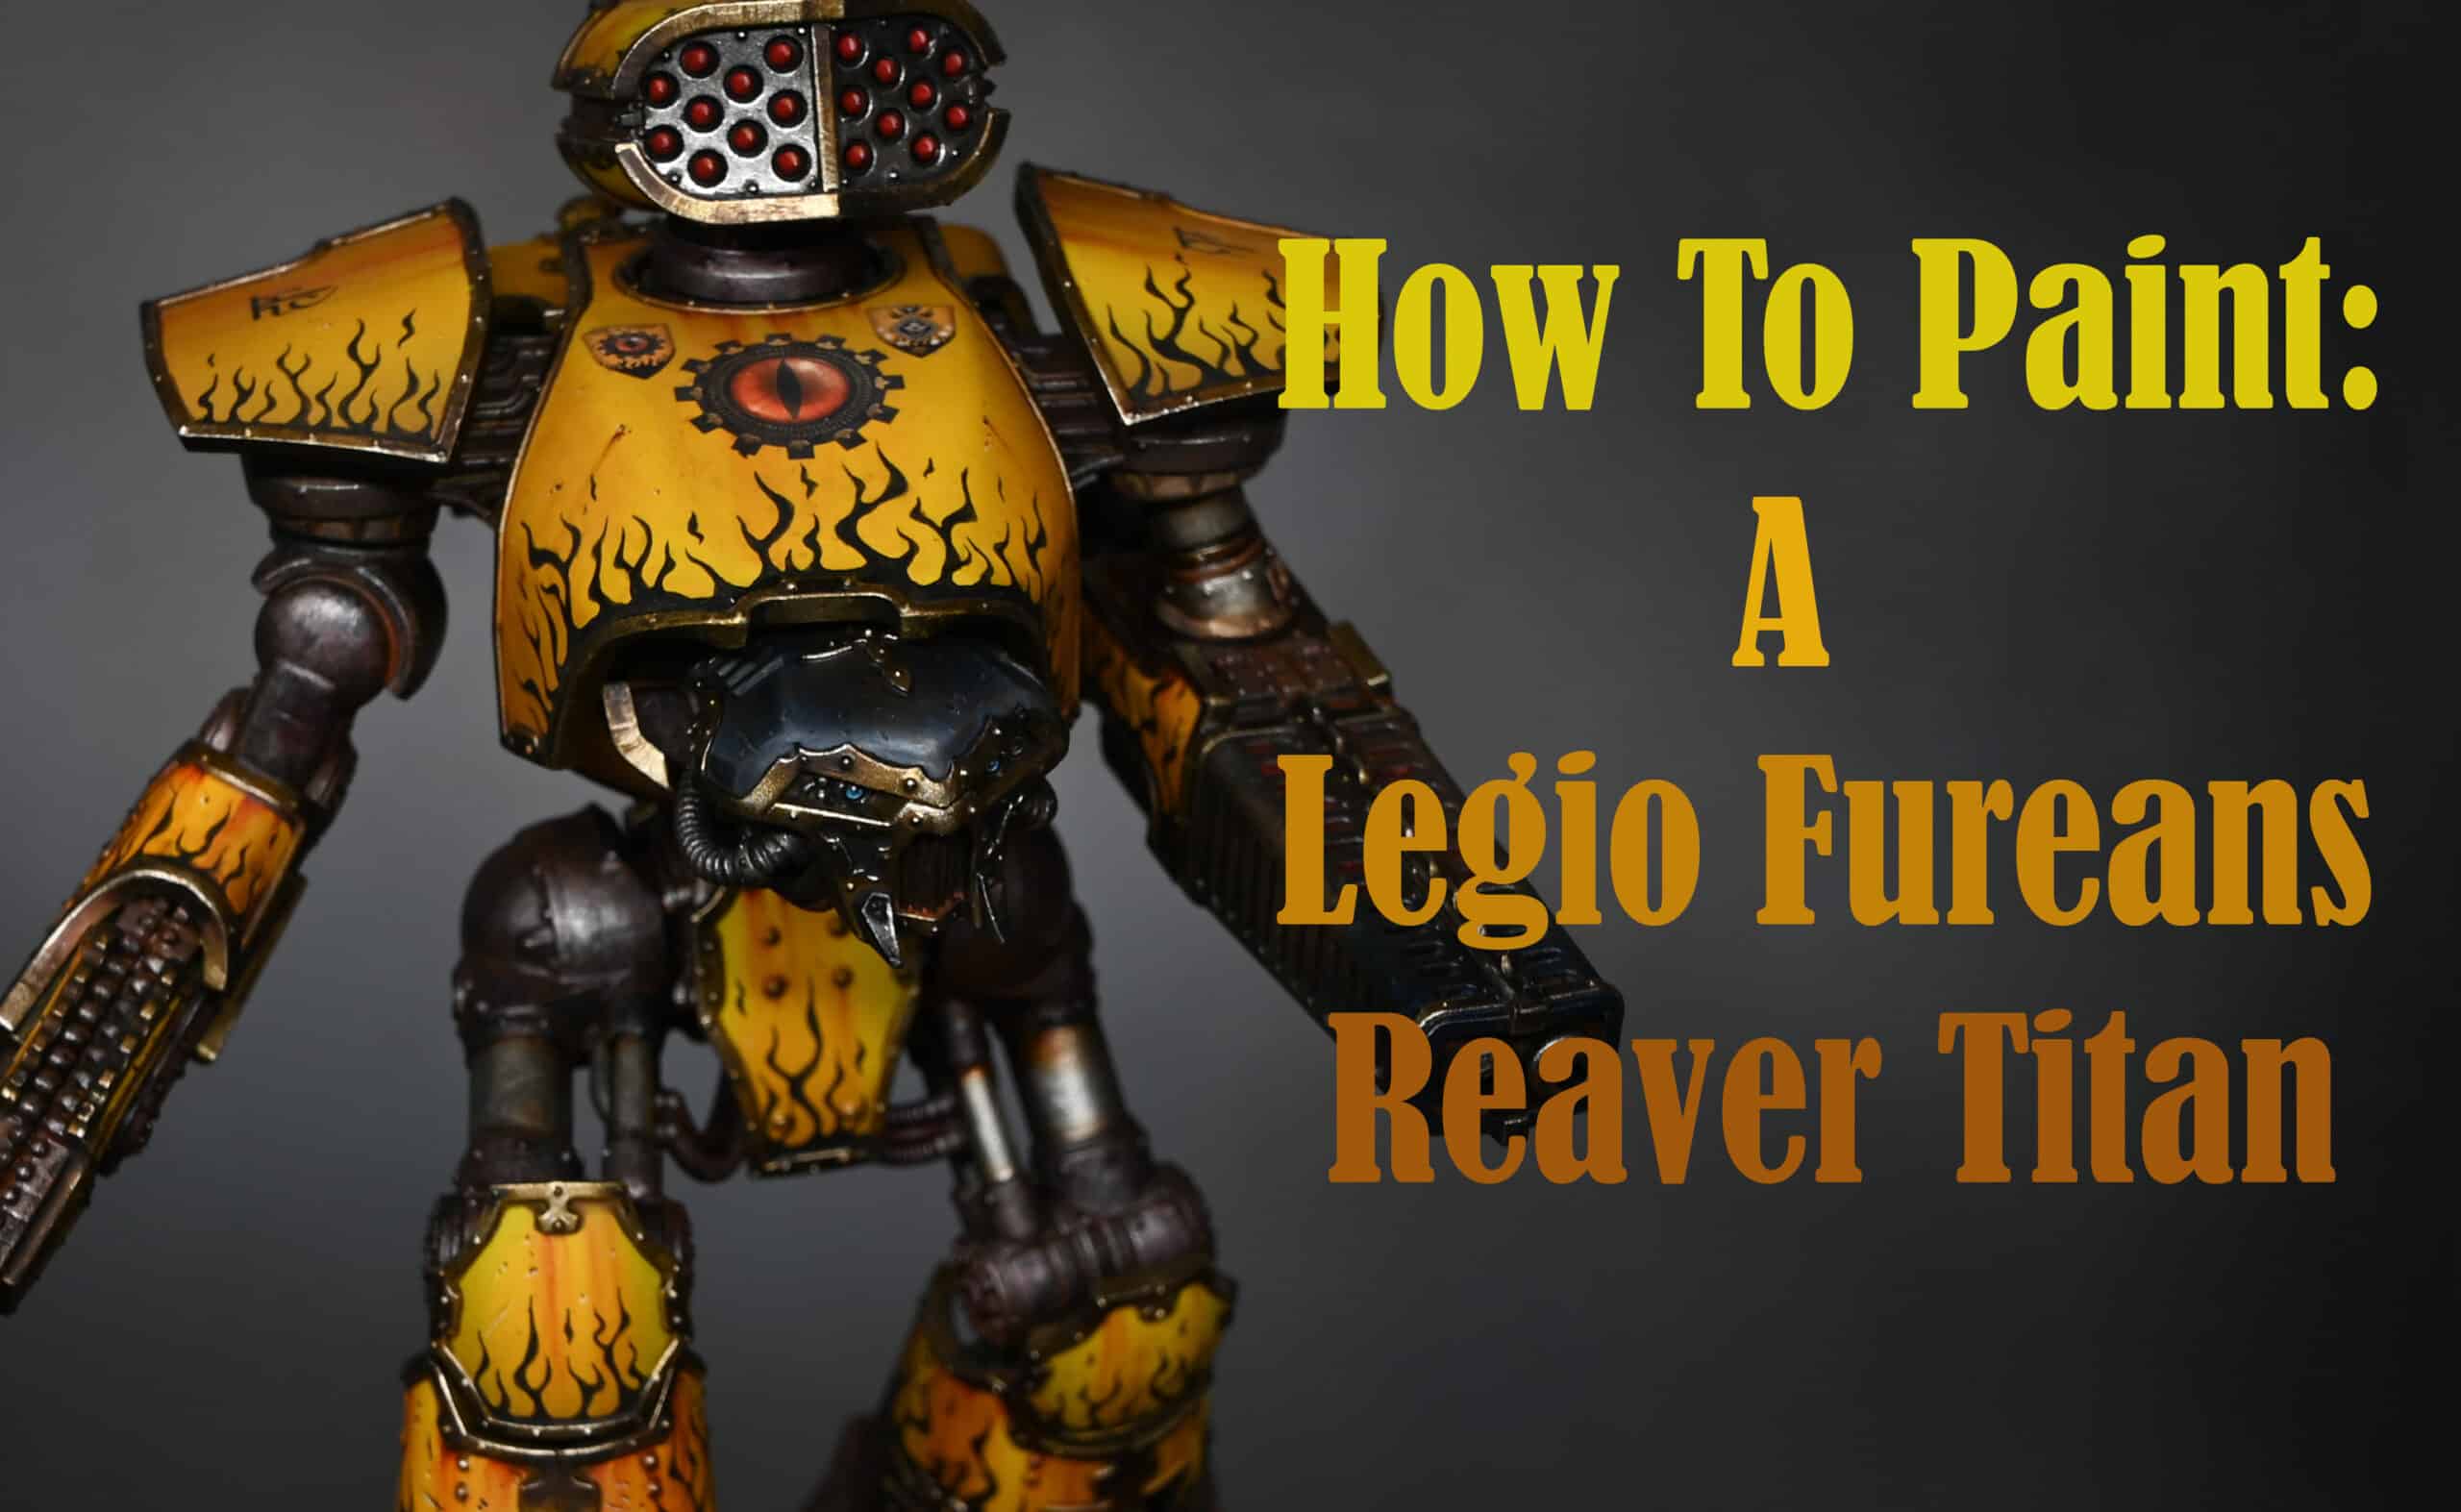
This video tutorial shows How to Paint a Legio Fureans Reaver (Tiger Eyes) from the Adeptus Titanicus game. I’ve done it as a gaming piece, but I’ll be doing a Warlord for a potential Golden Demon entry.
All videos are recorded in HD 1080p or higher – use full screen for the full effect and let the video load completely. You can also click the little “cog” and change the speed of the video, if I am going too fast (or slow!).
Materials and Paints:
Paints from Games Workshop (Yriel Yellow, Flash Gitz Yellow, Mournfang Brown, XV-88, Magos Purple Contrast, Technical Stormshield, Corvus Black, Sotek Green, Rhinox Hide), Vallejo (Dark Sea Grey, German Grey, Black, Metal Colour Burnt Iron, Metal Colour Chrome, Ice Yellow, White), and Scale 75 (Necro Gold).
Oil Colours: Winsor and Newton’s Sansodor mineral spirit, Black, and Burnt Sienna.
Primer: Badger Ultimate Primer in Black.
Airbrush: Infinity CR Plus, set at about 30-35 PSI.
Additional Tools: Mixing cups, a selection of brushes and a magnifying headset.
Step-by-Step Guide:
Priming: Start with a base coat of black primer.
Airbrushing the Carapace:
Dilute Yriel Yellow with Vallejo airbrush thinner. Apply several coats for a solid finish.
Optionally, start with a base of XV-88 for a quicker yellow hue.
Add depth with Mournfang Brown in recessed areas.
Reapply Yriel Yellow for a smooth blend.
Highlight the edges with Flash Gitz Yellow.
Mix a bit of Mournfang Brown with Yriel Yellow for a gentler transition.
Trim Painting:
Apply Necro Gold, thinned down to about a 50/50 mix with water.
Add depth with a wash of Aggrex Earthshade.
Detailing with Black Flames:
Hand-paint black flames using Model Color Black. Start with simple S-curves, then refine.
Applying Decals:
Apply a gloss varnish, then the decals with microset.
Seal with matt varnish after drying.
Oil Weathering:
Apply Burnt Sienna oil paint for realistic streaking effects.
Scratches and Dents:
Use Rhinox Hide for scratches, followed by Ice Yellow on the lower edges for a 3D effect.
Highlighting and Shading Trim:
Reapply Necro Gold, then blend with Vallejo Chrome for brighter highlights.
Use Wild Wood contrast paint for shading.
Main Structure Painting:
Stipple on Burnt Iron metallic colour.
Add depth with a Magos Purple wash, followed by a diluted Mournfang Brown wash.
Painting the Head and Lenses:
Start with a black base, then layer up highlights with German Grey and Dark Sea Grey.
Glaze over with Corvus Black to tone down and blend highlights.
Paint the lenses with Sotek Green and white highlights.
Finishing Touches:
Apply final weathering, varnishing, and any additional detailing as needed.
Richard’s Pro Tips:
Patience is key when airbrushing. Build up the layers gently for a more professional finish.
Experiment with brush strokes and blending to achieve your desired effect.
Each miniature is a canvas for creativity – don’t be afraid to add your own flair!
Always thin your paints for smoother application and a more refined look.
Take breaks! Detail work can be taxing on the eyes and hands.
More Free Video Tutorials
Free videos for logged in members – just sign up as a ‘friend’ to view and click any of the thumbs.To explore all of these, visit this page!
If you don’t have an account, please sign up here! The website currently has over 350 video tutorials, plus step by step guides and PDFs. You can explore more free videos with a free “freebies” membership, or take the plunge and become a full subscriber for full access.
If you’d prefer to support me on Patreon, please visit: https://www.patreon.com/RichardGray [...]
I was delighted to be interviewed by the Warhammer Community page, after painting up my Warhammer Titan!
There are interviews by three other painters, too – check it out here.
My interview is below!
Richard: I’m a huge fan of Adeptus Titanicus, so there was no doubt in my mind that I would be painting at least one (I’ve already ordered another!) of the new Warmaster Titans.
The kit is so well designed that it’s a joy to build. In particular, I was over the moon to see that the toes are separate pieces, so it’s now even easier to give your Titan a dynamic pose.
I decided to use an airbrush to paint the Warmaster because the kit is so big. The trim was probably the biggest hurdle, but I found that using Contrast paints to shade the metallics really helped the process.
Now I just need to paint a Legio Mortis Warmaster.
Learn how I painted him and my other Adeptus Titanicus bois by following my tutorials, online –
Videos Not Showing?
To view any of my paid tutorials, you need to be a member of the website – please click below to log in or join the site.
Not sure about joining just yet? Check out my Youtube for all my free tutorials or sign up as a free “friend” member on this site and visit the Freebies video page!
If you’d prefer to support me on Patreon, please visit: https://www.patreon.com/RichardGray [...]
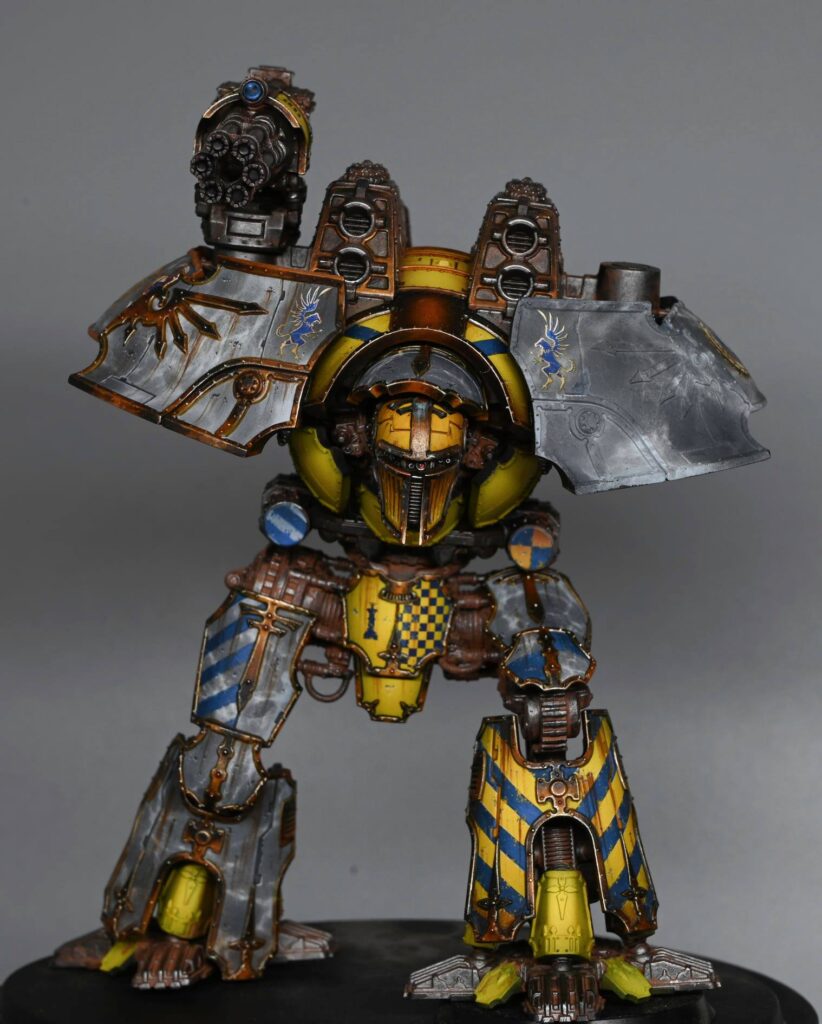
I’ve been going mad painting trim for days! I was fortunate to be sent a pre-release version of the new Warmaster, so here it is in War Griffons colours, along with two long How to Paint an Adeptus Titanicus Warmaster videos, if you’d like to give some of the techniques a go!The magnets needed for the arms are 6mm x 2mm
How to Paint an Adeptus Titanicus Warmaster : Part One
All videos are recorded in HD 1080p or higher – use full screen for the full effect and let the video load completely.
For part one, the following paints were used: Vallejo: Neutral Grey, Pale Grey Blue, Heavy Gold Brown, German Grey, Metal Colour Gold, Metal Colour Burnt Iron, Chrome Games Workshop: Balor Brown, Phalanx Yellow, Mephiston Red, Fire Dragon Bright, Mournfang Brown, Athonian Camoshade, Contrast Black Templas, Contrast Snakebite Leather, Contrast Guilliman FleshP3: Morrow White Winsor And Newton: Burnt Umber Water Mixable Oil ColourScale 75: Victorian Brass, Dwarven Gold Micro Set Gloss and Matte Varnish
Top Tips: How to Paint an Adeptus Titanicus Warmaster
Start with a clean model: Remove mould lines and prepare the model for painting.Choose the right primer: Use a durable black primer, such as Badger Ultimate Primer Black.Dry brushing for a worn look: Dry brush the model with Vallejo Burnt Iron Metallic paint using a large, soft brush in circular motions.Achieve a grainy, worn appearance that highlights raised areas.Add weathering powder for a grimy effect:Mix aged rust Forge World weathering powder with water and apply to the model.Dry brush over it to create a metallic and grimy look, enhancing the weathering effect.Apply a wash for depth:Use a large brush to apply a wash like Athonian Camoshade or Agrax Earthshade to add depth to the model.Separate panels before applying wash for efficiency, especially if using an airbrush.Painting the trim:Paint the trim with Scale 75 Victorian Brass and give it a wash for added detail.Use Contrast Paint (Snakebite Leather) in the recesses to make the trim stand out.Shade the trim for realism:Choose a shade like Contrast Guilliman Flesh to shade the trim for a realistic effect.Consider using Contrast Snakebite Leather for a quicker alternative.Optional edge highlighting for shine:Optionally, use a lighter colour like Dwarven Gold for edge highlighting to add shine to the model.Weathering scratches:Paint weathering scratches using streaking techniques and consider variations in opacity.Drag thick streaks down and manipulate them with a damp brush for a natural look.Gloss varnish for a final touch:Apply gloss varnish by hand for a shinier finish, especially around the rim where transfers meet the armour panel.Glossier finishes enhance the overall weathered appearance.Weathering with oil wash:Apply a weathering wash using Heavy Gold Brown by Vallejo.Be mindful of visible circles around decals, as the pigment settles in those areas during the weathering process.Other tips:Save time by being a bit more sloppy with the initial wash before painting the yellow sections.Consider airbrushing the metallics to achieve a consistent look across the model.
How to Paint an Adeptus Titanicus Warmaster : Part Two
For part 2, the following paints were used:
Vallejo: Neutral Grey, Pale Grey Blue, Heavy Gold Brown, German Grey, Metal Colour Gold, Metal Colour Burnt Iron, Chrome Games Workshop: Balor Brown, Phalanx Yellow, Mephiston Red, Fire Dragon Bright, Mournfang Brown, Athonian Camoshade, Contrast Black Templas, Contrast Snakebite Leather, Contrast Guilliman Flesh P3: Morrow White Winsor And Newton: Burnt Umber Water Mixable Oil Colour Scale 75: Victorian Brass, Dwarven Gold Micro Set Gloss and Matte Varnish
Top Tips for Part 2:
Snakebite Leather Contrast Paint: Time to define that armour trim. Grab your Snakebite Leather and carefully trace around the trim. Keep it tidy, but don’t stress—messiness is part of the charm.
Victorian Brass (Scale 75):Now, let’s make that trim stand out. Spend some extra time if you fancy making it posh, but for a gaming piece, a wash or contrast colour works a treat.
Dry Brushing the Bodywork: Grab a dry brush and add shadows to those curves. Imperfections? Embrace them—it adds character!
Gun Barrel Detailing: Be gentle as you dry brush the gun barrel with Age Rust and Screaming Skull. Keep it realistic in scale, avoiding excessive height.
Rust Effects: Use German Grey or Dark Grey for the darker areas. Add rust effects using Void World Weathering Powders—both orange and age rust. Keep it real, considering the scale you’re working in.
Banner Strip: This is the intricate part. Thin your paint, use German Grey or Dark Grey, and take your time. If freehanding text feels daunting, decals are a viable option. Legibility is key—fancy text is cool, but make sure it’s readable.
Fixing Mistakes: Don’t panic if you mess up the lettering. You can fix it with the base colours on your wet palette. Cut into it with base colours for cleaner edges.
More Adeptus Titanicus and Titan Videos can be watched by clicking the thumbnails below!
If you don’t have an account, please sign up here! The website currently has over 350 video tutorials, plus step by step guides and PDFs. You can explore my free videos with a free “freebies” membership, or take the plunge and become a full subscriber for full access.
If you’d prefer to support me on Patreon, please visit: https://www.patreon.com/RichardGray [...]

Here is the Warmaster Titan kit review, along with a 360 video of the model I painted!
Warmaster Titan Kit Review
If you don’t want to listen to me, (which is fine!), welcome to my detailed review of the new Warmaster Titan for Adeptus Titanicus. I was fortunate enough to receive a pre-release model, and in this Warmaster Titan Kit Video Review, I’ll not only share my thoughts on the model but also provide insights into the painting process.
Model Overview
The Warmaster Titan offers an array of features, including an assortment of weapons like melter cannons, turbo laser destructors, Vulcan mega bolters, missile launchers, and flamers. With three head options, you can tailor the appearance to suit the legion of your choice.
My Painting Tips:
Choosing Legion Colours: Select colours that align with your legion theme. Consistency is key for a visually cohesive and impressive result.
Detail Attention: Delve into the small details; this model boasts intricate components that can truly shine with careful painting.
Weapon Variety: Distinguish between weapon types with suitable paint variations to enhance the visual appeal of your Titan.
Head Selection: Carefully pick a head that complements your chosen legion theme, as it plays a significant role in defining the Titan’s overall appearance.
Poseability Magic: Make the most of the Titan’s poseability by removing any restricting tabs. Experiment with dynamic poses to add realism.
Magnetisation for Flexibility: Utilise 6×2 mm magnets for arm attachments, enabling easy weapon swaps and pose adjustments, adding a layer of flexibility.
What else can I do?
Card Organisation: Keep track of weapon stats with the included cards. Consider using an app for added convenience during gameplay.
Experimenting with Heads: Try experimenting with heads from other models for a unique touch, ensuring proportions align with your chosen legion theme.
So, in short?
The Warmaster Titan is a fantastic model, offering impressive detail and poseability. Take your time with the painting process, experiment with customisation options, and enjoy the journey of bringing this mighty Titan to life.
For a more immersive experience, don’t forget to watch my painting tutorials, where I walk you through the Warmaster Titan and share additional insights from my painting experience.
Paint your Titan with Related Tutorials!
Free Video Tutorials
Free videos (for logged in members – just sign up as a ‘friend’ to view and click any of the thumbs.To explore all of these, visit this page!
If you don’t have an account, please sign up here! The website currently has over 350 video tutorials, plus step by step guides and PDFs. You can explore more free videos with a free “freebies” membership, or take the plunge and become a full subscriber for full access.
If you’d prefer to support me on Patreon, please visit: https://www.patreon.com/RichardGray [...]
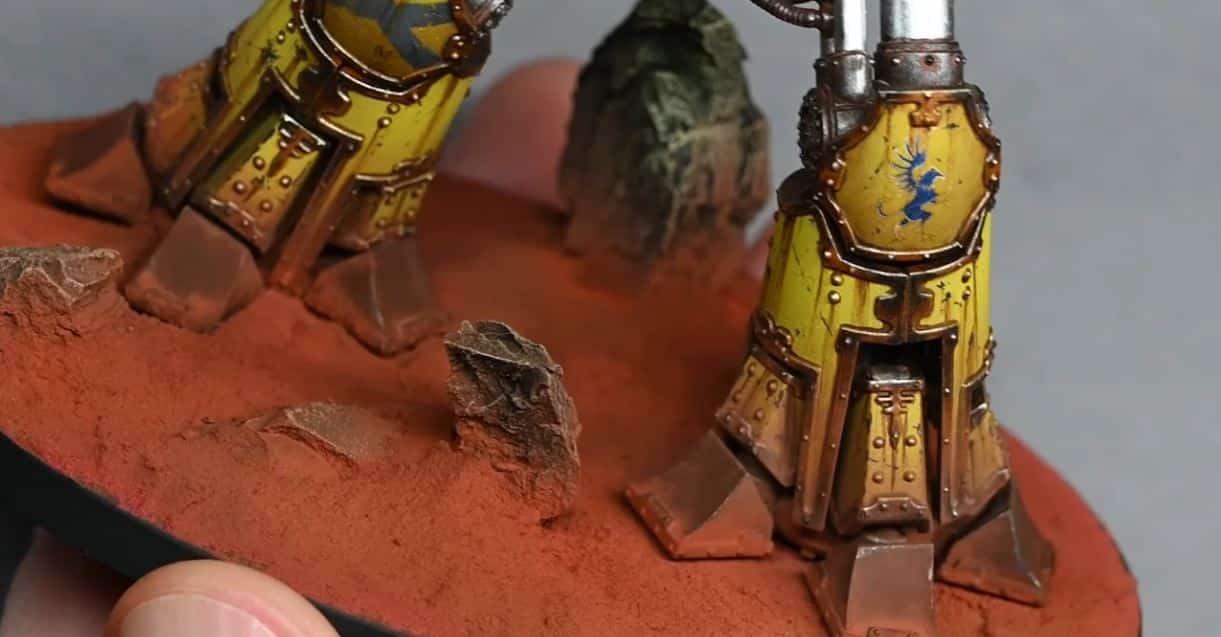
This video shows you how to create a Titan Martian Base, a Martian red landscape for your Adeptus Titanicus Titan, or for any large model you like, really!
Video Tutorial: Titan Martian Base
All videos are recorded in HD 1080p or higher – use full screen for the full effect and let the video load completely.
Paints and Materials Used
Fimo and Milliput: For making rock shapes.
Baking Soda: For creating the fine-grained surface texture.
Paints:
Scale 75’s Antares Red
Scale 75’s Red Leather (or similar Games Workshop red and brown colours)
Games Workshop’s Deathworld Forest
Games Workshop’s Ushabti Bone
Weathering Powders:
Forge World’s Aged Rust
Forge World’s Orange Rust
Matte Varnish: For sealing the base.
Tools:
Brushes for painting and dry brushing.
Sculpting tools or a flat surface for applying the baking soda mixture.
Airbrush for applying weathering powder (optional).
Other Materials:
Water: For mixing with weathering powders.
Super Glue: For securing rocks to the base.
Q-tip: Slightly damp, for cleaning up excess weathering powder.
Step by Step Guide
Preparing the Base: Start by placing your model on the base and arrange rocks around it. Use rocks made from a mixture of Fimo and Milliput, baked and then broken into shapes.
Creating the Surface: Mix baking soda (for fine texture), Scale 75’s Antares Red and Red Leather paint (or similar GW paints), and matte varnish to form a sticky, wet-looking substance. This creates the dusty, Martian surface.
Applying the Surface Mixture: Carefully apply the mixture to the base, ensuring it’s pushed up against the rocks. Use a large, slightly damp brush to stipple and smooth out the mixture, avoiding unnatural marks.
Using Cracking Paint: Apply a thin layer of Martian Ironearth cracking paint for subtle cracking effects. Ensure it’s not too thick to maintain the scale’s integrity.
Painting the Rocks: Once dry, paint the rocks with Vallejo Model Color Black or a similar black paint. Then dry brush with GW Deathworld Forest for initial colour, followed by Ushabti Bone for highlights.
Applying Weathering Powder: Mix Forge World Aged Rust and Orange Rust powder with a lot of water, and spray over the base using an airbrush. Focus on the lower parts of the model for a realistic effect. For manual application, use a large, soft brush.
Cleaning Up: After the weathering powder dries, use a slightly damp Q-tip to remove excess powder from the rocks and lower sections of the Titan, enhancing the details and textures.
Final Touches: Seal the base with a matte varnish to preserve the dusty look and reduce the brightness of the orange rust effect.
More Adeptus Titanicus
If you don’t have an account, please sign up here! The website currently has over 350 video tutorials with steps and tips, plus a selection of PDFs. If you are not sure about joining, you can explore my free videos with a free membership, or take the plunge and become a full subscriber for full access.
If you’d prefer to support me on Patreon, please visit: https://www.patreon.com/RichardGray [...]
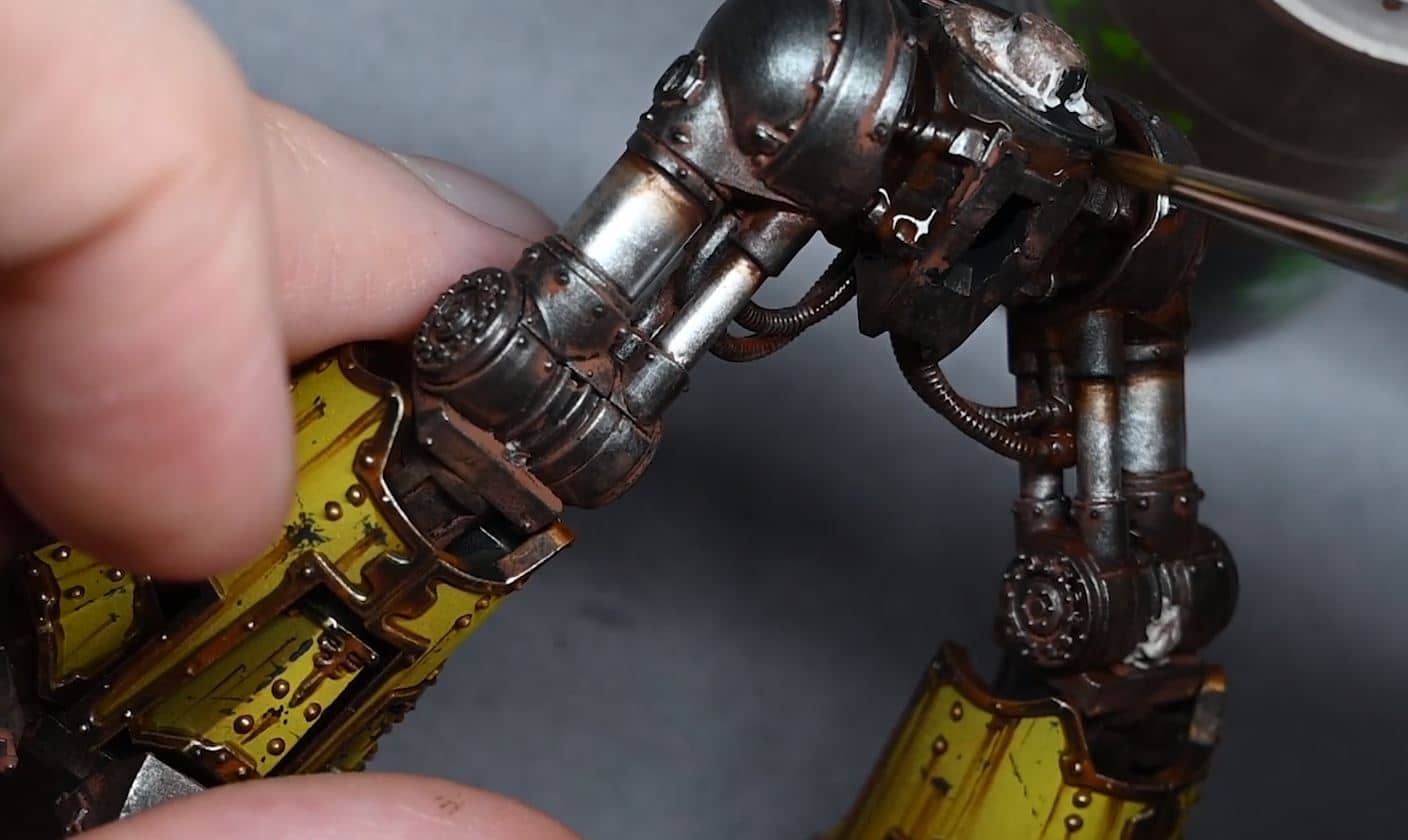
This video shows how to paint the metal and weathering effects on the legs of the Adeptus Titanicus Titan. Enhancing the metalwork, particularly the armour trim and skeletal structure, to achieves a detailed and realistic finish that looks fantastic on the battlefield. We’ll be using a mix of Games Workshop, Vallejo, and Forge World paints to bring our Titan to life.
Video: How to Paint Weathering and Metal on an Adeptus Titanicus Titan
All videos are recorded in HD 1080p or higher – use full screen for the full effect and let the video load completely.
Paints
Games Workshop:
Agrax Earthshade
Wyldwood (Contrast)
Contrast Aggaros Dunes
Forge World:
Aged Rust (Weathering Powder)
Vallejo Metal Colour (Airbrush Ready):
Victorian Brass (Scale 75 for an alternative base colour)
Magnesium
Gold
Chrome
Winsor & Newton:
Water Mixable Oil Colour Burnt Umber
Brushes
A fine detail brush for applying precise highlights and for controlled application of contrast paints and weathering powders.
A medium brush for applying base coats and larger areas of colour.
A soft, large brush for applying washes and for dusting off excess weathering powders.
I use the Artis Opus range of brushes, but any good quality brush is recommended.
Step by Step – Weathering and Metal on the Adeptus Titanicus Titan
Preparing the Armour Trim
Base Coat: Begin with a base coat of Scale 75 Victorian Brass over the trim. This provides a solid foundation for subsequent layers.
Initial Shading: Apply Contrast Aggaros Dunes over the Victorian Brass to introduce depth and shading to the trim. This step should have been completed in earlier stages of the model’s painting process.
Enhancing the Trim
Adding Depth: Use Games Workshop’s Wyldwood contrast paint to darken recesses and joints in the trim. The high contrast between the dark recesses and the metallic brass creates visual interest and depth. Apply the paint selectively to areas that would naturally accumulate shadow.
Highlighting: Vallejo Metal Colour Gold is used to highlight the edges of the trim. Due to its fluidity, it provides a smooth application but be mindful of its runniness. Lightly touch the edges with a fine brush to catch the raised areas.
Painting the Skeleton
Base Layer: Vallejo Metal Colour Magnesium serves as the base layer for the Titan’s skeletal structure. Its liquidity ensures it flows well into recesses but exercise caution to prevent pooling.
Weathering: Apply Forge World’s Aged Rust weathering powder mixed with water to the skeletal structure for a grimy, rusted effect. Focus on areas that would naturally collect dirt and rust, maintaining a balance to avoid obscuring details.
Sealing the Weathering: Once dry, seal the weathering with a mix of Agrax Earthshade. This reactivates and fixes the weathering powder, giving a durable and realistic rust effect.
Detailing Pistons and Metal Accents
Chrome Pistons: Vallejo Metal Colour Chrome is applied to pistons for a bright, reflective finish. Multiple thin layers may be needed for uniform coverage.
Oily Effects: Windsor and Newton’s Water Mixable Oil Colour Burnt Umber is used to simulate oil and grime on pistons and mechanical parts. Dilute with water for a manageable consistency and apply at joints and moving parts for a realistic oily effect.
Finishing Touches
Reichland Fleshshade Glaze: Optional, but can be used to add warmth to metal parts, particularly useful on brass or gold trims to simulate reflected light or heat staining.
Highlighting and Cleaning Up: After applying weathering and shading, go back to highlight edges and clean up any overspill with your base metallic colours. This step sharpens details and enhances the overall contrast of the model.
Techniques and Tips
Trim Detailing: Use the fine detail brush with Vallejo Metal Colour Gold to highlight the edges of the trim, applying the paint carefully to avoid spillage onto other areas.
Skeleton Base Layer: Apply Vallejo Metal Colour Magnesium with a medium brush, ensuring even coverage and avoiding pooling in recesses.
Weathering Powder Application: Mix Aged Rust with water in the well palette and apply with a large brush, targeting recesses and areas where rust would naturally accumulate.
Chrome Pistons: Use Vallejo Metal Colour Chrome, applying multiple thin layers as needed for a smooth, reflective finish.
Oily Effects: Dilute Winsor & Newton Water Mixable Oil Colour Burnt Umber with water and apply at the tops of pistons and around mechanical parts to simulate oil and grime.
Watch all the tutorials for my War Griffons Warlord!
War Griffons Warlord
A series of quick videos on the different techniques used on this model. These include the marble effect, the stripes, applying decals and weathering and metal.
Watch Now
Free Video Tutorials
Free videos for logged in members – just sign up as a ‘friend’ to view and click any of the thumbs.To explore all of these, visit this page!
If you don’t have an account, please sign up here! The website currently has over 350 video tutorials, plus step by step guides and PDFs. You can explore more free videos with a free “freebies” membership, or take the plunge and become a full subscriber for full access.
If you’d prefer to support me on Patreon, please visit: https://www.patreon.com/RichardGray [...]
In this tutorial, we’ll cover how to achieve a dynamic heat bloom effect on a Melta Cannon for an Adeptus Titanicus Reaver Titan, specifically for the Legio Gryphonicus, also known as the War Griffins. This effect will simulate the intense heat generated by the weapon, using a gradient of colours to represent the heat bloom.
Video: How to Paint a Melta Cannon Heat Bloom
All videos are recorded in HD 1080p or higher – use full screen for the full effect and let the video load completely.
Materials Needed:
Airbrush and Thinner: For applying smooth gradients of colour.
Brushes: A fine detail brush for precise application and a dry brush for highlighting.
Paints:
Vallejo Metal Colour Magnesium (for the metallic base).
Vallejo Metal Colour Chrome (for highlighting metallic areas).
Scale 75 Victorian Brass (for trim detailing).
Games Workshop Contrast Paints: Iyanden Yellow, Magos Purple, Talassar Blue (for the heat effect).
Games Workshop Contrast Aggaros Dunes (for additional trim detailing).
Melta Cannon Step-by-Step Guide:
Base Coating the Weapon:
Begin by airbrushing the Melta weapon’s recesses with Averland Sunset, ensuring the weapon’s holes face directly towards the airbrush to prevent uneven shading. Don’t worry about overspray on the weapon casing; this will be covered later.
Adding Initial Heat Glow:
Switch to Troll Slayer Orange and apply over the Averland Sunset, creating a gradient effect from the weapon’s recesses outward. Ensure even coverage without tilting the airbrush to maintain consistency across the recesses.
Masking for Overspray:
To prevent overspray on adjacent yellow armour panels, use masking tape or modelling putty. This step is crucial for maintaining clean lines and avoiding accidental paint transfer.
Metallic Base Coat:
Paint the metallic parts of the weapon with Vallejo Metal Colour Magnesium, carefully avoiding the recesses to maintain the glow effect. This creates a solid base for subsequent detailing.
Trim Detailing:
Apply Scale 75 Victorian Brass to the weapon’s trim, followed by a coat of Games Workshop Contrast Aggaros Dunes to add depth and dimension to the detailing.
Heat Bloom Effect:
Begin the heat bloom effect by airbrushing Iyanden Yellow halfway along the Melta Cannon barrel, avoiding the recesses. Layer Magos Purple over the Iyanden Yellow, leaving some yellow visible for a blended effect. Finish with Talassar Blue, applying it over the Magos Purple but not covering all the previous layers, creating a transition from yellow to deep blue.
Highlighting and Finishing Touches:
Dry brush Vallejo Metal Colour Chrome on the non-painted metallic areas to enhance the metallic sheen. Carefully highlight the lower edges of the weapon with Chrome using a normal paintbrush, accentuating the heat bloom’s impact.
Final Assembly:
Once all painting is complete, remove any masking materials and assemble any remaining parts of the Titan, paying attention to aligning the heat bloom effects correctly.
This technique for painting a heat bloom on a Melta Cannon adds a visually striking element to your Adeptus Titanicus Titans, emphasizing the weapon’s power and the heat it generates. The use of contrast paints over a metallic base allows for a vibrant, dynamic effect that stands out on the battlefield
Watch all the tutorials for my War Griffons Warlord!
War Griffons Warlord
A series of quick videos on the different techniques used on this model. These include the marble effect, the stripes, applying decals and weathering.
Watch Now
If you don’t have an account, please sign up here! The website currently has over 350 video tutorials with steps and tips, plus a selection of PDFs. If you are not sure about joining, you can explore my free videos with a free membership, or take the plunge and become a full subscriber for full access.
If you’d prefer to support me on Patreon, please visit: https://www.patreon.com/RichardGray [...]
How to Paint a Mini Questoris Knight with all his tiny details, with tips on metal, weathering and using weathering powder.
Knights are the agile war machines of the Knightly houses, each one commanded by a single skilled scion. When the Titan Legions mass for war, they call upon their allied Knightly Houses to aid them, the Questoris Support Banners acting as scouts and skirmishers for their larger kin. Bristling with fearsome weapons and protected by shimmering shields, Imperial Knights are amongst the most terrifying military assets in the galaxy. Except these ones do seem very small when brushing the ankles of a Titan.
Read on to explore both video tutorials on How to Paint a Mini Questoris Knight, with all materials you need plus step by step guides.
Video: How to Paint a Mini Questoris Knight – Part One
This guide focuses on painting a knight from Adeptus Titanicus in the colours of House Malinax, laying the foundation with base painting and initial detailing before advancing to more complex techniques like weathering and decal application covered in the second part.
Materials Needed:
Base Paints: Games Workshop Balor Brown, Ushabti Bone, Ceramite White, Agrax Earthshade
Metallics: Vallejo Gun Metal
Additional: Fine detail brush, airbrush (optional for smoother base coats)
Steps:
Priming and Base Coating:
Priming: Start with a black primer to ensure deep shadows and a strong contrast base for metallic and armour parts.
Metallic Areas: Apply Vallejo Gun Metal over all metal areas. Once dry, wash these areas with Agrax Earthshade to add depth and shadow, providing a worn metallic look.
Armour Plates: Paint the knight’s armour panels with Balor Brown. This stage might require multiple thin coats for an even, opaque finish, especially over a black primer. Use an airbrush for quicker application on larger areas like the carapace.
Detailing:
Highlighting Armour: Gradually build up highlights on the armour using Ushabti Bone, focusing on raised edges and areas that would naturally catch the light. Ceramite White can be used for final sharp highlights or points of interest.
Cleaning Up: Use a fine detail brush to tidy up any overspill or to sharpen edges between different colours, ensuring the model’s details are crisp and clear.
Preparing for Further Detailing:
Applying Washes: To add depth and further define the armour panels, apply Agrax Earthshade strategically into recesses and around detail work. This step enhances the model’s textures and adds a realistic shadow effect.
Additional Colour Details: Decide on accent colours for smaller details such as the cockpit, weapon casings, or heraldry that will complement the knight’s primary colour scheme. This adds visual interest and character to your model.
Sealing the Model: Once satisfied with the base painting and initial detailing, consider applying a matte varnish to protect your work before moving on to advanced weathering techniques and decal application. This step is optional but recommended if you plan on handling the model frequently.
The focus at this stage is on building a solid and clean colour foundation, preparing the knight for the weathering and detailing stages that follow. Patience is key—take your time with each layer and ensure complete drying between steps to achieve the best results.
Video: How to Paint a Mini Questoris Knight – Part Two
Weathering, Decal Application, and Basing Guide
In this continuation of our painting guide, we’ll delve into the final steps to bring your House Malinax Adeptus Titanicus knight to life with vibrant colours, detailed weathering, decals application, and an engaging base.
Materials Needed:
Primary Paints: Games Workshop Mephiston Red, Evil Sunz Scarlet, Wild Rider Red, Fire Dragon Bright, Lothern Blue
Weathering Powders: Forge World Aged Rust, Orange Rust
Decal Solutions: Micro Sol, Micro Set
Additional: Winsor and Newton Burnt Umber Water Soluble Oil Paint
Base Materials: Baking Soda, Vallejo Charred Brown, and a red of your choice (e.g., Typhus Corrosion for a darker tone)
Varnishes: AKInteractive Matte and Ultra Matte
Steps:
Painting Details:
Head, Chest, and Chainsword: Paint these components with Mephiston Red for a rich, dark base. Utilize Evil Sunz Scarlet and Wild Rider Red for highlights, focusing on raised areas and edges to create depth. For the knight’s eyes, a dab of Lothern Blue accented with Fire Dragon Bright captures attention.
Black Trim: Highlight black areas with Vallejo’s German Grey, progressing towards lighter greys like Blue Grey and Pale Blue Grey towards the edges for a nuanced, realistic metal effect. This contrast against the bone-coloured armour emphasizes the knight’s details.
Applying Decals:
Preparation: Apply a gloss varnish to the areas where decals will be placed. This provides a smooth surface, minimizing air bubbles and silvering.
Decal Application: Soak your decals in water until they slide off the backing paper easily. Apply Micro Set to the model’s surface before positioning your decal. Once in place, use Micro Sol over the decal to soften it, allowing it to conform to the model’s contours. After drying, seal with a gloss varnish for protection and an even surface.
Matte Finish: Once the decals are sealed and the varnish is dry, apply an ultra matte varnish over the entire model to unify the sheen and protect your work.
Weathering:
Initial Weathering: Use a fine brush to apply tiny chips and scratches with Rhinox Hide, focusing on areas that would naturally see wear. Keep these marks extremely small to maintain the model’s scale.
Oil Weathering: Dilute Winsor and Newton Burnt Umber Water Soluble Oil Paint with water. Apply this mixture selectively around metallic parts and lower leg sections to simulate grime and wear. This step adds realism and depth to the knight.
Basing:
Texture: Mix baking soda with matte varnish and Vallejo Charred Brown (and a red of choice) to create a paste. Apply this to the base, ensuring coverage around any rocks or debris. This creates a textured ground effect.
Colouring: Airbrush Forge World Aged Rust weathering powder over the base and lightly onto the knight’s feet for cohesion between the model and its base.
Detailing: Lightly dry brush the rocks with Ushabti Bone for contrast against the rusted ground, and apply Orange Rust weathering powder in recesses for additional depth.
Final Touches:
Re-highlight metallics if needed to ensure they stand out against the weathered and mattified surfaces.
Consider adding small narrative elements to the base, like battlefield debris, to further the story of your knight’s battles.
This comprehensive guide should leave you with a beautifully detailed, weathered knight that stands out on the battlefield. Remember, the key to a great finish is patience and attention to detail, especially when working on weathering and basing to achieve a cohesive and realistic look.
Struggling with Decals?
How to Apply Forge World Decals and Weather Them
A beginners guide on how to apply Forge World decals and weather them so they look a natural part of the painting on your model. Painting and applying decals to your models adds significant details and realism, making it stand out during tabletop gaming. It’s also a lot easier than freehand! I still use decals a lot in my models, despite also enjoying freehand work.
Watch and Read Now
If you don’t have an account, please sign up here! The website currently has over 350 video tutorials with steps and tips, plus a selection of PDFs. If you are not sure about joining, you can explore my free videos with a free membership, or take the plunge and become a full subscriber for full access.
If you’d prefer to support me on Patreon, please visit: https://www.patreon.com/RichardGray [...]

A series of quick videos on how to paint a War Griffons Warlord Adeptus Titanicus Titan to game standard. This included marble effects, stripes, weathering and decals and more!
Scroll down to explore the videos in order, or use the quick links below to jumps to a technique or part of the model in particular:
Video – How to Paint a War Griffons Warlord : Marble EffectMaterials List:Marble Armour Step-by-Step Guide:Video – How to Paint a War Griffons Warlord : The StripesMaterials Needed:The Stripes Step by Step:Additional Tips:Video – How to Paint a War Griffons Warlord : Weathering and DecalsMaterials Needed:Steps:Preparing the Surface:How to Apply the Forge World Decals:Sealing the Decal:Weathering the Decal and Armour:Additional Tips:Video – How to Paint a War Griffons Warlord : Heat Bloom on Melta CannonMaterials Needed:Melta Cannon Step-by-Step Guide:Video – How to Paint a War Griffons Warlord : Weathering and Metal PaintsStep by Step – Weathering and Metal on the War Griffons WarlordPreparing the Armour TrimEnhancing the TrimPainting the SkeletonDetailing Pistons and Metal AccentsFinishing TouchesTechniques and TipsMore Titan Tutorials!
Video – How to Paint a War Griffons Warlord : Marble Effect
All videos are recorded in HD 1080p or higher – use full screen for the full effect and let the video load completely.
Materials List:
Airbrush: Essential for applying smooth base coats and gradients.
Hand disinfectant wipes or baby wipes: Used to create the marble effect.
Paints:
Vallejo Pale Grey Blue: For the initial base coat.
Vallejo Neutral Grey: To begin creating the marble effect.
Vallejo Dark Grey (German Grey): For adding darker veins to the marble.
Vallejo Heavy Goldbrown: Base colour for yellow armour sections.
Games Workshop Phalanx Yellow: For highlighting yellow armour sections.
Marble Armour Step-by-Step Guide:
Base Coat:
Begin by airbrushing Vallejo Pale Grey Blue onto the carapace of the Titan. This may require a few coats to achieve a smooth finish. The paint can be thinned a bit, but not excessively, to ensure good coverage without too much speckling.
Preparing the Wipe:
Take a hand disinfectant wipe or baby wipe and stretch it out so it’s slightly spread and thin. This texture will be transferred to the armour to create the marble effect.
Applying the Wipe:
Lay the stretched wipe over the armour part you’ve just painted. Ensure it’s not too densely applied; the idea is to leave some areas exposed more than others for a varied marble effect.
Adding Darker Tones:
Airbrush Vallejo Neutral Grey over the wipe-covered armour. Keep the airbrush pressure low to avoid displacing the wipe. Focus more on the edges and less on the centre to mimic natural shading.
Without completely covering the previous layer, lightly apply Vallejo Dark Grey in a few select areas to create the appearance of darker veins within the marble.
Revealing the Effect:
Carefully remove the wipe to reveal the marble effect beneath. You’ll find areas of light and dark grey creating a naturalistic marble pattern.
Cleaning Up:
After removing the wipe, there may be strands left on the model. Take your time to clean these off to avoid them becoming permanently attached in later steps.
Painting Yellow Armour Sections:
For Legio Gryphonicus’s iconic grey and yellow scheme, base coat the relevant armour sections with Vallejo Heavy Goldbrown. Highlight these areas with Games Workshop Phalanx Yellow to achieve a vibrant, contrasting look against the grey marble.
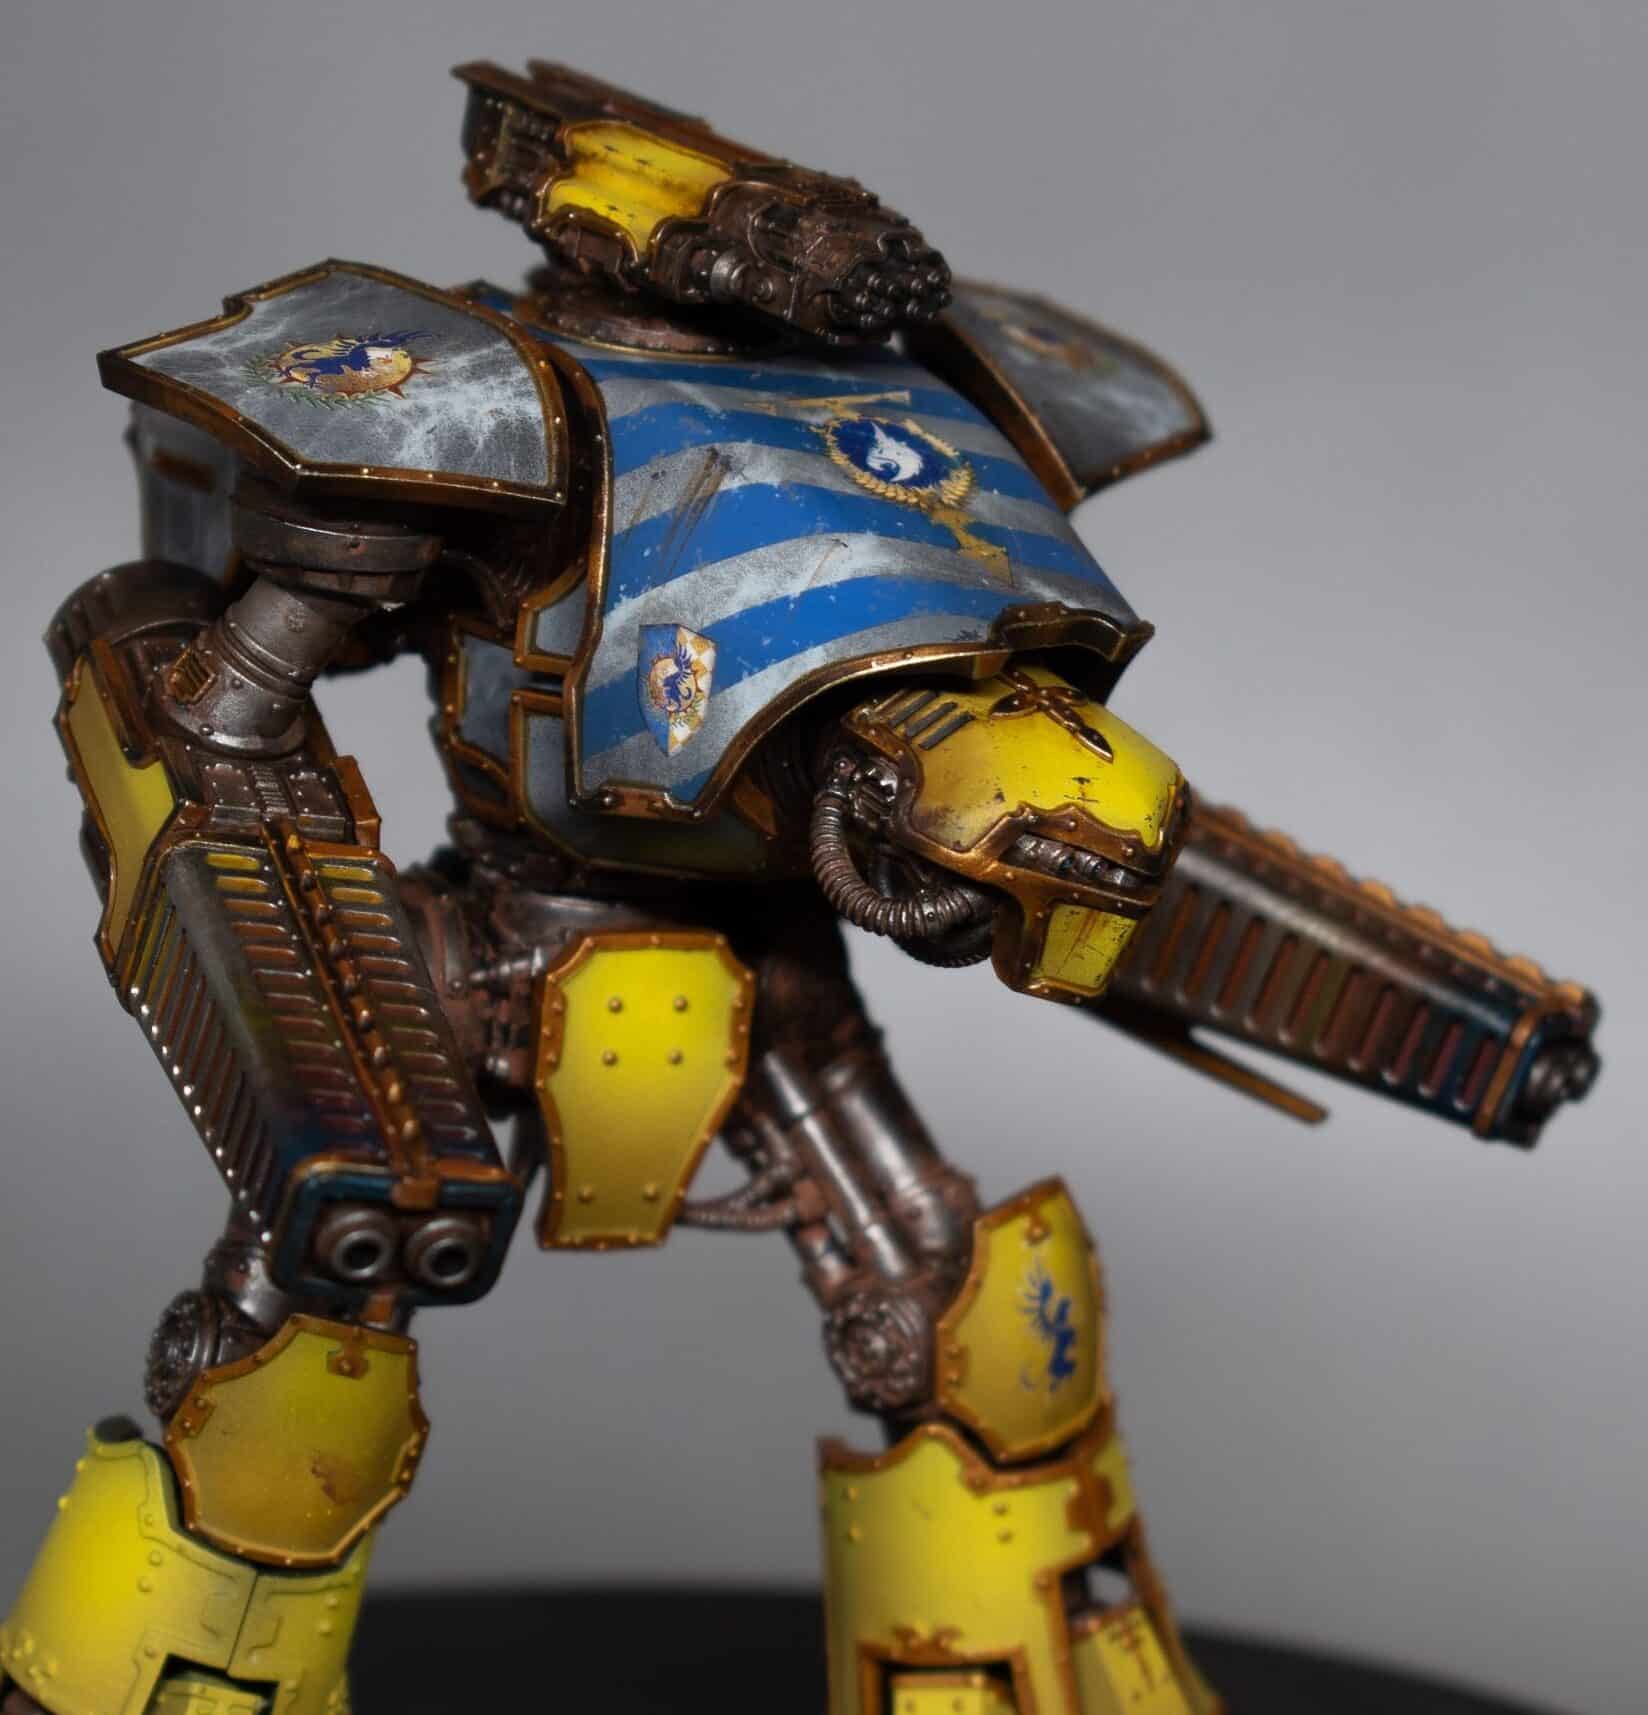
Video – How to Paint a War Griffons Warlord : The Stripes
This guide will take you through the process of painting and weathering the stripes to achieve a battle-worn effect, ensuring your titan stands out on the tabletop.
Materials Needed:
Scale 75 Victorian Brass (For the trim)
Tamiya Masking Tape (3mm strips recommended for precision)
Games Workshop Kantor Blue (For the base stripe colour)
Vallejo Ultramarine Blue (For highlighting the stripes)
Vallejo Neutral Grey (For weathering)
Vallejo Pale Grey Blue (For weathering)
Airbrush and airbrush thinner (Vallejo Airbrush Thinner recommended)
Fine detail brush for weathering
The Stripes Step by Step:
Prepare the Trim:
Begin by painting the trim of the carapace using Scale 75 Victorian Brass. This step should ideally be done after painting the stripes to avoid overspray, but if you prefer to paint it first, be prepared to touch it up later.
Masking for Stripes:
Apply Tamiya masking tape to the carapace to create the desired pattern for your stripes. Ensure the tape is firmly pressed down, especially near the edges and armour trim, to prevent paint from bleeding underneath.
Base Colour for Stripes:
Airbrush Games Workshop Kantor Blue over the masked areas. The paint should be thinned appropriately and applied in even coats to achieve an opaque finish. Be mindful of overspray on the trim.
Highlighting Stripes:
After the base colour dries, apply Vallejo Ultramarine Blue as a highlight. Focus on the raised edges and ridges to create a gradient effect, ensuring some Kantor Blue remains visible for contrast.
Removing Masking Tape:
Carefully peel off the masking tape to reveal crisp, clean stripes. This step is highly satisfying and reveals the neat lines that define the pattern.
Weathering the Stripes:
Using a fine detail brush, apply Vallejo Neutral Grey and Pale Grey Blue to simulate chips and wear on the stripes. Focus on areas that would naturally see more wear and tear, breaking up the clean edges of the stripes to create a more realistic, battle-worn look. Use the colours that match the underlying marble effect for a cohesive appearance.
Finishing Touches:
Optionally, go back over the trim with Victorian Brass to clean up any overspray from painting the stripes. This will ensure a neat and polished look.
Additional Tips:
The choice of stripe colour can vary; red or hazard striping are also effective options.
The weathering step is crucial for adding realism. Smaller, more concentrated damage marks enhance the scale effect, making the titan appear as a massive war machine.
Keep the weathering consistent with the overall wear on the rest of the titan for a unified appearance.
Video – How to Paint a War Griffons Warlord : Weathering and Decals
This step-by-step guide, designed to be beginner-friendly, will walk you through applying decals, adding a gloss finish for protection, and executing weathering techniques to give your titan a battle-worn appearance.
Materials Needed:
Vallejo Gloss Varnish
Water for softening decals
Micro Sol and Micro Set for decal application
Tamiya 3mm Masking Tape or equivalent
Games Workshop Kantor Blue
Vallejo Neutral Grey, Ultramarine Blue, and Pale Grey Blue for weathering
Games Workshop Matte Varnish
Fine detail brushes
Airbrush (optional for varnishing)
Forge World Decals for Legio Gryphonicus
Steps:
Preparing the Surface:
Apply Gloss Varnish: Begin by applying Vallejo Gloss Varnish to the areas where decals will be applied. This creates a smooth surface, reducing air pockets and imperfections. You can apply the varnish with a brush or an airbrush. If brushing, slightly dilute the varnish with water for easier application.
How to Apply the Forge World Decals:
Soften Decals in Water: Cut out your chosen decals and soak them in water until they easily slide off the backing paper. This typically takes a few minutes.
Apply Micro Sol: Place a small amount of Micro Sol on the model where the decal will be applied. This softener helps the decal conform to the model’s surface.
Position the Decal: Carefully slide the decal from the paper to the model. Use a soft brush to adjust its position accurately.
Remove Excess Water: Gently dab a soft, dry brush or a paper towel to remove any excess water and air bubbles beneath the decal.
Apply Micro Set: Once the decal is in place, apply Micro Set over it. This solution helps soften the decal further, allowing it to snuggle down into the model’s details. Let it dry thoroughly, ideally overnight. Don’t worry if the decal looks wrinkled at this stage; it will smooth out as it dries.
Sealing the Decal:
Apply Additional Gloss Varnish: After the decal has dried, apply another layer of gloss varnish over it using an airbrush for an even coat. This step helps to seal the decal and even out the surface. If necessary, apply 2-3 coats, allowing each to dry thoroughly.
Matte Varnish Finish: Once the gloss varnish is completely dry, apply a matte varnish over the entire model to give it a uniform, non-glossy finish. This also helps to further blend the edges of the decal into the model.
Weathering the Decal and Armour:
Weathering with Paint: Use Vallejo Neutral Grey and Pale Grey Blue to add weathering around the decals and on the armour. Use a fine detail brush to apply small chips and scratches, focusing on edges and areas that would naturally see more wear. This adds realism and depth to your titan.
Additional Weathering Techniques: For further realism, you can add streaks and rust effects using diluted paint or weathering powders. Apply these sparingly in areas where water and dirt would naturally accumulate and streak down the model’s surface.
Additional Tips:
Take your time with each step, especially when applying and positioning the decals.
Always allow each layer of varnish and paint to dry completely before proceeding to the next step.
Practice weathering techniques on a spare piece before applying them to your model to get a feel for the effect.
Video – How to Paint a War Griffons Warlord : Heat Bloom on Melta Cannon
Materials Needed:
Airbrush and Thinner: For applying smooth gradients of colour.
Brushes: A fine detail brush for precise application and a dry brush for highlighting.
Paints:
Vallejo Metal Colour Magnesium (for the metallic base).
Vallejo Metal Colour Chrome (for highlighting metallic areas).
Scale 75 Victorian Brass (for trim detailing).
Games Workshop Contrast Paints: Iyanden Yellow, Magos Purple, Talassar Blue (for the heat effect).
Games Workshop Contrast Aggaros Dunes (for additional trim detailing).
Melta Cannon Step-by-Step Guide:
Base Coating the Weapon:
Begin by airbrushing the Melta weapon’s recesses with Averland Sunset, ensuring the weapon’s holes face directly towards the airbrush to prevent uneven shading. Don’t worry about overspray on the weapon casing; this will be covered later.
Adding Initial Heat Glow:
Switch to Troll Slayer Orange and apply over the Averland Sunset, creating a gradient effect from the weapon’s recesses outward. Ensure even coverage without tilting the airbrush to maintain consistency across the recesses.
Masking for Overspray:
To prevent overspray on adjacent yellow armour panels, use masking tape or modelling putty. This step is crucial for maintaining clean lines and avoiding accidental paint transfer.
Metallic Base Coat:
Paint the metallic parts of the weapon with Vallejo Metal Colour Magnesium, carefully avoiding the recesses to maintain the glow effect. This creates a solid base for subsequent detailing.
Trim Detailing:
Apply Scale 75 Victorian Brass to the weapon’s trim, followed by a coat of Games Workshop Contrast Aggaros Dunes to add depth and dimension to the detailing.
Heat Bloom Effect:
Begin the heat bloom effect by airbrushing Iyanden Yellow halfway along the Melta Cannon barrel, avoiding the recesses. Layer Magos Purple over the Iyanden Yellow, leaving some yellow visible for a blended effect. Finish with Talassar Blue, applying it over the Magos Purple but not covering all the previous layers, creating a transition from yellow to deep blue.
Highlighting and Finishing Touches:
Dry brush Vallejo Metal Colour Chrome on the non-painted metallic areas to enhance the metallic sheen. Carefully highlight the lower edges of the weapon with Chrome using a normal paintbrush, accentuating the heat bloom’s impact.
Final Assembly:
Once all painting is complete, remove any masking materials and assemble any remaining parts of the Titan, paying attention to aligning the heat bloom effects correctly.
Video – How to Paint a War Griffons Warlord : Weathering and Metal
Paints
Games Workshop:
Agrax Earthshade
Wyldwood (Contrast)
Contrast Aggaros Dunes
Forge World:
Aged Rust (Weathering Powder)
Vallejo Metal Colour (Airbrush Ready):
Victorian Brass (Scale 75 for an alternative base colour)
Magnesium
Gold
Chrome
Winsor & Newton:
Water Mixable Oil Colour Burnt Umber
Step by Step – Weathering and Metal on the War Griffons Warlord
Preparing the Armour Trim
Base Coat: Begin with a base coat of Scale 75 Victorian Brass over the trim. This provides a solid foundation for subsequent layers.
Initial Shading: Apply Contrast Aggaros Dunes over the Victorian Brass to introduce depth and shading to the trim. This step should have been completed in earlier stages of the model’s painting process.
Enhancing the Trim
Adding Depth: Use Games Workshop’s Wyldwood contrast paint to darken recesses and joints in the trim. The high contrast between the dark recesses and the metallic brass creates visual interest and depth. Apply the paint selectively to areas that would naturally accumulate shadow.
Highlighting: Vallejo Metal Colour Gold is used to highlight the edges of the trim. Due to its fluidity, it provides a smooth application but be mindful of its runniness. Lightly touch the edges with a fine brush to catch the raised areas.
Painting the Skeleton
Base Layer: Vallejo Metal Colour Magnesium serves as the base layer for the Titan’s skeletal structure. Its liquidity ensures it flows well into recesses but exercise caution to prevent pooling.
Weathering: Apply Forge World’s Aged Rust weathering powder mixed with water to the skeletal structure for a grimy, rusted effect. Focus on areas that would naturally collect dirt and rust, maintaining a balance to avoid obscuring details.
Sealing the Weathering: Once dry, seal the weathering with a mix of Agrax Earthshade. This reactivates and fixes the weathering powder, giving a durable and realistic rust effect.
Detailing Pistons and Metal Accents
Chrome Pistons: Vallejo Metal Colour Chrome is applied to pistons for a bright, reflective finish. Multiple thin layers may be needed for uniform coverage.
Oily Effects: Windsor and Newton’s Water Mixable Oil Colour Burnt Umber is used to simulate oil and grime on pistons and mechanical parts. Dilute with water for a manageable consistency and apply at joints and moving parts for a realistic oily effect.
Finishing Touches
Reichland Fleshshade Glaze: Optional, but can be used to add warmth to metal parts, particularly useful on brass or gold trims to simulate reflected light or heat staining.
Highlighting and Cleaning Up: After applying weathering and shading, go back to highlight edges and clean up any overspill with your base metallic colours. This step sharpens details and enhances the overall contrast of the model.
Techniques and Tips
Trim Detailing: Use the fine detail brush with Vallejo Metal Colour Gold to highlight the edges of the trim, applying the paint carefully to avoid spillage onto other areas.
Skeleton Base Layer: Apply Vallejo Metal Colour Magnesium with a medium brush, ensuring even coverage and avoiding pooling in recesses.
Weathering Powder Application: Mix Aged Rust with water in the well palette and apply with a large brush, targeting recesses and areas where rust would naturally accumulate.
Chrome Pistons: Use Vallejo Metal Colour Chrome, applying multiple thin layers as needed for a smooth, reflective finish.
Oily Effects: Dilute Winsor & Newton Water Mixable Oil Colour Burnt Umber with water and apply at the tops of pistons and around mechanical parts to simulate oil and grime.
More Titan Tutorials!
If you don’t have an account, please sign up here! The website currently has over 350 video tutorials with steps and tips, plus a selection of PDFs. If you are not sure about joining, you can explore my free videos with a free membership, or take the plunge and become a full subscriber for full access.
If you’d prefer to support me on Patreon, please visit: https://www.patreon.com/RichardGray [...]
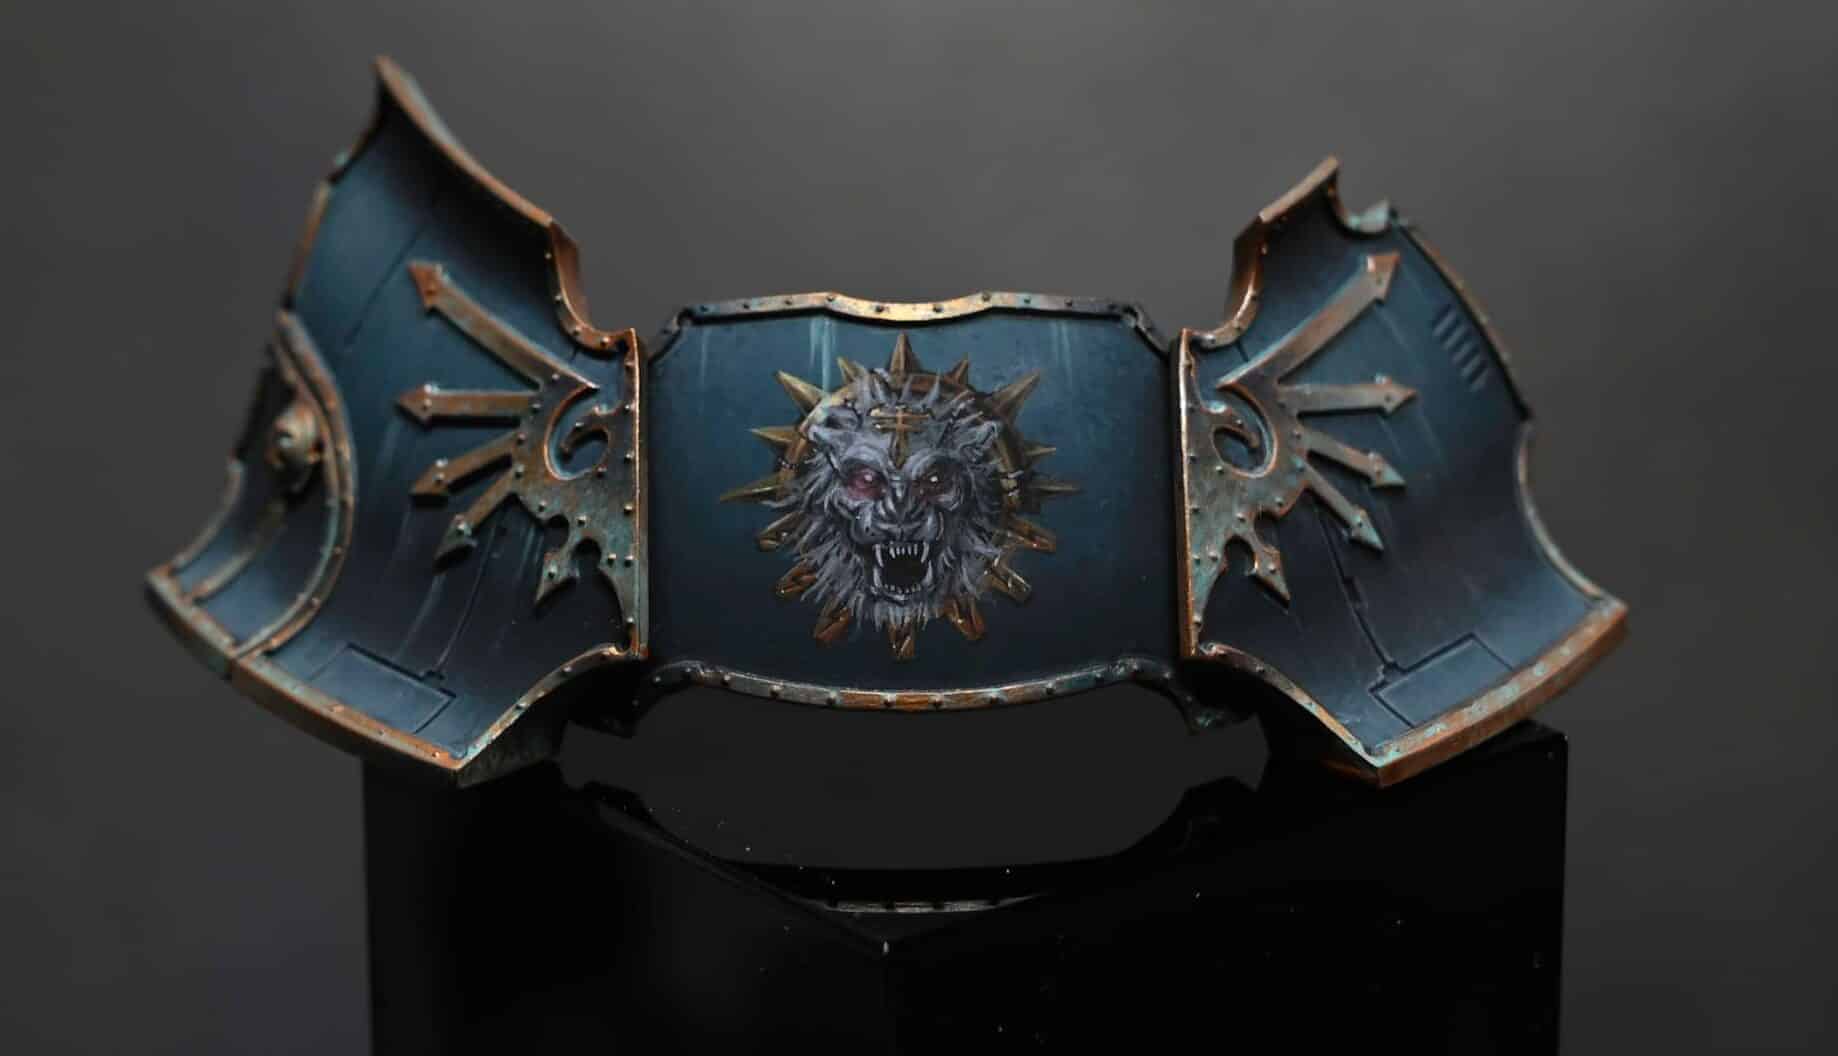
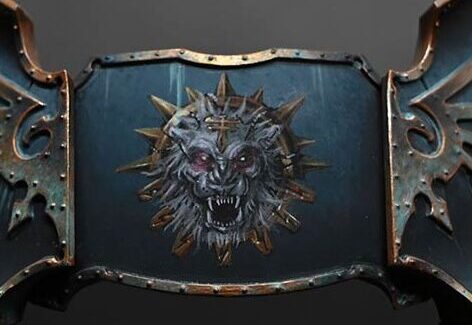
Welcome to this detailed guide on how to paint the Legio Sinister freehand symbol for a Warlord Titan. I will be using various Games Workshop and Vallejo paints to achieve a polished and striking look. This guide is suitable for intermediate to advanced hobbyists due to the precision required in freehand painting.
Video – Legio Sinister FreehandPaints UsedSteps and Tips for the Legio Sinister FreehandStep By Step Image GuideMore Freehand Tutorials on the WebsiteFree Video Tutorials
Video – Legio Sinister Freehand
All videos are recorded in HD 720p or higher – use full screen for the full effect and let the video load completely.
Paints Used
Vallejo Model Colour Black
Games Workshop Paints: Mechanicus Standard Grey, Slaanesh Grey, Grey Seer, Mephiston Red, Mournfang Brown, XV-88, Dorn Yellow, Screaming Skull
Steps and Tips for the Legio Sinister Freehand
Mapping Out the Position: Begin by using Vallejo Model Colour Black to roughly outline where the symbol will be placed. Start with a small circle at the centre, gradually expanding outwards. Include a line at the top of the curve to centralise the image.
Refining the Shape: Progressively enlarge the symbol, focusing on refining its shape. Paint an approximate circle with spikes extending outward. Ensure even distribution of the black paint to provide a solid base for subsequent layers.
Applying Initial Colours: Commence with Games Workshop’s Mournfang Brown, applying it as a foundation for the non-metallic parts of the symbol. Layer on XV-88 next, followed by Dorn Yellow, with a focus on the top-left for the lighting direction. Remember, moderate use of Dorn Yellow prevents oversaturation.
Adding Highlights: Employ Screaming Skull to introduce highlights. Be judicious in this step, concentrating on the top left to evoke a lustrous appearance. The XV-88 should remain the predominant colour for the metallic aspects.
Painting the Lion’s Face: Utilise a range of greys (Mechanicus Standard Grey, Slaanesh Grey, Grey Seer) to depict the lion’s face. Start with basic shapes, refining them progressively. Pay special attention to the eyes, nose, and mouth, building depth with shadows and highlights.
Detailing with Red: Apply a glaze of Mephiston Red for a subtle red glow around the eyes and other facial areas. This step enhances the lion’s fierce visage.
Adding Fur Details: Use greys to render fur details, commencing with darker shades and progressing to lighter highlights. Focus on creating a three-dimensional effect with varied brushstrokes.
Final Details: Paint the Titanicus symbol on the lion’s forehead using black as a base. Layer greys for the non-metallic metal effect, ensuring a thinner central line for a precise appearance. Use Dorn Yellow and Screaming Skull for the highest highlights, ensuring they are well-placed to create a realistic metallic sheen.
Refining and Adjusting: As you near completion, revisit areas that require refinement. This may include sharpening edges, deepening shadows, or enhancing highlights. The key is to achieve a balance between contrast and harmony in the symbol’s details.
Final Touches: Examine the overall piece for any last-minute adjustments. This might involve intensifying certain colours, smoothing transitions, or adding small details to bring the symbol to life. Ensure the lighting direction is consistent and the symbol stands out against the background.
Step By Step Image Guide
The team at Warhammer Community approached me for some tips on freehand and I created an article with step by step imagery for the tutorial above – to view it, visit:
Tips on Freehand – Step-By-Step Image Guide : Adeptus Titanicus
More Freehand Tutorials on the Website
Free Video Tutorials
Free videos for logged in members – just sign up as a ‘friend’ to view and click any of the thumbs.To explore all of these, visit this page!
If you don’t have an account, please sign up here! The website currently has over 350 video tutorials, plus step by step guides and PDFs. You can explore more free videos with a free “freebies” membership, or take the plunge and become a full subscriber for full access.
If you’d prefer to support me on Patreon, please visit: https://www.patreon.com/RichardGray [...]

An Adeptus Titanicus Knights Guide.
Please wait for the below to load, or alternatively download the guide here.
More Adeptus Titanicus Tutorials!
If you don’t have an account, please sign up here! The website currently has over 350 video tutorials with steps and tips, plus a selection of PDFs. If you are not sure about joining, you can explore my free videos with a free membership, or take the plunge and become a full subscriber for full access.
If you’d prefer to support me on Patreon, please visit: https://www.patreon.com/RichardGray [...]

An Adeptus Titanicus Building Guide.
Please wait for the below Adeptus Titanicus Building PDF to load. Alternatively, you can download it here.
Building
More Adeptus Titanicus Tutorials to Explore! [...]
The team at Warhammer Community approached me for some tips on freehand, especially for Adeptus Titanicus. The whole interview can be found here.
Richard: As a massive fan of Adeptus Titanicus, I knew I had to have the Warlord-Sinister Psi-Titan as soon as I saw it. After I built the model, I realised I would have to figure out how to add the Legio Sinister icon to the shoulder pads. With no transfers available, this would make an ideal project to show my freehand process.
The first thing to do when you want to freehand is a little research and planning. It’s very tempting to jump straight in and wing it. What usually happens if you do is that you run out of space, get details wrong and wish you had a transfer! With this in mind I looked for artwork of the Legio Sinister icon and managed to find a nice, large image. This tends to be when the true horror hits that you have a very detailed, large image that you need to fit in to a teeny tiny area.
Before you get started on your freehand piece itself, paint the background armour panel completely. It’s much easier to paint it now rather than trying to get nice highlights and transitions around your carefully painted freehand.
The colours I’m going to use for the freehand are as follows: For the non-metallic metal (NMM) sections, I’ll use Rhinox Hide, Mournfang Brown, XV-88, Dorn Yellow, and Screaming Skull. For the lion itself I will be using Mechanicus Standard Grey, Slaanesh Grey, Grey Seer, Abaddon Black and Mephiston Red.
To get started, I first map out the shape and position of the freehand in black. Start in the centre and work your way outwards to allow you to make small corrections as you go. If you try painting the outline straight off there’s a good chance you’ll get the position wrong, and then it’s very hard to change! For the spikes just make small marks for each position to make sure they are spaced correctly. The reason for using black as a base colour is that it’s much easier to build up the highlight positions and use the black as shading, to keep your tonal contrast high. It also means you can use black to correct any mistakes you make.
Once the outline is complete it’s time to move on to the next layer – NMM trim. Start with Rhinox hide and make very large highlight blocks. Remember that the highlights will get smaller and smaller with each layer. I didn’t make a straight copy of the reference artwork, but rather made the lighting come from the top left. This made it look a bit more dramatic and allowed me to build stronger highlights and shadows.
Hard edges and curves reflect the light more strongly, so focus on those areas for the brighter highlights. After the Rhinox Hide, continue adding highlight layers with the remaining NMM colours in the order listed previously. Save the XV-88 for the finest edge highlights.
After all of the trim is painted it’s time to start on the lion. This is where things get tricky! You should have a black, round hole in the middle of the design. Roughly block in the shape of the lion face using Mechanicus Standard Grey. This allows you to get the positioning correct without going over any of the work you’ve just done.
Next begin refining the details of the face with Slaanesh Grey – be careful not to corrupt your Psi-Titan! Imagine the face as a 3D object and try to think where the highlights would naturally fall. I kept the light direction coming from the top left to match the trim.
Now it’s time to start painting the lion’s mane. This is the scary part as it goes over all of the NMM that you’ve carefully painted. I strongly recommend that you take your time and try to be selective with your positioning. Avoid covering the bright point in the top left, as this feature helps make the NMM look metallic and shiny.
I used watered down Mephiston Red to paint in the eye sockets, this makes the lion look extra angry. You should pick out the eyes in Grey Seer, plus any other details can be finished up in this step.
By this stage everything should be starting to come together. One thing I strongly recommend is to take photos of your piece, and look at those rather than the painted model. The freehand is so small that it’s easy to miss mistakes, but on an enlarged photograph, your mistakes will look massive (and terrible)! This might be a difficult step, but it will be much easier to correct your work.
Once the lion’s complete, it’s time for the symbol to be painted on the forehead. Again, start with black to block in the shape, then use the same colours for the NMM. As this area is so small, you don’t need to bother with Rhinox Hide.
Finally, take one last photograph to check everything on the model and then give the whole panel a coat of matte varnish. This will remove any variances in the finish and will make the freehand look like it’s a part of the armour panel. I hope you liked my tips on freehand and if you’d like to learn more tips on freehand techniques from me, please scroll down to explore some videos, like the guide I created alongside this one, or explore the site!
I did a tutorial video alongside this guide, click below to view it!
Freehand Tutorials
If you don’t have an account, please sign up here! The website currently has over 350 video tutorials with steps and tips, plus a selection of PDFs. If you are not sure about joining, you can explore my free videos with a free membership, or take the plunge and become a full subscriber for full access.
If you’d prefer to support me on Patreon, please visit: https://www.patreon.com/RichardGray [...]

A bit more gaming stuff, in this case a warhound for my Adeptus Titanicus army. [...]