


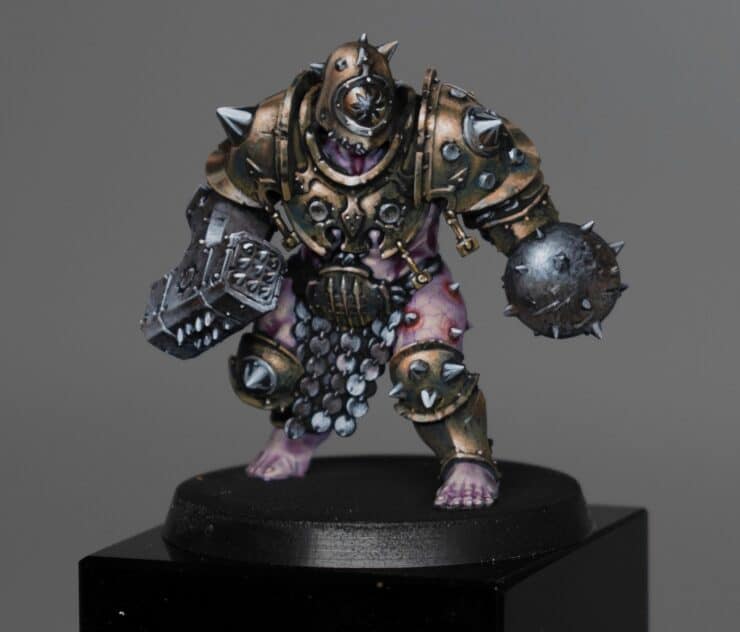
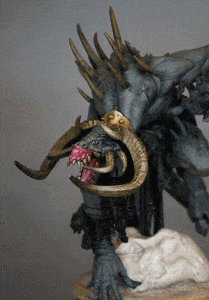
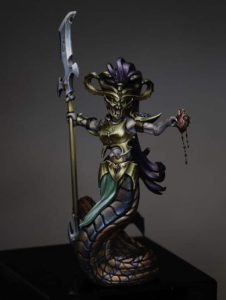
Guides on how to paint Ogor Breacher of the Iron Golems Warcy Warband including non metallic metal and veiny skin.
Part One – How to Paint Ogor Breacher NMM Armour
The following paints were used:
Games Workshop: Rhinox Hide, XV-88, Balor Brown, Cadian Fleshtone, Flayed one Flesh, Incubi Darkness, Morghast Bone.
Vallejo: Neutral Grey (Mechanicus Standard Grey), Pale Blue Grey (Blue Horror)
P3: Morrow White (White Scar)
Step-by-Step: How to Paint Ogor Breacher NMM Armour
Step 1: Prepare the Model – Ensure that the model’s mould lines are removed, it’s glued together, and primed black.
Step 2: Gather Your Paints – Have the above paints ready on a wet palette:
Step 3: Apply XV 88- Using XV 88, roughly block in the primary highlight points on the copper armour. Apply the paint thinly, allowing the black primer to show through for a worn and battered look.
Step 4: Embrace the Roughness – Don’t worry about smooth coats; let the blockiness show through for texture. Use thin layers of paint and apply quickly, catching parts like spikes and edges.
Step 5: Control Your Brush – Ensure your paintbrush isn’t overloaded. You want thin layers for easy correction and a controlled application.
Step 6: Follow the Model’s Shape – Apply highlights following the shape of the armour. If it’s a curved area, let the marks squiggle around, creating a chaotic yet textured look.
Step 7: Consider Light Source – Use a lamp as a light source to observe how light hits the model. Apply highlights with your paint where the light catches, focusing more on upper areas like shoulders and head.
Step 8: Adjust and Blend – Go back and forth between colours, adjusting and blending as needed. XV 88 and Cadian Fleshtone can be used to thicken layers and blend with each other.
Step 9: Add Secondary Highlights – Introduce Rhinox Hide as a secondary highlight, focusing on areas like shoulders. Use it to enhance texture and tone down any excess pinkness.
Step 10: Maintain Consistency – Ensure that highlights align across the model. Trim, rivets, and spikes should follow the same light direction for a cohesive look.
Step 11: Introduce Metallic Elements – Paint steel elements like spikes separately later to maintain expressive brush marks. The spikes add a reflective, shiny quality to emphasize highlights on the armour.
Step 12: Use Glazes – Apply glazes of Morghast Bone and Balor Brown to soften transitions and add subtle weathering. Adjust as needed for colour balance and reflection.
Step 13: Final Highlights – For the final highlights, use P3 Morrow White Base on primary highlight areas. Emphasize the main light source and knock back highlights in shadowed areas.
Step 14: Judge by Eye – Continuously judge the model by eye and make adjustments. Consider warmth, tone, and saturation to achieve a realistic and dynamic non-metallic copper effect.
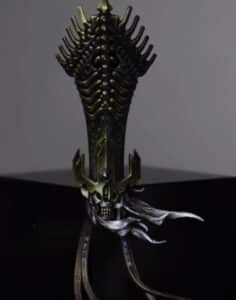
Part Two – How to Paint Ogor Breacher NMM Steel
The following paints were used:
Vallejo: Neutral Grey (Mechanicus Standard Grey), Pale Blue Grey (Blue Horror)
Games Workshop: Rhinox Hide, Mournfang Brown, Abaddon Black
P3: Morrow White (White Scar)
All videos are recorded in HD 720p or higher – use full screen for the full effect and let the video load completely.
Step-by-Step: How to Paint Ogor Breacher NMM Steel
Prepare Your Materials – Ensure you have the necessary paints ready to go! You’ll also need a variety of brushes, including a slightly worn-out one for creating rough textures.
Block in the Light Points – Use Neutral Gray to identify and block in the main light points on the weapons and metal discs. Refer to the primary light source from the armour painting in Part 1.
Create Texture on the Metal Discs – Focus on the metal discs, using a blunt-tipped brush to create rough, non-smooth textures. Emphasise dents and scratches to give the impression of a well-used surface.
Build Up Highlight – Gradually build up highlights with Neutral Gray, especially on upward-facing discs. Use the lamp’s light to guide where the light would naturally catch, such as shoulders, head, chest, kneecaps, and the top of the ball.
Add Pale Blue Grey for Translucency – Introduce Pale Blue Grey to add translucency to the highlights. Concentrate on the central highlight, allowing the paint to thin as it reaches the edges, creating a transition.
Incorporate Morrow White for Secondary Highlights – Use Morrow White for secondary highlights on the brightest discs. Be mindful of where the light hits the most, and create a pattern to enhance the non-metallic look.
Glaze with Mournfang Brown for Weathering – Dilute Mournfang Brown and apply it as a glaze to add weathering effects. Create chaotic scratches and imperfections on the surface, avoiding a repetitive pattern for a more natural appearance.
Hammer Painting – Apply Neutral Gray to the hammer’s curved areas, taking advantage of the brush’s worn tip to capture the curve. This creates a shiny effect and allows for a darker edge next to the armour.
Highlight Hammer Spikes – Use Pale Blue Grey to highlight spikes on the hammer, ensuring high contrast. Concentrate on the top part of the curve for a realistic shiny effect.
Intensify Highlights with Morrow White – Further intensify highlights with Morrow White, focusing on the brightest areas. Keep layering to achieve an opaque white, preventing the underlying gray from dulling the shine.
Glaze for Depth – Apply a glaze of Mournfang Brown to add depth and enhance the contrast between highlights and shadows. Be selective in the application, aiming for a chaotic pattern for a weathered look.
Final Touches – Continuously refine highlights, making them as bright as possible to stand out on the tabletop. Pay attention to tonal contrast, as the clear distinction between black and white creates a striking effect in the final model.
Part Three – How to Paint Ogor Breacher Skin
The following paints were used:
Games Workshop: Kislev Flesh, Magos Purple (Contrast), Contrast Medium, Dechala Lilac, Naggaroth Night, Skavenblight Dinge, Mephiston Red
P3: Morrow White (White Scar)
Step-by-Step: How to Paint Skin
Primer Application – Apply a black primer to the entire model, ensuring good coverage.
Use a thin layer of Chaos Black for the model’s skin, allowing it to dry between coats.
Base Coat – Mix equal parts of Dechala Lilac and Kislev Flesh to create a base coat.
Apply the base coat over the skin, focusing on highlight points.
Use a watery mix to achieve a translucent effect, building up with 3-4 coats for a solid finish.
Purple Wash – Apply a 50/50 mix of Magos Purple (Contrast) and Contrast Medium for a wash over the skin. Ensure an even coverage, allowing it to enhance the details and settle into recesses.
Highlighting – Mix Dechala Lilac and Kislev Flesh (50/50) for highlighting.
Apply highlights on areas catching the light, focusing on upper edges like triceps and lats.
Use a thin layer for a translucent effect, building up to create smooth transitions.
Enhancing Details – Use contrast paint details to enhance recesses and shadows.
Adjust the amount of paint based on the direction of light, creating realistic shadows.
Vein Detailing – Mix Naggaroth Night and white for vein detailing.
Apply veins on areas where they are likely to be more visible, such as upper back and thighs.
Use a thin layer for a faded look, adding realism to the skin.
Glazing – Apply glazes with Mephiston Red, heavily watered down (9 parts water to 1 part paint), for a warm, desaturated effect. Test the glaze on a surface before applying it to the model.
Final Touches – Add reflections using a neutral gray or blue-gray, focusing on small areas like rivets.
Glaze with white to achieve the desired level of contrast and smoothness.
Spend additional time on glazing for a display-level finish if desired.
Note:
– Consider adding additional layers for smoother transitions in a display-level model.
– Experiment with colours to achieve contrasting effects, keeping in mind the coluor wheel.
– Be mindful of shadows and lighting when highlighting and detailing different areas.
– Practice on smaller surfaces or test models to perfect techniques before applying them to the main model.
More of my latest tutorials:
Videos Not Showing?
To view any of my paid tutorials, you need to be a member of the website – please click below to log in or join the site.


Not sure about joining just yet? Check out my Youtube for all my free tutorials.