


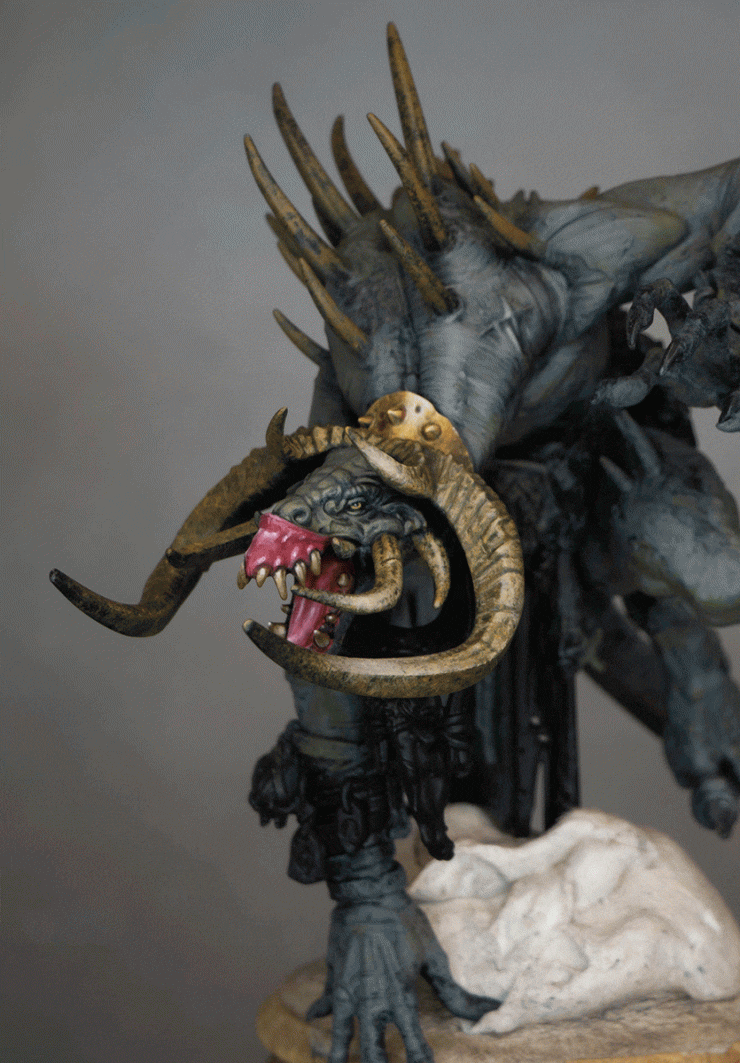
This is part 1 in a series for how to paint the Wilderfiend from the Darkoath army, which Games Workshop sent me. The first video looks at the skin, lips, teeth, eyes and horns. We’ll focus on creating a heavily textured look!
Video: How to Paint a Wilderfiend – Skin, teeth, eyes and horns
Paints
- Vallejo Neutral Grey – Used for base coating and initial layers.
- Vallejo Heavy Grey – Applied for shading and adding depth.
- Citadel XV-88 – Used for stippling detailed textures.
- Citadel Balor Brown – For additional layering over XV-88.
- Corvus Black (Games Workshop) – Used thinned down for shading and deepening recesses.
- Citadel Pink Horror – For specific details like the inner mouth and gums.
- Mephiston Red (Games Workshop) – Used for glazing and enhancing red areas.
- Balor Brown (Games Workshop) – Applied on horns and spikes.
- Morghast Bone (Games Workshop) – For highlighting teeth and bone-like structures.
- Screaming Skull (Games Workshop) – Additional highlighting, especially on bones and teeth.
- Two Thin Coats Dark Sun Yellow – For eyes and specific bright details.
- Kimera Colours White – Used to lighten other colours for highlighting.
Brushes
- Artis Opus (small size) – Mainly used for stippling the base coat.
- Modified Old Brush – Cut to half-size for fine stippling and detailed texture work.
- Standard Size 1 Brush – Used for general painting and finer details.
- Size 0 Brush – For very fine details, especially on smaller areas like teeth and eyes.
- Large Dry Brush – For broad strokes and quick coverage on larger areas.
How to Paint a Wilderfiend Step 1: Preparation
Before you start painting, ensure that all gaps and line gaps on the model, particularly between the muscles, are filled to prevent visible lines. Use sprue glue or putty as detailed in my other videos (you can watch one, here). This step is crucial for a clean finish once painted
- Objective: Prepare the model by filling any gaps to ensure a smooth surface.
- Materials: Sprue glue or sculpting putty.
- Method:
- Identify gaps, particularly between muscle joints or overlapping armor.
- Apply sprue glue or putty to fill these gaps. Use a small tool or toothpick for precision.
- Smooth the putty or glue with a moistened finger or tool to ensure it blends seamlessly into the surrounding area.
- Allow it to dry completely before proceeding to painting.
Step 2: Base Coating
- Objective: Establish a uniform base layer and start building texture.
- Materials: Vallejo Neutral Grey, Artist Opus small brush.
- Method:
- Thin the Neutral Grey slightly with water for a workable consistency.
- Use the brush to stipple the paint onto the model, creating a textured base. This method helps the paint adhere better and provides a base for subsequent layers.
- Ensure complete coverage, avoiding pooling of the paint.
Step 3: Adding Shades
- Objective: Add depth and dimension by shading recesses.
- Materials: Vallejo Heavy Grey.
- Method:
- Apply Heavy Grey into recesses and shadow-prone areas such as under limbs, behind equipment, and between muscles.
- Use a detail brush for precise application, avoiding over-application to maintain the integrity of the base texture.
- This step is not for detailed shading but to provide a variation in base tones.
Step 4: Detailing with Stippling
- Objective: Enhance texture and prepare for detailed painting.
- Materials: Citadel XV-88, modified old brush.
- Method:
- Stipple XV-88 on areas where additional texture is desired, like spikes, horns, or heavily detailed armor.
- The modified brush allows for finer, more controlled stippling, which is crucial for building up texture on smaller, detailed areas.
- Focus on achieving a random, natural-looking texture rather than uniform coverage.
Step 5: Additional Colour Layers
- Objective: Build up colour intensity and prepare for highlights.
- Materials: Citadel Bor Brown.
- Method:
- Apply Bor Brown over areas previously worked with XV-88, using the same stippling technique but with slightly thicker paint.
- This layer enhances the texture by adding a darker tone, which will add depth beneath the highlights.
- Ensure that this layer complements the textures and shadows already established.
Step 6: Corrections and Enhancements
- Objective: Clean up any imperfections and refine the model’s details.
- Materials: Scalpel.
- Method:
- Inspect the model closely under good lighting.
- Use the scalpel to gently remove any stray bristles, dust particles, or excess putty that may have been overlooked.
- Make any necessary corrections to ensure the smoothest and most detailed surface possible before proceeding.
Step 7: Highlighting
- Objective: Highlight to emphasize raised areas and textures.
- Materials: Mix of Heavy Grey, Neutral Grey, and white.
- Method:
- Gradually mix in white with the base grey mixture to create various stages of lighter shades for highlighting.
- Use a fine brush to apply highlights along edges, ridges, and on top of textured areas to simulate light reflection and enhance detail.
- This step requires a steady hand and a good eye for light placement, focusing on areas that would naturally catch light.
Step 8: Deepening Shadows
- Objective: Deepen the shadows to enhance the 3D effect.
- Materials: Watered-down Corvus Black.
- Method:
- Apply this dark grey mixture into the deepest recesses and around the base of raised textures to create an illusion of depth.
- Use a fine brush for control and avoid flooding the details. The paint should flow into recesses but not cover the raised textures.
- This step enhances the contrast between the highlighted areas and the shadows, adding to the realism of the model.
Step 9: Final Details
- Objective: Address small, fine details such as eyes, teeth, and intricate decorations.
- Materials: Specific colours for details like Pink Horror, Mephiston Red, etc.
- Method:
- Use the smallest brushes to carefully paint eyes, teeth, and other minute details.
- These details require precision and should be handled patiently to avoid errors that can detract from the overall appearance.
Step 10: Finishing Touches
- Objective: Protect the paint job and adjust the finish according to preference.
- Materials: Matte or satin varnish.
- Method:
- Choose a varnish based on the desired finish (matte for less shine, satin for a slight sheen).
- Apply the varnish evenly to protect the paint from wear and tear and to unify the appearance of the model.
Maintenance Tips:
- Always keep your brushes clean and well-shaped.
- Regularly check and mix your paints on a wet palette to maintain consistency.
- Adjust paint thickness based on the detail and texture desired.
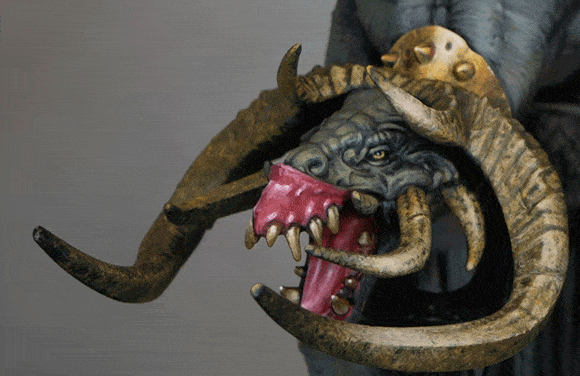
Video: How to Paint a Wilderfiend Necklace with NMM Metal and Skulls
How to Paint a Wilderfiend Necklace with NMM Metal and Skulls Guide
Materials Needed:
- Paints: AMMO by Mig Jimenez (White, Yellow, Brown, Basic Skin, Red), Games Workshop (Rhinox Hide, Balor Brown, Mournfang Brown, Morghast Bone, Screaming Skull)
- Brushes: Size 2 Artist Opus Brush, finer detail brushes as necessary
- Other: Water for thinning paints, wet palette, palette for mixing
Step-by-Step Guide:
1. Base Coating
- Colour Used: Mournfang Brown
- Start by applying a solid base coat of Mournfang Brown to the top section of the necklace. This initial layer is not about perfection but establishing a solid foundation for further details. Ensure even coverage to avoid patchiness that can complicate later stages.
2. Adding Highlights
- Colours Used: Gradually add Dark Sun Yellow to Mournfang Brown
- Begin to introduce highlights by slowly mixing in Dark Sun Yellow into the Mournfang Brown to create a gradient effect. Concentrate this lighter mixture on areas that would naturally catch light, such as the uppermost ridges and prominent features of the necklace. This method helps to simulate the reflective properties of metal without using metallic paints.
3. Integrating Scratches and Weathering
- Enhance the realism of the piece by introducing fine scratches and signs of wear. Using a finer brush, alternate between the original base mix and a lighter mix with more Dark Sun Yellow. Apply these marks strategically to suggest age and use, enhancing the textured look of a battle-worn artefact.
4. Refining Highlights
- Colours Used: Primarily Dark Sun Yellow, mixed progressively with AMMO White for brighter highlights
- As you refine your highlights, shift towards using lighter mixes, culminating in nearly pure Dark Sun Yellow with touches of white. Focus these brightest highlights on the most prominent areas where light would be strongest. This step is crucial for pushing the NMM effect, giving the illusion of metallic shine.
5. Adjusting Shadows and Midtones
- Colours Used: Glazes of Mournfang Brown and Rhinox Hide
- Apply glazes of Mournfang Brown to smooth the transitions between the mid-tones and shadows, ensuring there are no harsh lines between colours. Use Rhinox Hide to deepen shadows in the undercuts and less exposed areas of the necklace, which helps to enhance the three-dimensional feel and adds depth to the piece.
6. Final Details and Touch-ups
- Revisit all previously worked areas to add final details such as sharper lines and more refined scratches. This stage is about perfecting the look, making sure every feature stands out as intended, and the overall effect is cohesive. Sometimes, this might include toning down overdone highlights or reinforcing the shadows for better contrast.
7. Painting Skulls and Additional Elements
- Base Coat: Start with Balor Brown for skulls and bone elements.
- Highlights and Texturing: Build up highlights using Morghast Bone, gradually adding Screaming Skull to the mix for the highest points. Pay special attention to textural details like teeth and eye sockets, using lighter colours to bring these features forward. The contrast between the bone and the metallic effect of the necklace should be stark, with bones appearing more matte and subdued.
Techniques to Note:
- Glazing: This involves mixing a small amount of paint with a large portion of water to create a transparent layer that subtly shifts the tone beneath it.
- Stippling: Use the tip of your brush to apply small dots of paint, creating a textured effect that mimics the irregular surface of metals and worn materials.
- Dry Brushing: Gently drag a dry brush with minimal paint over raised textures to highlight edges and details quickly.
If you don’t have an account here on my website, please sign up here! I have over 350 video tutorials aside from my How to Paint a Wilderfiend with steps and tips, plus a selection of PDFs. If you are not sure about joining, you can explore my free videos with a free membership, or take the plunge and become a full subscriber for full access.


If you’d prefer to support me on Patreon, please visit: https://www.patreon.com/RichardGray