


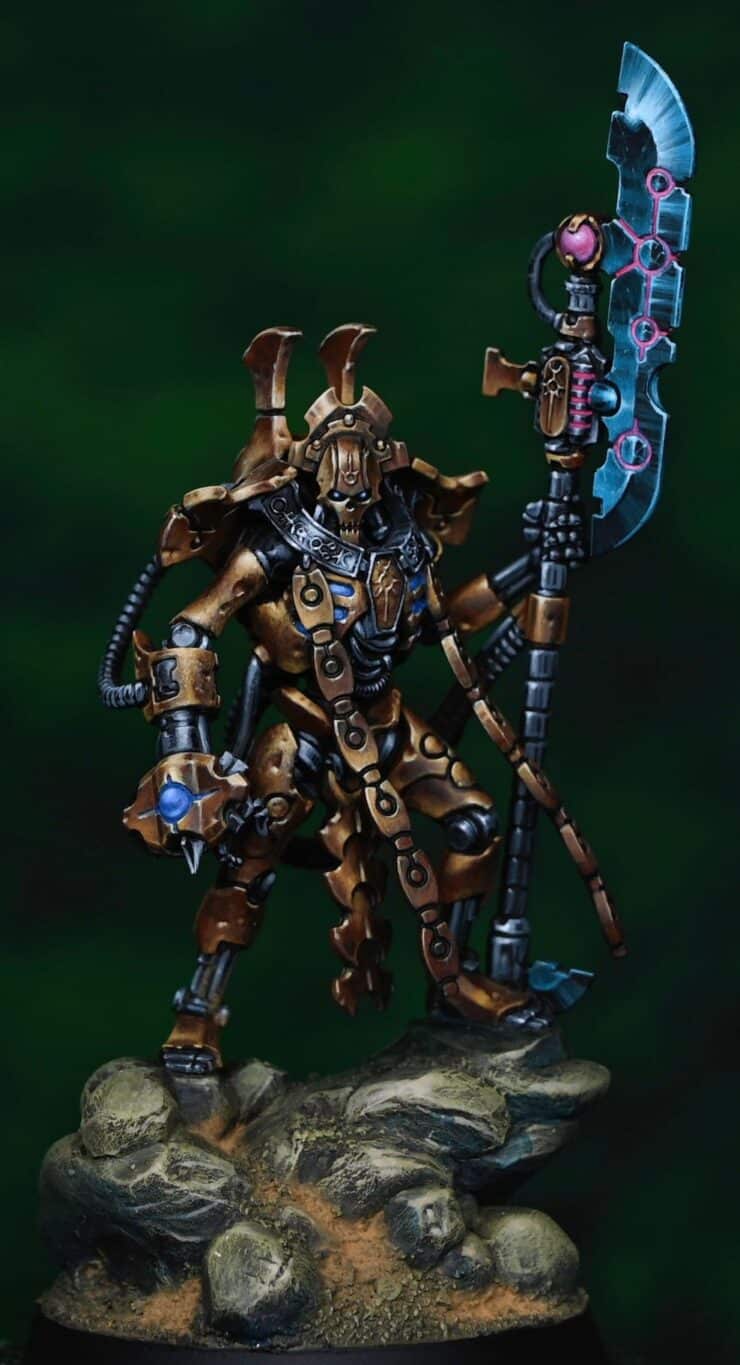
Here are all of my tutorials on how to paint a Gold Necron Overlord from the Indomitus box set, from his shining gold NMM armour, to his weapons and more. I sculpted a base for him from milliput, so he can stand tall while looking down on his enemies!
Scroll down to explore the how to paint a Gold Necron Overlord tutorials in order, or use the contents below to quickly jump to a specific part or technique:
Video: How to Paint a Gold Necron Overlord Part One
Materials Required
- Prime: The model is primed in black.
- Paints: Vallejo Heavy Ochre, Heavy Goldbrown, Ice Yellow, Ultramarine Blue, Doombull Brown, and P3 Morrow White.
- Brushes: Fine detail brushes, ideally size 0 or 00, suitable for precise application and blending. I use the Artist Opus series of brushes.
- Palette: A wet palette to help keep your paints at the correct consistency.
Step-by-Step Guide: How to Paint a Gold Necron Overlord Part One
Step 1: Base Layer
- Start with Doombull Brown, applying it to areas you want to be gold. Doombull Brown will serve as our base because of its deep, rich red-brown hue that provides a good foundation for gold. Expect it to darken as it dries, so multiple thin layers may be necessary for an even base without obscuring details.
Step 2: First Highlights
- Mix Doombull Brown and Heavy Ochre in a 50/50 ratio and apply this mixture to areas where light naturally hits the model. This blend starts the transition towards the brighter gold tones. Be mindful of the paint’s translucency; apply in thin layers to build up the colour gradually.
Step 3: Enhancing the Gold
- Apply pure Heavy Ochre to enhance the gold effect, focusing on raised areas and edges that would catch the light. This pigment is stronger and more opaque, allowing for more pronounced highlights.
Step 4: Bright Highlights
- Create a 50/50 mix of Heavy Goldbrown and Ice Yellow for the next layer of highlights. This combination starts to introduce the characteristic shine of gold, applied more selectively to the highest points and sharpest edges where light would be most intense.
Step 5: Final Highlights
- Use Ice Yellow for the brightest highlights, focusing on very specific areas that would reflect the most light. This step is crucial for selling the NMM effect, making the gold look luminous and reflective.
Step 6: Adding Depth and Contrast
- For the deepest shadows and to add contrast, return to Doombull Brown in areas opposite the light source or where shadows would be most pronounced. This contrast is key to the NMM technique, giving the illusion of metal.
Step 7: Fine Details
- Use Ultramarine Blue for elements like the Overlord’s eyes, adding a pop of colour and visual interest. This also prepares for potential object source lighting (OSL) effects in later stages.
Step 8: Refining and Adjusting
- Continue to refine and adjust the distribution of light and shadow across the model, ensuring a coherent light source and believable metallic effect. You may need to go back and forth between shades to achieve smooth transitions.
Step 9: Final Touches
- For the sharpest highlights and to represent the most reflective parts of the metal, apply tiny dots or very fine lines of Morrow White. Use this sparingly, as too much can detract from the gold effect.
Tips:
- Patience and Layers: NMM gold requires patience and numerous thin layers to build up the desired effect. Don’t rush the process.
- Light Source Consistency: Ensure all highlights and shadows are consistent with a single, imagined light source.
- Brush Care: Use different brushes for applying paint and mixing on your palette to maintain their condition. A worn brush can provide softer marks for blending, while a newer, sharper brush is ideal for fine details and edge highlighting.
Video: How to Paint a Gold Necron Overlord Part Two
In this session, we continue adding gold details, focusing on the elements cascading from the Overlord’s necklace and introducing more techniques for achieving a realistic NMM gold effect.
Paints
- Vallejo: Heavy Ochre, Heavy Goldbrown, Ice Yellow, Dark Grey, Neutral Grey, Silver Grey.
- Games Workshop: Doombull Brown.
- P3: Morrow White (used sparingly for final highlights).
Step-by-Step Guide: How to Paint a Gold Necron Overlord Part Two
Segmented Chains Highlighting:
Begin with the chains descending from the necklace. Each segment must be painted according to its angle relative to the light source. This approach ensures a varied and realistic representation of light across the figure, enhancing the NMM effect.
Use the colour palette established in Part 1: Doombull Brown, a mix of Doombull Brown and Heavy Ochre, Heavy Ochre, Heavy Goldbrown mixed with Ice Yellow, and pure Ice Yellow.
Adjusting Highlights According to Angle:
For segments angling upwards or more horizontally, apply more light to reflect their increased exposure. Conversely, more vertical segments should have subdued highlights to mimic realistic shadowing.
Application Technique:
Apply the base colours smoothly, ensuring that transitions between shades are gradual and natural. The aim is to mimic the light’s natural fall off on metallic surfaces without losing the detailed sculptural elements of the miniature.
Detailing and Texture:
As you move onto different sections, adjust the intensity and placement of highlights to suit each area’s orientation. Use a combination of stippling and smooth brushwork to add texture and depth, particularly on battle-damaged areas.
Necklace and Carapace:
For the necklace and parts of the carapace, transition to cooler tones using Dark Grey, Neutral Grey, and Silver Grey. These areas should complement the gold while maintaining the overall NMM technique.
Mix these greys to achieve the desired mid-tones and highlights, creating a metallic sheen that contrasts with the warmer gold tones.
Edge Highlighting and Final Touches:
Emphasise edges and details with finer highlights, gradually building up to the lightest tones. Reserve Morrow White for the most pronounced highlights to draw attention and impart a gleaming metallic finish.
Focus on ensuring that each part of the miniature works together as a cohesive whole. The goal is to have the NMM effect believable across the entire model, with careful attention to the light source consistency.
Video: How to Paint a Gold Necron Overlord Part Three
In this third installment of our painting guide, we focus on the Tachyon Arrow of the Necron Overlord from the Indomitus box set, continuing the theme of non-metallic metal (NMM) gold and adding depth to the blue globe.
Paints
Vallejo Heavy Ochre, Heavy Goldbrown, Ice Yellow, Ultramarine Blue; Games Workshop Doombull Brown; P3 Morrow White.
Step-by-Step Guide: How to Paint a Gold Necron Overlord Part Three
Preparing the Model:
If you’re following from previous videos, the model will have a base coat of Doombull Brown for the gold sections and Vallejo Ultramarine Blue for the blue globe.
Applying the Base Highlights:
Using the same colours as previous sections, begin enhancing the Tachyon Arrow. The palette includes Doombull Brown, a 50/50 mix of Doombull Brown and Heavy Ochre, pure Heavy Ochre, Heavy Goldbrown, a mix of Heavy Goldbrown and Ice Yellow, and pure Ice Yellow for the highest highlights.
Focusing on Key Highlights:
Pay special attention to a vertical crease to the right of the blue globe. Highlight this crease directly to simulate reflected light, using a brighter tone such as the Heavy Goldbrown and Ice Yellow mix or Ice Yellow for the most intense reflection.
Building Up Layers:
Gradually work up the highlights, starting with deeper shades like the 50/50 Doombull Brown and Heavy Ochre mix, moving through Heavy Ochre, and then to the lighter mixes involving Ice Yellow. This creates a realistic metallic sheen.
Remember to revisit darker shades if necessary to refine transitions and add depth to the NMM effect.
Handling Flat Panels:
The weapon’s flat panels require careful attention. Ensure that the transition from the base colour up to the lighter highlights is smooth, avoiding the temptation to skip straight to the lightest colours without building up the mid-tones.
Detailing the Blue Globe:
For the blue globe, start with a base of Ultramarine Blue. Gradually lighten the top of the globe where the light would naturally hit, blending towards Ice Yellow for the brightest points.
Incorporate a soft highlight at the globe’s base to simulate a bounce light effect, ensuring the transition is smooth to maintain the appearance of a soft, glowing object.
Final Touches:
Revisit the gold sections around the globe, ensuring that the transitions between colours are smooth and that the reflective qualities of the metal are accurately represented.
For the metallic sections not covered in gold, such as the weapon’s armature, use a gradient from Dark Grey to Silver Grey to create a steel effect, mirroring the techniques used on the gold but with cooler tones.
Video: How to paint a Necron Overlord Blade
In this tutorial, we’ll explore how to paint the blade of the Necron Overlord from the Indomitus boxed set, aiming for a standout effect with an alien technology vibe. We’ll employ a combination of vibrant and contrasting colours to achieve this unique look.
Paints
Vallejo Game Colour Turquoise, Sunset Red, Ice Yellow, Black; Games Workshop Abaddon Black, Ahriman Blue, Incubi Darkness; P3 Morrow White.
Step-by-Step Guide: How to Paint a Necron Blade
Step 1: Base Details
- Start with Ice Yellow, thinning it with approximately two parts water to one part paint for smooth flow. This thinned mixture should be applied to the recessed circular details on the blade, allowing capillary action to draw the paint into these areas. Let dry, then apply a second coat if needed for opacity.
Step 2: Adding Colour Contrast
- Apply Sunset Red (a vibrant magenta/hot pink shade) to further highlight the recessed areas, contrasting sharply with the future turquoise and blue elements. This step enhances the alien technology aspect with its striking colour difference.
Step 3: Initial Highlights
- Mix a little white with Sunset Red to desaturate the pink slightly for the first stage of highlights. Focus these lighter pink highlights around the recesses to emphasize the glow effect. Avoid adding too much white to maintain the vibrancy of the pink.
Step 4: Cleaning Up
- Once the recessed areas are highlighted, use Vallejo Black (or Games Workshop Abaddon Black) to tidy up the edges around these highlights. This step will sharpen the contrast and make the details pop against the blade’s darker base.
Step 5: Turquoise Application
- Begin applying Vallejo Game Colour Turquoise to the flat of the blade. This isn’t aimed at realistic reflection but rather at adding an otherworldly glow. Use this alongside a mix of Turquoise with a small amount of Black for shading and pure Turquoise for mid-tones.
Step 6: Adding Scratches and Texture
- For creating scratches and texture on the blade’s surface, use a very fine brush and lightly apply lines using a mix of Turquoise and White, gradually increasing the amount of white for the brightest highlights. Add these scratches sparingly to avoid overwhelming the design.
Step 7: Glazing for Depth
- To soften and blend the transitions on the blade, prepare glazes with Ahriman Blue (or an equivalent turquoise shade), Incubi Darkness for dark areas, and Abaddon Black for the deepest shadows. Apply these glazes carefully to merge the highlights and shades smoothly, enhancing the blade’s dimensional appearance.
Step 8: Final Highlights and Adjustments
- Using Morrow White, add final spot highlights to the edges and tips of the blade where light would naturally catch the most. This step brings together all the elements, giving the blade a polished, gleaming look that stands out from the rest of the model.
Tips for Success:
- Layering: Build up colours gradually, allowing each layer to dry before applying the next. This approach gives you more control over the final outcome.
- Contrast: Make use of contrasting colours to create visual interest and highlight the alien nature of the technology.
- Texture: Adding small scratches and imperfections can lend realism and character to the blade, suggesting wear and use.
Video: How to Paint a Gold Necron Overlord Back Carapace NMM
This guide provides detailed steps for painting the back carapace of a Necron Overlord miniature from the Indomitus box set.
Paints
Games Workshop Doombull Brown, Abaddon Black; Vallejo Heavy Ochre, Heavy Goldbrown, Ice Yellow; P3 Morrow White.
Step-by-Step Guide: How to Paint a Gold Necron Overlord Back Carapace NMM
Preparation:
Ensure the carapace is primed and ready for painting. If you have painted other parts of the model, make sure they are protected or carefully work around them.
Step 1: Establishing Base Layers
- Start with Doombull Brown as your base layer, covering the entire carapace area. This rich, deep brown will serve as the foundation for building up the gold effect.
Step 2: Building Up Layers
- Create a gradient of colours on your palette, starting with Doombull Brown and gradually mixing in Heavy Ochre to lighten the shade. Apply these mixed shades to areas where light naturally hits the carapace, considering your light source to be coming from the top right.
- Progress to Heavy Goldbrown, focusing on smaller areas within those previously highlighted. This creates depth and the illusion of a light source affecting the metal’s appearance.
- Mix Heavy Goldbrown with Ice Yellow for the next set of highlights, further refining the areas hit by light. This combination starts to give the gold a vibrant, reflective quality.
Step 3: Finishing Highlights
- Pure Ice Yellow is used for the highest points of light reflection. Apply this sparingly to the most prominent edges and areas where the light would be strongest.
- For the final highlights and to achieve the brightest points of light reflection, use Morrow White. This should be used very sparingly and only on the most elevated areas to simulate the reflection of light on metal.
Step 4: Adjusting Shadows
- Use Abaddon Black to glaze into the deepest recesses and shadows of the carapace. This step is crucial for enhancing the contrast, making the NMM effect more pronounced. It’s important to maintain a balance, ensuring that the dark areas do not overpower the lighter, reflective sections.
Step 5: Refining and Cleaning Up
- Go back with your initial colours, like Doombull Brown mixed with Heavy Ochre, to smooth out any transitions between shades or correct any oversights. This step also allows you to adjust the contrast and ensure that the lighting looks natural and consistent across the carapace.
- Use a fine detail brush to clean up edges or redefine lines that may have become muddled during the painting process.
Step 6: Final Inspection and Adjustments
- Once the main painting is complete, inspect the model from various angles to ensure the lighting looks consistent and the NMM effect is convincing. Make any necessary adjustments to the highlights or shadows to perfect the appearance.
Tips for Success:
- Lighting Consistency: Keep the light source direction consistent across the model for a cohesive look. Imagine how the light falls on the model and paint accordingly.
- Layering: Build up your colours gradually for a smooth transition between shades. This technique is key to achieving a realistic metal appearance.
- Controlled Brushwork: Use controlled, precise brush strokes, especially for the finer highlights and shadows, to ensure the best outcome for your NMM effect.
Video: How to Create a Base
This guide will walk you through sculpting and painting the base for the Necron Overlord from the Indomitus boxed set, utilising Milliput for the sculpting part and a selection of Games Workshop paints for painting.
Materials Needed
- Milliput (Super Fine White preferred, but any type will do)
- Sculpting tools and a scalpel
- Water or a lubricant like Vaseline for smoothing Milliput
- PVA glue and fine grain sand for texture
- Paints: Vallejo Model Color Black, Games Workshop Deathworld Forest, Ogryn Camo, Morghast Bone, Ushabti Bone, and Kantor Blue
- Weathering pigment (e.g., Forge World Dark Sand)
- Brushes, including a small Artist Opus dry brush
- Matte varnish for sealing
Step-by-Step Guide: How to Create a Base
Sculpting the Base
- Mixing Milliput: Take equal parts of Milliput’s two components and knead until uniformly beige. It might initially be flaky; continue until smooth.
- Forming the Terrain: Roll the mixed Milliput into a ball and press onto the base. Begin sculpting the rough shape of the terrain using sculpting tools, dipped in water or lubricant to prevent sticking.
- Adding Details: Once you have a basic shape, use tools and a scalpel to carve more detailed rock formations. Ensure the terrain is level where the model will stand.
- Creating Smaller Rocks: Take excess Milliput, form small balls, and press onto the base to simulate smaller rocks, blending them into the larger mass.
- Smoothing and Refining: Continue to refine the shapes, adding crevices and smoothing surfaces. Allow the Milliput to partially dry for easier handling.
Painting the Base
- Base Coat: Once the Milliput is dry, apply a thin base coat of Vallejo Model Color Black. Ensure it’s watered down to cover quickly without obscuring details.
- Adding Sand: Apply PVA glue to the base and sprinkle fine grain sand over it for additional texture. Allow to dry.
- Applying Weathering Pigment: Use a dark sand weathering pigment, pushing it into crevices and blowing away the excess.
- Washing: Create a wash with Deathworld Forest (5 parts water to 1 part paint) and cover the entire base. This will spread the pigment and add depth.
- Dry Brushing: Once dry, dry brush the base with Deathworld Forest, followed by Ogryn Camo, focusing on top-down strokes to highlight edges and textures.
- Detailing: Use Morghast Bone and Ushabti Bone to pick out individual rocks and edges for added contrast and detail.
- Adding Shadows: Water down Kantor Blue and apply it to the undersides of rocks and in shadowed areas to simulate ambient occlusion and enhance depth.
Finishing Touches
- Sealing: Once fully painted and dry, apply a matte varnish to seal the weathering pigment and paint, protecting your work.
- Base Rim: Tidy up the base’s rim with Vallejo Model Color Black for a neat finish.
Tips
- Work in stages, allowing materials to dry fully between steps.
- Be creative with your rock shapes but ensure the model will stand level on the finished base.
- Use a variety of brush sizes for dry brushing to reach different areas without disturbing the painted model.
- Test fit your model frequently on the base during the sculpting process to ensure a good fit
If you don’t have an account, please sign up here! The website currently has over 350 video tutorials with steps and tips, plus a selection of PDFs. If you are not sure about joining, you can explore my free videos with a free membership, or take the plunge and become a full subscriber for full access.


If you’d prefer to support me on Patreon, please visit: https://www.patreon.com/RichardGray