


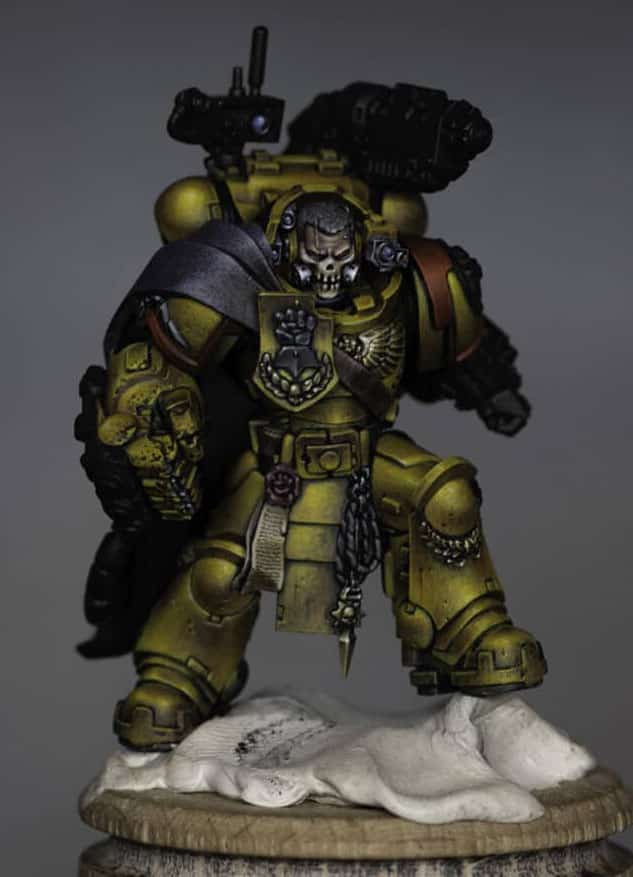
Learn how to paint Tor Garadon with my step-by-step video tutorials and guides, below! But who is he? Well, Tor Garadon is the Imperial Fists’ longest serving Battle Company Captain, an unstoppable warrior in whom the lessons of the Primarch have been distilled to their most punishing form. Tested on a thousand worlds, he is a master of the battlefield, and an unyielding bulwark against those who would oppose Mankind!
Here are a series of videos on how I painted him, including his yellow armour, details on the head and leather parts.
Video: How to Paint Tor Garadon Part One – Yellow Armour
In this session, we’ll focus on achieving a unique, gritty yellow armour that stands out with its weathered and textured appearance.
All videos are recorded in HD 1080p or higher – use full screen for the full effect and let the video load completely.
Materials Needed
Paints: Balor Brown, Yriel Yellow, Flash Gitz Yellow, Mournfang Brown, Screaming Skull (all from Games Workshop).
Tools: Fine detail brush, standard painting brush, wet palette.
Preparation
Model Preparation: Begin by assembling Tor Garadon. For a more menacing look, consider a head swap; the Reavers box set offers a skull face mask option that fits well.
Priming: Prime the model black. This will provide a strong contrast for the yellow armour and allow for effective shadowing.
Base Coating
Apply Balor Brown: Start with Balor Brown as your base. This colour, despite not being a vibrant yellow, offers excellent opacity for layering. Use the brush to apply the paint in a squiggling motion, creating a base texture for the armour. Focus on the areas that will be highlighted, leaving some black primer visible for natural shadows.
Layering and Texturing
Building Up Layers: Gradually build up layers with Yriel Yellow, focusing on highlight areas. This process requires patience as Yriel Yellow has lower opacity. Ensure each layer is thin to avoid paint build-up.
Enhance with Flash Gitz Yellow: For the brightest areas of the armour, such as edges and raised sections, apply Flash Gitz Yellow sparingly. This further defines the armour’s details and gives a sense of depth.
Weathering and Detailing
Mournfang Brown for Shadows: To add warmth and prevent the yellow from looking washed out, glaze Mournfang Brown into the deepest recesses and shadowed areas. This technique prevents the yellow from turning greenish in the shadows.
Chipping Effect: With a very fine brush, apply Rhinox Hide to simulate chips and scratches on the armour. Vary the size and placement of these chips to create a realistic weathered look. Focus on areas that would logically receive the most wear, such as edges and protrusions.
Highlighting Chips: Use a mix of Yriel Yellow and Screaming Skull to highlight the edges of the chips. This step adds dimension and makes the damage appear more realistic.
Screaming Skull for Extreme Highlights: Apply Screaming Skull very sparingly to the most prominent edges and details to make them pop. Be cautious with this step to maintain the armour’s yellow integrity.
Final Touches
Review and Adjust: Examine the model for any areas that may need more definition or correction. Use Balor Brown to smooth out any overly bright sections or to reintegrate areas that have become too saturated with highlights.
Texture and Depth: Continue to use the squiggling technique with Balor Brown and Yriel Yellow to add texture and depth, focusing on ensuring the armour looks worn but still distinctively yellow.
Video: How to Paint Tor Garadon Head
This guide will concentrate on painting the head, specifically the face and face mask.
Materials Needed
- Paints: Games Workshop’s Balor Brown, Morghast Bone, Screaming Skull, Khorne Red, Cadian Fleshtone, Kislev Flesh; Vallejo’s Pale Grey Blue, Neutral Grey; P3’s Morrow White.
- Brushes: A range of sizes from fine detail to standard.
- Accessories: Model holder (optional for ease), wet palette.
Preparation
Head Preparation: Assemble Tor Garadon’s head. This guide utilises an alternative head from the easy-to-build Reaver squad for a more menacing look.
Priming: The head should already be primed and the areas representing his “earmuffs” painted yellow as per the armour painting guide in Part 1.
Painting the Base Layers
Face: Start with Khorne Red as the base layer for the skin. Ensure the paint is slightly watered down for even coverage. A couple of coats may be needed. Focus on neatness to avoid extra clean-up later.
Hair: Apply Eshin Grey for the hair, thinned to a consistency thinner than single cream. This will be built up in layers to create texture. Focus on making the hairline more opaque and allow the colour to fade out towards the back of the head.
Detailing and Texturing
Skin Highlights: Use Cadian Fleshtone to highlight the prominent features of the face. Since Space Marine faces often have a scowling expression, pick out these details to emphasise his grimace. Apply Kislev Flesh for higher highlights, adding a bit of white to the Kislev Flesh for the most prominent areas.
Hair Detailing: To add depth and volume to the hair, use Skavenblight Dinge, followed by Dawnstone, focusing on the texture and ensuring the front of the hair is the brightest.
Painting the Eyes
Base: Use an off-white, such as Vallejo’s Pale Grey Blue, for the whites of the eyes. This choice helps make the final white dot stand out more.
Pupils: Carefully add a black dot to represent the iris and pupil. Given the size and recessed nature of the eyes, this step requires precision.
Reflection: Add a tiny dot of Morrow White to each eye to simulate reflection. Ensure both dots are symmetrically placed for a natural look.
Face Mask and Filters
Base Colour: Start with Balor Brown, identical to the armour’s base, for the face mask.
Bone Texture: Layer Morghast Bone followed by Screaming Skull for the bony parts of the face mask. Concentrate on achieving a natural bone colour, distinct from both the flesh tones and the yellow of the armour.
Filters: Paint the filters using Vallejo’s Neutral Grey, adding reflective highlights with Pale Grey Blue and Morrow White for a metallic effect.
Final Touches
Clean-Up and Adjustments: Revisit any areas that require tidying up, especially around the intricate parts like the eyes and the edges of the face mask.
Reflection and Shine: For areas intended to look reflective or shiny, such as the filters, ensure the contrast between light and dark is pronounced. Utilise glazes to smooth out transitions if necessary.
Video: How to Paint Tor Garadon Leather, Chest Eagle NMM, Red Shoulder Trim
This segment will cover the techniques for painting the leather details, non-metallic metal (NMM) effects on the chest eagle and other adornments, the red shoulder trim, and the blue lenses.
Materials Needed
- Base Paints: Rhinox Hide, Macragge Blue, Mephiston Red.
- Highlight Paints: Cadian Fleshtone, Mournfang Brown, Hoeth Blue, Baharroth Blue, Wild Rider Red, Evil Sunz Scarlet.
- Specialty Paints: Vallejo Japanese Uniform, English Uniform, Ice Yellow, Ivory; P3 Morrow White.
- Brushes: A selection ranging from fine detail to medium size.
- Other: Wet palette, water for thinning paints, paper towel for blotting.
Leather Details
Base Layer: Apply Rhinox Hide to the leather areas for a rich, dark brown base.
Weathering and Texture: Using Cadian Fleshtone, paint crack marks and weathering on the leather to simulate wear. Focus these marks more towards the edges and keep them parallel but slightly varied in angle for a natural look.
Shading and Depth: Mix a bit of Rhinox Hide into your Cadian Fleshtone on a wet palette and go back over your weathering marks to soften and blend them into the leather, enhancing depth.
Non-Metallic Metal (NMM) Chest Eagle
Base Colours: Start with Vallejo English Uniform as your base for the gold NMM areas.
Building Up Highlights: Layer Vallejo Japanese Uniform over the base, focusing on the upper left areas of the eagle to mimic a light source coming from that direction.
Bright Highlights: Add Vallejo Ice Yellow for the brighter highlights, concentrating on areas that would catch the most light.
Final Highlights: Use Vallejo Ivory and P3 Morrow White for the brightest points of light on the eagle, such as the tips of feathers or central areas closest to the perceived light source.
Red Shoulder Trim
Base Coat: Paint the shoulder trim with Mephiston Red, ensuring a solid, even base layer.
First Highlights: Apply Evil Sunz Scarlet to the upper portions of the trim where light would naturally hit.
Final Highlights: Use Wild Rider Red for the brightest highlights, applying it sparingly to maintain the red’s saturation and avoid it looking pink or orange.
Blue Lenses
Base Layer: Start with Macragge Blue, painting a dome shape on the lens, leaving some of the base black visible for depth.
Adding Depth: Layer Hoeth Blue over the Macragge Blue, focusing on the top left side to start building the reflective look.
Brighter Highlights: Apply Baharroth Blue in a smaller area than the Hoeth Blue, enhancing the sense of reflection.
Final Touches: Add a tiny dot of P3 Morrow White in the top left corner of the lens to simulate a pinpoint reflection of light.
Video: How to Paint Tor Garadon Imperial Fist Soft Textured Cloak
How to paint Tor Garadon’s cloak with a focus on creating a wool-like texture that contrasts with the hard surface of the armour.
Materials Required
- Paints: Vallejo German Grey, Vallejo Neutral Grey, P3 Morrow White, Games Workshop Naggaroth Night.
- Brushes: A small brush, preferably a 0 or 00 with a slightly worn tip for stippling.
Mixing the Colours
Prepare your palette: Place Vallejo German Grey and Neutral Grey on your palette. Create a gradient of mixes from pure German Grey to pure Neutral Grey in several steps. I recommend a ratio of 3:1 (German Grey to Neutral Grey) for the first mix, a 50/50 mix, and then a transition to pure Neutral Grey.
Base Coating
Initial Coating: Start with your 50/50 mix of German Grey and Neutral Grey, applying it loosely to the cloak. Focus on creating texture right from the base layer, using a dabbing motion rather than striving for a smooth finish.
Building Texture and Highlights
Creating Texture: With the cloak base ready, switch to pure Neutral Grey to start stippling. Use a light touch to create dots, focusing on areas that would naturally catch more light, such as the top and front of the shoulder. Keep your paint at a creamy consistency for clear dot marks.
Enhancing the Texture: Continue stippling by using lighter mixes towards the highlight areas. You should be creating a texture that contrasts with the smoother surfaces of the armour, suggesting a fabric-like material. Remember, the key to this technique is patience and a multitude of tiny dots to build up the texture gradually.
Final Highlights and Glazing
Adding Depth: Mix a small amount of P3 Morrow White into your Neutral Grey for the brightest highlights. Apply this sparingly to the very tops of the folds where the light would be strongest.
Glazing for Colour and Softness: Thin down some Naggaroth Night significantly with water (about 7 or 8 parts water to 1 part paint). Apply this glaze over the cloak to tint the grey slightly purple, enhancing the cloak’s appearance while softening the stippling effect. This glaze will unify the texture, blend the stippled dots, and add a subtle colour that contrasts beautifully with Tor Garadon’s yellow armour.
Key Tips
Stippling Technique: Ensure your brush is not overly loaded with paint to avoid large, unsightly dots. Aim for a multitude of small, controlled applications to build up the texture.
Glazing: Be mindful not to over-apply the Naggaroth Night glaze. The goal is to add a subtle hue and soften the stippling rather than to recolour the cloak.
Brush Care: A slightly worn brush is ideal for stippling as it prevents overly sharp dots that can look unnatural for this texture.
If you don’t have an account here on my website, please sign up here! I have over 350 video tutorials with steps and tips, plus a selection of PDFs. If you are not sure about joining, you can explore my free videos with a free membership.


If you’d prefer to support me on Patreon, please visit: https://www.patreon.com/RichardGray