


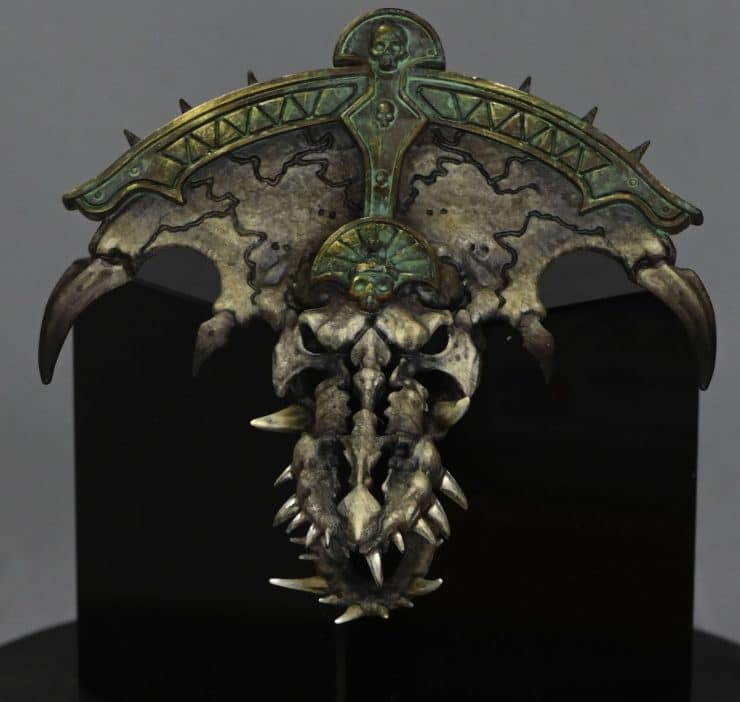
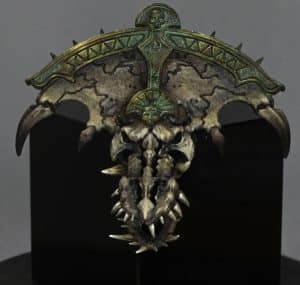
This video looks at how to paint the head of the Tomb Kings Bone Dragon. The video looks at the textured bone, how to add colour and interest and then how to add verdigris and NMM to the bronze trim.
Video – How to Paint the Tomb Kings Bone Dragon Head
Paints and Materials Used on the Tomb Kings Bone Dragon
Paints:
- Games Workshop Paints: Mournfang Brown, XV-88, Morghast Bone, Screaming Skull, Skavenblight Dinge, (Skeleton Horde Contrast optional)
- Kimera Colours: Fallen Grass (Sybarite Green as an alternative)
- Two Thin Coats: Dark Sun (Balor Brown alternative)
Brushes and Tools:
- Artis Opus Small Dry Brush: Used for stippling the base coat and first highlights.
- Size 2 Brush (Old): Ideal for glazing with Scavenblight Dinge and applying the verdigris effect on metallic elements. An older brush is recommended as the techniques used can be rough on the bristles.
- Size Z00 Brush: Used for finer detail work, such as adding texture to the verdigris effect. However, a larger brush may be more efficient for larger areas.
- Size 1 Brush: Recommended for applying non-metallic metal highlights. An older brush is suitable as long as it maintains a good point.
- Wet Palette: Handy for keeping your paint mixes workable and blending colours.
- Kitchen Roll: For dabbing off excess paint and ensuring the right consistency on the brush.
- Water Pot: For thinning paints and cleaning brushes.
Step-by-Step Guide to Painting the Tomb Kings Bone Dragon
Step 1: Base Coat
- Create a mix of Mournfang Brown and XV-88 in approximately a 50/50 ratio. The exact mix isn’t crucial, but aim for a reddish-brown shade.
- Thin this mixture with water (about two parts water to one part paint).
- Using an Artist Opus small dry brush, apply this mixture to the dragon head using a stippling method. Ensure the brush is damp, not wet, to avoid a dusty look.
- Cover the entire surface, allowing the small dots of paint to create texture. This might require two to three layers for opaque coverage.
Step 2: First Highlight
- Switch to Morghast Bone for the next layer of highlight.
- Again, thin the paint (similar ratio as before) and dab off excess paint on kitchen roll before applying.
- Stipple Morghast Bone more selectively, focusing on creating a transition from darker to lighter areas.
- Pay special attention to the metal crests and teeth-like protrusions, ensuring they are light enough for later glazing.
Step 3: Final Highlight
- Move on to Screaming Skull for the highest highlights.
- Apply this colour even more sparingly and delicately, focusing on the most raised areas and textures.
- Remember, this is not dry brushing. Dab the brush straight onto the model to create the desired texture.
Step 4: Painting the Teeth
- Start with the base colours used for the bone and apply them with a normal brush for a smoother finish.
- For the top teeth, paint from the bottom upwards. This creates a shiny effect, with the brightest part of the tooth at the top.
- Use Screaming Skull for the very top section of the teeth to enhance the shiny look.
Step 5: Softening Textures
- Use Scavenblight Dinge to soften the texture on the skull.
- Thin the paint significantly (about three to four parts water to one part paint).
- Apply with a large brush, focusing on midtones to shadows to enhance depth and contrast.
Step 6: Glazing and Highlighting
- Return to the mixture of XV-88 and Mournfang Brown, now very watered down.
- Glaze around the teeth and other areas to add warmth and contrast, separating different elements like teeth from the skull.
Step 7: Additional Details and Glazing
- Use Morghast Bone and Screaming Skull to pick out details, focusing on areas like the eye sockets and brow for added focus.
- For the bone spikes, start glazing with Rhinox Hide, thinned down.
- Progress from Rhinox Hide to a black colour (like Vallejo Model Color Black), applying from halfway down the bone spike towards the tip, creating a dark gradient.
Step 8: Metallic Elements
- Base the metal parts with Mournfang Brown.
- Apply a wash of Fallen Grass, heavily watered down (five parts water to one part paint), focusing on recesses.
- Follow up with black lining for added definition, using watered-down black paint.
Step 9: Non-Metallic Metal Highlights
- Create a palette with Mournfang Brown, a 50/50 mix of Mournfang Brown and Dark Sun, Dark Sun, Dark Sun mixed with white, and pure white.
- Start with the darker mixes and progressively highlight with lighter mixes, focusing on edges and areas where wear would naturally occur.
- Add finer highlights and scratches with the lightest mixtures.
Step 10: Finishing Touches
- Revisit areas with Scavenblight Dinge for further softening and definition.
- Optionally, add warmth with a glaze of Mournfang Brown and XV-88, or Skeleton Horde Contrast for subtlety.
Explore more Old World and Bone Tutorials!
If you don’t have an account, please sign up here! The website currently has over 350 video tutorials with steps and tips, plus a selection of PDFs. If you are not sure about joining, you can explore my free videos with a free membership, or take the plunge and become a full subscriber for full access.


If you’d prefer to support me on Patreon, please visit: https://www.patreon.com/RichardGray