How to paint an Alchemite Warforger

This full video shows how to paint an Alchemite Warforger from the Cites of Sigmar, which Games Workshop sent to me as an early review copy.

This guide will cover various techniques such as non-metallic metal effects (NMM), leather texture, and object source lighting (OSL).

How to paint an Alchemite Warforger Video

This video is currently hidden. To watch it, please make sure that you are logged into the website!

You’ll Need:

  • Alchemite Warforger.
  • A range of brushes (including a size 3 Artist Opus M brush).
  • Paints from Games Workshop: Rhinox Hide, Mournfang Brown, Balor Brown, Daemonette Hide, Slaanesh Grey, Mephiston Red, Yriel Yellow, Wild Rider Red, Troll Slayer Orange, Bugman’s Glow, Cadian Fleshtone, Morghast Bone.
  • Vallejo paints: Ice Yellow, German Grey, Neutral Grey.
  • P3 paint: Morrow White.
  • Mininatur Spring Moss Pads for basing.

Let’s Get Started:

  1. Base Coating: Initiate with a base layer of XV-88. This creates an ideal foundation for both gold and bronze non-metallic metal (NMM) effects. Apply these base colours in a relaxed manner; perfection isn’t the goal at this stage.
  2. Non-Metallic Metal (NMM) Bronze/Gold: Use a combination of XV-88, Balor Brown, Ice Yellow, and a touch of Rhinox Hide. Mix these colours in various ratios to achieve the desired NMM effect.
  3. Leather Textures: For the leather apron and straps, start with a base of Rhinox Hide. Then, build up the texture and highlights with Bugman’s Glow and Cadian Fleshtone, adding Morghast Bone for the lighter areas.
  4. Skin Tones: Begin with Mournfang Brown as the base for the skin. Gradually layer up the skin tones using a mix of Mournfang Brown and Cadian Fleshtone, finishing with lighter highlights.
  5. Object Source Lighting (OSL): For the glowing effects, such as the pot’s contents, start with Mephiston Red and build up to Yriel Yellow and Wild Rider Red for the intense glow.
  6. Detailing: Use Slaanesh Grey and Daemonette Hide for the cooler tones, and Vallejo’s Ice Yellow and Neutral Grey for the metallic areas. German Grey can be used for darker shadows.
  7. Finishing Touches: Use Morrow White for the brightest highlights and final touches. The base can be detailed with Mininatur Spring Moss Pads to add a natural touch.

Remember, painting is about building up layers and textures, so take your time and enjoy the process. Each layer adds depth and character to your Alchemite Warforger.


Explore More of my Character Tutorials

Character Tutorials
I was lucky enough to be sent the teeny tiny little Leviathan Dreadnoughts from the Legiones Astartes and couldn’t wait to paint them up. Follow along with my tutorial on how to paint a Leviathan Dreadnought yourself, below. Video: How to Paint a Tiny Leviathan Dreadnought This video looks at the new Leviathan model for Legions Imperialis and looks at an alternate method of painting the model as Imperial Fists. The same painting method can be used for other Legion models, but instead of the base red, just airbrush the off-white colour over the black primer and select an appropriate Legion Contrast Paint colour. Materials Needed: Primer: Black Base Paints: Wild Rider Red (Games Workshop) Highlight Paints: Chimera Colours Sunray (or Vallejo Ice Yellow as alternative), Imperial Fists Yellow (Contrast), Uriel Yellow (Games Workshop) Shading: Winsor & Newton Artist’s Oil Colour Burnt Umber, Agrax Earthshade (Games Workshop) Metallics: Metal Colour Exhaust Manifold (Vallejo) Additional Colours: Mournfang Brown, Rhinox Hide, Sotek Green, Morgast Bone, Skeleton Horde (Contrast), Black (Vallejo), Neutral Grey (Vallejo) Finishing: Decals, Coffee Granules, MIG Sand and Gravel Glue Tools: Airbrush, various brushes including a very worn-out old brush for oil washes, wet palette Steps: Preparation: Assemble your model ensuring to correctly match the pieces as per instructions to avoid misfitting parts. Prime the entire model in black to prepare for painting. Base Coating: Airbrush the model with Wild Rider Red as the base layer. Ensure a solid, even coat by applying two or three layers if necessary. Highlighting: Apply a zenithal highlight using Chimera Colours Sunray or Vallejo Ice Yellow. Focus on areas where sunlight naturally hits to create a sense of volume and depth. For further highlights, transition to a lighter shade using Uriel Yellow mixed with a bit of white for the brightest points on the model. Contrast Layering: Over the prepared base, apply Imperial Fists Yellow contrast paint. The red undercoat will enrich the yellow, providing a vibrant, intense colour suitable for Imperial Fists. Shading: Create depth using a wash of Winsor & Newton Artist’s Oil Colour Burnt Umber thinned with Sansodor. Apply this carefully to recesses and shaded areas to enhance details. Metallic Details: Paint metallic parts with Vallejo Metal Colour Exhaust Manifold. Transfer this paint to a pot for easier access and to avoid spillage. Use Agrax Earthshade to add depth to the metallic areas. Additional Details: For areas requiring darker tones or additional shading, use Mournfang Brown and Rhinox Hide. This includes adding weathering effects and battle damage. Eyes and lenses can be detailed using Sotek Green, with highlights added by mixing the green with white. Use Morgast Bone for highlighting edges and details subtly. Skeleton Horde contrast paint can be used for additional shading and to add variety to the base. Base Decoration: Prime the base in black, then airbrush with Neutral Grey. Apply coffee granules (fresh, not sticky or old) to simulate dirt or rubble, securing them with MIG Sand and Gravel Glue. Highlight the texture with Morgast Bone and add weathering powder for further detail. Decals: Apply decals as needed, using a small brush to position them. Set them with Micro Set and ensure they conform to the model’s surface. If necessary, seal with matte varnish to remove any glossiness. Finishing Touches: Finalise your model with any additional weathering, highlighting, or detailing as desired. This may include further battle damage, streaking effects using thinned-down Mournfang Brown, or reinforcing highlights on the most prominent features. Varnishing: Once satisfied with the painting, apply a matte varnish to protect your work and reduce any unwanted shine, especially over decals. More Legions Imperialis Tutorials and Videos! If you don’t have an account, please sign up here! The website currently has over 350 video tutorials with steps and tips, plus a selection of PDFs. If you are not sure about joining, you can explore my free videos with a free membership, or take the plunge and become a full subscriber for full access. If you’d prefer to support me on Patreon, please visit: https://www.patreon.com/RichardGray [...]
A series looking at how to paint Commander Dante, which was sent to me for early review purposes by Games Workshop. The model is being painted to a high standard and will be covered in large amounts of NMM (Non Metallic Metal) Quick Jump To: Materials and Paints Needed for the NMMVideo – How to Paint Commander Dante NMM: Part OneVideo – How to Paint Commander Dante NMM: Part TwoVideo – How to Paint Commander Dante NMM: Part ThreeSteps and Tips on Commander Dante: NMMBase LayerDeveloping Mid-TonesRefining HighlightsEnhancing BrightnessDeepening ShadowsFinal Highlights and Sharp DetailsGlazing and SmoothingClean UpTips for Success:Video – NMM Axe (First Version)Materials NeededStepsTipsVideo – NMM Axe (Second Version)Materials and Paints UsedPreparing the AxeBase PaintingSky Earth Non-Metallic Metal (NMM) TechniqueRefining the Metallic LookEdge Highlights and Final TouchesVideo – Head, Eyes, Blood GemMaterials and Paints Needed:Steps for Commander Dantes Head and DetailsVideo – Red Shoulder NMMPaints NeededStepsTips Materials and Paints Needed for the NMM Fine Detail Brushes: Essential for precise work on NMM effects. Black Primer: To create a solid base for your colours. Palette: For mixing your paints and achieving the right consistency. Paints: Base and Mid-Tones: Mournfang Brown, XV-88, Balor Brown (Games Workshop) Highlights: Ice Yellow (Vallejo; you can substitute with Dorn Yellow from GW), Troll Slayer Orange, Flash Gitz Yellow (Games Workshop) Shadows and Deep Recesses: Rhinox Hide (Games Workshop) Final Highlights and Sharp Details: Morrow White (P3; any high-quality white paint will suffice) Video – How to Paint Commander Dante NMM: Part One All videos are recorded in HD 1080p or higher – use full screen for the full effect and let the video load completely. Click the cog icon to choose speed, if I’m too fast or slow! Video – How to Paint Commander Dante NMM: Part Two Video – How to Paint Commander Dante NMM: Part Three Steps and Tips on Commander Dante: NMM Base Layer Paint: Mournfang BrownApplication: Apply Mournfang Brown as a base layer over the areas you intend to paint gold. This forms a foundational layer that aids in building depth. Developing Mid-Tones Paints: Mournfang Brown, XV-88, Balor BrownApplication: Begin layering XV-88 over the Mournfang Brown base, focusing on raised areas. Then, use Balor Brown to start defining the mid-tones, enhancing the dimensional appearance. Refining Highlights Paints: Mix of Balor Brown and Ice YellowApplication: Create a lighter shade by mixing Balor Brown with a small amount of Ice Yellow. Apply this mixture to the highest points of the highlighted areas, where light naturally catches more intensely. Enhancing Brightness Paints: Ice Yellow, Troll Slayer Orange, Flash Gitz YellowApplication: Gradually add brighter highlights using these colours. Focus on areas where light would hit the strongest, such as edges and prominent features. Deepening Shadows Paint: Rhinox HideApplication: Use Rhinox Hide to deepen the shadows and add contrast. Apply it in recessed areas and where different parts of the model meet, to give more definition and depth. Final Highlights and Sharp Details Paint: Morrow WhiteApplication: Apply Morrow White for the brightest highlights and sharp details, accentuating the most raised edges where the light would be most intense. Glazing and Smoothing Technique: GlazingApplication: If necessary, use glazing with the lighter colours to smooth out transitions between highlights and mid-tones, ensuring a more natural progression of colour. Clean Up Action: Tidy any overspill or mistakes with appropriate base colours. This step is crucial for a neat and professional finish. Tips for Success: Consistency is Key: Maintain the right paint consistency. For NMM, a slightly thicker mix can be preferable for vibrant colours, but it should still flow smoothly.Consider Lighting: Always consider the overall lighting and direction of your model. Your highlights should consistently reflect this light source.Brush Care: Look after your brushes. Use a separate brush for mixing paints to maintain the fine tips of your detail brushes.Patience Pays Off: Allow each layer to dry thoroughly before proceeding to the next. NMM is a technique that benefits greatly from patience and careful layering. Video – NMM Axe (First Version) Materials Needed Paints: Games Workshop: Sotek Green, Rhinox Hide, Mournfang Brown, Wazdakka Red Vallejo: German Grey, Neutral Grey, Ice Yellow P3: Morrow White Brushes: A variety of sizes including 00 for fine details Palette: For mixing colours Water pot: For thinning paints and cleaning brushes Steps Initial Blocking In: Start by applying a mix of Neutral Grey and Mournfang Brown at the lower part of the axe for the Earth section of SENMM. Above that, apply a mix of Sotek Green and Neutral Grey. However, this will be lightened later on for blending purposes. Lightening the Blue-Green Mix: Mix Ice Yellow with the Sotek Green and Neutral Grey mix to lighten it, allowing for smoother blending with the lighter colours in the middle. Painting the Upper and Lower Sections: Use various mixes of Neutral Grey and Ice Yellow to create gradients and highlights. For the Earthy sections, use Mournfang Brown and Rhinox Hide. Creating Specular Highlights: Apply Morrow White for the brightest highlights on the most raised edges. Be mindful of the light source and the reflective qualities you’re trying to achieve with NMM. Adding Lightning Effect: Use Wazdakka Red, gradually adding white for the lightning effects. Focus on creating dynamic, jagged lines emanating from the power nodes of the axe. Glazing and Smoothing: Use glazing techniques with lighter colours to smooth out transitions and refine highlights. Adjust the consistency of your glazes depending on the humidity and temperature of your painting environment. Final Touches: Refine the edges and any rough areas. If necessary, add more layers to enhance depth and realism. Tips Paint Consistency: Adjust the paint consistency based on your environment. Hotter conditions may require more frequent watering of paints. Brush Care: Use a separate brush for mixing paints to preserve the tips of your detail brushes. Light Reflection: Constantly refer back to how light naturally interacts with metal surfaces to guide your highlight placement. Patience and Layers: Build up your layers gradually and allow each to dry before applying the next. Video – NMM Axe (Second Version) This is my second try at the axe NMM, as I wasn’t happy with the first result! You can use whichever you prefer. Video – How to Paint Dante Axe NMM (V2) Materials and Paints Used Paints Games Workshop Paints: Baharroth Blue Rhinox Hide Mournfang Brown Vallejo Paints: Ice Yellow Neutral Grey German Grey Kimera Colours Paint: Diarylide Yellow (Note: You can create a similar effect by mixing Yriel Yellow with a small amount of orange) Materials Black Primer: For the initial coat on the axe. Wet Palette: For mixing and maintaining paint consistency. Fine Detail Brushes: Essential for applying precise highlights and details – I use Artist Opus brushes, but any high-quality fine-detail brush is fine Sanding Tools: For modifying and smoothing the cutting edge of the axe. Preparing the Axe Initial Assessment: Note that The Cutting Edge is blunt, almost a millimeter wide. Modification: Carefully shave down The Cutting Edge for a more realistic, thin look. Ensure evenness to avoid wonky highlights. Base Painting Primer: Apply a light coat of black primer. Base Colours: For the flat side of the axe, start with a base of Neutral Grey (Vallejo). For The Cutting Edge, use Rhinox Hide (Games Workshop) at the top, blending into Mournfang Brown towards the bottom. Sky Earth Non-Metallic Metal (NMM) Technique Sky Representation: Mix Baharroth Blue (Games Workshop) with Ice Yellow (Vallejo) to create a sky-like gradient on the flat side of the axe. Start darker at the top, gradually lightening towards the bottom. Earth Representation: At the bottom of The Cutting Edge, use a mix of Rhinox Hide and Mournfang Brown (Games Workshop) for the earth reflection. Blend Neutral Grey (Vallejo) into this mix for lighter shades towards the bottom. Adding Highlights: Gradually add more Ice Yellow (Vallejo) to the Baharroth Blue mix for the sky, and more Mournfang Brown for the earth, to create a sense of depth and reflection. Reflection Details: Add subtle warped shapes and lines to mimic trees or mountains in the reflection, enhancing the mirror-like quality. Refining the Metallic Look Glare Effect: Identify the primary light source and add a glare effect on the axe. This will be higher up on the axe blade. Shine Spots: Paint independent shine spots to enhance the metallic effect. Use a mix of Neutral Grey and German Grey (Vallejo) for darker areas, and a mix of Ice Yellow and Baharroth Blue for lighter areas. Edge Highlights and Final Touches Edge Highlights: Apply thin highlights along The Cutting Edge and other prominent edges of the axe. Use a mixture of the base colors for a consistent look. Lightning Effect (Optional): If desired, add a subtle lightning effect, particularly in darker areas. Use saturated colors with minimal highlights. Final Glazing: Use thinned down Ice Yellow (Vallejo) and Diarylide Yellow (Kimera Colors) or a similar mix for warm glazing over the highlights. Pure White Highlights: Add small dots of pure white paint at the brightest points of the shine spots for maximum impact. Video – Head, Eyes, Blood Gem Materials and Paints Needed: Fine Detail Brush: Crucial for precision work on small areas like eyes and gems. Magnification Tool (Optional): Can be useful for extremely detailed areas. Palette: Necessary for mixing and thinning your paints. For Gold Tones: XV-88, Balor Brown, Rhinox Hide (Games Workshop) Highlights for Gold: Troll Slayer Orange, Ice Yellow (Vallejo) Eyes Base Colour: Sotek Green (Games Workshop) Eyes and Gem Highlights: Morrow White (P3) Blood Gem: Mephiston Red, Wild Rider Red (Games Workshop) Steps for Commander Dantes Head and Details Refining the Gold: Enhance the gold’s depth by adding more orange reflections, especially on the cheeks and ear muffs. This technique replicates the way gold reflects on gold, creating an orange hue. Eyes Detailing: Start with Sotek Green for the base. For the highlights, progressively mix in Morrow White with Sotek Green. Focus on the lower edge of each eye, adding more intense highlights near the tear duct and finishing with a small white dot at the back for a gem-like appearance. Blood Gem on Forehead: Use Mephiston Red as the base color for the gem. Apply Wild Rider Red on the lower right section to simulate light reflection within the gem. Mix a small amount of Morrow White with Wild Rider Red for the edge highlights, ensuring a realistic gem look. Layering for NMM Gold Effect: Apply layers of XV-88, Balor Brown, and Rhinox Hide, using the translucency of the paints to create depth and warmth in the gold. Troll Slayer Orange is key for achieving reflective properties and varied tones in the gold. Detailed Facial Features: Paint a dark line from below the nose over both lips down to the chin. This creates a division on the face, adding to the realism. Make sure the right side of the face is slightly lighter than the left. Fine Touches on Eyes and Gem: Ensure the eyes are fully covered in blue to maintain their vibrancy. For the blood gem, detail the top left of the gem with a sharp edge and a line running down, symbolizing light reflection. Reviewing and Balancing: Regularly step back to assess the overall look. It’s essential to balance the details with the overall aesthetics of the miniature. Assembling and Final Review: Once all the parts are painted, assemble the head and do a final review. Make any necessary adjustments for a polished look. Video – Red Shoulder NMM Paints Needed Games Workshop: Mephiston Red, Evil Sunz Scarlet, Mournfang Brown, Balor Brown, Trollslayer Orange, Rhinox Hide Vallejo: Ice Yellow, Black Steps Base and Mapping: Start with Mephiston Red mixed with a small amount of black to map out where the shiny parts will be. Apply this mix to create the initial shape of the reflection on the shoulder pad. Building Layers: Use gradually lighter mixes of Mephiston Red and Evil Sunz Scarlet, adding Ice Yellow for the lighter tones. Focus on smooth layering to build up the red tones, paying attention to how light naturally reflects on a curved surface. Defining the Shine: For the brightest shine spot, use a combination of XV-88, Balor Brown, and Ice Yellow from Games Workshop. Apply these colours carefully to create a realistic reflection effect. Painting the Gold Trim: Start with Mournfang Brown and Rhinox Hide for darker areas. Progressively mix in Trollslayer Orange and Ice Yellow for brighter sections. Ensure a smooth transition between the red of the shoulder pad and the gold trim to maintain a cohesive look. Adding Additional Reflections: Insert additional shine spots in both the red and gold areas for more depth and realism. Use stippling techniques to create a diffused yet shiny highlight on the brightest parts. Be mindful of the shape and direction of these additional reflections to maintain consistency with the light source. Final Touches: Use a mix of Mephiston Red and Evil Sunz Scarlet for the final glazes to enhance the vibrancy of the red. Add final highlights with the lightest mix of Ice Yellow and white for the brightest points. Refinement: Go back and refine any areas as needed, especially the transitions between highlights and shadows. Add intricate details such as reflected light on the gold trim to enhance the NMM effect. Tips Paint Consistency: Adjust the paint-to-water ratio to around 60% water for smoother application and finish. Reflection Logic: Consider the shape of the shoulder pad and how light interacts with it. Use a lamp to guide your reflection placement. Edge Highlights: Be careful with edge highlights; ensure they are consistent with the overall light reflection and texture of the surface. Patience and Layers: Build up the layers gradually for a smooth transition. This is crucial for achieving a realistic NMM effect. Stippling Technique: Use stippling in the brightest areas to create a diffused highlight, adding depth and realism. Harmonizing Colours: Ensure the reds and golds complement each other, keeping the overall look cohesive. Reflective Details: Consider adding subtle reflective details in surrounding areas, like reflected red light on nearby silver parts, to enhance realism. Rest and Review: Sometimes stepping away from the model and returning with fresh eyes can help spot areas needing refinement or a different approach. More Tutorials to Explore If you don’t have an account, please sign up here! The website currently has over 350 video tutorials with steps and tips, plus a selection of PDFs. If you are not sure about joining, you can explore my free videos with a free “freebies” membership, or take the plunge and become a full subscriber for full access. If you’d prefer to support me on Patreon, please visit: https://www.patreon.com/RichardGray [...]
This video shows how to paint a Grimdark Grimy Death Guard for the Horus Heresy. The model is a new MKIII plastic marine and is painted in the Grimdark style to try and capture the weight and brutal nature of the armour. The following paints were used:Games Workshop: Balor Brown, Morghast Bone, Screaming Skull, Mephiston Red, Wildrider Red, Yriel Yellow, Contrast Darkoath Flesh, Contrast Medium, Rhinox Hide, Agrax Earthshade Vallejo: Heavy Blackgreen, Ice Yellow P3: Morrow White (Any white will do) Kimera Colours: Black (Any black will do) Pro Acryl: Light Bronze Metallic, Rich Gold Metallic Top Grimdark Grimy Death Guard Tips!: Prepare Your Palette: Utilize a wet palette to maintain paint hydration.For the initial dry brushing, use Balor Brown from Games Workshop on a wet palette.Choose the Right Brush:Select a small dry brush, like the Artis Opus dry brush, for the stippling technique.Stippling Technique:Diverge from traditional dry brushing; instead, stipple the paint onto the model.Aim for a disheveled, grimy, and weathered appearance.Start with Balor Brown, advancing to lighter hues like Morghast Bone, Screaming Skull, and Yriel Yellow for a textured effect.Application Method:Stipple the paint directly onto the model, concentrating on armour panels.Rotate the model as you paint to ensure each section dries before revisiting.Focus on hitting the model face-on with the brush to create a textured, dotty buildup.Chipping Effect:For chipping effects, use Rhinox Hide with a sponge chipping technique.Contemplate hand-painting some scratches for added detail.Accentuating Details:Employ a fine brush for details like scratches and chips.Highlight specific armour panels for added depth.Contrast and Weathering:Apply Darkoath Flesh contrast paint mixed with contrast medium to unify the your Grimdark Grimy Death Guard.Experiment with adding more brightness by layering appropriately watered-down contrast paints.Highlighting and Shadows: Highlight edges using Morrow White from P3.Contemplate applying washes like Agrax Earthshade to blend highlights and shadows.Use Ice Yellow from Vallejo for specific details, building up the colour gradually.Fine-Tune Highlights:Use a finer brush to refine highlights and correct any over-spill.Introduce Agrax Earthshade for added depth in recessed areas.Final Touches:Experiment with Wildrider Red and Mephiston Red from Games Workshop for added details.Apply a matte varnish to seal the paint job.Consider adding additional details to your Grimdark Grimy Death Guard like basing with textures and powders. If you don’t have an account, please sign up here! The website currently has over 350 video tutorials with steps and tips, plus tips and PDFs. If you are not sure about joining, you can explore my free videos with a free “freebies” membership, or take the plunge and become a full subscriber for full access. If you’d prefer to support me on Patreon, please visit: https://www.patreon.com/RichardGray [...]
Here is the shorter version of my Alchemite Warforger video, which is available to watch on here or Youtube for free. For more detail, check out the longer version! The following paints were used: Games Workshop: Rhinox Hide, Mournfang Brown, Balor Brown, Daemonette Hide, Slaanesh Grey, Mephiston Red, Yriel Yellow, Wild Rider Red, Troll Slayer Orange, Bugman’s Glow, Cadian Fleshtone, Morghast Bone, XV88.Vallejo: Ice Yellow, German Grey, Neutral GreyP3: Morrow White Grass: Mininatur Spring Moss Pads Step-by-Step Guide to the Alchemite Warforger Preparation: Assemble your Cities of Sigmar Alchemite Warforger model from the Cities of Sigma box set. Prime the model with black primer. Omit the cube with smoke for easier painting (add it back when you’ve painted the model!) Helmet Painting: Use XV88 to block in highlights for a bronzy colour on the helmet. Apply the paint loosely with a size 2 Artist Opus brush, focusing on where light naturally falls. Thin the paint to around 1.5 parts water to 1 part paint for easy layering. Metal Painting: Use a gray base colour (Neutral Gray or Mechanicum Standard Gray) for most steel-colored objects. Optionally, add colour with Daemonette Hide for a purpley-gray tone. Apply the paint loosely and scribbly to create texture. Use smaller brushes for refined marks in specific areas. Consider adding Daemonette Hide and Slaanesh Gray for additional colour on metal pieces for reflections. Leather Parts: Base the leather apron and other leather parts with Rhinox Hide. Apply the paint loosely with a mix of around 1.5 parts water to 1 part paint. Keep the paint flowing with the shape of the sculpt for a harmonized look. Highlighting: Highlight the metal parts with Slaanesh Gray, applying smaller and more refined marks. For leather, use Mornfang Brown for additional layers, creating a distinct color difference. Glaze with Mourning Brown on top of the highlights for added contrast. For leather straps, use larger black marks at the edges and smaller marks towards the core. Skin Painting: Base the skin with Rhinox Hide and layer with Mornfang Brown. Highlight using the following sequence: XV88, Guardian Flesh Tone mixed with Baneblade Brown and a bit of white. Keep the skin texture smooth, differentiating it from the heavily textured leather. Final Details: Apply Verdigris to metal clasps for a weathered look. Add OSL (Object Source Lighting) with plain flesh tone for the rune effect. Optionally, use Rhinox Hide for a runic effect. Consider the placement of the cube with smoke for potential obstructions. Remember, these steps are a guide, and you can adjust them based on your preferences and painting style. Happy painting! More Full Character Tutorials Free Video Tutorials Free videos (for logged in members – just sign up as a ‘friend’ to view and click any of the thumbs.To explore all of these, visit this page! If you don’t have an account, please sign up here! The website currently has over 350 video tutorials, plus step by step guides and PDFs. You can explore more free videos with a free “freebies” membership, or take the plunge and become a full subscriber for full access. If you’d prefer to support me on Patreon, please visit: https://www.patreon.com/RichardGray [...]
This full video shows how to paint an Alchemite Warforger from the Cites of Sigmar, which Games Workshop sent to me as an early review copy.This guide will cover various techniques such as non-metallic metal effects (NMM), leather texture, and object source lighting (OSL). How to paint an Alchemite Warforger Video You’ll Need: Alchemite Warforger. A range of brushes (including a size 3 Artist Opus M brush). Paints from Games Workshop: Rhinox Hide, Mournfang Brown, Balor Brown, Daemonette Hide, Slaanesh Grey, Mephiston Red, Yriel Yellow, Wild Rider Red, Troll Slayer Orange, Bugman’s Glow, Cadian Fleshtone, Morghast Bone. Vallejo paints: Ice Yellow, German Grey, Neutral Grey. P3 paint: Morrow White. Mininatur Spring Moss Pads for basing. Let’s Get Started: Base Coating: Initiate with a base layer of XV-88. This creates an ideal foundation for both gold and bronze non-metallic metal (NMM) effects. Apply these base colours in a relaxed manner; perfection isn’t the goal at this stage. Non-Metallic Metal (NMM) Bronze/Gold: Use a combination of XV-88, Balor Brown, Ice Yellow, and a touch of Rhinox Hide. Mix these colours in various ratios to achieve the desired NMM effect. Leather Textures: For the leather apron and straps, start with a base of Rhinox Hide. Then, build up the texture and highlights with Bugman’s Glow and Cadian Fleshtone, adding Morghast Bone for the lighter areas. Skin Tones: Begin with Mournfang Brown as the base for the skin. Gradually layer up the skin tones using a mix of Mournfang Brown and Cadian Fleshtone, finishing with lighter highlights. Object Source Lighting (OSL): For the glowing effects, such as the pot’s contents, start with Mephiston Red and build up to Yriel Yellow and Wild Rider Red for the intense glow. Detailing: Use Slaanesh Grey and Daemonette Hide for the cooler tones, and Vallejo’s Ice Yellow and Neutral Grey for the metallic areas. German Grey can be used for darker shadows. Finishing Touches: Use Morrow White for the brightest highlights and final touches. The base can be detailed with Mininatur Spring Moss Pads to add a natural touch. Remember, painting is about building up layers and textures, so take your time and enjoy the process. Each layer adds depth and character to your Alchemite Warforger. Explore More of my Character Tutorials If you don’t have an account, please sign up here! The website currently has over 350 video tutorials with steps and tips, plus a selection of PDFs. If you are not sure about joining, you can explore my free videos with a free “freebies” membership, or take the plunge and become a full subscriber for full access. If you’d prefer to support me on Patreon, please visit: https://www.patreon.com/RichardGray [...]
This video looks at how to paint a Deathwing Terminator from the new Leviathan boxed set, which Games Workshop sent to me as an early review copy. Video – How to Paint a Deathwing Terminator The following paints were used Games Workshop: Black Templar (Contrast), Darkoath Flesh (Contrast), Contrast Medium, XV-88, Morghast Bone, Ushabti Bone, Screaming Skull, Mephiston Red, Evil Sunz Scarlet, Wild Rider Red, Yriel Yellow Vallejo: Game Colour Dark Green, Neutral Grey, German Grey, Black, Gunmetal Grey (Metallic), Chrome (Metallic) P3: Morrow White Step by Step Guide Preparation and Priming: Assemble the Deathwing Terminator, modifying as desired (e.g., swapping weapons). Prime the model in black. Base Coat and Airbrush Highlighting: Apply a base coat of XV-88. Highlight with Morghast Bone using an airbrush, focusing on natural light areas. Applying Contrast Paint: Mix Darkoath Flesh with Contrast Medium and cover the Deathwing Terminator, emphasising recesses over large, smooth areas. Highlighting and Texturing: Hand apply highlights and textures using Ushabti Bone and Screaming Skull, targeting brighter airbrushed areas. Detailing with Black Paint: Paint areas destined for other colours (metal, red, green) with Black Templar Contrast or thinned black paint. Metallic Parts: Apply Vallejo Gunmetal Grey to metal parts. Use Agrax Earthshade for a matte effect. Add highlights with Chrome. Red Areas (Eyes, Lenses, Purity Seals): Base with Mephiston Red mixed with a small amount of black. Progressively highlight with Mephiston Red, Evil Sunz Scarlet, and Wild Rider Red. Green Areas (Chest Eagle): Base in Vallejo Game Colour Dark Green. Add highlights by progressively mixing in white. Bone Armour Texturing and Detailing: Further texture and scratch effects using Morghast Bone, Ushabti Bone, and Screaming Skull. Mix Morghast Bone with a bit of Mournfang Brown for shadows. Chest Eagle and Purity Seal Text: Use fine brushwork for text effects on purity seals with black paint. Final Highlights and Details: Apply final highlights with Screaming Skull or white, focusing on areas for maximum contrast. Blend and soften with Neutral Grey glazing. Basing: Base the Deathwing Terminator as preferred, employing sand texturing, painting rocks in German Grey and Neutral Grey, and adding grass tufts. Finishing Touches: Add chips and scratches across the armour with Rhinox Hide and Screaming Skull. Enhance details and edge highlights to complete your Deathwing Terminator! Show it off! As you progress, feel free to adapt and tweak techniques to suit your style. Good luck! When you’ve finished, why not pop into our Discord and show it off to other website members? 🙂 More Free Video Tutorials Free videos for logged in members – just sign up as a ‘friend’ to view and click any of the thumbs.To explore all of these, visit this page! If you don’t have an account, please sign up here! The website currently has over 350 video tutorials, plus step by step guides and PDFs. You can explore more free videos with a free “freebies” membership, or take the plunge and become a full subscriber for full access. If you’d prefer to support me on Patreon, please visit: https://www.patreon.com/RichardGray [...]
How to Paint a Vampire Lord from the Soulblight Gravelord Armies! This includes NMM shiny steel armour, face and hair, skeleton base tutorial plus a dripping gore-covered mace! Read on to watch the comprehensive set of How to Paint a Vampire Lord tutorials plus key steps, paints and materials guide. Quick Jump to: Video – How to Paint a Vampire Lord Steel ArmourPaints and MaterialsStep-by-Step Guide and Tips for the NMM ArmourVideo – How to Paint a Vampire NMM ShieldPaints and MaterialsStep-by-Step Guide and Tips for the NMM ShieldVideo – Non Metallic Metal Mace with added GorePaints and MaterialsStep-by-Step Guide and Tips for the Gory MaceVideo – Vampire Lord Face and HairPaints and MaterialsStep-by-Step Guide and Tips for the Face and HairVideo – Skeleton Base Part OnePaints and MaterialsStep-by-Step Guide and Tips for the Skeleton BaseBuilding the BasePainting the BaseFinishing TouchesVideo – Skeleton Base Part Two (Painting the Skeleton)Paints and MaterialsStep-by-Step Guide and Tips for Painting the Skeleton BasePainting the SkeletonPainting the SwordPainting the ClothAdding VegetationVideo – Simple Freehand DragonPaints and MaterialsStep-by-Step Guide and Tips for the Freehand Dragon Video – How to Paint a Vampire Lord Steel Armour All videos are recorded in HD 1080p or higher – use full screen for the full effect and let the video load completely. Click the cog icon to choose speed, if I’m too fast or slow! Paints and Materials Paints: Vallejo Neutral Grey: Used for mapping out highlights and base tones on the armour. Vallejo Ice Yellow: Applied for initial highlights, gives a warm, off-white effect. Games Workshop Mournfang Brown: Used sparingly for adding depth and richness in transitions. Games Workshop Abaddon Black: Thinned down and used for glazing to deepen shadows and smooth transitions. P3 Morrow White: For final bright highlights. Thinned down considerably for a subtle effect. Brushes: Fine Detail Brushes: Essential for applying precise highlights and for the stippling technique. I used the Artis Opus range, but any high-quality fine brush will work. Glazing Brushes: Preferably also with a fine tip, used for applying thinned down glazes of Mournfang Brown and Abaddon Black. Primer: Ultimate Primer (Black): Used for priming the model before painting. Step-by-Step Guide and Tips for the NMM Armour Preparation: Assemble the model but avoid gluing areas like the shield or head that might obstruct painting. Prime the model in black. For this, Ultimate Primer is a good choice. Base Layer: Start with Vallejo Neutral Grey to map out highlight points on the armour. This colour is ideal for desaturated, steel-like effects. Light Direction and Armour Detailing: Consider the light source and how it hits the model. Focus on areas like the hip covers and rib cage, and map out light and reflections. The Neutral Grey will be useful for creating the base tones. Initial Highlights: Apply Vallejo Ice Yellow for the highlights. Despite its name, Ice Yellow will give a desaturated, warm white appearance, especially when applied thinly. This is perfect for adding a subtle warmth to the steel. Refining the Highlights: Use a stippling technique with Neutral Grey and Ice Yellow, building up the texture and refining the highlights. Remember, this is a gradual process, and patience is key. Adding Depth with Mournfang Brown: Introduce Games Workshop Mournfang Brown sparingly at transition edges or darker areas for a richer tone. Be cautious not to overdo it, as too much brown can detract from the steel effect. Glazing for Smoothness: Thin down Mournfang Brown and Abaddon Black with water (about 5-6 parts water to 1 part paint) and apply them as glazes. This step will help in smoothing out transitions and adding depth. Final Highlights with Morrow White: Use P3 Morrow White for final bright highlights. Ensure the white is thinned down and apply it very carefully to the highest points of the armour.Adjusting and Blending: Keep adjusting the highlights and shadows, blending the colours where necessary. This might involve going back and forth between the different shades to achieve a smooth transition.Finish and Review: Once satisfied, review the model under different lighting to ensure the non-metallic metal effect is consistent and realistic. Throughout this process, keep your paint thin and apply multiple layers for the best results. The key to NMM is patience and gradual building of layers. Remember, each step contributes to the overall metallic effect, so take your time and enjoy the process! Video – How to Paint a Vampire NMM Shield Paints and Materials Games Workshop: Mournfang Brown, Abaddon Black, Mephiston Red, Balor BrownVallejo: Neutral Grey, Ice YellowP3: Morrow White Step-by-Step Guide and Tips for the NMM Shield Priming and Preparation: The shield should be primed black. The use of Ultramar Varnish is optional. Base Layering: Start with Vallejo Neutral Grey, using scribbly strokes to create a rough and scratchy base.Add a darker grey mixture by blending Neutral Grey with Abaddon Black. This can be substituted with other dark greys like Vallejo German Grey. Creating Texture: Continue with Neutral Grey, making irregular, scratchy marks. These marks will contribute to a subtle textured look.Focus on building up layers and refining the texture. Highlighting:Apply a mix of Neutral Grey and Ice Yellow for initial highlights.Move to Ice Yellow, applying it thinly (1.5 parts water to 1 part paint) to avoid a chalky finish.Apply the Ice Yellow in a stippling manner to refine the highlights and cover uneven areas.Painting the Dragon:Base the dragon with Mephiston Red.Create shadows by adding a small amount of Abaddon Black to Mephiston Red.For highlights, mix Mephiston Red with P3 Morrow White (or another white) and apply to raised areas and facets of the dragonGlazing and Refining: Use a heavily diluted mixture of Mournfang Brown, Abaddon Black, and P3 Morrow White for glazing.Apply the Mournfang Brown for a soft yellow-brown hue in certain areas.Use Abaddon Black to darken and dull areas and to create shadows.Use P3 Morrow White to soften and blend the highlighted areas. Adding Scratches and Imperfections:Add random scratch-like marks using a very light application for realism.Apply small white dots to suggest nicks and imperfections. Final Highlights and Adjustments:Go over the shield and dragon, adding final highlights and making adjustments as necessary.Focus on achieving a balanced look from different viewing angles. Painting the Trim: Paint the trim using a mix of Abaddon Black and Mephiston Red as a base.Layer with Balor Brown, and then add highlights with a mix of Balor Brown and Mournfang Brown.Add final edge highlights and details to match the overall lighting and contrast of the shield.Finishing Touches: Tidy up any rough edges or over-painted areas.Ensure that the shield’s various sections harmonize in terms of light and contrast.Remember to let each layer dry thoroughly before applying the next, and adjust the thickness of your paints with water to maintain control and avoid a textured buildup. Video – Non Metallic Metal Mace with added Gore Paints and Materials Primer: Black Paints: Vallejo Neutral Grey Vallejo Black Vallejo Basalt Grey Vallejo German Grey Games Workshop Rhinox Hide Games Workshop Blood for the Blood God P3 Morrow White Brushes: Fine detail brushes Additional: Gloss varnish, super glue, fishing wire for gore effect Step-by-Step Guide and Tips for the Gory Mace Priming: The mace should be primed in black. Base Layering: Start with Vallejo Neutral Grey. This can be created with a mix of black and white. Use Pearl Grey Blue for slight colour variation, though this is optional. German Grey can also be added to the mix. Highlighting and Texture: Focus on picking out angles and curves on the mace. Ensure brighter parts on surfaces facing you, with darker shades on less visible parts. Use a combination of different greys to build up layers and create a realistic metal effect. Detailing: Pay attention to the many facets of the mace, including chamfered edges and curves. Use fine brushes for precision in highlighting these small, detailed areas. Glazing: Mix Rhinox Hide with a significant amount of water for a thin glaze. Apply this to mid-tones to shadows, avoiding the brightest highlights. This step enhances contrast and adds a hint of colour to the mace. Adding the Gore Effect: Attach thin strands of fishing wire to the mace using super glue to create dangling gore. Apply gloss varnish to the connection points for added strength and flexibility. Once the varnish is dry, cover the fishing wire with “Blood for the Blood God” paint. Ensure the gore effect is applied in a realistic manner, considering where blood would naturally accumulate and drip from the mace. Final Touches: Revisit any areas that need refining or additional highlights. Make sure the gore effect blends seamlessly with the painted mace. Allow all layers to dry completely before handling. Tips: Take your time with each facet of the mace; precision is key to a realistic look. Ensure your paint consistency is right for each step – thinner for glazing, thicker for opaquer details. Be cautious when applying the gore effect; it’s a focal point but shouldn’t overwhelm the detailed painting beneath. Video – Vampire Lord Face and Hair Paints and Materials Games Workshop: Calgar Blue, Cadian Fleshtone, Ushabti Bone, Yriel Yellow, Khorne Red, Mephiston RedVallejo: Neutral Grey, Black Step-by-Step Guide and Tips for the Face and Hair Painting the Face:Base Coat: Start with a base coat of Calgar Blue over the black primer. Expect poor coverage initially. Thin the paint with approximately 1.5 parts water to 1 part paint. Apply 3-4 layers to achieve an opaque finish. Highlighting: Create a mix of 50/50 Calgar Blue and Cadian Fleshtone. Apply this mix to specific areas of the face, considering the natural light fall. Key areas include the forehead, cheekbones, and areas between the eyes and nose. This mix will start to give a flesh tone, retaining a hint of blue for the undead look. Further Detailing: Use Cadian Fleshtone and a mix of 50/50 Ushabti Bone and Cadian Fleshtone for additional highlighting. Focus on raised areas and consider how light interacts with facial features. Apply highlights gradually, using a heavily diluted mix for soft transitions. Eyes and Mouth: Paint the eyes and the inside of the mouth in black. This step ensures these areas are defined and helps balance the highlights on the face. Painting the Hair:Base Coat: Apply Neutral Grey from Vallejo over the black primer. Switch to Khorne Red for a vibrant, contrasting colour to the skin. Thin the paint slightly and apply multiple coats for an even, opaque finish. Highlighting: Use Ushabti Bone to highlight the hair. Mix it with Khorne Red in varying proportions, increasing the Ushabti Bone content for brighter highlights. Focus on areas where light would naturally hit, creating a shiny, luxurious look. Glazing for Colour Depth: After highlighting, the hair may appear too desaturated. To bring back the richness of the red, glaze over the hair with a heavily diluted Mephiston Red. This step enhances the red colour while maintaining the shine. Final Touches on Hair: Optionally, add Abaddon Black to the corn red to create darker shades in the hair, increasing the depth and contrast. Video – Skeleton Base Part One Paints and Materials A skeleton figure from Warhammer Underworlds Warbands Milliput and Fimo (or slate pieces) Green stuff (50/50 mix of blue and yellow) Super glue Sand (variety in particle size, not sharp sand) PVA glue (diluted with water) Base brush (flat Games Workshop brush or equivalent) Neutral Grey (Vallejo), Deathworld Forest, Morghast Bone, Agrax Earthshade, Athonian Camoshade, Astronomicon Grey (Games Workshop) Water for thinning paints Rock material guide by the fantastic Julien Casses:https://www.juliencasses.com/2012/11/how-to-make-rocks Step-by-Step Guide and Tips for the Skeleton Base Building the Base Prepare Skeleton: Start by preparing your skeleton figure, ensuring it has a ‘rising from the ground’ appearance. Create Stone Slabs: Mix Milliput and Fimo, bake at 120°C for 30 minutes, then break into slabs to represent stones. Alternatively, use slate pieces. Attach these slabs to the base with super glue. Apply Green Stuff: Mix blue and yellow Green Stuff and use it to create a ridge around the skeleton, giving the illusion of a hole from which the skeleton emerges. Embed the Vampire Lord’s rock into the Green Stuff to integrate it with the base. Add Texture: Sculpt some small, round rocks using Green Stuff for added detail. Sand Application: Cover the base in beach sand, avoiding sharp sand. Use various particle sizes for a natural look. Painting the Base Seal Sand: Brush diluted PVA glue over the sand to seal it and prevent flaking. Base Colour for Sand: Dry brush the entire base with Deathworld Forest, focusing on sandy areas. Highlighting Sand: Apply a lighter dry brush of Morghast Bone to the sand for highlights. Defining Rocks: Use Agrax Earthshade as a thick glaze around the sculpted rocks to define their shapes. Enhancing Greenery: Apply Athonian Camoshade to enhance the green tones on the base. Rock Painting: Begin detailed painting on rocks using Neutral Grey. Focus on highlighting angles and adding scratchy details for texture. Additional Rock Highlights: Use Pelgrave Blue, potentially mixed with white, to highlight rocks further. Remember not to overpower the model with the base’s contrast. Enhancing Edges: Add lighter edges around rocks using Astronomicon Grey to define shapes. Finishing Touches Consider adding other details like small flowers or greenery to the base. Reflect these colours onto the Vampire Lord for cohesion. Ensure the base matches the quality and style of your painted model. Video – Skeleton Base Part Two (Painting the Skeleton) Paints and Materials Paints: XV-88, Balor Brown, Moot Green, Deathworld Forest, Ushabti Bone, Mournfang Brown, Trollslayer Orange (Games Workshop); Neutral Grey, Pale Grey Blue, Black (Vallejo); Iosen Green, Morrow White (P3) Mininatur Moss Pads and Flowers Water for thinning paints Brushes with fine tips PVA Glue Jeweler’s tweezers Step-by-Step Guide and Tips for Painting the Skeleton Base Painting the Skeleton Eyes: Start by painting the eye sockets with white paint, thinned down. Apply 2-3 layers for an opaque finish. Avoid overloading to prevent the paint from pooling. Adding Color to Eyes: Use Pro Acryl Golden Yellow (or any similar yellow) around the edges of the eye sockets, leaving the back white to mimic a light source. Then, use Moot Green, thinned down, around the yellow, ensuring smooth transitions. Skeleton Bone: Use XV-88 to paint the skull and bones. Apply the paint thinly and unevenly to create a natural, weathered look. Emphasize areas where light would naturally hit, based on the light source direction. Highlighting Bone: Apply Ushabti Bone for highlights, focusing on raised areas and edges. Keep the paint thin for a smooth finish. Additional Details: Add small scratches or battle damage marks for realism. Final Highlights on Bone: Use white (Morrow White) for the final highlights on the most raised areas. Painting the Sword Base Colour: Use Neutral Grey to paint the entire sword, including the hilt and blade. Weathering: Add Mournfang Brown to the blade for a rust effect, focusing on recessed areas and pitted holes. Highlighting the Blade: Use Pale Grey Blue for highlighting and adding scratchy details, focusing on areas that would catch light. Rust Details: Add Trollslayer Orange in the deepest recesses for an inverted highlight effect. Refining Highlights: Go back with Neutral Grey and Pale Grey Blue to refine the highlights and add more detail to the weathered look. Painting the Cloth Base Layer: Apply Deathworld Forest over black primer, focusing on raised folds and areas that would catch light. Highlighting: Use Balor Brown for further highlights, keeping the paint very thin to maintain a dark, grubby appearance. Adding Vegetation Applying Moss Pads: Use PVA glue to attach Mininatur Moss Pads around the base. Utilize jeweler’s tweezers for precise placement. Adding Flowers: Integrate white flowers from Mininatur for additional detail. Trim if necessary to avoid overpowering the base. Adding Roots: For an emerging effect, glue small roots around the skeleton, bending them to create a natural look. Dry Brushing: Gently dry brush Balor Brown over the moss pads to integrate them with the base and add depth. Video – Simple Freehand Dragon Paints and Materials The following paints were used:Games Workshop: Rhinox Hide, Mournfang Brown Vallejo: German Grey, Neutral Grey, Ice Yellow, White Step-by-Step Guide and Tips for the Freehand Dragon Prepare the Surface: Begin by roughly painting the inside of the shield with a mixture of Mournfang Brown and Rhinox Hide from Games Workshop. These paints should be heavily thinned with approximately two parts water to one part paint. Use a large brush, like a size 2 artist opus brush, for quick and broad coverage. This base coat doesn’t need to perfectly match the shield’s front colour, as it will largely be covered. Apply Texture: The texture on the back of the shield differs from the front to differentiate it from the armor. Apply the paint in a scratchy manner to simulate wear and tear. For this, use Neutral Grey from Vallejo, mixed with Ice Yellow for highlights, and German Grey for darker areas. Remember, this part doesn’t have to be perfectly blended, as some roughness adds character. Glazing: If needed, glaze over the scratchy texture with more diluted Rhinox Hide and German Grey. Glazing helps to soften the texture and can hide any imperfections in the painting. Freehanding the Dragon: When painting the dragon, start with a reference photo of the dragon design on the shield’s front. This helps maintain consistency across the model. Use Vallejo Model Color Black for the dragon outline, ensuring the paint is well-diluted for fine lines. Brush Selection: Use a fine brush for detailed work. A worn-out brush might not give the sharp lines needed for intricate details. A newer, sharper brush is recommended for finer details and corrections. Highlighting the Dragon: Start with Neutral Grey for initial highlights. For more pronounced highlights, mix Neutral Grey with Ice Yellow, leaning more towards Ice Yellow for brighter highlights. Apply these highlights only to the upper edges of the dragon design, where light would naturally catch. Adjusting for 3D Effect: Paint the inside of the dragon with a darker grey, such as a mix of German Grey and Neutral Grey, to create depth and avoid a flat black appearance. Final Touches: Add fine highlights to the dragon, especially along the edges and raised areas, to enhance the 3D effect. Use a mix of Neutral Grey and Ice Yellow, and pure Ice Yellow for the brightest points. Be mindful of the shield’s orientation to ensure that highlights correspond to the light source. Painting the Shield Trim: Finally, paint the shield’s trim, likely in a gold or metal colour. This trim frames the dragon and gives a polished look to the shield, enhancing the overall appearance. More Vampire Tutorials! If you don’t have an account, please sign up here! The website currently has over 350 video tutorials with steps and tips, plus a selection of PDFs. If you are not sure about joining, you can explore my free videos with a free membership, or take the plunge and become a full subscriber for full access. If you’d prefer to support me on Patreon, please visit: https://www.patreon.com/RichardGray [...]
This video looks at How to Paint Snikrot the Ork! The model is painted to a high tabletop standard and Contrast paints are used heavily. Tools and Paints: Games Workshop Contrast: Black Legion, Mantis Warriors Green, Aggaros Dunes, Skeleton Horde, Garaghak’s Sewer Vallejo Game Colour (New): White Ink, Mecha Matt Varnish, Neutral Grey, Black, Desert Yellow, Bile Green, Grunge Brown, Dead Flesh, Turquoise, Aquamarine, Dead White, Airbrush Thinner Step By Step: How to Paint Snikrot the Ork Priming and Highlighting Begin with a primed model and apply a highlight using an airbrush and white ink from Vallejo. Thin the white ink with airbrush thinner for a smooth finish. Ensure the focal points, such as the face and chest, receive extra brightness during airbrushing. The contrast paint naturally enhances shadows and highlights. Applying Contrast Paints Use contrast paints for a high tabletop standard. Apply contrast paint to the model, focusing on loading up the brush with a generous amount to let it run into crevices and create shadow effects. Choose contrast colours based on personal preference, as they all work similarly. I’ve used contrast black (Templar Black) for metal areas. Leather and Metal Details Paint leather areas with desert yellow, avoiding excessive thinning as it complements the contrast paints. For metal areas, use contrast black or any black color of choice. Leave teeth and tongue unpainted, applying a coat of skeleton horde or a chosen pink colour for the tongue. Matte Varnish Apply matte varnish to reduce the shiny finish of contrast paints. Vallejo’s matte varnish is recommended for its balanced matte effect. Use a Wet Palette to Organise Your Paints Arrange neutral gray, neutral gray mixed with white, black, and dead white for easy access during painting. Detailing and Highlights Use grunge brown for detailing and add highlights with desert yellow. Experiment with different water-to-paint ratios for varied effects. Metallic Effects Achieve a metallic effect by using opaque white sparingly. Focus on creating highlights on edges and surfaces, making the metal look scratched and darkened. Creating Texture Experiment with brushes to create texture on the model. Stipple with an older, worn brush for a more textured effect on specific areas. Lenses and Final Touches Paint lenses using turquoise as the base colour and add highlights with Aquamarine or a mix of turquoise and white. Follow a common technique for gem-like effects. Looking for the Rebecca version? My wife did an April Fools version of this video, with her voice-over. It can be found below!: Explore more tutorials Liked this video? Check out all my latest subscriber videos by clicking the thumbnails below, or explore more freebies by clicking here [...]
This video looks at how to paint the Ork special character, Snikrot, which Games Workshop sent to me as an early review copy.The model is painted to a high tabletop standard and Contrast paints are used heavily. Quick Jump to: Video Tutorial – How to Paint Snikrot the Ork!Steps and TipsPriming and HighlightingApplying Contrast PaintPainting DetailsNon-Metallic Metal (NMM) TechniqueSkin HighlightsLeather and StrapsFinal Touches on Metallic AreasLenses and EyesVideo Tutorial – (Richard Version)More Free Video Tutorials Video Tutorial – How to Paint Snikrot the Ork! The following paints were used: Games Workshop Contrast: Black Legion, Mantis Warriors Green, Aggaros Dunes, Skeleton Horde, Garaghak’s Sewer Vallejo Game Colour (New): White Ink, Mecha Matt Varnish, Neutral Grey, Black, Desert Yellow, Bile Green, Grunge Brown, Dead Flesh, Turquoise, Aquamarine, Dead White, Airbrush Thinner Steps and Tips Priming and Highlighting Prime the model.Apply white ink using an airbrush, thinned with Vallejo airbrush thinner, focusing on the face and chest for natural light effects. Applying Contrast Paint Start with Mantis Warriors Green for the skin. Use a large brush for efficient coverage, allowing the paint to settle in the recesses.For trousers, use Aggaros Dunes, a dark brown contrast paint.Apply another brown contrast paint for the leather areas.Paint all metal areas with Black Legion contrast paint, without worrying about neatness as black will cover any overlapping paint.For bone areas, use Skeleton Horde. Painting Details Paint teeth and tongue with Skeleton Horde, and use a pink colour for the tongue.Apply a coat of matte varnish (Mecha Matt Varnish by Vallejo) to reduce the sheen from the contrast paints. Non-Metallic Metal (NMM) Technique Start with Vallejo Game Colour Neutral Grey for the metallic areas.Create a palette with Neutral Grey, mixed with white and black, and use Dead White for the brightest highlights. Skin Highlights Mix Bile Green with white for brighter skin highlights. Focus on the areas where natural light wouldhit, such as the tops of muscles and face. Leather and Straps For additional texture and highlights on leather, use Grunge Brown.Apply Desert Yellow for final highlights on leather, following the sculpted creases and stress points. Final Touches on Metallic Areas Enhance the metal parts with additional Grunge Brown, focusing on recesses and flat surfaces for a grimy look.Use Dead Flesh for final highlights on metallic areas, achieving a high contrast non-metallic metal effect. Lenses and Eyes Paint the lenses starting with Turquoise, followed by Aquamarine for the first highlight.Add a small dot of Dead White at the bottom for a reflective effect.Throughout the process, remember to let each layer dry before applying the next. Video Tutorial – (Richard Version) Yep – it was an April Fools! 😀 This was my wife and she wanted to have some fun doing a voice over.She has her own channel here, if you’d like to check out more of her Warhammer New Release unboxings and voice overs. More Free Video Tutorials Free videos for logged in members – just sign up as a ‘friend’ to view and click any of the thumbs.To explore all of these, visit this page! If you don’t have an account, please sign up here! The website currently has over 350 video tutorials, plus step by step guides and PDFs. You can explore more free videos with a free “freebies” membership, or take the plunge and become a full subscriber for full access. If you’d prefer to support me on Patreon, please visit: https://www.patreon.com/RichardGray [...]
This video tutorial and step-by-step guide shows how to paint a Desolation Dark Angel, one of the new Desolation Marines from the Strike Force Agastus, which was sent to me by Games Workshop. Read on for a full video, lots of tips and full materials and paints list. Video Tutorial – Desolation Dark Angel Materials: Vallejo Model Colour (New): Angel Green, Charcoal, Toxic Yellow, Black, Turquoise, Aquamarine, Grunge Brown, Orange Fire, Nocturnal Red, Scarlet Blood Games Workshop: Darkoath Flesh (Contrast), Contrast Medium Two Thin Coats: Plate Armour, Dragon’s Gold P3: Morrow White Steps: Base Coat:Mix Angel Green and Charcoal (50:50 ratio).Apply this mix over the entire model using a large dry brush or makeup brush.Water the paint down slightly for a smoother application, aiming for a 50:50 water-to-paint ratio. Layering:Apply straight Angel Green on top, using a kitchen roll to dab off excess paint for a thin layer.Focus on light volumes, covering flat surfaces more than edges. Metallics:Paint metallic areas using Two Thin Coats’ Plate Armour and Dragon’s Gold.Thin these slightly for better flow and coverage. Red Details:Use Nocturnal Red and Scarlet Blood for red areas, like the gun.Mix them for a base layer, then use Scarlet Blood mixed with a bit of white for highlights. Adding Depth:Use Vallejo Black for shading and defining darker areas. Highlighting Armour:Create three mixes on your palette: pure Angel Green, a 50:50 mix of Angel Green and Toxic Yellow, and a majority Toxic Yellow with a small amount of Angel Green.Apply these mixes progressively, starting with the darkest and moving to the lightest for highlights. Use a brush control technique similar to edge highlighting. Contrast and Washes:Apply Darkoath Flesh (Contrast) selectively, followed by Contrast Medium for dilution in specific areas.Use Nuln Oil for metallic parts to create depth. Detailing Metallics:Add highlights to metallic areas using a mix of Plate Armour and white. Eyes and Lenses:Paint eyes with a base of Nocturnal Red, adding highlights with a mix of Scarlet Blood and white.Use a small white dot for reflection. For lenses, use Turquoise mixed with Charcoal, then highlight with Aquamarine and pure white. Final Touches:Add fine scratches and details using lighter shades of the base colours.For the belt, use Grunge Brown base and Orange Fire for highlights. Basing:Apply PVA glue and sand.Once dry, wash with Agrax Earthshade and apply weathering powder. More Free Video Tutorials Free videos for logged in members – just sign up as a ‘friend’ to view and click any of the thumbs.To explore all of these, visit this page! If you don’t have an account, please sign up here! The website currently has over 350 video tutorials, plus step by step guides and PDFs. You can explore more free videos with a free “freebies” membership, or take the plunge and become a full subscriber for full access. If you’d prefer to support me on Patreon, please visit: https://www.patreon.com/RichardGray [...]
This video and step by step guide shows paint and oil weathering on a Plastic Sicaran from Games Workshop. I use some fun techniques and paints, including Imperial Fist Contrast paint and oil paint for some oil weathering! Video: Paint and Oil Weathering on a Plastic Sicaran All videos are recorded in HD 1080p or higher – use full screen for the full effect and let the video load completely. You can also click the little “cog” and change the speed of the video, if I am going too fast (or slow!). Materials and Paints Used: Paints: Games Workshop: XV-88, Sotek Green, Imperial Fist (Contrast), Rhinox Hide, Abaddon Black, Daemonette Hide, Doomfire Magenta (Contrast), Asurmen Blue (Contrast), Black Legion (Contrast) Vallejo: German Grey, Metal Burnt Iron Winsor and Newton: Burnt Sienna (Series 1 oil paint), Black P3: Morrow White (Any White will do) Vallejo Mecha Varnish: Gloss and Matt Other Materials: Sansodoor mineral spirit Abteilung 502: Desert and Sand Pigment set Micro Set for decals Airbrush (for various stages of painting) Brushes of various sizes Sponge (for weathering) Card for stencil work Wet palette Water jar Step-by-Step Guide: 1. Base Coating: Start with an airbrush application of XV-88, focusing on avoiding the tracks and recesses to ease later stages. Thin the paint with Tamiya X-20A thinner for a smoother flow and less blockage. 2. Adding Transitions: Add white to XV-88 to lighten it for transition layers. Apply the transition layers by hand, focusing on areas where light and shadow would naturally occur, to create a modulation effect. 3. Applying Contrast Paint: Use Imperial Fist Contrast paint over the entire tank for a vibrant yellow hue. This step ties together all the previous layers. 4. Highlighting the Turret: Start with German Grey, followed by Daemonette Hide, and a mix of Daemonette Hide and white for successive highlights. Be mindful of the position of highlights. 5. Metallic Areas: Use Vallejo Metal Color Burnt Iron for metallic sections. Don’t worry about minor mistakes as they will be covered in the weathering process. 6. Weathering with Sponge: Apply Rhinox Hide with a sponge, focusing on edges and areas where wear would naturally occur. Rotate the sponge to avoid a uniform pattern. 7. Detailed Chipping: Use a brush for detailed chipping and scrapes, focusing on the front of the tank and areas near the tracks. 8. Decals: Apply decals using Micro Set, followed by a gloss varnish, and finally a coat of matt varnish. 9. Streaking and Oil Washes: Use Burnt Sienna oil paint for rust streaks, applied in small blobs and streaked with a damp brush dipped in mineral spirits. For an oil wash, mix Burnt Sienna and Black, thinned with mineral spirits, and apply into recesses and around rivets. 10. Heat Bloom on Weapons: Spray weapon tips with chrome, then apply layers of Imperial Fist yellow, Doomfire Magenta, and Asurmen Blue, followed by black at the tips. 11. Applying Weathering Powder: Use a dry weathering powder around lower sections and tracks for a dusty effect. Fix the powder with a light airbrushing of matt varnish. 12. Painting Lenses: Start with Sotek Green mixed with a bit of black, then layer with increasingly lighter shades of Sotek Green and white, focusing on smooth transitions. 13. Final Weathering and Varnishing: Dry brush tracks with Burnt Iron, focusing on raised areas. Finish with a coat of ultra matt varnish to unify all elements and add protection. Explore more Imperial Fists tutorials If you don’t have an account, please sign up here! The website currently has over 350 video tutorials with steps and tips, plus a selection of PDFs. If you are not sure about joining, you can explore my free videos with a free membership, or take the plunge and become a full subscriber for full access. If you’d prefer to support me on Patreon, please visit: https://www.patreon.com/RichardGray [...]
This video looks at the new Contrast paints from Games Workshop and I use them to paint a very colourful Sylvaneth Gossamid Archer. Read on to watch and follow along with a detailed step-by-step paints and steps guide. Video Tutorial: How to Paint a Sylvaneth Gossamid Archer The following paints were used: Games Workshop: Mantis Warriors Green (Contrast), Striking Scorpion Green (Contrast), Karandras Green (Contrast), Garaghak’s Sewer (Contrast), Magmadroth Flame (Contrast), Baal Red (Contrast), Doomfire Magenta (Contrast), Sigvald Burgundy (Contrast), Seraphim Sepia (Shade), Flash Gitz Yellow, Rhinox Hide, XV-88, Balor Brown, Xereus Purple Vallejo: Mecha Varnish Matt P3: Morrow White (Any White will do) Step-by-Step Guide: How to Paint a Sylvaneth Gossamid Archer Priming and Preparing the Model Start by assembling and priming your Gossamid Archer model. Use Wraithbone as a base colour, which helps in achieving brighter, cleaner colours. If you want an even brighter finish, you can spray the whole model white. A zenithal highlight can be applied to create natural focal points on the head and chest, allowing for more dynamic shading. Applying Base Colours with Contrast Paints Begin painting with a variety of contrast paints to achieve a vibrant and varied colour scheme. Use a large brush like an Artist Opus size 4 for quick application. Key contrast paints to use are Striking Scorpion Green, Karandras Green, and Garaghak’s Sewer. While the paints are still wet, you can blend them together on the model for a smooth transition. However, be cautious of drying times to avoid streaking. Correcting and Refining with Airbrush If needed, refine areas with an airbrush. For instance, overpainting with Striking Scorpion Green can provide a more opaque and smoother finish, especially on the wings. Mixing Contrast Paints with Acrylics Contrast paints can be mixed with regular acrylics for more versatility. Mix Striking Scorpion Green with P3 Morrow White to create various shades for highlighting. This method allows for smooth transitions and a semi-translucent finish. Painting Wings with Dragonfly Effect For a dragonfly-like effect on the wings, use a mix of Striking Scorpion Green and white to paint vein-like lines, emulating a dragonfly’s wing pattern. Start with basic lines, then create four-sided shapes like rectangles or squares, resembling the vein structure. The lines don’t need to be perfect, as the organic nature of the wings allows for some variation. Ensure your brush isn’t overloaded with paint for finer lines. Skin and Body Details For the skin, use Magmadroth Flame contrast paint, which provides a strong, vibrant base while still allowing for natural shading in recesses. For the arm and other body parts, apply Sigvald Burgundy, Baal Red, Doomfire Magenta, and other contrast colours, blending while they are wet for a smooth transition. Use smaller brushes for detailed areas, and ensure you cover all surfaces. Highlighting and Detailing Highlight the skin by mixing Magmadroth Flame with Kislev Flesh, gradually adding more Kislev Flesh and white for higher highlights. Apply these mixes to the raised areas like shoulders, chest, and arms. For the hair, start with a vibrant base of Flash Gitz Yellow, dulled down with a Seraphim Sepia wash. Highlight by adding white to Flash Gitz Yellow for a striking effect. Bow and Other Accessories Paint the bow using Rhinox Hide, XV-88, and Balor Brown, adding white for final highlights. Keep the painting simple, avoiding overly intricate freehand patterns unless desired. Remember to mix and match colours to add more interest to the model. Finishing Touches with Matt Varnish Once the painting is complete, apply a coat of Vallejo Mecha Varnish Matt. This will unify the finish of the model, reducing any unwanted shine from the contrast paints and enhancing the overall appearance. More Contrast Paint Projects and Tutorials More Free Video Tutorials Free videos for logged in members – just sign up as a ‘friend’ to view and click any of the thumbs.To explore all of these, visit this page! If you don’t have an account, please sign up here! The website currently has over 350 video tutorials, plus step by step guides and PDFs. You can explore more free videos with a free membership, or take the plunge and become a full subscriber for full access. If you’d prefer to support me on Patreon, please visit: https://www.patreon.com/RichardGray [...]
This video tutorial looks at a couple of the new Contrast paints from Games Workshop and I see if I can paint an Imperial Fist using ‘Imperial Fist’ paint! I also go through top techniques and tips you can use on all your Space Marines. Video Tutorial: How to Paint Imperial Fists with Contrast Paint All videos are recorded in HD 1080p or higher – use full screen for the full effect and let the video load completely. You can also click the little “cog” and change the speed of the video, if I am going too fast (or slow!). The following paints and materials were used: Games Workshop: Mournfang Brown, Yriel Yellow, Sotek Green, Forge World Weathering Powder Dark Sand, Imperial Fist (Contrast), Garaghak’s Sewer (Contrast), Contrast Medium, Morghast Bone, Screaming Skull Vallejo: German Grey, Neutral Grey, Black Vallejo: Mecha Varnish Gloss, Mecha Varnish Matt, Metal Exhaust Manifold P3: Morrow White (Any White will do) Micro Set BrushesArtis Opus: Series S size 1 and 00, Step by Step Guide – How to Paint Imperial Fists with Contrast Paint Preparing the Base Coat Start with Mournfang Brown as the base coat. This provides a solid foundation and eliminates black elements that might affect the final colour. Apply a thin, even layer to ensure a smooth finish. Creating a Pre-Shade Effect To create a pre-shade effect, mix P3 Morrow White with Mournfang Brown. This technique helps in achieving both highlights and shadows in one go. Avoid taking the pre-shade highlight all the way up to pure white unless you desire a very bright yellow. Applying Imperial Fist Contrast Paint Use the Imperial Fist contrast paint, a bright yellow, over the pre-shaded model. This contrast paint is translucent and needs a light base for optimal results. Apply it evenly, focusing on the model’s raised areas to enhance the pre-shade effect. If the first coat appears too orange, apply a light layer of P3 Morrow White on the desired areas and reapply the contrast paint for a brighter yellow. Enhancing Highlights with White For areas requiring a more vibrant yellow, directly apply P3 Morrow White using an airbrush. This step significantly brightens up the yellow tones, providing a more striking appearance to the model. Adding Depth with Contrast Paints Experiment with Rattling Grime contrast paint for adding depth. If it appears too dark, dilute it with Contrast Medium. Apply it sparingly, especially in recessed areas, to create natural shadows. Applying Matte Varnish Once the contrast paints are dry, apply a coat of Vallejo Mecha Varnish Matt. This helps to dull any unwanted shine and sets the base for further detailing. Glazing with Yriel Yellow Create a glaze by heavily thinning down Yriel Yellow with water. Apply this glaze selectively to the model’s raised areas, building up the colour in thin layers. This process enhances the vibrancy of the yellow and adds more dimension. Detailing with Additional Colours Use Morghast Bone and Screaming Skull for detailing elements like scroll work. These colours contrast well with the yellow and bring out the finer details. For battle damage, use Rhinox Hide or a similar dark colour to create chips and scratches. Highlighting Battle Damage Mix Yriel Yellow with a bit of white (or use Dawn Yellow) for highlighting the lower edges of the battle damage. This creates a more realistic chipped paint effect. Painting the Weapon For the bolter or other weapons, use a combination of German Grey and Neutral Grey from Vallejo. Apply them in a gradient for a realistic metallic effect, and use black to blend and soften transitions. Lenses and Eyes Paint lenses and eyes using Sotek Green, gradually adding white to the mix for successive highlights. Ensure the brightest highlights are off-centre for a natural glow effect. Finishing Touches Finally, apply Forge World Weathering Powder Dark Sand to the base and lower parts of the legs for a gritty, battle-worn look. Seal with a matte varnish to fix the powder in place. More Contrast Paint Tutorial and Projects If you don’t have an account, please sign up here! The website currently has over 350 video tutorials with steps and tips, plus a selection of PDFs. If you are not sure about joining, you can explore my free videos with a free membership, or take the plunge and become a full subscriber for full access. If you’d prefer to support me on Patreon, please visit: https://www.patreon.com/RichardGray [...]
In this guide you will be shown how to paint a Plastic Contemptor Dreadnought in Imperial First colours from the new Horus Heresy boxed game. Many of you were asking for help painting a model in this style without using an airbrush or oils – so here he is! Video: How to Paint a Plastic Contemptor Dreadnought All videos are recorded in HD 1080p or higher – use full screen for the full effect and let the video load completely. You can also click the little “cog” and change the speed of the video, if I am going too fast (or slow!). The following paints were used: Games Workshop: Mournfang Brown, Yriel Yellow, Darkoath Flesh (Contrast), Contrast Medium, Sotek Green, Forge World Weathering Powder Dark Sand. Vallejo: Black, Mecha Varnish Gloss, Mecha Varnish Matt, Metal Colour Burnt Iron P3: Morrow White (Any White will do) Step by Step Guide: How to Paint a Plastic Contemptor Dreadnought Initial Preparation Begin with assembling the Plastic Contemptor Dreadnought. Keep arms and backpack separate for easier painting. Prime your Plastic Contemptor Dreadnought in black to set the stage for the upcoming colours. Base Coating with Mournfang Brown Start with Mournfang Brown, heavily diluted with water for a translucent effect. Using a large brush, apply the paint in a stippling motion. This technique creates a mottled, weathered look on the model. Multiple thin coats are needed, around three or four, to achieve the desired coverage. Creating Highlights Mix P3 Morrow White (or any available white paint) with Mournfang Brown. This mixture is used for creating highlights on the model. Apply with a smaller dry brush for more controlled and precise placement of highlights, especially on areas like the chest and upper stomach. Adding Layers and Textures Progress with the painting by layering and texturing the model. Focus on building up colours gradually. Use the stippling method to apply these layers, which enhances the weathered and battle-worn appearance. Incorporating Uriel Yellow Uriel Yellow, diluted in a similar fashion to Mournfang Brown, is used next. It’s important to keep the brush damp, not wet, to avoid the paint running. Apply in a dabbing motion, focusing on areas where light naturally falls. This stage is crucial for developing the yellow hue characteristic of the Imperial Fist. Glazing and Fine Details Move to glazing layers using Uriel Yellow. This involves a thinner consistency and focuses on the model’s focal points like the head and chest. Pay attention to edges and hard lines, using a fine brush for precise application. Weathering and Final Touches For weathering effects, employ Rhinox Hide for chipping and damage marks. Apply these strategically across the model to create a realistic battle-damaged effect. Focus on edges and areas likely to receive wear. Enhancing Eyes and Metal Details Sotek Green is used for the eyes, creating a layered effect with a transition from green-blue to pure white. For metal parts, use Vallejo Metal Color Exhaust Manifold and Copper, applying carefully due to their fluid nature. Applying Transfers and Final Varnishing After applying decals or transfers, coat them with gloss varnish to blend them seamlessly into the model. Use Micro Set for applying and setting the transfers. Base Details Finish by creating a cohesive base using Forge World Weathering Powder Dark Sand. Apply multiple layers, interspersed with matte varnish, to build up a textured, grimy effect that complements your Contemptor Dreadnought Show it off! As you progress, feel free to adapt and tweak techniques to suit your style. Good luck! When you’ve finished, why not pop into our Discord and show it off to other website members? 🙂 More Free Video Tutorials Free videos for logged in members – just sign up as a ‘friend’ to view and click any of the thumbs.To explore all of these, visit this page! If you don’t have an account, please sign up here! The website currently has over 350 video tutorials, plus step by step guides and PDFs. You can explore more free videos with a free “freebies” membership, or take the plunge and become a full subscriber for full access. If you’d prefer to support me on Patreon, please visit: https://www.patreon.com/RichardGray [...]
A series of videos on how I painted my Aeldari Autarch (Eldritch Omens). This includes the pearlescent NMM armour, the soulstones, sword and Death Spinner(s)! Scroll down to explore the tutorials in order, or look at specific parts or techniques of your Aeldari Autarch by clicking one of the links below: Video – Aeldari Autarch ArmourMaterials NeededVideo – Aeldari Autarch SoulstoneMaterials NeededStep-by-Step Guide:Video: Aeldari Autarch Power SwordMaterials Needed:Step by Step GuideVideo – Aeldari Autarch Death Spinner WraithboneMaterials NeededStep-by-Step GuideVideo – Aeldari Autarch Death Spinner (Black)Materials NeededStep by Step GuideMore Aeldari/Eldar! Video – Aeldari Autarch Armour All videos are recorded in HD 1080p or higher – use full screen for the full effect and let the video load completely. You can also click the little “cog” and change the speed of the video, if I am going too fast (or slow!). Materials Needed Base Paints: Vallejo Turquoise (Sotek Green can be used as an alternative), Vallejo Black Highlight Paint: P3 Morrow White (or any high-quality white paint) Brushes: Fine detail brushes, including a customised, cut-down brush for stippling Palette: Preferably a wet palette for mixing and maintaining paint consistency Water: For thinning paints Step-by-Step Guide Assembly and Priming: Assemble your Autarch, ensuring clean joins and smooth surfaces. Prime the model in black to enhance the depth and contrast of the subsequent layers. Base Coating Initial Base Coat: Mix Vallejo Turquoise with a small amount of black to create a dark base colour. Apply this mixture evenly across the armour, setting the stage for the lighter highlights to come. This base layer helps in mapping out the armour’s contours and provides a foundation for building contrast. Highlighting Mixing Highlights: Create several shades of turquoise by mixing the base Vallejo Turquoise with varying amounts of black for darker shades and white for lighter shades. This range will allow you to build up the shiny armour effect through gradual layering. Applying Highlights: Start highlighting areas where light naturally hits the armour, such as the helmet’s curvature. Use a “scratchy” application method for this initial layer to block in the highlight areas without aiming for perfection. Refining Highlights Stippling Technique: Shift to a stippling technique with a customised brush (cut down to keep the tip thin) to apply the finer, lighter highlights. This approach allows for more precise control over the intensity and spread of the highlights, contributing to the shiny armour effect. Enhancing the Shine: Focus on areas that would reflect light more intensely, such as the helmet’s forehead and other raised surfaces. Gradually lighten these highlights by adding more white to the turquoise, working towards pure white for the most intense reflections. Adding Depth and Detail Creating Contrast: Apply darker shades into recesses and around the edges of the lighter highlights to enhance contrast and depth. This step is crucial for making the shiny effect believable and visually striking. Detailing with Black: Use Vallejo Black to paint areas such as the faceplate, ensuring to keep these areas distinct and not overly bright to avoid detracting from the focal points of the armour. Finishing Touches Edge Highlighting: Use the lightest turquoise mix to carefully edge highlight the armour, defining its shapes and enhancing the overall shininess. Be precise and consistent with these highlights to maintain the model’s clean appearance. Final Adjustments: Review the model for any areas that need softening or additional contrast. Use glazes (thin, transparent layers of paint) to adjust the intensity of the highlights or shadows as necessary. Video – Aeldari Autarch Soulstone All videos are recorded in HD 1080p or higher – use full screen for the full effect and let the video load completely. You can also click the little “cog” and change the speed of the video, if I am going too fast (or slow!). Materials Needed Fine detail brushes Palette for mixing paints Water for thinning paints Paints Used: Games Workshop: Khorne Red, Pink Horror Vallejo: Pink, Black P3: Morrow White (or any high-quality white paint) Step-by-Step Guide: Base Coating: Begin by painting the entire soulstone with Khorne Red. Aim for a smooth, even coat. If the paint is too thick, thin it with a bit of water (about 50/50 ratio). Let dry and apply a second coat if necessary for full coverage. Creating the Horizon Line: Mix Khorne Red with a tiny amount of black to darken it slightly. Paint a wobbly horizon line towards the bottom of the soulstone, simulating a shadowed effect. This line doesn’t need to be perfectly straight; a bit of curvature adds to the natural look. Blending the Horizon: Below this line, blend back to the original Khorne Red, creating a smooth transition. You can achieve this by using a damp brush to soften the edge between the two colours. Adding Highlights: On the upper part of the soulstone, start highlighting with Pink Horror. Near the horizon line, make this highlight bright and prominent, fading it as you move upwards. Mix Pink Horror with Vallejo Pink to lighten it for further highlights, applying these closer to the top of the gem. Enhancing the Gem Effect: Introduce a brighter layer by using a mix of Vallejo Pink and white. This should be applied sparingly, focusing on the top edges and areas you want to emphasise the most. Defining the Edges: Carefully outline the left and right edges of the soulstone with the light pink mix. This step requires a steady hand to achieve a thin, precise line that enhances the gem’s shape. Final Touches: Add a small dot of P3 Morrow White at the top left of the soulstone to simulate a reflection point, making the gem appear more lustrous. Optionally, add a tiny white dot on the opposite bottom right to suggest light passing through the gem. Adjusting and Correcting: If any areas need adjustment, gently glaze over them with the base colours to correct the intensity or blend. Always allow paint to dry between layers to avoid muddying the colours. Video: Aeldari Autarch Power Sword All videos are recorded in HD 1080p or higher – use full screen for the full effect and let the video load completely. You can also click the little “cog” and change the speed of the video, if I am going too fast (or slow!). Materials Needed: Vallejo Neutral Grey Vallejo Ice Yellow Games Workshop Yriel Yellow Games Workshop Mournfang Brown Games Workshop Abaddon Black Games Workshop Sotek Green P3 Morrow White A mix of Neutral Grey and Yriel Yellow A mix of Ice Yellow and Morrow White Step by Step Guide Base Coating: Start by applying a base coat of Vallejo Neutral Grey across the sword. This serves as a solid foundation for building up the NMM gold effect. Initial Highlights: Mix Vallejo Neutral Grey with a small amount of Yriel Yellow to create your first highlight layer. Focus this mixture towards the edges and points of the sword where light would naturally be strongest. Enhancing the Highlights: Gradually introduce lighter shades by adding more Yriel Yellow and then Ice Yellow into your mixes. Apply these to the most pronounced edges and features to simulate the effect of light reflecting off the metal. Defining Reflections: Pay attention to the dynamic shape of the sword, applying strategic highlights to suggest the reflection of light on its surface. This includes the curvature near the tip and along the flat of the blade. Deepening Shadows: Use a mixture of Neutral Grey and a touch of black to deepen the shadows along the less illuminated parts of the sword. This contrast is crucial for the NMM effect. Finishing Touches: For the brightest points of light reflection, mix Ice Yellow with Morrow White and apply sparingly to the very tips and edges where light would hit directly. Glazing for Depth: Glaze the sword with thin layers of Mournfang Brown and Sotek Green to add colour depth and variety, enhancing the alien quality of the weapon. Final Highlights: Use pure white to add final highlights to the most prominent areas. This step is critical for creating the illusion of a gleaming, reflective surface. Throughout this process, remember the importance of maintaining thin paint consistency to avoid clumping and to achieve the smoothest transitions possible. If you encounter challenges with colour transitions, consider creating bridge transitions by mixing intermediate shades. Video – Aeldari Autarch Death Spinner Wraithbone All videos are recorded in HD 1080p or higher – use full screen for the full effect and let the video load completely. You can also click the little “cog” and change the speed of the video, if I am going too fast (or slow!). Materials Needed Base Paints: Games Workshop Dryad Bark Layer Paints: Games Workshop Baneblade Brown, Karak Stone, Morghast Bone, Ushabti Bone, Screaming Skull Highlight Paints: Games Workshop Evil Sunz Scarlet, Sotek Green, Warpstone Glow, P3 Morrow White (or any white paint) Brushes: Fine detail brushes for texture and highlight application Palette: For mixing and thinning your paints Water: For thinning paints to the desired consistency Step-by-Step Guide Start with a Black Base: Ensure your miniature is primed in black. This will deepen the subsequent layers of paint, adding to the aged effect. Apply Dryad Bark: Cover the entire weapon in a layer of Dryad Bark. This dark brown serves as a rich foundation for the wraithbone texture. Layering First Layer with Baneblade Brown: Apply Baneblade Brown over the Dryad Bark, focusing on the areas that will catch light. Don’t worry about perfect coverage; the slight translucency adds to the texture. Add Karak Stone Highlights: Layer Karak Stone over the Baneblade Brown, enhancing the lighter areas and beginning to define the wraithbone texture. Again, embrace the paint’s translucency to build depth. Texture and Detailing Fine Texture with Morghast Bone: Use Morghast Bone to start adding fine, squiggly textures resembling weathered bone. Use the very tip of your brush and light pressure to create jagged, circular shapes. Enhance Texture with Ushabti Bone: Increase the texture’s visibility by applying Ushabti Bone, focusing on shadowed areas and blending into the lighter sections for a smooth transition. Highlight with Screaming Skull: Apply Screaming Skull sparingly to the most raised areas and edges to simulate light reflecting off the bone’s surface. This layer should be thin and focused. Final Highlights and Corrections Bright Highlights with White: Use P3 Morrow White (or any white paint) diluted with water to add final touches to the texture, focusing on the highest points and sharpest edges. This step brings out the detail and adds a sense of dimension to the wraithbone. Adjust Texture and Contrast: If necessary, go back with previous colours to adjust the texture and contrast. This could mean softening too-bright areas with Screaming Skull or Ushabti Bone or deepening shadows with Morghast Bone. Adding Colour and Detail Apply Evil Sunz Scarlet: For the weapon’s energy filaments, start with a base of Evil Sunz Scarlet. Draw fine lines to mimic lightning or energy crackling from one end to the other. Mix in White for Highlights: Gradually add white to your Evil Sunz Scarlet to lighten the colour for the highlights. Focus these lighter shades towards the base (or top, depending on orientation) of the energy filaments, creating a gradient effect. Incorporate Sotek Green and Warpstone Glow: To add a unique touch and colour variation, introduce Sotek Green and Warpstone Glow sparingly into the wraithbone texture. This can simulate moss or growth, adding to the ancient appearance. Use these greens lightly to avoid overwhelming the bone texture. Painting a wraithbone texture on your Aeldari Autarch Deathspinner involves a delicate balance of layering, texture creation, and strategic highlighting. By following these steps and adjusting based on your model’s specific details and your personal preference, you can achieve a beautifully aged, textured effect that stands out on the battlefield. Remember, the key to this technique is patience and layering; build your colours gradually for the most natural and detailed result. Video – Aeldari Autarch Death Spinner (Black) All videos are recorded in HD 1080p or higher – use full screen for the full effect and let the video load completely. You can also click the little “cog” and change the speed of the video, if I am going too fast (or slow!). Materials Needed Base Paint: Vallejo Model Color Black Highlight Paints: Vallejo Basalt Grey, and any white paint (I’ve used P3 Morrow White, but any white will do) Mixing Palette: For creating various shades of grey Fine Detail Brushes: For precise application of highlights Water: For thinning paints Step by Step Guide Base Coating Prepare the Miniature: Ensure your Aeldari Autarch Deathspinner is clean, primed, and ready for painting. If you’ve previously painted it, as I have, ensure the model is painted over in Vallejo Model Color Black. This provides a flat, non-satin finish that’s perfect as a canvas for our shiny black effect. Highlights Observe the Model: Look at the shapes and details of the model. Identify areas that will naturally catch the light, such as edges, raised surfaces, and textures. The Deathspinner has a mix of flat and curved surfaces, which will influence our highlight placement. Create a Gradient Palette: Mix Vallejo Basalt Grey with black to create several shades of grey, from dark to light. Also, prepare a mix with white to create lighter greys. These will be used to build up the highlights gradually. Start with Mid-Tones: Begin highlighting with a mid-tone grey, not the darkest shade. This helps in mapping out the highlights clearly without committing to high contrast immediately. Apply this mid-tone grey to areas you’ve identified as natural light catchers. Increase Contrast: Gradually work your way up through the shades of grey you’ve mixed, moving towards the lighter greys and eventually white. Focus on smaller areas within the already highlighted sections to create a sense of light reflecting off a shiny surface. Edge Highlighting: Use fine detail brushes to apply edge highlights meticulously. This step is crucial for defining the shapes and textures of the model, making them stand out against the black base. Refining the Highlights Adjust the Highlights: If any area looks too grey or the contrast isn’t high enough, go back in with your darker greys or black to redefine the shadows. This step is about balancing the overall look to maintain the illusion of a shiny black surface. Glazing: Mix a glaze using Vallejo Model Color Black thinned down with water. Use this to subtly adjust the intensity of your highlights and shadows, smoothing out transitions and ensuring that the black remains the dominant colour. Final Touches Sharpening Highlights: For the brightest points, use white or a very light grey to add final touches. These should be very small, focused on the most prominent areas where light would naturally be most intense. Cleanup: Review your Aeldari Autarch and clean up any areas where the paint may have overstepped. Use black to correct any mistakes and sharpen the edges. Cant see the Aeldari Autarch videos? If you don’t have an account, please sign up here! The website currently has over 350 video tutorials with steps and tips, plus a selection of PDFs. If you are not sure about joining, you can explore my free videos with a free membership, or take the plunge and become a full subscriber for full access. If you’d prefer to support me on Patreon, please visit: https://www.patreon.com/RichardGray More Aeldari/Eldar! [...]
In this guide you will be shown how to paint MKVI Imperial Fists in Beakie armour, from the Horus Heresy. Video – How to Paint MKVI Imperial Fists All videos are recorded in HD 1080p or higher – use full screen for the full effect and let the video load completely. You can also click the little “cog” and change the speed of the video, if I am going too fast (or slow!). Materials and Paints Used Games Workshop: Mournfang Brown, Balor Brown, Yriel Yellow, Mephiston Red, Wild Rider Red, Sotek Green, Forge World Weathering Powder Dark Sand. Vallejo: German Grey, Neutral GreyWindsor and Newton oil paints: Burnt Siena, Black, Sansodor mineral spiritVallejo: Mecha Varnish Gloss, Mecha Varnish Matt, Metal Exhaust ManifoldP3: Morrow White (Any White will do). BrushesArtis Opus: Series S size 1 and 00. Step by Step Guide – How to Paint MKVI Imperial Fists Base Coating with Mournfang BrownBegin by airbrushing or hand painting Mournfang Brown onto the miniatures, creating a solid base for subsequent layers. Highlight Placement Lighten Mournfang Brown with a bit of white, applying it to areas of natural highlights like upward-facing surfaces. Applying Yriel Yellow Over the pre-shaded miniatures, apply thinned Yriel Yellow, bringing out the Imperial Fists’ iconic yellow. Detailing with Mephiston Red Use Mephiston Red for the sergeant’s red head stripe, distinguishing the squad leader. Eyes and Weapons Paint eyes and weapon details black, setting the stage for later detailing. Metallic Elements Apply Vallejo Metal Exhaust Manifold to metallic areas, focusing on weapon coils and armour studs. Gloss Varnishing for Decals Apply a coat of gloss varnish over the miniatures to smooth the surface for decal application. Decal Application Carefully apply Imperial Fist decals, using microset for proper adherence and fit. Oil Washes for Depth Create a wash with Burnt Sienna, Black, and Sansodor mineral spirit, enhancing depth and worn appearance. Matte Varnishing After the oil wash dries, apply a coat of matte varnish to seal previous layers and prepare for final detailing. Enhancing Yellow Highlights Revisit yellow areas with thinned-down Yriel Yellow, creating bright focal points. Eyes and Plasma Effect Create glowing effects with Sotek Green mixed with white, applying to eyes and plasma details. Weathering with Rhinox Hide Add a battle-worn effect using Rhinox Hide for scratches and chips across the armour. Final Touches Add highlights to the red plume, enhance yellow details, and complete any final touches. Base Decoration Decorate the base with sand, PVA glue, Agrax Earthshade, and weathering powder for a realistic ground effect. Final Sealing Seal the model with a final layer of matte varnish to protect your work. Show it off! As you progress, feel free to adapt and tweak techniques to suit your style. Good luck! When you’ve finished the how to paint MKVI Imperial Fists tutorial, why not pop into our Discord and show it off to other website members? 🙂 More Free Video Tutorials Free videos for logged in members – just sign up as a ‘friend’ to view and click any of the thumbs.To explore all of these, visit this page! If you don’t have an account, please sign up here! The website currently has over 350 video tutorials, plus step by step guides and PDFs. You can explore more free videos with a free membership, or take the plunge and become a full subscriber for full access. If you’d prefer to support me on Patreon, please visit: https://www.patreon.com/RichardGray [...]
In this guide you will be shown how to paint Rogal Dorn’s armour in NMM (non-metallic metal) gold. This is a higher level technique, suitable for the mighty Primarch of the Imperial Fists! (make sure you are logged in to view!) All videos are recorded in HD 1080p or higher – use full screen for the full effect and let the video load completely. You can also click the little “cog” and change the speed of the video, if I am going too fast (or slow!). Paints and Materials Games Workshop: Rhinox Hide, Mournfang Brown, XV-88, Balor BrownP3: Morrow White (Any White will do) BrushesArtis Opus: Series S size 1 and 00, Small Drybrush Priming Prime the model black for a deep shadow base. Over the primer, airbrush or brush on Mournfang Brown thinly. Base Highlights Use XV-88 to mark where light naturally reflects on the armor. Focus on large shapes and avoid intricate details at this stage. Layering Gradually build up lighter tones, moving from Rhinox Hide to Balor Brown. This step creates a depth and transition in the gold effect. Bright Highlights Mix small amounts of Morrow White into Balor Brown. Apply this mix to areas where light hits strongest like the shoulders and helmet. Smoothing Transitions Use glazing techniques to blend the transitions smoothly. Aim for a gradient effect from dark to light tones. Deepening Shadows Apply darker tones like Rhinox Hide in recessed areas for depth. Contrast between shadows and highlights enhances the metallic look. Final Touches Add nearly pure white highlights at the highest points of light reflection. These should be minimal but bright for impact. Refinement Revisit the model to tighten any details and ensure uniformity. A matte varnish can be used at the end to protect the paintwork and unify the sheen. More Free Video Tutorials Free videos for logged in members – just sign up as a ‘friend’ to view and click any of the thumbs.To explore all of these, visit this page! If you don’t have an account, please sign up here! The website currently has over 350 video tutorials, plus step by step guides and PDFs. You can explore more free videos with a free membership, or take the plunge and become a full subscriber for full access. If you’d prefer to support me on Patreon, please visit: https://www.patreon.com/RichardGray [...]
This free video shows how to paint a Blood Angel in new Mark VI armour, from the Horus Heresy (make sure you are logged in to view!) Video: How to Paint A Blood Angel in MKVI Armour All videos are recorded in HD 1080p or higher – use full screen for the full effect and let the video load completely. You can also click the little “cog” and change the speed of the video, if I am going too fast (or slow!). Paints and Materials: Games Workshop: Mephiston Red, Evil Sunz Scarlet, Wild Rider Red, Warboss Green, Moot Green, Mournfang Brown, Darkoath Flesh (Contrast), Contrast Medium, Forge World Weathering Powder Dark Sand. Vallejo: Black, Mecha Varnish Gloss, Mecha Varnish Matt, Metal Colour Burnt IronP3: Morrow White (Any White will do)BrushesArtis Opus: Series S size 1 and 00, Small Drybrush Step-by-Step: How to Paint A Blood Angel in MKVI Armour Preparation Clean Model: Ensure the model is cleaned of mold lines and primed. Drill the barrel for added realism if it hasn’t been done already. Assembly: Fully assemble the model before starting to paint. Base Coating Red Armor: First Layer: Start with Mephiston Red, diluting it to a 50/50 mix with water. Apply with a small drybrush or a large round soft brush, using a stippling motion to cover the armor. Second Layer: Apply Evil Sunz Scarlet to areas where light naturally falls, like shoulders and helmet, using a gentler stippling motion. Final Layer: Add Wild Rider Red to the brightest areas, but be careful as it’s a pinky-orange hue. This layer is just for the very highlights. Detailing Metallics: Paint metallic areas with Vallejo Metal Colour Burnt Iron. These metallics have good coverage, so there’s no need for a black undercoat. Once dry, apply a coat of gloss varnish (optional). Eyes: Start with Warboss Green for the base of the eye lenses. Add Moot Green over the Warboss Green, leaving some of the darker green visible around the edges. Mix Moot Green with a bit of white for the next layer, focusing on the central part of the lenses. Finish with a small dot of white in the center for the glowing effect. Black Areas: Paint any black parts like the bolter and the eyes. Shading Wash: Mix Darkoath Flesh (Contrast) with a bit of Contrast Medium and apply liberally over the model for shadows and depth. Use a clean brush to remove excess wash, especially in recesses. Highlights and Finishing Touches Red Armor: Revisit with Evil Sunz Scarlet and Wild Rider Red, focusing on areas where light hits to enhance the red color. For chips and scratches, use Rhinox Hide with a fine brush, adding tiny dots and lines to simulate battle damage. Metallics: Re-highlight with Burnt Iron to restore the metallic sheen. Base Cover with PVA glue and sand. Once dry, apply a brown wash and let it dry. Apply Forge World Weathering Powder Dark Sand for a dusty, battle-worn look. Varnishing Finish with a coat of Vallejo Mecha Varnish Matt for protection and a matte finish. Final Touches Detailing: Add any final details like highlighting edges or correcting overspills. Decals (Optional): If you have Blood Angels decals, apply them after the shading stage. More Free Video Tutorials Free videos for logged in members – just sign up as a ‘friend’ to view and click any of the thumbs.To explore all of these, visit this page! If you don’t have an account, please sign up here! The website currently has over 350 video tutorials, plus step by step guides and PDFs. You can explore more free videos with a free membership, or take the plunge and become a full subscriber for full access. If you’d prefer to support me on Patreon, please visit: https://www.patreon.com/RichardGray [...]
In this free video you will be shown how to paint a Night Lords Praetor in terminator armour, from the Horus Heresy (make sure you are logged in to view!) All videos are recorded in HD 1080p or higher – use full screen for the full effect and let the video load completely. You can also click the little “cog” and change the speed of the video, if I am going too fast (or slow!). The following paints were used: Games Workshop: Night Lords Blue, Kantor Blue, Macragge Blue, Calgar Blue (optional), Mephiston Red, Evil Sunz Scarlet, Wild Rider Red, Firedragon Bright, Baneblade Brown, Cadian Fleshtone, Balor Brown, Mournfang Brown, Morghast Bone, Screaming Skull, Forge World Weathering Powder Dark Sand. Windsor and Newton oil paints: Burnt Siena, Black, Sansodor mineral spiritVallejo: Mecha Varnish Gloss, Mecha Varnish Matt, Metal Colour Burnt Iron Scale 75: Elven Gold (optional)P3: Morrow White (Any White will do)BrushesArtis Opus: Series S size 1 and 00, Small Drybrush Step by Step : How to paint a Night Lords Praetor Painting Steps: Priming and Assembly: Assemble your model fully and prime it in black. In this case, the head is already glued in, making it slightly more challenging to paint. Base Layering: Start with Night Lords Blue, diluted roughly 50:50 with water. Use a small dry brush or makeup brush to stipple the paint onto the model, ensuring to get into all the recesses. Progressive Highlights: Apply subsequent layers of Kantor Blue, then Macragge Blue. With each layer, be less vigorous and focus more on areas where light naturally hits. Detailing with a Small Brush: For hard-to-reach areas like the chest, use a small brush to apply highlights. Final Highlighting: If desired, add a final stage of highlighting with Calgar Blue, although its translucency can be less satisfying. A mix of Macragge Blue and white can be more effective. Blocking in Other Colours: Apply base colours for other parts of the model, such as Mephiston Red for red areas, Baneblade Brown for leather straps, and Balor Brown for skulls and bones. Metallics and Golds: Paint metallic areas with Vallejo Metal Colour Burnt Iron and golden areas with Scale 75 Elven Gold. Gloss Varnish and Oil Wash: Once all base colors are blocked in, apply Vallejo Mecha Gloss Varnish. Follow this with a mix of Burnt Sienna and Black oil paint thinned with mineral spirits. Apply it liberally over the model and then remove excess with a clean brush dipped in mineral spirits. Matte Varnish: After the oil wash has dried, apply Vallejo Mecha Matt Varnish to prepare the model for further acrylic painting. Refining Highlights: Revisit areas with acrylic highlights, enhancing details and cleaning up where necessary. Lightning Effect: Use a mix of Macragge Blue and white, then pure white, to paint lightning effects on armor panels. Finishing Touches: Add final details to the model such as eye lenses, further skull highlighting, and final metallic edge highlights. Base Detailing: For the base, use Forge World Weathering Powder Dark Sand over glued sand for a realistic texture. Additional Tips on how to paint a Night Lords Praetor: Keep the paint consistency thin to avoid losing details. Use stippling and careful brushwork to create texture and depth. Be patient with the oil wash and varnish steps, as they significantly enhance the final look. Experiment with the lightning effect to create dynamic visual interest on the armor. Free Video Tutorials Free videos (for logged in members – just sign up as a ‘friend’ to view and click any of the thumbs.To explore all of these, visit this page! If you don’t have an account, please sign up here! The website currently has over 350 video tutorials, plus step by step guides and PDFs. You can explore more free videos with a free “freebies” membership, or take the plunge and become a full subscriber for full access. If you’d prefer to support me on Patreon, please visit: https://www.patreon.com/RichardGray [...]
This free video shows how to paint a Grimdark Black Templar to tabletop standard (make sure you are logged in to view!) All videos are recorded in HD 1080p or higher – use full screen for the full effect and let the video load completely. You can also click the little “cog” and change the speed of the video, if I am going too fast (or slow!). Materials and Paints: Paints: Games Workshop (Mephiston Red, Evil Sunz Scarlet, Yriel Yellow, Morghast Bone, Screaming Skull), Vallejo (Basalt Grey, Neutral Grey, Pale Grey Blue, German Grey, Metal Colour Exhaust Manifold, Metal Colour Gunmetal Grey), Scale 75 (Necro Gold), P3 (Morrow White) Oil Colours: Winsor & Newton (Black, Burnt Sienna) Odorless Mineral Spirit: Winsor & Newton Sansodor Primer: Badger Ultimate Primer in Black Brushes: Artis Opus Series S size 1 and 00, Small Drybrush Varnish: Vallejo Mecha Matt Varnish (optional Mecha Gloss Varnish) How to Paint a Grimdark Black Templar – Step-by-Step Guide: 1. Base Preparation: Prime the model black, leaving the head with blue tack for easier eye painting. 2. Armour Texture and Highlights: Stipple German Grey (or a dark grey mix) over the armour, focusing on the edges and avoiding leather pouches and shoulder pads. This creates a textured base for highlighting. Progress with lighter greys, like Basalt and Neutral Grey, using a similar stippling technique. This builds up the highlights and adds depth. 3. Shoulder Pads: Paint shoulder pads with Neutral Grey. This area will eventually be white but start with a grey base to create a grimy look. 4. Masking for Airbrushing: Use putty to mask off areas and airbrush a mix of Morrow White and a touch of Abaddon Black on the shoulder pads, creating a gradient effect. 5. Detailing Black Areas: Use black paint to touch up any overspray from airbrushing, particularly on the armour trim and the Black Templar cross. 6. Leather and Skull: Apply Mournfang Brown to leather areas and the skull. The oil wash will later help blend and shade these parts. 7. Gold Details: Paint gold areas with Necro Gold, watering down the metallics for a smooth finish. 8. Metallics: Fill in all metallic parts with Gunmetal Grey. Oil wash will later enhance these metallics, providing depth and shading. 9. Skull Highlight: Add a quick highlight of Morghast Bone to the skull to make it stand out against the dark base. 10. Verdigris Effect: Apply a mix of Sotek Green and White for a verdigris effect on gold areas, focusing on recesses and crevices. 11. Oil Wash: Mix Burnt Sienna and Black oil paint with mineral spirit and apply generously over the model. This step dramatically alters the model’s look, blending and toning down highlights and adding a weathered effect. 12. Touching up Highlights: Redo the highlights in smaller areas using Neutral Grey, Dark Sea Grey, and Pale Blue Grey. This step refines the highlights post-oil wash. 13. Lenses: Paint the lenses starting with Mephiston Red, followed by layers of Evil Sunz Scarlet, Fire Dragon Bright mixed with Yriel Yellow, and finally pure Yriel Yellow for a glowing effect. 14. Final Touches: Reapply metallic paints to certain areas for a contrast boost. Apply final highlights and adjust any last-minute details to your liking. Explore more of the latest free videos! If you don’t have an account, please sign up here! The website currently has over 350 video tutorials, plus step by step guides and PDFs. You can explore more free videos with a free “freebies” membership, or take the plunge and become a full subscriber for full access. If you’d prefer to support me on Patreon, please visit: https://www.patreon.com/RichardGray [...]
In this Emperors Champion Armour PDF guide you will be shown, in detail, how to paint the armour of the Emperor’s Champion for the Black Templars. The PDF will load below (please allow a few mins for it to load!). You can also access it by clicking here. Templar-Armour The following paints were used in the PDF guide:Games Workshop: Daemonette Hide, Rhinox Gide, Xereus Purple, Corvus Black, Abaddon BlackVallejo: Black (Any Black will do)P3: Morrow White (Any White will do) If you don’t have an account, please sign up here! The website currently has over 350 video tutorials with steps and tips, plus a selection of PDFs like the above Emperors Champion Armour PDF guide. If you are not sure about joining, you can explore my free videos with a free membership, or take the plunge and become a full subscriber for full access. If you’d prefer to support me on Patreon, please visit: https://www.patreon.com/RichardGray More Emperors Champion Tutorials [...]
Learn how to paint an Ork Squigosaur (shark squig!) with my selection of tutorial videos, paints and top tips plus a detailed PDF on how I paint. How to Paint an Ork Squigosaur Skin, Teeth and Eyes All videos are recorded in HD 1080p or higher – use full screen for the full effect and let the video load completely. You can also click the little “cog” and change the speed of the video, if I am going too fast (or slow!). The following paints were used: Games Workshop: Warboss Green, Moot Green, Khorne Red, Mephiston Red, Mournfang Brown, XV-88, Balor Brown, Morghast Bone, Screaming Skull, Pink Horror Vallejo: Black, Basalt Grey, Neutral Grey, Dark Sea Grey, Pale Grey Blue P3: Morrow White (Any White will do) How to Paint an Ork Squigosaur Tips! Inside the Mouth: Utilise an airbrush to paint the inside of the mouth for a clean and efficient finish.Opt for dark grey shades, ensuring subtle highlights.Adding Spot Colours: Introduce spot colours on the shark squig to break up the desaturated black and grey appearance.Consider using Dark Sea Grey for added interest.Matte Varnish: Apply matte varnish to areas with overspray to reduce shine and enhance focus during highlighting.Choosing Greys: Experiment with greys like Neutral Grey, Black, and Basalt Grey for various effects.Create your own versions of greys using Black and White if needed.Texture Marks: Add scratches and texture marks to simulate battle damage and wear on the model.Follow the shape of organic surfaces for a more natural look.Squiggly Lines: Create squiggly lines and scratches quickly for a battle-worn effect.Vary the length and direction of the lines for a more authentic appearance.Control brush pressure for varying line thickness.Use a thinner brush for more intricate details.Glazing: Thin down Basalt Grey for glazing to correct areas that need additional highlights.Achieve a smooth blend with thin layers of glaze.Teeth Painting: Paint teeth bone-coloured for high contrast.Darken the tips of upper row teeth and lighten the tips of the lower row teeth for realism.Eye Detailing: Paint the eyeball with Dark Sea Grey or similar colours.Gradually transition from dark to bright greens for a realistic eye effect.Add a touch of white at the bottom of the eye for a shiny appearance.Layering and Highlights: Layer highlights on scars and skin texture to add de How to Paint a Leather Belt The following paints were used: Games Workshop: Rhinox Hide, Troll Slayer Orange, Bugman’s Glow, Kislev Flesh, Screaming Skull, Mournfang Brown Leather Belt Top Tips! Base Coat: Begin with Rhinox Hide to establish the base colour for the leather belt. Ensure complete coverage, particularly around edges that meet the skin. Texturing Technique: Utilise an old brush with approximately a third of it trimmed off to create a diminutive dry brush. Load it with Troll Slayer Orange (thick paint) and press it onto the model. This technique produces thick, heavily textured orange marks. Scratchy Marks with Bugman’s Glow: Employ Bugman’s Glow to form scratchy, vertical marks on the leather belt. Flip the model upside down for better control when applying marks on the upper edges. Building Texture: Gradually build up the texture with small, controlled marks. Avoid going too heavy, both in terms of the number of marks and the pressure applied with the brush. Highlighting with Kislev Flesh: Apply Kislev Flesh for highlighting, focusing on worn edges and areas that need more weathering. This adds depth and contrast to the leather. Refinement with Screaming Skull: The final highlight is done with Screaming Skull for subtle refinements. These highlights add a bit more contrast and make details stand out. Glazing Technique: Conclude by glazing over the leather belt with thinned Mournfang Brown. This adds a strong colour while maintaining translucency. If you prefer a neater glaze, use a wet palette. Remember, the key is to be purposefully chaotic with the marks to create unique and interesting textures. Don’t be afraid to experiment and vary your approach for a more dynamic result. Chrome Exhaust Games Workshop: Mournfang Brown, Calgar BlueVallejo: Black, German Grey, Basalt Grey, Neutral Grey, Dark Sea Grey, Pale Grey BlueP3: Morrow White Chrome Top Tips! Colour Palette: Utilise a wet palette with shades such as neutral grey, basalt grey, dark sea grey, pale grey blue, blue-black, and German grey for achieving the chrome effect.Incorporate Mournfang Brown to emulate ground reflections.Primary Highlight: Initiate the process with a substantial primary highlight along the central axis of the exhaust to establish the main chrome effect.Blend neutral grey and German grey to facilitate a seamless transition between shades.Random Reflections: Introduce random secondary bounce highlights to imitate reflections on the chrome surface.Reflect the surroundings, rider, and ground on the chrome, while considering the cylindrical shape.Golden Angle: Ensure that the primary highlight is discernible from the golden angle of the model, particularly on the face of the shark squig.Surface Texture: Diversify the texture on distinct surfaces; employ scribbly marks for the engine compartment and controlled lines for the exhaust pipe.Edge Highlights: Illuminate the edges of the exhaust to impart a heightened reflective quality, as light tends to accentuate edges.Adding Colour: Infuse Mournfang Brown for ground reflections, creating a nuanced separation from the model’s skin.Apply Kalgar Blue as a glaze for a touch of colour, ensuring it doesn’t overpower the overall moody aesthetic.Final Highlights: Gradually layer on highlights using lighter shades such as dark sea grey, pale grey blue, and eventually white for the highest points.Neatening Up: Dedicate time to refining the chrome effect for a polished finish, especially concentrating on edges and highlight points.Pay meticulous attention to detail, rectifying any imperfections such as bumps or sprue marks.Optional Enhancements: Contemplate incorporating ice yellow for a sunlit effect, if desired.Experiment with alternative colours for reflections, keeping in mind the overall mood and theme of the model. How to Paint an Ork Squigosaur Skin, Teeth and Eyes – PDF In this guide you will be shown how to paint an Ork Sharksquig (squigosaur) from Warhammer40,000, focusing on the skin, eyes and teeth. How to Paint Sharksquig Skin, Teeth and Eyes – PDF If you don’t have an account here on my website, please sign up here! I have over 350 video tutorials with steps and tips, plus a selection of PDFs. If you are not sure about joining, you can explore my free videos with a free membership, or take the plunge and become a full subscriber for full access. If you’d prefer to support me on Patreon, please visit: https://www.patreon.com/RichardGray [...]
In this guide you will be shown how to paint Karazai, a dragon from Age of Sigmar. The below PDF may take a few mins to load, as it’s a big one! You can also click this link. dragon1 The following paints were used:Games Workshop: Daemonette Hide, Khorne Red, Wazdakka Red, Pink Horror, XV-88, Balor Brown,Morghast Bone, Ushabti Bone, Screaming Skull, Rhinox Gide, Corvus BlackVallejo: Black (Any Black will do)P3: Morrow White (Any White will do)Windsor and Newton: Sansodor solvent, Burnt Umber oil colourGloss and Matt varnish Who is Karazai? Karazai, also known as “The Scarred,” is a prominent Draconith prince in the Age of Sigmar, a key figure among the Draconith, the dragon-like descendants of Dracothion the Great Drake. Alongside his brother Krondys, Karazai is notable for his deep involvement in the Draconith’s struggle for survival and their resurgence in the Mortal Realms. Distinguished by his passion for scholastic lore, Karazai played an instrumental role in discovering and establishing a telepathic link with the Slann, ancient and powerful beings. This intellectual curiosity and foresight led to a pivotal alliance that proved crucial for the Draconith’s survival. When faced with the threat posed by Kragnos, a powerful Drogrukh who sought the destruction of the Draconith, it was Karazai’s initiative that sought the intervention of Lord Kroak, a revered Slann figure. As a result of Karazai’s actions, the remaining Draconith eggs were given to the protection of Kroak’s temple-ships, ensuring the race’s continuity. This act of preservation was vital in the return of the Draconith during the Era of the Beast. It was then that Karazai, alongside his brother Krondys, led the Draconith to ally with the Stormcast Eternals, forming the formidable Stormdrake Guard under the Pact Draconis. Karazai’s name resonates with a sense of resilience and adaptability, reflecting his capacity to navigate the Draconith through periods of great peril. His contributions have not only safeguarded his race but also positioned the Draconith as significant allies in the ongoing struggles of the Mortal Realms. Karazai’s legacy is one of wisdom, strategic foresight, and an unyielding commitment to the preservation and advancement of his people. If you don’t have an account, please sign up here! The website currently has over 350 video tutorials with steps and tips, plus a selection of PDFs. If you are not sure about joining, you can explore my free videos with a free membership, or take the plunge and become a full subscriber for full access. If you’d prefer to support me on Patreon, please visit: https://www.patreon.com/RichardGray [...]
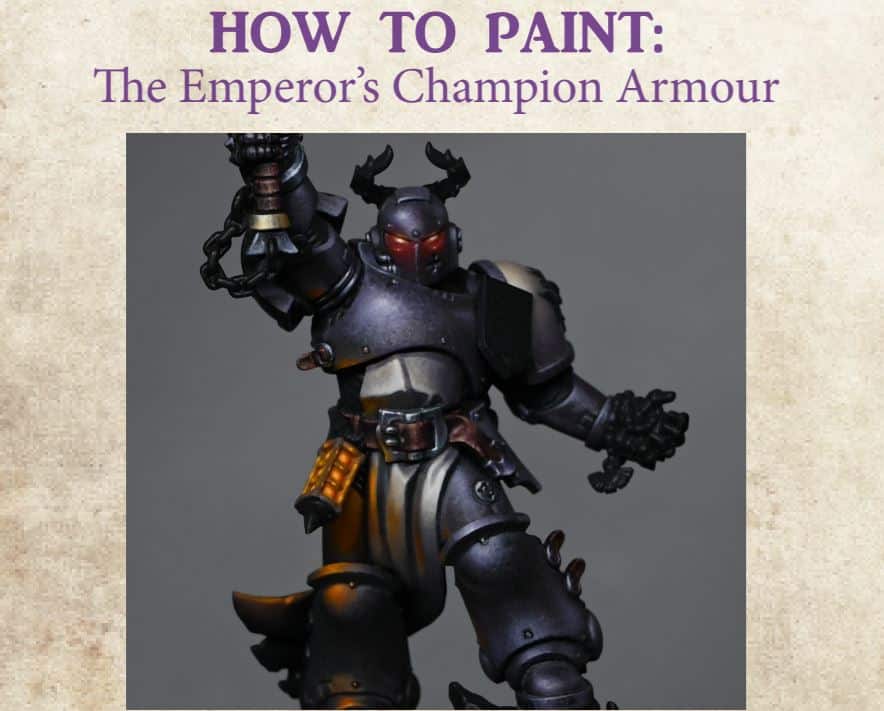
A series for how to paint Be’lakor, the Dark Master. This includes his face and horns, his muscles and glowing pointed star, leather and chain NMM on his loincloth and the NMM of his gleaming armour! Scroll to view the videos and step-by-step guides on how to paint Be’lakor in order, or use the contents below to quickly jump to a video or technique. Quick Jump to: Video: How to Paint Be’Lakor Face and Horns Part OnePaints and MaterialsStep by Step GuideVideo: Be’Lakor Face and Horns Part TwoPaints and MaterialsStep by Step GuideVideo: How to Paint Be’lakor Chest and Chaos StarPaints and MaterialsStep-by-Step GuideVideo: How to Paint Be’lakor AbdominalsPaints and MaterialsStep-by-Step Guide on How to Paint Be’lakor Abdominals Video Tutorial: How to Paint Be’lakor Armour NMMPaints and MaterialsStep-by-Step: How to Paint Be’lakor Armour NMMVideo Tutorial: How to Paint Be’lakor LoinclothPaints and MaterialsStep-by-Step Guide Video: How to Paint Be’Lakor Face and Horns Part One All videos are recorded in HD 1080p or higher – use full screen for the full effect and let the video load completely. You can also click the little “cog” and change the speed of the video, if I am going too fast (or slow!). Paints and Materials Games Workshop: Pink Horror (mixed with black and white), Balor Brown, Morghast Bone, Ushabti Bone, Screaming Skull, Mephiston Red, Wild Rider Red (Yriel Yellow for eye dot) Vallejo: Black (and black is fine) P3: Morrow White (any white is fine) Step by Step Guide 1. Priming: Start with a black-primed model. (The first and greatest of the Daemon Princes) 2. Skin Base and Highlights: Mix Vallejo Black with a small amount of Games Workshop’s Pink Horror for the base skin colour. Gradually add more Pink Horror to the mix, creating several shades up to a majority of Pink Horror. For lighter shades, mix Pink Horror with P3’s Morrow White (or any white). Start with a small amount of white, increasing up to about 50/50 or more for the brightest highlights. Note: Avoid using Pink Horror alone, as it can become overly saturated. 3. Lighting and Shadowing: Ensure the model is painted evenly, focusing on high-quality shadow and light contrast. Paint the details on both the lit and shadow sides, maintaining visible details throughout. 4. Textured Skin Effect: Create texture on the skin, simulating muscle grain. Use bodybuilder images for reference, and exaggerate for effect. Apply this texture across the entire body. 5. Horns: Initially paint the horns uniformly, and later apply glazing for shadowed areas. Use a stippling method for texture. Start with Balor Brown for the base of the horns. Highlight the horns progressively using Morghast Bone, Ushabti Bone, and Screaming Skull, leading up to white for the brightest points. 6. Eyes: Paint the eyes starting with Mephiston Red, followed by Wild Rider Red. Highlight with Balor Brown, and for the brightest points, use Yriel Yellow for a glowing effect. Correct any mistakes by repainting the area with black, then reapplying the colours as needed. 7. Teeth: Paint the teeth using the same colors as the horns, ensuring they appear distinct from the bony parts of the model. 8. Final Touches and Glazing: Use glazing to soften the overall texture and colours on the horns. Mechanical Standard Grey from Games Workshop or Vallejo Neutral Grey can be used for this purpose. Remember, the key to this paint job is to build up layers gradually and focus on creating contrast and texture. Video: Be’Lakor Face and Horns Part Two All videos are recorded in HD 1080p or higher – use full screen for the full effect and let the video load completely. You can also click the little “cog” and change the speed of the video, if I am going too fast (or slow!). Paints and Materials Games Workshop: Pink Horror (mixed with black and white), Balor Brown, Morghast Bone, Ushabti Bone, Screaming Skull, Mephiston Red, Wild Rider Red (Yriel Yellow for eye dot) Vallejo: Black (and black is fine) P3: Morrow White (any white is fine) Step by Step Guide 1. Texturising the Horns: Begin with Balor Brown from Games Workshop to create a base layer of texture. Apply vertical strokes across the horns, but avoid being overly precise. Focus on the area where the horns intersect, creating an overlap of lines. This not only makes the area more interesting but also serves as a natural highlight, accentuating the joint. 2. Highlighting Techniques: Utilise Ushabti Bone for the initial highlights. For a gradual transition, you might consider starting with Morghast Bone and then refining with Ushabti Bone. However, given that subsequent glazing will soften these transitions, a stark contrast is not paramount. 3. Get Glazing: Employ a glazing method using diluted Mournfang Brown, Rhinox Hide, and Vallejo Black (or alternatively Abaddon Black from Games Workshop). Begin with Mournfang Brown, applied lightly over the textures. Start from the horn tips and work downwards, ensuring the glaze remains semi-transparent and does not obscure the underlying textures. Progress to Rhinox Hide, but don’t cover the Mournfang Brown entirely. Aim for a gradient effect. Culminate with black, focusing predominantly on the horn tips to create a striking contrast. 4. Finalising the Highlights: Apply the concluding highlights on the horn tips using the same colour palette (Balor Brown, Ushabti Bone, and possibly Morghast Bone). Exercise caution with these transitions to maintain a natural appearance. 5. Painting the Horn Rings: For the rings, opt for Neutral Grey, Pale Grey Blue, and white, aiming for a non-metallic, desaturated effect. Start with Neutral Grey to outline the highlights, ensuring a ridge is painted down the middle of the rings. Add secondary highlights with Pale Grey Blue, defining the ring’s contours. For maximum contrast, apply white highlights in a small blob or dot to simulate a reflective glare. 6. The Finishing Touches: Use a larger brush for broader coverage but be careful to prevent obscuring the hard-earned details. Reapply glazes as necessary, taking care not to excessively diminish the textures. Strive for smooth transitions and ensure the highlights match the rest of the model. Video: How to Paint Be’lakor Chest and Chaos Star All videos are recorded in HD 1080p or higher – use full screen for the full effect and let the video load completely. You can also click the little “cog” and change the speed of the video, if I am going too fast (or slow!). Paints and Materials Games Workshop: Pink Horror, Mephiston Red, Evil Sunz Scarlet, Trollslayer Orange, Yriel YellowVallejo: Black P3: Morrow White Step-by-Step Guide 1. Preparing the Palette: Begin with a wet palette containing a range of colours primarily based around Pink Horror, mixed with either black or white. Avoid using pure Pink Horror to prevent excessive saturation. Having a variety of mixes allows for smoother transitions between shades. 2. Establishing the Base: Start by blocking in highlight points on the chest. It’s important to consider the model’s orientation – ensure the body is slightly turned left, aligning with the head’s direction, to correctly place highlights. 3. Focusing on the Golden Angle: Paint with a focus on the model’s ‘golden angle’, the most aesthetically pleasing view, but ensure all angles are addressed, especially for competition entries like Golden Demon. 4. Using Bodybuilder References: Employ references of bodybuilders to understand muscle structure and highlight placement. This will aid in achieving realistic light volumes and muscle definition. 5. Adding Muscle Textures: Begin texturing the muscles, especially on the chest, with long, simple lines that will later be turned into muscle striations. Adjust the texture’s visibility based on the muscle’s exposure to light. 6. Preparing the Chaos Star: If desired, apply a base layer of Mephiston Red to the Chaos star before detailing the chest, as this might affect the surrounding areas. 7. Detailing the Chest: Continue refining the chest, enhancing the muscle textures and striations. Use lighter paint for visible lines and ensure the chest is brighter than other body parts to draw focus. 8. Painting the Chaos Star: Start with a base of Mephiston Red, followed by layers of Evil Sunz Scarlet and Trollslayer Orange, each layer being more focused towards the centre of the star for an Object Source Lighting (OSL) effect. Finish with a central dot of Yriel Yellow, mixed with a bit of white, for the brightest point. 9. Applying OSL Effect: Add a glow effect around the Chaos star, using red shades to highlight edges of the pectoral muscles closest to the star. The glow should decrease in intensity further from the star. 10. Final Adjustments: Revisit the chest and Chaos star for final tweaks. This includes refining edge highlights and adjusting the balance between the red glow of the star and the natural skin highlights. Video: How to Paint Be’lakor Abdominals All videos are recorded in HD 1080p or higher – use full screen for the full effect and let the video load completely. You can also click the little “cog” and change the speed of the video, if I am going too fast (or slow!). Paints and Materials Games Workshop: Pink Horror Vallejo: Black (Abaddon Black is fine) P3: Morrow White (Any white will do) Step-by-Step Guide on How to Paint Be’lakor Abdominals Initial Colour Mixing: Start by blending your primary colours. Use Games Workshop’s Pink Horror, Vallejo’s Black (Abaddon Black will suffice), and P3’s Morrow White (any white is suitable). Create a range of shades on your palette. Remember, never use pure Pink Horror; always mix it with black or white for varied tones. Base Layers and Texturing: Begin with a dark base. Combine a bit of Pink Horror with Vallejo Black to form your starting dark shade. Apply this mix to the abdominals using a scratchy technique. This stage is about establishing texture and base tones rather than precision. Gradually add more Pink Horror to the mix for lighter tones, ensuring even the lightest shade contains a touch of black. Detailing Muscle Structure: Focus on painting the muscle lines and shapes. Avoid using straight lines; follow the natural muscle flow and curves. Vary the direction and weight of your brushstrokes to replicate muscle striations and textures. Pay special attention to the upper abs and lower sections where muscle groups intersect, adding subtle lines to suggest skin over muscles. Adding Depth with Highlights and Shadows: Progressively lighten your colour mix by incorporating more white into Pink Horror for highlights. Apply highlights consistent with the light source and muscle contours for a natural effect. Use a darker glaze (Pink Horror and black mix) for enhancing shadows, adding depth and contrast. Final Adjustments and Corrections: Use a fine-tip brush for detailed work. Adjust brush pressure to vary line thickness while maintaining precision. If some areas seem too stark or transitions between shades are abrupt, employ glazing techniques. Mix a very light glaze (predominantly water) of your lightest colour and softly apply over highlighted areas to soften. Similarly, darken shadow areas with a darker glaze. Reviewing Your Work: Regularly review your model under a lamp or through a photograph to check for consistency and realism. Make necessary adjustments, ensuring the overall appearance is visually appealing and coherent. Keep in mind that whilst striving for realism, there’s leeway Video Tutorial: How to Paint Be’lakor Armour NMM All videos are recorded in HD 1080p or higher – use full screen for the full effect and let the video load completely. You can also click the little “cog” and change the speed of the video, if I am going too fast (or slow!). Paints and Materials Vallejo: Black, German Grey, Basalt Grey, Neutral Grey, Dark Sea Grey, Pale Grey Blue, Ice Yellow, Japanese Uniform Games Workshop: Mournfang Brown, Corvus Black, XV-88, Dryad Bark P3: Morrow White Step-by-Step: How to Paint Be’lakor Armour NMM Observe and Plan Examine how light reflects on the model’s armour. Use these reflections as a reference for placing highlights to achieve a non-metallic metal (NMM) effect. Prepare Your Palette Set up your palette with the following colours: Vallejo Black, German Grey, Basalt Grey, Neutral Grey, Dark Sea Grey, Pale Grey Blue, Ice Yellow, Japanese Uniform; Games Workshop Mournfang Brown, Corvus Black, XV-88, Dryad Bark; P3 Morrow White. Base Coating Start with the steel plate, applying a base coat of the darker colours like German Grey and Basalt Grey. Adding Texture Use the base colours to add texture to the armour. This includes creating scratchy, chaotic marks that follow the armour’s undulations. This step aims to capture a scuffed NMM effect, reflecting the battle-damaged look of the model. Non-Metallic Gold Trim As you progress, begin working on the gold trim alongside the steel plate. This ensures that the lighting and colouration remain consistent across different armour elements. Highlighting Progressively add lighter shades, like Neutral Grey and Dark Sea Grey, to create a transition from dark to light. Focus on raised areas and edges for highlight placement. Final Highlights Utilise the lightest colours, such as Ice Yellow and Morrow White, for the final highlights. Apply these carefully to the most raised and prominent parts of the armour to create a strong metallic effect. Glazing for Depth Use thin glazes of Corvus Black and Mournfang Brown to deepen the shadows and enrich the colours. Apply these glazes sparingly, focusing on mid-tones and shadows, avoiding the brightest highlights to maintain their intensity. Refining and Detailing Go back over the armour, refining the highlights and ensuring a smooth transition between shades. Add small details like edge highlights and minor scratches for realism. The Golden Trim For the gold trim, start with a base of Dryad Bark, followed by layers of XV-88, Japanese Uniform, and Ice Yellow for highlights. Apply these colours while considering the light source and the sculpted details of the trim. Final Touches As a final step, revisit the brightest highlights and make any necessary adjustments. You can use a fine brush to add small, bright dots of white to simulate reflective points on the armour. Attention to detail and gradual layering are key to achieving the desired NMM Video Tutorial: How to Paint Be’lakor Loincloth All videos are recorded in HD 1080p or higher – use full screen for the full effect and let the video load completely. You can also click the little “cog” and change the speed of the video, if I am going too fast (or slow!). Paints and Materials Games Workshop: Rhinox Hide, Bugman’s Glow, Mournfang Brown, Firedragon Bright, Corvus Black, Balor Brown, Morghast Bone, Vallejo: Neutral Grey, Pale Grey Blue, Basalt Grey, Dark Sea Grey, Black P3: Morrow White Step-by-Step Guide Base Coat: Prime the model in black. Use Games Workshop’s Rhinox Hide to paint the leather-based Be’lakor Loincloth, skulls, and optionally the chains for a rusted look. Ensure to fill in the holes in the chains where the leather shows through. Chain Detailing: For the chains, use Vallejo’s Basil Grey. Apply it gently, almost like dry brushing, to pick up the surface details without clogging the chain links. Aim for a patchy look to represent rust and wear. Leather Texture: Focus on the leather flap under the belly button using Bugman’s Glow from Games Workshop. Apply paint with scuffy, squiggly lines using the brush tip to create a textured look that combines both texture and highlights. The goal is to maintain texture visibility even on highlighted areas. Gradually build up the opacity where needed, using a mix of approximately 50% water to 50% paint. Weathering the Leather: Add weathering using Vallejo’s Basalt Grey, focusing on the edges to depict wear. Enhance the leather’s worn appearance with more faded grey towards the bottom. Adding Colours to Leather on the Be’lakor Loincloth: Introduce Games Workshop’s Mournfang Brown for added richness. Apply it sparingly for a translucent effect. Go back with Bugman’s Glow if needed for further blending or highlighting. Skull Painting: Paint skulls using a base of Balor Brown, focusing on creating texture with stippling and maintaining the balance of light and dark areas. Progressively highlight with Morghast Bone and finally with P3’s Morrow White, focusing on teeth and prominent skull areas. Use Corvus Black for glazing in shadow areas to blend and desaturate colors. Metal Hook Detailing: Paint the hooks using a combination of Neutral Grey, Pale Grey Blue, and White from Vallejo. Focus on creating a worn, dented look with lines and stippling. Ensure to paint the back edges of the hooks to separate them from the chains. Apply final highlights with Morrow White to create a shiny appearance. Rust Effects on Chains and Hooks: Use Mournfang Brown to create rust effects, especially around areas where the skulls and hooks meet the chains. Introduce Fire Dragon Bright for brighter, more saturated rust spots. Apply it with stippling for a subtle effect. Highlight chains using Pale Grey Blue followed by small dots of White for metallic shine. Final Touches: Review the entire area, making adjustments as needed. Utilize all the colours on your palette to tweak and correct any areas. Ensure that highlights and shadows are consistent with the light source direction and the overall look of the model. Explore more of my latest Character tutorials! If you don’t have an account, please sign up here! The website currently has over 350 video tutorials with steps and tips, plus a selection of PDFs. If you are not sure about joining, you can explore my free videos with a free membership, or take the plunge and become a full subscriber for full access. If you’d prefer to support me on Patreon, please visit: https://www.patreon.com/RichardGray [...]
Lady Annika’s thirst for blood is legendary, even amongst the Soulblight vampires! I really enjoyed painting her and made a few tweaks to the model. Here is a series of videos I created for how to paint Lady Annika, scroll down to explore them in order, or use the contents below to quickly jump to to a part of Lady Annika, The Thirsting Blade! Video: How to Paint Lady Annika Face and HairMaterials Needed for her Face and HairPreparationPainting the SkinPainting the HairFinishing TouchesVideo: How to Paint Lady Annikas Mask of HorrorMaterials NeededBase CoatCreating the Skin TonesRefining DetailsAdding Horror ElementsFinishing TouchesVideo: How to Paint Lady Annikas DressMaterials Needed for Lady Annikas Vampire Red DressStep by Step Guide to Lady Annikas Vampire Red DressVideo: How to Paint Lady Annikas Dress Freehand (First Version)Materials and Tools UsedStep by Step on How to Paint Lady Annikas Dress Freehand (First Version)Painting the Freehand PatternAdjusting the PatternVideo: How to Paint Lady Annika BootsMaterials Needed to Paint Lady Annikas Boots:Step by Step Guide to the BootsVideo: How To Paint A Much Cooler Freehand SkullMaterials NeededStep by Step – How To Paint A Much Cooler Freehand SkullExplore more of my Vampires! Video: How to Paint Lady Annika Face and Hair This is the first video in a series of how to paint Lady Annika.This video looks at painting the face and hair to display level. All videos are recorded in HD 1080p or higher – use full screen for the full effect and let the video load completely. Materials Needed for her Face and Hair Games Workshop Paints: Kislev Flesh, Dark Reaper, Ushabti Bone, Flayed One Flesh, Moot Green, Yriel Yellow Vallejo Paints: Black, Basalt Grey, Dark Sea Grey P3 Paint: Morrow White Fine detail brushes Wet palette Water (for thinning paints) Preparation Prime and Prepare: Prime the whole model and build it, leaving the head separate for easier painting. This approach allows better access to the head, especially around areas obstructed by accessories like masks. Painting the Skin Base Coat with Kislev Flesh: Thin Kislev Flesh with water at a ratio of approximately 2:1 (water:paint). Apply the thinned paint to the head, aiming for a very translucent effect. This will take around 3-4 layers to achieve a good, but not opaque, coverage. Shading: Mix Kislev Flesh with Dark Reaper to create various shades for skin shadows. Start with a small amount of Dark Reaper to slightly darken the Kislev Flesh and incrementally increase the amount of Dark Reaper for deeper shadows. Apply these mixes carefully to areas like under the eyes, around the nose, and under the chin to simulate natural shadows. Adding Depth with Ushabti Bone and Flayed One Flesh: Introduce Ushabti Bone and Flayed One Flesh for highlights and to add depth to the skin. These should also be thinned and applied sparingly to areas that would naturally catch the light. Refining Details: Use pure Dark Reaper to define the eyes and deeper shadows. Then, carefully increase the intensity of highlights and shadows by adding more layers, paying close attention to the light source (coming from the left in this case) to ensure a realistic appearance. Painting the Hair Base with Moot Green: Apply Moot Green as the base colour for the hair. If necessary, mix Moot Green with a little black to adjust the shade. Ensure to cover all strands, aiming for a uniform base layer. Add Highlights and Shadows: Create a gradient effect by mixing Moot Green with white for highlights and pure black for deeper shadows. Apply these mixes strategically to mimic natural hair highlights and to give the impression of volume and movement. Detailing with Fine Strands: Use a fine brush to add delicate strands of hair in lighter green shades towards the tips and darker shades near the roots to simulate depth and texture. Roots Detailing: For an added touch of realism, use Basalt Grey and Dark Sea Grey near the roots to suggest regrowth or a transition of colour. This technique adds complexity and depth to the hair. Finishing Touches Glazing for Smoothness: Once satisfied with the skin and hair, use glazing techniques to smooth out transitions and blend the colours more seamlessly. This step involves thin layers of paint applied over dry areas to subtly adjust tones and shades. Eyes and Teeth: Paint the eyes using Yriel Yellow for the whites and Vallejo Black for the pupils. For the teeth, use Ushabti Bone for a natural look, and carefully define each tooth for clarity. Lips: Paint the lower lip with a mixture of red (e.g., Mephiston Red from Games Workshop) and add highlights with a mix of Shabti Bone and the red base colour to create a natural gradient. Video: How to Paint Lady Annikas Mask of Horror This video shows how to paint the mask (and some of the difficulties I had!) for Lady Annika. Materials Needed Games Workshop Paints: Cadian Fleshtone, Rhinox Hide, Ushabti Bone, Mephiston Red, Dark Reaper (later changed to Corvus Black) Vallejo Paint: Model Color Air White Fine detail brushes Wet palette Water (for thinning paints) Base Coat Prime the Mask: Begin with a black primer to ensure the colours that follow stand out. Apply Cadian Fleshtone: Cover the mask with Cadian Fleshtone. This will likely take three to four coats due to the poor coverage over the black primer. The aim is to achieve a base that resembles a realistic skin tone, though the mask itself is quite small, making this task more challenging. Creating the Skin Tones Mix Shades: Prepare a range of shades on your wet palette by mixing Cadian Fleshtone with varying amounts of white for highlights and Rhinox Hide for shadows. For deeper shadows, use a 50/50 mix of Cadian Fleshtone and Rhinox Hide, and for pure shadow areas, use Rhinox Hide alone. Block in Highlights and Shadows: Considering the light source is from the top left, start blocking in highlights and shadows to define the mask’s features. This initial stage doesn’t require perfect blending, as the translucent nature of the watered-down paints (approximately two parts water to one part paint) allows for underlying layers to show through, contributing to a more natural look. Refining Details Enhance the Highlights: Use the lighter mixes (Cadian Fleshtone with white and Ushabti Bone with white) to highlight areas like the bridge of the nose, cheekbones, and forehead. These areas may need even more watered-down paint to avoid a chalky texture. Detailing the Eyes and Mouth: With Corvus Black, add definition around the eyes and mouth. Initially, Dark Reaper was used, but Corvus Black provided a more suitable shade for creating a horror effect without being overly saturated. Adding Horror Elements Mascara Tears: Using Corvus Black, paint streaks running down from the eyes to simulate mascara tears, ensuring they thin out towards the bottom. This effect should look distressed and slightly uneven to enhance the horror aesthetic. Red Lips: Paint the lips with Mephiston Red, carefully defining them to stand out against the paler skin tones. The open mouth adds to the mask’s gormless, horrific expression. Finishing Touches Softening and Blending: Go back over the mask to soften any harsh lines or transitions, especially around the streaks and shadowed areas, to ensure a coherent and lifelike (yet horrific) appearance. Detailing and Corrections: If necessary, use the skin tone mixes to correct any mistakes or overly bold lines, particularly around the eyes and eyebrows, to maintain the desired look. Video: How to Paint Lady Annikas Dress These videos show how to paint Lady Annikas dress, from the distinctive vivid reds to the freehand pattern on her skirts. I decided I didn’t like the freehand after all and changed it to something else (that video is a little further down!) Materials Needed for Lady Annikas Vampire Red Dress Games Workshop Paints: Mephiston Red, Evil Sunz Scarlet Vallejo Paint: Model Color Black (or any black paint you prefer) Fine detail brushes Wet palette Water for thinning paints Step by Step Guide to Lady Annikas Vampire Red Dress Create a Gradient of Reds: On your wet palette, start with pure Mephiston Red. Then create four additional shades by progressively adding Vallejo Model Color Black to Mephiston Red. You should have a range from pure Mephiston Red to a dark, almost brownish red. The exact proportions aren’t crucial, but aim for a gradual transition from light to dark across the five mixes. Apply a Dark Red Base: Select one of the darker red mixes (close to a 50/50 mix of Mephiston Red and black) and cover the entire dress. This base layer sets a foundation for building up the red tones and ensures that the shadows aren’t too stark or black. Begin with Mid-tones: Starting with the second or third darkest shade, begin to layer up the colour, focusing on areas that would naturally catch the light. Keep your paints thinned (approximately 1.5 parts water to 1 part paint) to ensure smooth transitions. Add Highlights: Gradually work your way up through the shades, ending with pure Mephiston Red for the brightest highlights. Focus these on the highest points of the dress, where light would naturally hit the most. This includes the tops of folds and the hip area. Smooth Out Transitions: Unlike non-metallic metal (NMM) techniques, which require stark contrasts, velvet demands soft, gradual transitions. Achieve this by applying multiple thin layers, allowing each to dry before applying the next. This method ensures a soft, velvety texture. Bright Highlights: To add vibrancy, sparingly apply Evil Sunz Scarlet to the very highest points and sharpest creases of the dress. Be cautious with this bright, slightly orange shade, as overuse can detract from the deep red velvet effect. Focus on areas like creases on the arm and the upper parts of the dress. Detailing: Use the darker red mixes to deepen shadows or adjust transitions where necessary. If you’ve already painted adjacent areas (such as hands or accessories), be extra cautious to avoid splattering these with red. Modifying Your Brush: For fine detail work, consider customising your brush by trimming it to create a longer, thinner tip. This can provide more control for painting fine details and maintaining thin, even coats. Video: How to Paint Lady Annikas Dress Freehand (First Version) This is the first version of the skirt freehand I did for Lady Annika. Although this attempt was ultimately not to my liking, so I started afresh, the process and techniques described here may be useful for anyone looking to add intricate details to miniature models. This step-by-step guide incorporates a gothic vine pattern. Materials and Tools Used Paints: Vallejo German Grey, Neutral Grey, Black, and Dark Sea Grey; Games Workshop Corvus Black, Pelgrave Blue, and Blue Horror. Brushes: Fine detail brushes suitable for precise freehand work. Palette: A wet palette to keep your paints workable. Water: For thinning your paints. Step by Step on How to Paint Lady Annikas Dress Freehand (First Version) Basecoat the Dress: Begin with a black primer as a solid foundation for your paints. This tutorial focuses on the inner dress section or skirt of Lady Annika. Block in Highlights and Shadows: Use a mix of German Grey and Neutral Grey to block in the highlights on the dress, focusing on areas that would naturally catch the light. Add shadows with a blend of Neutral Grey and Black to create depth. This foundational work is crucial for the subsequent freehand pattern. Painting the Freehand Pattern Sketch the Pattern: Start by roughly sketching the pattern using a light grey, such as Dark Sea Grey. This initial sketch doesn’t have to be perfect; it serves as a guideline for your detailed work later. Refine the Pattern: Once the basic pattern is laid out, begin refining the lines, making them thinner and more precise. This step requires patience and a steady hand. Use the original sketch as a guide but allow for adjustments as needed to achieve a more intricate design. Add Details: Incorporate additional elements such as leaves or vines into the pattern to enhance its complexity and appeal. These details should complement the overall design and follow the flow of the fabric. Adjusting the Pattern Correcting Mistakes: Use the base colours (German Grey and Neutral Grey mixed with Black) to correct any errors or to sharpen the pattern. This “erasing” technique allows for adjustments and improvements to the pattern’s clarity and coherence. Glazing for Depth: Apply glazes of Blue Horror and Corvus Black to integrate the pattern with the underlying highlights and shadows. These glazes help the pattern adhere to the fabric’s contours, making it appear more natural. Evaluate and Adjust: Step back and assess your work. Make any final adjustments to the pattern, highlights, or shadows to ensure a cohesive appearance. The goal is for the pattern to complement the model’s overall aesthetic without overwhelming it. Video: How to Paint Lady Annika Boots How I did her shining leather boots…. Materials Needed to Paint Lady Annikas Boots: Vallejo Paints: Black, Neutral Grey P3 Paint: Morrow White (or any white paint) Wet palette Fine detail brushes (sizes 0 and 00 recommended) Kitchen roll or paper towel Lamp for highlighting guidance Step by Step Guide to the Boots Prepare Your Palette: On your wet palette, mix a variety of greys using Black from Vallejo, Neutral Grey from Vallejo, and P3 Morrow White. The goal is to create a spectrum of grey shades. You can adjust the quantities to get lighter or darker shades as needed. Base Coating: Start with a base coat of Neutral Grey on the boots. You can adjust the shade by mixing in either more black or white to darken or lighten the grey, respectively. This base coat serves as the foundation for building up highlights and shadows. Highlight Mapping: Using a slightly lighter grey, begin mapping out where the highlights on the boots will be. Don’t worry about being too precise; the goal is to identify where light naturally hits the boots. Use a lamp to observe how light interacts with the surface and mimic this on the model. Remember, we aim for a shiny leather look, so some highlights will be exaggerated. Adjusting Highlights: If you over-highlight, it’s fine. You’ll refine these highlights later in the process. The key is to create contrast and depth, making the boots appear shiny. Lady Annika’s slender design means space is limited, so choose your highlight areas wisely, focusing on making them visible from the primary viewing angle. Glazing and Fine Tuning: Once you’re satisfied with the highlight placement, it’s time to blend and smooth out the transitions. This is where the stippling technique comes into play. Dilute your paint with water (around a 50:50 ratio, but adjust as necessary for a finer stipple) and gently apply to the edges of highlights to create a gradual transition. Glaze over the boots with a thin layer of black to enrich the colour and add depth. This will also help to knock back any over-highlighted areas, ensuring they blend seamlessly into the overall finish. Reflective Highlights: For added realism, incorporate some reflective highlights. These should be small and placed strategically to mimic how light reflects off a shiny surface. Use the brightest grey or even white for these highlights but apply them sparingly. Final Adjustments: Review the model under different angles and lighting conditions. You might need to go back and adjust some highlights or shadows to ensure the boots look good from all perspectives. The goal is for the boots to have a high contrast, shiny appearance, indicative of leather. Finishing Touches: As a final step, use glazing to unify all the elements. A thin glaze of black can help to tie together the highlights and shadows, making the transition between them smoother and more natural. This step also adds a satin finish to the boots, enhancing the leather effect. Video: How To Paint A Much Cooler Freehand Skull In one of my previous videos I did a pattern on the dress for Lady Annika, but decided I wanted to change it to something a little bit creepier. Here is how I did the freehand skull design that replaced it! It includes tips on folds and how I did the weathering at the bottom of the cloth. Materials Needed Primer: Black (if you started with a black primer base). Base Paints: Vallejo Black, German Grey, Neutral Grey, Dark Sea Grey. Highlight Paints: 50/50 mix of Neutral Grey and Dark Sea Grey. Weathering Paints: Vallejo Heavy Grey (appears green), Games Workshop Rhinox Hide, Cadian Fleshtone, Monfang Brown. Fine Detail Brushes Wet Palette Reference Image: A realistic skull from a science book (or the Internet!) for accuracy. Step by Step – How To Paint A Much Cooler Freehand Skull Design Sketching: Sketch the skull design lightly on the skirt. Consider the folds and curves of the fabric; your design must follow these contours to look natural. The skull should be positioned considering the fabric’s folds, especially around tricky areas like deep creases or hard lines. Base Painting: Using Vallejo Black as your darkest shade, begin blocking in the skull and its surroundings. Gradually build up the mid-tones using German Grey and Neutral Grey. For highlights, use a 50/50 mix of Neutral Grey and Dark Sea Grey. Keep the contrast lower than other elements (like the boots) to ensure the skirt’s design doesn’t overpower the miniature’s other focal points. Adding Details: Focus on defining the skull’s features, adjusting for the fabric’s folds. Use your mixed greys to paint in the finer details, such as the teeth and eye sockets, considering the underlying fabric’s shape and the skull’s anatomy. For the headdress, spikes, and cobweb details, apply the same grey tones, ensuring they blend seamlessly into the skull. Final Highlights and Shadows: Revisit the highlights and shadows, emphasizing the skull’s curvature and the fabric’s texture. Use the lighter greys to enhance the design’s three-dimensionality, paying special attention to areas that catch the light or recede into shadow. Weathering: Start with Rhinox Hide, diluted significantly with water. Apply it to the lower third of the skirt, building up layers until you achieve a subtle, brown tint. Follow with Monfang Brown for a richer tone, focusing more intensely at the very bottom. This creates a gradient effect, simulating dirt accumulation. Final Touches: Use a mix of the weathering colours to add texture and depth to the weathered area, mimicking the appearance of mud or dust caught in the fabric’s texture. This step enhances the realism of your miniature, grounding it in its environment. Explore more of my Vampires! If you don’t have an account, please sign up here! The website currently has over 350 video tutorials with steps and tips, plus a selection of PDFs. If you are not sure about joining, you can explore my free videos with a free membership, or take the plunge and become a full subscriber for full access. If you’d prefer to support me on Patreon, please visit: https://www.patreon.com/RichardGray [...]
In this guide you will be shown how to paint an Ork Sharksquig (squigosaur) from Warhammer40’000, focusing on the skin, eyes and teeth. Sometimes the PDF will take a few mins to load below – You can also click this link. sharksquig1 The following paints were used:Games Workshop: Warboss Green, Moot Green, Khorne Red, Mephiston Red,Mournfang Brown, XV-88, Balor Brown, Morghast Bone, Screaming Skull, Pink HorrorVallejo: Black, Basalt Grey, Neutral Grey, Dark Sea Grey, Pale Grey BlueP3: Morrow White (Any White will do) More Squig Tutorials! If you don’t have an account, please sign up here! The website currently has over 350 video tutorials with steps and tips, plus a selection of PDFs. If you are not sure about joining, you can explore my free videos with a free membership, or take the plunge and become a full subscriber for full access. If you’d prefer to support me on Patreon, please visit: https://www.patreon.com/RichardGray [...]
In this extensive 26 page guide you will be shown how to paint the Ork Beastboss from Warhammer 40k. The below PDF may take a few mins to load, as it’s a big one! You can also click this link. BeastbossinDesign-1 More PDF Guides! If you don’t have an account, please sign up here! The website currently has over 350 video tutorials with steps and tips, plus a selection of PDFs. If you are not sure about joining, you can explore my free videos with a free membership, or take the plunge and become a full subscriber for full access. If you’d prefer to support me on Patreon, please visit: https://www.patreon.com/RichardGray [...]
These videos shows how to paint an Ork Beastboss to a high level tabletop standard.In them, we are aiming to achieve a rugged, battle-worn look, emphasising strong contrasts and weathered metallics. Quick Jump to: Video – How to Paint an Ork Beastboss : Part OneMaterials NeededStep-by-step Guide on How to Paint the Ork BeastbossVideo – How to Paint an Ork Beastboss : Part TwoPaints UsedStep-by-step Guide on How to Paint the Ork BeastbossPDF GuideFree Video Tutorials There is also a detailed 26 page PDF guide for this model, which can be found here. Video – How to Paint an Ork Beastboss : Part One All videos are recorded in HD 1080p or higher – use full screen for the full effect and let the video load completely. You can also click the little “cog” and change the speed of the video, if I am going too fast (or slow!). Materials Needed Ork Beastboss Miniature Brushes: Various sizes for different techniques Paints (Games Workshop): Mournfang Brown, Contrast Medium, Balor Brown, Trollslayer Orange, Yriel Yellow, Ork Flesh (Contrast), Skeleton Horde (Contrast), Black Templar (Contrast), Blood Angel Red (Contrast), Gryph-Hound Orange (Contrast), Flesh Tearers Red (Contrast), Volupus Pink (Contrast) Vallejo Paints: Dark Sea Grey, Pale Grey Blue, Ice Yellow P3 Paint: Morrow White (or any white will do) Step-by-step Guide on How to Paint the Ork Beastboss Priming and Zenithal Highlighting: Prime the model black and apply a zenithal highlight using Vallejo Pale Grey Blue. This creates natural shadows and highlights, guiding future paint layers. Skin Tones: Paint the Ork’s flesh using a 50/50 mix of Ork Flesh Contrast and Contrast Medium. This enables some of the grey from the zenithal highlighting to show through, providing a guide for later highlights. Fur and Details: Apply Skeleton Horde Contrast directly for fur, ensuring highlights are visible. Use Volupus Pink Contrast for lizard-like skin textures and Blood Angel Red Contrast for the top knot and tassel. Armour and Metallics: Paint areas intended to be bronzy or gold with Gryph-Hound Orange Contrast. This creates a dark orange base over the light grey zenithal highlights. For black areas or parts you want darker, mix Black Templar Contrast with Contrast Medium and apply. Bronze Metallics: Start painting the skeleton head and other bronzy parts. Use scratchy, rough strokes to build up layers, starting from a darker base and gradually adding lighter colours for highlights. Highlight Placement: Follow the guide provided by the zenithal priming for light placement, enhancing it with further highlights where needed. Steel Armor: For a steel-like finish on certain armour parts, use a similar scratchy technique, starting with Vallejo Dark Sea Grey and building up to lighter greys and whites. Weathering and Rust: Add weathering using Mournfang Brown and Trollslayer Orange, focusing on recessed areas, rivets, and parts where rust naturally accumulates. Video – How to Paint an Ork Beastboss : Part Two Paints Used Games Workshop: Mournfang Brown, Contrast Medium, Balor Brown, Trollslayer Orange, Yriel Yellow, Ork Flesh (Contrast), Skeleton Horde (Contrast), Black Templar (Contrast), Blood Angel Red (Contrast), Gryph-Hound Orange (Contrast), Flesh Tearers Red (Contrast), Volupus Pink (Contrast) Vallejo: Dark Sea Grey, Pale Grey Blue, Ice Yellow P3: Morrow White (Any white will do) Step-by-step Guide on How to Paint the Ork Beastboss Picking up from where we left off in the first guide… 1. Sword (Big Chopper) with Rusty Texture Base Layer: Start with Rhinox Hide, using a scribbly and scratchy technique similar to the armour’s style. This creates a dark base for the flat of the blade. If Rhinox Hide is unavailable, mix Mournfang Brown with Black for a close approximation. Stippling Technique: Apply Mournfang Brown with stippling, creating a rusty texture. Remember, the paint can be a bit thicker here to add texture. Additional Rust Effect: Use Trollslayer Orange for more rust detail, focusing on areas like the top hook of the blade. This paint is slightly translucent, so you might need to layer it for a stronger effect. 2. Highlighting the Blade Scratches and Cutting Edge: Use lighter colours like Pale Grey Blue and White to highlight and define scratches and the cutting edge of the blade. This gives a contrasting effect to the rusty areas. Bounce Highlights: Consider adding bounce highlights to reflect the battlefield’s environment, like green reflections for a green terrain. 3. Horns and Fur Base Colours: Use the same colours as the blade for consistency. Start with a mix of Rhinox Hide and Morghast Bone. Highlighting: Gradually lighten the base with pure Morghast Bone and then Screaming Skull, focusing more on the base of the horns and the top of the fur for a natural gradient. 4. The Face Initial Layers: Begin with a base of Warboss Green. You might need several layers due to its translucency. To reduce the shine from contrast paints, apply an ultra-matte varnish partway through the painting process. Detailing: Add more detail than is sculpted, especially around the temple and eyes, to create a more menacing look. Use Warboss Green mixed with Screaming Skull for highlights, making the face a focal point. 5. Teeth and Bone Decorations Base Colour: For teeth and bone-like decorations, start with a base of Balor Brown. Texture Technique: Use a stippling and scratchy technique for texture, similar to the horns and fur. 6. Red Hair Base and Highlights: Start with a base of Evil Sunz Scarlet. For highlighting, mix in a bit of white for a slightly pinkish hue, but be careful not to overdo it. Detailing: Use vertical strokes to highlight, focusing on the strands without overly brightening the recesses. 7. Loin Cloth (Lizard Skin) Base Layer: Use Xereus Purple over a base that was previously primed and given a coat of Volupus Pink. Highlighting: Highlight selectively, focusing on larger scales and facets. Use lighter shades of purple mixed with white for the highlights, but remember to keep the overall area dark for contrast. 8. Verdigris Effect on Bronze Areas Base Colour: Apply Sotek Green, watered down for a flowing effect into recesses. Layering: Add white to Sotek Green for progressive highlights, focusing on the darker areas and avoiding the brightest highlights to maintain the metallic sheen. 9. Back to the Face Detailed Texturing: Add more detailed textures to the face using the lighter green mixture, emphasizing areas where light hits directly. Balancing Highlights: Alternate between highlighting and shading to balance the contrast and maintain the focus on the face. 10. Finishing the Eyes Initial Layers: Start with a base of Pearl Grey Blue, then define the iris with Sotek Green. Highlighting: Use lighter shades of blue for the lower parts of the eyes. For the final highlights, map out the placement with the first highlight blue, focusing on the top left to represent the light source. 11. Final Touches Teeth and Tongue: Paint teeth in Balor Brown and adjust the tongue if needed. Bone Decorations: Add final touches to bone decorations, ensuring they stand out against the hair. Red Hair: Refine the highlights and ensure they blend well with the base colour. And there you have it, your Ork Beastboss is now ready for battle, boasting a range of textures and colours, all contributing to its fierce and battle-worn appearance. For more detailed instruction, check out the PDF Guide! PDF Guide I have also created a detailed 26 page PDF guide on painting this model, that can be found here for full website members: How to Paint an Ork Beastboss – PDF Free Video Tutorials Free videos for logged in members – just sign up as a ‘friend’ to view and click any of the thumbs.To explore all of these, visit this page! If you don’t have an account, please sign up here! The website currently has over 350 video tutorials, plus step by step guides and PDFs. You can explore more free videos with a free “freebies” membership, or take the plunge and become a full subscriber for full access. If you’d prefer to support me on Patreon, please visit: https://www.patreon.com/RichardGray [...]
This video shows the whole process of how to paint a Grimdark Imperial Fist for Warhammer 40,000, plus a step by step text guide. Tool and Paints The following paints were used: Games Workshop: Mephiston Red, Wild Rider Red, Cadian Fleshtone, Ushabti Bone, Yriel Yellow, Sotek Green, Balor Brown, XV-88 Vallejo: Neutral Grey, Ice Yellow, Black, (Metal Colour Magnesium) P3: Morrow White (Any brand of white is fine) Scale 75: Dwarven Gold, Neco Gold Winsor & Newton: Oil Colour: Burnt Sienna, Black, Sansodoor solvent Step by Step Guide : How to Paint a Grimdark Imperial Fist Step 1: Base Coating with XV-88 Start with a model primed in black and assembled (except for head and backpack). Use XV88 paint directly from the pot and scrunch it onto a piece of paper towel. Stipple the paint onto the model with a large brush to cover all armour panels. Stab the marine harshly with the stippling brush to create texture. Don’t worry about getting paint on other parts; focus on covering armour panels thoroughly. Step 2: Adding Baylor Brown Highlights Switch to a smaller brush for precision. Use Balor Brown paint and continue stippling, focusing on areas with prominent curves (shoulder pads, backpack, head). Highlight the model by emphasizing the curves for a top-down lighting effect. Step 3: Airbrushing with Yriel Yellow and Ice Yellow Thin Yriel Yellow paint with airbrush thinner in a wet palette. Apply a thin coat with an airbrush, blending and smoothing the texture. Use Ice Yellow with the airbrush to highlight specific metal areas (gun, joints, recesses). Step 4: Red Trim with Mephiston Red Paint the trim on the marine in red using Mephiston Red paint. Avoid painting directly from the pot; thin the paint with water to achieve the right consistency. Focus on essential highlights rather than painting every edge. Step 5: Final Highlights and Stippling Use worn-out brushes for final highlights, adding details to areas with texture or leftover stippling. Stipple lightly to blend and enhance highlights. Step 6: Weathering with Sotek Green and Verdigris Apply Sotek Green for verdigris weathering on the chest piece. Water down the paint and run it into recesses for a weathered effect. Step 7: Apply Decals and Micro Set Glue the head on to avoid wobbly head issues. Apply decals using Micro Set for adhesion. Skip Micro Sol; Micro Set alone is sufficient for shaping decals. Step 8: Oil Wash with Agrax Earthshade Thin Agrax Earthshade with some Sansodor to create a wash. Apply the wash generously over the model, allowing it to settle in recesses. Wipe off excess if needed. Step 9: Final Touches and Stippling Stipple over highlights again to clean up and enhance contrast. Use Metal Colour Magnesium paint on lower areas (shin, foot) for a dirty, textured effect. Focus on making the knee pad stand out and eliminating unwanted highlights. Step 10: Eyes and Final Details Paint eyes with a mix of Sotek Green and Metal Colour Magnesium for a glowing effect. Add final details as needed, keeping the overall grimy and weathered appearance. Free Video Tutorials More free videos for logged in members – just sign up as a ‘friend’ to view and click any of the thumbs.To explore all of these, visit this page! If you don’t have an account, please sign up here! The website currently has over 350 video tutorials, plus step by step guides and PDFs. You can explore more free videos with a free “freebies” membership, or take the plunge and become a full subscriber for full access. If you’d prefer to support me on Patreon, please visit: https://www.patreon.com/RichardGray [...]
Here are all of my tutorials so far on how to paint Mephiston, from basic assembly and removing mould lines and filling gaps, to detailed instruction on his painting itself with freehand, NMM and more. Scroll to watch all of the videos in order, or quickly jump to a part of the model or technique by clicking on the below: Video Tutorial : Build and Convert Mephiston Without Mould Lines or Gaps!Video Tutorial: How to Paint Mephiston – Part OnePaints and MaterialsStep by Step GuideVideo Tutorial: How to Paint Mephiston – Part TwoPaints and MaterialsSteps on How to Paint MephistonVideo Tutorial: How to Paint Mephiston’s Head to Display StandardPaints and Materials NeededStep by Step GuideVideo Tutorial: How to paint a Sword in NMM (plus lightning)Paints and MaterialsStep by Step GuideVideo Tutorial: How to paint Filigree (fancy details)Paints and MaterialsStep-by-Step GuideVideo: How to Paint Blood Phials on MephistonPaints and MaterialsStep-by-Step Guide Video Tutorial : Build and Convert Mephiston Without Mould Lines or Gaps! This video shows you how to build and convert Mephiston of the Blood Angels and end up with a result that has no mould lines or gaps. The following tools were used in the video:Tamiya Extra Thin Cement RevellContacta Plus GlueGreenstuff 2 Part Yellow and Blue epoxyScalpelClippers (I used Tamiya 300074123 – Diagonal Cutter) Video Tutorial: How to Paint Mephiston – Part One All videos are recorded in HD 1080p or higher – use full screen for the full effect and let the video load completely. Paints and Materials Paints: Mephiston Red, Abaddon Black, Rhinox Hide, XV-88, Balor Brown, Yriel Yellow, Evil Sunz Scarlet, Wild Rider Red (Games Workshop); Ice Yellow (Vallejo); Morrow White (P3) Step by Step Guide Preparation: Ensure your model is primed black and free of mould lines or gaps. Refer to the accompanying video (Build and Convert Mephiston Without Mould Lines or Gaps!) on how to convert and build Mephiston for detailed preparation instructions. Base Layering: Start with a base layer of Mephiston Red, applying the paint in the top right area of each section of the model. This establishes the direction of your primary light source, which is from the top right. Shoulder Pad Painting (Non-Metallic Gold): Begin with XV-88, applying it in a sketchy manner. This approach allows for the creation of texture which can be refined later into smoother transitions or left as-is for a more battle-worn look. Remember to consider the direction of light and how it interacts with different surfaces. For flat surfaces, create random reflections, whereas curved surfaces should have highlights that follow their shape. Highlighting and Detailing: Progress through the colours from XV-88 to Balor Brown and then to Ice Yellow for highlights. Use stippling techniques to apply these highlights, focusing on the brightest points where light would naturally hit. Mix Yriel Yellow with Ice Yellow for warmer gold tones, especially near the edges of the armour. This contrast will be accentuated by a cooler light source on the opposite side. Painting the Red Armour: Apply Mephiston Red as a base, followed by Evil Sunz Scarlet and Wild Rider Red for highlights. Focus on the top right areas to align with the primary light source. Mix Ice Yellow with Wild Rider Red for the highest highlights, ensuring these are applied sparingly to maintain the red tone of the armour. Use Rhinox Hide and Abaddon Black to deepen shadows and refine transitions. Applying Fine Details: For finer details such as ribbing on the armour and small features, use a worn-out size 1 brush for better control. Incorporate small imperfections like scratches and dents for added realism. Utilise stippling with finer brushes (size 00) for more delicate work, especially on small, detailed areas like the golden skull. Adjusting Highlights and Shadows: Revisit areas to adjust the opacity and brightness of highlights. Use P3 Morrow White for the brightest points, ensuring these are opaque for a metallic effect. Enhance the contrast between highlights and mid-tones to achieve a more dynamic look. Final Touches: Add subtle glazes with Yriel Yellow and other colours to enrich the hues while maintaining the integrity of the primary and secondary light sources. Continuously refine and adjust the balance between light and dark, ensuring a coherent and harmonious appearance across the model. Video Tutorial: How to Paint Mephiston – Part Two All videos are recorded in HD 1080p or higher – use full screen for the full effect and let the video load completely. Paints and Materials Paints: Mephiston Red, Abaddon Black, Rhinox Hide, XV-88, Balor Brown, Yriel Yellow, Evil Sunz Scarlet, Wild Rider Red, Cadian Fleshtone, Mournfang Brown (Games Workshop); Ice Yellow, Neutral Grey, Pale Grey Blue (Vallejo); Morrow White (P3) Steps on How to Paint Mephiston Enhancing Chest Armour: Revisit the chest armour, increasing the brightness and size of the highlights. Ensure that the recesses between the ribs are lighter to avoid overly pronounced shine dots. Aim for a balanced sheen between the gold and the cloth elements. Refining Highlights and Shadows: Soften the transitions on the pectoral armour and midsection, avoiding excessively bright highlights that compete with the main shine points. Use a blend of Mephiston Red, Evil Sunz Scarlet, and Wild Rider Red, gradually adding Ice Yellow for the brightest highlights. Skirt Painting: Focus on creating a rich, saturated red tone using Mephiston Red. Apply multiple layers for opacity, ensuring the red stands out against darker areas. For the highest highlights, mix Wild Rider Red with a small amount of Ice Yellow or White. Use a glaze of Mephiston Red to unify the tones and correct any overly orange highlights. Painting the Tubing: For the ribbed tubing, create a more natural metallic look by blending highlights into the recesses rather than highlighting each rib perfectly. Use a mix of Neutral Grey, Pearl Grey Blue, and Morrow White for the right side (light source), and Neutral Grey for the left. Filigree on Skirt: Plan to add non-metallic gold filigree details on the skirt’s trim in a later stage to enhance the model’s detail and coherence. Necklace String: Paint the necklace string with XV-88, creating an angled line pattern to mimic the texture of a rope or string. Highlight with Cadian Fleshtone, blending shadows with XV-88 for depth. Final Adjustments and Preparing for Future Steps: Continually adjust the balance between light and dark areas. Prepare for painting the face and sword in upcoming tutorials, ensuring all elements harmonise in terms of light direction and intensity. Video Tutorial: How to Paint Mephiston’s Head to Display Standard All videos are recorded in HD 1080p or higher – use full screen for the full effect and let the video load completely. Paints and Materials Needed Paints: Cadian Fleshtone, XV-88, Kislev Flesh, Macragge Blue, Calgar Blue, Blue Horror, Abaddon Black, Ushabti Bone, Screaming Skull (Games Workshop); Ice Yellow, Neutral Grey, Pale Grey Blue (Vallejo); Morrow White (P3, or any white) Step by Step Guide Skin Base Layer: Begin by applying a thin base layer of Cadian Fleshtone, using a 2:1 ratio of water to paint. Apply multiple layers to build up colour, focusing on keeping the paint thin to avoid texture build-up on the face. Hair Base Layer: For the hair, use XV-88 with a similar water to paint ratio as the skin. The goal is to lay a foundation for subsequent detailing and highlights. Eye Sockets: Fill in the eye sockets with Cantor Blue. The focus is to cover the whole recess without overspilling onto the lower eyelids. This sets the stage for Mephiston’s glowing blue eyes. Adjusting Flesh Tones: Mix a small amount of Abaddon Black with Cadian Fleshtone to create a darker flesh tone for shading. Apply this carefully, focusing on the left side of the face, which will be in shadow due to planned OSL (Object Source Lighting) effects. Refining Facial Highlights: Apply Kislev Flesh to raised areas of the face. This stage involves working back and forth with different skin tones to create a realistic light effect. Pay particular attention to the nose bridge and avoid highlighting just the tip of the nose. Hair Detailing: Blend Ice Yellow with XV-88 for the hair, focusing on creating transitions and natural looking highlights. Later, adjust the hair colour with grey tones to achieve a more platinum blonde look, differentiating it from the non-metallic gold elsewhere on the model. Facial Details: Use Screaming Skull for teeth, keeping them understated rather than overly bright. Apply white highlights to the blue eyes, making them glow but avoiding an overly bright look. Metal Temple Piece: Paint the metal piece on the temple starting with Neutral Grey and working up to Pale Grey Blue and then white for the brightest highlights. This should mimic the light effect seen on the rest of the model. Final Touches: Apply final highlights and shadows, paying attention to the overall balance of the face. Use photography to assess the progress and make adjustments as needed. Add subtle details like a highlight on the lips and final adjustments to the hair. Video Tutorial: How to paint a Sword in NMM (plus lightning) All videos are recorded in HD 1080p or higher – use full screen for the full effect and let the video load completely. Paints and Materials Paints: Basalt Grey, Neutral Grey, Ice Yellow, Black, Pale Grey Blue (Vallejo), Mournfang Brown, Rhinox Hide, Sotek Green (Games Workshop), Morrow White (P3) Ultra Matte varnish Fine paintbrushes Wet palette Step by Step Guide Primer and Base Layers: Ensure your sword is primed black. Begin by applying Basalt Grey to the sword, using horizontal strokes if the sword is held horizontally. This step forms the base of our NMM effect. Creating Texture and Contrast: Add some texture to your paintwork by creating random reflections on the blade with Basalt Grey. Increase the contrast by adding Ice Yellow for bright highlights. Remember, the Vallejo colours may separate on the palette, so ensure you mix them well before applying. Blending and Highlights: Use a stippling technique for blending. Mix Neutral Grey and Ice Yellow on your brush for an intermediate tone and blend directly on the model. The goal is to create a smooth transition from dark to light, focusing on the edges of the blade. Adding Colour to Transitions: Introduce Pale Grey Blue at the edges of the transitions for colour variation. This step is crucial for adding realism to the NMM effect. Painting the Lightning Effect: Begin with Sotek Green to paint the base of your lightning. Create thin, jagged lines emanating from the blue gems on the sword hilt. Mix in a small amount of Morrow White with Sotek Green for a lighter shade and highlight the lightning bolts, focusing on the forks for a realistic effect. Detailing the Sword Hilt: Paint the hilt in a gold colour (method not covered in this tutorial). Ensure the hilt complements the blade in terms of light direction and colour intensity. Adjusting the Lower Part of the Blade: Paint the lower part of the blade using Mournfang Brown and Rhinox Hide, keeping it darker to contrast with the lightning. This area reflects the ground, so keep the highlights subtle and minimal. Final Touches: Use Black, watered down, for glazing and refining the transitions. This step is crucial for achieving a smooth gradient and realistic metallic effect. Revisit any areas that need more contrast or sharper highlights. The brightest spots should be opaque for a shiny effect. Finishing with Ultra Matte Varnish: Once satisfied with your painting, apply a coat of Ultra Matte varnish to even out the surface and enhance the overall look. Video Tutorial: How to paint Filigree (fancy details) This video shows how to paint filigree (fancy details) on the lower robes of Mephiston. All videos are recorded in HD 1080p or higher – use full screen for the full effect and let the video load completely. Paints and Materials The following paints were used:Games Workshop: XV-88, Mephiston Red, Abaddon Black Vallejo: Ice Yellow Step-by-Step Guide Preparation and Design: Begin by sketching out a filigree pattern on paper to familiarize yourself with the shapes and design. Consider simplifying the design as needed for the scale of the miniature. Initial Painting: Using Games Workshop’s XV-88, start painting the base of the filigree design. Focus on getting the shape right, especially the backward facing ‘S’ shapes, as this forms the main part of your design. Ensure your brush has a clean, sharp tip for precise painting. Adapting the Design: Adjust the design as you paint, especially if certain elements don’t translate well on the miniature. Remember that minor inconsistencies are less noticeable once the entire row is painted. Paint Consistency and Application: Use Mephiston Red from Games Workshop, diluted with water in a 2:1 ratio, for correcting mistakes. Apply the paint by pulling the brush towards you, not pushing, to avoid splaying the bristles and creating uneven lines. Refining the Design: Introduce curves and dots to the design for a more dynamic and finished look. Use the red paint to cut into the filigree and refine its edges, achieving cleaner lines. Painting Details and Highlights: For highlighting, use a mix of Baelor Brown and Vallejo’s Ice Yellow, starting with broader highlights and gradually reducing their size. Highlight all parts of the filigree, regardless of their position in the light, as this enhances the design rather than simulating realistic lighting. Adjusting the Paint Palette: Refresh your paint regularly on the wet palette, especially when working over multiple sessions. Add new paint on top of the slightly dried paint to maintain the desired consistency. Final Touches and Adjustments: Revisit earlier sections of the filigree and make adjustments to ensure consistency across the design. Remember to maintain the filigree design across the folds of the skirt, adapting as necessary to fit the miniature’s contours. Closing Tips: Take your time with the first section to establish the pattern and technique. Continually refine your approach as you progress, making adjustments for better results. Video: How to Paint Blood Phials on Mephiston All videos are recorded in HD 1080p or higher – use full screen for the full effect and let the video load completely. Paints and Materials Paints: Sotek Green, Evil Sunz Scarlet, Mournfang Brown, Cadian Fleshtone, Rhinox Hide (Games Workshop); Neutral Grey, White, Pale Grey Blue (Vallejo) Fine paintbrushes – I use the Artist Opus range, but any high-quality paintbrush is recommended. Step-by-Step Guide Preparation: Start by blocking in the leather strip with Rhinox Hide. This step is crucial as it prevents messing up the details of the syringes and vials later. How to Paint the Blood Phials: Use Evil Sunz Scarlet to paint the blood. This brighter red contrasts well with the rest of the model and helps the blood stand out. Mimic the angle and motion of the vial in your painting. This adds realism to the blood’s appearance inside the vial. Mix Abaddon Black with Evil Sunz Scarlet for the top half of the vial to create a sense of translucency. Don’t worry about perfection here as the upcoming highlights will cover much of this area. Non-Metallic Steel Effect: Begin with Neutral Grey for a steel effect on the syringes. Paint rough, random shapes to replicate metallic reflections. Mix Neutral Grey, Pearl Grey Blue, and White for highlights, ensuring to match the style of the armour’s highlights. Highlight Consistency: Pay attention to the direction of light when applying highlights. Ensure they are consistent across the model. Use Model Color Black to tidy any overpainting. OSL Reflections: Use Sotek Green for OSL reflections on the left side of the vials, creating a blue-green effect. Start from the top right and move downwards, letting the paint naturally form a highlight at the bottom. Mix a bit of white with Sotek Green for increased brightness on the rounded bases. Detailing the Syringes: Syringes are easier due to their identifiable shapes. Use the same NMM technique as before, but pay extra attention to the direction of the light source. Add bounce highlights using Evil Sunz Scarlet to mimic the reflection from the surrounding environment. Needle Painting: The needles require precision. Use a very fine brush, like an Artist Opus size 00, to achieve sharp, thin highlights. Apply primary highlights and then add bounce highlights in red (for the cloth reflection) and Sotek Green (for OSL). Leather Strap Painting: Start with Mournfang Brown directly onto the wet palette. Apply the paint in varying intensities to create a weathered look. Add Cadian Fleshtone for brighter highlights, using scratchy marks for texture. Use Sotek Green for OSL effects on the leather strap, subtly altering the brown tones. Finishing Touches: Utilize a diluted mix of Mournfang Brown to soften and add colour to the mid-tones and shadows. Ensure all highlights and shadows are consistent and align correctly across the different elements of the model. If you don’t have an account, please sign up here! The website currently has over 350 video tutorials with steps and tips, plus a selection of PDFs. If you are not sure about joining, you can explore my free videos with a free membership, or take the plunge and become a full subscriber for full access. If you’d prefer to support me on Patreon, please visit: https://www.patreon.com/RichardGray [...]

If you don’t have an account, please sign up here! The website currently has over 350 video tutorials with steps and tips, plus a selection of PDFs. If you are not sure about joining, you can explore my free videos with a free “freebies” membership, or take the plunge and become a full subscriber for full access.

how to paint an Alchemite Warforger

If you’d prefer to support me on Patreon, please visit: https://www.patreon.com/RichardGray

Leave a Reply