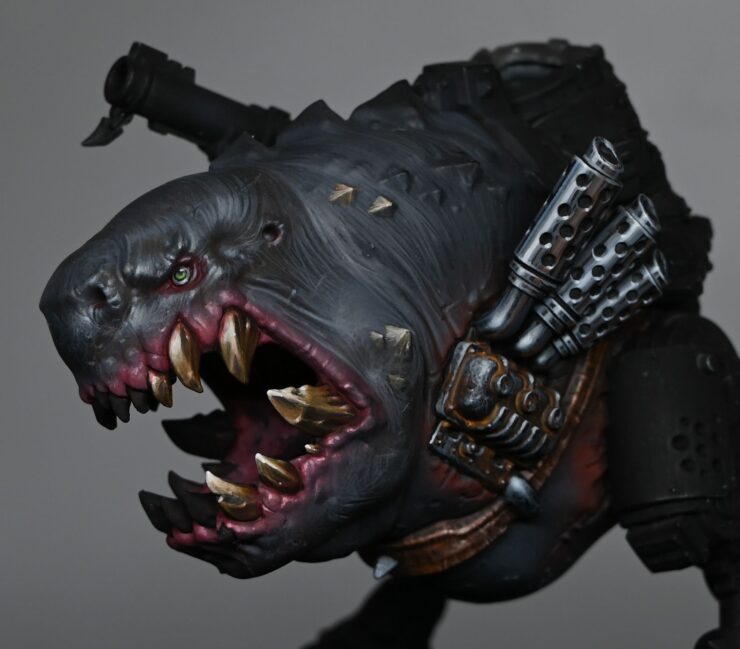
Learn how to paint an Ork Squigosaur (shark squig!) with my selection of tutorial videos, paints and top tips plus a detailed PDF on how I paint.
How to Paint an Ork Squigosaur Skin, Teeth and Eyes
The following paints were used:
Games Workshop: Warboss Green, Moot Green, Khorne Red, Mephiston Red, Mournfang Brown, XV-88, Balor Brown, Morghast Bone, Screaming Skull, Pink Horror
Vallejo: Black, Basalt Grey, Neutral Grey, Dark Sea Grey, Pale Grey Blue
P3: Morrow White (Any White will do)
How to Paint an Ork Squigosaur Tips!
Inside the Mouth: Utilise an airbrush to paint the inside of the mouth for a clean and efficient finish.
Opt for dark grey shades, ensuring subtle highlights.
Adding Spot Colours: Introduce spot colours on the shark squig to break up the desaturated black and grey appearance.
Consider using Dark Sea Grey for added interest.
Matte Varnish: Apply matte varnish to areas with overspray to reduce shine and enhance focus during highlighting.
Choosing Greys: Experiment with greys like Neutral Grey, Black, and Basalt Grey for various effects.
Create your own versions of greys using Black and White if needed.
Texture Marks: Add scratches and texture marks to simulate battle damage and wear on the model.
Follow the shape of organic surfaces for a more natural look.
Squiggly Lines: Create squiggly lines and scratches quickly for a battle-worn effect.
Vary the length and direction of the lines for a more authentic appearance.
Control brush pressure for varying line thickness.
Use a thinner brush for more intricate details.
Glazing: Thin down Basalt Grey for glazing to correct areas that need additional highlights.
Achieve a smooth blend with thin layers of glaze.
Teeth Painting: Paint teeth bone-coloured for high contrast.
Darken the tips of upper row teeth and lighten the tips of the lower row teeth for realism.
Eye Detailing: Paint the eyeball with Dark Sea Grey or similar colours.
Gradually transition from dark to bright greens for a realistic eye effect.
Add a touch of white at the bottom of the eye for a shiny appearance.
Layering and Highlights: Layer highlights on scars and skin texture to add de
How to Paint a Leather Belt
The following paints were used:
Games Workshop: Rhinox Hide, Troll Slayer Orange, Bugman’s Glow, Kislev Flesh, Screaming Skull, Mournfang Brown
Leather Belt Top Tips!
Base Coat: Begin with Rhinox Hide to establish the base colour for the leather belt. Ensure complete coverage, particularly around edges that meet the skin.
Texturing Technique: Utilise an old brush with approximately a third of it trimmed off to create a diminutive dry brush. Load it with Troll Slayer Orange (thick paint) and press it onto the model. This technique produces thick, heavily textured orange marks.
Scratchy Marks with Bugman’s Glow: Employ Bugman’s Glow to form scratchy, vertical marks on the leather belt. Flip the model upside down for better control when applying marks on the upper edges.
Building Texture: Gradually build up the texture with small, controlled marks. Avoid going too heavy, both in terms of the number of marks and the pressure applied with the brush.
Highlighting with Kislev Flesh: Apply Kislev Flesh for highlighting, focusing on worn edges and areas that need more weathering. This adds depth and contrast to the leather.
Refinement with Screaming Skull: The final highlight is done with Screaming Skull for subtle refinements. These highlights add a bit more contrast and make details stand out.
Glazing Technique: Conclude by glazing over the leather belt with thinned Mournfang Brown. This adds a strong colour while maintaining translucency. If you prefer a neater glaze, use a wet palette.
Remember, the key is to be purposefully chaotic with the marks to create unique and interesting textures. Don’t be afraid to experiment and vary your approach for a more dynamic result.
Chrome Exhaust
Games Workshop: Mournfang Brown, Calgar Blue
Vallejo: Black, German Grey, Basalt Grey, Neutral Grey, Dark Sea Grey, Pale Grey Blue
P3: Morrow White
Chrome Top Tips!
Colour Palette: Utilise a wet palette with shades such as neutral grey, basalt grey, dark sea grey, pale grey blue, blue-black, and German grey for achieving the chrome effect.
Incorporate Mournfang Brown to emulate ground reflections.
Primary Highlight: Initiate the process with a substantial primary highlight along the central axis of the exhaust to establish the main chrome effect.
Blend neutral grey and German grey to facilitate a seamless transition between shades.
Random Reflections: Introduce random secondary bounce highlights to imitate reflections on the chrome surface.
Reflect the surroundings, rider, and ground on the chrome, while considering the cylindrical shape.
Golden Angle: Ensure that the primary highlight is discernible from the golden angle of the model, particularly on the face of the shark squig.
Surface Texture: Diversify the texture on distinct surfaces; employ scribbly marks for the engine compartment and controlled lines for the exhaust pipe.
Edge Highlights: Illuminate the edges of the exhaust to impart a heightened reflective quality, as light tends to accentuate edges.
Adding Colour: Infuse Mournfang Brown for ground reflections, creating a nuanced separation from the model’s skin.
Apply Kalgar Blue as a glaze for a touch of colour, ensuring it doesn’t overpower the overall moody aesthetic.
Final Highlights: Gradually layer on highlights using lighter shades such as dark sea grey, pale grey blue, and eventually white for the highest points.
Neatening Up: Dedicate time to refining the chrome effect for a polished finish, especially concentrating on edges and highlight points.
Pay meticulous attention to detail, rectifying any imperfections such as bumps or sprue marks.
Optional Enhancements: Contemplate incorporating ice yellow for a sunlit effect, if desired.
Experiment with alternative colours for reflections, keeping in mind the overall mood and theme of the model.
How to Paint an Ork Squigosaur Skin, Teeth and Eyes – PDF
In this guide you will be shown how to paint an Ork Sharksquig (squigosaur) from Warhammer
40,000, focusing on the skin, eyes and teeth.
If you don’t have an account here on my website, please sign up here! I have over 350 video tutorials with steps and tips, plus a selection of PDFs. If you are not sure about joining, you can explore my free videos with a free membership, or take the plunge and become a full subscriber for full access.
If you’d prefer to support me on Patreon, please visit: https://www.patreon.com/RichardGray


