


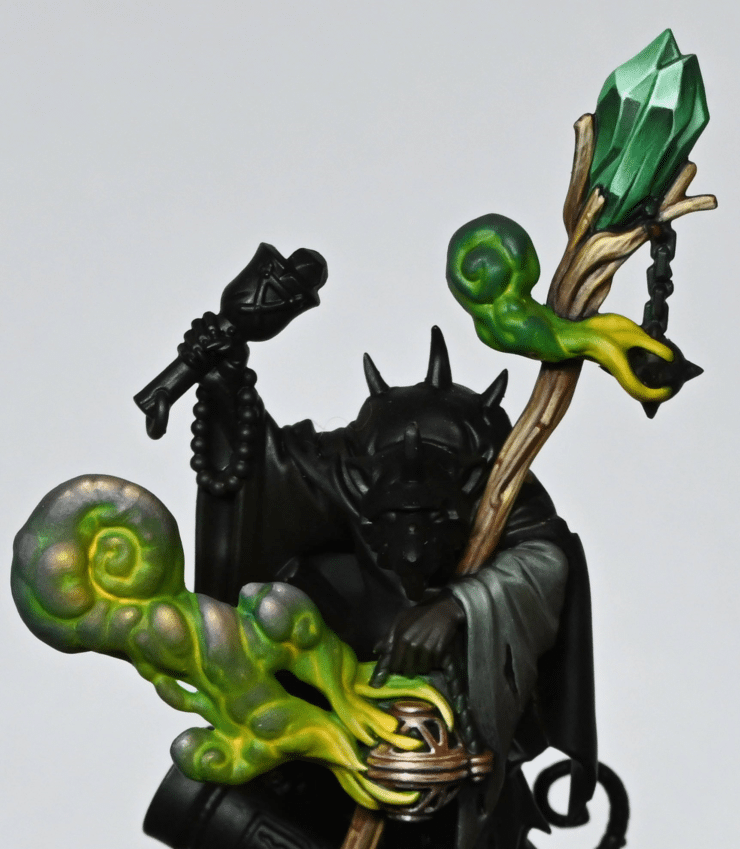
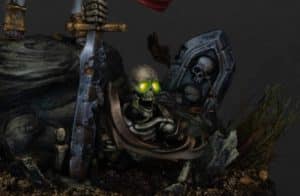
Two videos on how to paint the Skaven Plague Monk. In these videos, we explore the Warpstone Rock on his staff, the wooden staff, plague smoke and his robe.
How to Paint a Skaven Plague Monk: Warpstone Rock, Staff and Robe
You’ll Need:
- Skaven Plague Monk miniature
- Wet Palette
- A fine selection of brushes, including a size 2 Artist Opus M brush
- Paints: Games Workshop’s Warpstone Glow, Death Korps Drab, Mournfang Brown, Balor Brown, Vallejo’s Ice Yellow and Black, P3’s Morrow White
How to Paint a Skaven Plague Monk – Step by Step Guide:
- Basecoat the Staff: Start by basecoating the staff with Mournfang Brown. Remember, it doesn’t have to be immaculate at this stage. It’s all about getting a good foundation.
- Warpstone Glow: Mix Warpstone Glow with a tiny bit of black – a little goes a long way. On your wet palette, create a gradient from this dark mix to pure Warpstone Glow, adding white progressively for the highlights.
- Painting the Warpstone: Begin with the darkest green mix, working up to the lighter mixes. Focus on achieving a shiny look at the top of the warpstone. Remember, you’re going for a mix of realistic and high-contrast lighting here. The key is to make sure the top is bright and shiny, which will give most of the warpstone its luminous character.
- Detailing the Warpstone: Use a size 2 brush for broader strokes, switching to a size 00 for finer details and edges. Your goal is to create a balance of light and dark, enhancing the natural shine of the warpstone.
- Wood Grain on the Staff: Now, layer up with XV-88 followed by Balor Brown, adding Ice Yellow for highlights. Use thin, scratchy strokes to mimic wood grain, focusing on the natural textures and adding additional lines for detail. Don’t forget to leave the recesses dark for contrast.
- Robe Sleeve: Base the sleeve with Death Korps Drab. As with the staff, build up the texture with scratchy strokes, lightening the colour with Ice Yellow as you highlight. Follow the natural lighting, but don’t be afraid to exaggerate the brightness for a bit of artistic flair.
- Final Touches: Once satisfied with the staff and sleeve, revisit any areas that need more saturation or sharper contrasts. Glazing with the base colours can help reintegrate the original hues if they’ve been overpowered by the highlights
How to Paint a Skaven Plague Monk: Plague Smoke
You’ll also see a few of the difficulties I had while painting it! The rest of the model should be pretty smooth sailing.
You’ll Need:
- Skaven Plague Monk miniature
- A selection of brushes, including a size 2 for broader strokes
- Paints: Games Workshop’s Moot Green, Yriel Yellow, Xereus Purple; P3’s Iosen Green (Warpstone Green is a suitable alternative), Morrow White; Vallejo’s Ice Yellow, and Airbrush Thinner
The Painting Process:
- Basecoat with Iosen Green: Start with a basecoat of Iosen Green. You might need a few coats to get solid coverage. For a faster application, you can use an airbrush.
- Mix Your Colours: On your palette, mix various shades. You’ll need pure Iosen Green, Iosen Green mixed with Moot Green, pure Moot Green, Iosen Green mixed with Xereus Purple, more Xereus Purple, and straight Xereus Purple. Additionally, mix Uriel Yellow, Ice Yellow, and Morrow White for later stages.
- Inverted Painting Technique: Since we’re aiming for a glowing effect, paint the recesses lighter and the raised areas darker. This inverted approach can be tricky, so patience is key. Use the mixed greens and purples to create this effect, gradually transitioning from lighter to darker shades as you move outwards.
- Highlighting and Blending: Highlight the raised areas using lighter greens and eventually Xereus Purple for the outermost areas. This creates a high-contrast look, making the smoke appear as if it’s glowing from within. Remember, smoother transitions are crucial for a realistic effect.
- Stippling for Texture: If you fancy a textured look, use stippling. This method adds a softly textured effect, enhancing the ethereal quality of the smoke.
- Finishing with Airbrush Glazing: Once you’re happy with your hand-painted transitions, use an airbrush to apply a thin glaze of Uriel Yellow. This unifies the entire smoke area, softening transitions and giving a final luminous quality. Be careful with the airbrush; you want a subtle effect, not an overpowering one.
- Refining and Adjusting: Go back and refine areas as necessary. Add more green or purple where needed, and use the glazing technique to adjust the overall tone and smoothness. Your aim is a cohesive, glowing effect that still retains some of the hand-painted character.
Remember, the process of painting smoke, especially to create a glowing effect, can be iterative and might require several adjustments to get it just right. Take your time, and don’t be afraid to go back and tweak areas that don’t quite match your vision. Good luck, and enjoy bringing this smoky effect to life!
Explore my latest video tutorials
If you don’t have an account and can’t see the videos, please sign up here! The website currently has over 350 video tutorials with steps and tips, plus a selection of PDFs. If you are not sure about joining, you can explore my free videos with a free “freebies” membership, or take the plunge and become a full subscriber for full access.


If you’d prefer to support me on Patreon, please visit: https://www.patreon.com/RichardGray