


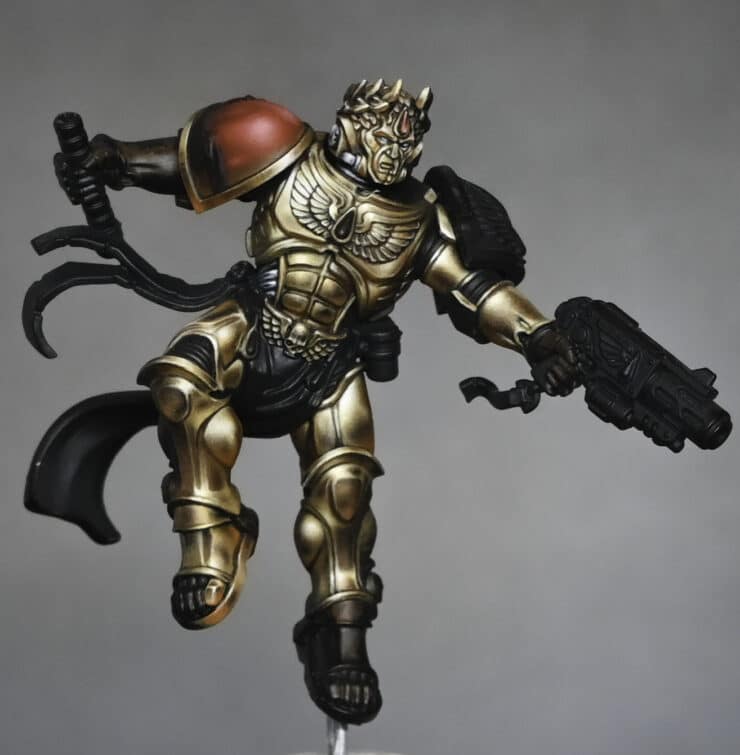
A series looking at how to paint Commander Dante, which was sent to me for early review purposes by Games Workshop. The model is being painted to a high standard and will be covered in large amounts of NMM (Non Metallic Metal)
Quick Jump To:
Materials and Paints Needed for the NMM
- Fine Detail Brushes: Essential for precise work on NMM effects.
- Black Primer: To create a solid base for your colours.
- Palette: For mixing your paints and achieving the right consistency.
Paints:
- Base and Mid-Tones: Mournfang Brown, XV-88, Balor Brown (Games Workshop)
- Highlights: Ice Yellow (Vallejo; you can substitute with Dorn Yellow from GW), Troll Slayer Orange, Flash Gitz Yellow (Games Workshop)
- Shadows and Deep Recesses: Rhinox Hide (Games Workshop)
- Final Highlights and Sharp Details: Morrow White (P3; any high-quality white paint will suffice)
Video – How to Paint Commander Dante NMM: Part One
Video – How to Paint Commander Dante NMM: Part Two
Video – How to Paint Commander Dante NMM: Part Three
Steps and Tips on Commander Dante: NMM
Base Layer
Paint: Mournfang Brown
Application: Apply Mournfang Brown as a base layer over the areas you intend to paint gold. This forms a foundational layer that aids in building depth.
Developing Mid-Tones
Paints: Mournfang Brown, XV-88, Balor Brown
Application: Begin layering XV-88 over the Mournfang Brown base, focusing on raised areas. Then, use Balor Brown to start defining the mid-tones, enhancing the dimensional appearance.
Refining Highlights
Paints: Mix of Balor Brown and Ice Yellow
Application: Create a lighter shade by mixing Balor Brown with a small amount of Ice Yellow. Apply this mixture to the highest points of the highlighted areas, where light naturally catches more intensely.
Enhancing Brightness
Paints: Ice Yellow, Troll Slayer Orange, Flash Gitz Yellow
Application: Gradually add brighter highlights using these colours. Focus on areas where light would hit the strongest, such as edges and prominent features.
Deepening Shadows
Paint: Rhinox Hide
Application: Use Rhinox Hide to deepen the shadows and add contrast. Apply it in recessed areas and where different parts of the model meet, to give more definition and depth.
Final Highlights and Sharp Details
Paint: Morrow White
Application: Apply Morrow White for the brightest highlights and sharp details, accentuating the most raised edges where the light would be most intense.
Glazing and Smoothing
Technique: Glazing
Application: If necessary, use glazing with the lighter colours to smooth out transitions between highlights and mid-tones, ensuring a more natural progression of colour.
Clean Up
Action: Tidy any overspill or mistakes with appropriate base colours. This step is crucial for a neat and professional finish.
Tips for Success:
Consistency is Key: Maintain the right paint consistency. For NMM, a slightly thicker mix can be preferable for vibrant colours, but it should still flow smoothly.
Consider Lighting: Always consider the overall lighting and direction of your model. Your highlights should consistently reflect this light source.
Brush Care: Look after your brushes. Use a separate brush for mixing paints to maintain the fine tips of your detail brushes.
Patience Pays Off: Allow each layer to dry thoroughly before proceeding to the next. NMM is a technique that benefits greatly from patience and careful layering.
Video – NMM Axe (First Version)
Materials Needed
- Paints:
- Games Workshop: Sotek Green, Rhinox Hide, Mournfang Brown, Wazdakka Red
- Vallejo: German Grey, Neutral Grey, Ice Yellow
- P3: Morrow White
- Brushes:
- A variety of sizes including 00 for fine details
- Palette: For mixing colours
- Water pot: For thinning paints and cleaning brushes
Steps
- Initial Blocking In:
- Start by applying a mix of Neutral Grey and Mournfang Brown at the lower part of the axe for the Earth section of SENMM.
- Above that, apply a mix of Sotek Green and Neutral Grey. However, this will be lightened later on for blending purposes.
- Lightening the Blue-Green Mix:
- Mix Ice Yellow with the Sotek Green and Neutral Grey mix to lighten it, allowing for smoother blending with the lighter colours in the middle.
- Painting the Upper and Lower Sections:
- Use various mixes of Neutral Grey and Ice Yellow to create gradients and highlights.
- For the Earthy sections, use Mournfang Brown and Rhinox Hide.
- Creating Specular Highlights:
- Apply Morrow White for the brightest highlights on the most raised edges.
- Be mindful of the light source and the reflective qualities you’re trying to achieve with NMM.
- Adding Lightning Effect:
- Use Wazdakka Red, gradually adding white for the lightning effects.
- Focus on creating dynamic, jagged lines emanating from the power nodes of the axe.
- Glazing and Smoothing:
- Use glazing techniques with lighter colours to smooth out transitions and refine highlights.
- Adjust the consistency of your glazes depending on the humidity and temperature of your painting environment.
- Final Touches:
- Refine the edges and any rough areas.
- If necessary, add more layers to enhance depth and realism.
Tips
- Paint Consistency: Adjust the paint consistency based on your environment. Hotter conditions may require more frequent watering of paints.
- Brush Care: Use a separate brush for mixing paints to preserve the tips of your detail brushes.
- Light Reflection: Constantly refer back to how light naturally interacts with metal surfaces to guide your highlight placement.
- Patience and Layers: Build up your layers gradually and allow each to dry before applying the next.
Video – NMM Axe (Second Version)
This is my second try at the axe NMM, as I wasn’t happy with the first result! You can use whichever you prefer.
Video – How to Paint Dante Axe NMM (V2)
Materials and Paints Used
Paints
- Games Workshop Paints:
- Baharroth Blue
- Rhinox Hide
- Mournfang Brown
- Vallejo Paints:
- Ice Yellow
- Neutral Grey
- German Grey
- Kimera Colours Paint:
- Diarylide Yellow (Note: You can create a similar effect by mixing Yriel Yellow with a small amount of orange)
Materials
- Black Primer: For the initial coat on the axe.
- Wet Palette: For mixing and maintaining paint consistency.
- Fine Detail Brushes: Essential for applying precise highlights and details – I use Artist Opus brushes, but any high-quality fine-detail brush is fine
- Sanding Tools: For modifying and smoothing the cutting edge of the axe.
Preparing the Axe
- Initial Assessment: Note that The Cutting Edge is blunt, almost a millimeter wide.
- Modification: Carefully shave down The Cutting Edge for a more realistic, thin look. Ensure evenness to avoid wonky highlights.
Base Painting
- Primer: Apply a light coat of black primer.
- Base Colours:
- For the flat side of the axe, start with a base of Neutral Grey (Vallejo).
- For The Cutting Edge, use Rhinox Hide (Games Workshop) at the top, blending into Mournfang Brown towards the bottom.
Sky Earth Non-Metallic Metal (NMM) Technique
- Sky Representation: Mix Baharroth Blue (Games Workshop) with Ice Yellow (Vallejo) to create a sky-like gradient on the flat side of the axe. Start darker at the top, gradually lightening towards the bottom.
- Earth Representation: At the bottom of The Cutting Edge, use a mix of Rhinox Hide and Mournfang Brown (Games Workshop) for the earth reflection. Blend Neutral Grey (Vallejo) into this mix for lighter shades towards the bottom.
- Adding Highlights: Gradually add more Ice Yellow (Vallejo) to the Baharroth Blue mix for the sky, and more Mournfang Brown for the earth, to create a sense of depth and reflection.
- Reflection Details: Add subtle warped shapes and lines to mimic trees or mountains in the reflection, enhancing the mirror-like quality.
Refining the Metallic Look
- Glare Effect: Identify the primary light source and add a glare effect on the axe. This will be higher up on the axe blade.
- Shine Spots: Paint independent shine spots to enhance the metallic effect. Use a mix of Neutral Grey and German Grey (Vallejo) for darker areas, and a mix of Ice Yellow and Baharroth Blue for lighter areas.
Edge Highlights and Final Touches
- Edge Highlights: Apply thin highlights along The Cutting Edge and other prominent edges of the axe. Use a mixture of the base colors for a consistent look.
- Lightning Effect (Optional): If desired, add a subtle lightning effect, particularly in darker areas. Use saturated colors with minimal highlights.
- Final Glazing: Use thinned down Ice Yellow (Vallejo) and Diarylide Yellow (Kimera Colors) or a similar mix for warm glazing over the highlights.
- Pure White Highlights: Add small dots of pure white paint at the brightest points of the shine spots for maximum impact.
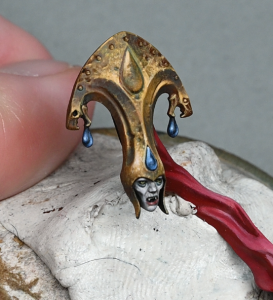
Video – Head, Eyes, Blood Gem
Materials and Paints Needed:
- Fine Detail Brush: Crucial for precision work on small areas like eyes and gems.
- Magnification Tool (Optional): Can be useful for extremely detailed areas.
- Palette: Necessary for mixing and thinning your paints.
- For Gold Tones: XV-88, Balor Brown, Rhinox Hide (Games Workshop)
- Highlights for Gold: Troll Slayer Orange, Ice Yellow (Vallejo)
- Eyes Base Colour: Sotek Green (Games Workshop)
- Eyes and Gem Highlights: Morrow White (P3)
- Blood Gem: Mephiston Red, Wild Rider Red (Games Workshop)
Steps for Commander Dantes Head and Details
Refining the Gold: Enhance the gold’s depth by adding more orange reflections, especially on the cheeks and ear muffs. This technique replicates the way gold reflects on gold, creating an orange hue.
Eyes Detailing: Start with Sotek Green for the base. For the highlights, progressively mix in Morrow White with Sotek Green. Focus on the lower edge of each eye, adding more intense highlights near the tear duct and finishing with a small white dot at the back for a gem-like appearance.
Blood Gem on Forehead: Use Mephiston Red as the base color for the gem. Apply Wild Rider Red on the lower right section to simulate light reflection within the gem. Mix a small amount of Morrow White with Wild Rider Red for the edge highlights, ensuring a realistic gem look.
Layering for NMM Gold Effect: Apply layers of XV-88, Balor Brown, and Rhinox Hide, using the translucency of the paints to create depth and warmth in the gold. Troll Slayer Orange is key for achieving reflective properties and varied tones in the gold.
Detailed Facial Features: Paint a dark line from below the nose over both lips down to the chin. This creates a division on the face, adding to the realism. Make sure the right side of the face is slightly lighter than the left.
Fine Touches on Eyes and Gem: Ensure the eyes are fully covered in blue to maintain their vibrancy. For the blood gem, detail the top left of the gem with a sharp edge and a line running down, symbolizing light reflection.
Reviewing and Balancing: Regularly step back to assess the overall look. It’s essential to balance the details with the overall aesthetics of the miniature.
Assembling and Final Review: Once all the parts are painted, assemble the head and do a final review. Make any necessary adjustments for a polished look.
Video – Red Shoulder NMM
Paints Needed
- Games Workshop: Mephiston Red, Evil Sunz Scarlet, Mournfang Brown, Balor Brown, Trollslayer Orange, Rhinox Hide
- Vallejo: Ice Yellow, Black
Steps
- Base and Mapping:
- Start with Mephiston Red mixed with a small amount of black to map out where the shiny parts will be.
- Apply this mix to create the initial shape of the reflection on the shoulder pad.
- Building Layers:
- Use gradually lighter mixes of Mephiston Red and Evil Sunz Scarlet, adding Ice Yellow for the lighter tones.
- Focus on smooth layering to build up the red tones, paying attention to how light naturally reflects on a curved surface.
- Defining the Shine:
- For the brightest shine spot, use a combination of XV-88, Balor Brown, and Ice Yellow from Games Workshop.
- Apply these colours carefully to create a realistic reflection effect.
- Painting the Gold Trim:
- Start with Mournfang Brown and Rhinox Hide for darker areas.
- Progressively mix in Trollslayer Orange and Ice Yellow for brighter sections.
- Ensure a smooth transition between the red of the shoulder pad and the gold trim to maintain a cohesive look.
- Adding Additional Reflections:
- Insert additional shine spots in both the red and gold areas for more depth and realism.
- Use stippling techniques to create a diffused yet shiny highlight on the brightest parts.
- Be mindful of the shape and direction of these additional reflections to maintain consistency with the light source.
- Final Touches:
- Use a mix of Mephiston Red and Evil Sunz Scarlet for the final glazes to enhance the vibrancy of the red.
- Add final highlights with the lightest mix of Ice Yellow and white for the brightest points.
- Refinement:
- Go back and refine any areas as needed, especially the transitions between highlights and shadows.
- Add intricate details such as reflected light on the gold trim to enhance the NMM effect.
Tips
- Paint Consistency: Adjust the paint-to-water ratio to around 60% water for smoother application and finish.
- Reflection Logic: Consider the shape of the shoulder pad and how light interacts with it. Use a lamp to guide your reflection placement.
- Edge Highlights: Be careful with edge highlights; ensure they are consistent with the overall light reflection and texture of the surface.
- Patience and Layers: Build up the layers gradually for a smooth transition. This is crucial for achieving a realistic NMM effect.
- Stippling Technique: Use stippling in the brightest areas to create a diffused highlight, adding depth and realism.
- Harmonizing Colours: Ensure the reds and golds complement each other, keeping the overall look cohesive.
- Reflective Details: Consider adding subtle reflective details in surrounding areas, like reflected red light on nearby silver parts, to enhance realism.
- Rest and Review: Sometimes stepping away from the model and returning with fresh eyes can help spot areas needing refinement or a different approach.
More Tutorials to Explore
If you don’t have an account, please sign up here! The website currently has over 350 video tutorials with steps and tips, plus a selection of PDFs. If you are not sure about joining, you can explore my free videos with a free “freebies” membership, or take the plunge and become a full subscriber for full access.


If you’d prefer to support me on Patreon, please visit: https://www.patreon.com/RichardGray