How to Paint a Vampire Lord

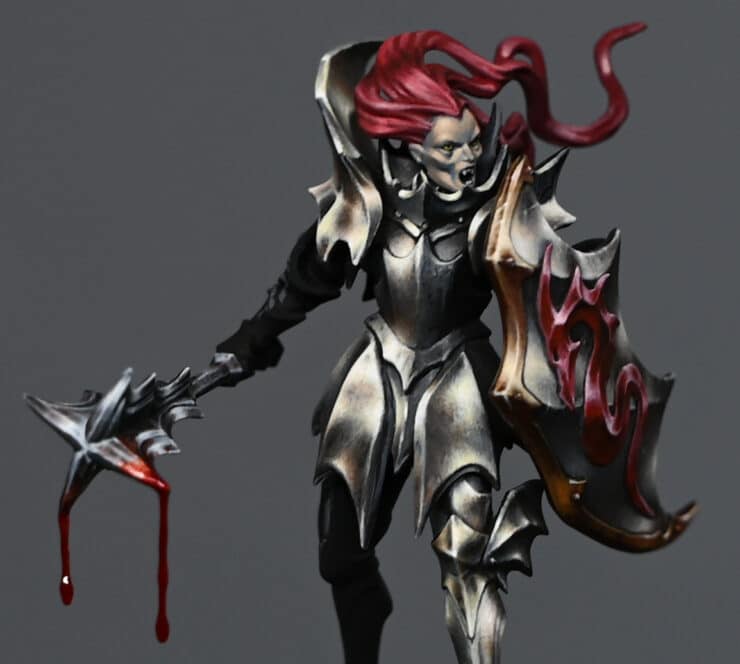
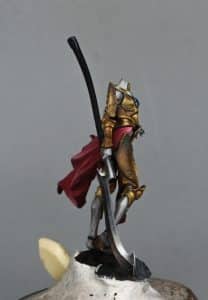
How to Paint a Vampire Lord from the Soulblight Gravelord Armies! This includes NMM shiny steel armour, face and hair, skeleton base tutorial plus a dripping gore-covered mace! Read on to watch the comprehensive set of How to Paint a Vampire Lord tutorials plus key steps, paints and materials guide.

Quick Jump to:

Video – How to Paint a Vampire Lord Steel Armour

This video is currently hidden. To watch it, please join the website and ensure that you are logged in.

Paints and Materials

Paints:

  1. Vallejo Neutral Grey: Used for mapping out highlights and base tones on the armour.
  2. Vallejo Ice Yellow: Applied for initial highlights, gives a warm, off-white effect.
  3. Games Workshop Mournfang Brown: Used sparingly for adding depth and richness in transitions.
  4. Games Workshop Abaddon Black: Thinned down and used for glazing to deepen shadows and smooth transitions.
  5. P3 Morrow White: For final bright highlights. Thinned down considerably for a subtle effect.

Brushes:

  • Fine Detail Brushes: Essential for applying precise highlights and for the stippling technique. I used the Artis Opus range, but any high-quality fine brush will work.
  • Glazing Brushes: Preferably also with a fine tip, used for applying thinned down glazes of Mournfang Brown and Abaddon Black.

Primer:

  • Ultimate Primer (Black): Used for priming the model before painting.

Step-by-Step Guide and Tips for the NMM Armour

Preparation: Assemble the model but avoid gluing areas like the shield or head that might obstruct painting. Prime the model in black. For this, Ultimate Primer is a good choice.

Base Layer: Start with Vallejo Neutral Grey to map out highlight points on the armour. This colour is ideal for desaturated, steel-like effects.

Light Direction and Armour Detailing: Consider the light source and how it hits the model. Focus on areas like the hip covers and rib cage, and map out light and reflections. The Neutral Grey will be useful for creating the base tones.

Initial Highlights: Apply Vallejo Ice Yellow for the highlights. Despite its name, Ice Yellow will give a desaturated, warm white appearance, especially when applied thinly. This is perfect for adding a subtle warmth to the steel.

Refining the Highlights: Use a stippling technique with Neutral Grey and Ice Yellow, building up the texture and refining the highlights. Remember, this is a gradual process, and patience is key.

Adding Depth with Mournfang Brown: Introduce Games Workshop Mournfang Brown sparingly at transition edges or darker areas for a richer tone. Be cautious not to overdo it, as too much brown can detract from the steel effect.

Glazing for Smoothness: Thin down Mournfang Brown and Abaddon Black with water (about 5-6 parts water to 1 part paint) and apply them as glazes. This step will help in smoothing out transitions and adding depth.

Final Highlights with Morrow White: Use P3 Morrow White for final bright highlights. Ensure the white is thinned down and apply it very carefully to the highest points of the armour.

Adjusting and Blending: Keep adjusting the highlights and shadows, blending the colours where necessary. This might involve going back and forth between the different shades to achieve a smooth transition.

Finish and Review: Once satisfied, review the model under different lighting to ensure the non-metallic metal effect is consistent and realistic.

Throughout this process, keep your paint thin and apply multiple layers for the best results. The key to NMM is patience and gradual building of layers. Remember, each step contributes to the overall metallic effect, so take your time and enjoy the process!

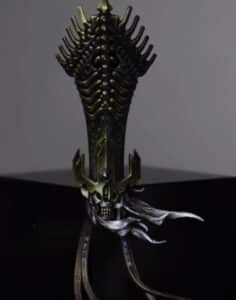
Video – How to Paint a Vampire NMM Shield

This video is currently hidden. To watch it, please join the website and ensure that you are logged in.

Paints and Materials

Games Workshop: Mournfang Brown, Abaddon Black, Mephiston Red, Balor Brown
Vallejo: Neutral Grey, Ice Yellow
P3: Morrow White

Step-by-Step Guide and Tips for the NMM Shield

Priming and Preparation:
The shield should be primed black. The use of Ultramar Varnish is optional.

Base Layering:
Start with Vallejo Neutral Grey, using scribbly strokes to create a rough and scratchy base.
Add a darker grey mixture by blending Neutral Grey with Abaddon Black. This can be substituted with other dark greys like Vallejo German Grey.

Creating Texture:
Continue with Neutral Grey, making irregular, scratchy marks. These marks will contribute to a subtle textured look.
Focus on building up layers and refining the texture.

Highlighting:
Apply a mix of Neutral Grey and Ice Yellow for initial highlights.
Move to Ice Yellow, applying it thinly (1.5 parts water to 1 part paint) to avoid a chalky finish.
Apply the Ice Yellow in a stippling manner to refine the highlights and cover uneven areas.

Painting the Dragon:
Base the dragon with Mephiston Red.
Create shadows by adding a small amount of Abaddon Black to Mephiston Red.
For highlights, mix Mephiston Red with P3 Morrow White (or another white) and apply to raised areas and facets of the dragon

Glazing and Refining:
Use a heavily diluted mixture of Mournfang Brown, Abaddon Black, and P3 Morrow White for glazing.
Apply the Mournfang Brown for a soft yellow-brown hue in certain areas.
Use Abaddon Black to darken and dull areas and to create shadows.
Use P3 Morrow White to soften and blend the highlighted areas.

Adding Scratches and Imperfections:
Add random scratch-like marks using a very light application for realism.
Apply small white dots to suggest nicks and imperfections.

Final Highlights and Adjustments:
Go over the shield and dragon, adding final highlights and making adjustments as necessary.
Focus on achieving a balanced look from different viewing angles.

Painting the Trim: Paint the trim using a mix of Abaddon Black and Mephiston Red as a base.
Layer with Balor Brown, and then add highlights with a mix of Balor Brown and Mournfang Brown.
Add final edge highlights and details to match the overall lighting and contrast of the shield.
Finishing Touches:

Tidy up any rough edges or over-painted areas.
Ensure that the shield’s various sections harmonize in terms of light and contrast.
Remember to let each layer dry thoroughly before applying the next, and adjust the thickness of your paints with water to maintain control and avoid a textured buildup.

Video – Non Metallic Metal Mace with added Gore

This video is currently hidden. To watch it, please join the website and ensure that you are logged in.

Paints and Materials

  1. Primer: Black
  2. Paints:
    • Vallejo Neutral Grey
    • Vallejo Black
    • Vallejo Basalt Grey
    • Vallejo German Grey
    • Games Workshop Rhinox Hide
    • Games Workshop Blood for the Blood God
    • P3 Morrow White
  3. Brushes: Fine detail brushes
  4. Additional: Gloss varnish, super glue, fishing wire for gore effect

Step-by-Step Guide and Tips for the Gory Mace

  1. Priming: The mace should be primed in black.
  2. Base Layering:
    • Start with Vallejo Neutral Grey. This can be created with a mix of black and white.
    • Use Pearl Grey Blue for slight colour variation, though this is optional.
    • German Grey can also be added to the mix.
  3. Highlighting and Texture:
    • Focus on picking out angles and curves on the mace.
    • Ensure brighter parts on surfaces facing you, with darker shades on less visible parts.
    • Use a combination of different greys to build up layers and create a realistic metal effect.
  4. Detailing:
    • Pay attention to the many facets of the mace, including chamfered edges and curves.
    • Use fine brushes for precision in highlighting these small, detailed areas.
  5. Glazing:
    • Mix Rhinox Hide with a significant amount of water for a thin glaze.
    • Apply this to mid-tones to shadows, avoiding the brightest highlights.
    • This step enhances contrast and adds a hint of colour to the mace.
  6. Adding the Gore Effect:
    • Attach thin strands of fishing wire to the mace using super glue to create dangling gore.
    • Apply gloss varnish to the connection points for added strength and flexibility.
    • Once the varnish is dry, cover the fishing wire with “Blood for the Blood God” paint.
    • Ensure the gore effect is applied in a realistic manner, considering where blood would naturally accumulate and drip from the mace.
  7. Final Touches:
    • Revisit any areas that need refining or additional highlights.
    • Make sure the gore effect blends seamlessly with the painted mace.
    • Allow all layers to dry completely before handling.

Tips:

  • Take your time with each facet of the mace; precision is key to a realistic look.
  • Ensure your paint consistency is right for each step – thinner for glazing, thicker for opaquer details.
  • Be cautious when applying the gore effect; it’s a focal point but shouldn’t overwhelm the detailed painting beneath.

Video – Vampire Lord Face and Hair

This video is currently hidden. To watch it, please join the website and ensure that you are logged in.

Paints and Materials

Games Workshop: Calgar Blue, Cadian Fleshtone, Ushabti Bone, Yriel Yellow, Khorne Red, Mephiston Red
Vallejo: Neutral Grey, Black

Step-by-Step Guide and Tips for the Face and Hair

Painting the Face:
Base Coat: Start with a base coat of Calgar Blue over the black primer. Expect poor coverage initially. Thin the paint with approximately 1.5 parts water to 1 part paint. Apply 3-4 layers to achieve an opaque finish.

Highlighting: Create a mix of 50/50 Calgar Blue and Cadian Fleshtone. Apply this mix to specific areas of the face, considering the natural light fall. Key areas include the forehead, cheekbones, and areas between the eyes and nose. This mix will start to give a flesh tone, retaining a hint of blue for the undead look.

Further Detailing: Use Cadian Fleshtone and a mix of 50/50 Ushabti Bone and Cadian Fleshtone for additional highlighting. Focus on raised areas and consider how light interacts with facial features. Apply highlights gradually, using a heavily diluted mix for soft transitions.

Eyes and Mouth: Paint the eyes and the inside of the mouth in black. This step ensures these areas are defined and helps balance the highlights on the face.

Painting the Hair:
Base Coat: Apply Neutral Grey from Vallejo over the black primer. Switch to Khorne Red for a vibrant, contrasting colour to the skin. Thin the paint slightly and apply multiple coats for an even, opaque finish.

Highlighting: Use Ushabti Bone to highlight the hair. Mix it with Khorne Red in varying proportions, increasing the Ushabti Bone content for brighter highlights. Focus on areas where light would naturally hit, creating a shiny, luxurious look.

Glazing for Colour Depth: After highlighting, the hair may appear too desaturated. To bring back the richness of the red, glaze over the hair with a heavily diluted Mephiston Red. This step enhances the red colour while maintaining the shine.

Final Touches on Hair: Optionally, add Abaddon Black to the corn red to create darker shades in the hair, increasing the depth and contrast.

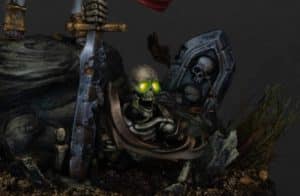
Video – Skeleton Base Part One

This video is currently hidden. To watch it, please join the website and ensure that you are logged in.

Paints and Materials

  • A skeleton figure from Warhammer Underworlds Warbands
  • Milliput and Fimo (or slate pieces)
  • Green stuff (50/50 mix of blue and yellow)
  • Super glue
  • Sand (variety in particle size, not sharp sand)
  • PVA glue (diluted with water)
  • Base brush (flat Games Workshop brush or equivalent)
  • Neutral Grey (Vallejo), Deathworld Forest, Morghast Bone, Agrax Earthshade, Athonian Camoshade, Astronomicon Grey (Games Workshop)
  • Water for thinning paints

Rock material guide by the fantastic Julien Casses:
https://www.juliencasses.com/2012/11/how-to-make-rocks

Step-by-Step Guide and Tips for the Skeleton Base

Building the Base

  1. Prepare Skeleton: Start by preparing your skeleton figure, ensuring it has a ‘rising from the ground’ appearance.
  2. Create Stone Slabs: Mix Milliput and Fimo, bake at 120°C for 30 minutes, then break into slabs to represent stones. Alternatively, use slate pieces. Attach these slabs to the base with super glue.
  3. Apply Green Stuff: Mix blue and yellow Green Stuff and use it to create a ridge around the skeleton, giving the illusion of a hole from which the skeleton emerges. Embed the Vampire Lord’s rock into the Green Stuff to integrate it with the base.
  4. Add Texture: Sculpt some small, round rocks using Green Stuff for added detail.
  5. Sand Application: Cover the base in beach sand, avoiding sharp sand. Use various particle sizes for a natural look.

Painting the Base

  1. Seal Sand: Brush diluted PVA glue over the sand to seal it and prevent flaking.
  2. Base Colour for Sand: Dry brush the entire base with Deathworld Forest, focusing on sandy areas.
  3. Highlighting Sand: Apply a lighter dry brush of Morghast Bone to the sand for highlights.
  4. Defining Rocks: Use Agrax Earthshade as a thick glaze around the sculpted rocks to define their shapes.
  5. Enhancing Greenery: Apply Athonian Camoshade to enhance the green tones on the base.
  6. Rock Painting: Begin detailed painting on rocks using Neutral Grey. Focus on highlighting angles and adding scratchy details for texture.
  7. Additional Rock Highlights: Use Pelgrave Blue, potentially mixed with white, to highlight rocks further. Remember not to overpower the model with the base’s contrast.
  8. Enhancing Edges: Add lighter edges around rocks using Astronomicon Grey to define shapes.

Finishing Touches

  • Consider adding other details like small flowers or greenery to the base.
  • Reflect these colours onto the Vampire Lord for cohesion.
  • Ensure the base matches the quality and style of your painted model.

Video – Skeleton Base Part Two (Painting the Skeleton)

This video is currently hidden. To watch it, please join the website and ensure that you are logged in.

Paints and Materials

  • Paints: XV-88, Balor Brown, Moot Green, Deathworld Forest, Ushabti Bone, Mournfang Brown, Trollslayer Orange (Games Workshop); Neutral Grey, Pale Grey Blue, Black (Vallejo); Iosen Green, Morrow White (P3)
  • Mininatur Moss Pads and Flowers
  • Water for thinning paints
  • Brushes with fine tips
  • PVA Glue
  • Jeweler’s tweezers

Step-by-Step Guide and Tips for Painting the Skeleton Base

Painting the Skeleton

  1. Eyes: Start by painting the eye sockets with white paint, thinned down. Apply 2-3 layers for an opaque finish. Avoid overloading to prevent the paint from pooling.
  2. Adding Color to Eyes: Use Pro Acryl Golden Yellow (or any similar yellow) around the edges of the eye sockets, leaving the back white to mimic a light source. Then, use Moot Green, thinned down, around the yellow, ensuring smooth transitions.
  3. Skeleton Bone: Use XV-88 to paint the skull and bones. Apply the paint thinly and unevenly to create a natural, weathered look. Emphasize areas where light would naturally hit, based on the light source direction.
  4. Highlighting Bone: Apply Ushabti Bone for highlights, focusing on raised areas and edges. Keep the paint thin for a smooth finish.
  5. Additional Details: Add small scratches or battle damage marks for realism.
  6. Final Highlights on Bone: Use white (Morrow White) for the final highlights on the most raised areas.

Painting the Sword

  1. Base Colour: Use Neutral Grey to paint the entire sword, including the hilt and blade.
  2. Weathering: Add Mournfang Brown to the blade for a rust effect, focusing on recessed areas and pitted holes.
  3. Highlighting the Blade: Use Pale Grey Blue for highlighting and adding scratchy details, focusing on areas that would catch light.
  4. Rust Details: Add Trollslayer Orange in the deepest recesses for an inverted highlight effect.
  5. Refining Highlights: Go back with Neutral Grey and Pale Grey Blue to refine the highlights and add more detail to the weathered look.

Painting the Cloth

  1. Base Layer: Apply Deathworld Forest over black primer, focusing on raised folds and areas that would catch light.
  2. Highlighting: Use Balor Brown for further highlights, keeping the paint very thin to maintain a dark, grubby appearance.

Adding Vegetation

  1. Applying Moss Pads: Use PVA glue to attach Mininatur Moss Pads around the base. Utilize jeweler’s tweezers for precise placement.
  2. Adding Flowers: Integrate white flowers from Mininatur for additional detail. Trim if necessary to avoid overpowering the base.
  3. Adding Roots: For an emerging effect, glue small roots around the skeleton, bending them to create a natural look.
  4. Dry Brushing: Gently dry brush Balor Brown over the moss pads to integrate them with the base and add depth.

Video – Simple Freehand Dragon

This video is currently hidden. To watch it, please join the website and ensure that you are logged in.

Paints and Materials

The following paints were used:
Games Workshop: Rhinox Hide, Mournfang Brown
Vallejo: German Grey, Neutral Grey, Ice Yellow, White

Step-by-Step Guide and Tips for the Freehand Dragon

  1. Prepare the Surface: Begin by roughly painting the inside of the shield with a mixture of Mournfang Brown and Rhinox Hide from Games Workshop. These paints should be heavily thinned with approximately two parts water to one part paint. Use a large brush, like a size 2 artist opus brush, for quick and broad coverage. This base coat doesn’t need to perfectly match the shield’s front colour, as it will largely be covered.
  2. Apply Texture: The texture on the back of the shield differs from the front to differentiate it from the armor. Apply the paint in a scratchy manner to simulate wear and tear. For this, use Neutral Grey from Vallejo, mixed with Ice Yellow for highlights, and German Grey for darker areas. Remember, this part doesn’t have to be perfectly blended, as some roughness adds character.
  3. Glazing: If needed, glaze over the scratchy texture with more diluted Rhinox Hide and German Grey. Glazing helps to soften the texture and can hide any imperfections in the painting.
  4. Freehanding the Dragon: When painting the dragon, start with a reference photo of the dragon design on the shield’s front. This helps maintain consistency across the model. Use Vallejo Model Color Black for the dragon outline, ensuring the paint is well-diluted for fine lines.
  5. Brush Selection: Use a fine brush for detailed work. A worn-out brush might not give the sharp lines needed for intricate details. A newer, sharper brush is recommended for finer details and corrections.
  6. Highlighting the Dragon: Start with Neutral Grey for initial highlights. For more pronounced highlights, mix Neutral Grey with Ice Yellow, leaning more towards Ice Yellow for brighter highlights. Apply these highlights only to the upper edges of the dragon design, where light would naturally catch.
  7. Adjusting for 3D Effect: Paint the inside of the dragon with a darker grey, such as a mix of German Grey and Neutral Grey, to create depth and avoid a flat black appearance.
  8. Final Touches: Add fine highlights to the dragon, especially along the edges and raised areas, to enhance the 3D effect. Use a mix of Neutral Grey and Ice Yellow, and pure Ice Yellow for the brightest points. Be mindful of the shield’s orientation to ensure that highlights correspond to the light source.
  9. Painting the Shield Trim: Finally, paint the shield’s trim, likely in a gold or metal colour. This trim frames the dragon and gives a polished look to the shield, enhancing the overall appearance.

More Vampire Tutorials!

Vampires and Undead
April 17, 2024This is another video looking at Sekhar the vampire, this time focusing on how to paint a skeleton with glowing eyes for the model on her base. This video looks at the skeleton, how to paint his glowing eyes, sword and bones etc. The whole model is covered! Video: How to Paint a Skeleton with Glowing Eyes Materials needed: Skeleton ModelPriming spray (I’ve used black!) Brushes:I use the Artist Opus range of brushesFine detail brushMedium-sized brushLarge brush (optional, for basecoating larger areas) Wet Palette (for mixing and thinning paints)Varnish (to protect the finished paint job) Paints:All paints mentioned are from Games Workshop’s Citadel range. Yriel Yellow Moot Green Balor Brown Morghast Bone Screaming Skull Mournfang Brown XV-88 Rhinox Hide Other Materials: Rocks or pebblesFoliage (such as static grass or miniature leaves)Sand or texture paste (for ground texture)Super glue (for attaching basing materials)Water (for thinning paints)Paper towels or cloth to ensure your brushes are totally clean! How to Paint a Skeleton with Glowing Eyes – Step 1: Priming Prime your model with a suitable undercoat. Black is recommended as it provides a good base for both the glowing effects and the shadowed recesses of the skeleton. Step 2: Base Coating Skeleton: Apply a thin base coat of XV-88 over the entire skeleton. Ensure the paint is thinned with water to maintain detail. Eyes: Start by painting the eye sockets with Kimera White. Given the deep recesses, apply multiple thin layers to build up a solid white base. Patience is key here to avoid a textured look. Step 3: Adding Depth to Eyes Mix Yriel Yellow with Kimera White to create a pale yellow. Carefully fill in the eye sockets, leaving the deepest part still white to simulate glow. Gradually add more Yriel Yellow towards the front of the eye sockets, intensifying the colour as you move forwards. Define the edges of the sockets with Moot Green to enhance the glow effect, blending it slightly into the yellow for a smooth transition. Step 4: Skeletal Detailing General Bone Texture: Lightly dry brush the skeleton with a mixture of Mournfang Brown and XV-88 to bring out the texture. Enhanced Details: Use Morghast Bone to highlight edges and raised details across the bones. Deepening Shadows: Mix Rhinox Hide with a small amount of black to create shadows in the deeper recesses and under the bones for added depth. Step 5: Sword and Metallic Effects Base Coat: Apply Neutral Grey as a base for the sword and any metallic elements. Weathering: Add scratch effects using Troll Slayer Orange mixed with Mournfang Brown to simulate rust and age. Highlights: Use Screaming Skull to pick out edges and features, giving the impression of worn, yet still sharp, metal. Step 6: Final Touches Refining Glows: Go back to the eyes, adding pure Yriel Yellow to the centres and intensifying the green at the edges if necessary. Blending and Smoothing: Use glazes of the base colours to smooth out transitions and unify the appearance, particularly around the eye sockets and on the sword to blend the rust effects. Contrasting Details: For a final layer of detail, use Screaming Skull to highlight teeth, knuckles, and other small bone protrusions, adding a subtle layer of Rhinox Hide for ageing. Step 7: Sealing the Model Once fully satisfied with your painting, seal the model with a matte varnish to protect your work and reduce any unwanted shininess, ensuring the skeletal figure looks as haunting in the display case as it does on the battlefield. Explore more of my Golden Demon entry tutorials If you don’t have an account here on my website, please sign up here! I have over 350 video tutorials in addition to my How to Paint a Skeleton with Glowing Eyes, with steps and tips, plus a selection of PDFs. If you are not sure about joining, you can explore my free videos with a free membership, or take the plunge and become a full subscriber for full access. If you’d prefer to support me on Patreon, please visit: https://www.patreon.com/RichardGray [...] Read more...
April 11, 2024A small series on how to paint Rodney Roachbait, the new Blood Bowl star player for their Gnome team! In these videos we will explore lots of different textures and techniques a lot different to my usual moody and dark style. I hope you enjoy following along as much as I enjoyed painting him. Video Part One: How to paint Rodney Roachbait – Base colours, skin, beard and jumper. Although the model is painted to a high standard the techniques can still be used for tabletop gaming. This first part looks at preparing all of the base colours for the model, the skin, beard and jumper. Materials List Brushes:Fine Detail Brush, Standard Brush, Drybrush – I use the Artist Opus range of brushes. Paints:Games Workshop: Rhinox Hide, Mournfang Brown, Bugman’s Glow, Cadian Fleshtone, Morghast Bone, Contrast Dark Oath Flesh, Sotek GreenKimera Colours: Fallen GrassWhite (or P3 Morrow White)Sun Ray (or Vallejo Ice Yellow)Vallejo: Neutral GreyOther Materials: PVA Glue, Gloss Varnish, Magnifying Headset Steps and Tips on How to Paint Rodney Roachbait Preparation and Base Colour: I recommend using a headset to enhance visibility on this model as he is very, VERY small. I’ve based coated him black to begin. Base Colour Application: Begin by applying a base colour to the entire model to avoid the prominence of black from the primer. Use Rhinox Hide to block in areas like the hat and the ball. However, upon closer inspection, I realised he wore waders instead of boots, so I switched to Mournfang Brown as the base colour for the waders to avoid excessive brown tones. Paint the strap holding the fish carcass onto the hat using Mournfang Brown. When painting resin models like this one, you may notice slight lines, but these are easily obscured with paint. Addressing Imperfections: However, there are more pressing imperfections on this model – if you have some, like resin air bubbles, fill them with PVA glue and painting over. For the strap over the hat, use Fallen Grass from Chimera Colors. These paints are single-pigment, avoiding separation issues common with other paints. Mixing them with Games Workshop paints adds a satin finish to maintain colour vibrancy while avoiding using varnish, which can interfere with the model’s look. Painting Specific Areas: For specific areas like the jumper, use Sotek Green for a matte finish, while the leather hat has a satin finish achieved by mixing in Games Workshop paints. Paint the fish head and tail using Sotek Green and Balthasar Gold for the bony parts. Adding Depth: After basic block-ins, apply a thinned-down contrast paint, Dark Oath Flesh, over the model to give it a slight filter effect. This helps tie the colours together and softens harsh lines, especially on resin models with sharp details. Take care when using contrast paint, as it may pool in recesses, requiring careful cleanup. Once dry, it adds depth and subtle shading to the model. Correcting Imperfections: Apply gloss varnish to smooth out any unwanted textures, like creases on the cheeks, providing a polished finish. More tutorials for him to follow! In the mean time, why not explore my other videos? If you don’t have an account here on my website, please sign up here! I have over 350 video tutorials with steps and tips, plus a selection of PDFs. If you are not sure about joining, you can explore my free videos with a free membership, or take the plunge and become a full subscriber for full access. If you’d prefer to support me on Patreon, please visit: https://www.patreon.com/RichardGray [...] Read more...
April 8, 2024My detailed how to paint the Nagash helmet tutorials, with videos plus step by step guide and tips with full paints used. Video – How to Paint the Nagash Helmet Part OnePaints and Materials UsedPaintsBrushesOther MaterialsSteps and Tips on How to Paint the Nagash HelmetVideo – How to Paint the Nagash Helmet Part TwoPaintsSteps and Tips on How to Paint the Nagash Helmet (Part Two)Video – How to Paint the Nagash Freehand Swirls/FiligreePaintsTips for the Freehand FiligreeVideo – How to Paint the Nagash Helmet Leather Strips and RunesPaintsStep and Tips on How to Paint the Nagash Helmet Leather Strips and RunesFor all of my Nagash Tutorials in one place, go hereExplore More Nagash Technique Tutorials Video – How to Paint the Nagash Helmet Part One In this tutorial, we’ll focus on painting the metallic areas of Nagash, specifically the head. The colours used for this tutorial are a bit different from the standard, and in the video I discuss techniques in more detail to achieve a textured, refined finish. Paints and Materials Used Paints Vallejo: English Uniform (VX-88) Golden Olive (Elysian Green mixed with Yriel Yellow) Yellow Green (Dorn Yellow mixed with Moot Green) Ice Yellow (Dorn Yellow) Ivory (Screaming Skull) Games Workshop: Rhinox Hide Abaddon Black Naggaroth Night (for future use) Brushes Fine detail brush (suitable for intricate work and small highlights) Medium-sized brush (for larger areas and base coating) Wet palette (to keep paints fresh and workable) Other Materials Wet palette Green stuff (for sculpting additional details, if desired) Painting lamp (for consistent lighting during the painting process) Miniature holder (for ease of handling and painting) Steps and Tips on How to Paint the Nagash Helmet Prepare the Model: Ensure your miniature is assembled and primed appropriately for painting. I’ve used a black primer for my Nagash. Block in the Base Colour: Start by blocking in the main highlights using Vallejo’s English Uniform (VX-88). Apply this colour where you want the primary light source to hit, focusing on a top-left orientation.Be mindful not to make the colour too opaque; a slight texture is desirable for the metallic effect. Understanding Colour Choices: The choice of metallic colours doesn’t have to be conventional. For this model, I went for a dark and moody theme inspired by the artwork of Nagash.My chosen metallic shades include Golden Olive, Yellow Green, and Ice Yellow from Vallejo, along with Rhinox Hide and Abaddon Black from Games Workshop. Building Layers of Colour: Use Golden Olive to build layers on top of the English Uniform, focusing on areas that require additional depth and shading.The opacity of Vallejo paints allows for strong, defined marks, ideal for creating small details and textures. Creating Texture and Depth: With each layer, gradually introduce lighter shades such as Yellow Green and Ice Yellow to enhance highlights and add dimension to the metallic surfaces.Keep in mind the direction of light and focus on maintaining a balance between light and shadow. Understanding Volume and Light: Highlighting metallic surfaces requires understanding how light interacts with volume. Unlike standard blending techniques, aim for distinct contrasts between light and shadow. Make sure you consider how light reflects off different surfaces, creating highlights and shadows of varying intensities. I like to use lots of real-life references of metal to study as I paint. Achieving a Moody Atmosphere: For an undead character like Nagash, aim for a dark, desaturated overall appearance. Use strong, small highlights strategically to draw attention to focal points. Avoid smooth blending; purposefully textured painting adds depth and character to the model. Experimenting with Glazing TechniquesExperiment with glazing techniques to blend colours seamlessly and soften transitions between different areas of the model.Glazing allows for subtle colour adjustments and can help unify the overall color scheme, creating a harmonious visual effect. Video – How to Paint the Nagash Helmet Part Two In this part, we’ll focus on painting the skull face, hair, and bone structures atop the hat. Paints Vallejo Model Colour: English Uniform (VX-88), Golden Olive (Elysian Green mixed with Yriel Yellow), Yellow Green (Dorn Yellow mixed with Moot Green), Ice Yellow (Dorn Yellow), Ivory (Screaming Skull), Neutral Grey (Mechanicus Standard Grey), Pale Grey Blue (Grey Seer mixed with Blue Horror) Games Workshop: Rhinox Hide, Warpstone Green Contrast, Deathclaw Brown P3: Morrow White Steps and Tips on How to Paint the Nagash Helmet (Part Two) Paint the Bone Structures: Using Vallejo’s English Uniform (VX-88), begin by painting the bone structures on top of the hat. Focus on picking out the highlights, keeping in mind the top-left orientation of the light source. Apply the paint carefully to emphasize the edges and contours of the bones.Enhance the Bone Texture: Utilise Golden Olive (a mix of Elysian Green and Yriel Yellow) to add depth and shading to the bone structures. Concentrate on areas that require additional definition, such as the joints and sockets. Remember to maintain a balance between light and shadow to create a realistic, textured effect.Add Highlights: With Yellow Green (a mix of Dorn Yellow and Moot Green), further highlight the bone structures, focusing on the areas where light would naturally hit. Pay attention to the left-hand side of the model to create a stronger contrast and emphasise the lighting direction.Refine the Highlights: Using Ice Yellow (Dorn Yellow), continue to build up the highlights on the bone structures, especially on the left-hand side. Gradually increase the brightness of the highlights towards the center of the model to draw attention to focal points.Adjusting with Rhinox Hide: If necessary, use Rhinox Hide to refine any areas where you’ve made mistakes or to add depth to the shadows. The translucency of this paint allows for easy blending and adjustment while maintaining a natural look.Painting the Skull Face: For the skull face, start with Deathclaw Brown, focusing on creating a weathered, textured appearance. Apply the paint in a rough, uneven manner to mimic the natural wear and tear of ancient bones.Highlighting the Skull: Gradually add highlights to the skull using Morghast Bone. Concentrate the highlights towards the left-hand side of the face to maintain consistency with the overall lighting scheme. Ensure the highlights stand out against the darker base colour to create depth and dimension.Adding Detail to the Eyes: Use a small amount of Morghast Bone to pick out the details around the eyes, emphasising the cheekbones and brow ridge. Be mindful of the sculpted eye sockets and adjust the highlights accordingly to enhance the overall appearance.Painting the Hair: Begin painting the hair with Neutral Grey, focusing on the large, clumpy strands. Keep the highlights towards the top side of the hair to simulate light hitting the surface. Apply the paint in a rough, textured manner to achieve a realistic look.Adding Texture to the Hair: Continue to build up the texture of the hair using Pale Grey Blue. Emphasize the highlights on the top side of the hair while leaving the underside darker to create depth and volume.Refining the Highlights: Using Morrow White sparingly, refine the highlights on the hair strands to add contrast and dimension. Focus on the areas closest to the face to draw attention to the focal points. Video – How to Paint the Nagash Freehand Swirls/Filigree Paints Vallejo: English Uniform (VX-88), Golden Olive (Elysian Green mixed with Yriel Yellow), Yellow Green (Dorn Yellow mixed with Moot Green), Ivory (Screaming Skull), Neutral Grey (Mechanicus Standard Grey), Pale Grey Blue (Grey Seer mixed with Blue Horror)Games Workshop: Warpstone Green Contrast, Abaddon BlackP3: Morrow White Tips for the Freehand Filigree Base Coat: Apply a base coat of Vallejo English Uniform (VX-88) to start the filigree on the Nagash hat. Ensure even coverage and allow it to dry completely. Highlighting with Yellow-Green: Mix Vallejo Yellow Green (Dorn Yellow mixed with Moot Green) with a small amount of white to increase opacity. Use a fine tip brush to apply highlights to what would be the raised areas of the filigree. Focus on creating sharp lines and highlights to enhance the detail. Adding Ivory Highlight Dots: Using Vallejo Ivory (Screaming Skull), create small highlight dots on the filigree. These dots should be strategically placed on curves and extreme curve points to simulate shine and reflectivity. Ensure consistency in placement for a cohesive look. Enhancing Contrast with Black: With Games Workshop Abaddon Black, carefully outline the filigree details to enhance contrast and definition. Use a fine tip brush and steady hand to create clean lines and borders. Glazing with Warpstone Green Contrast: Thin Games Workshop Warpstone Green Contrast with water (about two parts water to one part paint) to create a glaze. Apply the glaze over the filigree to enhance shading and highlights. Final Touches: Use P3 Morrow White to add final highlights to the filigree, focusing on the most raised and reflective areas. Ensure consistency and restraint with the white highlights to avoid overpowering the overall effect. Video – How to Paint the Nagash Helmet Leather Strips and Runes By following these steps and techniques, you can effectively paint leather strips and runes on your Nagash (or any other model, really!) adding depth, texture, and character. Paints Games Workshop: Rhinox Hide, Mournfang Brown, Cadian Fleshtone, Temple Guard Blue, Barroth Blue. Step and Tips on How to Paint the Nagash Helmet Leather Strips and Runes Base Coat: Ensure that the leather strips on the Nagash helmet are properly primed with black primer. Once primed, apply a base coat of Games Workshop Mournfang Brown to the leather strips. This will serve as the foundation for the leather texture. Highlighting with Mournfang Brown: Using Games Workshop Mournfang Brown, begin highlighting the curves and raised areas of the leather strips. Apply the paint in a textured manner, focusing on creating depth and dimension to simulate the appearance of weathered leather. Don’t worry about perfect blending; imperfections add to the realism. Layering with Cadian Fleshtone: Next, switch to Games Workshop Cadian Fleshtone and continue highlighting the leather strips. Apply this paint more sparingly, focusing on the most raised areas and curves to enhance the texture. The tonal contrast between Mournfang Brown and Cadian Fleshtone will create depth and visual interest. Glazing with Rhinox Hide: Thin Games Workshop Rhinox Hide with water to create a glaze. Apply the glaze over the highlighted areas to tone down the highlights and add depth to the leather texture. Focus on applying the glaze in the shadowed areas and along the edges of the leather strips for a realistic look. Painting Runes: Using Games Workshop Temple Guard Blue and Barroth Blue, paint the runes onto the leather strips. Ensure that the runes are clearly visible and neatly painted. Use a fine tip brush and steady hand to create clean lines and shapes. Less is more; avoid overcrowding the leather strips with too many runes to maintain balance. Touching Up: Review the painted leather strips and runes, making any necessary touch-ups or adjustments. Ensure consistency in highlighting placement and rune design throughout the miniature model. For all of my Nagash Tutorials in one place, go here Nagash, Supreme Lord of the Undead Nagash, Supreme Lord of the Undead is the father of necromancy.  I created a series of detailed tutorials on how I painted him. Watch Now Explore More Nagash Technique Tutorials If you don’t have an account here on my website, please sign up here! I have over 350 video tutorials with steps and tips, plus a selection of PDFs. If you are not sure about joining, you can explore my free videos with a free membership, or take the plunge and become a full subscriber for full access. If you’d prefer to support me on Patreon, please visit: https://www.patreon.com/RichardGray [...] Read more...
April 7, 2024Games Workshop sent me the new gnome special character, Rodney Roachbait, for the gnome Blood Bowl team. I haven’t quite managed to finish him yet, but close enough. The rope is only base coloured, the handle isn’t done and his orange waders need finishing on the back, among other bits and pieces. A Gnome Star Player in Blood Bowl, Rodney Roachbaitis a notorious line-man of the Altdorf Park Anglers. He’s an absolutely tiny model, but so full of character, I couldn’t resist painting him. It was also a nice change of pace from all the mean and moody things I’ve been painting. Tutorials for him to follow very soon – with so many textures to explore that you can recreate on a variety on your models. Who is Rodney Roachbait? Unveiled at the Warhammer World Anniversary Preview, Rodney emerged from the shadows as a seasoned Star Player, bringing with him a legacy of both notoriety and skill from his days as a line-man for the Altdorf Park Anglers. In Blood Bowl, Rodney stands apart as a gnome of unconventional tactics, but with a determination often very present in gnomes! While most gnomes revel in the chaos of the gridiron, Rodney was keen to prove that the boisterous sport of Blood Bowl pales in comparison to the finesse required in the art of fishing. Initially met with defeat, Rodney refused to be deterred. Armed with his trusty fishing rod, he ventured onto the field against the Merry Mootmen Halfling team, weaving his angling expertise into the game and securing a victory for his gnome brethren. His triumph became the stuff of legend, a tale he relishes recounting whenever given the chance (certainly not a “one that got away” story, ha ha). (Sorry) For teams fortunate enough to enlist Rodney Roachbait, his tactical acumen and fisherman’s flair make him a great team member. With his Catch of the Day ability, Rodney can seize control of an unattended ball once per half, leaving opponents in disarray. Combining his Stunty and Sidestep skills, Rodney evades tackles with ease, and his resilience is further bolstered by Jump Up, ensuring he swiftly bounces back from any knockdowns. At a mere 70,000 GP, Rodney is a bargain for Halfling Thimble Cup teams seeking an edge on the field. Available as an expert kit crafted from Forge World resin, Rodney Roachbait promises to elevate any team lucky enough to harness his unparalleled prowess! If you don’t have an account here on my website, please sign up here! I have over 350 video tutorials with steps and tips, plus a selection of PDFs. If you are not sure about joining, you can explore my free videos with a free membership, or take the plunge and become a full subscriber for full access. If you’d prefer to support me on Patreon, please visit: https://www.patreon.com/RichardGray [...] Read more...
March 13, 2024Creating a Non-Metallic Metal (NMM) texture on a sword for a miniature model requires patience, precision, and a good understanding of light and shadow. This guide is designed to walk you through the process of painting the weapon blade of Sekhar The Vampire, focusing on achieving a weathered, high-contrast, NMM effect. Video: Non Metallic Metal Texture Sword Materials Required Paints: Vallejo Neutral Grey, Ice Yellow; Games Workshop Mournfang Brown, Rhinox Hide; P3 Morrow White; Two Thin Coats Dark Sun Yellow. Brushes: Fine detail brushes capable of making very thin lines. Palette: A wet palette to ensure your paints remain workable. Water or Thinner: For diluting your paints to the desired consistency. Step-by-Step Guide to the Non Metallic Metal Texture Sword Preparing the Blade: Begin with a clean, primed miniature. Ensure Sekhar’s blade is smooth and free from any debris or fingerprints. Base Coating: Apply a base coat of Neutral Grey on the blade. This serves as your midpoint for building up highlights and deepening shadows. Establishing Light Points: Identify the main light points on the blade using a lamp. Typically, the flat back section of the blade and the curved edges will catch the most light. Mark these areas mentally as points where the highest highlights will be placed. Initial Highlights and Shadows: Create a gradient on your palette ranging from Neutral Grey to Ice Yellow, progressively adding Ice Yellow to lighten the mixture. Include a separate mix with Mournfang Brown and Neutral Grey for warmer tones, and pure white for the brightest highlights. Begin adding these mixtures to the blade, focusing on the predetermined light points. Use a scratchy, controlled technique with the very tip of your brush for texture. Refining the Texture: As the paint on your palette dries slightly, it will naturally become thicker. Use this to your advantage to add textured highlights and shadows, adjusting the water content as necessary for softer transitions or more pronounced scratches. Correcting and Sharpening Details: Utilise black to correct any oversteps or to sharpen the divisions between different sections of the blade. This step is crucial for defining the shape and enhancing the contrast of your NMM effect. Adding Depth with Glazes: Mix highly diluted glazes of Mournfang Brown (and variations with Neutral Grey) to apply to the lower sections of the blade. This creates a sense of depth and simulates a subtle reflection from the environment. Final Highlights: Use the brightest mixtures, including pure white, to add the final highlights to the top light points. This step might require going back to reinforce the contrast between the brightest highlights and the adjacent shadows. Weathering Effects: To add a weathered look, incorporate fine scratches across the blade’s surface with a very thin brush and lighter paint mixes. These should traverse both the light and dark areas to create a unified texture across the blade. Bounce Light: For a more advanced NMM effect, paint a bounce light on the cutting edge of the blade. This is a subtle highlight that simulates light reflecting off the ground, adding to the realism of your metal effect. Finishing Touches: Reassess the overall effect from multiple angles, ensuring that the blade looks good from all perspectives. Additional Tips Patience is Key: Achieving a convincing NMM effect is time-consuming. Work slowly and carefully. Lighting: Understanding how light interacts with metal is crucial for NMM. Study real-life examples if possible. More Soulblight, Undead and Vampire Tutorials! If you don’t have an account, please sign up here! The website currently has over 350 video tutorials with steps and tips, plus a selection of PDFs. If you are not sure about joining, you can explore my free videos with a free membership, or take the plunge and become a full subscriber for full access. If you’d prefer to support me on Patreon, please visit: https://www.patreon.com/RichardGray [...] Read more...

If you don’t have an account, please sign up here! The website currently has over 350 video tutorials with steps and tips, plus a selection of PDFs. If you are not sure about joining, you can explore my free videos with a free membership, or take the plunge and become a full subscriber for full access.

How to Paint a Vampire Lord

If you’d prefer to support me on Patreon, please visit: https://www.patreon.com/RichardGray

Leave a Reply