


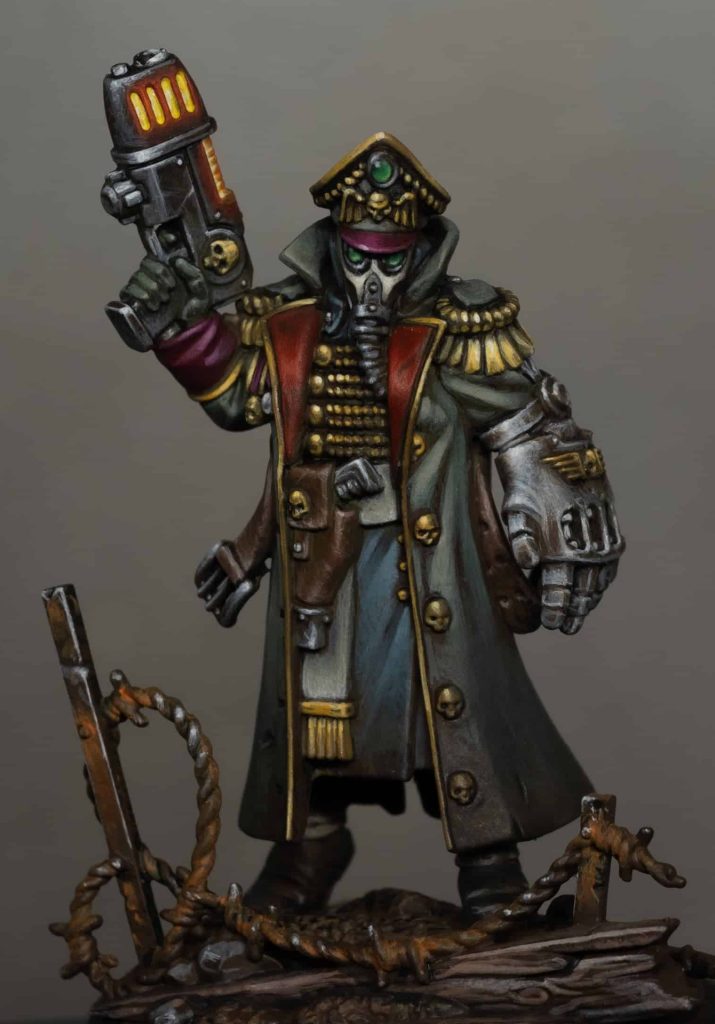
Learn how to paint a Death Korps of Krieg Commissar in quick this step-by-step tutorial! I will walk through every stage of painting this iconic Warhammer 40K model, from grimy base tones to crisp non-metallic metal highlights. Using a single size 4 Artis Opus brush and a carefully selected mix of AK Interactive, Games Workshop, and Vallejo paints, this guide focuses on achieving a gritty, atmospheric finish that captures the grim determination of the Death Korps.
Whether you’re aiming to level up your brush control or simply want to try your hand at non-metallic metals and subtle weathering effects, this tutorial will take you through the full process with practical techniques, clear colour choices, and tips on creating smooth transitions and visual interest.
- Video: How to Paint a Death Korps of Krieg Commissar
- How to Paint a Death Korps of Krieg Commissar – Materials List
- Base Colours and Atmospheric Foundation
- Clothing and Fabric
- Red Sections
- Gold Details (Buttons, Braid, Trim, Sash)
- Sash (Waist & Chest)
- Mask and Tubes
- Leather (Holsters, Boots, Straps)
- Power Fist and Gun Handle
- Plasma Pistol (OSL Effect)
- Gem on Cap & Lenses
- Rust and Base Metalwork
- Basing
Video: How to Paint a Death Korps of Krieg Commissar
How to Paint a Death Korps of Krieg Commissar – Materials List
Paints Used
AK Interactive
- Very Dark Brown
- Camouflage Green
- Anthracite Grey
- Dark Green Grey
- Grey Green
- Sand Yellow
- Wine Red
- Sky Grey
- Neutral Grey
- Pale Grey (optional for subtle NMM transitions)
- Black (used as a glaze)
- Dark Green (for lenses and gem)
- Volcanic Yellow (for OSL effect)
Games Workshop – Citadel Colours
- Mephiston Red
- Evil Sunz Scarlet
- Wild Rider Red
- XV-88
- Screaming Skull
- Morgast Bone
- Mournfang Brown
- Cadian Fleshtone (optional highlight for leather)
Vallejo
- Neutral Grey (repeated from AK, but interchangeable in the tutorial)
- White (alternative to P3 or AK white)
Two Thin Coats
- Dark Sun Yellow (used in gold NMM highlights)
Privateer Press (P3)
- Morrow White (final white highlights)
Other Colours Mentioned as Options
- Pastel Yellow (AK or similar)
- Ice Yellow (AK or Vallejo – optional for warm lens highlights)
- Deep Green (used alongside AK Dark Green for lenses/gems)
- Flesh tones (e.g. Cadian Fleshtone) for warm leather highlights
- Deep Orange (used in OSL and rust effect)
Brushes
- Artis Opus – Size 4 (used for entire model as an exercise)
Note: Smaller brushes can be used for detail work if preferred
How to Paint a Death Korps of Krieg Commissar
Using a size 4 Artis Opus brush, AK Interactive paints, and Games Workshop colours
Base Colours and Atmospheric Foundation
- Prime your model black and let it dry completely.
- All-over coat:
- AK Very Dark Brown – slap it on liberally, just avoid obscuring detail.
- While still wet, blend in:
- AK Camouflage Green – this mingles into the dark brown and creates a murky, grimy undertone that sets the tone of the piece.
Clothing and Fabric
Front Skirt
- Base: AK Anthracite Grey – leave gaps for natural shadows.
- Highlights:
- Mix Anthracite Grey with white in two stages.
- Keep highlights focused toward the waist, with loose brush marks and tighter placement on top.
- Use stippling and scratch marks to create transitions and texture.
- If shadows become too harsh, glaze back in with Anthracite Grey or the first highlight mix.
Back Coat (Greatcoat)
- First Highlight: AK Dark Green Grey – scratchy, stippled marks.
- Layer Highlight: AK Grey Green – don’t cover the whole area.
- Glaze: AK Black (4:1 water to paint) – glaze from midtone to shadows using a large brush. This smooths transitions and deepens shadows.
Red Sections
Front of Coat
- Base: Mephiston Red
- Highlights:
- Evil Sunz Scarlet
- Wild Rider Red (use sparingly – too much and it goes pink)
- If over-highlighted, glaze back with Mephiston or Evil Sunz
Cap Peak and Cuffs
- Base: AK Wine Red
- Highlight: Add white to Wine Red as needed, use light placement for small reflective shines (e.g., on the peak)
Gold Details (Buttons, Braid, Trim, Sash)
- Base: XV-88
- Highlights:
- Two Thin Coats Dark Sun Yellow
- AK Sand Yellow
- Pastel Yellow
- Optional: White on only the brightest dots to simulate a metallic shine
- Technique:
- Use selective highlighting rather than evenly highlighting every strand or button
- Apply scratches or small strokes to suggest light-catching areas
Sash (Waist & Chest)
- Base: AK Grey Green
- Highlight: Sky Grey
- If jump too harsh: Mix Sky Grey with Grey Green 1:1 as a transition
- Technique tip: Apply highlights while base is wet or on a semi-loaded brush for natural blends
Mask and Tubes
Skull Mask
- Base: AK Grey Green
- Highlight: Morgast Bone → Screaming Skull or white
- Focus: Forward-facing parts and around goggles
Tubes and Lenses
- Base: Vallejo Neutral Grey
- Highlights:
- Sky Grey
- White
- Use curved highlights for shine; match lens trim highlights to gem placement
Leather (Holsters, Boots, Straps)
- Base: Mournfang Brown
- Highlight options:
- Add white (creates a pale, almost pink tone)
- Add bone or flesh tones like Cadian Fleshtone for warmth
- Technique:
- Scratchy highlight marks
- Optional glaze with Mournfang Brown to blend and bring warmth back
Power Fist and Gun Handle
Power Fist
- Base: Vallejo Neutral Grey
- Highlights:
- Sky Grey
- White (very sparing)
- Technique:
- Broad, generous first highlight
- Successive layers get smaller
- Use scratchy textures outside, solid blocks on interior parts (like pistons)
- Optional brown glaze (Mournfang Brown thinned) to tie tones and add reflection
Gun Handle
- Same colours and process as above – keep it desaturated
- Optional: Use black selectively for the deepest shadows
Plasma Pistol (OSL Effect)
- Base: White (2-3 coats, watered down)
- Glow Colour: AK Volcanic Yellow (thinned, layered)
- Highlight Glow Centre: White
- Surrounding Coils:
- Mephiston Red
- Deep Orange for raised areas
- Black glaze over edges of red
- Final Touches:
- Edge highlights on casing with Neutral Grey → Sky Grey → (optional) White
- Adjust scratchiness depending on whether the part is meant to be metal or rubber
Gem on Cap & Lenses
- Base: AK Dark Green
- Midtone: Deep Green
- Highlights:
- Add white or pastel/sand yellow to Deep Green
- Final tiny white dot (P3 Morrow White or equivalent)
- Match highlight shape with trim for realism
Rust and Base Metalwork
- Rust Layer: Deep Orange (thinned, focused in recesses, varying consistency)
- Edge Highlight: Neutral Grey
- Final Highlights:
- Sky Grey
- Optional white dots (very sparing – this is rust!)
Basing
- Not shown in detail – paint to match the rest of your army
- Consider using your original dark brown + camouflage green base mix for continuity
Final Thoughts
- If any highlights feel too strong or transitions too harsh, glaze with the base colour.
- Always glaze in the direction that ends in the area you want the pigment deposit (shadow or highlight).
- Use white sparingly to maintain its impact – it should only be on focal, bright points.
Need more detail?
I have a longer, two-part version of this tutorial available, below, for full members of the website:
How to Paint a Death Korps of Krieg Commissar
Learn how to paint a Death Korps of Krieg Commissar to a high standard in this two-part tutorial. From rich red lapels to battle-worn non-metallic metals, this guide takes you through each stage of the painting process—including grimy shading, precise highlighting, and texturing techniques to bring out the full character of the model.
Free Video Tutorials
Free videos for logged in members – just sign up as a ‘friend’ to view and click any of the thumbs.
To explore all of these, visit this page!


If you don’t have an account, please sign up here! The website currently has over 350 video tutorials, plus step by step guides and PDFs. You can explore more free videos with a free “freebies” membership, or take the plunge and become a full subscriber for full access.


If you’d prefer to support me on Patreon, please visit: https://www.patreon.com/RichardGray