


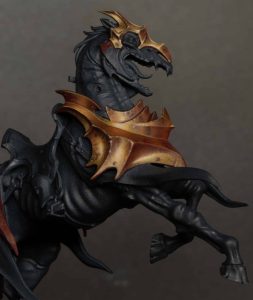
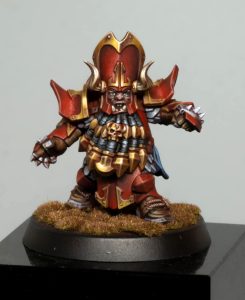
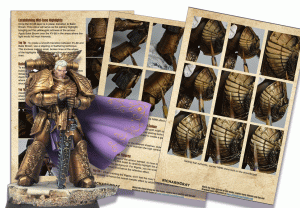
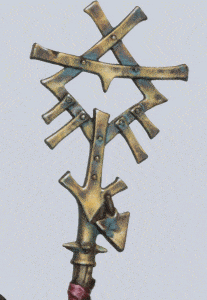
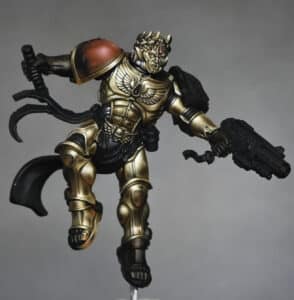
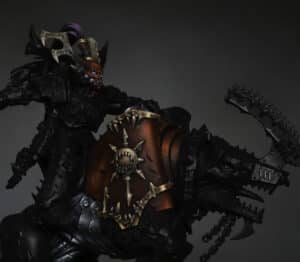
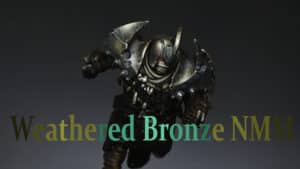
In this first part of the tutorial, we’re tackling the red-gold armour on the vampire’s mount. This section covers light placement, colour layering, and blending techniques, all using a controlled, scratchy-brush NMM approach. While the model is eventually intended for a Golden Demon entry, the process is adaptable for any painter looking to explore rich, atmospheric NMM.
Video: How to Paint Red-Gold NMM Armour – Vampire Mount
Paints and Materials Used
Games Workshop:
- XV-88
- Mournfang Brown
AK Interactive:
- Burnt Red
- Golden Brown
- Pastel Peach
- Ice Yellow
- Deep Orange
Two Thin Coats:
- Dark Sun Yellow
Brushes:
- Size 1 and Size 4 (Artis Opus preferred)
Step-by-Step Guide
1. Preparation
- Assemble the model in sub-assemblies. In this case, the rider and head are painted separately.
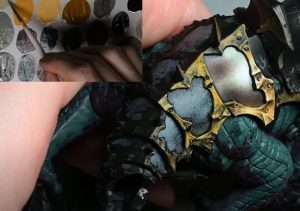
- Prime the model as normal. The armour will be our focus area, specifically on the horse’s chest for this tutorial.
2. Base Colour
- Start by applying a solid coat of AK Burnt Red over all the armour sections to act as your base tone. This sets the underlying richness and warmth for the NMM gold effect.
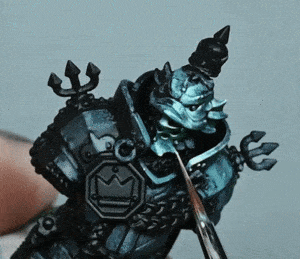
3. Rough Highlight Placement
- Use a size 1 or 4 brush to apply scratchy, broken strokes of XV-88. Keep it random and avoid patterned hatching – the goal is to build subtle texture.
- Don’t refine this too much at this stage. You’re laying down rough shapes to act as guideposts for future layers.
4. Midtone Highlights
- Add AK Golden Brown to the previous highlights, still using scratchy marks. This begins to lift the light volumes and introduce warmth.
- Work in large volumes rather than tiny lines – these layers will show through later and act as glow beneath the higher highlights.
5. Bright Highlights
- Introduce AK Pastel Peach and then AK Ice Yellow, again with small, sharp strokes in the brightest spots.
- These tones help simulate the metallic shine. Don’t overdo it – keep the brightest areas concentrated and refined later.
6. Orange Reflective Tones
- Mix Mournfang Brown with AK Deep Orange to create a warm orange for upward-facing surfaces.
- This simulates bounce light where golden sections reflect on each other.
- You can vary this by mixing in Dark Sun Yellow to adjust saturation.
7. Fine Detailing
- Continue layering scratches and stippling with decreasing highlight size as the tones get brighter.
- Work toward your brightest shine, then blend backwards using intermediary tones to soften the transition.
8. Light Placement & Golden Angle
- Hold the model at your intended display angle (“golden angle”) and sketch in the main highlight shapes accordingly.
- Map light sources based on this viewpoint. Once that’s established, rotate and adjust other sides for balance and consistency.
9. Glazing and Smoothing
- Create a thin glaze (7–8 parts water to 1 part paint) using AK Burnt Red to tone down harsh transitions and enrich the red shadows.
- Apply gently over midtones and shadow areas to unify the colour and reduce any chalkiness.
Pro Tip: Avoid using the burnt red glaze over light highlights like Ice Yellow – it will dull them and make them muddy.
10. Optional Glazing for Highlights
- If needed, glaze Ice Yellow (very diluted, ~5:1 water to paint) over highlight spots to soften texture and enhance the finish.
- For slightly more satin finish, Golden Brown or Sand Yellow (if available) can work beautifully.
Final Notes on How to Paint Red-Gold NMM Armour
- Non-metallic metal is all about contrast and placement. Keep checking the model under a lamp to evaluate your lighting decisions.
- This method intentionally preserves texture and visual noise with the scratchy method – refined blending comes after the brightest highlights are in place.
- Don’t panic if early stages look rough – that’s part of the process. Every layer adds complexity and realism.
If you don’t have an account here on my website, please sign up here! I have over 350 video tutorials with steps and tips, plus a selection of PDFs. If you are not sure about joining, you can explore my free videos with a free membership, or take the plunge and become a full subscriber for full access.


If you’d prefer to support me on Patreon, please visit: https://www.patreon.com/RichardGray