


How to paint the Khorne Lord Invocatus from the World Eaters, which was sent to me as an early review copy from Games Workshop. Currently this includes his face, horns and hair to his shining red armour and NMM gold trim.
You can watch the current tutorials in order by scrolling down, or quick jump to a specific technique, paints lists or tips by clicking on the options below:
Video Part One: How to paint the Khorne Lord Invocatus from the World Eaters Armour, Horns, Eyes, Hair
Paints and Materials Used
Games Workshop: Barak-Nar Burgandy, Mephiston Red, Evil Sunz Scarlet, Wild Rider Red, Sotek Green, XV-88, Balor Brown
Vallejo: Ice Yellow (Dorn Yellow optional)
Two Thin Coats: White Star, Carcharodon Grey, Doomdeath Black
- Brushes: Fine detail brushes, larger brushes for smooth transitions.
- Palette: Wet palette recommended for paint mixing and consistency maintenance.
Step by Step Guide
1. Priming:
- Prime the head using Ultimate Primer (black), thinned with airbrush thinner for a matte finish.
2. Armour (Red Parts):
- Basecoat the helmet with Barak-Nar Burgundy, extending slightly onto the horns for a color transition.
- Apply Mephiston Red over the burgundy for the true red areas. This serves as the key red tone.
- For highlights, carefully apply Evil Sunz Scarlet, followed by Wild Rider Red, ensuring the Mephiston Red remains visible for a true red effect.
3. Horns:
- Start with a dark mix of XV-88 and black, blending into the burgundy on the helmet.
- Gradually lighten towards the tips using XV-88 with diminishing amounts of black.
- Finish the tips with pure XV-88 and a touch of Morghast Bone, ensuring smooth transitions.
4. Eyes:
- Base the eyes with Sotek Green.
- Highlight with a mix of Sotek Green and White Star.
- Add final highlights using pure White Star, placed strategically for a realistic lens effect.
5. Hair:
- Begin with a base of Barak-Nar Burgundy.
- Gradually mix in White Star for highlights, focusing on the upward-facing sections.
- Aim for smooth transitions to mimic natural hair shine.
6. Metal Details:
- Use a mix of Doomdeath Black and Carcharodon Grey for base and mid-tones.
- Highlight with Carcharodon Grey and White Star.
- Add red reflections from the armor using the red tones previously mentioned.
7. Teeth:
- Use the grey mix (Carcharodon Grey with black, then pure Carcharodon Grey) for base and mid-tones.
- Highlight the teeth with White Star, considering the light source for realistic placement.
8. Leather Strips (Topknot):
- Base with Rhinox Hide.
- Layer with Dwarf Skin and Elf Skin (or similar tones like Bugman’s Glow and Cadian Fleshtone).
- Glaze with thinned Mournfang Brown for added warmth.
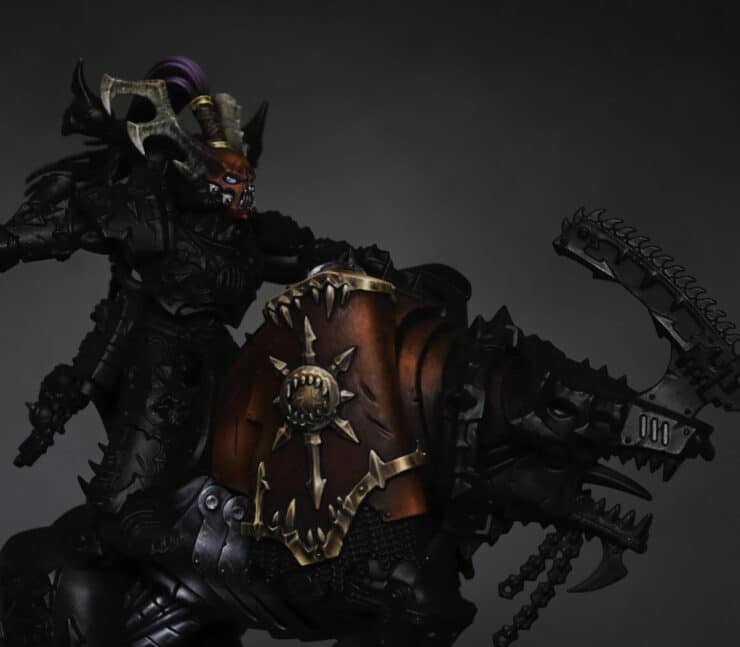
Video Part Two : Red Armour
This video shows how to paint the red armour on the juggernaut of Khorne
Paints and Materials Used
The following paints were used:
Vallejo Model Colour (new): Evil Red, Nocturnal Red
Games Workshop: Evil Sunz Scarlet, Wild Rider Red
Two Thin Coats: White Star (Any white will do)
Step by Step Guide
1. Base Layer:
- Begin by applying a base coat of Evil Red from Vallejo Model Colour. This hue is a dark burgundy or purple tone. It may necessitate several layers to achieve a consistent and opaque covering.
2. Initial Highlight:
- Use Nocturnal Red from Vallejo Model Colour for the first layer of highlights. This shade is a deep and rich red, offering more vibrancy compared to Evil Red, thus setting the stage for subsequent highlighting.
3. Main Highlights:
- Apply Evil Sunz Scarlet by Games Workshop for primary highlights. This brighter shade contrasts well with the darker base.
- For heightened highlights and a more textured finish, apply Wild Rider Red by Games Workshop to areas that would naturally catch more light.
- To create the textured effect, employ a small brush (such as size 00) and make small, scratchy, stipple-like marks on the armour, focusing on areas where light naturally falls.
4. Enhanced Highlighting and Blending:
- If the transition between Nocturnal Red and Evil Sunz Scarlet seems too abrupt, blend them by applying Nocturnal Red over the edges of the Evil Sunz Scarlet highlights.
- For the brightest points, mix Wild Rider Red with White Star (or any white paint) and apply cautiously. Excessive white can desaturate the red and diminish its intensity.
- Soften and merge the texture marks by glazing over them with thinned Nocturnal Red.
5. Refinement:
- Alternate between Nocturnal Red, Evil Sunz Scarlet, and Wild Rider Red to refine the texture and smoothly blend the highlights.
- Adjust the highlight intensity depending on the curvature and structure of the armour pieces.
6. Final Adjustments:
- Once content with the highlighting and texture, make any final tweaks necessary. This might involve reinforcing the deepest shadows or adding a final glaze to unify the colours.
Technique Tips:
- Consistency is key. Ensure the paint is properly thinned for a smoother application.
- Build up the colours in layers, allowing each to dry before applying the next.
- Consider the light source and its interaction with the armour’s shape when placing highlights.
- For the textured effect, use just the tip of the brush with a gentle hand.
Video Part Three : Bronze Trim on the Armour (NMM)
This video shows how to paint the bronze trim on the juggernaut armour using NMM (Non Metallic Metal)
The following paints were used:
Paints and Materials Used
Vallejo Model Colour (New): Gorgon Brown, Grunge Brown, Sunset Orange, Toxic Yellow
Two Thin Coats: Doomdeath Black, White Star (and black and white will do)
Step by Step Guide
1. Base Coat:
- Start by applying Gorgon Brown from Vallejo Model Colour. This colour serves as your base for the bronze trim. It’s a dark brown that’s not as red as Rhinox Hide but works well for this purpose.
2. Building the Colour:
- Next, apply Grunge Brown, also from Vallejo, to begin building up the bronze colour. This shade will act as a mid-tone in your NMM technique.
3. Adding Highlights:
- Use Sunset Orange from Vallejo Model Colour to start highlighting the raised areas of the trim. Blend it in at the sides with Grunge Brown for a smoother transition.
4. Mixing for Intermediate Shades:
- Create a mix of Grunge Brown and Sunset Orange (about 50/50) to create an intermediate shade. Use this to bridge the gap between the darker base and the brighter highlights.
5. Further Highlighting:
- Proceed with Toxic Yellow from Vallejo Model Colour for your next layer of highlights. This colour, akin to Ice Yellow, provides a nice, smooth application and gives a cooler yellow tone to your bronze.
6. Using White for Final Highlights:
- For the brightest highlights, mix a small amount of White Star from Duncan Rhodes Two Thin Coats (or any suitable white paint) with your highlight colour. Apply this sparingly to the most raised and reflective areas of the trim.
7. Refining and Adjusting:
- Go back and forth between your colours, adjusting the blends and refining the highlights. Remember, NMM is about creating the illusion of metal through contrast and careful placement of lights and darks.
8. Glazing for Saturation:
- If the colours lack saturation or depth, glaze over the mid-tones and shadows with a diluted Grunge Brown. This step adds richness and depth to the bronze colour.
Technique Tips:
- Aim for smooth transitions between shades. Use glazing techniques to blend the layers seamlessly.
- Focus on the light source and how it would naturally hit the trim. The highest points should have the brightest highlights.
- For NMM, contrast is key. Don’t shy away from using dark shadows against bright highlights to mimic the reflective nature of metal.
If you don’t have an account, please sign up here! The website currently has over 350 video tutorials with steps and tips, plus a selection of PDFs. If you are not sure about joining, you can explore my free videos with a free membership, or take the plunge and become a full subscriber for full access.


If you’d prefer to support me on Patreon, please visit: https://www.patreon.com/RichardGray