


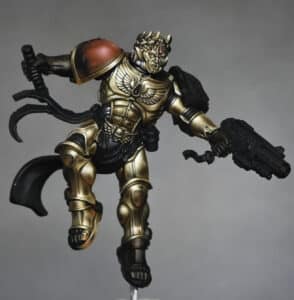
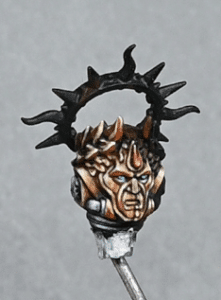
This video looks more at the head of Commander Dante and shows his Eyes, and Blood Drop as well as more NMM Gold of the face. Commander Dante is being painted as a Golden Demon entry.
Video Tutorial: Commander Dante Head and Details
Materials and Paints Needed:
- Fine Detail Brush: Crucial for precision work on small areas like eyes and gems.
- Magnification Tool (Optional): Can be useful for extremely detailed areas.
- Palette: Necessary for mixing and thinning your paints.
Paints:
- For Gold Tones: XV-88, Balor Brown, Rhinox Hide (Games Workshop)
- Highlights for Gold: Troll Slayer Orange, Ice Yellow (Vallejo)
- Eyes Base Colour: Sotek Green (Games Workshop)
- Eyes and Gem Highlights: Morrow White (P3)
- Blood Gem: Mephiston Red, Wild Rider Red (Games Workshop)
Steps for Commander Dantes Head and Detail:
Refining the Gold: Enhance the gold’s depth by adding more orange reflections, especially on the cheeks and ear muffs. This technique replicates the way gold reflects on gold, creating an orange hue.
Eyes Detailing: Start with Sotek Green for the base. For the highlights, progressively mix in Morrow White with Sotek Green. Focus on the lower edge of each eye, adding more intense highlights near the tear duct and finishing with a small white dot at the back for a gem-like appearance.
Blood Gem on Forehead: Use Mephiston Red as the base color for the gem. Apply Wild Rider Red on the lower right section to simulate light reflection within the gem. Mix a small amount of Morrow White with Wild Rider Red for the edge highlights, ensuring a realistic gem look.
Layering for NMM Gold Effect: Apply layers of XV-88, Balor Brown, and Rhinox Hide, using the translucency of the paints to create depth and warmth in the gold. Troll Slayer Orange is key for achieving reflective properties and varied tones in the gold.
Detailed Facial Features: Paint a dark line from below the nose over both lips down to the chin. This creates a division on the face, adding to the realism. Make sure the right side of the face is slightly lighter than the left.
Fine Touches on Eyes and Gem: Ensure the eyes are fully covered in blue to maintain their vibrancy. For the blood gem, detail the top left of the gem with a sharp edge and a line running down, symbolizing light reflection.
Reviewing and Balancing: Regularly step back to assess the overall look. It’s essential to balance the details with the overall aesthetics of the miniature.
Assembling and Final Review: Once all the parts are painted, assemble the head and do a final review. Make any necessary adjustments for a polished look.
Continue Painting Commander Dante!
If you don’t have an account, please sign up here! The website currently has over 350 video tutorials with steps and tips, plus a selection of PDFs. If you are not sure about joining, you can explore my free videos with a free “freebies” membership, or take the plunge and become a full subscriber for full access.


If you’d prefer to support me on Patreon, please visit: https://www.patreon.com/RichardGray