


A short series on how to paint a Striking Scorpion Exarch to a high display standard.
Can’t see the content? Make sure you are a member of the website and logged in!
Want more Aeldari?
Aeldari
A short series on how to paint a Striking Scorpion Exarch to a high display standard.
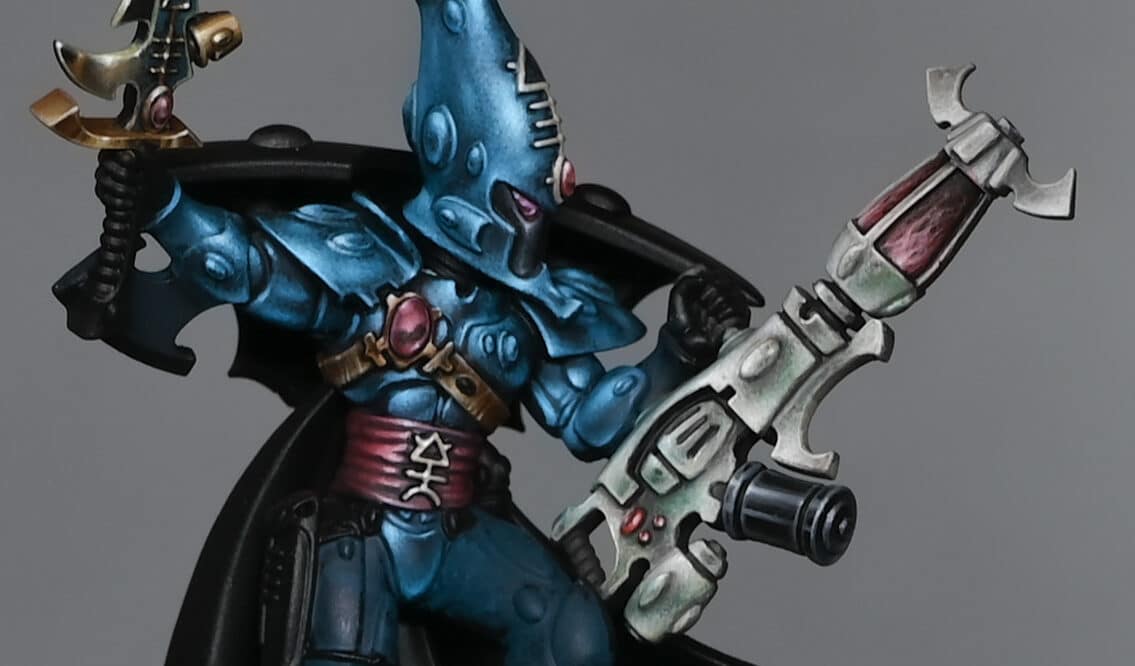
How to Paint a Striking Scorpion Exarch: Part 1
This video looks at the painting techniques and the importance of light placement and reflections.
The following paints were used: Games Workshop: Moot Green, Sotek Green Vallejo: Black P3: Morrow White
How to Paint a Striking Scorpion Exarch: Part 2
The video carries on with the armour, but mainly looks at the yellow face mask and NMM gold scorpion symbol on the chest.
The following paints were used:Games Workshop: Moot Green, Sotek Green, Balor Brown, Mournfang Brown, XV-88, Yriel Yellow Vallejo: Black, Ice Yellow Kimera Colours: Diarylide Yellow (Yriel Yellow and Troll Slayer Orange mix as alternative) P3: Morrow White
Top Tips for So Far to Paint a Striking Scorpion Exarch
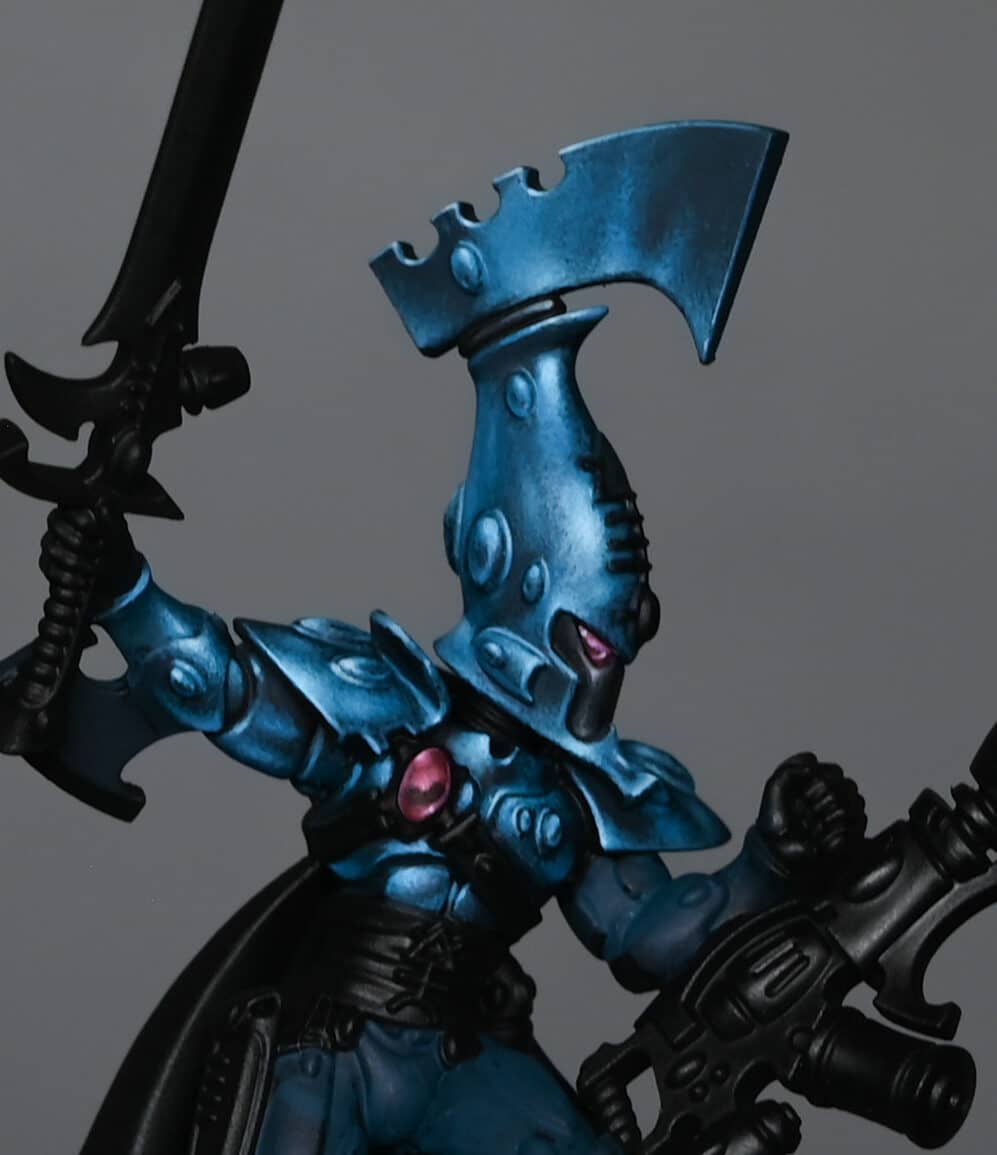
Colour Mixing for Green Armour:Use a mix of Moot Green and Sotek Green for a rich green colour.Adjust the ratio to control warmth and coolness in the colour.Dealing with Opacity Issues:When adding highlights and shadows, mix with white or black to improve coverage.Yellow can be challenging, so adding black or white helps with opacity.Order of Painting:Consider painting highlights and shadows first before adding mid-tones.This allows better control over saturation and coverage.
Balancing Highlights:Balance highlights based on the light source; adjust brightness for different parts like shoulders and chest.Reflective Details:Reflect shiny details on the armor, like the gemstones on the helmet, on adjacent panels.Use a similar technique for lenses and gems as for the eyes.
Gemstone Painting:Use a base of Sotek Green, adding a bit of black for contrast.Map out highlights in layers, from blue to white.Consider adding orange for a gold-like effect on certain areas.Attention to Detail:Be meticulous in painting smaller, intricate details to maintain realism.Feather in colors at the edges of highlights for a more natural look.
Handling Contrasts:Adjust contrast using glazes if needed to tone down stark transitions.
Bounce Highlights on Gold:Add orange to gold highlights for a subtle bounce effect.
Highlight Placement on Ribbing:Vary the intensity and placement of highlights on ribbed sections.Align highlights with other shine points on the armor for a cohesive look.
Want more Aeldari?
Videos Not Showing?
To view any of my paid tutorials, you need to be a member of the website – please click below to log in or join the site.
Not sure about joining just yet? Check out my Youtube for all my free tutorials or sign up as a free “friend” member on this site and visit the Freebies video page! [...]
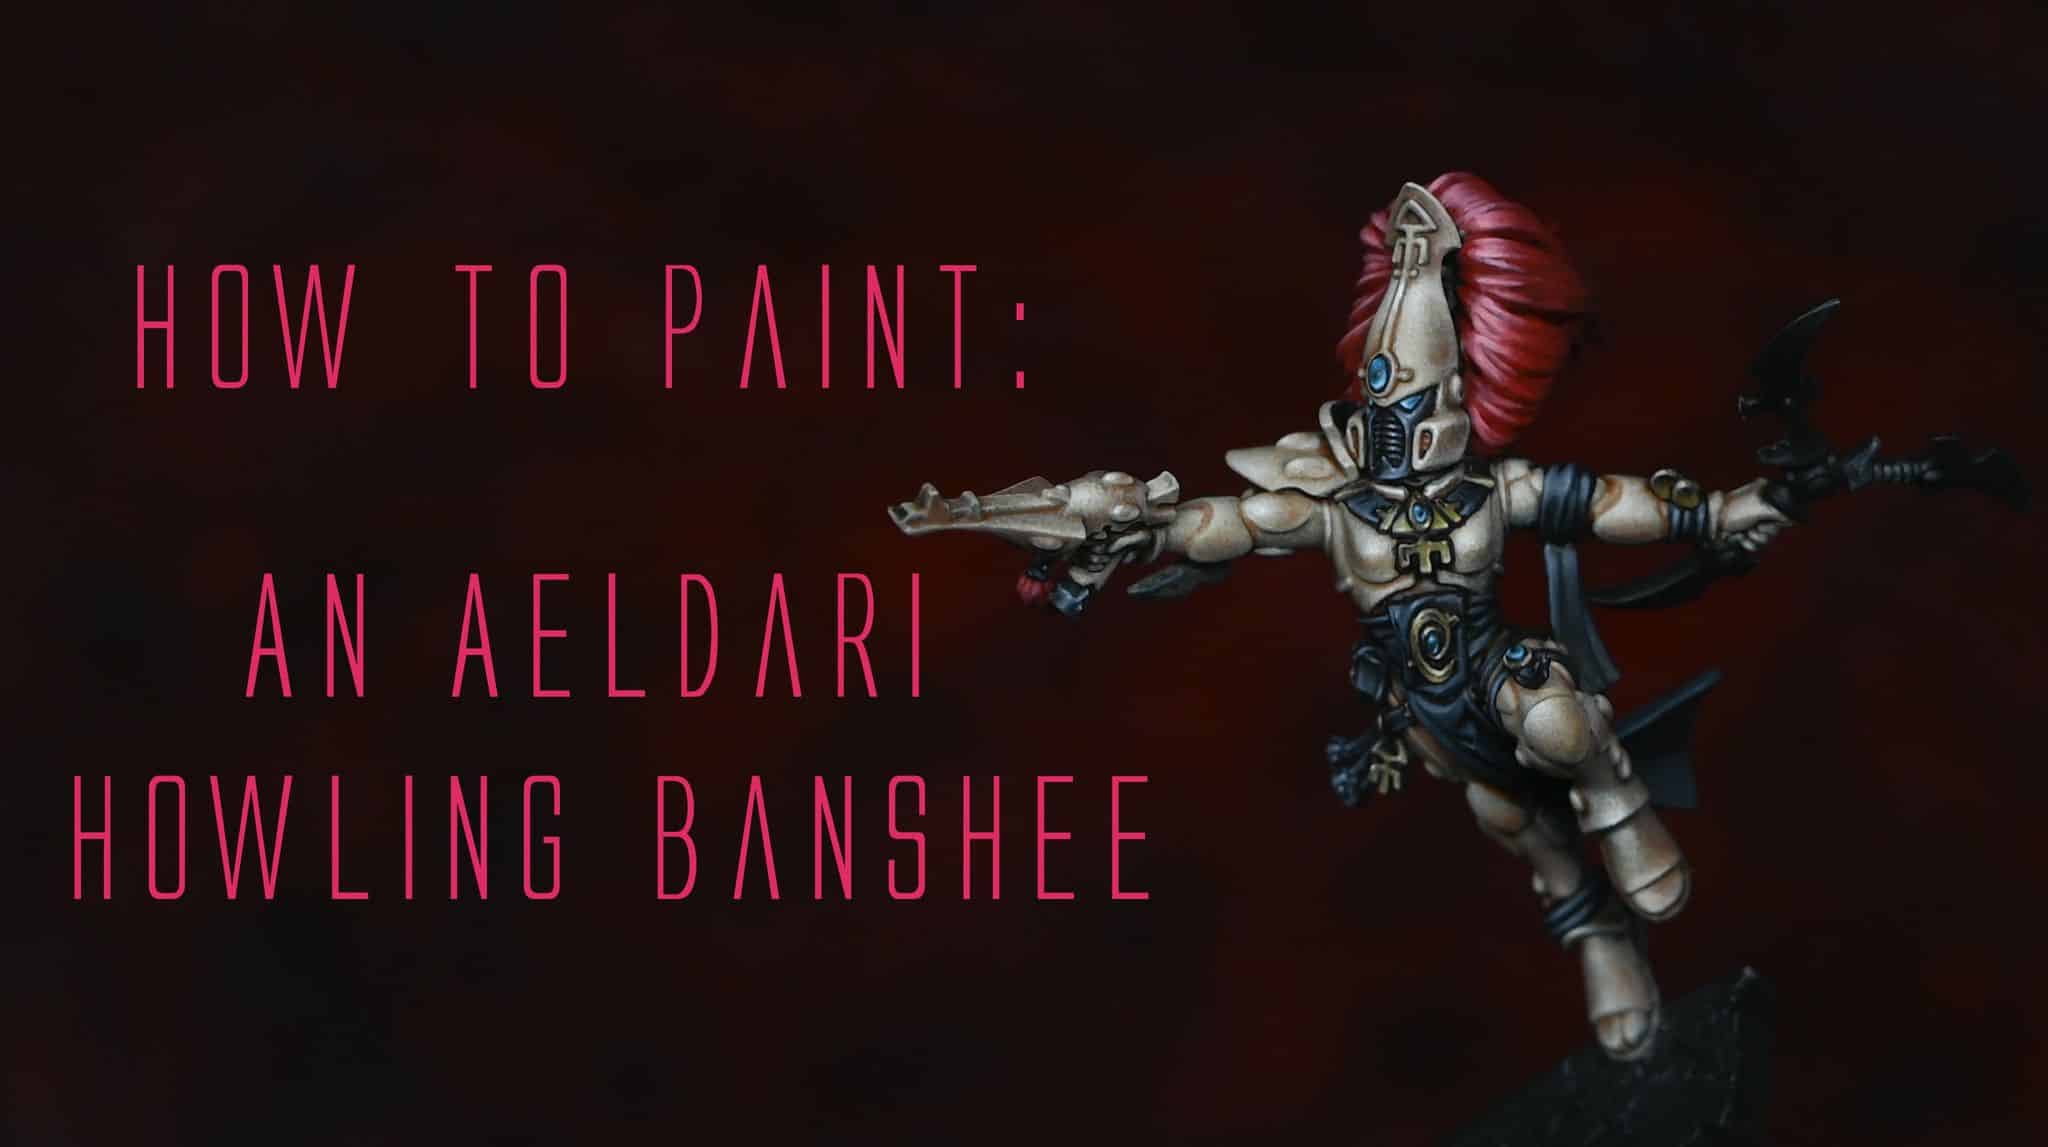
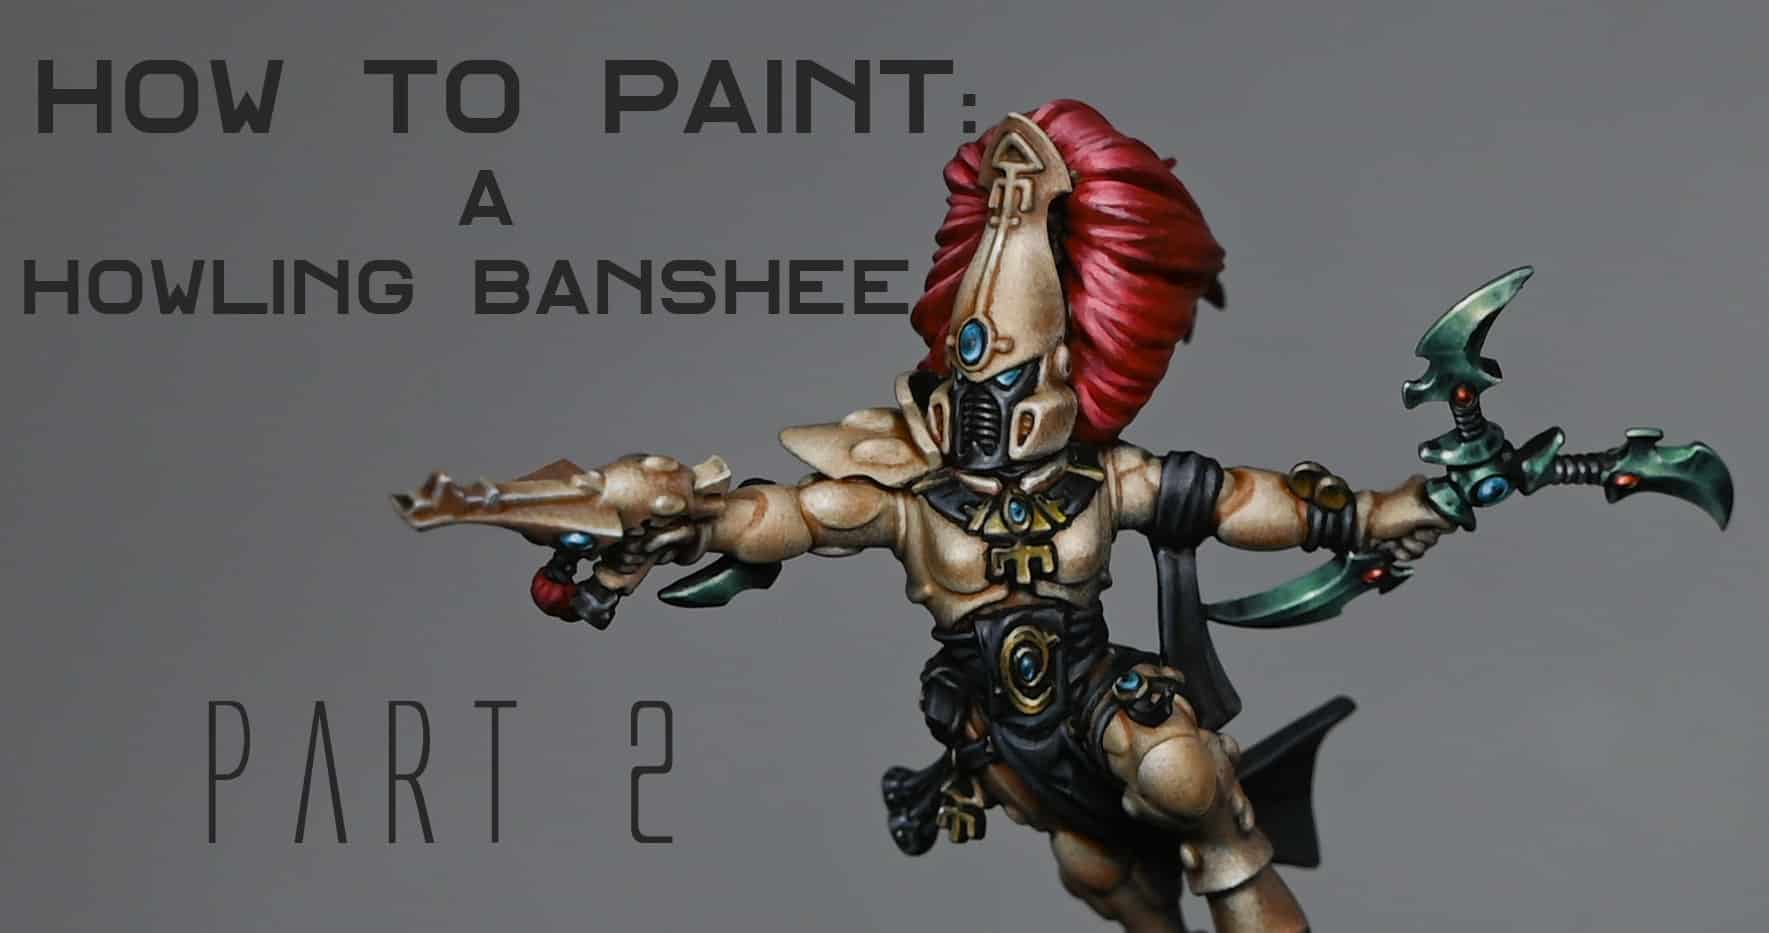
These videos show how to paint an Aeldari Howling Banshee to a high level tabletop standard, ideal for a commanding presence in your army or for smaller game systems like Kill Team.
Part One – How to Paint a Howling BansheeMaterials NeededPaints NeededStep-by-Step Tips and GuidePart Two: How to Paint a Howling Banshee WeaponMaterials NeededStep-by-Step Tips and Guide – Green NMMMore Video Tutorials
Part One – How to Paint a Howling Banshee
This session focuses on achieving a detailed, bone-coloured armour synonymous with Howling Banshees.
All videos are recorded in HD 1080p or higher – use full screen for the full effect and let the video load completely. You can also click the little “cog” and change the speed of the video, if I am going too fast (or slow!).
Materials Needed
Aeldari Howling Banshee Miniature
Brushes: Various sizes, including a size two for base coating and size 00 Artist Opus (or equivalent) for detail work.
Paints Needed
Games Workshop Paints:
Base Colours: Morghast Bone, Ushabti Bone, Screaming Skull, Mephiston Red, Sotek Green
Shades and Glazes: Mournfang Brown, Darkoath Flesh (Contrast), Contrast Medium
Highlight and Detail Colours: Evil Sunz Scarlet, Corvus Black (for black areas)
Vallejo Paints:
Basalt Grey, Pale Grey Blue, Ice Yellow (for non-metallic metals)
P3 Paint:
Morrow White (or any white for extreme highlights)
Step-by-Step Tips and Guide
Base Coating and Stippling:
Prime the miniature and begin with a stippling technique using Morghast Bone and Ushabti Bone.
Apply the paint thinly and evenly with a dry brush for a smooth base.
Adding Depth with Contrast Paint:
Mix Darkoath Flesh (Contrast) with Contrast Medium and apply over the stippled areas for added depth.
Refining Armour with Stippling:
Progressively build up highlights with Ushabti Bone, Screaming Skull, and Morrow White.
Focus on light placement to enhance features, keeping the paint watered down for a soft finish.
Glazing for Shadows:
Thin down Mournfang Brown considerably and apply in recesses to deepen shadows.
Painting the Eyes and Non-Metallic Metals:
Use Sotek Green, Ice Yellow, and Basalt Grey for non-metallic metal areas, ensuring the correct placement of light and reflections.
Hair and Cloth Details:
Base the hair with Mephiston Red, building up highlights with Evil Sunz Scarlet and white.
For the black areas, create subtle highlights with Basalt Grey and Pale Grey Blue, avoiding an overly grey appearance.
Final Touches:
Refine details, adjust highlights, and ensure a balanced, cohesive look.
Part Two: How to Paint a Howling Banshee Weapon
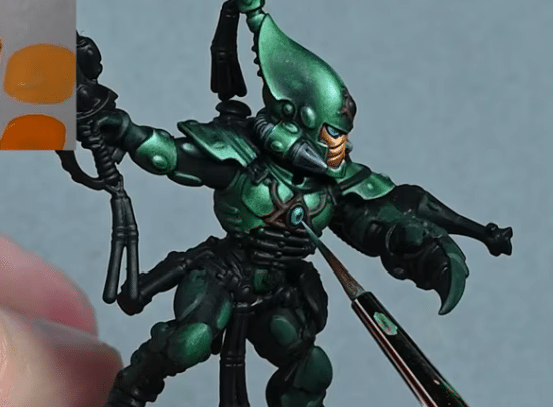
The Aeldari Howling Banshee’s power weapon will have a non-metallic, yet luminous green effect. This method involves intricate layering and stippling to simulate reflection. We’ll primarily utilise Cybrite Green from Games Workshop, blended with various quantities of black for shadows, and Vallejo’s Ice Yellow for the highlights.
Materials Needed
Cybrite Green (Games Workshop)
Black (Vallejo Model Colour)
Ice Yellow (Vallejo)
Evil Sunz Scarlet (Games Workshop)
Wild Rider Red (Games Workshop)
Fire Dragon Bright (Games Workshop)
Morrow White (P3 or any alternative white)
A fine brush
A wet palette
Step-by-Step Tips and Guide – Green NMM
Base Layer: Firstly, coat the power weapon in black, creating a pristine base.
Green Layering:
Blend Cybrite Green with a touch of black. Apply this darker green shade to parts of the weapon less exposed to light.
Incrementally integrate more black into the mixture for creating deeper shadows, ensuring smooth transitions.
Highlight Application:
Form lighter shades by mixing Cybrite Green with small increments of Ice Yellow. Gradually apply these on the weapon’s raised and edge areas, depicting where light naturally strikes.
Keep your paint mix slightly thinned for better control during layering. A recommended mix is two parts water to one part paint.
Texture via Stippling:
With the lighter green mixes, stipple the surface to generate a textured, reflective look. The density of the dots correlates with the opacity.
Reflections Definition:
Under a lamp, observe the natural light reflections on the blade. Mimic these on the blade’s upper portion using lighter green shades, ensuring they’re the most luminous parts.
Finalising Highlights:
Employ white or the palest green mix for the highest light points. Apply these sparingly as minute dots or slender lines to achieve a sparkling effect.
Gemstone Painting:
For red gems: Start with Evil Sunz Scarlet, augment with highlights using Wild Rider Red and Fire Dragon Bright, mainly on the gems’ lower areas. Cap off with an Ice Yellow or white dot atop each gem for reflection.
For the blue gem: Adopt a similar approach, starting with Sotek Green and progressively incorporating white for highlights.
Refinement and Adjustment:
If needed, use glazes (diluted paint) to soften transitions or reintroduce colour in areas where over-highlighting may have occurred.
Continuously evaluate and tweak the intensity and positioning of highlights to achieve a balanced and realistic reflective appearance.
More Video Tutorials
Free videos for logged in members – just sign up as a ‘friend’ to view and click any of the thumbs.To explore all of these, visit this page!
If you don’t have an account, please sign up here! The website currently has over 350 video tutorials, plus step by step guides and PDFs. You can explore more free videos with a free “freebies” membership, or take the plunge and become a full subscriber for full access.
If you’d prefer to support me on Patreon, please visit: https://www.patreon.com/RichardGray [...]
A series of videos on how I painted my Aeldari Autarch (Eldritch Omens). This includes the pearlescent NMM armour, the soulstones, sword and Death Spinner(s)!
Scroll down to explore the tutorials in order, or look at specific parts or techniques of your Aeldari Autarch by clicking one of the links below:
Video – Aeldari Autarch ArmourMaterials NeededVideo – Aeldari Autarch SoulstoneMaterials NeededStep-by-Step Guide:Video: Aeldari Autarch Power SwordMaterials Needed:Step by Step GuideVideo – Aeldari Autarch Death Spinner WraithboneMaterials NeededStep-by-Step GuideVideo – Aeldari Autarch Death Spinner (Black)Materials NeededStep by Step GuideMore Aeldari/Eldar!
Video – Aeldari Autarch Armour
All videos are recorded in HD 1080p or higher – use full screen for the full effect and let the video load completely. You can also click the little “cog” and change the speed of the video, if I am going too fast (or slow!).
Materials Needed
Base Paints: Vallejo Turquoise (Sotek Green can be used as an alternative), Vallejo Black
Highlight Paint: P3 Morrow White (or any high-quality white paint)
Brushes: Fine detail brushes, including a customised, cut-down brush for stippling
Palette: Preferably a wet palette for mixing and maintaining paint consistency
Water: For thinning paints
Step-by-Step Guide
Assembly and Priming: Assemble your Autarch, ensuring clean joins and smooth surfaces. Prime the model in black to enhance the depth and contrast of the subsequent layers.
Base Coating
Initial Base Coat: Mix Vallejo Turquoise with a small amount of black to create a dark base colour. Apply this mixture evenly across the armour, setting the stage for the lighter highlights to come. This base layer helps in mapping out the armour’s contours and provides a foundation for building contrast.
Highlighting
Mixing Highlights: Create several shades of turquoise by mixing the base Vallejo Turquoise with varying amounts of black for darker shades and white for lighter shades. This range will allow you to build up the shiny armour effect through gradual layering.
Applying Highlights: Start highlighting areas where light naturally hits the armour, such as the helmet’s curvature. Use a “scratchy” application method for this initial layer to block in the highlight areas without aiming for perfection.
Refining Highlights
Stippling Technique: Shift to a stippling technique with a customised brush (cut down to keep the tip thin) to apply the finer, lighter highlights. This approach allows for more precise control over the intensity and spread of the highlights, contributing to the shiny armour effect.
Enhancing the Shine: Focus on areas that would reflect light more intensely, such as the helmet’s forehead and other raised surfaces. Gradually lighten these highlights by adding more white to the turquoise, working towards pure white for the most intense reflections.
Adding Depth and Detail
Creating Contrast: Apply darker shades into recesses and around the edges of the lighter highlights to enhance contrast and depth. This step is crucial for making the shiny effect believable and visually striking.
Detailing with Black: Use Vallejo Black to paint areas such as the faceplate, ensuring to keep these areas distinct and not overly bright to avoid detracting from the focal points of the armour.
Finishing Touches
Edge Highlighting: Use the lightest turquoise mix to carefully edge highlight the armour, defining its shapes and enhancing the overall shininess. Be precise and consistent with these highlights to maintain the model’s clean appearance.
Final Adjustments: Review the model for any areas that need softening or additional contrast. Use glazes (thin, transparent layers of paint) to adjust the intensity of the highlights or shadows as necessary.
Video – Aeldari Autarch Soulstone
All videos are recorded in HD 1080p or higher – use full screen for the full effect and let the video load completely. You can also click the little “cog” and change the speed of the video, if I am going too fast (or slow!).
Materials Needed
Fine detail brushes
Palette for mixing paints
Water for thinning paints
Paints Used:
Games Workshop: Khorne Red, Pink Horror
Vallejo: Pink, Black
P3: Morrow White (or any high-quality white paint)
Step-by-Step Guide:
Base Coating: Begin by painting the entire soulstone with Khorne Red. Aim for a smooth, even coat. If the paint is too thick, thin it with a bit of water (about 50/50 ratio). Let dry and apply a second coat if necessary for full coverage.
Creating the Horizon Line: Mix Khorne Red with a tiny amount of black to darken it slightly. Paint a wobbly horizon line towards the bottom of the soulstone, simulating a shadowed effect. This line doesn’t need to be perfectly straight; a bit of curvature adds to the natural look.
Blending the Horizon: Below this line, blend back to the original Khorne Red, creating a smooth transition. You can achieve this by using a damp brush to soften the edge between the two colours.
Adding Highlights: On the upper part of the soulstone, start highlighting with Pink Horror. Near the horizon line, make this highlight bright and prominent, fading it as you move upwards. Mix Pink Horror with Vallejo Pink to lighten it for further highlights, applying these closer to the top of the gem.
Enhancing the Gem Effect: Introduce a brighter layer by using a mix of Vallejo Pink and white. This should be applied sparingly, focusing on the top edges and areas you want to emphasise the most.
Defining the Edges: Carefully outline the left and right edges of the soulstone with the light pink mix. This step requires a steady hand to achieve a thin, precise line that enhances the gem’s shape.
Final Touches: Add a small dot of P3 Morrow White at the top left of the soulstone to simulate a reflection point, making the gem appear more lustrous. Optionally, add a tiny white dot on the opposite bottom right to suggest light passing through the gem.
Adjusting and Correcting: If any areas need adjustment, gently glaze over them with the base colours to correct the intensity or blend. Always allow paint to dry between layers to avoid muddying the colours.
Video: Aeldari Autarch Power Sword
All videos are recorded in HD 1080p or higher – use full screen for the full effect and let the video load completely. You can also click the little “cog” and change the speed of the video, if I am going too fast (or slow!).
Materials Needed:
Vallejo Neutral Grey
Vallejo Ice Yellow
Games Workshop Yriel Yellow
Games Workshop Mournfang Brown
Games Workshop Abaddon Black
Games Workshop Sotek Green
P3 Morrow White
A mix of Neutral Grey and Yriel Yellow
A mix of Ice Yellow and Morrow White
Step by Step Guide
Base Coating: Start by applying a base coat of Vallejo Neutral Grey across the sword. This serves as a solid foundation for building up the NMM gold effect.
Initial Highlights: Mix Vallejo Neutral Grey with a small amount of Yriel Yellow to create your first highlight layer. Focus this mixture towards the edges and points of the sword where light would naturally be strongest.
Enhancing the Highlights: Gradually introduce lighter shades by adding more Yriel Yellow and then Ice Yellow into your mixes. Apply these to the most pronounced edges and features to simulate the effect of light reflecting off the metal.
Defining Reflections: Pay attention to the dynamic shape of the sword, applying strategic highlights to suggest the reflection of light on its surface. This includes the curvature near the tip and along the flat of the blade.
Deepening Shadows: Use a mixture of Neutral Grey and a touch of black to deepen the shadows along the less illuminated parts of the sword. This contrast is crucial for the NMM effect.
Finishing Touches: For the brightest points of light reflection, mix Ice Yellow with Morrow White and apply sparingly to the very tips and edges where light would hit directly.
Glazing for Depth: Glaze the sword with thin layers of Mournfang Brown and Sotek Green to add colour depth and variety, enhancing the alien quality of the weapon.
Final Highlights: Use pure white to add final highlights to the most prominent areas. This step is critical for creating the illusion of a gleaming, reflective surface.
Throughout this process, remember the importance of maintaining thin paint consistency to avoid clumping and to achieve the smoothest transitions possible. If you encounter challenges with colour transitions, consider creating bridge transitions by mixing intermediate shades.
Video – Aeldari Autarch Death Spinner Wraithbone
All videos are recorded in HD 1080p or higher – use full screen for the full effect and let the video load completely. You can also click the little “cog” and change the speed of the video, if I am going too fast (or slow!).
Materials Needed
Base Paints: Games Workshop Dryad Bark
Layer Paints: Games Workshop Baneblade Brown, Karak Stone, Morghast Bone, Ushabti Bone, Screaming Skull
Highlight Paints: Games Workshop Evil Sunz Scarlet, Sotek Green, Warpstone Glow, P3 Morrow White (or any white paint)
Brushes: Fine detail brushes for texture and highlight application
Palette: For mixing and thinning your paints
Water: For thinning paints to the desired consistency
Step-by-Step Guide
Start with a Black Base: Ensure your miniature is primed in black. This will deepen the subsequent layers of paint, adding to the aged effect.
Apply Dryad Bark: Cover the entire weapon in a layer of Dryad Bark. This dark brown serves as a rich foundation for the wraithbone texture.
Layering
First Layer with Baneblade Brown: Apply Baneblade Brown over the Dryad Bark, focusing on the areas that will catch light. Don’t worry about perfect coverage; the slight translucency adds to the texture.
Add Karak Stone Highlights: Layer Karak Stone over the Baneblade Brown, enhancing the lighter areas and beginning to define the wraithbone texture. Again, embrace the paint’s translucency to build depth.
Texture and Detailing
Fine Texture with Morghast Bone: Use Morghast Bone to start adding fine, squiggly textures resembling weathered bone. Use the very tip of your brush and light pressure to create jagged, circular shapes.
Enhance Texture with Ushabti Bone: Increase the texture’s visibility by applying Ushabti Bone, focusing on shadowed areas and blending into the lighter sections for a smooth transition.
Highlight with Screaming Skull: Apply Screaming Skull sparingly to the most raised areas and edges to simulate light reflecting off the bone’s surface. This layer should be thin and focused.
Final Highlights and Corrections
Bright Highlights with White: Use P3 Morrow White (or any white paint) diluted with water to add final touches to the texture, focusing on the highest points and sharpest edges. This step brings out the detail and adds a sense of dimension to the wraithbone.
Adjust Texture and Contrast: If necessary, go back with previous colours to adjust the texture and contrast. This could mean softening too-bright areas with Screaming Skull or Ushabti Bone or deepening shadows with Morghast Bone.
Adding Colour and Detail
Apply Evil Sunz Scarlet: For the weapon’s energy filaments, start with a base of Evil Sunz Scarlet. Draw fine lines to mimic lightning or energy crackling from one end to the other.
Mix in White for Highlights: Gradually add white to your Evil Sunz Scarlet to lighten the colour for the highlights. Focus these lighter shades towards the base (or top, depending on orientation) of the energy filaments, creating a gradient effect.
Incorporate Sotek Green and Warpstone Glow: To add a unique touch and colour variation, introduce Sotek Green and Warpstone Glow sparingly into the wraithbone texture. This can simulate moss or growth, adding to the ancient appearance. Use these greens lightly to avoid overwhelming the bone texture.
Painting a wraithbone texture on your Aeldari Autarch Deathspinner involves a delicate balance of layering, texture creation, and strategic highlighting. By following these steps and adjusting based on your model’s specific details and your personal preference, you can achieve a beautifully aged, textured effect that stands out on the battlefield. Remember, the key to this technique is patience and layering; build your colours gradually for the most natural and detailed result.
Video – Aeldari Autarch Death Spinner (Black)
All videos are recorded in HD 1080p or higher – use full screen for the full effect and let the video load completely. You can also click the little “cog” and change the speed of the video, if I am going too fast (or slow!).
Materials Needed
Base Paint: Vallejo Model Color Black
Highlight Paints: Vallejo Basalt Grey, and any white paint (I’ve used P3 Morrow White, but any white will do)
Mixing Palette: For creating various shades of grey
Fine Detail Brushes: For precise application of highlights
Water: For thinning paints
Step by Step Guide
Base Coating
Prepare the Miniature: Ensure your Aeldari Autarch Deathspinner is clean, primed, and ready for painting. If you’ve previously painted it, as I have, ensure the model is painted over in Vallejo Model Color Black. This provides a flat, non-satin finish that’s perfect as a canvas for our shiny black effect.
Highlights
Observe the Model: Look at the shapes and details of the model. Identify areas that will naturally catch the light, such as edges, raised surfaces, and textures. The Deathspinner has a mix of flat and curved surfaces, which will influence our highlight placement.
Create a Gradient Palette: Mix Vallejo Basalt Grey with black to create several shades of grey, from dark to light. Also, prepare a mix with white to create lighter greys. These will be used to build up the highlights gradually.
Start with Mid-Tones: Begin highlighting with a mid-tone grey, not the darkest shade. This helps in mapping out the highlights clearly without committing to high contrast immediately. Apply this mid-tone grey to areas you’ve identified as natural light catchers.
Increase Contrast: Gradually work your way up through the shades of grey you’ve mixed, moving towards the lighter greys and eventually white. Focus on smaller areas within the already highlighted sections to create a sense of light reflecting off a shiny surface.
Edge Highlighting: Use fine detail brushes to apply edge highlights meticulously. This step is crucial for defining the shapes and textures of the model, making them stand out against the black base.
Refining the Highlights
Adjust the Highlights: If any area looks too grey or the contrast isn’t high enough, go back in with your darker greys or black to redefine the shadows. This step is about balancing the overall look to maintain the illusion of a shiny black surface.
Glazing: Mix a glaze using Vallejo Model Color Black thinned down with water. Use this to subtly adjust the intensity of your highlights and shadows, smoothing out transitions and ensuring that the black remains the dominant colour.
Final Touches
Sharpening Highlights: For the brightest points, use white or a very light grey to add final touches. These should be very small, focused on the most prominent areas where light would naturally be most intense.
Cleanup: Review your Aeldari Autarch and clean up any areas where the paint may have overstepped. Use black to correct any mistakes and sharpen the edges.
Cant see the Aeldari Autarch videos?
If you don’t have an account, please sign up here! The website currently has over 350 video tutorials with steps and tips, plus a selection of PDFs. If you are not sure about joining, you can explore my free videos with a free membership, or take the plunge and become a full subscriber for full access.
If you’d prefer to support me on Patreon, please visit: https://www.patreon.com/RichardGray
More Aeldari/Eldar! [...]
A series of videos on how I painted my Aeldari Avatar, from the NMM armour and gold to the glowing lava and shining soulstones! Scroll down to explore these in order, or use the contents below to jump to a specific part or technique used on the model.
Quick jump!
Materials ListVideo – Aeldari Avatar Basics and AirbrushingPaints and MediumsPreparation and AssemblyAirbrushing BasicsPainting TechniquesFinal TouchesVideo – Aeldari Avatar NMM SteelMaterials RequiredPreparationStep by Step GuideAdvanced TipsVideo – Aeldari Avatar NMM Shoulder ArmourMaterials NeededStep-by-Step GuideVideo – Aeldari Avatar Lava GlowMaterials NeededPainting the Lava GlowPainting the Cooled MagmaAdditional TipsVideo – Aeldari Avatar Symbol in Gold NMMMaterials NeededStep-by-Step GuideAdditional TipsVideo – Aeldari Avatar Soul StonesMaterials NeededStep-by-Step GuideAdditional Tips
Materials List
Primers
Ultimate Primer
Black
Tools and Equipment
Airbrush
An airbrush equipped with a 0.4 needle, suitable for fine detail work and broad coverage. A compressor set to around 30psi is recommended for optimal flow and control.
Magnets (optional)
Small magnets if you wish to magnetize the weapon arm for easy swapping of weapons.
Brushes
Detail Brushes
A selection of fine detail brushes for hand-painting intricate details, highlights, and glazes after the base airbrushing is complete. A range from fine to very fine is advisable – I use Artist Opus brushes but any high-quality brush designed for miniatures is recommended.
Other Supplies
Mixing Palette
For mixing paints and thinners. A wet palette is beneficial for keeping paints hydrated during the painting process.
Scrap Card or Paper
For testing airbrush flow and paint consistency before applying to the model.
Cleaning Supplies
Airbrush cleaner and water for maintaining your airbrush after use.
Protective Gear
Gloves and a mask, especially if working in a poorly ventilated area, to protect against paint and thinner fumes.
Assembly Materials
Plastic Glue or Super Glue
For assembling the miniature, excluding the parts intended to be painted separately.
Hobby Knife
For cleaning mould lines and preparing surfaces for magnetization or assembly.
Video – Aeldari Avatar Basics and Airbrushing
All videos are recorded in HD 1080p or higher – use full screen for the full effect and let the video load completely. You can also click the little “cog” and change the speed of the video, if I am going too fast (or slow!).
Paints and Mediums
Games Workshop
Mephiston Red
Flash Gitz Yellow
Vallejo
Black
Airbrush Thinner
Preparation and Assembly
Before we begin, ensure your model is primed with Ultimate Primer Black and assembled, except for the head and the arm, which we’ll paint separately due to their intricate details
Weapon Options: The kit includes an axe, a sword, and a spear, along with three head variants. Choose your preferred options; I’ve opted for a particular head variant for its aesthetic appeal.
Magnetizing Weapons: For versatility, you can magnetize the weapon arm. I’ve simplified the process by adjusting the arm’s joint for easier magnet attachment, allowing for weapon swaps without affecting in-game performance.
Airbrushing Basics
Equipment: I’ll be using an airbrush with a 0.4 needle and operating at around 30psi. For thinning the paint, Vallejo Airbrush Thinner is recommended for smoother application, but water can also be used as a cost-effective alternative.
Initial Colour Application: Start by airbrushing the main body parts. Initially, I applied Mephiston Red to the armour, planning for a non-metallic red armour with blue flames. However, I later decided to adjust this approach for a more traditional flame colour and a non-metallic steel or iron look for the armour to reflect the flames’ light.
Applying Base Colours: For the flames, begin with Mephiston Red as the base, gradually adding Flash Gitz Yellow to the mix for each layer. Aim for a smooth transition from the red at the tips to a vibrant yellow at the base of the flames. This step provides a solid foundation for detailing the flames later.
Painting Techniques
Precision and Patience: When airbrushing, ensure you’re working in a well-ventilated area and practice on a piece of scrap material to adjust the flow and pressure settings before applying paint to the model.
Layering: Apply thin layers to achieve an even coverage without obscuring the details. This method requires patience as multiple coats may be needed for a solid colour, especially when building up from dark to light hues.
Correcting Mistakes: Don’t fret over airbrush overspray; we’ll cover armour sections later with Vallejo Black to redefine the model’s details and contrast.
Final Touches
Detailing the Flames: After airbrushing, the next stages will involve hand painting to enhance the flames’ brightness and add depth with highlights and glazes.
Armour Detailing: Following the airbrush work, we’ll hand paint the armour sections with Vallejo Black to create sharp contrasts between the flames and the armour, accentuating the model’s dynamic appearance.
Thats it for the groundwork for painting your Aeldari Avatar, focusing on airbrushing techniques for a vibrant base. The next part will delve into detailed hand painting, bringing your Avatar to life.
Video – Aeldari Avatar NMM Steel
Part 2 in a series of how to paint the Aeldari Avatar, looking at painting the helmet in NMM) Non Metallic Metal) steel.
Materials Required
Paints: Mournfang Brown, Abaddon Black (Games Workshop); Black, German Grey, Basalt Grey, Neutral Grey, Dark Sea Grey, Dark Blue Pale (optional from Vallejo); Morrow White (P3).
Tools: Wet palette, fine detail paintbrushes, water for diluting paints.
Preparation
Base Colours: Ensure your model is prepared with base colours as detailed in the prior video. This guide focuses exclusively on the helmet.
Palette Preparation: Ready your wet palette with a gradient of greys from black to light grey. Include Dark Blue Pale mixed with white for optional blue-tinged reflections.
Step by Step Guide
Initial Highlights
Start with Basalt Grey: Start by outlining the shapes of the highlights on the helmet. Use a lamp to discern where the primary highlight should be, based on the model’s orientation towards a light source. This is often on the forehead for the Aeldari Avatar.
Insert Random Reflections: Beyond the primary highlight, add arbitrary, smaller reflections to mimic light from various environmental sources, such as explosions or other battlefield illuminations.
Shaping Highlights
Modify for Surface Shape: The shape of your highlights should vary based on the curvature and texture of the helmet’s surface. Steer clear of mirror finishes; instead, target generic highlight shapes that are simpler to achieve and adjust.
Edge Highlights: Integrate edge highlights to represent light catching at sharper angles more intensely than on flatter surfaces.
Enhancing Highlights
Layering Greys: Progressively work up the highlights, starting from darker greys and moving towards lighter shades. The transition between shades should be subtle, enhancing the metallic effect without losing contrast.
Final Details
Apply Glazes for Depth: Use glazes of Mournfang Brown and Morrow White to add depth and variation to the highlights. These paints should be thinned more than usual to avoid overpowering the underlying layers.
Reflections and Contrast: Introduce imagined reflections and ensure there’s a balanced contrast across the helmet. Excessive grey can diminish the metallic effect, while insufficient grey can make it appear overly dark.
Finishing Touches
Sharp Highlights: Utilise the brightest greys or white for the most intense points of light, particularly on edges facing upwards or at points where light would be most concentrated.
Glazing for Smoothness: If needed, use glazes to smooth out transitions between highlights, especially where you aim to soften or deepen the contrast.
Advanced Tips
Dynamic Lighting: Consider the environment your avatar will be placed in. Adding subtle colour reflections (e.g., blues or browns) can suggest surrounding elements or atmospheric conditions.
Texture Variation: Leverage the texture of your brush and the viscosity of your paint to add interest. A worn brush can create softer transitions, ideal for blending, while a new brush with a sharp point is perfect for fine details.
Video – Aeldari Avatar NMM Shoulder Armour
Materials Needed
Paints: Neutral Grey, German Grey, Black (Vallejo); Morrow White (P3); Mournfang Brown (Games Workshop).
Tools: Wet palette, size 00 Artist Opus brush, water for thinning paints.
Step-by-Step Guide
Preparing Your PaletteStart by mixing a range of greys from black and white on your wet palette. The inclusion of Neutral Grey can help, but the exact shades are less critical than having a smooth gradient from black to white. This range will make sure that your transitions on the armour are as smooth as possible.
Mapping Primary Light SourcesDetermine where the primary light source hits the model, focusing on the shoulder pads. The areas facing the front should be the brightest. This initial mapping helps in planning where the most intense highlights and reflections will be placed.
Blocking in HighlightsWith your size 00 brush, begin to block in the primary highlights. At this stage, the marks can be rough; precision comes later. Your goal is to establish the areas that will catch the most light based on the model’s orientation and the envisioned light source.
Refining HighlightsAfter laying down the initial highlights, start refining them. At this point, you are not aiming for a competition-level finish but rather a coherent look that enhances the model’s focal points. Use your small brush to navigate the model’s details without overpainting previously finished areas.
Adding Texture and DetailUse the tip of your brush to apply the paint in a non-uniform manner, creating texture on the armour. Techniques such as stippling or squiggly lines can add depth. Avoid repetitive patterns unless you desire a specific stylistic effect.
Building Up LayersGradually work through your greys, from darkest to lightest, to build up the armour’s metallic look. Each new layer should be slightly lighter than the previous, focusing on refining the transitions and enhancing the brightness at the focal points.
Glazing for AtmosphereOnce you are satisfied with the grey layers, it’s time to add atmospheric colours to the model. Using thin glazes of Mournfang Brown (and potentially Morrow White for highlights), carefully apply these to midtones and shadows to introduce warmth and coherence across the model.
Final TouchesPay special attention to the model’s rear. Depending on your preference, you can either create a stark contrast between the brightly lit front and a darker rear or maintain a more uniform lighting around the model. This step involves strategic planning to ensure the model looks interesting from all angles.
Consistency and PatienceThroughout the painting process, maintain a consistent paint consistency. Thinner paint layers are crucial for smooth transitions and avoiding texture build-up, especially as you approach using white for the brightest highlights.
Glazing with WhiteUtilise white glazes sparingly to enhance the brightest points of the armour. This technique helps to smooth out the final appearance and add a further level of depth to the NMM effect.
Video – Aeldari Avatar Lava Glow
How to paint the molten lava and body panels on the Aeldari Avatar. This guide will walk you through the process of painting both the glowing lava effect and the cooled magma appearance on the body
Materials Needed
Paints:
Flash Gitz Yellow (Games Workshop)
Firedragon Bright (Games Workshop)
Mephiston Red (Games Workshop)
Daemonette Hide (Games Workshop)
Black (Vallejo Model Colour or any black)
Morrow White (P3 or any white)
Tools: Wet palette, fine detail brushes, water for thinning paints.
Painting the Lava Glow
Preparing Your Palette
On your wet palette, prepare a mix of Flash Gitz Yellow with a small amount of Morrow White to increase opacity. Aim for a shade slightly darker than Dawn Yellow but lighter than pure Flash Gitz Yellow.
Base Layer
Apply the yellow-white mix thoroughly into all the cracks between the model’s muscles, where you want the lava effect to show. This base layer might need to be applied liberally due to the translucency of the yellow.
Adding Brightness
While the first layer is still wet, add pure Morrow White into the mixture directly on the model, blending it in the centre of the lava channels to create a gradient effect from white to yellow.
Enhancing the Glow
After the initial layers dry, apply pure Flash Gitz Yellow at the base of the lava channels to diversify the intensity of the glow, adding depth to the effect.
Darkening the Muscles
Mix Mephiston Red with a bit of black to darken the muscle areas adjacent to the lava channels. This enhances the contrast and makes the glow appear more intense.
Painting the Cooled Magma
Initial Dark Layer
Apply a mix of black across the raised areas of the muscles, avoiding covering deep recesses or textural details to maintain a sense of depth and heat variation.
Adding Grey Tones
Lightly brush a mix of Daemonette Hide and black over the blackened areas to simulate cooled magma. Be sparing with this application to keep the high-contrast effect intact.
Final Highlights
Use pure Daemonette Hide to highlight the edges and highest points of the cooled magma areas, enhancing the texture and adding a final touch to the illusion of heat emanating from beneath.
Additional Tips
Contrast is Key: The effectiveness of the lava glow effect relies heavily on the contrast between the bright, almost white centres of the lava channels and the dark, cooled magma areas.
Layering: Build up the glow effect gradually, allowing each layer to dry before applying the next. This approach helps in achieving a smooth gradient.
Mixing Paints: Adjust the mixtures based on the specific details and shapes of your model. The suggested ratios are starting points; feel free to modify them to suit your needs.
Patience and Practice: Achieving a convincing lava glow effect requires patience and practice, especially when blending the colours directly on the model.
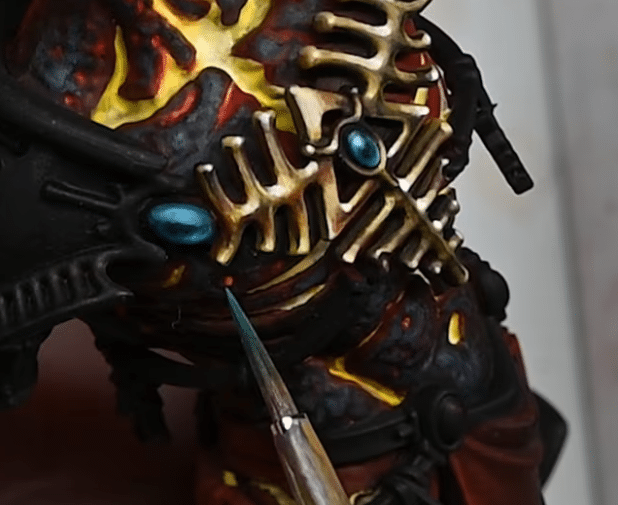
Video – Aeldari Avatar Symbol in Gold NMM
How to paint the symbol on the chest of the Aeldari Avatar in NMM Gold.
Materials Needed
Paints:
Mournfang Brown (Games Workshop)
XV-88 (Games Workshop)
Balor Brown (Games Workshop)
Flash Gitz Yellow (Games Workshop)
Morrow White (P3 or any high-quality white paint)
Tools: A fine detail brush, a wet palette for mixing paints, and water for diluting paints as necessary.
Step-by-Step Guide
Base Layer
Begin by applying a base coat of Mournfang Brown to the entire chest symbol, ensuring full coverage. You may need to apply a couple of layers to achieve an opaque finish due to the paint’s translucency. Allow each layer to dry thoroughly before applying the next.
Highlight Placement
Next, use XV-88 to start blocking in the highlight placement. Focus on areas where the light naturally catches due to the symbol’s curvature and angles. Consider the light source direction (in this case, top left) and mimic this in your highlight placement for consistency. The XV-88 highlights should be applied generously to form the base for subsequent lighter shades.
Building Up Highlights
Mix Balor Brown with a small amount of Flash Gitz Yellow to create a slightly yellower gold shade. Apply this mixture to areas previously highlighted with XV-88, reducing the highlight area slightly to start forming a gradient effect. This step introduces more vibrancy and begins to establish the gold tone.
Enhancing Gold Tone
Use Flash Gitz Yellow mixed with a small amount of Morrow White to create the next layer of highlights. Focus on further reducing the highlight areas, concentrating on the most raised parts and edges where light would be strongest. This mixture will start to bring a bright, metallic look to the symbol.
Final Highlights
For the final highlights, use pure Morrow White sparingly on the very peaks and edges of the symbol to simulate the brightest points of light reflection. This step is crucial for achieving the NMM effect, as it provides the contrast needed to mimic the appearance of shiny gold.
Adjusting for Realism
Throughout the process, adjust the size and placement of your highlights based on the model’s orientation and your chosen light source direction. Remember, the goal is to create a realistic metallic effect through the use of non-metallic colours.
Glazing for Cohesion
If you find the gold effect too desaturated or not quite matching the warmth of the model’s other elements (like lava glow), you can glaze over the symbol with thin layers of Flash Gitz Yellow. This will unify the colour scheme and add warmth to the gold without obscuring the detail work.
Additional Tips
Light Source Consistency: Ensure all parts of the model reflect the same light source direction for a cohesive look.
Layering: Achieve smooth transitions by allowing layers to dry fully before applying the next.
Paint Consistency: Keep your paint slightly thinned to aid smooth application but not so much that it loses opacity too quickly.
Practice Makes Perfect: NMM techniques require practice to perfect, especially in controlling the placement and size of highlights for a realistic metallic effect.
Video – Aeldari Avatar Soul Stones
This guide will walk you through the steps to achieve a realistic gem effect on your model using Sotek Green, Black, and Morrow White.
Materials Needed
Paints:
Sotek Green (Games Workshop)
Black (Vallejo or equivalent)
Morrow White (P3 or equivalent)
Tools: Fine detail brush, wet palette for mixing and diluting paints, water for thinning paints.
Step-by-Step Guide
Preparing the Palette
On your wet palette, prepare Sotek Green, Black, and White. You’ll be using these colours to create the gem effect, with Black and White to modify the Sotek Green for shadows and highlights.
Base Layer
Start by applying Sotek Green directly to the soul stones on the model. Focus on achieving a neat, circular highlight at the top of each gem to represent the light source’s direction. If the paint appears too thin and the underlying colour shows through, apply another layer to enhance opacity.
Highlighting
Mix a small amount of Morrow White with Sotek Green to lighten the colour. Apply this lighter shade to the upper part of the gem, following the initial highlight’s shape but slightly reducing the area to create a gradient effect. Ensure this blend is more concentrated towards where you envision the light source hitting the gem, typically the top left, matching the light direction established on other parts of the model, like the non-metallic gold avatar symbol.
Refining the Gem
For added depth, incorporate a very small line of this lighter mix at the bottom right of the gem, creating a sense of reflection and roundness. Use the original Sotek Green to tidy up any overspill and blend the edges of your highlights for a smoother transition.
Intensifying Highlights
Gradually add more Morrow White to the mix for the brightest points of light on the gem. Focus these intensified highlights on a smaller area within your previously applied lighter shade, continuously narrowing the focus as you add more white. This method creates a luminous effect, simulating light reflecting within the gem.
Adjusting Shadows
To define the gem further, mix a small amount of Black with Sotek Green and apply it sparingly to the edges and around the base of the soul stone, enhancing its three-dimensional appearance. Be cautious with the amount of black, as it can quickly overpower the Sotek Green due to its strong pigmentation.
Final Touches
Use pure Morrow White to add a final pinpoint highlight to the top left of the gem, where the light source is strongest. This small detail significantly contributes to the gem’s realistic sparkle.
Additional Tips
Light Source Consistency: Ensure all gems on the model reflect the same light source direction for coherence across the miniature.
Layering: Achieve a smooth transition between shades by allowing each layer to dry thoroughly before applying the next. This technique prevents unwanted blending and muddiness.
Paint Consistency: Adjust the paint’s thickness based on the effect you’re aiming for. Thinner paint can act as a glaze to smooth out transitions, while thicker paint is better for opaque highlights.
Practice: Perfecting the soul stone effect may take practice. Experiment on a test model or an inconspicuous area before applying the technique to more visible parts of the miniature.
By following these steps and adjusting your technique as needed based on the specific details and shape of your model’s soul stones, you can achieve a striking and realistic gem effect.
If you don’t have an account, please sign up here! The website currently has over 350 video tutorials with steps and tips, plus a selection of PDFs. If you are not sure about joining, you can explore my free videos with a free membership, or take the plunge and become a full subscriber for full access.
If you’d prefer to support me on Patreon, please visit: https://www.patreon.com/RichardGray [...]
These videos show how to paint the Aeldari Soul Weaver from the Killteam: Nachmund boxed set that Games Workshop sent me.
Video: How to Paint the Aeldari Soul Weaver Part One
All videos are recorded in HD 1080p or higher – use full screen for the full effect and let the video load completely. You can also click the little “cog” and change the speed of the video, if I am going too fast (or slow!).
Video: How to Paint the Aeldari Soul Weaver Part Two
Paints
Games Workshop / Citadel:
Pink Horror
Cadian Fleshtone
Corvus Black
Mephiston Red
Mournfang Brown
Warpstone Glow
XV-88
Morghast Bone
Screaming Skull
Dryad Bark
Vallejo:
Turquoise
Light Turquoise
Model Colour Black
P3:
Morrow White
Brushes
A range of sizes for different tasks:
Detail work: Fine-tip brushes, such as a size 0 or 00, for eyes, facial details, and filigree.
Base coating and blending: Larger brushes, sizes 1 to 4, for smoother application over larger areas like cloaks and armour.
A dedicated dry brush for texture work on bases.
Additional Materials
Primer: Black primer for base coating.
Wet Palette: To keep paints moist and facilitate mixing and blending.
Water pot: For rinsing brushes.
Paper Towel or Cloth: For brush drying and cleaning.
Palette: For mixing paints, if not using a wet palette.
Glue: For assembling the model.
Blu-tack or Temporary Adhesive: Recommended for temporarily positioning parts like the head for easier painting access.
Fine Sand and PVA Glue: For texturing the base.
Varnish: Matte varnish to protect the finished model.
Tweezers and Sculpting Tools: Useful for applying small details like tufts or manipulating small parts.
Static Grass or Tufts: For detailing the base.
Preparation
Assembly: Assemble the model but consider leaving the head unglued to make painting the face easier. Prime the model in black to prepare it for painting.
Painting Guide
Armour and Cloak
Armour Base: Mix Vallejo Turquoise with a small amount of black to create a dark turquoise shade. Apply this mixture to the armour sections of the model.
Cloak Base: For the cloak, use Pink Horror mixed with a slight amount of black to achieve a dark pink base.
Skin
Base Layer: Apply Cadian Fleshtone, diluted with water (about 50:50), to the skin areas. Several layers may be required for opaque coverage due to the translucent nature of the paint.
Facial Features
Eyes and Eyebrows: Detail the eyes with Corvus Black and highlight with a light grey mixed from black and white. Add eyebrows with Corvus Black for a natural appearance.
Lips: Paint the lips with the same pink used for the cloak and highlight accordingly.
Hair
Mix Mephiston Red and Mournfang Brown for the hair’s base colour. Highlight by adding white to this mixture, progressively lightening the shade for higher highlights.
Leather and Accessories
Base Colour: Use Dryad Bark for leather parts, adding Cadian Fleshtone to lighten for highlights.
Soul Stones: Start with Warpstone Glow, adding white for highlights. Place a white dot on the top left of each stone to simulate light reflection.
Final Details and Assembly
Reassemble: If you left the head detached, glue it in place once the face is fully painted.
Base: Apply a simple textured base coated in a neutral colour like XV-88, followed by dry brushing with Morghast Bone and Screaming Skull to highlight texture.
Additional Tips
Highlighting: Use a wet palette to mix and blend colours smoothly. When highlighting, work from dark base shades up to light tones, focusing on where light naturally hits the model.
Blending: For smooth transitions, especially on the cloak and skin, thin your paints and build up layers gradually.
Detail Work: For fine details like eyes, use a fine-tip brush and steady hand. Keep correction fluid handy for any slips.
Finishing Touches: Use a light hand with final white highlights to ensure they complement rather than overwhelm the model’s colours.
More Aeldari/Eldar Tutorials to Explore!
If you don’t have an account, please sign up here! The website currently has over 350 video tutorials with steps and tips, plus a selection of PDFs. If you are not sure about joining, you can explore my free videos with a free membership, or take the plunge and become a full subscriber for full access.
If you’d prefer to support me on Patreon, please visit: https://www.patreon.com/RichardGray [...]
This video shows how to paint an Aeldari Howling Banshee Triskele Weapon to a high level tabletop standard.
The Aeldari Howling Banshee’s power weapon (the ‘triskele’ weapon) will have a non-metallic, yet luminous green effect. This method involves intricate layering and stippling to simulate reflection. We’ll primarily utilise Cybrite Green from Games Workshop, blended with various quantities of black for shadows, and Vallejo’s Ice Yellow for the highlights.
Materials Needed
Cybrite Green (Games Workshop)
Black (Vallejo Model Colour)
Ice Yellow (Vallejo)
Evil Sunz Scarlet (Games Workshop)
Wild Rider Red (Games Workshop)
Fire Dragon Bright (Games Workshop)
Morrow White (P3 or any alternative white)
A fine brush
A wet palette
Step-by-Step Tips and Guide – Green NMM
Base Layer: Firstly, coat the triskele weapon in black, creating a pristine base.
Green Layering:
Blend Cybrite Green with a touch of black. Apply this darker green shade to parts of the triskele weaponless exposed to light.
Incrementally integrate more black into the mixture for creating deeper shadows, ensuring smooth transitions.
Highlight Application:
Form lighter shades by mixing Cybrite Green with small increments of Ice Yellow. Gradually apply these on the triskele weapon’s raised and edge areas, depicting where light naturally strikes.
Keep your paint mix slightly thinned for better control during layering. A recommended mix is two parts water to one part paint.
Texture via Stippling:
With the lighter green mixes, stipple the surface to generate a textured, reflective look. The density of the dots correlates with the opacity.
Reflections Definition:
Under a lamp, observe the natural light reflections on the blade. Mimic these on the blade’s upper portion using lighter green shades, ensuring they’re the most luminous parts.
Finalising Highlights:
Employ white or the palest green mix for the highest light points. Apply these sparingly as minute dots or slender lines to achieve a sparkling effect.
Gemstone Painting:
For red gems: Start with Evil Sunz Scarlet, augment with highlights using Wild Rider Red and Fire Dragon Bright, mainly on the gems’ lower areas. Cap off with an Ice Yellow or white dot atop each gem for reflection.
For the blue gem: Adopt a similar approach, starting with Sotek Green and progressively incorporating white for highlights.
Refinement and Adjustment:
If needed, use glazes (diluted paint) to soften transitions or reintroduce colour in areas where over-highlighting may have occurred.
Continuously evaluate and tweak the intensity and positioning of highlights to achieve a balanced and realistic reflective appearance on the triskele weapon.
Explore more Non-Metallic Metal Tutorials
If you don’t have an account, please sign up here! The website currently has over 350 video tutorials with steps and tips, plus a selection of PDFs. If you are not sure about joining, you can explore my free videos with a free “freebies” membership, or take the plunge and become a full subscriber for full access.
If you’d prefer to support me on Patreon, please visit: https://www.patreon.com/RichardGray [...]
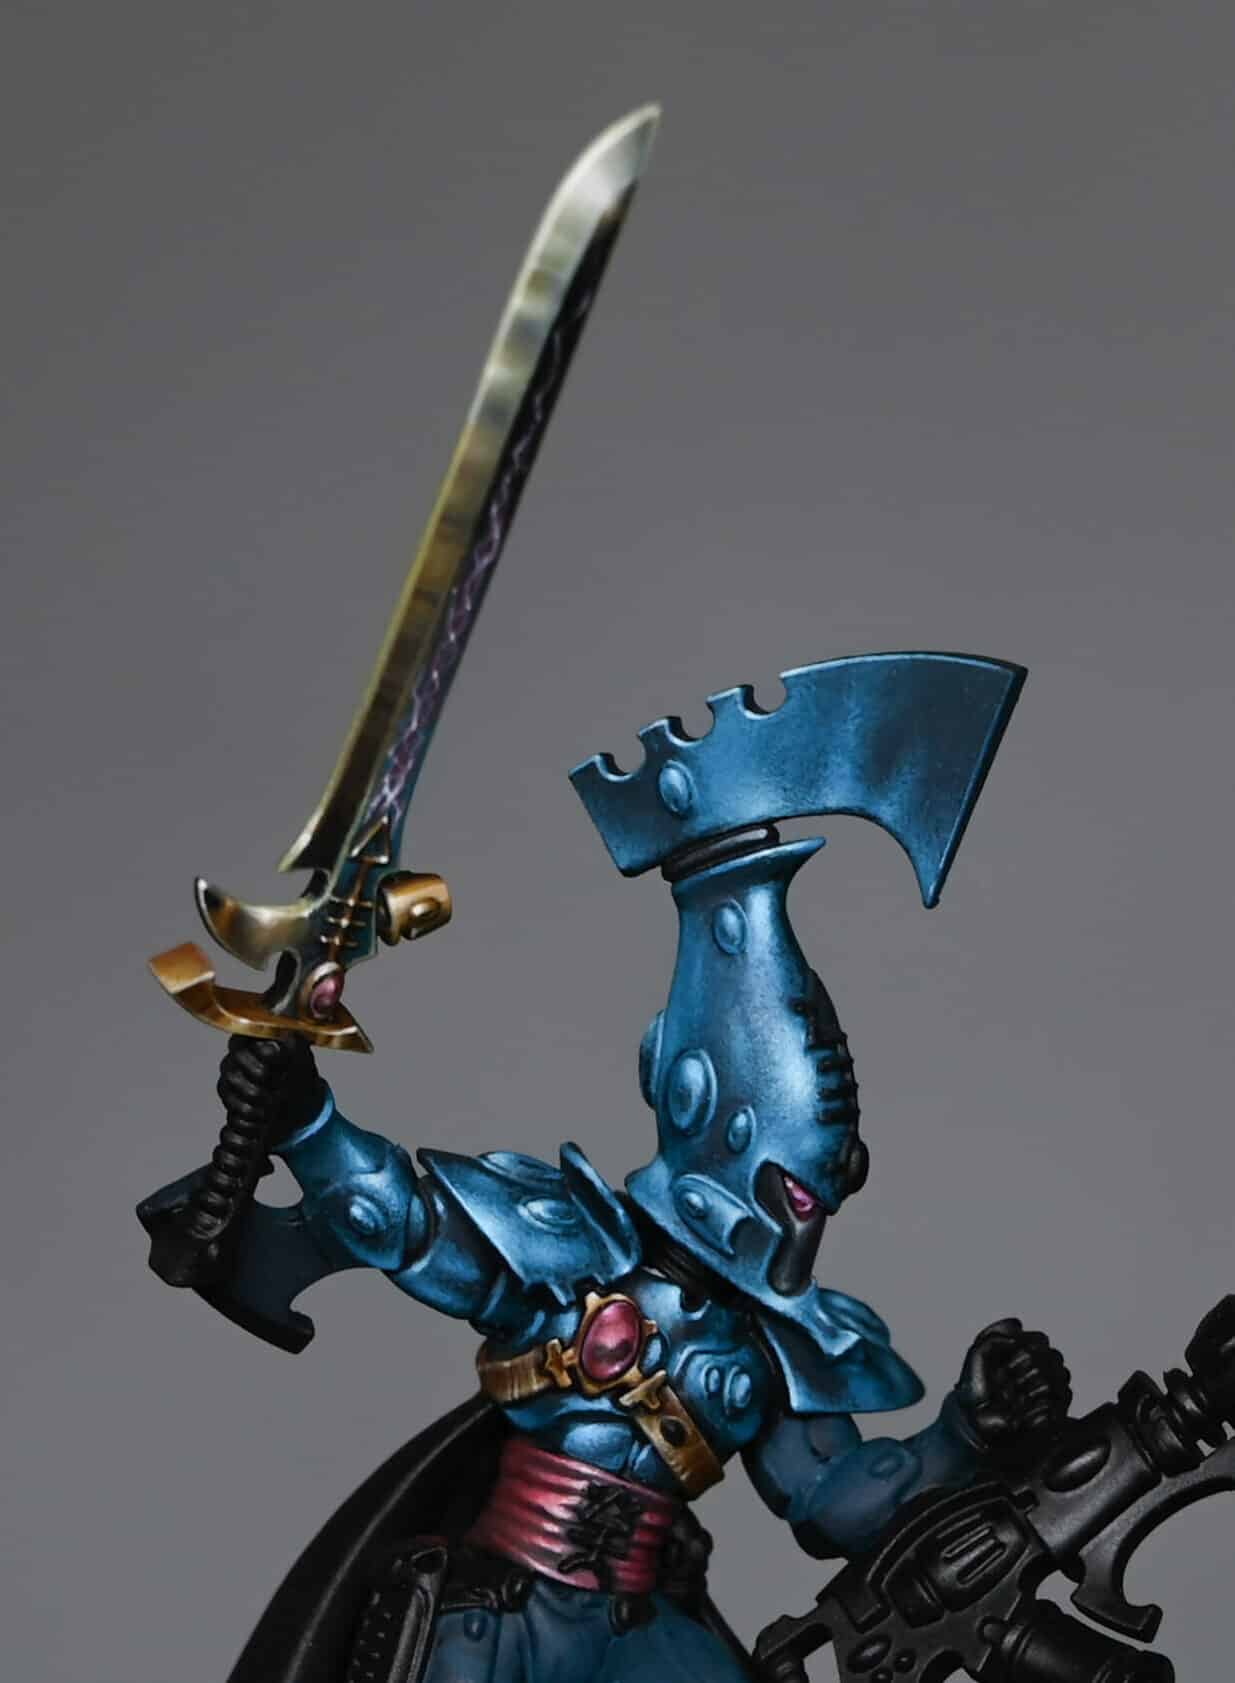
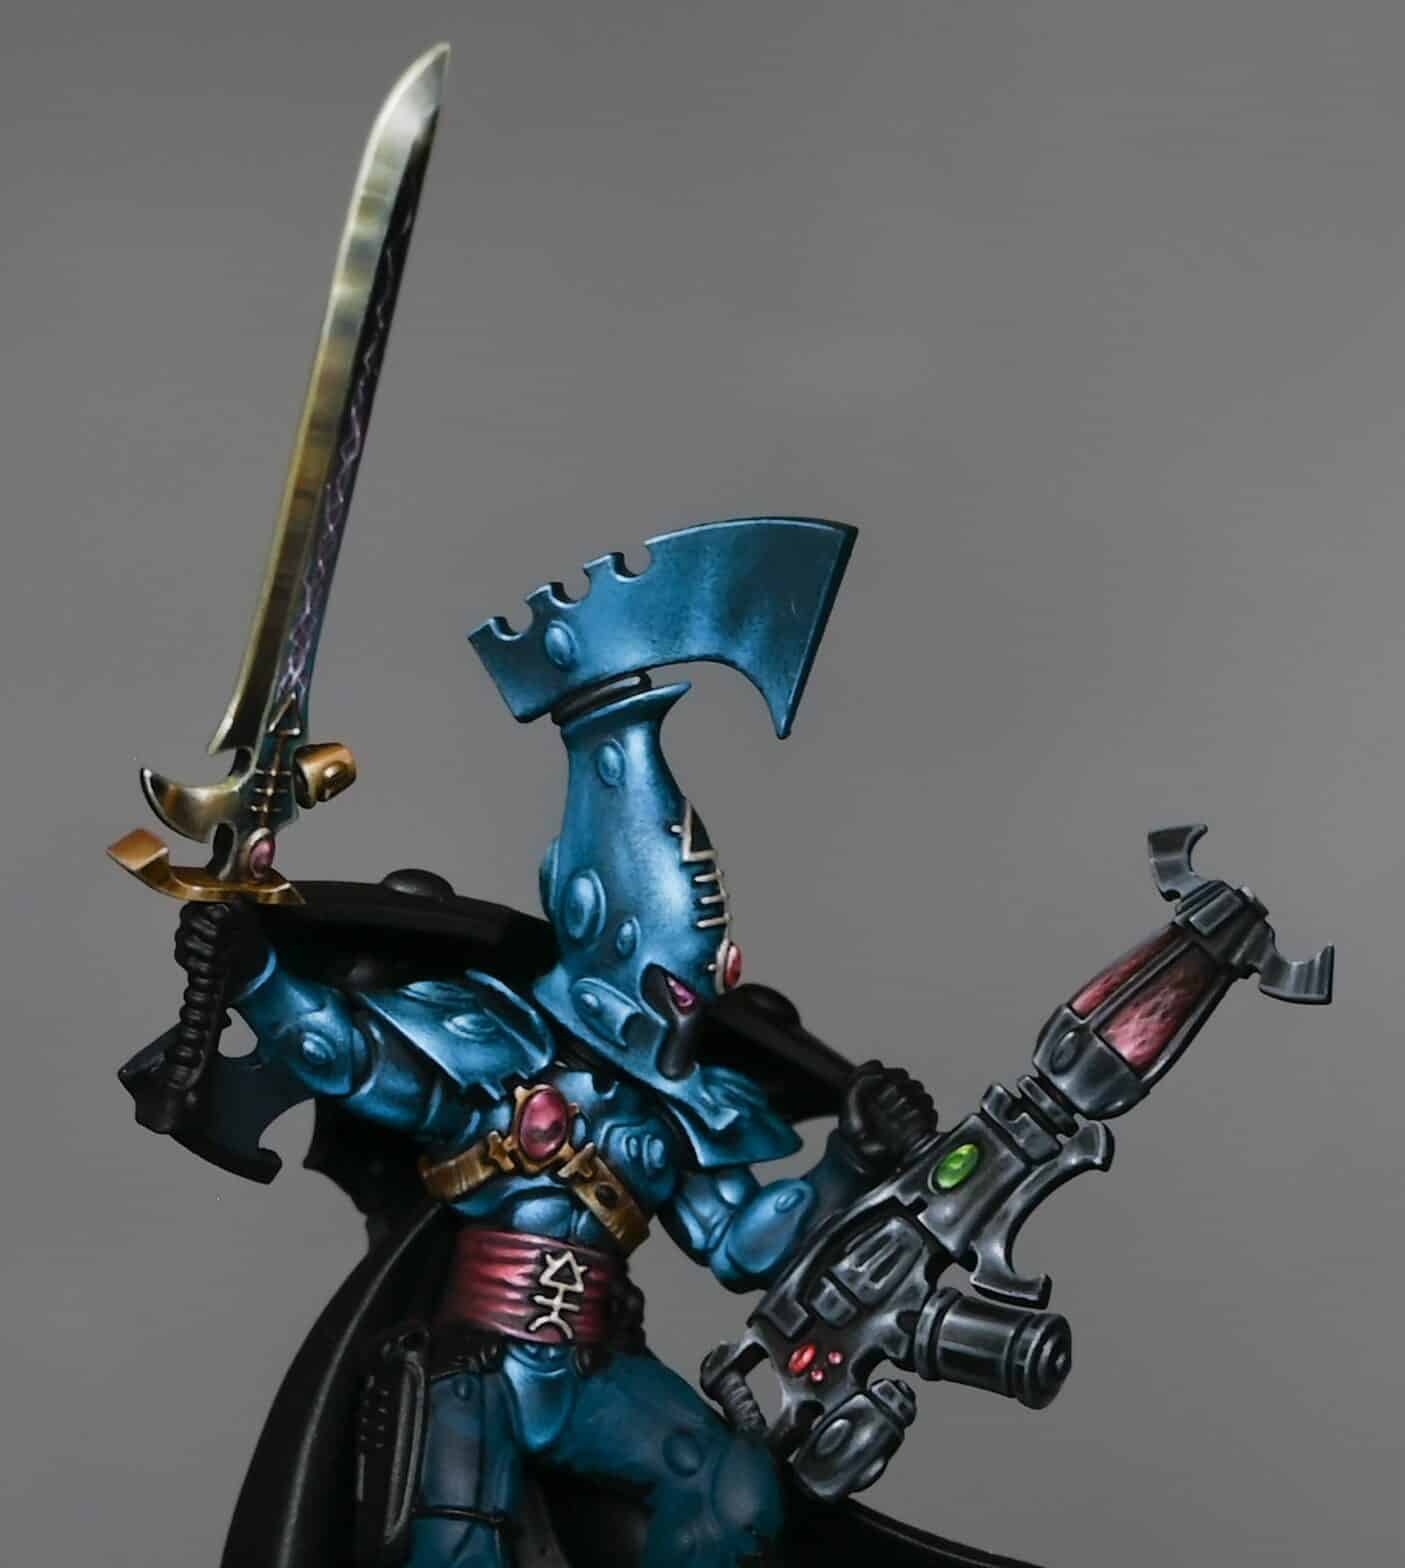
In this tutorial, I’ll be guiding you through how to paint an Aeldari Autarch power sword, focusing on achieving a non-metallic metal (NMM) effect to accentuate its alien elegance.
Video: How to Paint Aeldari Autarch Power Sword
All videos are recorded in HD 1080p or higher – use full screen for the full effect and let the video load completely. You can also click the little “cog” and change the speed of the video, if I am going too fast (or slow!).
Materials Needed:
Vallejo Neutral Grey
Vallejo Ice Yellow
Games Workshop Yriel Yellow
Games Workshop Mournfang Brown
Games Workshop Abaddon Black
Games Workshop Sotek Green
P3 Morrow White
A mix of Neutral Grey and Yriel Yellow
A mix of Ice Yellow and Morrow White
Step by Step Guide
Base Coating: Start by applying a base coat of Vallejo Neutral Grey across the sword. This serves as a solid foundation for building up the NMM gold effect.
Initial Highlights: Mix Vallejo Neutral Grey with a small amount of Yriel Yellow to create your first highlight layer. Focus this mixture towards the edges and points of the sword where light would naturally be strongest.
Enhancing the Highlights: Gradually introduce lighter shades by adding more Yriel Yellow and then Ice Yellow into your mixes. Apply these to the most pronounced edges and features to simulate the effect of light reflecting off the metal.
Defining Reflections: Pay attention to the dynamic shape of the sword, applying strategic highlights to suggest the reflection of light on its surface. This includes the curvature near the tip and along the flat of the blade.
Deepening Shadows: Use a mixture of Neutral Grey and a touch of black to deepen the shadows along the less illuminated parts of the sword. This contrast is crucial for the NMM effect.
Finishing Touches: For the brightest points of light reflection, mix Ice Yellow with Morrow White and apply sparingly to the very tips and edges where light would hit directly.
Glazing for Depth: Glaze the sword with thin layers of Mournfang Brown and Sotek Green to add colour depth and variety, enhancing the alien quality of the weapon.
Final Highlights: Use pure white to add final highlights to the most prominent areas. This step is critical for creating the illusion of a gleaming, reflective surface.
Throughout this process, remember the importance of maintaining thin paint consistency to avoid clumping and to achieve the smoothest transitions possible. If you encounter challenges with colour transitions, consider creating bridge transitions by mixing intermediate shades.
Watch all the tutorials for my Aeldari Autarch
Aeldari Autarch (Eldritch Omens)
A series of videos on how I painted my Aeldari Autarch (Eldritch Omens). This includes the pearlescent NMM armour, the soulstones, sword and Death Spinner(s).
Watch Now
If you don’t have an account, please sign up here! The website currently has over 350 video tutorials with steps and tips, plus a selection of PDFs. If you are not sure about joining, you can explore my free videos with a free membership, or take the plunge and become a full subscriber for full access.
If you’d prefer to support me on Patreon, please visit: https://www.patreon.com/RichardGray [...]
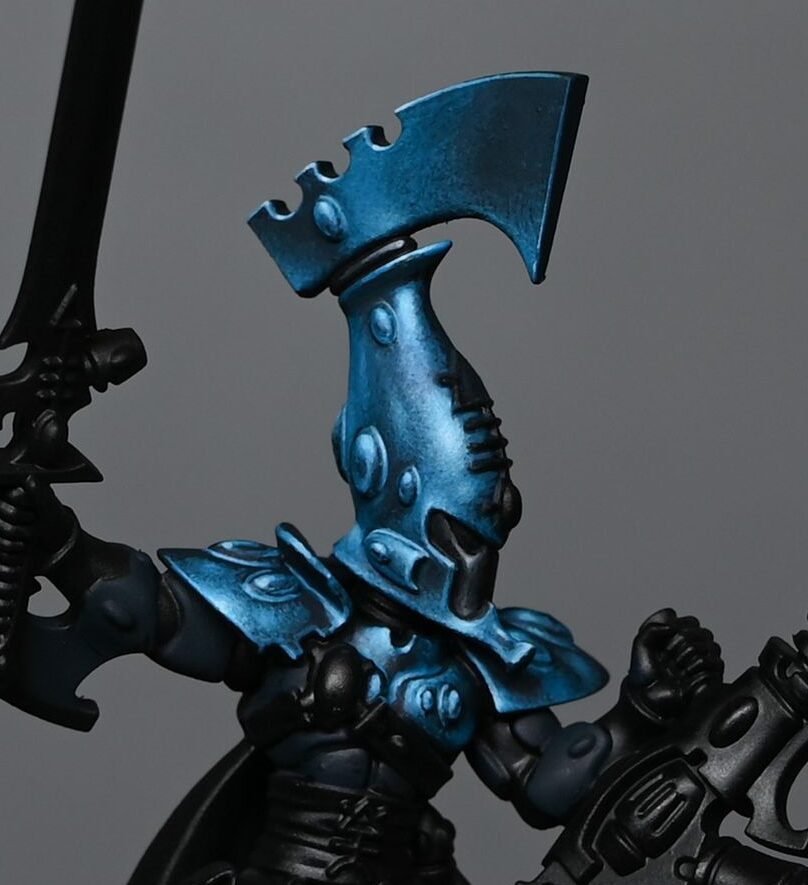
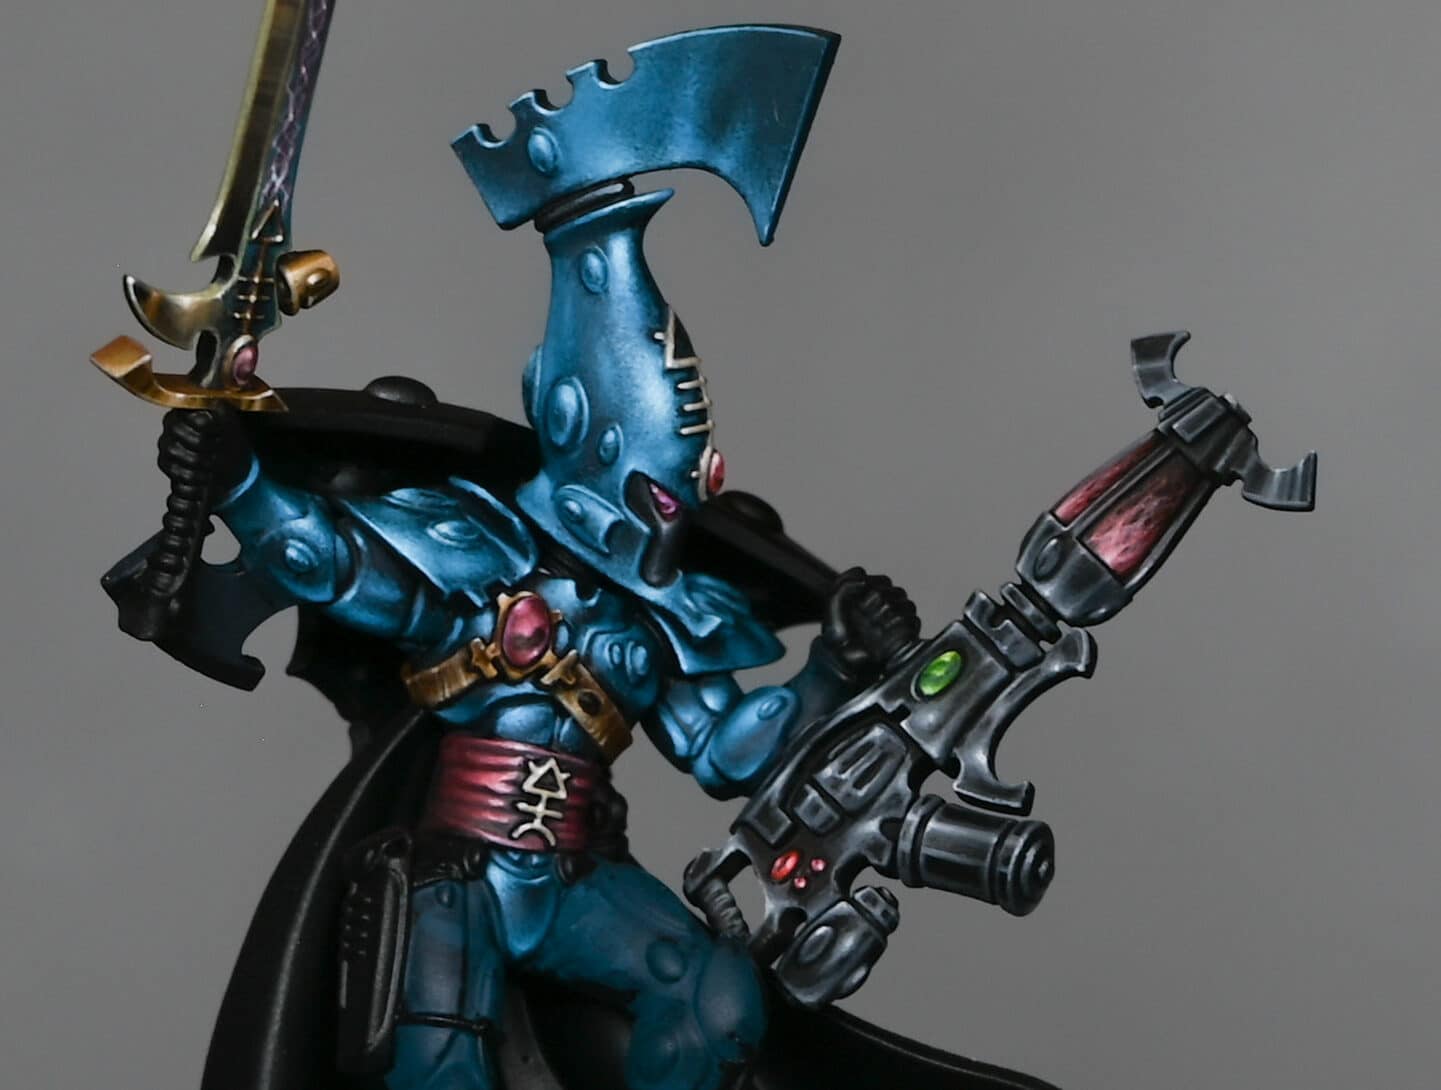
This video shows how to paint Aeldari Autarch Armour for the new Aeldari Autarch from Eldritch Omens to display standard.
Creating a striking, shiny armour effect on an Aeldari Autarch miniature requires patience, precision, and a blend of carefully chosen paints. This guide outlines the steps to achieve a high-quality finish using Vallejo and P3 paints, focusing primarily on achieving a glossy, turquoise armour reflective of the Aeldari’s elegant aesthetics. We’ll start with the helmet and touch on techniques applicable to other armour parts
Video – Aeldari Autarch Armour
All videos are recorded in HD 1080p or higher – use full screen for the full effect and let the video load completely. You can also click the little “cog” and change the speed of the video, if I am going too fast (or slow!).
Materials Needed
Base Paints: Vallejo Turquoise (Sotek Green can be used as an alternative), Vallejo Black
Highlight Paint: P3 Morrow White (or any high-quality white paint)
Brushes: Fine detail brushes, including a customised, cut-down brush for stippling
Palette: Preferably a wet palette for mixing and maintaining paint consistency
Water: For thinning paints
Preparing the Model
Assembly and Priming: Assemble your Autarch, ensuring clean joins and smooth surfaces. Prime the model in black to enhance the depth and contrast of the subsequent layers.
Base Coating
Initial Base Coat: Mix Vallejo Turquoise with a small amount of black to create a dark base colour. Apply this mixture evenly across the armour, setting the stage for the lighter highlights to come. This base layer helps in mapping out the armour’s contours and provides a foundation for building contrast.
Highlighting
Mixing Highlights: Create several shades of turquoise by mixing the base Vallejo Turquoise with varying amounts of black for darker shades and white for lighter shades. This range will allow you to build up the shiny armour effect through gradual layering.
Applying Highlights: Start highlighting areas where light naturally hits the armour, such as the helmet’s curvature. Use a “scratchy” application method for this initial layer to block in the highlight areas without aiming for perfection.
Refining Highlights
Stippling Technique: Shift to a stippling technique with a customised brush (cut down to keep the tip thin) to apply the finer, lighter highlights. This approach allows for more precise control over the intensity and spread of the highlights, contributing to the shiny armour effect.
Enhancing the Shine: Focus on areas that would reflect light more intensely, such as the helmet’s forehead and other raised surfaces. Gradually lighten these highlights by adding more white to the turquoise, working towards pure white for the most intense reflections.
Adding Depth and Detail
Creating Contrast: Apply darker shades into recesses and around the edges of the lighter highlights to enhance contrast and depth. This step is crucial for making the shiny effect believable and visually striking.
Detailing with Black: Use Vallejo Black to paint areas such as the faceplate, ensuring to keep these areas distinct and not overly bright to avoid detracting from the focal points of the armour.
Finishing Touches
Edge Highlighting: Use the lightest turquoise mix to carefully edge highlight the armour, defining its shapes and enhancing the overall shininess. Be precise and consistent with these highlights to maintain the model’s clean appearance.
Final Adjustments: Review the model for any areas that need softening or additional contrast. Use glazes (thin, transparent layers of paint) to adjust the intensity of the highlights or shadows as necessary.
Painting the Aeldari Autarch’s shiny armour is a meticulous process that rewards patience and attention to detail. By gradually building up highlights and carefully controlling the contrast between light and dark areas, you can achieve a vibrant, reflective armour finish that stands out on the battlefield or in a display case. Remember, the key to a successful paint job is not just in following the steps but in adapting the techniques to suit the unique contours and details of your miniature.
Watch all the tutorials for my Aeldari Autarch
Aeldari Autarch (Eldritch Omens)
A series of videos on how I painted my Aeldari Autarch (Eldritch Omens). This includes the pearlescent NMM armour, the soulstones, sword and Death Spinner(s).
Watch Now
If you don’t have an account, please sign up here! The website currently has over 350 video tutorials with steps and tips, plus a selection of PDFs. If you are not sure about joining, you can explore my free videos with a free membership, or take the plunge and become a full subscriber for full access.
If you’d prefer to support me on Patreon, please visit: https://www.patreon.com/RichardGray [...]
This video shows how to paint the Autarch Death Spinner in a shiny black, for the new Aeldari Autarch.
This is a little bit different in that the Wraithbone effect is painted first and then I just paint over it with the black shiny effect! I explain a little bit about why this happened in the video below… don’t worry, you don’t need to paint it Wraithbone, first – I just decided I wanted it black after finishing the Wraithbone version.
Video – Autarch Death Spinner
All videos are recorded in HD 1080p or higher – use full screen for the full effect and let the video load completely. You can also click the little “cog” and change the speed of the video, if I am going too fast (or slow!).
Materials Needed
Base Paint: Vallejo Model Color Black
Highlight Paints: Vallejo Basalt Grey, and any white paint (I’ve used P3 Morrow White, but any white will do)
Mixing Palette: For creating various shades of grey
Fine Detail Brushes: For precise application of highlights
Water: For thinning paints
Step by Step Guide
Step 1: Base Coating
Prepare the Miniature: Ensure your Autarch Deathspinner model is clean, primed, and ready for painting. If you’ve previously painted it, as I have, ensure the model is painted over in Vallejo Model Color Black. This provides a flat, non-satin finish that’s perfect as a canvas for our shiny black effect.
Step 2: Planning Your Highlights
Observe the Model: Look at the shapes and details of the model. Identify areas that will naturally catch the light, such as edges, raised surfaces, and textures. The Deathspinner has a mix of flat and curved surfaces, which will influence our highlight placement.
Create a Gradient Palette: Mix Vallejo Basalt Grey with black to create several shades of grey, from dark to light. Also, prepare a mix with white to create lighter greys. These will be used to build up the highlights gradually.
Step 3: Applying the Highlights
Start with Mid-Tones: Begin highlighting with a mid-tone grey, not the darkest shade. This helps in mapping out the highlights clearly without committing to high contrast immediately. Apply this mid-tone grey to areas you’ve identified as natural light catchers.
Increase Contrast: Gradually work your way up through the shades of grey you’ve mixed, moving towards the lighter greys and eventually white. Focus on smaller areas within the already highlighted sections to create a sense of light reflecting off a shiny surface.
Edge Highlighting: Use fine detail brushes to apply edge highlights meticulously. This step is crucial for defining the shapes and textures of the model, making them stand out against the black base.
Step 4: Refining the Highlights
Adjust the Highlights: If any area looks too grey or the contrast isn’t high enough, go back in with your darker greys or black to redefine the shadows. This step is about balancing the overall look to maintain the illusion of a shiny black surface.
Glazing: Mix a glaze using Vallejo Model Color Black thinned down with water. Use this to subtly adjust the intensity of your highlights and shadows, smoothing out transitions and ensuring that the black remains the dominant colour.
Step 5: Final Touches
Sharpening Highlights: For the brightest points, use white or a very light grey to add final touches. These should be very small, focused on the most prominent areas where light would naturally be most intense.
Cleanup: Review your model and clean up any areas where the paint may have overstepped. Use black to correct any mistakes and sharpen the edges.
Watch all the tutorials for my Aeldari Autarch
Aeldari Autarch (Eldritch Omens)
A series of videos on how I painted my Aeldari Autarch (Eldritch Omens). This includes the pearlescent NMM armour, the soulstones, sword and Death Spinner(s).
Watch Now
Explore more Aeldari Tutorials
If you don’t have an account, please sign up here! The website currently has over 350 video tutorials with steps and tips, plus a selection of PDFs. If you are not sure about joining, you can explore my free videos with a free membership, or take the plunge and become a full subscriber for full access.
If you’d prefer to support me on Patreon, please visit: https://www.patreon.com/RichardGray [...]
This video shows how to paint the Death Spinner in a wraithbone texture, for the new Aeldari Autarch. This guide will walk you through the entire process, from base coating to final highlights, using a range of Games Workshop paints. The goal is to achieve an ancient, weathered look reminiscent of bone, adding depth and character to your model.
Video – Autarch Death Spinner Wraithbone
All videos are recorded in HD 1080p or higher – use full screen for the full effect and let the video load completely. You can also click the little “cog” and change the speed of the video, if I am going too fast (or slow!).
Materials Needed
Base Paints: Games Workshop Dryad Bark
Layer Paints: Games Workshop Baneblade Brown, Karak Stone, Morghast Bone, Ushabti Bone, Screaming Skull
Highlight Paints: Games Workshop Evil Sunz Scarlet, Sotek Green, Warpstone Glow, P3 Morrow White (or any white paint)
Brushes: Fine detail brushes for texture and highlight application
Palette: For mixing and thinning your paints
Water: For thinning paints to the desired consistency
Step 1: Base Coating
Start with a Black Base: Ensure your miniature is primed in black. This will deepen the subsequent layers of paint, adding to the aged effect.
Apply Dryad Bark: Cover the entire weapon in a layer of Dryad Bark. This dark brown serves as a rich foundation for the wraithbone texture.
Step 2: Layering
First Layer with Baneblade Brown: Apply Baneblade Brown over the Dryad Bark, focusing on the areas that will catch light. Don’t worry about perfect coverage; the slight translucency adds to the texture.
Add Karak Stone Highlights: Layer Karak Stone over the Baneblade Brown, enhancing the lighter areas and beginning to define the wraithbone texture. Again, embrace the paint’s translucency to build depth.
Step 3: Texture and Detailing
Fine Texture with Morghast Bone: Use Morghast Bone to start adding fine, squiggly textures resembling weathered bone. Use the very tip of your brush and light pressure to create jagged, circular shapes.
Enhance Texture with Ushabti Bone: Increase the texture’s visibility by applying Ushabti Bone, focusing on shadowed areas and blending into the lighter sections for a smooth transition.
Highlight with Screaming Skull: Apply Screaming Skull sparingly to the most raised areas and edges to simulate light reflecting off the bone’s surface. This layer should be thin and focused.
Step 4: Final Highlights and Corrections
Bright Highlights with White: Use P3 Morrow White (or any white paint) diluted with water to add final touches to the texture, focusing on the highest points and sharpest edges. This step brings out the detail and adds a sense of dimension to the wraithbone.
Adjust Texture and Contrast: If necessary, go back with previous colours to adjust the texture and contrast. This could mean softening too-bright areas with Screaming Skull or Ushabti Bone or deepening shadows with Morghast Bone.
Step 5: Adding Colour and Detail
Apply Evil Sunz Scarlet: For the weapon’s energy filaments, start with a base of Evil Sunz Scarlet. Draw fine lines to mimic lightning or energy crackling from one end to the other.
Mix in White for Highlights: Gradually add white to your Evil Sunz Scarlet to lighten the colour for the highlights. Focus these lighter shades towards the base (or top, depending on orientation) of the energy filaments, creating a gradient effect.
Incorporate Sotek Green and Warpstone Glow: To add a unique touch and colour variation, introduce Sotek Green and Warpstone Glow sparingly into the wraithbone texture. This can simulate moss or growth, adding to the ancient appearance. Use these greens lightly to avoid overwhelming the bone texture.
Painting a wraithbone texture on your Aeldari Autarch Deathspinner involves a delicate balance of layering, texture creation, and strategic highlighting. By following these steps and adjusting based on your model’s specific details and your personal preference, you can achieve a beautifully aged, textured effect that stands out on the battlefield. Remember, the key to this technique is patience and layering; build your colours gradually for the most natural and detailed result.
Watch all the tutorials for my Aeldari Autarch
Aeldari Autarch (Eldritch Omens)
A series of videos on how I painted my Aeldari Autarch (Eldritch Omens). This includes the pearlescent NMM armour, the soulstones, sword and Death Spinner(s).
Watch Now
If you don’t have an account, please sign up here! The website currently has over 350 video tutorials with steps and tips, plus a selection of PDFs. If you are not sure about joining, you can explore my free videos with a free membership, or take the plunge and become a full subscriber for full access.
If you’d prefer to support me on Patreon, please visit: https://www.patreon.com/RichardGray [...]
Here we will be painting an Aeldari Soulstone, a key decorative feature that brings your Eldar models to life with vibrant colours and intricate light effects. Follow this guide closely to achieve a stunning gemstone effect on your miniature.
Video – Aeldari Soulstone
All videos are recorded in HD 1080p or higher – use full screen for the full effect and let the video load completely. You can also click the little “cog” and change the speed of the video, if I am going too fast (or slow!).
Materials Needed
Fine detail brushes
Palette for mixing paints
Water for thinning paints
Paints Used:
Games Workshop: Khorne Red, Pink Horror
Vallejo: Pink, Black
P3: Morrow White (or any high-quality white paint)
Step-by-Step Guide:
Base Coating: Begin by painting the entire soulstone with Khorne Red. Aim for a smooth, even coat. If the paint is too thick, thin it with a bit of water (about 50/50 ratio). Let dry and apply a second coat if necessary for full coverage.
Creating the Horizon Line: Mix Khorne Red with a tiny amount of black to darken it slightly. Paint a wobbly horizon line towards the bottom of the soulstone, simulating a shadowed effect. This line doesn’t need to be perfectly straight; a bit of curvature adds to the natural look.
Blending the Horizon: Below this line, blend back to the original Khorne Red, creating a smooth transition. You can achieve this by using a damp brush to soften the edge between the two colours.
Adding Highlights: On the upper part of the soulstone, start highlighting with Pink Horror. Near the horizon line, make this highlight bright and prominent, fading it as you move upwards. Mix Pink Horror with Vallejo Pink to lighten it for further highlights, applying these closer to the top of the gem.
Enhancing the Gem Effect: Introduce a brighter layer by using a mix of Vallejo Pink and white. This should be applied sparingly, focusing on the top edges and areas you want to emphasise the most.
Defining the Edges: Carefully outline the left and right edges of the soulstone with the light pink mix. This step requires a steady hand to achieve a thin, precise line that enhances the gem’s shape.
Final Touches: Add a small dot of P3 Morrow White at the top left of the soulstone to simulate a reflection point, making the gem appear more lustrous. Optionally, add a tiny white dot on the opposite bottom right to suggest light passing through the gem.
Adjusting and Correcting: If any areas need adjustment, gently glaze over them with the base colours to correct the intensity or blend. Always allow paint to dry between layers to avoid muddying the colours.
Tips for Success:
Patience is Key: Work slowly, especially when applying highlights and blending colours.
Thin Layers: Thin your paints to ensure smooth transitions and avoid obscuring details on the miniature.
Practice Makes Perfect: If you’re new to painting gems, practice on a spare bit or an inconspicuous area first.
This approach to painting an Aeldari Soulstone can be adapted for any gem colours by substituting the base and highlight paints. Experiment with different shades to customise your army’s look. Enjoy the process and take pride in adding these vibrant details to your miniatures!
Watch all the tutorials for my Aeldari Autarch
Aeldari Autarch (Eldritch Omens)
A series of videos on how I painted my Aeldari Autarch (Eldritch Omens). This includes the pearlescent NMM armour, the soulstones, sword and Death Spinner(s).
Watch Now
If you don’t have an account, please sign up here! The website currently has over 350 video tutorials with steps and tips, plus a selection of PDFs. If you are not sure about joining, you can explore my free videos with a free membership, or take the plunge and become a full subscriber for full access.
If you’d prefer to support me on Patreon, please visit: https://www.patreon.com/RichardGray [...]
How to Paint Soul Stones. A short video and guide to walk you through the steps to achieve a realistic gem effect on your model (in this case, the Aeldari Avatar) using Sotek Green, Black, and Morrow White.
Materials Needed
Paints:
Sotek Green (Games Workshop)
Black (Vallejo or equivalent)
Morrow White (P3 or equivalent)
Tools: Fine detail brush, wet palette for mixing and diluting paints, water for thinning paints.
Step-by-Step Guide
Preparing the Palette
On your wet palette, prepare Sotek Green, Black, and White. You’ll be using these colours to create the gem effect, with Black and White to modify the Sotek Green for shadows and highlights.
Base Layer
Start by applying Sotek Green directly to the soul stones on the model. Focus on achieving a neat, circular highlight at the top of each gem to represent the light source’s direction. If the paint appears too thin and the underlying colour shows through, apply another layer to enhance opacity.
Highlighting
Mix a small amount of Morrow White with Sotek Green to lighten the colour. Apply this lighter shade to the upper part of the gem, following the initial highlight’s shape but slightly reducing the area to create a gradient effect. Ensure this blend is more concentrated towards where you envision the light source hitting the gem, typically the top left, matching the light direction established on other parts of the model, like the non-metallic gold avatar symbol.
Refining the Gem
For added depth, incorporate a very small line of this lighter mix at the bottom right of the gem, creating a sense of reflection and roundness. Use the original Sotek Green to tidy up any overspill and blend the edges of your highlights for a smoother transition.
Intensifying Highlights
Gradually add more Morrow White to the mix for the brightest points of light on the gem. Focus these intensified highlights on a smaller area within your previously applied lighter shade, continuously narrowing the focus as you add more white. This method creates a luminous effect, simulating light reflecting within the gem.
Adjusting Shadows
To define the gem further, mix a small amount of Black with Sotek Green and apply it sparingly to the edges and around the base of the soul stone, enhancing its three-dimensional appearance. Be cautious with the amount of black, as it can quickly overpower the Sotek Green due to its strong pigmentation.
Final Touches
Use pure Morrow White to add a final pinpoint highlight to the top left of the gem, where the light source is strongest. This small detail significantly contributes to the gem’s realistic sparkle.
Additional Tips
Light Source Consistency: Ensure all gems on the model reflect the same light source direction for coherence across the miniature.
Layering: Achieve a smooth transition between shades by allowing each layer to dry thoroughly before applying the next. This technique prevents unwanted blending and muddiness.
Paint Consistency: Adjust the paint’s thickness based on the effect you’re aiming for. Thinner paint can act as a glaze to smooth out transitions, while thicker paint is better for opaque highlights.
Practice: Perfecting the soul stone effect may take practice. Experiment on a test model or an inconspicuous area before applying the technique to more visible parts of the miniature.
By following these steps and adjusting your technique as needed based on the specific details and shape of your model’s soul stones, you can achieve a striking and realistic gem effect.
If you don’t have an account, please sign up here! The website currently has over 350 video tutorials with steps and tips, plus a selection of PDFs. If you are not sure about joining, you can explore my free videos with a free membership, or take the plunge and become a full subscriber for full access.
If you’d prefer to support me on Patreon, please visit: https://www.patreon.com/RichardGray [...]
Videos Not Showing?
To view any of my paid tutorials, you need to be a member of the website – please click below to log in or join the site.


Not sure about joining just yet? Check out my Youtube for all my free tutorials or sign up as a free “friend” member on this site and visit the Freebies video page!