


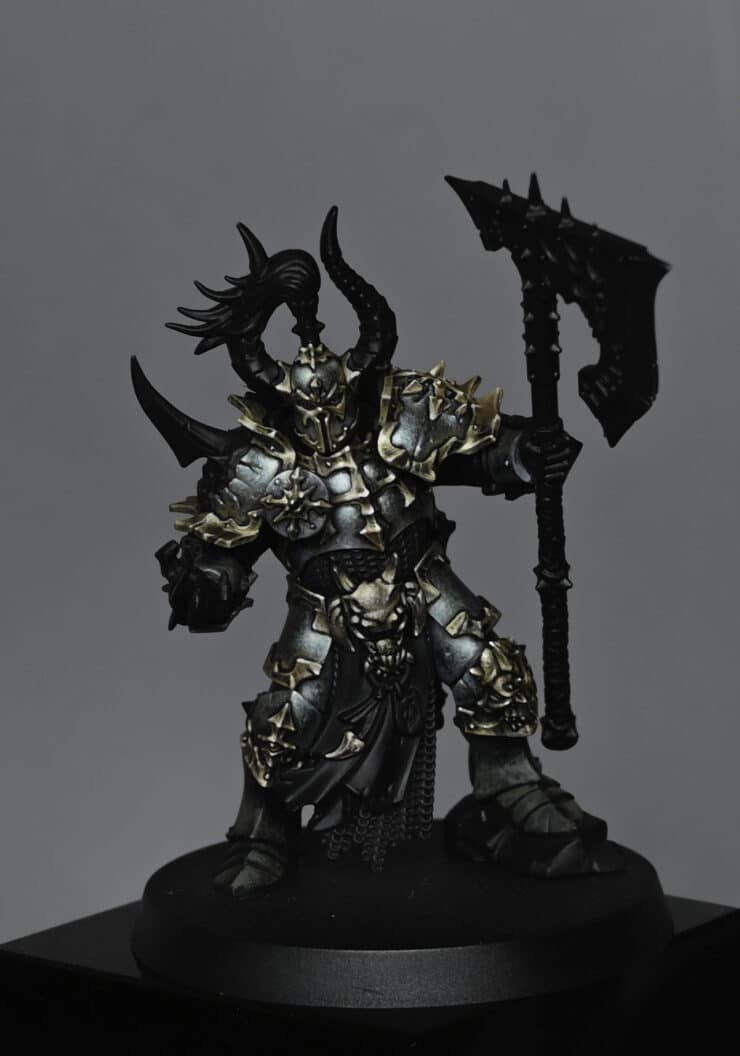
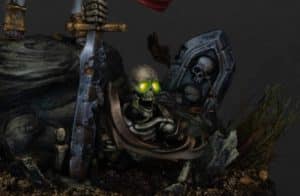
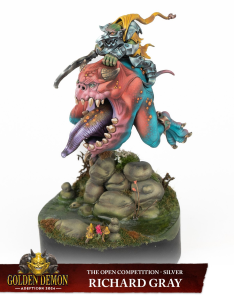
These videos show how to paint the the Chaos Champion from the Slaves to Darkness army box that Games Workshop sent me, with full paints list and detailed step by steps. This guide is a part of a series focusing on non-metallic metal (NMM) armour, NMM gold, and a large animal skull, using a variety of paints including Games Workshop and Vallejo colours. The second video where we paint his NMM axe can be found below the first.
Video: How to Paint the Chaos Champion
Materials and Paints:
- Vallejo Heavy Grey
- Games Workshop Barroth Blue
- Games Workshop XV-88
- Games Workshop Balor Brown
- Games Workshop Mournfang Brown
- Vallejo Ice Yellow
- P3 Morrow White
- Vallejo Neutral Grey
- Vallejo Model Color Black
- Games Workshop Elysium Green (optional)
- Size 00 and Size 1 brushes
- Wet palette
Step-by-Step Guide on How to Paint the Chaos Champion:
Step 1: Base Coat the Armour
- Apply Vallejo Heavy Grey across all armour panels. This colour isn’t a plain grey but has a greenish, olive drab tone, adding a subtle hint of colour to the model.
Step 2: Detailed Armour Painting
- Begin with a haphazard application of Heavy Grey, ensuring not to fill the recesses excessively.
- For the first highlight, mix Heavy Grey and Barroth Blue in a 50/50 ratio. Apply this carefully, focusing on stippling and scratchy textures.
- Progressively add more Barroth Blue to the mix for subsequent highlights.
- The final highlight uses P3 Morrow White, applied sparingly on the most prominent parts.
Step 3: Non-Metallic Gold Trim
- Start with a base coat of Games Workshop XV-88.
- Apply Balor Brown, followed by Ice Yellow for highlights.
- Use Vallejo Neutral Grey for lower bounce highlights.
- Focus on creating high contrasts on sharp edges and subtle curves to mimic metallic shine.
Step 4: Painting the Skull
- Base the skull with Games Workshop XV-88.
- Add texture using Games Workshop Mournfang Brown, focusing on stippling to create a bone-like appearance.
- Use Games Workshop Screaming Skull for higher highlights.
- Finish with a glaze of Vallejo Neutral Grey to soften contrasts.
Step 5: Horns and Details
- Paint the horns starting with Mournfang Brown, transitioning to Rhinox Hide, and finishing with black towards the tips.
- Apply small highlights of Balor Brown and then white at the tips for a shiny effect.
Step 6: Finishing Touches
- Continuously refine the armour’s highlights, focusing on light direction and texture.
- Use stippling techniques for texture on the skull and bones.
- Ensure all parts of the model, including edges and recesses, are neatly finished.
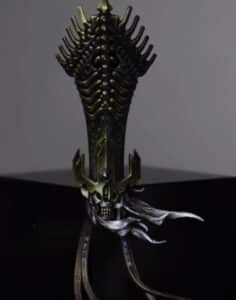
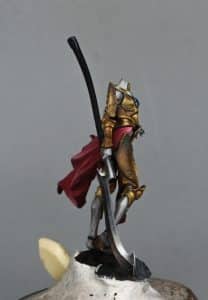
Video: How to Paint the Chaos Champion NMM Axe
Materials:
- Paints: Mournfang Brown, Rhinox Hide, XV-88, Balor Brown, Barroth Blue (Games Workshop); Ice Yellow, Neutral Grey, German Grey, Black (Vallejo); Morrow White (P3)
- Fine detail paintbrushes
- Wet palette (optional, but recommended)
Steps for NMM Steel Effect on the Axe Blade:
- Base Colour: Start with Neutral Grey. Block in the areas where you anticipate highlights, but don’t worry about precision at this stage. This step is about mapping out your light and dark areas.
- Adding Reflections: Employ a ‘Sky Earth’ technique, but avoid a mirror-like chrome finish. Instead, aim for a less reflective surface with smoother transitions. This will differ from the steel look on the armour.
- Colour Integration: On downward-facing surfaces, integrate a bit of Mournfang Brown into your Neutral Grey. For the top of the blade, use a lighter mix, incorporating a bit of Ice Yellow into Neutral Grey.
- Brightness and Shadows: Apply Barroth Blue to represent the sky’s reflection. It should be brighter but not overly stark. Add Rhinox Hide to darken and desaturate certain areas, especially on downward curves.
- Blending and Transition: Focus on blending your colours. Use a stippling or cross-hatching technique to create smooth transitions between the different tones. Pay attention to the balance between the bright and dark areas to maintain the metallic effect.
- Final Highlights: For the brightest points, use Morrow White, especially on the uppermost curves and edges. This step is crucial for selling the metallic effect. Remember to keep these highlights sharp and focused.
Steps for NMM Gold Effect on the Axe Trim:
- Base Coat: Start with XV-88. Outline the areas you want to appear as gold. This will be the foundation for your gold effect.
- Layering: Gradually build up layers with Balor Brown, focusing on areas that would naturally catch more light. Be mindful of the shape and texture of the trim.
- Adding Highlights: Use Ice Yellow for the brightest highlights on the gold sections. Apply it sparingly to the most prominent areas, like the edges and raised details.
- Refining Details: Introduce Mournfang Brown and Rhinox Hide in the darker areas for deeper shadows, creating contrast and depth.
- Final Touches: Use Morrow White for the brightest spots on the gold trim, emphasizing the highest points of light reflection. This will enhance the metallic illusion.
Key Tips:
- Brush Control: Use the tip of your brush for precision. The quality of your lines and blending directly impacts the realism of the NMM effect.
- Light Source Consistency: Ensure that the light source is consistent across the model. This affects where you place highlights and shadows.
- Patience and Layers: NMM is about building up layers gradually. Work slowly and allow layers to dry before applying the next.
- Blending: Smooth transitions between colours are vital. Practice stippling and glazing techniques for seamless blends.
- Reflections and Realism: Study how light interacts with metallic surfaces. Incorporate reflected colours and environments subtly into your NMM work for added realism.
Explore my latest tutorials
If you don’t have an account, please sign up here! The website currently has over 350 video tutorials with steps and tips, plus a selection of PDFs. If you are not sure about joining, you can explore my free videos with a free membership, or take the plunge and become a full subscriber for full access.


If you’d prefer to support me on Patreon, please visit: https://www.patreon.com/RichardGray