How to Paint a Warcry Witherlord

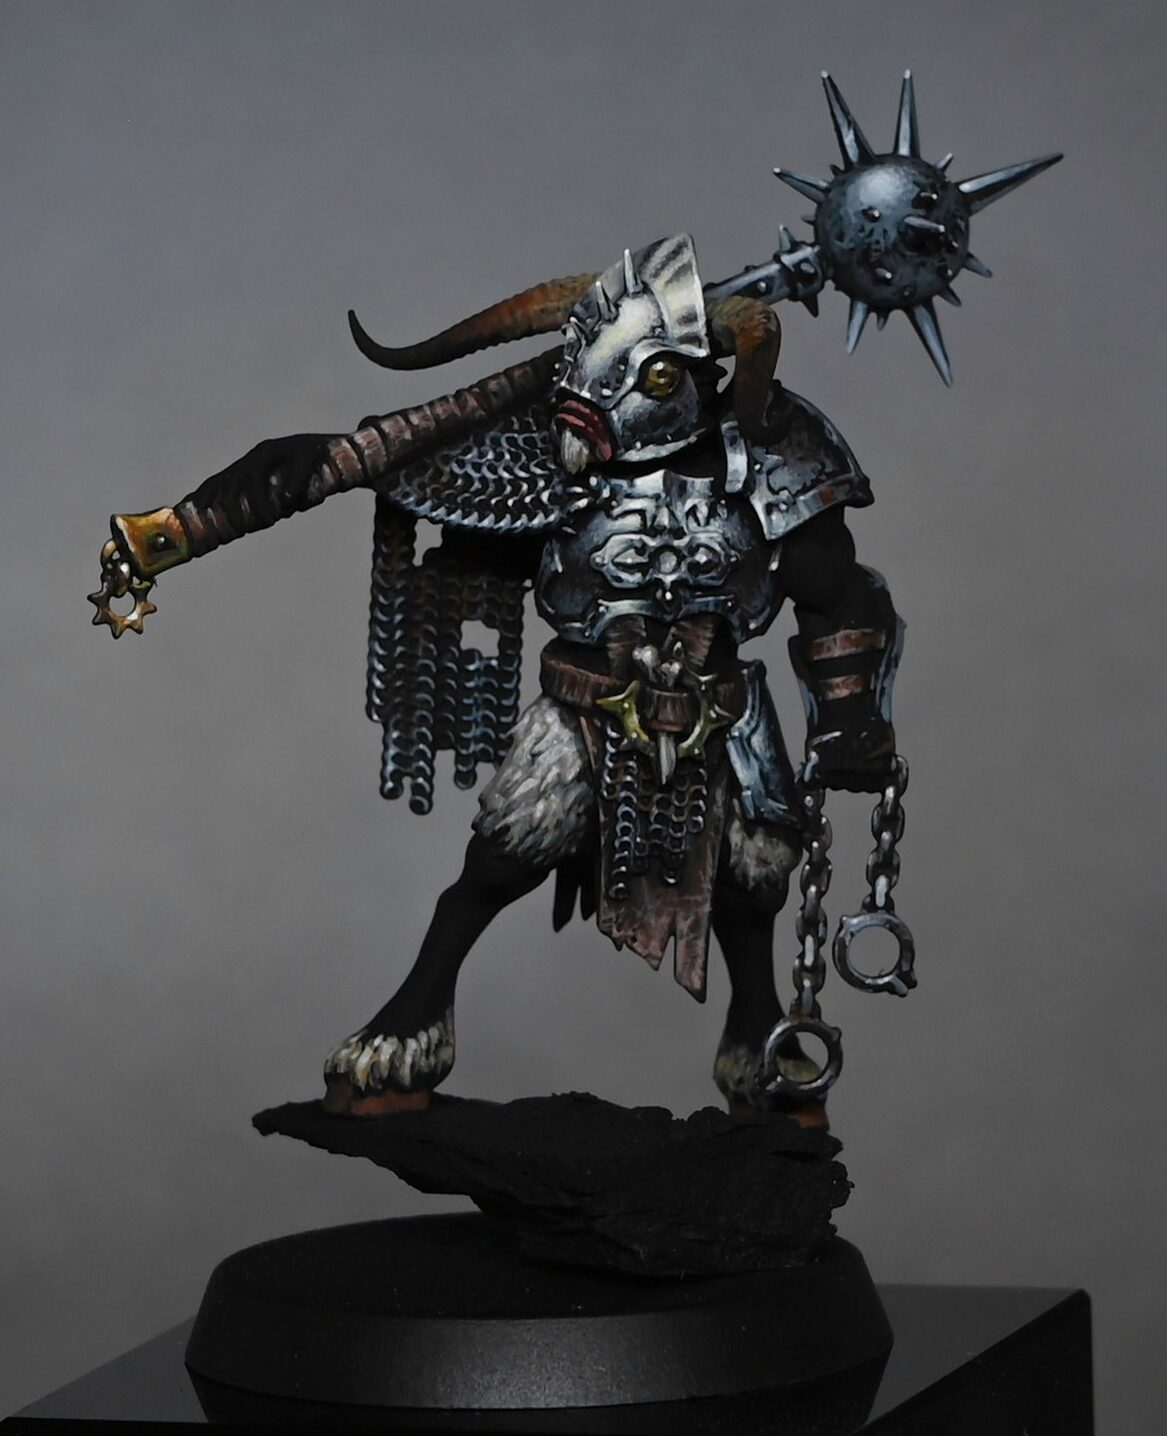
This video shows how to paint a Warcry Witherlord from the Rotmire Creed warband, which can be found in the new Warcry Heart of Ghur box, which was sent to me by Games Workshop.

This video is currently hidden. To watch it, please log in to the website.

Materials and Paints Used

  • Vallejo: Neutral Grey, Black
  • Games Workshop: Deathworld Forest, Mournfang Brown, Rhinox Hide, Balor Brown, Hobgrot Hide, Bugman’s Glow, Morghast Bone, Moot Green, Yriel Yellow, Darkoath Flesh (Contrast Paint), Contrast Medium
  • P3: Morrow White

Step-by-Step:How to Paint a Warcry Witherlord

Preparation and Base Coat

Begin by assembling your Witherlord model, sticking all parts together. Prime it black, followed by a zenithal coat using Vallejo Neutral Grey. The grey coat will serve as a base for the highlights, ensuring the colours painted on top aren’t overly bright.

Applying Base Colours

Start with Deathworld Forest, applying it in thin, watered-down layers. This model is painted to a high standard, requiring multiple thin coats for a smooth finish. For areas like bamboo sticks and his helmet, use Hobgrot Hide, applying in the same manner. For leather parts and wooden elements like the staff, use Mournfang Brown and Rhinox Hide respectively.

Skin Tones

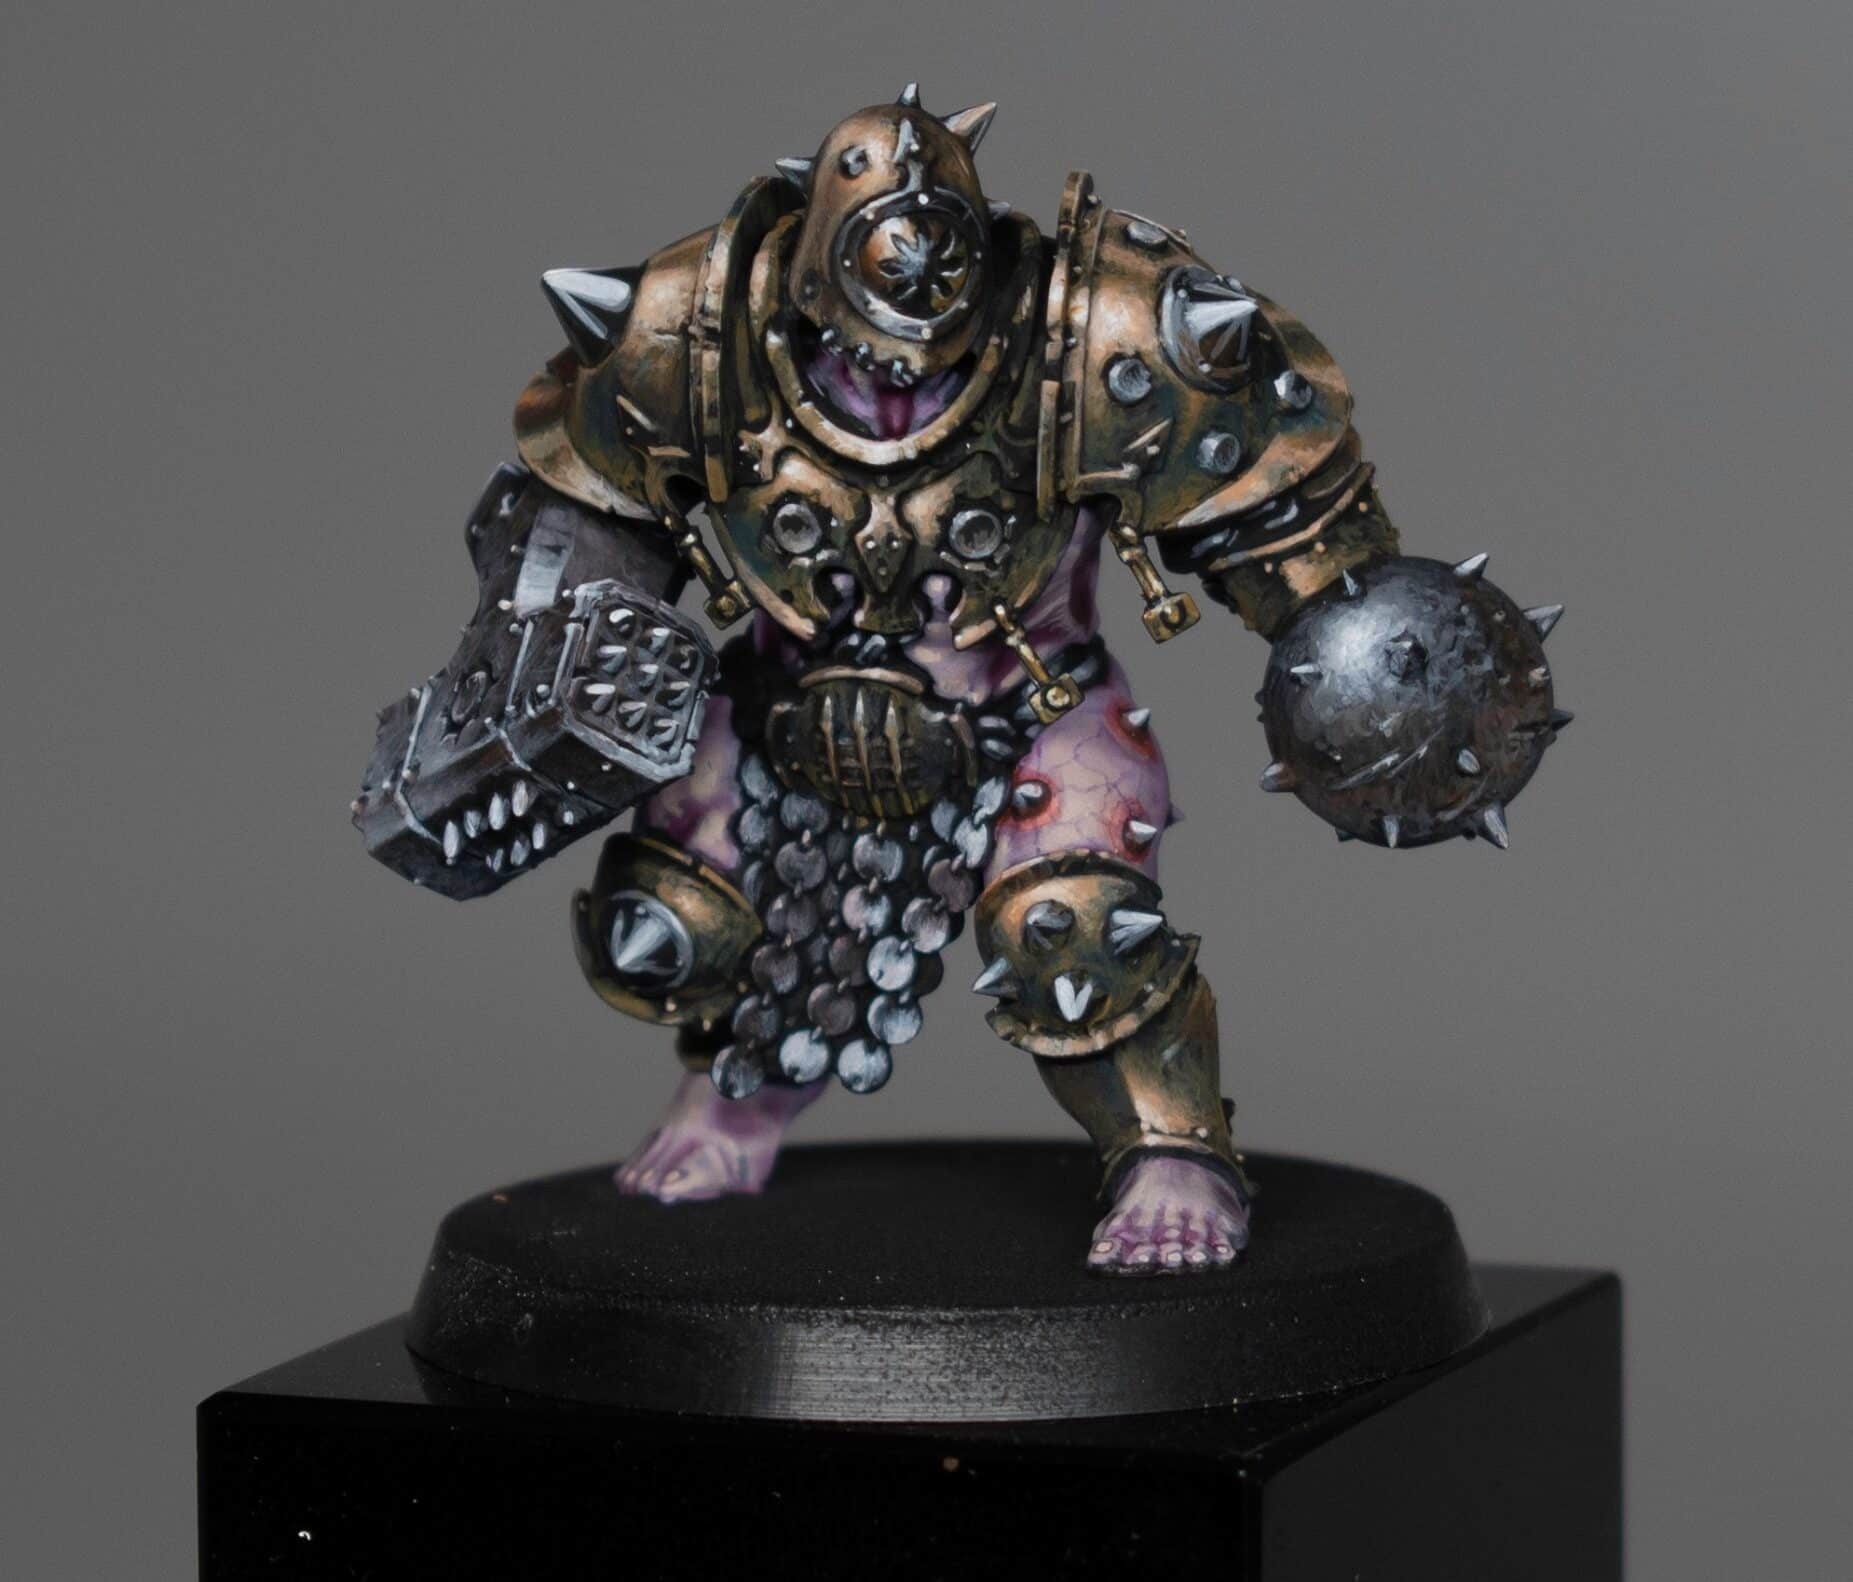
For the skin, start with a base of Bugman’s Glow. This rich, pinkish tone contrasts well with the green of the cloak. The skin will appear quite vibrant initially but will be adjusted with glazes later.

Bone and Bamboo Details

Paint bone elements with Balor Brown and bamboo with Hobgrot Hide. Both elements are highlighted by adding small amounts of white to the base colours and applying successive, lighter layers. Focus on making the bamboo and bone distinct from each other, despite similar base colours.

Advanced Highlighting Techniques

Use a size 2 brush for most of the model, switching to a smaller brush for tight areas. The larger brush can cover bigger areas quickly and allows for softer highlights. Mix your paints on a wet palette, gradually adding white to your base colours for highlights. Remember to water down your paints for smooth transitions.

Glazing for Depth and Atmosphere

Mix Darkoath Flesh with Contrast Medium and flood the model. This will settle in the recesses and provide shading. Be careful not to let it pool excessively. After this, apply glazes to modify colours and add depth. For instance, a neutral grey glaze over the skin tones will tone down the pink and add a sickly quality, fitting for a Nurgle-themed model.

Final Touches and Base

Add final highlights with more white mixed into your base colours, focusing on the brightest areas. For the base, blend Deathworld Forest with black for a swampy look. Add Mod Podge for a wet effect, and sprinkle tea leaves or similar materials for additional texture.

More Warcry Tutorials to Explore!

Warcry
This three-part video series and step-by-step text guides the process of painting a Warcry Spire Tyrants Bestigor Destroyer, aiming to achieve a high tabletop standard with a painterly finish reminiscent of Frank Frazetta’s work. We will use a desaturated colour palette to create sharp contrasts and detailed texture. Video: How to Paint a Warcry Spire Tyrants Bestigor Destroyer Part One We’ll start with the basics and gradually add complexity and depth to the miniature. All videos are recorded in HD 720p or higher – use full screen for the full effect and let the video load completely. Paints and Materials Needed Paints Games Workshop: Rhinox Hide Mournfang Brown Zandri Dust Mephiston Red (for minor details) Vallejo: Golden Olive Neutral Grey Pale Grey Blue Heavy Bluegrey Heavy Sienna Black Ivory Ice Yellow White Brushes A worn-out brush (for dry brushing and applying rough textures, I’ve used a size 0 but worn to not retain a fine point) A detail brush with a somewhat intact tip (a size 00 or finer based on the description) A larger brush for applying varnish (essential for applying the matte varnish evenly) Basing Materials Milliput Fimo (These two are mixed and then baked to create lightweight rock-like structures for the base) Additional Supplies Black primer (for base coating the miniature) Wet palette (for keeping paints moist and workable) Baking equipment (for curing the Milliput and Fimo mix) Ultra Matte Varnish (AK Interactive recommended for the final protective and matte finish) Lamp (used for understanding how light naturally falls on the miniature to guide painting) Materials and Preparation Base Material: For the rock surface the model stands on, mix Milliput and Fimo, then bake for about 30 minutes. This method creates a lightweight and easy-to-shape base compared to natural slate. Wet Palette Preparation: Prepare your wet palette with desaturated colours, focusing mainly on greys and browns. The standout colour will be Heavy Gold Brown, with Mephiston Red added later for minor details. Painting Steps Prime the Model: Begin by priming your model with a black primer to ensure subsequent colours stand out. Base Coating: Start blocking in the main colours and highlights on the armour using Neutral Grey. This will serve as the foundational layer for further detailing. Grey Tones for Armour: Utilize a range of greys (Black, Neutral Grey, Heavy Blue Grey, and Pale Grey Blue) to build up the tones on the armour. You can mix black and white to achieve similar grey tones if specific colours are unavailable. Applying Texture and Highlights While the initial armour highlights might appear rough, this method adds character and texture, essential for achieving a grimdark aesthetic. Focus the lighting from above and slightly to the left, mimicking natural light. For non-metallic metal (NMM) effects, adjust the light reflections based on the desired material finish rather than relying solely on the lamp’s natural light. Detailing with Colour Incorporate Golden Olive for areas you want to hint at green without overpowering the model, building upon this with Heavy Gold Brown for metallic parts. Use Rhinox Hide and Heavy Sienna for leather details, applying the paint in thin layers to build texture and depth gradually. Enhancing Textures Utilize a worn brush for techniques like dry brushing on chainmail, focusing on capturing the texture without needing a perfect finish. The key is to build up the model’s features layer by layer, focusing on light direction and textural contrasts. Refining and Adding Highlights Progressively refine the model by adding Ice Yellow and Ivory highlights to areas that catch the most light, enhancing the model’s dimensional appearance. Pay attention to focal points such as the helmet and weaponry, which benefit from additional detailing to draw the eye. Chainmail and Metallic Textures Apply subtle highlights to the chainmail and metallic surfaces to simulate light reflection, giving the impression of different materials. Balance is crucial; ensure that upward-facing edges receive stronger highlights than those facing downwards to maintain a realistic light effect. Eyes and Small Details The eyes can be painted effectively with a combination of Heavy Sienna, Heavy Gold Brown, Ice Yellow, and a dot of Ivory for the reflective point. This combination quickly brings life to the model’s gaze. Video: How to Paint a Warcry Spire Tyrants Bestigor Destroyer Part Two In this continuation of the Bestigore Destroyer painting tutorial, we focus on refining the non-metallic metal (NMM) effects on the armour and making the helmet a prominent focal point. Materials Needed: Paints: Rhinox Hide, Mournfang Brown, Zandri Dust, Cadian Fleshtone, Mephiston Red (Games Workshop); Golden Olive, Neutral Grey, Pale Grey Blue, Heavy Bluegrey, Heavy Sienna, Black, Ivory, Ice Yellow, White, Heavy Goldbrown (Vallejo). Brushes: A fine detail brush for stippling and precise highlights, and a larger brush for broader strokes and base coats. Other: Wet palette, water for thinning paints, a good light source. Helmet Refinement Begin with Heavy Bluegrey to enhance the helmet. Apply it carefully, almost like stippling, focusing on increasing the brightness and making the helmet stand out. Balancing Colours Use a combination of Heavy Bluegrey, Pale Grey Blue, and Ice Yellow to adjust the warmth and coldness of the metallic effect. Remember, Ice Yellow adds warmth, while the greys cool down and temper the yellow, ensuring the helmet doesn’t look overly yellow or cold. Creating Focal Points The goal is to make the helmet catch more light than the rest of the model, suggesting a dramatic light source, like a sunbeam breaking through clouds. Mace Detailing Apply a stylized NMM effect to the mace, focusing on making it look metallic without directly replicating a mirror-like finish. Emphasize primary light sources with bright highlights and use the shape of the object to guide the placement of these highlights. Adding Colour with Mephiston Red and Cadian Fleshtone Introduce spot colours such as Mephiston Red for the lips, toned down with Cadian Fleshtone to add interest without making it look like lipstick. This step breaks up the desaturated colours and draws attention to the face. Fur Detailing Revisit the Zandri Dust base on the fur, applying it to raised areas and using Ivory for highlights. Apply Neutral Grey to add texture and depth, making the yellow tones stand out more against the grey, creating a fluffy appearance. Leather and Cloth Detailing Use Rhinox Hide, Mournfang Brown, and Heavy Sienna for the leather and cloth, paying attention to light sources and shapes. For the loincloth, focus highlights along edges to mimic wear and tear. Final Touches Go back and refine areas such as the mace and armour, ensuring they match the brightness and detail level of the helmet. Adjust any areas that need more colour or contrast to maintain focus on the helmet as the primary focal point. Video: How to Paint a Warcry Spire Tyrants Bestigor Destroyer Part Three In this final installment, we will complete our Warcry Spire Tyrants Bestigor Destroyer by painting the skin, horns, and finishing the base. The goal is to achieve a painterly finish reminiscent of Frank Frazetta’s work, focusing on desaturated colours and sharp contrasts. Paints Used Paints: Rhinox Hide, Mournfang Brown, Zandri Dust, Cadian Fleshtone, Mephiston Red, Ushabti Bone (Games Workshop); Golden Olive, Neutral Grey, Pale Grey Blue, Heavy Bluegrey, Heavy Sienna, Black, Ivory, Ice Yellow, White, Heavy Goldbrown (Vallejo); AK Interactive Ultra Matte Varnish. Painting Skin Base Colours: Start with Heavy Sienna, focusing on highlight areas to create texture while keeping the skin dark. Do not cover the entire skin; allow some black areas to remain for contrast. Layering: Apply Heavy Grey on top of Heavy Sienna, blending them to smooth the transition. Then, use Zandri Dust for final highlights, creating a desaturated, almost colourless finish that complements the overall tone of the model. Painting Horns Base Layer: Use the same colours as previously used for the fur—Mournfang Brown, Rhinox Hide, and Zandri Dust—to block in the basic gradients. Detailing: With Heavy Sienna, add texture and highlights towards the tips of the horns. Layer Zandri Dust and finally, Ivory for the brightest points and edges, maintaining a rough, textured look to enhance the painterly style. Balance and Contrast: Add small amounts of Heavy Sienna at the base of the horns for a subtle colour variation. Focus on achieving a balance between the desaturated colours and the highlighted areas to draw attention to the head. Finishing the Base Colour Application: Using Neutral Grey, Heavy Sienna, and Zandri Dust, paint the base to match the model’s colour scheme. Focus highlights around the front foot to create a point of interest and use Ushabti Bone for dry brushing to pick out texture. Details and Texture: Glaze the base with thinned Neutral Grey to blend colours and deepen shadows subtly. Dry brush with Ushabti Bone to highlight the texture of the rock and sand, mimicking natural light and adding depth. Final Touches: Apply small amounts of flock and static grass to introduce life and contrast to the base, enhancing the model’s dynamic appearance on the battlefield. More of my latest videos: If you don’t have an account here on my website, please sign up here! I have over 350 video tutorials with steps and tips, plus a selection of PDFs. If you are not sure about joining, you can explore my free videos with a free membership, or take the plunge and become a full subscriber for full access. If you’d prefer to support me on Patreon, please visit: https://www.patreon.com/RichardGray [...]
Guides on how to paint Ogor Breacher of the Iron Golems Warcy Warband including non metallic metal and veiny skin. Part One – How to Paint Ogor Breacher NMM Armour The following paints were used: Games Workshop: Rhinox Hide, XV-88, Balor Brown, Cadian Fleshtone, Flayed one Flesh, Incubi Darkness, Morghast Bone.Vallejo: Neutral Grey (Mechanicus Standard Grey), Pale Blue Grey (Blue Horror) P3: Morrow White (White Scar) Step-by-Step: How to Paint Ogor Breacher NMM Armour Step 1: Prepare the Model – Ensure that the model’s mould lines are removed, it’s glued together, and primed black. Step 2: Gather Your Paints – Have the above paints ready on a wet palette: Step 3: Apply XV 88- Using XV 88, roughly block in the primary highlight points on the copper armour. Apply the paint thinly, allowing the black primer to show through for a worn and battered look. Step 4: Embrace the Roughness – Don’t worry about smooth coats; let the blockiness show through for texture. Use thin layers of paint and apply quickly, catching parts like spikes and edges. Step 5: Control Your Brush – Ensure your paintbrush isn’t overloaded. You want thin layers for easy correction and a controlled application. Step 6: Follow the Model’s Shape – Apply highlights following the shape of the armour. If it’s a curved area, let the marks squiggle around, creating a chaotic yet textured look. Step 7: Consider Light Source – Use a lamp as a light source to observe how light hits the model. Apply highlights with your paint where the light catches, focusing more on upper areas like shoulders and head. Step 8: Adjust and Blend – Go back and forth between colours, adjusting and blending as needed. XV 88 and Cadian Fleshtone can be used to thicken layers and blend with each other. Step 9: Add Secondary Highlights – Introduce Rhinox Hide as a secondary highlight, focusing on areas like shoulders. Use it to enhance texture and tone down any excess pinkness. Step 10: Maintain Consistency – Ensure that highlights align across the model. Trim, rivets, and spikes should follow the same light direction for a cohesive look. Step 11: Introduce Metallic Elements – Paint steel elements like spikes separately later to maintain expressive brush marks. The spikes add a reflective, shiny quality to emphasize highlights on the armour. Step 12: Use Glazes – Apply glazes of Morghast Bone and Balor Brown to soften transitions and add subtle weathering. Adjust as needed for colour balance and reflection. Step 13: Final Highlights – For the final highlights, use P3 Morrow White Base on primary highlight areas. Emphasize the main light source and knock back highlights in shadowed areas. Step 14: Judge by Eye – Continuously judge the model by eye and make adjustments. Consider warmth, tone, and saturation to achieve a realistic and dynamic non-metallic copper effect. Part Two – How to Paint Ogor Breacher NMM Steel The following paints were used: Vallejo: Neutral Grey (Mechanicus Standard Grey), Pale Blue Grey (Blue Horror) Games Workshop: Rhinox Hide, Mournfang Brown, Abaddon Black P3: Morrow White (White Scar) All videos are recorded in HD 720p or higher – use full screen for the full effect and let the video load completely. Step-by-Step: How to Paint Ogor Breacher NMM Steel Prepare Your Materials – Ensure you have the necessary paints ready to go! You’ll also need a variety of brushes, including a slightly worn-out one for creating rough textures. Block in the Light Points – Use Neutral Gray to identify and block in the main light points on the weapons and metal discs. Refer to the primary light source from the armour painting in Part 1.Create Texture on the Metal Discs – Focus on the metal discs, using a blunt-tipped brush to create rough, non-smooth textures. Emphasise dents and scratches to give the impression of a well-used surface.Build Up Highlight – Gradually build up highlights with Neutral Gray, especially on upward-facing discs. Use the lamp’s light to guide where the light would naturally catch, such as shoulders, head, chest, kneecaps, and the top of the ball.Add Pale Blue Grey for Translucency – Introduce Pale Blue Grey to add translucency to the highlights. Concentrate on the central highlight, allowing the paint to thin as it reaches the edges, creating a transition.Incorporate Morrow White for Secondary Highlights – Use Morrow White for secondary highlights on the brightest discs. Be mindful of where the light hits the most, and create a pattern to enhance the non-metallic look.Glaze with Mournfang Brown for Weathering – Dilute Mournfang Brown and apply it as a glaze to add weathering effects. Create chaotic scratches and imperfections on the surface, avoiding a repetitive pattern for a more natural appearance.Hammer Painting – Apply Neutral Gray to the hammer’s curved areas, taking advantage of the brush’s worn tip to capture the curve. This creates a shiny effect and allows for a darker edge next to the armour.Highlight Hammer Spikes – Use Pale Blue Grey to highlight spikes on the hammer, ensuring high contrast. Concentrate on the top part of the curve for a realistic shiny effect.Intensify Highlights with Morrow White – Further intensify highlights with Morrow White, focusing on the brightest areas. Keep layering to achieve an opaque white, preventing the underlying gray from dulling the shine.Glaze for Depth – Apply a glaze of Mournfang Brown to add depth and enhance the contrast between highlights and shadows. Be selective in the application, aiming for a chaotic pattern for a weathered look.Final Touches – Continuously refine highlights, making them as bright as possible to stand out on the tabletop. Pay attention to tonal contrast, as the clear distinction between black and white creates a striking effect in the final model. Part Three – How to Paint Ogor Breacher Skin The following paints were used: Games Workshop: Kislev Flesh, Magos Purple (Contrast), Contrast Medium, Dechala Lilac, Naggaroth Night, Skavenblight Dinge, Mephiston Red P3: Morrow White (White Scar) Step-by-Step: How to Paint Skin Primer Application – Apply a black primer to the entire model, ensuring good coverage.Use a thin layer of Chaos Black for the model’s skin, allowing it to dry between coats.Base Coat – Mix equal parts of Dechala Lilac and Kislev Flesh to create a base coat.Apply the base coat over the skin, focusing on highlight points.Use a watery mix to achieve a translucent effect, building up with 3-4 coats for a solid finish.Purple Wash – Apply a 50/50 mix of Magos Purple (Contrast) and Contrast Medium for a wash over the skin. Ensure an even coverage, allowing it to enhance the details and settle into recesses.Highlighting – Mix Dechala Lilac and Kislev Flesh (50/50) for highlighting.Apply highlights on areas catching the light, focusing on upper edges like triceps and lats.Use a thin layer for a translucent effect, building up to create smooth transitions.Enhancing Details – Use contrast paint details to enhance recesses and shadows.Adjust the amount of paint based on the direction of light, creating realistic shadows.Vein Detailing – Mix Naggaroth Night and white for vein detailing.Apply veins on areas where they are likely to be more visible, such as upper back and thighs.Use a thin layer for a faded look, adding realism to the skin.Glazing – Apply glazes with Mephiston Red, heavily watered down (9 parts water to 1 part paint), for a warm, desaturated effect. Test the glaze on a surface before applying it to the model.Final Touches – Add reflections using a neutral gray or blue-gray, focusing on small areas like rivets.Glaze with white to achieve the desired level of contrast and smoothness.Spend additional time on glazing for a display-level finish if desired.Note: – Consider adding additional layers for smoother transitions in a display-level model. – Experiment with colours to achieve contrasting effects, keeping in mind the coluor wheel. – Be mindful of shadows and lighting when highlighting and detailing different areas. – Practice on smaller surfaces or test models to perfect techniques before applying them to the main model. More of my latest tutorials: Videos Not Showing? To view any of my paid tutorials, you need to be a member of the website – please click below to log in or join the site. Not sure about joining just yet? Check out my Youtube for all my free tutorials. [...]

If you don’t have an account, please sign up here! The website currently has over 350 video tutorials with steps and tips, plus a selection of PDFs. If you are not sure about joining, you can explore my free videos with a free membership, or take the plunge and become a full subscriber for full access.

How to Paint a Warcry Witherlord

If you’d prefer to support me on Patreon, please visit: https://www.patreon.com/RichardGray