


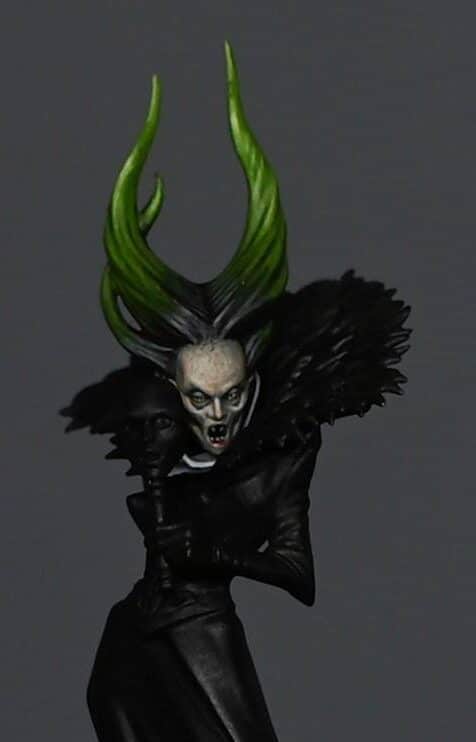
This is the first video in a series of how to paint undead vampire skin onLady Annika.
This video looks at painting the face and hair to display level.
This video tutorial is currently hidden. To unlock it and watch, please join the website and log in.
Materials Needed for her Undead Vampire Skin and Hair
- Games Workshop Paints: Kislev Flesh, Dark Reaper, Ushabti Bone, Flayed One Flesh, Moot Green, Yriel Yellow
- Vallejo Paints: Black, Basalt Grey, Dark Sea Grey
- P3 Paint: Morrow White
- Fine detail brushes
- Wet palette
- Water (for thinning paints)
Preparation
- Prime and Prepare: Prime the whole model and build it, leaving the head separate for easier painting. This approach allows better access to the head, especially around areas obstructed by accessories like masks.
Painting the Undead Vampire Skin
- Base Coat with Kislev Flesh: Thin Kislev Flesh with water at a ratio of approximately 2:1 (water:paint). Apply the thinned paint to the head, aiming for a very translucent effect. This will take around 3-4 layers to achieve a good, but not opaque, coverage.
- Shading: Mix Kislev Flesh with Dark Reaper to create various shades for skin shadows. Start with a small amount of Dark Reaper to slightly darken the Kislev Flesh and incrementally increase the amount of Dark Reaper for deeper shadows. Apply these mixes carefully to areas like under the eyes, around the nose, and under the chin to simulate natural shadows.
- Adding Depth with Ushabti Bone and Flayed One Flesh: Introduce Ushabti Bone and Flayed One Flesh for highlights and to add depth to the skin. These should also be thinned and applied sparingly to areas that would naturally catch the light.
- Refining Details: Use pure Dark Reaper to define the eyes and deeper shadows. Then, carefully increase the intensity of highlights and shadows by adding more layers, paying close attention to the light source (coming from the left in this case) to ensure a realistic appearance.
Painting the Hair
- Base with Moot Green: Apply Moot Green as the base colour for the hair. If necessary, mix Moot Green with a little black to adjust the shade. Ensure to cover all strands, aiming for a uniform base layer.
- Add Highlights and Shadows: Create a gradient effect by mixing Moot Green with white for highlights and pure black for deeper shadows. Apply these mixes strategically to mimic natural hair highlights and to give the impression of volume and movement.
- Detailing with Fine Strands: Use a fine brush to add delicate strands of hair in lighter green shades towards the tips and darker shades near the roots to simulate depth and texture.
- Roots Detailing: For an added touch of realism, use Basalt Grey and Dark Sea Grey near the roots to suggest regrowth or a transition of colour. This technique adds complexity and depth to the hair.
Finishing Touches
- Glazing for Smoothness: Once satisfied with the skin and hair, use glazing techniques to smooth out transitions and blend the colours more seamlessly. This step involves thin layers of paint applied over dry areas to subtly adjust tones and shades.
- Eyes and Teeth: Paint the eyes using Yriel Yellow for the whites and Vallejo Black for the pupils. For the teeth, use Ushabti Bone for a natural look, and carefully define each tooth for clarity.
- Lips: Paint the lower lip with a mixture of red (e.g., Mephiston Red from Games Workshop) and add highlights with a mix of Shabti Bone and the red base colour to create a natural gradient.
Watch all of my Lady Annika tutorials by clicking the link below! :
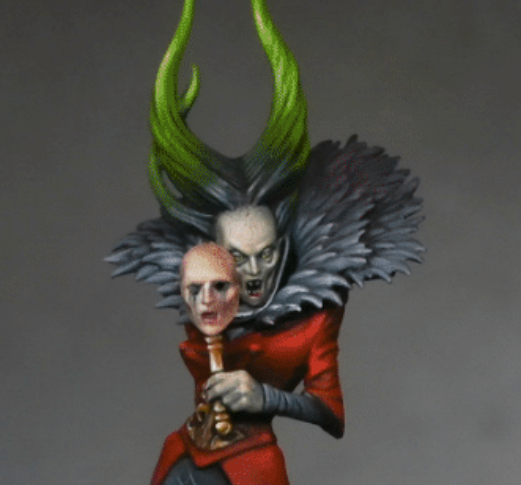
Lady Annika
Golden Demon Entry – Lady Annika’s thirst for blood is legendary, even amongst the Soulblight vampires! I really enjoyed painting her and made a few tweaks to the model.
If you don’t have an account, please sign up here! The website currently has over 350 video tutorials with steps and tips, plus a selection of PDFs. If you are not sure about joining, you can explore my free videos with a free membership, or take the plunge and become a full subscriber for full access.


If you’d prefer to support me on Patreon, please visit: https://www.patreon.com/RichardGray