


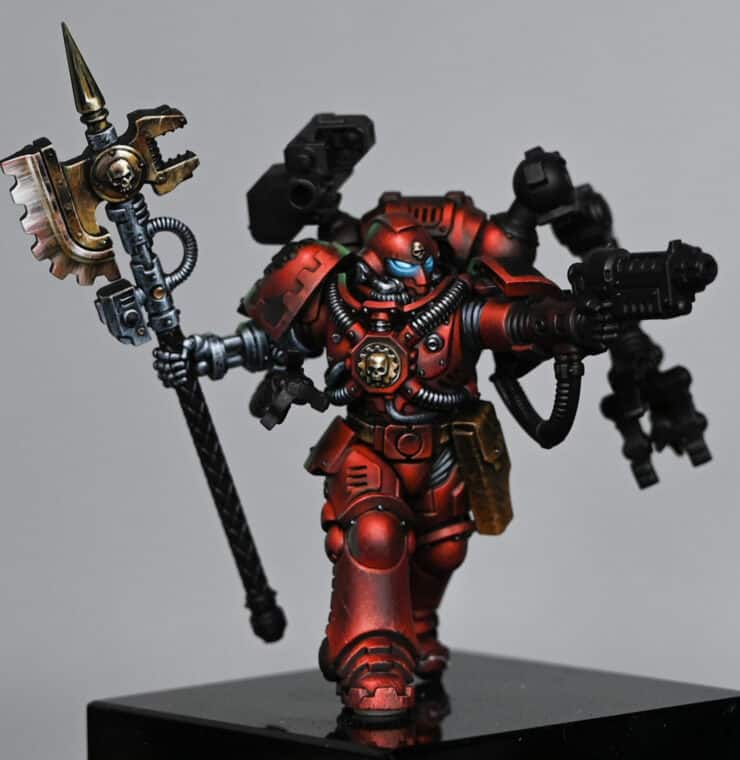
How to paint a Red Primaris Techmarine with this striking, stunning red NMM armour, weapon and gold and steel NMM chest pieces.
Video: How to Paint a Red Techmarine – Part One (Red Armour)
This part focuses on the upper of the red armour, with his head and chest the main part we look at in the video.
All videos are recorded in HD 1080p or higher – use full screen for the full effect and let the video load completely.
Materials Needed
- Primed Miniature: Primaris Techmarine, primed in black.
- Paints: Games Workshop’s Gal Vorbak Red, Khorne Red, Evil Sunz Scarlet, Wild Rider Red; Vallejo’s Neutral Grey, Pale Grey Blue, White Grey, Turquoise.
- Brushes: Fine detail brushes for precise application.
- Palette: Wet palette to keep your paints workable.
- Water or Thinning Medium: For thinning paints as needed.
Step-by-Step Guide
Step 1: Base Layer
Start with Gal Vorbak Red: Apply this as your base layer over the black primer. Due to its high translucency, a couple of coats may be needed. This layer will serve as the base shading colour and for glazes later in the process.
Step 2: Main Armour Colour
Apply Khorne Red: This is your primary armour colour. Begin by mapping out highlights, but don’t worry about covering every area just yet. Focus on getting a solid base on visible parts of the armour.
Step 3: Highlighting
Progress to Evil Sunz Scarlet: Apply this brighter red sparingly as your first layer of highlights. Remember, the goal is to maintain the dark, moody look of the Techmarine while still providing contrast. Use the paint thinly to ensure smooth transitions.
Finish with Wild Rider Red: Use this for the brightest highlights but apply it very conservatively to avoid overpowering the red armour with too bright or orange tones.
Step 4: Enhancing Details
Create Depth with Glazes: Return to Gal Vorbak Red for glazing in shadows and softening transitions. This enhances depth and maintains the richness of the red.
Detail Work: Use fine detail brushes to add scratches and wear, enhancing the battle-worn look of the Techmarine’s armour.
Step 5: Tech Elements and Eyes
Paint Tubes and Trim: Start with Neutral Grey, moving through Pale Grey Blue to White Grey for metallic effects. Highlight edges and curves to simulate light reflection, keeping in mind the direction of the light source.
Glowing Eyes: Begin with a base of Vallejo Turquoise, layering up through mixed shades with White Grey for brightness. Focus the brightest points in the centre of the eyes, using glazing techniques to blend and soften edges.
Step 6: Final Touches
Matte Finish: Consider using a matte varnish on armour sections to contrast with the glossier look of metallic and glowing parts.
Adjustments: Revisit any areas that may need further refinement, ensuring a coherent look across the miniature.
Tips for Success
- Layering: Build up colours gradually, allowing each layer to dry thoroughly before applying the next.
- Highlighting: Keep highlights focused and restrained. Over-highlighting can desaturate the base colour and detract from the overall appearance.
- Glazing: Use thin glazes to smooth out transitions and add depth to colours without obscuring underlying details.
- Light Source: Consistency in highlighting according to a single light source adds realism to the miniature. Regularly take a step back and check you are painting the light source from the same angle.
Video: How to Paint a Red Techmarine – Part Two (Red Armour)
This part focuses on the lower areas of the red armour, with his leg and knee the main part we look at in the video.
Materials Needed:
- Games Workshop paints: Gal Vorbak Red, Khorne Red, Evil Sunz Scarlet, Wild Rider Red, and a white paint of your choice for mixing.
- A wet palette to keep your paints workable.
- A fine detail brush for precise application and stippling.
- A standard painting brush for broader strokes.
Step-by-Step Guide
Preparing the Model:
- Base Coat: Begin by applying a base coat of Gal Vorbak Red over the black primer. This dark red serves as the foundation for our armour and helps subsequent layers stand out.
Painting the Knee:
- Initial Highlights: Apply Khorne Red to map out highlights on the knee. Use a stippling motion rather than smooth strokes to create texture and blend into the Gal Vorbak Red base.
- Adding Depth: As the paint dries, it will become duller. Add a light spot right at the front of the knee and a soft bounce highlight at the bottom to give the armor shape and definition.
Highlighting the Armor:
- Building Up Highlights: Gradually build up highlights using Evil Sunz Scarlet and Wild Rider Red. Focus the brighter highlights (Wild Rider Red mixed with a small amount of white) on areas that would naturally catch the light, such as the top edges and curves of the armor.
- Refining Highlights: Use a stippling technique to apply brighter highlights, ensuring you let each layer dry before adding more. This prevents removing previous layers and ensures a smooth transition between shades.
Adjusting Translucency:
- Working with Translucent Paints: Reds are translucent, so work from a dark base upwards. Use the translucency to blend shadows naturally, focusing on highlights rather than covering everything in a bright red.
Creating Texture and Detail:
- Stippling for Texture: Continue to use stippling to create a textured look, suggesting wear and maintenance on the armor. This technique also helps blend highlights seamlessly.
- Adding Scratches: Use Wild Rider Red, and for the brightest points, mix Wild Rider Red with a small amount of white. Apply fine lines and dots to simulate scratches and wear, enhancing the model’s realism.
Finishing Touches:
- Edge Highlighting: Use Wild Rider Red for edge highlighting, focusing on defining the shape of the armor without overpowering the main highlights.
- Final Adjustments: If any area becomes too bright or loses its red hue, go back in with Gal Vorbak Red to glaze over and tone down the intensity. This also helps blend all elements together harmoniously.
Additional Tips:
- Ensure your paint consistency is right; it should be thin enough to flow smoothly but not so thin that it loses coverage. A ratio of about 1.5 parts water to 1 part paint is a good starting point, but adjust as needed based on your paint’s condition and the ambient conditions.
- Always wait for layers to dry before applying the next, especially when working with stippling techniques, to avoid lifting previous layers.
- Use lighting references (such as holding the model under a lamp) to understand where natural highlights and shadows would fall, guiding your painting process.
Video: How to Paint a Red Techmarine – Part Three (Cables, robotic arm and gun holster.)
This section focuses on achieving a high-contrast, non-metallic metal look on various components of the Techmarine, including the cables on his chest, the mechanical arm, and a leather pouch
Materials Needed:
- A selection of brushes, including fine detail brushes for precise work.
- A wet palette to keep your paints hydrated and workable.
- Vallejo and Games Workshop (GW) paints as listed:
- Vallejo: Neutral Grey, Pale Grey Blue, White Grey, Black, Dark Grey, London Grey, Dark Blue Pale
- Games Workshop: Doombull Brown, Balor Brown, Ushabti Bone
- P3: Morrow White
Step-by-Step Guide:
Painting the Cables:
- Base Colour: Start with Neutral Grey for the base of the cables, considering how light naturally hits each ridge but enlarging the highlighted area for visual effect.
- Adding Depth: Utilize Black from Vallejo to correct any mistakes, leveraging its matte finish to adjust the appearance of cables against the satin finish of the primer.
Highlighting Techniques:
- Building Highlights: Gradually build up highlights using Pale Grey Blue and White Grey, focusing on areas where light would naturally catch more intensely. Utilize Morrow White for the brightest points, ensuring to create dots slightly larger than the underlying highlight for a reflective effect.
- Refining Details: Pay special attention to the underside of cables and other small details, possibly using a lighter grey or reflecting the armour’s red for realism, though maintaining high contrast for visual impact.
Painting the Leather Pouch:
- Texture and Base: Start with Doombull Brown, applying the paint in a scribbly fashion to simulate the texture of worn leather. Focus more on the bottom of the pouch for a modulated look.
- Highlighting the Leather: Progress through Balor Brown to Ushabti Bone, focusing on edges and areas of wear. The goal is to create a highly textured appearance, indicative of frequently used leather.
Glazing for Depth:
- Subtlety with Glazes: Use glazes made from thinned-down Abaddon Black and a mix of Doombull Brown and Monopack Brown (or a similar light brown) to tone down the brightness of the highlights and add depth to the textures.
Painting the Mechanical Arm:
- Non-Metallic Metal (NMM) Technique: Begin with Neutral Grey, layering up towards Pale Grey Blue and then to white for the brightest highlights. Utilize a scratchy, cross-hatching technique for a worn metallic look, ensuring to maintain the light source consistency across the model.
- Detailing and Contrast: Focus on creating a contrast between the mechanical arm and the rest of the model, paying attention to the placement of primary and secondary (bounce) highlights to simulate metallic reflections.
Additional Tips:
- Practice Makes Perfect: These techniques, especially the NMM and texturing on the leather pouch, require practice to master. Don’t be discouraged by initial attempts; each model you paint will help improve your skills.
- Attention to Detail: Small details like the rivets and the banding between armour plates can significantly impact the model’s final appearance. Take your time with these areas to ensure they contribute to the overall look of the miniature.
- Consistency in Lighting: Ensure that the light source is consistent across the model to maintain realism in your highlights and shadows. This applies to all aspects of the model, from the armour to the accessories.
Video: How to Paint a Red Techmarine – Part Four (NMM Axe)
This guide aims to help you achieve a realistic non-metallic metal effect on your Techmarine’s axe, with a focus on contrast, texture, and light reflection.
Materials Needed:
- Fine detail brushes for precise application.
- A wet palette to keep your paints hydrated.
- Vallejo and Games Workshop paints: Doombull Brown, Mournfang Brown, Balor Brown, XV-88, Ice Yellow, Pale Grey Blue, and P3 Morrow White (or any white).
Preparing the NMM Axe:
- Metal Pole: Begin by painting the metal pole using the same NMM techniques detailed in the previous video. This ensures consistency across metallic elements of the miniature.
Painting the Circular Detail on the NMM Axe:
- Base Colour: Start with the darker brown (Doombull Brown), applying it as the base for the small circular detail on the pole. This connects the colour scheme with the axe head, adding warmth and interest.
- Highlighting: Gradually build up the highlights transitioning from dark (Doombull Brown) to light (XV-88 to Ice Yellow) from the top to the bottom of the circular detail. Finish with a thin edge highlight at the top for definition.
Painting the NMM Axe Blade:
- Vertical Lines: Initially, paint vertical lines across the blade with a mixture of 50:50 water to paint. This underlayer softens the stark contrast between subsequent horizontal lines and the dark primer.
- Adding Texture: Apply horizontal lines over the vertical ones to create a cross-hatching effect. This technique adds texture and subtlety to the blade, avoiding harsh contrasts.
- Defining Highlights: Focus on creating a diagonal highlight across the axe head, marking the primary light reflection. This line should be brighter at the top edge of the blade, tapering and becoming more subtle as it crosses the blade.
Building Up the Blade’s Texture:
- Further Highlights: Use Mournfang Brown to add more texture and depth, emphasizing the top of the blade where the light is strongest. The aim is to make the top appear lighter than the bottom, enhancing the NMM effect.
- Ice Yellow Highlights: Progress to Ice Yellow for the highest highlights, concentrating on areas that would catch the most light. Ensure these lines are fine and precise to maintain the textured look.
Detailing the Axe Head:
- Base Texturing: With Mournfang Brown, create scribbly, textured marks on the flat of the axe head, focusing on creating a light to dark modulation from one edge to the other.
- Enhancing Texture: Progress through Balor Brown and XV-88, adding finer, more controlled highlights to build up the texture. These should be more focused and less extensive than the base texture, adding depth and interest to the surface.
- Final Highlights: Use Ice Yellow and Pale Grey Blue for the final highlights, paying particular attention to areas like the skull and the circle on the axe head. These colours should only be applied to the blade for differentiation, so don’t go too crazy with them, adding a cool tone to contrast with the warmer body of the axe head.
Finishing Touches:
- Neatening Edges: Go back and tidy up any overspill or overly broad lines with the base colours, ensuring the texture remains coherent and the contrasts sharp.
- Evaluation: Step back and review the entire piece, making any necessary adjustments to ensure the NMM effect is convincing and the textures and contrasts work together harmoniously.
If you can’t see the videos, please sign up here! The website currently has over 350 video tutorials with steps and tips, plus a selection of PDFs. If you are not sure about joining, you can explore my free videos with a free membership, or take the plunge and become a full subscriber for full access.


If you’d prefer to support me on Patreon, please visit: https://www.patreon.com/RichardGray