


Two video tutorials on how to paint a red squig, a friendly little fella who is a member of Zarbags Gits! Keep reading to watch the videos and explore the full paints and materials list, plus a step by step guide on how to paint a red squig.
Video – How to Paint a Red Squig: Part One
All videos are recorded in HD 1080p or higher – use full screen for the full effect and let the video load completely.
Paints and Materials Used
Paints:
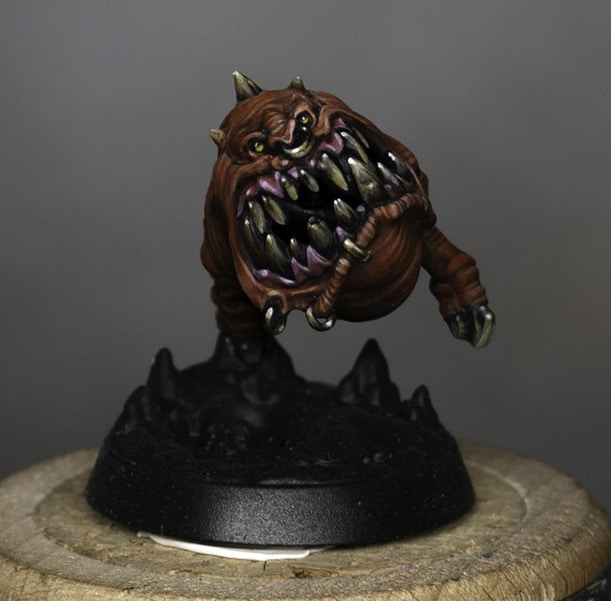
- Mephiston Red (Games Workshop) – Your primary base colour.
- Evil Suns Scarlet (Games Workshop) – For brighter tones and highlights.
- Abaddon Black (Games Workshop) – Used for mixing shadows and darker tones.
- Ratskin Flesh (Games Workshop) – Employed for highlighting and detailing.
- Ushabti Bone (Games Workshop) – For final, bright highlights.
- Ceramite White (Games Workshop) – Used sparingly for the brightest points.
Brushes:
- A selection of fine detail brushes. I typically use a range of Artis Opus brushes from sizes 00 to 1. The key here is to have a brush that keeps a good point for fine details and another for broader base coating.
- It’s essential to have brushes you’re comfortable with, especially when working on finer details like striations and facial features.
Primer:
- Alclad Black Primer: Used for priming the model. Remember, this primer is a bit hazardous, so ensure good ventilation and use a mask.
Other Materials:
- Palette: For mixing your colours. A wet palette can be especially helpful in keeping your paint at the right consistency.
- Varnish: AK Interactive Ultra Matte Varnish for spraying over the model to reduce the shininess of the primer.
- Mask and Ventilation Equipment: Necessary when using Alclad Black Primer due to its hazardous nature.
- Water Cup: For cleaning your brushes.
- Paper Towels or Cloth: For brush maintenance during painting.
Optional:
- Airbrush Thinner or Flow Improver: These can be mixed with your paints to alter consistency, especially if you’re finding a particular paint too thick or difficult to work with.
Step by Step Guide
Step 1: Priming Your Model
- First things first, prime your model. In this case, I’ve experimented with Alclad Black Primer. It’s a bit more hazardous than others, so make sure you have good ventilation and wear a mask. It’s a bit shiny, but don’t worry, we’ll address that as we go along.
Step 2: Applying the Base Coat
- Begin by applying a base coat of Mephiston Red. This is your foundational layer. When applying this, pay attention to the direction of your brushstrokes. Follow the muscle shapes and striations of the model. This technique is crucial as the paint isn’t completely opaque, and the direction of your brushstrokes will subtly influence the final look.
Step 3: Creating Shadows
- Now, let’s mix a bit of Abaddon Black with Mephiston Red to create a dark, reddish-black colour. Use this to start adding shadows to your model. Remember, a bit of messiness here can actually add to the natural variation in tones, so don’t worry about being too neat.
Step 4: Preparing Your Palette
- It’s time to prepare your palette with six colours. These are Ratskin Flesh, Evil Suns Scarlet, Mephiston Red, Abaddon Black, and two custom mixes – one that’s mainly Abaddon Black with a touch of Mephiston Red, and the other predominantly Mephiston Red with a small amount of Abaddon Black. These mixes are vital for creating smooth transitions and depth.
Step 5: Working on the Shadows
- Start with the shade mixture that’s primarily Mephiston Red with a bit of Abaddon Black. Work this into some of the shadow areas. Don’t worry too much about covering the deepest shadows, as the slight opacity of the paint aids in blending and creating transitions.
Step 6: Adding Darker Shades
- Gradually move to the darker shade – the mix that has more Abaddon Black. Apply this to the darker areas. When doing this, think about the direction of your brushstrokes. Painting towards the shadows helps create a more natural look.
Step 7: Building up Striations
- As you continue, look for the brush marks you’ve made and use them to guide where you apply the striations. You want these lines to look organic and slightly irregular – too uniform, and it loses its natural feel. Use Ratskin Flesh to start painting these striations more clearly.
Step 8: Working with Brighter Tones
- Use Evil Suns Scarlet to enhance the brighter areas. Blend it with Ratskin Flesh to create a mid-tone that smoothly transitions between colours.
Step 9: Top-Down Highlighting
- Focus on top-down highlighting. The brightest points will be at the top of the model, fading down. But remember, the direction in which you remove the brush is crucial. You want the brightest part of the stroke to align with the direction of the light.
Step 10: Applying Final Highlights
- Finally, introduce Ushabti Bone and Ceramite White to your palette. Use these for the very brightest points, but sparingly. The focus here is on creating highlights that draw attention to the focal points of the model, like the face.
Video – How to Paint a Red Squig: Part Two
Paints Used
Paints:
- Mephiston Red (Games Workshop) – Used as the main base colour.
- Evil Sunz Scarlet (Games Workshop) – For glazing and enhancing the red vibrancy.
- Wild Rider Red (Games Workshop) – Used for additional glazing.
- Incubi Darkness (Games Workshop) – Employed for creating contrasting shadows.
- Yriel Yellow (Games Workshop) – Utilised for the eyes.
- Balor Brown (Games Workshop) – Used for painting teeth and non-metallic gold effects.
- Ceramite White (Games Workshop) – Applied for the brightest highlights on the teeth and eyes.
- Pink Horror (Games Workshop) – The base colour for the gums.
- Emperor’s Children (Games Workshop) – Used for highlighting the gums.
- Ushabti Bone (Games Workshop) – Employed for highlighting teeth and non-metallic gold effects.
- AK Interactive Ultra Matte Varnish – Used to reduce shine from the primer and flatten the colours.
Step by Step Guide
Step 1: Glazing Over Highlights
- Begin by applying a glaze of Evil Sunz Scarlet over the striations and highlights from your previous session. This glaze will help tone down the harshness of the highlights and restore the red vibrancy to the model. Be cautious with glazing; too much can render the colour opaque and flat.
Step 2: Adding Contrast with Incubi Darkness
- Use Incubi Darkness to add contrasting shadows. This colour, a dark, desaturated green-blue, is excellent for creating contrast against the red without being overpoweringly green.
Step 3: Spraying Matte Varnish
- Apply a coat of AK Interactive Ultra Matte Varnish to the model. This step addresses the shine from the primer and flattens the colours, making them suitable for photography. Keep in mind that matte varnish can make colours appear faded.
Step 4: Glazing with Wildrider Red
- Use Wildrider Red to continue glazing. The difference between Wildrider Red and Evil Sunz Scarlet is subtle, so the choice between them is not crucial. The primary goal is to add layers of glaze attentively to enhance the model’s colour without losing detail.
Step 5: Painting the Gums
- Paint the gums with Pink Horror, a desaturated red that harmonises with the main body colour. As this is a layer paint over a black base, it might require multiple coats for even coverage. Be neat, especially around the teeth, to maintain a clear definition.
Step 6: Highlighting the Gums
- Highlight the gums using Emperor’s Children. Focus the highlights on the midpoint of curves rather than painting all edges. This approach ensures the highlights correspond with the light direction used on the rest of the body.
Step 7: Painting the Teeth
- Start painting the teeth with Balor Brown. This step involves creating a basic blend, not focusing too much on individual strands.
Step 8: Applying Highlights to Teeth
- Highlight the teeth using Ushabti Bone for a softer transition. For the brightest highlights, apply Ceramite White, especially at the tips of the teeth to mimic a shiny, glossy look.
Step 9: Painting the Eyes
- Use Yriel Yellow for the eyes, painting them as shiny orbs. Add a small dot of Ceramite White at the top of each eye to create a reflective effect, bringing life to the eyes.
Step 10: Non-metallic Metal Effects
- For the golden trinkets, start with Balor Brown and progress through shades to Ushabti Bone, and finally, Ceramite White. Focus on light placement and maintaining enough dark areas to create the impression of a shiny, metallic surface.
By following these steps on how to paint a Red Squig, you’ll be able to achieve a vibrant and detailed Red Squig, applying various techniques to enhance its appearance. Remember, the key is in the details and the careful layering of colours.
If you don’t have an account, please sign up here! The website currently has over 350 video tutorials with steps and tips, plus a selection of PDFs. If you are not sure about joining, you can explore my free videos with a free membership, or take the plunge and become a full subscriber for full access.


If you’d prefer to support me on Patreon, please visit: https://www.patreon.com/RichardGray