


Here we have the start of my tutorials on how to paint a Deathwing Knight, which Games Workshop kindly sent me a review copy of. In these videos, we will explore how to paint the ancient armour, eyes and metal trim on the model.
Video Part One – How to Paint a Deathwing Knight Armour
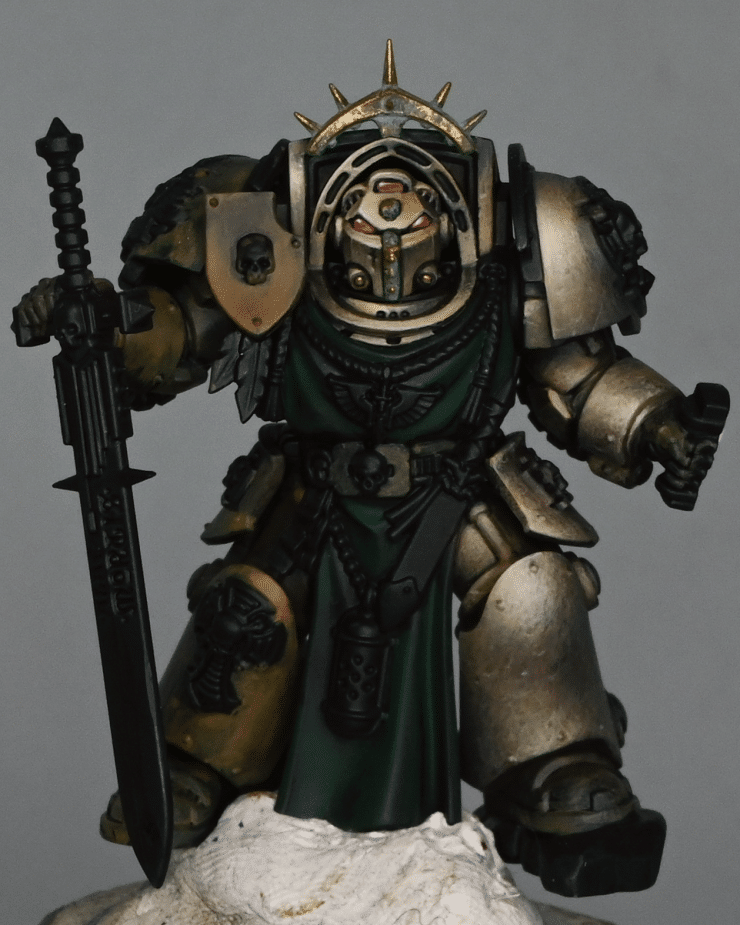
In this detailed guide, we’ll explore the process of painting the armour of a Deathwing Knight from the Dark Angels army, capturing the ancient and battle-worn aesthetic.
Paints and Materials Used
Paints
- Games Workshop Paints:
- XV-88
- Morghast Bone
- Screaming Skull
- Rhinox Hide
- Skavenblight Dinge
Brushes
- Artist Opus Size 2 Brush: Used for applying the base coats and larger areas. The brush I used has blunt tip which is beneficial for covering larger surface areas.
- A Newer Brush with a Sharp Tip: This is required for the scratchy, stippling technique used for texturing. I suggest using a custom brush or around a size 1 for this stage.
Other Materials:
- Blue Tack: Used for temporarily affixing the head to the model, allowing easy removal for detailed painting.
- Wet Palette: To mix and maintain the consistency of paints.
- Kitchen Roll: For removing excess paint from the brush, especially when creating glazes.
- Water Pot: For thinning paints and cleaning brushes.
Step-by-Step Guide: How to Paint a Deathwing Knight Armour
Step 1: Base Coating with XV-88 Start by applying XV-88 liberally over the armour. Use an older, size 2 brush with a blunt tip for better surface coverage. Don’t worry about perfection at this stage; focus on coverage, avoiding robes or non-armour parts.
Step 2: Adding Depth with Rhinox Hide Next, work on the recesses and harder-to-reach areas with Rhinox Hide. This darker shade creates depth and a natural shadow effect. Blend it with the XV-88 on your brush for smooth transitions. This step enhances the overall dimension of the armour.
Step 3: Layering for Texture After the base coat dries, add more layers of XV-88 to build up texture. Focus on areas like the wrist strap, shin guard, and shoulder pad. This layering will prepare the armour for more detailed texturing later.
Step 4: Creating Texture with Scratchy Technique Using a newer brush with a sharp tip (a custom one or a size 1), start applying Morghast Bone with a scratchy, stippling technique. This creates an aged, textured look. For areas closer to light, apply more densely for opaqueness. In darker areas, let the scratches be more dispersed, showing the underlying layers.
Step 5: Transitioning with Mixed Colours Prepare a mix of XV-88 and Morghast Bone on your palette. Use this blend for transitioning from light to dark areas, ensuring a gradual change in tone. This mix can also be used for subtle bounce highlights on cylindrical areas, like the wrist guard.
Step 6: Toning Down with Skavenblight Dinge For a final touch, use a glaze of Skavenblight Dinge. Thin it down significantly (about four or five parts water to one part paint) and apply it over the armour, avoiding the brightest highlights. This step unifies the texture and reduces the contrast slightly, making the finish look more cohesive.
Video Part Two – How to Paint a Deathwing Knight Head and Eyes
Paints Used:
- Games Workshop Paints:
- XV-88
- Morghast Bone
- Screaming Skull
- Sotek Green
- Mephiston Red
- Rhinox Hide
- Skavenblight Dinge
- Agrax Earthshade
- P3:
- Morrow White
- Two Thin Coats:
- Dragon’s Gold
Step-by-Step Guide: How to Paint a Deathwing Knight Head and Eyes
Painting the Head
- Initial Highlight Placement: Start with placing highlights on the head. Focus on the upper part, which is more illuminated. Use Morghast Bone here, but apply it subtly.
- Detailing Smaller Panels: On the smaller head panels, add a touch of texture. Mix Morghast Bone with lighter shades for this, ensuring the application is understated.
- Enhancing Facial Highlights: Introduce additional highlights using white paint for a more pronounced and neat appearance, especially on the top-facing areas of the head.
- Shadowed Lower Face: Overemphasise the highlighting on the lower face section, which would naturally be shadowed, to keep it consistent with the rest of the model. Stick to Morghast Bone for these highlights.
- Grey Glazing: Employ Skavenblight Dinge for glazing over the forehead, adding a subtle gradient and maintaining uniformity across the model.
- Light Direction Consideration: Keep in mind that the light source is angled slightly from the left, so the left side of the head should have more pronounced highlights than the right.
Painting the Eyes
- Base Colour: Begin with a base of Mephiston Red, applied asymmetrically in each eye, focusing the red in the bottom right section of both eyes.
- Highlighting: Create highlights by blending Morrow White into Mephiston Red. Concentrate these highlights in the top left of each eye, where it was previously black.
- Final Highlights: Apply pure Morrow White for the final highlights on the primary shine spots of the eyes. Ensure to leave a pinkish perimeter around these spots for a glowing effect.
Painting the Metallic Trim
- Dragon’s Gold Base Coat: Apply two thin layers of Dragon’s Gold over all metallic areas.
- Shading: Shade these areas with Agrax Earthshade to achieve a matte finish.
- Metallic Highlights: Reapply Dragon’s Gold, focusing on areas where light would naturally hit. This mimics the highlighting technique used on the bone armour.
- Optional Verdigris Effect: If desired, add a subtle verdigris effect using a mix of Sotek Green and Skavenblight Dinge.
- Finishing Touches: Revisit areas with Dragon’s Gold to clean up and highlight specific spots, particularly rivets and the brightest parts.
If you don’t have an account, please sign up here! The website currently has over 350 video tutorials with steps and tips, plus a selection of PDFs. If you are not sure about joining, you can explore my free videos with a free membership, or take the plunge and become a full subscriber for full access.


If you’d prefer to support me on Patreon, please visit: https://www.patreon.com/RichardGray
Hey Richard! Love seeing your videos. However, for some reason I can’t see this Video of the Deathwing Knight. Tried logging out and refreshing on my end but it didn’t seem to work. Anyway you can see if it’s on your end? Thank you!
Hey Demetrius! Thank you for your comment – it looks like you are not a subscribed member of the website at the moment, so all the videos that are not set as free will unfortunately not show.