


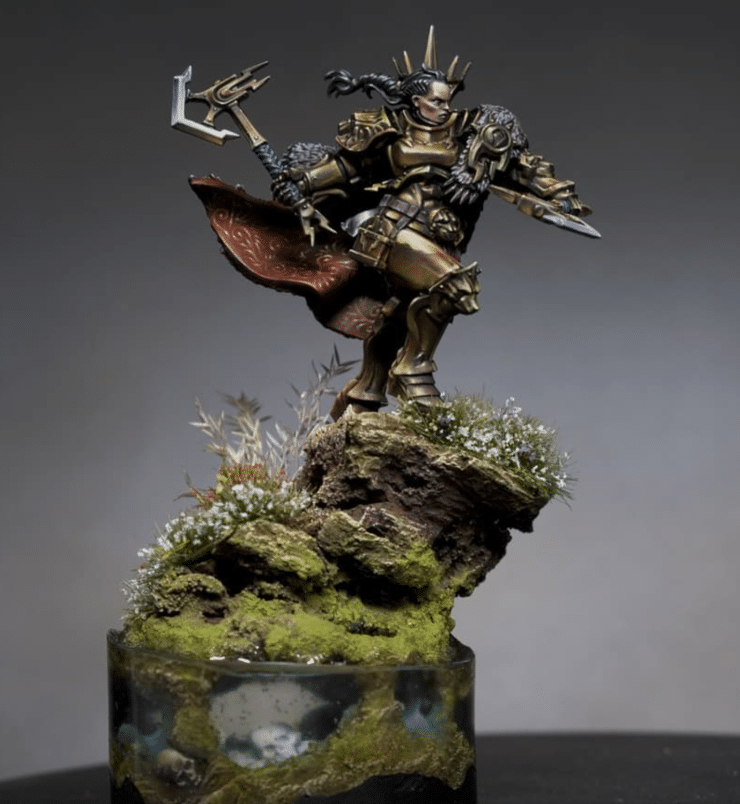
Today, we’re in my archives learning how to create a water effect base for the formidable Neave Blacktalon. This tutorial will help you in bringing a scene to life, adding depth and narrative to your miniature.
The landscape we are looking to create is complete with realistic water effects that give the impression of Neave Blacktalon traversing through a treacherous, water-logged terrain. Working with materials like resin for water effects can be tricky and messy. Patience is key. Ensuring a watertight seal for the resin and avoiding air bubbles are crucial steps that require a steady hand and mustn’t be rushed. Also, when working with various textures like cork and sand, achieving a natural blend with your paints is essential for realism.
Biggest thing on this tutorial is not to rush the drying and curing process of the materials we use. Patience pays off in ensuring each layer, from the base textures to the resin, sets perfectly. And remember, when dealing with intricate details, like adding vegetation and painting skulls, less is often more. Subtlety can make all the difference in achieving a natural look.
Video Tutorial – How to Create a Water Effect Base
Materials Required
- Resin plinths and cork bark for the base.
- Tools including a Dremel for shaping.
- Protective gear: Mask for dust protection.
- Games Workshop plastic skulls for decoration.
- Builder’s sand (with a mix of fine and large grains).
- Standard PVA glue.
- Baking soda and matte varnish for texture.
- Scale 75 paints (Brown Leather, Orange Leather, Arabic Shadow, Sherwood Green, Black Leather).
- Games Workshop Ahriman Blue and Ceramite White.
- P3 Menoth White Base.
- Airbrush (optional).
- Superglue.
- Acetate sheet or similar for creating a barrier.
- Epoxy resin for water effects.
- Gloss varnish (AK Interactive recommended).
- Vallejo Model Colour Black.
Step-by-Step Guide
- Base Preparation: Glue resin plinths together and top with cork bark for a natural rock formation look. Use a Dremel to shape the cork, ensuring proper ventilation and safety measures when you do so.
- Adding Detail: Place GW plastic skulls in the drilled areas for added interest.
- Texturing with Sand: Apply a mix of builder’s sand using PVA glue to add varied texture. This creates a more natural look with different grain sizes.
- Baking Soda and Varnish Mix: Combine baking soda with matte varnish to add fine texture, particularly around the edges and over the cork.
- Priming: Once dry, prime the base black using Vallejo Surface Primer.
- Airbrushing Base Colours: Optionally use an airbrush to apply Scale 75 paints in layers (Brown Leather, followed by Orange Leather, then Arabic Shadow). Airbrush inside the holes with Ahriman Blue, lightened with Ceramite White for a glowing effect.
- Dry Brushing Textures: Overemphasize textures with dry brushing, starting with Balor Brown and progressively lighter shades up to Menoth White Base. Focus on raised areas and edges.
- Applying Colour Washes: Use watered-down Scale 75 Sherwood Green and Black Leather to add natural colour variations. The washes will blend naturally, creating a cohesive look.
- Moss and Algae Effects: Mix Sherwood Green with baking soda and varnish to create a mossy texture, especially around the water edge.
- Adding Vegetation: Apply grass tufts, flowers (from Army Painter and MiniNatur), and field-found “real life!” vegetation with PVA and superglue for a diverse and organic look.
- Resin Water Effects: Carefully pour mixed epoxy resin into the prepared areas. Ensure a leak-proof barrier with acetate and superglue. Let it set for at least 24 hours.
- Final Touches: Once the resin is set and clear, tidy up the base edges with Vallejo Model Colour Black. Sand any rough edges if needed.
- Integration with the Model: To blend the model with the base, replicate the base’s texturing under the model’s foot.
- Completion: Leave to dry and cure fully. The finished base should present a detailed and textured landscape, complete with realistic water effects, enhancing Neave Blacktalon’s dynamic pose.
If you don’t have an account, please sign up here! The website currently has over 350 video tutorials with steps and tips, plus a selection of PDFs. If you are not sure about joining, you can explore my free videos with a free membership, or take the plunge and become a full subscriber for full access.


If you’d prefer to support me on Patreon, please visit: https://www.patreon.com/RichardGray