


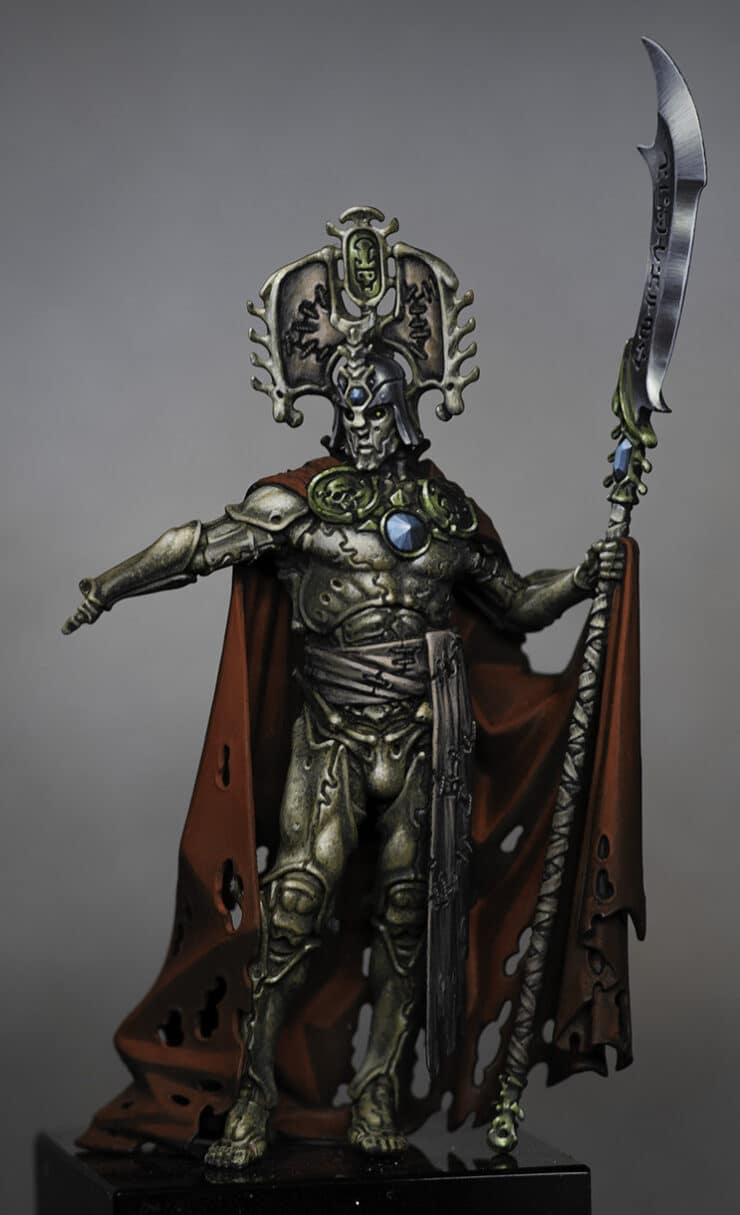
Orpheon Katakros is the emperor of an undying elite, and he goes to war with all of the pomp and circumstance that befits his station. Here are my video tutorials on How to Paint Katakros, with full step by step guide, paints and materials needed.
For me he has a statue of David vibe mixed in with a Spartan and a Prometheus Engineer.
Video Part One: How to Paint Katakros – Bone Armour
Materials Needed
- Primer: Black (Alternatively, dark brown like Rhinox Hide for a slightly different base tone)
- Base Paints: Baelor Brown (XV-88 can be a substitute)
- Highlight Paints: Morgast Bone, Screaming Skull, P3 Morrow White
- Glazing: Mechanicus Standard Grey
- Brushes: Artist Opus Dry Brush (or a makeup brush), fine detail brush for stippling and highlights
- Other: Wet palette, matte varnish (e.g., from AK Interactive)
Step-by-Step Guide
Priming
Prime the model with a black primer to create a dark base that enhances the texture and depth of the bone armour. A dark brown primer can also be used for a different atmospheric effect.
Base Layer
Use Baelor Brown straight from the pot to apply a thick base layer over the areas you want to be bone armour. This technique ensures the paint retains more texture and creates stronger marks. Apply this liberally over the model, including over areas that will later be painted differently. This stage sets the foundation for the textured look of the bone.
Stippling for Texture
Dip your dry brush or makeup brush into Baelor Brown, dabbing off the excess. Then, apply the paint in a stippling motion to create texture. Focus on creating a pitted, worn look, avoiding a dry brush effect that merely picks out edges. Aim for a top-down lighting effect, keeping the upper parts of the model lighter to simulate light direction. This process builds up the texture and base color for the armour.
Adding Highlights
Transition to Morgast Bone for the next layer of highlights. Continue using a stippling motion, now focusing on areas that catch the light. As Morgast Bone dries, it becomes more translucent, so apply it sparingly at first and observe its intensity as it sets. This step begins to introduce variation and depth to the bone armour.
Refining Highlights
Move onto Screaming Skull for finer highlights, still employing stippling to maintain texture. Focus on the most prominent edges and areas that would naturally catch the most light. By now, you should see a clear progression of light and texture on the model’s armour.
Final Highlights
Apply P3 Morrow White sparingly for the final highlights. Concentrate on the smallest areas that would reflect the most light, such as edges and tips of the armour. This step accentuates the lightest points and adds a final touch to the sense of realism and depth.
Glazing for Depth
Use Mechanicus Standard Grey for glazing over the armour. This will help soften transitions between shades, desaturate the Baelor Brown slightly, and add a subtle grey tone, contributing to the aged look of the bone.
Finishing Touches
Inspect the model for any areas that may be too bright or where transitions are too stark. You can use a mix of Baelor Brown and black to create shadows or go back with pure Baelor Brown to adjust the intensity of the highlights.
Sealing the Model
Finish the painting process by applying a matte varnish. This step unifies the sheen of the model, protects the paint job, and ensures the bone armour retains its intended appearance under various lighting conditions.
Video Part Two: How to Paint Katakros – Cloak and Blue Gem
Materials Needed
- Base Paints: Mephiston Red, Sotek Green
- Highlight Paints: Evil Suns Scarlet, Temple Guard Blue, Baharroth Blue, Blue Horror, P3 Morrow White
- Shading: Rhinox Hide
- Contrast Paint: Blood Angels Red
- Glazing: Incubi Darkness
- Varnish: AK Interactive Ultra Matte Varnish
- Brushes: Fine detail brush, larger brush for quick blending, wet palette
Cloak Painting Guide
Priming
- Begin with a black primer to utilize its natural shadowing effect. This will enhance the depth of the cloak.
Base Layer
- Apply Mephiston Red as the base layer. This colour may require multiple applications to achieve an opaque finish due to its translucent nature. Focus on areas that will catch light, leaving recesses darker to leverage the black primer as shadow.
Highlighting and Shading
- First Highlights: Use Evil Suns Scarlet to highlight the folds and raised areas of the cloak that would naturally catch the light.
- Shading: Apply Rhinox Hide in the deepest recesses and undersides of the cloak folds. This creates depth and contrast, enhancing the texture of the fabric.
- Refinement with Contrast Paint: Use Blood Angels Red contrast paint diluted with water (about 50/50) to enrich the red tones and smooth transitions. Apply this mixture carefully to avoid excessive pooling.
Finishing Touches
- To eliminate the gloss finish from the contrast paint, apply a coat of AK Interactive Ultra Matte Varnish. This also unifies the appearance of the cloak, providing a consistent matte finish across different paint mediums.
Blue Gem Painting Guide
Base Layer and Initial Highlights
- Base: Cover the gem in Sotek Green, focusing more paint on one side to begin creating a directional light effect. Leave the underside slightly darker.
- First Highlight: With Temple Guard Blue, highlight approximately two-thirds of the gem facets, ensuring each facet is distinctly outlined but not fully covered, to maintain depth.
- Subsequent Highlights: Progress through Baharroth Blue and then Blue Horror, reducing the area highlighted each time to enhance the sense of light reflecting off the gem.
Final Highlights and Shading
- Finishing Highlights: Use P3 Morrow White to add final touches to the most prominently lit facets and edges. This step accentuates the gem’s sparkle and realism.
- Deepening Shadows: Apply Incubi Darkness to the darkest facets to increase contrast and emphasize the gem’s shape. This can be blended with Sotek Green for a more nuanced shadow effect.
Additional Tips
- Maintain a steady hand and be meticulous with edge highlights to ensure the gem facets and cloak folds are sharply defined.
- Regularly reassemble the model (if parts are painted separately) to check coverage and consistency, particularly for areas obscured or highlighted by the model’s pose.
- Experiment with the thickness of layers and blending techniques to achieve the desired colour saturation and smoothness in transitions.
Video Part Three: How to Paint Katakros – NMM Blade and Handle Wrap
Materials and Paints Needed
- Vallejo Paints: Neutral Grey, Heavy Bluegrey, Ice Yellow, German Grey
- Games Workshop Paints: Rhinox Hide, Zandri Dust, Morghast Bone, Screaming Skull
- P3 Paints: Morrow White
- Brushes: Fine detail brushes for precise work and larger brushes for blending
- Palette: Preferably a wet palette to keep paints workable
Blade Painting Guide (NMM Technique)
1. Base Coating
- Neutral Grey: Start by blocking in the areas on the blade where light naturally hits. This base coat is not the final highlight but serves as a guide for the lightest areas.
2. Developing Highlights
- Move to Heavy Bluegrey for mid-tones. Apply this over and around the Neutral Grey base, blending where the two meet. Use a wet blending technique for smooth transitions.
- Introduce Ice Yellow for warm highlights to mimic sunlight reflecting on the blade. Apply sparingly to keep the effect subtle.
- Use Morrow White for the highest highlights, focusing on areas that would catch the most light. This paint should be used to fine-tune the brightest points and to soften the Ice Yellow.
3. Refining and Texture
- Work on creating texture and separation between the flat and edged parts of the blade. Horizontal and vertical lines help distinguish these areas, creating a more realistic metallic effect.
- Revisit areas with German Grey to deepen shadows and enhance contrast, especially near the edges and curves of the blade.
4. Final Adjustments
- Glaze with Rhinox Hide in downward-facing parts and near the bottom of the blade to simulate reflected ground light, adding depth and realism to the NMM effect.
Handle Wrap Painting Guide
1. Base Layer
- Start with Zandri Dust for the initial layer, focusing on creating vertical texture lines along the wrap. This base layer sets the tone for the wrap’s appearance.
2. Adding Highlights
- Progress to Morghast Bone for the first layer of highlights. Apply this more heavily near the fingers and taper off towards the bottom of the staff. Use the paint’s translucency to your advantage for a natural gradient.
- Screaming Skull is used for further highlighting, focusing on the top areas near the hand for brighter emphasis.
3. Finishing Touches
- The highest points receive touches of Morrow White for the brightest highlights, creating contrast and drawing attention to the texture.
- For added depth and to age the wrap, apply a glaze of Rhinox Hide at the bottom of the staff, blending it into the higher tones for a seamless transition.
If you don’t have an account, please sign up here! The website currently has over 350 video tutorials with steps and tips, plus a selection of PDFs. If you are not sure about joining, you can explore my free videos with a free membership, or take the plunge and become a full subscriber for full access.


If you’d prefer to support me on Patreon, please visit: https://www.patreon.com/RichardGray