


I’ve created this tutorial to simply show you how to paint a plasma cannon with for a Fists Redemptor Dreadnought, in those striking purple!
Video – How to Paint a Plasma Cannon
This video tutorial is currently hidden. To unlock it and watch, please join the website and log in.
All videos are recorded in HD 1080p or higher – use full screen for the full effect and let the video load completely.
Paints Used
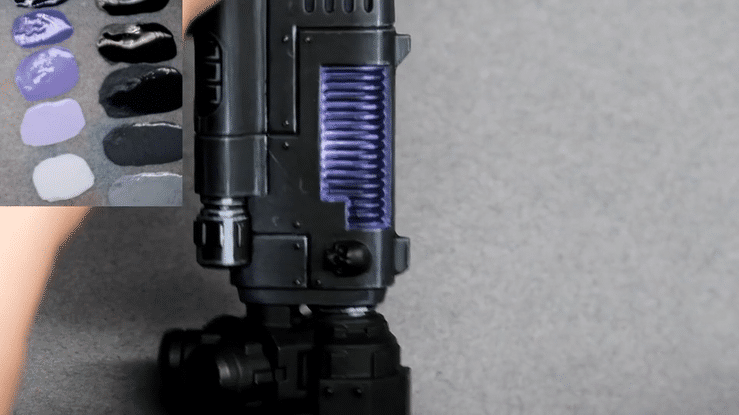
- Games Workshop: Naggaroth Night, Corvus Black, Abaddon Black
- Vallejo: Black, German Grey, Neutral Grey, Pale Grey Blue
- P3: Morrow White
How to Paint a Plasma Cannon – Step-by-Step Guide
- Base Coat and Black Highlights:
- Begin by painting the plasma gun in Vallejo Black. This base coat sets the stage for the plasma effect.
- Create a gradient using a mix of Vallejo Neutral Grey and German Grey, starting from the lightest point at the bottom of the gun and transitioning to darker shades towards the skull.
- Highlight the curved areas of the gun, as these naturally catch more light.
- Rough Blending Technique:
- Use a rough blending technique, starting with the 50/50 mix of Neutral Grey and German Grey, then working towards darker and lighter shades.
- This method creates a textured look, suitable for a tabletop model, with less paint buildup.
- Use Vallejo Model Colour Black to blend and create a matte effect, contrasting with the primer’s satin finish.
- Highlighting the Gun:
- Add highlights along the edges and hard lines of the gun, using Pale Grey Blue. Ensure these highlights are consistent and symmetrical on both sides of the gun for uniformity.
- Paint rivets with Pale Grey Blue, adding a small dot and line underneath each for a reflective effect.
- Preparing for OSL:
- Before painting the plasma effect, make sure the surrounding areas, like the black of the gun, are well highlighted, as the OSL effect will overlap these areas.
- Paint the plasma coils with Games Workshop Naggaroth Night, ensuring good coverage. This might require multiple coats due to the paint’s translucency.
- Creating the Plasma Effect:
- Mix Naggaroth Night with various amounts of Morrow White to create different shades, ranging from dark to light.
- Start with the darkest purple, painting in between the coils, and then use lighter shades to highlight towards the center of the gun, creating a glow effect.
- Focus the brightest highlights in the middle of the gun, using lighter purples and whites.
- Be cautious with white, as it can create stark contrasts and visible brush strokes. Use stippling or glazing to soften these effects.
- Glazing for Smoothness:
- Use Corvus Black to glaze over the highlights, starting from the lightest areas and moving towards the darker areas. This technique will soften the transitions and unify the finish.
- If needed, use Abaddon Black in the darkest areas for deeper contrast.
- Final Touches:
- Add additional details and refine any areas that need more attention, especially around the plasma coils.
- For additional realism, you can create a subtle purple glow around the plasma gun using a glaze of Naggaroth Night.
- Finishing the Model:
- Once satisfied with the painting, apply a matte varnish if desired to reduce shine and unify the finish.
If you don’t have an account, please sign up here! The website currently has over 350 video tutorials with steps and tips, plus a selection of PDFs. If you are not sure about joining, you can explore my free videos with a free membership, or take the plunge and become a full subscriber for full access.


If you’d prefer to support me on Patreon, please visit: https://www.patreon.com/RichardGray