


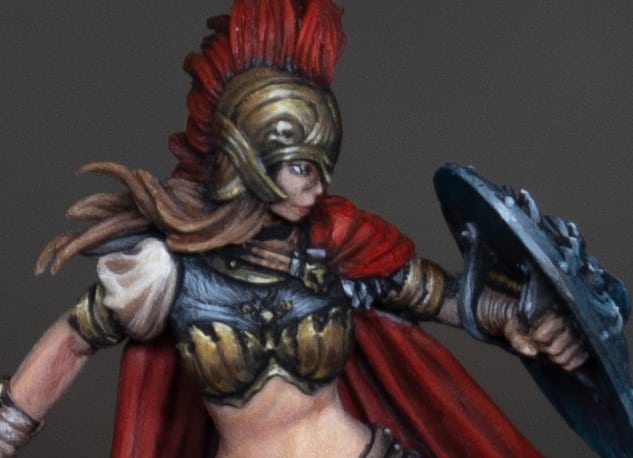
Transform the Kingdom Death Gladiator, a 32mm scale resin marvel, into a painted masterpiece worthy of any collection. My detailed tutorial provides a step-by-step explanation in bringing to life the dynamic figure, from the black priming to the elaborated effects of non-metallic metal and realistic skin tones.
Whether you want to impress at competition or simply add a striking piece to your display, this guide gives you all the techniques and tips you will need from a curated selection of paints by Games Workshop, Vallejo, and P3.
Materials you will need:
Brushes
I use the Artist Opus range of brushes, but any high-quality brush designed for miniature painting will do.
- A fine detail brush (Size 00) for intricate work such as eyes and small details.
- A small layer brush (Size 0) for base coating and detail work on smaller areas.
- A medium layer brush (Size 1 or 2) for base coating larger areas and applying washes.
Other Materials
- Black Primer: To prime the model and ensure paint adhesion.
- Airbrush (optional): For applying the initial flesh tone layer.
- Model holder or cork: To hold the model securely without touching the painted areas.
- Tweezers: For handling small components or adjusting positioning.
- Mixing palette: For mixing and thinning paints.
- Water cup: For rinsing brushes and thinning paints.
- Kitchen roll or paper towel: For brush cleaning and drying.
- Fine sandpaper or a modelling file: For smoothing any resin imperfections before priming.
Additional Tips
- When working with thin layers or glazes, maintaining the right paint consistency is crucial. A wet palette can help keep your paints at the correct consistency for longer periods.
- Good lighting and a magnifying glass or lamp can be invaluable when working on the fine details of a model of this scale.
Video: Kingdom Death Gladiator Part One
Paints Needed:
Games Workshop (Citadel):
- Mournfang Brown
- Rhinox Hide
- Ushabti Bone
- Abaddon Black
- Mephiston Red
- Kislev Flesh
- Cadian Fleshtone
- Bugman’s Glow
- Ratskin Flesh
Vallejo Model Color:
- Neutral Grey (Comparable to Skavenblight Dinge)
- German Grey (Comparable to Abaddon Black with a touch of white)
- English Uniform (Comparable to XV-88)
- Japanese Uniform (Comparable to Balor Brown)
- Ice Yellow (Comparable to Ushabti Bone with a touch of yellow)
P3 (Privateer Press):
- Morrow White (Comparable to Ceramite White)
- Bootstrap Leather (Comparable to Baneblade Brown with a touch of Rhinox Hide)
Step-by-step guide
Model Preparation
- Prime the model with a black primer to ensure subsequent colours stand out.
- Airbrush the skin areas with a flesh tone to establish a base colour. Perfect coverage isn’t necessary at this stage, as it’s merely to underpin further detailing.
- Reapply black paint to correct any overspray, maintaining clarity and visibility of details as you paint.
Armour Painting
- Base coat the helmet and breast armour with Vallejo English Uniform, laying the foundation for the non-metallic gold effect.
- Layer with Vallejo Japanese Uniform to enhance the gold effect, concentrating on highlighted areas. Ensure layers are thin to facilitate smooth transitions.
- Utilise Rhinox Hide for blending and softening transitions where needed, applying it sparingly to preserve the colour’s opacity.
- Highlight the most prominent parts with Vallejo Ice Yellow to mimic gold’s lustre.
Flesh Tones and Facial Details
- Blend Kislev Flesh, Cadian Fleshtone, Bugman’s Glow, and Ratskin Flesh on the skin, mixing directly on the model for seamless transitions. Pay special attention to natural highlights such as the cheeks, nose, and chin.
- Paint the eyes by starting with a black outline and then filling in with white, adjusting the size to achieve the desired expression and scale.
Hair and Leather Accents
- Begin the hair with a Mournfang Brown base coat, adjusting the hue as the process unfolds.
- For leather straps, apply P3 Bootstrap Leather, layering over the black to add depth. Highlight edges and textures for a realistic worn appearance using Ushabti Bone and Mournfang Brown.
- Detail the studs on the leather with Neutral Grey and German Grey, finishing with a dot of Morrow White to simulate reflection.
Additional Details and Refinements
- Enhance non-metallic gold areas with Morrow White for the brightest highlights.
- Modify the hair colour if necessary, aiming for harmony with the model’s overall palette.
- Perfect the skin tones to ensure gradients are smooth and shading is lifelike.
Video: Kingdom Death Gladiator Part Two
Materials List:
- Primer: Black primer
- Brushes: Fine detail brushes
- Paints:
- Games Workshop: Mournfang Brown, Rhinox Hide, Ushabti Bone, Abaddon Black, Mephiston Red, Kislev Flesh, Cadian Fleshtone, Bugman’s Glow, Ratskin Flesh, Temple Guard Blue, Agrax Earthshade, Wild Rider Red
- Vallejo: Neutral Grey (Skavenblight Dinge equivalent), German Grey (A mix of Abaddon Black and a touch of white), English Uniform (XV-88 equivalent), Japanese Uniform (Balor Brown equivalent), Ice Yellow (A mix of Ushabti Bone and a touch of yellow)
- P3: Morrow White (Ceramite White equivalent), Bootstrap Leather (A mix of Baneblade Brown and a touch of Rhinox Hide)
- Other Materials: Wet palette, airbrush (optional), fine detail water pot
Step-by-Step Guide:
Armoured Skirt:
- Begin with Vallejo Heavy Blue Grey, applying it selectively to mimic light reflections. Emphasize edges and upper scales more prominently to create a natural light effect.
- Use Vallejo Neutral Grey for scales in shadow to add depth and dimension.
- Enhance highlights with additional layers of Heavy Blue Grey and touches of white for the brightest points.
Shield (Back):
- Apply a base layer of Vallejo Neutral Grey, mixing directly on the model with black for shadows and Heavy Blue Grey for highlights.
- To achieve a battered look, apply the paint in a patchy, textured manner.
- Utilize white for extreme highlights, focusing on areas that would catch the most light.
- Glaze with Temple Guard Blue to unify the tones and add a subtle colour shift.
Shield (Front):
- Follow a similar approach to the back, but with a focus on the top left as the primary light source.
- Create texture and highlight edges and details to mimic the effects of light reflecting off the metal.
- Use a glaze of Temple Guard Blue to tie the colours together and reduce contrast, emphasizing a cohesive look.
Weapon:
- Paint the base with Vallejo Neutral Grey, adding highlights with Heavy Blue Grey and white.
- For chain links, highlight based on their orientation to the light source, creating a dynamic and realistic metal effect.
- Apply Agrax Earthshade to the spiked ball for a grimy, used appearance.
Hair Adjustments:
- Adjust previous highlights by overlaying Mephiston Red followed by Wild Rider Red for a vibrant, less shiny finish.
Final Touches:
- Revisit any areas that require additional highlights or adjustments to ensure a cohesive and polished look.
If you can’t see the videos, please sign up here! The website currently has over 350 video tutorials with steps and tips, plus a selection of PDFs. If you are not sure about joining, you can explore my free videos with a free membership, or take the plunge and become a full subscriber for full access.


If you’d prefer to support me on Patreon, please visit: https://www.patreon.com/RichardGray