


My series for how to paint Fulgrim Transfigured as a Golden Demon entry. This will be a big project and more videos will be added as I go…
Quick Jump To:
Please join the website or login to view!
Want to watch each how to paint Fulgrim video on it’s own page? No problem, follow the links below:
Fulgrim Transfigured
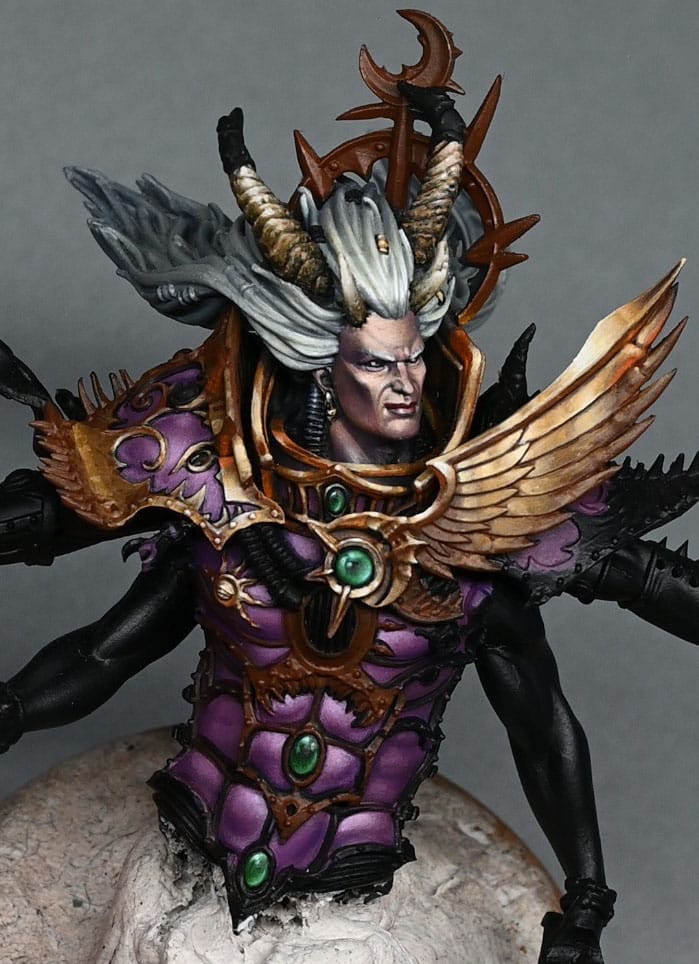
This video looks at How to Paint Fulgrim’s shiny purple armour, with tips on shine and bounce highlights.
How to Paint Fulgrim’s Shiny Purple Armour
The following colours were used:Games Workshop: Xereus Purple, Pink Horror P3: Morrow White
Quick Tips:
Base Colours and Mixes:Utilise Games Workshop’s Xereus Purple, Pink Horror, and P3’s Morrow White for the pinky purple armour. Create a 50/50 mix at the bottom left of your wet palette, adjusting for your preferred shade. Gradually add more white for each mix going up the palette, ensuring a smooth transition from dark to light. On the top right of the wet palette, fashion an off-white colour using Pink Horror and Morrow White for highlighting.Tools and Brushes:For broader, rapid coverage, employ a larger brush, but switch to a smaller brush for finer details. The Z00 brush provides superior control for detailed work, guaranteeing precise placement of highlights and shadows. Implement the stippling technique: Stipple in a motion for blending, ensuring a smooth transition without a textured effect.Highlighting Technique:Apply highlights from darker areas towards the highlight, retaining control over the direction. Do not hesitate to use translucent layers for a gradual build-up of colour intensity.Armour Reflections and Shadows:Consider the model’s pose and angle. Adjust the brightness and placement of highlights accordingly. Craft bounce highlights from the ground for a three-dimensional, shiny appearance on the armour. Introduce darker reflections with Xereus Purple for added depth and interest.Embrace imperfections during the initial stages; the process improves as you move through different sections.Adjustments and Personalisation:Modify the colour mix ratio based on personal preference for a more purple or pink look. Experiment with additional reflections and shadows for a unique and captivating finish.Final Touches:Use stippling sparingly for blending and refining transitions. Be mindful of contrast and avoid overly bright highlights, adjusting as needed to achieve a realistic yet captivating result.
If you don’t have an account, please sign up here! The website currently has over 350 video tutorials, plus step by step guides and PDFs. You can explore more free videos with a free “freebies” membership, or take the plunge and become a full subscriber for full access.
If you’d prefer to support me on Patreon, please visit: https://www.patreon.com/RichardGray [...]
Read more...
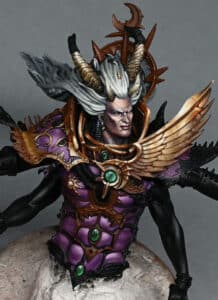
My series for how to paint Fulgrim Transfigured as a Golden Demon entry. This will be a big project and more videos will be added as I go…
Quick Jump To:
How to Paint Fulgrim HeadHow to Paint Fulgrim Hair and HornsFulgrim Gold Wing and Shiny Gem!Gold Wing NMMGreen, Shiny GemFulgrim’s Shiny Purple Armour
How to Paint Fulgrim Head
Please join the website or login to view!
Steps:
Prepare the Model:
Clean the model, addressing any excess resin flash and imperfections, especially around the chaotic halo and other intricate details.
Priming and Base Coat:
Prime the model in black for a solid base.
Optionally, apply a thin, shiny coat of a flesh-tone primer for initial guidance (though this isn’t crucial).
Blocking in Black Cables:
Prioritise painting the black cables on either side of Fulgrim’s head first to avoid complications later.
Use a matte black paint like Chimera black or model color black for this step.
Establishing Highlights:
Determine the direction of the light source, with a top-left bias for highlights.
Begin highlighting the face, focusing on light placement rather than smooth blending at this stage.
Use a shiny primer to make highlighting easier, allowing details to stand out.
Fixing Imperfections:
Inspect the model for any imperfections, such as bubbles or bumpy areas.
Address these imperfections by cutting off bumpy bits and applying multiple coats of gloss varnish, allowing each layer to dry before the next.
Continuing Highlights:
Continue highlighting the face, focusing on the left side for the primary source of light.
Paint additional details on the face, ensuring consistency in colours and paying attention to details around the eyes and other facial features.
Eye Detailing:
Paint the eyes using flesh-tone highlight colours rather than pure white.
Carefully paint the iris and pupil, avoiding excess paint on surrounding details like eyelids.
Adjust the size and detailing of the eyes to achieve the desired expression.
Lip and Facial Features:
Paint the lips with a bright red colour.
Add highlights to the lips to create depth and definition.
Focus on refining facial features, adjusting as needed to achieve a balanced and aesthetically pleasing look.
Refining and Tweaking:
Step back and assess the overall look of the model.
Identify areas that need refinement, such as blending in highlights, adjusting colour tones, and tweaking specific details.
Final Touches:
Paint additional elements like front horns and non-metallics around the face.
Ensure balance in the elements on the forehead and brow area.
Aim for a lighter, off-white colour to enhance the focus on Fulgrim’s face, considering the model’s central nature.
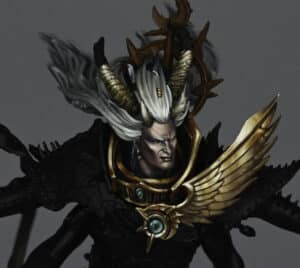
How to Paint Fulgrim Hair and Horns
Here we will look at the horns and hair, as well as general issues with resin.
The following paints were used:Vallejo: Neutral Grey, Ice Yellow, BlackGames Workshop: Balor Brown, Morghast Bone, Screaming Skull, Mournfang BrownP3: Morrow WhiteI forgot to mention in the video what I use the gloss varnish for! You will see me paint some on the model and it is when the surface is slightly rough. If you apply a few coats of gloss varnish it will smooth out the surface so that when you paint over it, it looks much neater.Quick Tips:Fulgrim’s Hair:Begin with Vallejo Neutral Gray using a large brush for overall coverage.Gradually add ice yellow and white to the mix for highlights and reflections, maintaining a desaturated look.Use a large brush for broad strokes to cover more significant areas, allowing for a natural blend.Don’t wash off the brush between different shades to leverage harsh lighting for enhanced detail visibility.Employ vertical lines while blending to mimic the natural flow of hair strands.Fulgrim’s Horns:Paint the horns with Mournfang Brown as the base colour, ensuring a textured application for added contrast.Highlight segmented elements and recesses with lighter shades such as Screaming Skull.Darken the lower sections of the horns to create depth and contrast with the upper areas.“Texture effects are really handy for hiding the damage or little inconsistencies within the sculpt.”BrushesUse a larger brush for the initial application of the base colour on the horns.Switch to a smaller brush (size 00) for highlighting and detailing, especially when working on the segmented elements and recesses.Contrast Tips:Leverage texture on the horns to create natural contrast against the smoother hair.Ensure that the highlights on the hair and horns complement each other for a cohesive look.Darken specific areas, such as the base of the horns, to enhance contrast and make details stand out.Consider the overall colour scheme to ensure that both hair and horns harmonise effectively on the model.Top TipHarsh Lighting: Work under harsh lighting during painting to reveal and address minute details that might be overlooked under softer lighting.
Fulgrim Gold Wing and Shiny Gem!
Gold Wing NMM
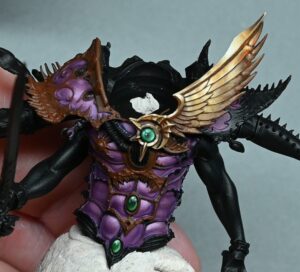
This video shows you how to paint the Non-Metallic-Metal Gold on the chest of Fulgrim. It talks about the reflections and some of the difficulties with the shape of the piece.
The following paints were used: Games Workshop: Rhinox Hide, Mournfang Brown, XV-88, Balor Brown, Troll Slayer Orange Vallejo: Ice Yellow P3: Morrow White Kimera Colours: Diarylide Yellow (Fire Dragon Bright alternative)
Quick Tips:
Colour Mixes for Base Coat: Use a mix of colours for the base coat; in this case, Mournfang Brown was used. Experiment with mixing to achieve the desired tone and richness.Layering for Opacity: Layer the colours with attention to opacity. Ensure that each layer is opaque enough, especially for brighter colours like Ice Yellow, to maintain a shiny and clean appearance.Brush Selection and Size: Choose a brush size appropriate for the area being painted. Larger brushes can cover larger surfaces efficiently, while smaller brushes are useful for detailed work and additional reflections.Highlights and Shadows: Gradually build up highlights, paying attention to where the light hits the most. Add shadows with darker tones, keeping in mind the overall light direction.Reflections and Light Volumes: Consider reflections on the model, especially on curved surfaces like wings. Mimic light volumes to create a realistic appearance. Don’t forget smaller reflections to add complexity.
Patience with Resin Models: Be patient when working with resin models. Expect the need for additional tweaking and cleaning during the painting process due to the material’s characteristics.
Scale Realism: Adjust the scale of details to the model’s size. For larger models like Fulgrim, make smaller details extra tiny to maintain a realistic appearance.
Focal Points: Invest extra time and attention on focal points of the model, like the wing and face. Perfecting these areas allows for some flexibility in other, less prominent parts.
Balance Brightness: Maintain a balance in brightness across different sections. Avoid making some areas too bright, as it can affect the overall realism of the NMM effect.
Green, Shiny Gem
This video shows you how to paint the green, shiny gem on the chest of Fulgrim. It talks about the reflections and some of the difficulties with the shape of the piece.
The following paints were used: Games Workshop: Sotek Green, Moot Green Vallejo: Black (only to correct mistakes) P3: Morrow White
Top Gem Tips:
Colour Consistency is Key: When painting gems, mix your own colours to maintain consistency throughout. Experiment with different shades, but ensure a harmonious look by using variations of the base colour
Define the Shape: Gems with protruding shapes require more definition. Paint a circle around the gem to give it a three-dimensional appearance. Be mindful of how light interacts with the shape, especially from different angles.
Play with Reflections: Instead of the standard dark top left, light bottom right approach, add three distinct reflections for a more unique look. These reflections can be influenced by the gem’s surroundings, offering a chance to get creative with the environment’s impact on the gem’s appearance.
Distortion Matters: Consider the shape of the gem when painting reflections. A sphere, for example, will distort reflections, so adjust accordingly. This adds realism and interest to the gem’s appearance.
Adjust Saturation for Impact: After painting, use glazing to adjust saturation, especially at the edges of highlights. This technique can bring out a stronger colour without compromising the contrast. Remember to leave the black section undisturbed for high contrast and to make shine spots stand out.
Experiment with Gem Cuts: Don’t feel limited by traditional gem-cut rules. Different gem cuts can impact reflections, so if your gem has a unique shape, consider how it interacts with light and reflections.
Incorporate Environmental Factors: Gems don’t exist in isolation. Consider the environment of your model and how it influences reflections. Objects nearby, lighting conditions, and even occlusions or inclusions within the gem can affect the way light plays on its surface.
Details Matter: Pay attention to small details. Even if a flaw is present in the resin mould, take the time to correct and refine it. Small adjustments can significantly enhance the overall appearance of the gem.
Experiment with Colour Palette: While my tutorial suggests specific colours, don’t hesitate to experiment with your own palette. Gems come in various colours, and adapting the technique to different hues can yield exciting and unique results.
Have Fun and Be Creative: Painting gems offers an opportunity for creativity. Don’t feel constrained by conventions. Have fun experimenting with colours, shapes, and reflections to create a gem that stands out and adds character to your model.
Fulgrim’s Shiny Purple Armour
This video looks at the purple armour of Fulgrim and how to make it shiny and give it bounce highlights.
The following paints were used:Games Workshop: Xereus Purple, Pink Horror P3: Morrow White
Quick Tips:
Base Colours and Mixes:Utilise Games Workshop’s Xereus Purple, Pink Horror, and P3’s Morrow White for the pinky purple armour. Create a 50/50 mix at the bottom left of your wet palette, adjusting for your preferred shade. Gradually add more white for each mix going up the palette, ensuring a smooth transition from dark to light. On the top right of the wet palette, fashion an off-white colour using Pink Horror and Morrow White for highlighting.Tools and Brushes:For broader, rapid coverage, employ a larger brush, but switch to a smaller brush for finer details. The Z00 brush provides superior control for detailed work, guaranteeing precise placement of highlights and shadows. Implement the stippling technique: Stipple in a motion for blending, ensuring a smooth transition without a textured effect.Highlighting Technique:Apply highlights from darker areas towards the highlight, retaining control over the direction. Do not hesitate to use translucent layers for a gradual build-up of colour intensity.Armour Reflections and Shadows:Consider the model’s pose and angle. Adjust the brightness and placement of highlights accordingly. Craft bounce highlights from the ground for a three-dimensional, shiny appearance on the armour. Introduce darker reflections with Xereus Purple for added depth and interest.Embrace imperfections during the initial stages; the process improves as you move through different sections.Adjustments and Personalisation:Modify the colour mix ratio based on personal preference for a more purple or pink look. Experiment with additional reflections and shadows for a unique and captivating finish.Final Touches:Use stippling sparingly for blending and refining transitions. Be mindful of contrast and avoid overly bright highlights, adjusting as needed to achieve a realistic yet captivating result.
Want to watch each how to paint Fulgrim video on it’s own page? No problem, follow the links below:
Videos Not Showing?
To view any of my paid tutorials, you need to be a member of the website – please click below to log in or join the site.
Not sure about joining just yet? Check out my Youtube for all my free tutorials or sign up as a free “friend” member on this site and visit the Freebies video page! [...]
Read more...
Two more videos for Fulgrim, this time how to paint the NMM (non-metallic metal) on his chest, plus the gem, too.
Gold Wing NMM
This video shows you how to paint the Non-Metallic-Metal Gold on the chest of Fulgrim. It talks about the reflections and some of the difficulties with the shape of the piece.
The following paints were used: Games Workshop: Rhinox Hide, Mournfang Brown, XV-88, Balor Brown, Troll Slayer Orange Vallejo: Ice Yellow P3: Morrow White Kimera Colours: Diarylide Yellow (Fire Dragon Bright alternative)
Quick Fulgrim NMM Tips:
Colour Mixes for Base Coat: Use a mix of colours for the base coat; in this case, Mournfang Brown was used. Experiment with mixing to achieve the desired tone and richness.Layering for Opacity: Layer the colours with attention to opacity. Ensure that each layer is opaque enough, especially for brighter colours like Ice Yellow, to maintain a shiny and clean appearance.Brush Selection and Size: Choose a brush size appropriate for the area being painted. Larger brushes can cover larger surfaces efficiently, while smaller brushes are useful for detailed work and additional reflections.Highlights and Shadows: Gradually build up highlights, paying attention to where the light hits the most. Add shadows with darker tones, keeping in mind the overall light direction.Reflections and Light Volumes: Consider reflections on the model, especially on curved surfaces like wings. Mimic light volumes to create a realistic appearance. Don’t forget smaller reflections to add complexity.
Patience with Resin Models: Be patient when working with resin models. Expect the need for additional tweaking and cleaning during the painting process due to the material’s characteristics.
Scale Realism: Adjust the scale of details to the model’s size. For larger models like Fulgrim, make smaller details extra tiny to maintain a realistic appearance.
Focal Points: Invest extra time and attention on focal points of the model, like the wing and face. Perfecting these areas allows for some flexibility in other, less prominent parts.
Balance Brightness: Maintain a balance in brightness across different sections. Avoid making some areas too bright, as it can affect the overall realism of the NMM effect.
Green, Shiny Gem
This video shows you how to paint the green, shiny gem on the chest of Fulgrim. It talks about the reflections and some of the difficulties with the shape of the piece.
The following paints were used: Games Workshop: Sotek Green, Moot Green Vallejo: Black (only to correct mistakes) P3: Morrow White
Top Gem Tips:
Colour Consistency is Key: When painting gems, mix your own colours to maintain consistency throughout. Experiment with different shades, but ensure a harmonious look by using variations of the base colour
Define the Shape: Gems with protruding shapes require more definition. Paint a circle around the gem to give it a three-dimensional appearance. Be mindful of how light interacts with the shape, especially from different angles.
Play with Reflections: Instead of the standard dark top left, light bottom right approach, add three distinct reflections for a more unique look. These reflections can be influenced by the gem’s surroundings, offering a chance to get creative with the environment’s impact on the gem’s appearance.
Distortion Matters: Consider the shape of the gem when painting reflections. A sphere, for example, will distort reflections, so adjust accordingly. This adds realism and interest to the gem’s appearance.
Adjust Saturation for Impact: After painting, use glazing to adjust saturation, especially at the edges of highlights. This technique can bring out a stronger colour without compromising the contrast. Remember to leave the black section undisturbed for high contrast and to make shine spots stand out.
Experiment with Gem Cuts: Don’t feel limited by traditional gem-cut rules. Different gem cuts can impact reflections, so if your gem has a unique shape, consider how it interacts with light and reflections.
Incorporate Environmental Factors: Gems don’t exist in isolation. Consider the environment of your model and how it influences reflections. Objects nearby, lighting conditions, and even occlusions or inclusions within the gem can affect the way light plays on its surface.
Details Matter: Pay attention to small details. Even if a flaw is present in the resin mould, take the time to correct and refine it. Small adjustments can significantly enhance the overall appearance of the gem.
Experiment with Colour Palette: While my tutorial suggests specific colours, don’t hesitate to experiment with your own palette. Gems come in various colours, and adapting the technique to different hues can yield exciting and unique results.
Have Fun and Be Creative: Painting gems offers an opportunity for creativity. Don’t feel constrained by conventions. Have fun experimenting with colours, shapes, and reflections to create a gem that stands out and adds character to your model.
If you don’t have an account, please sign up here! The website currently has over 350 video tutorials, plus step by step guides and PDFs. You can explore more free videos with a free “freebies” membership, or take the plunge and become a full subscriber for full access.
If you’d prefer to support me on Patreon, please visit: https://www.patreon.com/RichardGray [...]
Read more...
This video continues the series for how to paint Fulgrim Transfigured. Here we will look How to Paint Fulgrim hair and horns as well as how to work with general issues with resin.
The following paints were used:Vallejo: Neutral Grey, Ice Yellow, BlackGames Workshop: Balor Brown, Morghast Bone, Screaming Skull, Mournfang Brown P3: Morrow White
I forgot to mention in the video what I use the gloss varnish for! You will see me paint some on the model and it is when the surface is slightly rough. If you apply a few coats of gloss varnish it will smooth out the surface so that when you paint over it, it looks much neater.
Quick Tips on How to Paint Fulgrim Hair and Horns:
Fulgrim’s Hair:
Begin with Vallejo Neutral Gray using a large brush for overall coverage.
Gradually add ice yellow and white to the mix for highlights and reflections, maintaining a desaturated look.
Use a large brush for broad strokes to cover more significant areas, allowing for a natural blend.Don’t wash off the brush between different shades to leverage harsh lighting for enhanced detail visibility.
Employ vertical lines while blending to mimic the natural flow of hair strands.
Fulgrim’s Horns:
Paint the horns with Mournfang Brown as the base colour, ensuring a textured application for added contrast.
Highlight segmented elements and recesses with lighter shades such as Screaming Skull.
Darken the lower sections of the horns to create depth and contrast with the upper areas.
“Texture effects are really handy for hiding the damage or little inconsistencies within the sculpt.”
Brushes
Use a larger brush for the initial application of the base colour on the horns.Switch to a smaller brush (size 00) for highlighting and detailing, especially when working on the segmented elements and recesses.
Contrast Tips:
Leverage texture on the horns to create natural contrast against the smoother hair.
Ensure that the highlights on the hair and horns complement each other for a cohesive look.
Darken specific areas, such as the base of the horns, to enhance contrast and make details stand out.
Consider the overall colour scheme to ensure that both hair and horns harmonise effectively on the model.
Top Tip:Harsh Lighting: Work under harsh lighting during painting to reveal and address minute details that might be overlooked under softer lighting.
More Fulgrim Videos!
If you don’t have an account, please sign up here! The website currently has over 350 video tutorials, plus step by step guides and PDFs. You can explore more free videos with a free “freebies” membership, or take the plunge and become a full subscriber for full access.
If you’d prefer to support me on Patreon, please visit: https://www.patreon.com/RichardGray [...]
Read more...
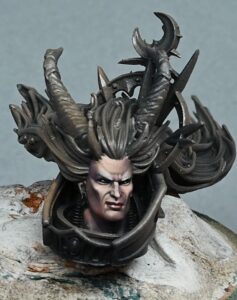
How to paint the Fulgrim Transfigured Head. It’s the start of a massive series for how to paint Fulgrim Transfigured as a Golden Demon entry. This is a big project, with links to more tutorial videos for Fulgrim at the bottom of this page.
The following paints were used: Games Workshop: Cadian Fleshtone, Xereus Purple P3: Morrow White Kimera: Black (Any black will do)
Steps:
Prepare the Model:
Clean the model, addressing any excess resin flash and imperfections, especially around the chaotic halo and other intricate details.
Priming and Base Coat:
Prime the model in black for a solid base.
Optionally, apply a thin, shiny coat of a flesh-tone primer for initial guidance (though this isn’t crucial).
Blocking in Black Cables:
Prioritize painting the black cables on either side of Fulgrim’s head first to avoid complications later.
Use a matte black paint like Chimera black or model color black for this step.
Establishing Highlights:
Determine the direction of the light source, with a top-left bias for highlights.
Begin highlighting the face, focusing on light placement rather than smooth blending at this stage.
Use a shiny primer to make highlighting easier, allowing details to stand out.
Fixing Imperfections:
Inspect the model for any imperfections, such as bubbles or bumpy areas.
Address these imperfections by cutting off bumpy bits and applying multiple coats of gloss varnish, allowing each layer to dry before the next.
Continuing Highlights:
Continue highlighting the face, focusing on the left side for the primary source of light.
Paint additional details on the face, ensuring consistency in colours and paying attention to details around the eyes and other facial features.
Eye Detailing:
Paint the eyes using flesh-tone highlight colours rather than pure white.
Carefully paint the iris and pupil, avoiding excess paint on surrounding details like eyelids.
Adjust the size and detailing of the eyes to achieve the desired expression.
Lip and Facial Features:
Paint the lips with a bright red colour.
Add highlights to the lips to create depth and definition.
Focus on refining facial features, adjusting as needed to achieve a balanced and aesthetically pleasing look.
Refining and Tweaking:
Step back and assess the overall look of the model.
Identify areas that need refinement, such as blending in highlights, adjusting colour tones, and tweaking specific details.
Final Touches:
Paint additional elements like front horns and non-metallics around the face.
Ensure balance in the elements on the forehead and brow area.
Aim for a lighter, off-white colour to enhance the focus on Fulgrim’s face, considering the model’s central nature.
Check out the next video!
More Fulgrim Tutorials!
If you don’t have an account, please sign up here! The website currently has over 350 video tutorials, plus step by step guides and PDFs. If you are not sure about joining, you can explore my free videos with a free “freebies” membership, or take the plunge and become a full subscriber for full access.
If you’d prefer to support me on Patreon, please visit: https://www.patreon.com/RichardGray [...]
Read more...
Videos Not Showing?
To view any of my paid tutorials, you need to be a member of the website – please click below to log in or join the site.


Not sure about joining just yet? Check out my Youtube for all my free tutorials or sign up as a free “friend” member on this site and visit the Freebies video page!