


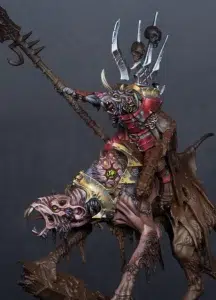
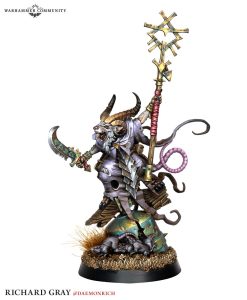
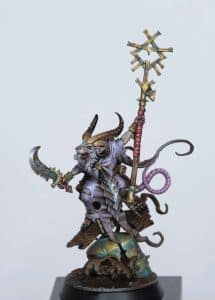
In this guide, we’ll walk through how to paint the Skaven Arch-Warlock with a grimy, non-metallic metal (NMM) effect. The focus will be on creating weathered steel armour and verdigris-weathered copper. You’ll learn to build up layers using stippling and dry brushing, while maintaining the gritty, battle-worn look typical of Skaven. This method is also ideal for quickly painting an entire army to a table-ready standard.
Video – How to Paint the Skaven Arch-Warlock: Part One
Materials Needed:
- Games Workshop Paints: Doombull Brown, Bugman’s Glow, Rhinox Hide, Mournfang Brown, Abaddon Black, Warpstone Glow, Moot Green, Flash Gitz Yellow
- Vallejo Paints: Neutral Grey, Ice Yellow
- Brushes: Large and small dry brushes (Artis Opus recommended, or makeup brushes can suffice), size 0 brush, and others as needed
Step 1: Prime the Model
- Begin by priming your assembled model with Abaddon Black,
Step 2: Base Layer with Mournfang Brown
- Using a large dry brush, apply a base coat of Mournfang Brown using a stippling technique. Thin the paint by mixing it with water (about 50/50 ratio). Ensure the dry brush is damp but not wet to avoid texture buildup.
- Stipple the paint all over the model, ensuring a smooth application with no unwanted texture. This will create a rough surface that adds depth to the dirty, grimy appearance of the armour.
Step 3: Add Neutral Grey Highlights
- Switch to a smaller dry brush for more control, and apply Vallejo Neutral Grey. Again, thin the paint with water (50/50) and lightly stipple the paint over areas where you want the steel effect.
- Focus on armour plates and metallic surfaces, building up a soft layer of grey over the brown to give it a worn metallic look. Let the initial layer of Mournfang Brown peek through to give the impression of rust and grime.
Step 4: Refine the Metallic Layers
- Now, switch to your size 0 brush for more detailed work. Continue building highlights using Neutral Grey but add small amounts of Ice Yellow with each layer.
- Increase the amount of Ice Yellow in each highlight as you progress, eventually reaching pure Ice Yellow for the brightest highlights. Add a final touch of white if you want to push the contrast further.
- Be cautious not to overblend; the strength of this technique lies in the visible transitions between layers, adding texture and a rough, battle-worn appearance.
Step 5: Create Verdigris on Copper Sections
- For the copper elements, begin with Doombull Brown as your base colour. Hold the model under a light to identify the highlight areas. Thin Doombull Brown and apply it to the copper parts of the model.
- Mix Bugman’s Glow with Doombull Brown for the next layer, applying this mix to the raised areas of the copper.
- Progressively add Ice Yellow to Bugman’s Glow for further highlights, working up to nearly pure Ice Yellow. If your copper starts looking too pale, glaze over with a watered-down layer of Doombull Brown to restore some warmth.
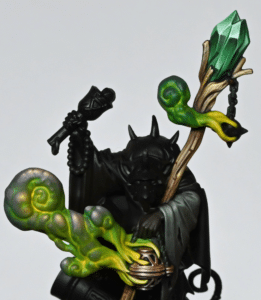
Step 6: Add Verdigris Weathering
- To achieve a verdigris effect, mix Vallejo Ice Yellow and Warpstone Glow with water (about 3:1 ratio of water to paint). Apply this to recesses and areas where the copper would naturally oxidise.
- Focus on the joints and edges of the copper parts. As the glaze dries, it will create a subtle verdigris patina, enhancing the aged look of the model.
Step 7: Apply Rusty Shadows and Dark Glazes
- To deepen the shadows on the armour, mix Rhinox Hide with Abaddon Black, thinning it with water (4:1 water to paint). Use this glaze to darken recesses and areas where rust would gather, particularly around the joints and lower sections.
- Glaze carefully to avoid losing the texture created by earlier stippling. Stay away from the brightest highlights to maintain the contrast.
Step 8: Add a Pop of Colour – Warpstone Glow Lens
- For small details like lenses, start by applying Warpstone Glow to the lens, followed by a highlight of Moot Green. Finish with a small dot of Flash Gitz Yellow in the upper corner of the lens for a specular highlight.
- Ensure the lens stands out from the grimy armour to give the model a bit of Skaven flare.
This stage of painting the Skaven Arch-Warlock gives you a quick and effective tabletop-ready look, perfect for gaming or as a base for further refinement. The grimy, weathered appearance suits the Skaven’s lore, while the stippling and dry brushing techniques create a realistic metallic effect without needing an airbrush.
In the next part, we’ll continue with other details such as the weapon, robe, and tail.
If you don’t have an account here on my website, please sign up here! I have over 350 video tutorials with steps and tips, plus a selection of PDFs. If you are not sure about joining, you can explore my free videos with a free membership, or take the plunge and become a full subscriber for full access.


If you’d prefer to support me on Patreon, please visit: https://www.patreon.com/RichardGray