How to Paint an Askurgan Exemplar Vampire

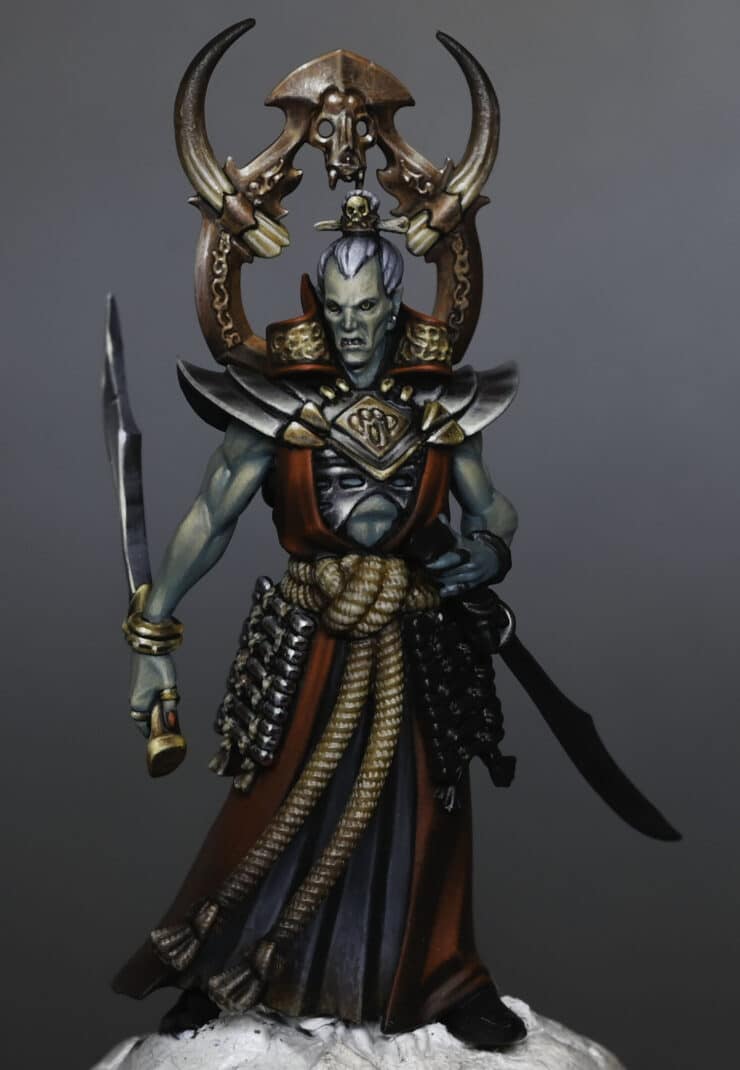
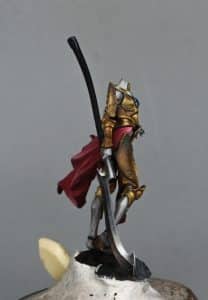
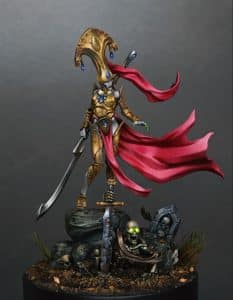
A series for how to paint an Askurgan Exemplar from the Warcry Bloodhunt box, who I painted as part of my Commended Golden Demon Entry for 2023. Because it’s a Demon entry, the techniques will be very in-depth and very precise!

In these videos you will learn how to paint his undead skin, red robes and rope, NMM metals on his weapon and armour, horn effect on his trophy rack and lots of other little tips and tricks. Read on to explore them along with paints, materials and step by step help.

How to Paint an Askurgan Exemplar Vampire Part One: Face, Arm and Shoulder

This video is currently hidden. To watch, please make sure that you are a member of the website and logged in!

Materials and Paints

  • Paints: Games Workshop (Sotek Green, Cadian Fleshtone, Kislev Flesh, Mournfang Brown, Balor Brown, Yriel Yellow, Evil Sunz Scarlet), Vallejo (Toxic Yellow, Ice Yellow, Neutral Grey, German Grey, Black), Two Thin Coats (Dark Sun Yellow – optional)
  • White Paint: Schmincke White
  • Brushes: Size 00 and other fine brushes for detailed work

Painting the Skin

  1. Base Colour: Mix Sotek Green with Cadian Fleshtone for a warm, turquoise green. This will be your base colour for the skin, providing a unique look while not being too dark.
  2. Building Highlights: Progressively lighten this mixture by adding more Kislev Flesh, and Toxic Yellow from Vallejo for higher highlights. The aim is to create a series of progressively lighter shades, leading up to a final mix of Toxic Yellow, Kislev Flesh, and Schmincke White for the brightest highlights.
  3. Application Technique: Use a very thin consistency (about 1.5 parts water to 1 part paint). Apply with a size 00 brush, focusing on upwards-facing surfaces and muscles for a natural look. Remember, the key is to layer thinly and build up the colour gradually.
  4. Detailing the Face: For the vampire’s face, focus on defining sharp features while maintaining a natural appearance. Use the lightest colour mix for the highest points like the brow ridges and cheekbones. The eyes are painted black with Yriel Yellow for the irises, positioned such that the upper eyelid slightly covers the iris.

Non-Metallic Metal (NMM) on Armour

  1. Chest Armour: Begin with a base of Mournfang Brown. For highlighting, use a mix of Neutral Grey and Ice Yellow, progressively adding more Ice Yellow for brighter areas. Paint the armour’s detailed features like fangs and textures with care, incrementally building up to white for the highest highlights.
  2. Shoulder Armour: Start with Neutral Grey, building up highlights towards the top where the light naturally hits. Add reflections and finer details, creating a smooth transition from light to dark. Use Mournfang Brown, thinned down, for adding tonal variation and depth.
  3. Gold Details: Utilise a combination of Mournfang Brown and Dark Sun Yellow (or Balor Brown) for the base of gold areas. Highlight with Ice Yellow, and for the brightest spots, use a mix of Ice Yellow and Schmincke White. Be sure to maintain the gold’s richness by not over-highlighting with white, thus keeping the metallic effect.

Additional Tips

  • Glazing: Use glazes (thin, transparent layers of paint) to smooth out transitions between colours, especially on the gold and armour sections.
  • Edge Highlighting: On the armour, especially the shoulder guards, use edge highlighting to define shapes and enhance the metallic appearance.
  • Reflections and Light Sources: Be mindful of the environment’s impact on reflections. Vary the reflections on different parts of the armour to create a more dynamic and realistic look.
  • Detailing and Textures: Pay attention to the texture of each surface. For instance, the vampire’s skin should have a smooth finish, while the armour can have a more textured appearance.
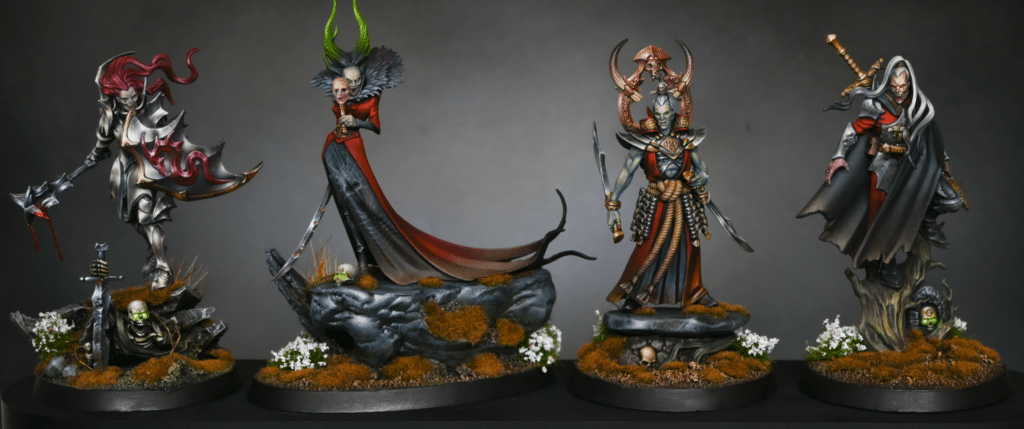
  • Consistency Across the Unit: If this model is part of a unit, ensure consistency in the painting style and colour scheme across all models, while allowing for individual variations. One of the reasons I believe I missed out on a trophy with my vampires is because I made them all much too unique and they didn’t look like they were part of the group. Cohesion and lore accuracy is very important for Golden Demon! I talk about this a bit more in my Golden Demon 2023 video, here. Anyway, sorry, back to the model..!

How to Paint an Askurgan Exemplar Vampire Part Two: Red Robes, Hair and Rope

This video is currently hidden. To watch, please make sure that you are a member of the website and logged in!

Materials and Paints

Games Workshop Colours:
Rhinox Hide: A deep brown, used as a base for the red robes.
Mournfang Brown: Utilized in creating non-metallic gold effects and for darkening rope.
Mephiston Red: Employed to enrich the red highlights.
Evil Sunz Scarlet: A vibrant red for brighter highlights.
Wild Rider Red: Used very sparingly for the highest red highlights.
Balor Brown: Mixed with other colors for non-metallic gold effects.
Karak Stone: The base for the rope.
Skeleton Horde (Contrast): Applied for shading and depth on the rope.

Vallejo Colours:
Toxic Yellow: Mixed for non-metallic gold effects and for rope detailing.
Ice Yellow: Used in similar contexts as Toxic Yellow.
Neutral Grey: A base for light grey hair and for mixing higher highlights.
German Grey: Mixed with Neutral Grey for hair.
Black: Used for various detailing and mixing.

Other Materials:
Schmincke White: An artist’s acrylic paint used for the highest highlights, particularly in the hair.

Painting Red Robes

  • Base Coat: Start with Rhinox Hide. Despite its brown tone, it’s essentially a deep red. Apply this as a base for the robe.
  • First Highlight: Mix Rhinox Hide with Mephiston Red. This creates a richer, warmer red. Apply with a size 2 brush for broad strokes.
  • Subsequent Highlights: Progressively lighten the red using Evil Sunz Scarlet and Wild Rider Red. Be cautious with Wild Rider Red, using it sparingly to maintain the robe’s red saturation.

Technique and Brushwork

  • Use a larger brush for the broader areas of the robe to achieve smooth, clean strokes.
  • For finer areas, switch to a smaller brush for precise application and to highlight raised details and creases.

Painting Hair

  • Initially, aim for shiny black hair, but later shift to a light grey, matte finish.
  • Use Neutral Grey mixed with white for higher highlights, painting in the direction of the hair’s texture.
  • Be mindful of the hairline; avoid a stark contrast between the skin and hair. Aim for a subtle shadow effect.

Painting the Rope

  • Base coat the rope with Karak Stone.
  • Use a larger brush to cover the area efficiently.
  • Apply Skeleton Horde contrast paint for shading and depth.
  • For texture, add tiny lines with a mix of Karak Stone and white, representing the rope’s fibres.

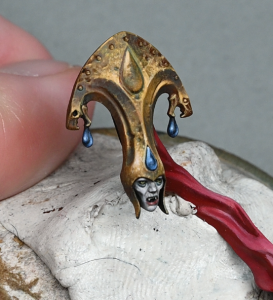
Non-Metallic Metal Effect on Collar

  • This segment is challenging due to its intricate texture.
  • Use a mix of Mournfang Brown, Balor Brown, Toxic Yellow, and Ice Yellow to create a gold effect.
  • Add white for the brightest highlights, focusing on the collar’s embossed details.

Other Tips

Throughout the process, maintain a balance between boldness and subtlety. The goal is to accentuate the model’s features without overwhelming its overall appearance. Key points to remember:

  • Layering and Blending: The layering technique is crucial, especially for the red robes. Begin with dark tones and gradually build up to lighter hues, ensuring a seamless transition.
  • Directional Brushwork: Align your brush strokes with the texture and direction of the materials you are painting, whether it’s the flow of the robes or the strands of hair. This approach enhances realism.
  • Contrast and Focal Points: High contrast areas, like the non-metallic metal collar, should be approached with caution. Ensure they complement, rather than overpower, the focal points like the face.
  • Texture and Detailing: The rope’s texture is a time-consuming but rewarding aspect. Those fine lines, while tedious, add a significant level of detail to the model.

How to Paint an Askurgan Exemplar Vampire Part 3: Sword Blade, Gold Sword Hilt and Hip Armour

This video is currently hidden. To watch, please make sure that you are a member of the website and logged in!

Materials and Paints

Games Workshop Colours:

  1. Rhinox Hide: A deep, dark brown, used for shading and creating gradients on elements like the rope and as a base for other colours.
  2. Mournfang Brown: Employed in non-metallic metal effects and to add depth to certain elements.
  3. Mephiston Red: A bright red, used for adding vivid highlights and details.
  4. Balor Brown: Mixed with other colours for non-metallic gold effects.
  5. Karak Stone: Used as a base colour for the rope.
  6. Skeleton Horde (Contrast): Applied for shading and to add depth, especially on the rope.

Vallejo Colours:

  1. Ice Yellow: Mixed for creating highlights and for non-metallic gold effects.
  2. Neutral Grey: A base for grey tones and for mixing higher highlights.
  3. German Grey: Used in conjunction with Neutral Grey for various details.
  4. Black: Employed for shading and defining details.

Other Materials:

  1. Schmincke White: An artist-grade acrylic paint used for the highest level of highlights.

Base Coating

  • Apply the base colours: Rhinox Hide for darker areas, Mournfang Brown for metallic parts, Karak Stone for the rope, and other base colours as required for different parts.

Painting the Rope

  • Apply Karak Stone as the base colour.
  • Shade with Skeleton Horde (Contrast) to add depth.
  • For weathering effects, use Rhinox Hide in a glaze consistency (about three parts water to one part paint) at the bottom of the rope.

Hip Armour

  • Paint the ropes in the armour with the same technique as the main rope.
  • For the armoured plates (that resemble bones), start with a metallic base using Mournfang Brown.
  • Create a non-metallic metal effect by gradually building up layers, transitioning to lighter colours like Balor Brown and then Ice Yellow. Include reflective highlights where light would naturally hit.

Sword Blade and Handle

  • For the sword blade, use Neutral Grey as a base, applying highlights where light would naturally reflect. Pay attention to any sculpted details like indents or edges, and enhance these with your highlights.
  • The sword hilt is treated similarly, with a non-metallic gold technique. Start with Mournfang Brown, adding highlights and transitioning to lighter tones like Ice Yellow and White.
  • For both the blade and hilt, remember to add glazes for smoother transitions.

Detailing and Finishing Touches

  • Enhance the gold sections (such as the bracelets and sword hilt) with Ice Yellow and White for bright highlights.
  • For small details like rings or intricate parts of the armour, use precise brush strokes. Highlight the top edges and create contrast with darker shades in recesses.
  • If necessary, use glazes (a thin mix of paint and water) to smooth out transitions and make the colours more cohesive.
  • Pay attention to the consistency of the paint. It should be thin enough to flow smoothly but not so thin that it loses opacity.

Edge Highlighting and Refinement

  • Carefully apply edge highlights to the armor and sword, using lighter colors like Ice Yellow or White. This step brings out the details and gives a more three-dimensional appearance.
  • For the sword blade, create the effect of light reflecting off the blade by adding thin lines and highlights. Remember to adjust the intensity based on the angle and curvature of the blade.
  • Use a mix of Neutral Grey, Ice Yellow, and White to create the non-metallic metal effect, building up to the brightest highlights where the light would be strongest.

How to Paint an Askurgan Exemplar Vampire Part 4: Trophy Rack and Horns

This video is currently hidden. To watch, please make sure that you are a member of the website and logged in!

Materials and Paints

  • Brushes: Size 2 M Artist Opus, Size 0 and 00
  • Paints: Games Workshop’s Rhinox Hide, Evil Sunz Scarlet, Balor Brown, Ushabti Bone, Skeleton Horde (Contrast); Vallejo’s Ice Yellow, Dead White

Trophy Rack

Base Coat

  • Combine Rhinox Hide and Evil Sunz Scarlet in a 2:1 ratio
  • Thin the mixture with equal parts water for a smoother application

First Highlight

  • Add Balor Brown to the base mix for a subdued pink tone
  • Apply carefully, ensuring light effects align with the model’s other parts

Additional Highlights

  • Incrementally introduce more Balor Brown and a touch of Ice Yellow for brighter highlights
  • Utilise the larger brush for expansive areas, switching to finer brushes for detailed texturing

Detailing Filigree

  • Employ a slender brush for precision
  • Gently add lighter paint to intricate patterns, avoiding overly fluid paint

Horns

  • Begin with Ushabti Bone on a black base, requiring several layers for full coverage
  • Typically, four coats achieve a solid foundation

Gradients

  • Gradually mix in Rhinox Hide with Ushabti Bone for shading
  • Paint each segment, progressing towards the horn’s tip

Texture Highlights

  • Revert to Ushabti Bone for accentuating raised textures
  • Apply using small wiggles and dots, extending into less detailed areas

Horns – Finishing Touches

  • Apply a significantly diluted Rhinox Hide for softening transitions
  • Use Skeleton Horde Contrast for added depth and hue

Final Notes

  • Ensure uniform painting on all sides of the horns
  • Balance detailed work with broader strokes for a unified, realistic appearance

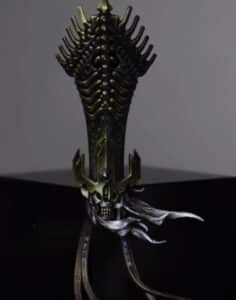
How to Paint an Askurgan Exemplar Vampire Part 5: NMM Sword

This video is currently hidden. To watch, please make sure that you are a member of the website and logged in!

This guide focuses on creating a realistic non-metallic metal (NMM) effect on a sword, employing careful layering and blending techniques to achieve a shiny appearance. Patience and attention to detail are key in this process.

Paints and Materials Required

  • Brushes: Various sizes for detailed work
  • Paints: Vallejo Neutral Grey, Ice Yellow, German Grey, Black; Games Workshop Mournfang Brown

Base Coat and Highlighting

  • Start with Neutral Grey as the base colour
  • Mix Neutral Grey with a small amount of Ice Yellow for the first stage highlight
  • Progressively add Ice Yellow to the mixture for brighter highlights
  • Use Ice Yellow with a touch of White for the brightest points
  • Thin the paints appropriately for smooth application

Blade Edge Detailing

  • Focus on parallel line textures for the cutting blade edge
  • Use horizontal and vertical strokes for diverse textural effects
  • Emphasize the sharpness of the blade with these line details

Flat Blade Surface

  • Change brush marks on the flat blade surface for distinction
  • Plan for coloured reflections, using Mournfang Brown as a glazing colour

Reflections and Highlights

  • Paint all reflections in grey tones before applying colour glazes
  • Remember that the lower edge of the blade will reflect the ground, requiring a different treatment
  • Use glazes to soften and blend reflections and highlights

Edge Highlights

  • Apply fine line highlights along the sharpest part of the blade
  • Ensure these highlights are thin and precise for a realistic effect

Refining and Adjusting Highlights

  • Adjust and refine highlights as needed for balance and symmetry
  • Use a mix of stippling and glazing techniques for smoother transitions
  • Pay attention to the spine of the sword, adjusting the placement and intensity of highlights

Final Touches

  • Use glazes to smooth out textures, especially when working with lighter colours
  • Consider the overall composition and aesthetic appeal when placing final highlights
  • Ensure a unified and realistic look by balancing light and shadow

How to Paint an Askurgan Exemplar Vampire Dirt On His Robe

This video is currently hidden. To watch, please make sure that you are a member of the website and logged in!

Paints Required

  • Games Workshop: Rhinox Hide, Mournfang Brown, Balor Brown

Preparing to Paint

  • Begin with Rhinox Hide: Apply at the very bottom of the robe. This colour blends well with the red robe, creating a subtle effect. As you move upwards, make the application more visible with small dots and splotches. This creates an impression of staining.

Adding Depth with Mournfang Brown

  • Switch to Mournfang Brown: This shade gives depth to the weathering effect. Initially, it might seem light but it darkens as it dries. If you find it too strong, you can tone it down with Rhinox Hide to soften the effect. The key here is to balance the intensity, ensuring it doesn’t overpower the base colour of the robe.

Finishing Touches with Balor Brown

  • Finalise with Balor Brown: This is a strong colour, so apply it cautiously. It’s significantly different from the previous colours and can make a bold impact. Focus on the very bottom of the robe, gradually building up a denser application of paint. Be mindful of areas near the highlights, such as near the foot of the robe at the front. Here, you might need to add more Balor Brown to counteract the brighter red tones.

General Tips for an Authentic Effect

  • Strive for unevenness: Avoid symmetrical or uniform patterns. Some areas should appear dirtier than others for a realistic effect.
  • Control the paint consistency: Aim for a 50/50 mix of paint to water for optimal flow and control. This consistency allows you to work for an extended period without creating a heavy texture.
  • Use a smaller brush: A smaller brush gives you more control, especially for creating uneven, chaotic patterns. Avoid pressing too hard to prevent large, unintended marks.
  • Adjust for mistakes: If you apply too much paint, quickly rub it off with your finger. For smears, stipple over them with a bit of Rhinox Hide to create interesting marks.
how to paint an Askurgan Exemplar

More Undead and Vampire Tutorials to Explore!

Vampires and Undead
April 17, 2024This is another video looking at Sekhar the vampire, this time focusing on how to paint a skeleton with glowing eyes for the model on her base. This video looks at the skeleton, how to paint his glowing eyes, sword and bones etc. The whole model is covered! Video: How to Paint a Skeleton with Glowing Eyes Materials needed: Skeleton ModelPriming spray (I’ve used black!) Brushes:I use the Artist Opus range of brushesFine detail brushMedium-sized brushLarge brush (optional, for basecoating larger areas) Wet Palette (for mixing and thinning paints)Varnish (to protect the finished paint job) Paints:All paints mentioned are from Games Workshop’s Citadel range. Yriel Yellow Moot Green Balor Brown Morghast Bone Screaming Skull Mournfang Brown XV-88 Rhinox Hide Other Materials: Rocks or pebblesFoliage (such as static grass or miniature leaves)Sand or texture paste (for ground texture)Super glue (for attaching basing materials)Water (for thinning paints)Paper towels or cloth to ensure your brushes are totally clean! How to Paint a Skeleton with Glowing Eyes – Step 1: Priming Prime your model with a suitable undercoat. Black is recommended as it provides a good base for both the glowing effects and the shadowed recesses of the skeleton. Step 2: Base Coating Skeleton: Apply a thin base coat of XV-88 over the entire skeleton. Ensure the paint is thinned with water to maintain detail. Eyes: Start by painting the eye sockets with Kimera White. Given the deep recesses, apply multiple thin layers to build up a solid white base. Patience is key here to avoid a textured look. Step 3: Adding Depth to Eyes Mix Yriel Yellow with Kimera White to create a pale yellow. Carefully fill in the eye sockets, leaving the deepest part still white to simulate glow. Gradually add more Yriel Yellow towards the front of the eye sockets, intensifying the colour as you move forwards. Define the edges of the sockets with Moot Green to enhance the glow effect, blending it slightly into the yellow for a smooth transition. Step 4: Skeletal Detailing General Bone Texture: Lightly dry brush the skeleton with a mixture of Mournfang Brown and XV-88 to bring out the texture. Enhanced Details: Use Morghast Bone to highlight edges and raised details across the bones. Deepening Shadows: Mix Rhinox Hide with a small amount of black to create shadows in the deeper recesses and under the bones for added depth. Step 5: Sword and Metallic Effects Base Coat: Apply Neutral Grey as a base for the sword and any metallic elements. Weathering: Add scratch effects using Troll Slayer Orange mixed with Mournfang Brown to simulate rust and age. Highlights: Use Screaming Skull to pick out edges and features, giving the impression of worn, yet still sharp, metal. Step 6: Final Touches Refining Glows: Go back to the eyes, adding pure Yriel Yellow to the centres and intensifying the green at the edges if necessary. Blending and Smoothing: Use glazes of the base colours to smooth out transitions and unify the appearance, particularly around the eye sockets and on the sword to blend the rust effects. Contrasting Details: For a final layer of detail, use Screaming Skull to highlight teeth, knuckles, and other small bone protrusions, adding a subtle layer of Rhinox Hide for ageing. Step 7: Sealing the Model Once fully satisfied with your painting, seal the model with a matte varnish to protect your work and reduce any unwanted shininess, ensuring the skeletal figure looks as haunting in the display case as it does on the battlefield. Explore more of my Golden Demon entry tutorials If you don’t have an account here on my website, please sign up here! I have over 350 video tutorials in addition to my How to Paint a Skeleton with Glowing Eyes, with steps and tips, plus a selection of PDFs. If you are not sure about joining, you can explore my free videos with a free membership, or take the plunge and become a full subscriber for full access. If you’d prefer to support me on Patreon, please visit: https://www.patreon.com/RichardGray [...] Read more...
April 8, 2024My detailed how to paint the Nagash helmet tutorials, with videos plus step by step guide and tips with full paints used. Video – How to Paint the Nagash Helmet Part OnePaints and Materials UsedPaintsBrushesOther MaterialsSteps and Tips on How to Paint the Nagash HelmetVideo – How to Paint the Nagash Helmet Part TwoPaintsSteps and Tips on How to Paint the Nagash Helmet (Part Two)Video – How to Paint the Nagash Freehand Swirls/FiligreePaintsTips for the Freehand FiligreeVideo – How to Paint the Nagash Helmet Leather Strips and RunesPaintsStep and Tips on How to Paint the Nagash Helmet Leather Strips and RunesFor all of my Nagash Tutorials in one place, go hereExplore More Nagash Technique Tutorials Video – How to Paint the Nagash Helmet Part One In this tutorial, we’ll focus on painting the metallic areas of Nagash, specifically the head. The colours used for this tutorial are a bit different from the standard, and in the video I discuss techniques in more detail to achieve a textured, refined finish. Paints and Materials Used Paints Vallejo: English Uniform (VX-88) Golden Olive (Elysian Green mixed with Yriel Yellow) Yellow Green (Dorn Yellow mixed with Moot Green) Ice Yellow (Dorn Yellow) Ivory (Screaming Skull) Games Workshop: Rhinox Hide Abaddon Black Naggaroth Night (for future use) Brushes Fine detail brush (suitable for intricate work and small highlights) Medium-sized brush (for larger areas and base coating) Wet palette (to keep paints fresh and workable) Other Materials Wet palette Green stuff (for sculpting additional details, if desired) Painting lamp (for consistent lighting during the painting process) Miniature holder (for ease of handling and painting) Steps and Tips on How to Paint the Nagash Helmet Prepare the Model: Ensure your miniature is assembled and primed appropriately for painting. I’ve used a black primer for my Nagash. Block in the Base Colour: Start by blocking in the main highlights using Vallejo’s English Uniform (VX-88). Apply this colour where you want the primary light source to hit, focusing on a top-left orientation.Be mindful not to make the colour too opaque; a slight texture is desirable for the metallic effect. Understanding Colour Choices: The choice of metallic colours doesn’t have to be conventional. For this model, I went for a dark and moody theme inspired by the artwork of Nagash.My chosen metallic shades include Golden Olive, Yellow Green, and Ice Yellow from Vallejo, along with Rhinox Hide and Abaddon Black from Games Workshop. Building Layers of Colour: Use Golden Olive to build layers on top of the English Uniform, focusing on areas that require additional depth and shading.The opacity of Vallejo paints allows for strong, defined marks, ideal for creating small details and textures. Creating Texture and Depth: With each layer, gradually introduce lighter shades such as Yellow Green and Ice Yellow to enhance highlights and add dimension to the metallic surfaces.Keep in mind the direction of light and focus on maintaining a balance between light and shadow. Understanding Volume and Light: Highlighting metallic surfaces requires understanding how light interacts with volume. Unlike standard blending techniques, aim for distinct contrasts between light and shadow. Make sure you consider how light reflects off different surfaces, creating highlights and shadows of varying intensities. I like to use lots of real-life references of metal to study as I paint. Achieving a Moody Atmosphere: For an undead character like Nagash, aim for a dark, desaturated overall appearance. Use strong, small highlights strategically to draw attention to focal points. Avoid smooth blending; purposefully textured painting adds depth and character to the model. Experimenting with Glazing TechniquesExperiment with glazing techniques to blend colours seamlessly and soften transitions between different areas of the model.Glazing allows for subtle colour adjustments and can help unify the overall color scheme, creating a harmonious visual effect. Video – How to Paint the Nagash Helmet Part Two In this part, we’ll focus on painting the skull face, hair, and bone structures atop the hat. Paints Vallejo Model Colour: English Uniform (VX-88), Golden Olive (Elysian Green mixed with Yriel Yellow), Yellow Green (Dorn Yellow mixed with Moot Green), Ice Yellow (Dorn Yellow), Ivory (Screaming Skull), Neutral Grey (Mechanicus Standard Grey), Pale Grey Blue (Grey Seer mixed with Blue Horror) Games Workshop: Rhinox Hide, Warpstone Green Contrast, Deathclaw Brown P3: Morrow White Steps and Tips on How to Paint the Nagash Helmet (Part Two) Paint the Bone Structures: Using Vallejo’s English Uniform (VX-88), begin by painting the bone structures on top of the hat. Focus on picking out the highlights, keeping in mind the top-left orientation of the light source. Apply the paint carefully to emphasize the edges and contours of the bones.Enhance the Bone Texture: Utilise Golden Olive (a mix of Elysian Green and Yriel Yellow) to add depth and shading to the bone structures. Concentrate on areas that require additional definition, such as the joints and sockets. Remember to maintain a balance between light and shadow to create a realistic, textured effect.Add Highlights: With Yellow Green (a mix of Dorn Yellow and Moot Green), further highlight the bone structures, focusing on the areas where light would naturally hit. Pay attention to the left-hand side of the model to create a stronger contrast and emphasise the lighting direction.Refine the Highlights: Using Ice Yellow (Dorn Yellow), continue to build up the highlights on the bone structures, especially on the left-hand side. Gradually increase the brightness of the highlights towards the center of the model to draw attention to focal points.Adjusting with Rhinox Hide: If necessary, use Rhinox Hide to refine any areas where you’ve made mistakes or to add depth to the shadows. The translucency of this paint allows for easy blending and adjustment while maintaining a natural look.Painting the Skull Face: For the skull face, start with Deathclaw Brown, focusing on creating a weathered, textured appearance. Apply the paint in a rough, uneven manner to mimic the natural wear and tear of ancient bones.Highlighting the Skull: Gradually add highlights to the skull using Morghast Bone. Concentrate the highlights towards the left-hand side of the face to maintain consistency with the overall lighting scheme. Ensure the highlights stand out against the darker base colour to create depth and dimension.Adding Detail to the Eyes: Use a small amount of Morghast Bone to pick out the details around the eyes, emphasising the cheekbones and brow ridge. Be mindful of the sculpted eye sockets and adjust the highlights accordingly to enhance the overall appearance.Painting the Hair: Begin painting the hair with Neutral Grey, focusing on the large, clumpy strands. Keep the highlights towards the top side of the hair to simulate light hitting the surface. Apply the paint in a rough, textured manner to achieve a realistic look.Adding Texture to the Hair: Continue to build up the texture of the hair using Pale Grey Blue. Emphasize the highlights on the top side of the hair while leaving the underside darker to create depth and volume.Refining the Highlights: Using Morrow White sparingly, refine the highlights on the hair strands to add contrast and dimension. Focus on the areas closest to the face to draw attention to the focal points. Video – How to Paint the Nagash Freehand Swirls/Filigree Paints Vallejo: English Uniform (VX-88), Golden Olive (Elysian Green mixed with Yriel Yellow), Yellow Green (Dorn Yellow mixed with Moot Green), Ivory (Screaming Skull), Neutral Grey (Mechanicus Standard Grey), Pale Grey Blue (Grey Seer mixed with Blue Horror)Games Workshop: Warpstone Green Contrast, Abaddon BlackP3: Morrow White Tips for the Freehand Filigree Base Coat: Apply a base coat of Vallejo English Uniform (VX-88) to start the filigree on the Nagash hat. Ensure even coverage and allow it to dry completely. Highlighting with Yellow-Green: Mix Vallejo Yellow Green (Dorn Yellow mixed with Moot Green) with a small amount of white to increase opacity. Use a fine tip brush to apply highlights to what would be the raised areas of the filigree. Focus on creating sharp lines and highlights to enhance the detail. Adding Ivory Highlight Dots: Using Vallejo Ivory (Screaming Skull), create small highlight dots on the filigree. These dots should be strategically placed on curves and extreme curve points to simulate shine and reflectivity. Ensure consistency in placement for a cohesive look. Enhancing Contrast with Black: With Games Workshop Abaddon Black, carefully outline the filigree details to enhance contrast and definition. Use a fine tip brush and steady hand to create clean lines and borders. Glazing with Warpstone Green Contrast: Thin Games Workshop Warpstone Green Contrast with water (about two parts water to one part paint) to create a glaze. Apply the glaze over the filigree to enhance shading and highlights. Final Touches: Use P3 Morrow White to add final highlights to the filigree, focusing on the most raised and reflective areas. Ensure consistency and restraint with the white highlights to avoid overpowering the overall effect. Video – How to Paint the Nagash Helmet Leather Strips and Runes By following these steps and techniques, you can effectively paint leather strips and runes on your Nagash (or any other model, really!) adding depth, texture, and character. Paints Games Workshop: Rhinox Hide, Mournfang Brown, Cadian Fleshtone, Temple Guard Blue, Barroth Blue. Step and Tips on How to Paint the Nagash Helmet Leather Strips and Runes Base Coat: Ensure that the leather strips on the Nagash helmet are properly primed with black primer. Once primed, apply a base coat of Games Workshop Mournfang Brown to the leather strips. This will serve as the foundation for the leather texture. Highlighting with Mournfang Brown: Using Games Workshop Mournfang Brown, begin highlighting the curves and raised areas of the leather strips. Apply the paint in a textured manner, focusing on creating depth and dimension to simulate the appearance of weathered leather. Don’t worry about perfect blending; imperfections add to the realism. Layering with Cadian Fleshtone: Next, switch to Games Workshop Cadian Fleshtone and continue highlighting the leather strips. Apply this paint more sparingly, focusing on the most raised areas and curves to enhance the texture. The tonal contrast between Mournfang Brown and Cadian Fleshtone will create depth and visual interest. Glazing with Rhinox Hide: Thin Games Workshop Rhinox Hide with water to create a glaze. Apply the glaze over the highlighted areas to tone down the highlights and add depth to the leather texture. Focus on applying the glaze in the shadowed areas and along the edges of the leather strips for a realistic look. Painting Runes: Using Games Workshop Temple Guard Blue and Barroth Blue, paint the runes onto the leather strips. Ensure that the runes are clearly visible and neatly painted. Use a fine tip brush and steady hand to create clean lines and shapes. Less is more; avoid overcrowding the leather strips with too many runes to maintain balance. Touching Up: Review the painted leather strips and runes, making any necessary touch-ups or adjustments. Ensure consistency in highlighting placement and rune design throughout the miniature model. For all of my Nagash Tutorials in one place, go here Nagash, Supreme Lord of the Undead Nagash, Supreme Lord of the Undead is the father of necromancy.  I created a series of detailed tutorials on how I painted him. Watch Now Explore More Nagash Technique Tutorials If you don’t have an account here on my website, please sign up here! I have over 350 video tutorials with steps and tips, plus a selection of PDFs. If you are not sure about joining, you can explore my free videos with a free membership, or take the plunge and become a full subscriber for full access. If you’d prefer to support me on Patreon, please visit: https://www.patreon.com/RichardGray [...] Read more...
March 13, 2024Creating a Non-Metallic Metal (NMM) texture on a sword for a miniature model requires patience, precision, and a good understanding of light and shadow. This guide is designed to walk you through the process of painting the weapon blade of Sekhar The Vampire, focusing on achieving a weathered, high-contrast, NMM effect. Video: Non Metallic Metal Texture Sword Materials Required Paints: Vallejo Neutral Grey, Ice Yellow; Games Workshop Mournfang Brown, Rhinox Hide; P3 Morrow White; Two Thin Coats Dark Sun Yellow. Brushes: Fine detail brushes capable of making very thin lines. Palette: A wet palette to ensure your paints remain workable. Water or Thinner: For diluting your paints to the desired consistency. Step-by-Step Guide to the Non Metallic Metal Texture Sword Preparing the Blade: Begin with a clean, primed miniature. Ensure Sekhar’s blade is smooth and free from any debris or fingerprints. Base Coating: Apply a base coat of Neutral Grey on the blade. This serves as your midpoint for building up highlights and deepening shadows. Establishing Light Points: Identify the main light points on the blade using a lamp. Typically, the flat back section of the blade and the curved edges will catch the most light. Mark these areas mentally as points where the highest highlights will be placed. Initial Highlights and Shadows: Create a gradient on your palette ranging from Neutral Grey to Ice Yellow, progressively adding Ice Yellow to lighten the mixture. Include a separate mix with Mournfang Brown and Neutral Grey for warmer tones, and pure white for the brightest highlights. Begin adding these mixtures to the blade, focusing on the predetermined light points. Use a scratchy, controlled technique with the very tip of your brush for texture. Refining the Texture: As the paint on your palette dries slightly, it will naturally become thicker. Use this to your advantage to add textured highlights and shadows, adjusting the water content as necessary for softer transitions or more pronounced scratches. Correcting and Sharpening Details: Utilise black to correct any oversteps or to sharpen the divisions between different sections of the blade. This step is crucial for defining the shape and enhancing the contrast of your NMM effect. Adding Depth with Glazes: Mix highly diluted glazes of Mournfang Brown (and variations with Neutral Grey) to apply to the lower sections of the blade. This creates a sense of depth and simulates a subtle reflection from the environment. Final Highlights: Use the brightest mixtures, including pure white, to add the final highlights to the top light points. This step might require going back to reinforce the contrast between the brightest highlights and the adjacent shadows. Weathering Effects: To add a weathered look, incorporate fine scratches across the blade’s surface with a very thin brush and lighter paint mixes. These should traverse both the light and dark areas to create a unified texture across the blade. Bounce Light: For a more advanced NMM effect, paint a bounce light on the cutting edge of the blade. This is a subtle highlight that simulates light reflecting off the ground, adding to the realism of your metal effect. Finishing Touches: Reassess the overall effect from multiple angles, ensuring that the blade looks good from all perspectives. Additional Tips Patience is Key: Achieving a convincing NMM effect is time-consuming. Work slowly and carefully. Lighting: Understanding how light interacts with metal is crucial for NMM. Study real-life examples if possible. More Soulblight, Undead and Vampire Tutorials! If you don’t have an account, please sign up here! The website currently has over 350 video tutorials with steps and tips, plus a selection of PDFs. If you are not sure about joining, you can explore my free videos with a free membership, or take the plunge and become a full subscriber for full access. If you’d prefer to support me on Patreon, please visit: https://www.patreon.com/RichardGray [...] Read more...
February 27, 2024How to paint the skin, face, and eyes of Sekhar the Blood Queen, highlighting common pitfalls when painting tiny faces like hers, and how to rectify them. We’ll use a specific set of paints from Games Workshop, Vallejo, and P3 to achieve our desired effects. Video Part Three: Sekhar the Blood Queen Face with Eyes, and Skin Paints Needed Games Workshop: Bugman’s Glow, Sotek Green, Yriel Yellow, Evil Sunz Scarlet, Morghast Bone Vallejo: Ice Yellow, Neutral Grey, Black P3: Morrow White (or any white paint) Step-by-Step Guide to Sekhar the Blood Queen Face, Eyes and Skin Preparing the Base Mixture for Skin: Mix a 50/50 blend of Sotek Green and Bugman’s Glow to create the base skin tone. This unique combination provides a natural, yet distinctly fantastical, skin colour for our vampire queen. Adding Highlights to the Skin: Gradually incorporate Ice Yellow into the base mixture for highlights. Start with small quantities and increase the Ice Yellow for each successive highlight layer. This technique helps achieve a smooth gradient in the skin tone, offering a more lifelike appearance. Advanced Skin Highlights: For a creamy and realistic skin tone, mix Bugman’s Glow with Ice Yellow, carefully adjusting the blend to prevent the colours from becoming overly vibrant. Add a tiny amount of white to this mixture for the lightest highlights, aiming for an off-white shade that retains a hint of the base tones. Painting Contrast and Metallic Elements: Apply a grey base to the collar, preparing it for a metallic silver finish. This step is crucial for setting up the contrast between the metallic textures and the skin, ensuring that both elements stand out without competing for attention. Achieving Skin Texture and Smooth Transitions: Use thin layers for the skin, starting with a mix of approximately 1.5 parts water to 1 part paint, and adjust as necessary for smoother finishes. Ensure each layer is completely dry before applying the next to avoid any unwanted textures. Highlighting Techniques: Focus on painting towards the highlights, lifting the brush at the brightest points for precise application. This method ensures that the highlights are sharp and well-defined, enhancing the model’s dimensional details. Painting Facial Features: Pay particular attention to the face, adjusting features like the nose with shading and highlighting to ensure it fits naturally under any headgear. Avoid relying solely on box art for colour references, as this can mislead your perception of how facial features should be represented. Painting the Eyes: Start with a solid base colour for the eyes, using black or a deep brown. Paint the iris in a striking colour, adding a small dot of white to each eye to simulate light reflection. This detail adds life and intensity to the figure’s gaze. Enhancing the Lips: Choose a vibrant red for the lips, applying it carefully to add depth and dimension. This colour choice should complement the vampire theme, adding an element of allure and danger to the figure. Overall Facial Harmony: Revisit the entire face to ensure all elements work together harmoniously. Adjust shadows, highlights, and colour intensity to achieve a balanced and realistic facial expression that suits the character’s persona. More Soulblight, Undead and Vampire Tutorials! If you don’t have an account, please sign up here! The website currently has over 350 video tutorials with steps and tips, plus a selection of PDFs. If you are not sure about joining, you can explore my free videos with a free membership, or take the plunge and become a full subscriber for full access. If you’d prefer to support me on Patreon, please visit: https://www.patreon.com/RichardGray [...] Read more...
February 6, 2024I was lucky enough to be sent Sekhar, Fang of Nulahmia by Games Workshop as an early review copy and couldn’t wait to paint her up for you. I’ve gone for an aged bronze look for her. Read on for my tutorials so far on how to paint her, with paints and step-by-step guide. Sekhar, Fang of Nulahmia, stands as a formidable agent of Neferata, wielding hypnotic powers to enthrall her foes. Accompanied by the serpent Ouboroth (although not in my version, sorry!) and leading packs of Dire Wolves and Fell Bats into battle, she embodies the deadly elegance of Nulahmia’s dark majesty. This set introduces Sekhar, her loyal Dire Wolves, and swooping Fell Bats, ready to bring terror to the Soulblight Gravelord armies! First Video Tutorial: Sekhar, Fang of NulahmiaMaterials NeededPreparationPainting the ArmourAdditional TipsVideo Part Two: Red Satin Cloak and Bronze HelmetPaintsPainting the Bronze HelmetPainting the Satin Red CloakVideo Part Three: Sekhar Fang of Nulahmia Face with Eyes, and SkinPaints NeededStep-by-Step Guide to her Face, Eyes and SkinVideo Part Four: Non Metallic Metal Texture SwordMaterials RequiredStep-by-Step Guide to the Non Metallic Metal Texture SwordAdditional TipsVideo Part Five: How to Paint a Skeleton with Glowing EyesMaterials needed:More Soulblight, Undead and Vampire Tutorials! First Video Tutorial: Sekhar, Fang of Nulahmia Welcome to this step-by-step painting guide for Sekhar, a new vampire model from the Soulblight Gravelords range by Games Workshop. In this tutorial, we will focus on achieving a bronzed armour effect using a non-metallic metal (NMM) technique and subtly applying verdigris for an aged look. Materials Needed Primer: Black Base Paints: Mournfang Brown, Mephiston Red (for the cloak) Main Paints: Mournfang Brown, Sybarite Green, Rhinox Hide, Dark Sun Yellow (or Balor Brown with a bit of yellow), Morrow White Tools: Airbrush (optional), brushes (sizes 1 or 2 and a finer 00 for details), wet palette, super glue, and plastic glue. Preparation Prime the Model: Begin with a black primer. If desired, airbrush the cloak with Mephiston Red. Allow the primer to fully cure to avoid rubbing off the paint. Assembly: Attach all parts with plastic glue, except for the head, which you should temporarily attach with a tiny bit of super glue for easy removal and precise painting. Painting the Armour Base Layer: Apply a solid base layer of Mournfang Brown over the armour. The coverage doesn’t need to be perfect due to the textured look we’re aiming for. Highlight Preparation: Mix your highlights on a wet palette. Start with Mournfang Brown and progressively mix in Dark Sun Yellow and Morrow White to create a gradient of shades from dark brown to light yellow, finishing with white for the brightest highlights. Applying Highlights: Start with a mid-tone mix of Mournfang Brown and Dark Sun Yellow, then progressively lighten the highlights by adding more Dark Sun Yellow and eventually white. Map out the highlights, focusing on the armour’s raised areas and edges. Texture Effect: Use a scratchy technique to add texture to the highlights, simulating wear and tear. Combine this with stippling for denser highlights. Ensure the texture is consistent across the armour to maintain a cohesive look. Verdigris Effect: Thin down Sybarite Green with water (approximately 70:30 water to paint ratio) for a heavy glaze. Apply this to mid-tones and shadows, avoiding the highest highlights to maintain the metallic sheen. For a more subtle verdigris, mix a small amount of Rhinox Hide into Sybarite Green. Avoid using the mix of Sybarite Green and white, as this may look too bright and unnatural. Additional Tips Brush Selection: Use larger brushes for broad highlights and switch to a finer brush (like a 00) for detailed texture work and smaller areas. Glazing: Use glazes to smooth transitions or adjust the intensity of colours. This is especially useful for blending the verdigris into the surrounding areas. Reflections and Details: For areas like the silver collar necklace, consider how it will reflect its surroundings. This includes colours from the helmet, the sky, and possibly the red cloak. Use lighter, desaturated colours to simulate reflection. Evaluating Your Work: Frequently step back and review your progress. Adjust highlights, shadows, and textures as needed to ensure a balanced and cohesive look. Video Part Two: Red Satin Cloak and Bronze Helmet Paints Mournfang Brown (Games Workshop) Sybarite Green (Games Workshop) Rhinox Hide (Games Workshop) Mephiston Red (Games Workshop) Morrow White (P3; any white will do) Dark Sun Yellow (Two Thin Coats; Balor Brown can be substituted with added yellow) White (Kimera Colours; any white optional) Painting the Bronze Helmet Base Layer: Start with a base layer of Mournfang Brown on the helmet. Ensure even coverage for a solid foundation. Mixing for Bronze: Prepare a mix of Mournfang Brown and a small amount of Dark Sun Yellow (or Balor Brown with added yellow) to create the bronze shade. This mix should be applied in two thin coats to ensure smooth coverage without obscuring details. Highlighting: Gradually add white to the bronze mix to create highlights. Focus these lighter shades on areas where light would naturally hit the helmet, enhancing the non-metallic metal effect. For very high highlights, use a mix predominantly of white with a touch of the bronze mixture. Verdigris Effect: Mix Sybarite Green and Rhinox Hide to create the verdigris shade. Apply this sparingly in recesses and areas where weathering would naturally accumulate. This step is optional and can be adjusted based on personal preference for the weathered look. Texture and Final Highlights: For added texture and to simulate wear, apply very fine dots and scratches using the lighter bronze mix. These should be concentrated around edges and high points where wear would be most apparent. Painting the Satin Red Cloak Base Layer: Apply a base coat of Mephiston Red over the cloak. Ensure smooth, even coverage as this will be the foundation for subsequent layers. Shadows: Create a shadow mix by combining Mephiston Red with Rhinox Hide. Apply this mixture in areas that would naturally be in shadow, such as under folds or lower parts of the cloak. Highlighting: Begin highlighting by adding white to Mephiston Red for a brighter red mix. Apply this to areas where light would naturally strike the cloak, such as the top of folds and raised areas. Gradually increase the amount of white in the mix for higher highlights, but avoid going up to pure white to maintain a satin finish. Glazing for Smoothness: Use glazes (thin, transparent layers) of your red mixes to smooth out transitions between shadows, mid-tones, and highlights. This step is crucial for achieving the smooth, satin look of the cloak. Final Adjustments: Revisit both the helmet and cloak for any final adjustments. Add more highlights or shadows as needed to enhance contrast and detail. Pay special attention to maintaining the balance between detailed texture on the helmet and the smooth finish of the cloak. Video Part Three: Sekhar Fang of Nulahmia Face with Eyes, and Skin Paints Needed Games Workshop: Bugman’s Glow, Sotek Green, Yriel Yellow, Evil Sunz Scarlet, Morghast Bone Vallejo: Ice Yellow, Neutral Grey, Black P3: Morrow White (or any white paint) Step-by-Step Guide to her Face, Eyes and Skin Preparing the Base Mixture for Skin: Mix a 50/50 blend of Sotek Green and Bugman’s Glow to create the base skin tone. This unique combination provides a natural, yet distinctly fantastical, skin colour for our vampire queen. Adding Highlights to the Skin: Gradually incorporate Ice Yellow into the base mixture for highlights. Start with small quantities and increase the Ice Yellow for each successive highlight layer. This technique helps achieve a smooth gradient in the skin tone, offering a more lifelike appearance. Advanced Skin Highlights: For a creamy and realistic skin tone, mix Bugman’s Glow with Ice Yellow, carefully adjusting the blend to prevent the colours from becoming overly vibrant. Add a tiny amount of white to this mixture for the lightest highlights, aiming for an off-white shade that retains a hint of the base tones. Painting Contrast and Metallic Elements: Apply a grey base to the collar, preparing it for a metallic silver finish. This step is crucial for setting up the contrast between the metallic textures and the skin, ensuring that both elements stand out without competing for attention. Achieving Skin Texture and Smooth Transitions: Use thin layers for the skin, starting with a mix of approximately 1.5 parts water to 1 part paint, and adjust as necessary for smoother finishes. Ensure each layer is completely dry before applying the next to avoid any unwanted textures. Highlighting Techniques: Focus on painting towards the highlights, lifting the brush at the brightest points for precise application. This method ensures that the highlights are sharp and well-defined, enhancing the model’s dimensional details. Painting Facial Features: Pay particular attention to the face, adjusting features like the nose with shading and highlighting to ensure it fits naturally under any headgear. Avoid relying solely on box art for colour references, as this can mislead your perception of how facial features should be represented. Painting the Eyes: Start with a solid base colour for the eyes, using black or a deep brown. Paint the iris in a striking colour, adding a small dot of white to each eye to simulate light reflection. This detail adds life and intensity to the figure’s gaze. Enhancing the Lips: Choose a vibrant red for the lips, applying it carefully to add depth and dimension. This colour choice should complement the vampire theme, adding an element of allure and danger to the figure. Overall Facial Harmony: Revisit the entire face to ensure all elements work together harmoniously. Adjust shadows, highlights, and colour intensity to achieve a balanced and realistic facial expression that suits the character’s persona. Video Part Four: Non Metallic Metal Texture Sword Creating a Non-Metallic Metal (NMM) texture on a sword for a miniature model requires patience, precision, and a good understanding of light and shadow. This guide is designed to walk you through the process of painting the weapon blade of Sekhar The Vampire, focusing on achieving a weathered, high-contrast, NMM effect. Materials Required Paints: Vallejo Neutral Grey, Ice Yellow; Games Workshop Mournfang Brown, Rhinox Hide; P3 Morrow White; Two Thin Coats Dark Sun Yellow. Brushes: Fine detail brushes capable of making very thin lines. Palette: A wet palette to ensure your paints remain workable. Water or Thinner: For diluting your paints to the desired consistency. Step-by-Step Guide to the Non Metallic Metal Texture Sword Preparing the Blade: Begin with a clean, primed miniature. Ensure Sekhar’s blade is smooth and free from any debris or fingerprints. Base Coating: Apply a base coat of Neutral Grey on the blade. This serves as your midpoint for building up highlights and deepening shadows. Establishing Light Points: Identify the main light points on the blade using a lamp. Typically, the flat back section of the blade and the curved edges will catch the most light. Mark these areas mentally as points where the highest highlights will be placed. Initial Highlights and Shadows: Create a gradient on your palette ranging from Neutral Grey to Ice Yellow, progressively adding Ice Yellow to lighten the mixture. Include a separate mix with Mournfang Brown and Neutral Grey for warmer tones, and pure white for the brightest highlights. Begin adding these mixtures to the blade, focusing on the predetermined light points. Use a scratchy, controlled technique with the very tip of your brush for texture. Refining the Texture: As the paint on your palette dries slightly, it will naturally become thicker. Use this to your advantage to add textured highlights and shadows, adjusting the water content as necessary for softer transitions or more pronounced scratches. Correcting and Sharpening Details: Utilise black to correct any oversteps or to sharpen the divisions between different sections of the blade. This step is crucial for defining the shape and enhancing the contrast of your NMM effect. Adding Depth with Glazes: Mix highly diluted glazes of Mournfang Brown (and variations with Neutral Grey) to apply to the lower sections of the blade. This creates a sense of depth and simulates a subtle reflection from the environment. Final Highlights: Use the brightest mixtures, including pure white, to add the final highlights to the top light points. This step might require going back to reinforce the contrast between the brightest highlights and the adjacent shadows. Weathering Effects: To add a weathered look, incorporate fine scratches across the blade’s surface with a very thin brush and lighter paint mixes. These should traverse both the light and dark areas to create a unified texture across the blade. Bounce Light: For a more advanced NMM effect, paint a bounce light on the cutting edge of the blade. This is a subtle highlight that simulates light reflecting off the ground, adding to the realism of your metal effect. Finishing Touches: Reassess the overall effect from multiple angles, ensuring that the blade looks good from all perspectives. Additional Tips Patience is Key: Achieving a convincing NMM effect is time-consuming. Work slowly and carefully. Lighting: Understanding how light interacts with metal is crucial for NMM. Study real-life examples if possible. Video Part Five: How to Paint a Skeleton with Glowing Eyes This is another video looking at Sekhar the vampire, this time focusing on how to paint a skeleton with glowing eyes for the model on her base. This video looks at the skeleton, how to paint his glowing eyes, sword and bones etc. The whole model is covered! Materials needed: Skeleton ModelPriming spray (I’ve used black!) Brushes:I use the Artis Opus range of brushesFine detail brushMedium-sized brushLarge brush (optional, for basecoating larger areas) Wet Palette (for mixing and thinning paints)Varnish (to protect the finished paint job) Paints:All paints mentioned are from Games Workshop’s Citadel range. Yriel Yellow Moot Green Balor Brown Morghast Bone Screaming Skull Mournfang Brown XV-88 Rhinox Hide Other Materials: Rocks or pebblesFoliage (such as static grass or miniature leaves)Sand or texture paste (for ground texture)Super glue (for attaching basing materials)Water (for thinning paints)Paper towels or cloth to ensure your brushes are totally clean! More Soulblight, Undead and Vampire Tutorials! If you don’t have an account here on my website, please sign up here! I have over 350 video tutorials with steps and tips, plus a selection of PDFs. If you are not sure about joining, you can explore my free videos with a free membership, or take the plunge and become a full subscriber for full access. If you’d prefer to support me on Patreon, please visit: https://www.patreon.com/RichardGray [...] Read more...

Videos Not Showing?

To view any of my paid tutorials, you need to be a member of the website – please click below to log in or join the site.

how to paint an Askurgan Exemplar

Not sure about joining just yet? Check out my Youtube for all my free tutorials or sign up as a free “friend” member on this site and visit the Freebies video page!

Leave a Reply