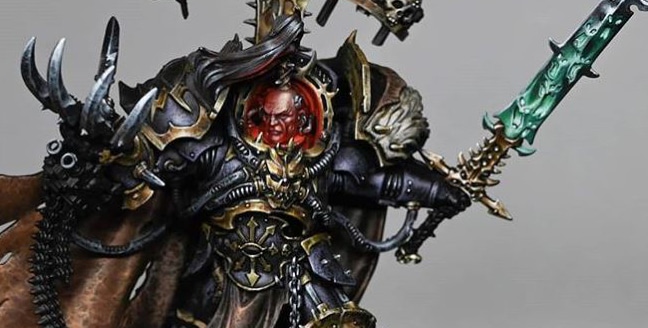
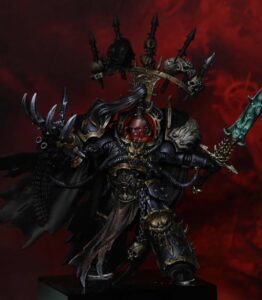
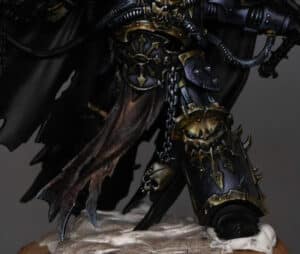
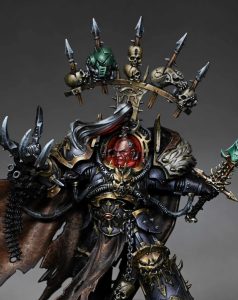
Welcome to this detailed guide on how to paint Abaddon the Despoiler, the Warmaster of Chaos. Follow along with my videos to achieve a competition-standard display model. Make sure you have the necessary paints and tools ready – each video will have a complete materials list below it.
Scroll down to explore the tutorials in order, or quick jump to a technique or part on how to paint Abaddon the Despoiler, just below:
Video – How to Paint Abaddon the Despoiler Part One (Gold Armour)Materials and paints neededPreparationInitial AssemblyBase CoatingAdding TexturesHighlights and DetailsDetailing the ArmourFinishing TouchesVideo – How to Paint Abaddon the Despoiler: Skull and LeatherPaints neededPainting the SkullPainting the Leather LoinclothVideo – How to Paint Abaddon Sword, Drach’nyenPaints neededPainting the BladeAdding Non-Metallic Metal (NMM) EffectsPainting the HiltVideo – How to Paint Abaddon Armour TrimPaints neededPainting the Golden TrimPainting the ArmourPainting the Tubing and CablesVideo – How to Paint Abaddon Head and Red OSLPaints neededPainting the HeadCreating the Red OSL EffectRefining and DetailingVideo – How to Paint Abaddon Hair and TalonPaints neededPainting the Talon (Non-Metallic Metal Effect)Painting the HairFinal TouchesVideo – How to Paint Abaddon Cloak (Leather Effect)Paints neededPainting the Inside of the Cloak Video – How to Paint Abaddon Cloak Freehand Part OnePaints and materials neededPreparing the CloakStarting the Freehand Video – How to Paint Abaddon Cloak Freehand Part TwoPaints needed:Refining the Slaanesh HeadDetailing and TexturingVideo – How to Paint Abaddon Cloak Freehand Part ThreePaints neededPainting the Khorne Head Video – How to Paint Abaddon Cloak Freehand Part FourPaints and materials neededPainting the Nurgle Head Video – How to Paint Abaddon Cloak Freehand Part FivePaints needed:Video – How to Paint Abaddon Cloak Freehand Final PartPaints neededVideo – How to Paint Abaddon Trophy RackPaints used:Space Marine HelmetWooden SpikesNMM Metal Spike TipsStep 4: SkullsVideo – How to Paint Abaddon Shoulder PadPaints usedPreparing the SurfaceBase Coating the EyePainting the PupilPainting the IrisHighlighting the EyePainting the NMM Gold TrimAdding Final Details
Video – How to Paint Abaddon the Despoiler Part One (Gold Armour)
Materials and paints needed
Paints:
Games Workshop: Daemonette Hide, Balor Brown, XV-88
Vallejo: Pale Grey Blue, Neutral Grey
Brushes:
Detail brush (size 0 or 00 – I used the Artist Opus range for details)
Standard brush
Primer: Black spray primer
Tools:
Blu Tack
Palette
Water cup
Clean cloth or paper towel
Preparation
Prime the Model:
Ensure the model is clean and free from any mould lines.
Use a black spray primer to coat the entire model evenly. This helps the paint adhere better and provides a solid base for painting.
Not sure how to build and clean your Abaddon?
This video and step by step guide shows the whole process how to build Abraxia, which shows you the techniques you can use when cleaning and prepping your Abaddon. I go over lots of little tips and tricks to hide join lines, remove and smooth down mould marks and fill in gaps.
Watch Now
Read PDF Guide
Initial Assembly
Temporary Assembly:
Use Blu Tack to temporarily hold the model together. This allows easy access to hard-to-reach areas while painting. Parts like the claw and sword can be glued on as they won’t hinder your brush.
Base Coating
Non-Metallic Metal Gold:
Start with the non-metallic gold areas using XV-88 and Balor Brown. These colours are less saturated to create a more desaturated gold effect.
Apply XV-88 as the base coat for the gold areas.
Add Balor Brown to create depth and variation.
Adding Textures
Texture Application:
Use a stippling technique with Balor Brown to create a rough, textured look on the gold areas.
This involves applying the paint in a dabbing motion to simulate scratches and imperfections.
Highlights and Details
Highlighting Gold:
Mix Pale Grey Blue with Balor Brown for the highlights. This will desaturate the gold, giving it a cooler, metallic appearance.
Apply the highlights sparingly, focusing on the edges and raised areas to create contrast.
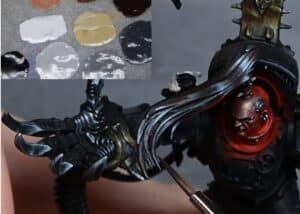
Painting the Armour:
Use Daemonette Hide for the armour. This light purple has good coverage and adds a unique hue to the model.
Apply it in a rough, uneven manner to maintain the textured look.
Detailing the Armour
Detail Brush Work:
Use a size 0 detail brush to carefully apply highlights and details. This helps avoid accidental paint application on unwanted areas.
For the tubing and other details, use Vallejo Neutral Grey. This neutral colour separates these elements from the armour, providing visual contrast.
Finishing Touches
Final Highlights and Adjustments:
Revisit the highlighted areas with Pale Grey Blue, adding final touches to ensure the gold and armour have the desired reflective quality.
If needed, use a fine brush to add edge highlights with Balor Brown or Pale Grey Blue, ensuring they are sharp and precise.
Balancing the Model:
Ensure that the focal points, like the chest and head, are balanced. Add more warmth to the gold if necessary using a mix of XV-88 and a tiny amount of ice yellow.
Video – How to Paint Abaddon the Despoiler: Skull and Leather
Paints needed
Paints:
Games Workshop: XV-88, Morghast Bone, Screaming Skull, Rhinox Hide, Cadian Fleshtone, Mournfang Brown
Vallejo: Neutral Grey
P3: Morrow White
Painting the Skull
Base Coat:
Start by applying a base coat of XV-88 to the skull. Use a rough, stippling technique to create texture. Thin the paint slightly (1.5 parts water to 1 part paint) to allow the black primer to show through, providing natural shading.
First Highlight:
Apply Morghast Bone using a similar stippling technique. Focus on smaller areas than the base coat, building up highlights gradually. Ensure the paint is thin and applied delicately to avoid overpowering the base coat.
Second Highlight:
Use Screaming Skull for the next layer of highlights. Apply smaller stipples, concentrating on the areas that would catch the most light from the top left. This creates a sense of depth and realism.
Final Highlight:
Add the final highlights with P3 Morrow White. Use a fine brush to apply very small, controlled stipples. This step emphasizes the brightest points on the skull, giving it a natural bone appearance.
Detailing the Studs:
Paint the service studs on the forehead with Vallejo Pale Grey Blue and add a small dot of P3 Morrow White for the final highlight, creating a shiny metallic effect.
Painting the Leather Loincloth
Base Coat:
Apply a rough base coat of Rhinox Hide to the leather loincloth. The coverage doesn’t need to be perfect; a patchy application adds to the texture and realism.
Initial Highlights:
Mix Rhinox Hide and Cadian Fleshtone in a 50/50 ratio. Apply this mix to the highlight areas, using a rough, textured technique. Highlight both convex and concave areas, reflecting where the light hits.
Further Highlights:
Use pure Cadian Fleshtone to add more delicate highlights. Focus on the most raised or prominent areas, using fine, controlled strokes to create the appearance of worn leather.
Final Highlights:
Carefully apply Morghast Bone to the highest points of the leather. Use thin, controlled lines to simulate creases and cracks in the leather, adding depth and realism.
Adding Wear and Tear:
Apply Vallejo Neutral Grey to the torn edges of the leather. This step is optional but adds an interesting worn effect. Be sparing with this colour to avoid overpowering the brown tones.
Glazing:
Glaze the entire loincloth with Rhinox Hide to unify the colours and add depth. Thin the paint to a wash consistency and apply it carefully, focusing more on the shadowed areas to enhance contrast.
Final Touches:
For additional warmth and contrast, apply very light glazes of Mournfang Brown to selected areas. Be cautious with this step to avoid lightening the shadows too much.
Video – How to Paint Abaddon Sword, Drach’nyen
Paints needed
Paints:
Games Workshop: Warpstone Glow, Sotek Green, Gauss Blaster Green
Vallejo: Neutral Grey, Pale Blue Grey, Black
P3: Morrow White
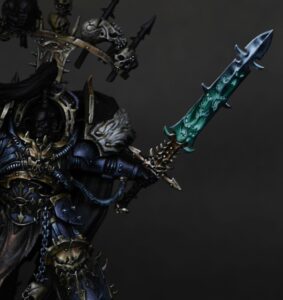
Painting the Blade
Base Coating:
Start by applying a base coat of Warpstone Glow mixed with Sotek Green. This mix should have a bluish tint. Apply multiple thin layers to build up a solid base colour, as Warpstone Glow has poor coverage.
Highlighting the Blade:
Begin highlighting the blade with a mix of Sotek Green and Gauss Blaster Green. Focus on the central and lower sections of the blade to create a gradient effect. Use thin layers to gradually build up the highlights.
Use Gauss Blaster Green for the brightest highlights, especially near the bottom of the blade and around the eyes and mouths of the faces sculpted on the blade.
Detailing the Faces:
Paint the eyes and mouths of the faces on the blade using Gauss Blaster Green. Apply multiple layers to achieve a smooth, glowing effect. Focus the highlights towards the bottom of the eyes and mouths for a more intense glow.
Ensure there is a fine dark line around the edges of the eyes and mouths to maintain definition.
Adding Non-Metallic Metal (NMM) Effects
Mapping Out the NMM Areas:
Use Neutral Grey to map out the areas where you want the NMM effects. Apply this to the edges and central spine of the blade. Keep your brush strokes in the same direction to create a feathered edge effect.
Building Up the NMM Highlights:
Gradually build up the highlights using Pale Blue Grey. Focus on the edges and central spine of the blade. Apply thin layers, blending them into the Neutral Grey.
Add P3 Morrow White for the brightest highlights. Use small, controlled dots and lines to simulate light reflecting off the blade. Be sparing with this colour to avoid overpowering the other highlights.
Refining the Details:
Use Black to deepen the shadows and add contrast. Apply this carefully around the eyes and mouths to enhance the glow effect and define the edges.
Revisit the highlights with Gauss Blaster Green and P3 Morrow White as needed to maintain the glowing effect and sharpness of the NMM.
Painting the Hilt
Base Coating:
Apply a base coat of Rhinox Hide to the hilt. Ensure an even coverage, as this will be the foundation for the gold NMM effect.
Building Up the Gold NMM:
Use English Uniform to start building up the highlights. Apply this to the raised areas and edges of the hilt. Focus on the left-hand side of the demon face on the hilt to create a focal point.
Gradually add Japanese Uniform and Ice Yellow to the highlights. Be careful with the amount of Ice Yellow used, as it is a significant step up in tone.
Final Highlights:
Apply P3 Morrow White for the final highlights. Use tiny dots and lines to simulate light glinting off the metallic surfaces. Focus on the highest points and edges.
Refining and Blending:
Use Mournfang Brown to glaze over the gold areas, unifying the colours and softening transitions. Apply thin layers to avoid losing the detail in the highlights.
Video – How to Paint Abaddon Armour Trim
Paints needed
Games Workshop: XV-88, Balor Brown, Rhinox Hide, Mournfang Brown, Daemonette Hide
Vallejo: Pale Grey Blue
P3: Morrow White
Painting the Golden Trim
Base Coating:
Start by applying a base coat of XV-88 to all the golden trim areas. Use thin layers to ensure an even coverage and maintain the details of the model.
Building Up the Gold:
Apply Balor Brown over the base coat, focusing on the raised areas and edges. This will create depth and variation in the gold.
Add Mournfang Brown to warm up the gold. Apply this colour to the shadowed areas and deeper recesses, blending it smoothly into the Balor Brown.
Highlighting:
Use Pale Grey Blue to start highlighting the trim. This will create a cooler, more desaturated look. Apply the highlights carefully, focusing on the edges and raised areas.
Add final highlights with P3 Morrow White. Use small dots and lines to simulate light reflecting off the gold. Be sparing with this colour to avoid overpowering the other highlights.
Refining and Balancing:
Go back with Balor Brown to reinforce the mid-tones and blend the highlights smoothly. This helps maintain the warmth in the gold and prevents it from looking too silver.
Use Rhinox Hide for deeper shadows, applying it to the darkest areas to enhance the contrast and depth.
Painting the Armour
Base Coating:
Apply a base coat of Daemonette Hide to the armour. Use a textured technique with a stippling or scrubbing motion to create a rough, worn look.
Building Up the Armour:
Mix Daemonette Hide with Pale Grey Blue in a 50/50 ratio. Use this mix to highlight the armour, focusing on the raised areas and edges. Apply the paint in a textured manner, using small dots, scratches, and smears to create a worn effect.
Highlighting:
For the highest highlights, use pure Pale Grey Blue. Apply it sparingly to the most prominent areas, such as the chest and shoulders, to create a focal point.
Refining and Blending:
Use Rhinox Hide and Abaddon Black to glaze the shadows and unify the colours. Apply thin layers to deepen the shadows and enhance the contrast. This step is crucial for creating a dramatic lighting effect.
Painting the Tubing and Cables
Base Coating:
Start with a base coat of Neutral Grey for the tubing and cables. Ensure an even coverage, paying attention to the ribbed sections.
Building Up the Highlights:
Use Pale Grey Blue to highlight the tubing and cables. Apply the highlights to the raised areas, following the curves and contours of the model.
Add final highlights with P3 Morrow White, focusing on the edges and most prominent parts. Use small dots and lines to simulate light reflecting off the cables.
Creating Shiny Effects:
Pay attention to the direction of the light source when applying highlights. Ensure that the highlights are aligned with the light direction on the rest of the model.
Use very small amounts of paint and apply it with the tip of the brush to create precise, controlled highlights.
Video – How to Paint Abaddon Head and Red OSL
Paints needed
Paints:
Games Workshop: Bugman’s Glow, Cadian Fleshtone, Kislev Flesh, Ushabti Bone, Mephiston Red, Evil Sunz Scarlet, Wild Rider Red, Abaddon Black, Rhinox Hide
P3: Morrow White
Painting the Head
Base Coating:
Start by applying a base coat of Bugman’s Glow to Abaddon’s head. The paint should be thinned to ensure translucency, allowing the black primer to show through slightly. This helps to build up the layers gradually and control the lighting effect.
Layering the Skin:
Apply multiple thin layers of Bugman’s Glow to build up the opacity on the areas where light would naturally hit, such as the forehead, cheeks, and chin. Avoid the recessed areas under the eyebrows and the lower parts of the face to maintain shadow.
Adding Shadows:
Use Abaddon Black thinned down with water (around 6:1 ratio) to glaze the lower parts of the face, such as under the cheeks, eyebrows, and chin. This creates a strong contrast and enhances the lighting effect.
Highlighting the Skin:
Begin highlighting the skin with Cadian Fleshtone, focusing on the higher points like the forehead, nose, and upper cheeks. Apply the paint in thin, controlled strokes to create smooth transitions.
Follow with Kislev Flesh for the next level of highlights. Concentrate on the most prominent areas, keeping the highlights small and precise.
Final Highlights:
Use Ushabti Bone mixed with Kislev Flesh for the highest highlights. Apply sparingly to the brightest areas, such as the forehead and the tops of the cheeks.
For the ultimate highlight, add a small amount of P3 Morrow White to the Ushabti Bone mix and apply tiny dots to the highest points. This adds a final touch of brightness.
Creating the Red OSL Effect
Base Red Glow:
Apply Mephiston Red to the areas where the red glow will be the strongest, such as the underside of the chin, lower cheeks, and under the eyebrows. The paint should be thinned and applied in layers to build up the intensity gradually.
Enhancing the Glow:
Use Evil Sunz Scarlet to intensify the red glow. Focus on the areas closest to the light source, such as the lower part of the face and the underside of the chin. Blend the edges smoothly into the Mephiston Red.
Highlighting the Red:
Add Wild Rider Red to the mix for the highlights within the red areas. Apply this to the recesses where the light would be most intense, such as the underside of the chin and the lower edges of the cheeks.
Balancing the Glow:
Occasionally switch back to Bugman’s Glow to refine the flesh highlights and balance them with the red glow. This ensures a seamless transition between the skin tones and the red lighting effect.
Refining and Detailing
Refining Shadows:
Use Rhinox Hide thinned down (around 7:1 ratio) to glaze the deepest recesses and enhance the shadows. Apply this carefully to avoid overpowering the existing layers.
Detailing the Eyes:
Paint the eyes black with Abaddon Black. Add a small white dot with P3 Morrow White to create a catchlight, giving the eyes a lifelike appearance.
Red Glows on Armour:
With the armour in place, use Mephiston Red and Evil Sunz Scarlet to add red highlights to the insides of the armour around the neck and any other areas that would catch the glow. This helps to integrate the head with the rest of the model.
Video – How to Paint Abaddon Hair and Talon
Paints needed
Paints:
Games Workshop: Mournfang Brown, Rhinox Hide, Cadian Fleshtone, Ushabti Bone
Vallejo: Neutral Grey, Pale Grey Blue
P3: Morrow White (or any preferred white)
Painting the Talon (Non-Metallic Metal Effect)
Base Coating:
Start by applying a base coat of Neutral Grey on the talon. Ensure an even coverage over the entire claw.
Initial Highlights:
Using Pale Grey Blue, begin to highlight the raised areas and the edges of the talon. The highlights should be applied in a random, scratchy manner to replicate a worn and weathered effect. Focus more highlights towards the tips of the talon.
Refining the Highlights:
Add Morrow White to your palette. Apply this white in smaller, more concentrated areas to create a strong highlight effect. These highlights should follow the scratches and wear marks to enhance the worn look.
Adjusting Shadows:
If any areas are too bright or need more definition, use Abaddon Black or a mix of Neutral Grey and black to tone down and refine the shadows. Apply this mix to the recesses and areas further from the light source.
Adding Depth:
Introduce a bit of Mournfang Brown thinned with water (around 2:1 ratio) to glaze over the lower parts of the talon. This adds a subtle dirt effect and ground reflection, enhancing the realism.
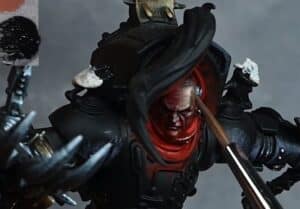
Painting the Hair
Base Coating:
Start by applying a base coat of Rhinox Hide over all the hair. Be careful around the face to avoid damaging the detailed work already done.
Building Up Highlights:
Use Mournfang Brown to paint the majority of each hair strand, leaving the deeper recesses in Rhinox Hide. This creates the first level of highlight.
Refining Highlights:
With Cadian Fleshtone, begin highlighting the edges and raised areas of the hair. Apply the paint in a slightly scruffy manner to mimic the texture of hair strands. Ensure to follow the direction of the hair flow.
Final Highlights:
Apply Ushabti Bone to the very edges and tips of the hair strands to create the brightest highlights. Use a fine detail brush to add individual strands and enhance the overall texture.
Enhancing Shine:
Introduce Neutral Grey, Pale Grey Blue, and a mix of both to the palette. Apply these colors sparingly to areas where the hair would naturally catch the most light, creating a shiny effect. Add Morrow White to the highest points for a final touch of brightness.
Balancing Colors:
To prevent the hair from looking too non-metallic, glaze over with Rhinox Hide or Mournfang Brown thinned down to dull any overly bright areas. This helps integrate the hair with the rest of the model’s coloor scheme.
Final Touches
Detailing the Leather Wrap:
Paint the leather wrap around the hair with Rhinox Hide as the base coat. Highlight with Mournfang Brown and then add finer highlights with Cadian Fleshtone and Ushabti Bone. Apply small lines and dots to mimic worn leather.
Painting Metal Spikes:
Paint the small metal spikes on the leather wrap using the same NMM technique as the talon. Use Neutral Grey, Pale Grey Blue, and Morrow White to create highlights and depth.
Matte Varnish:
Apply a coat of matte varnish to the model to protect your work and tone down any unwanted shine. This will also help to differentiate between the non-metallic metal effect on the talon and the shiny hair.
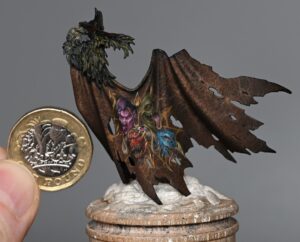
Video – How to Paint Abaddon Cloak (Leather Effect)
Paints needed
Paints:
Vallejo: Heavy Sienna, Dwarf Skin, Scab Red
Games Workshop: Rhinox Hide, Mournfang Brown
Painting the Inside of the Cloak
Base Coating:
Prime the cloak black. This will serve as the base for the following layers.
Apply a rough coat of Rhinox Hide. Use a scrubbing motion with your brush to create an uneven, patchy texture. This coat should be about 1.5 parts paint to 1 part water. The goal is to have a base color that isn’t perfectly smooth, as this will add to the weathered effect.
First Layer of Texture:
Use Vallejo Heavy Sienna to add the first layer of texture. This paint is extra opaque, which makes it ideal for creating highlights and adding detail.
Apply the paint using the tip of your brush, creating very rough, random marks all over the cloak. Use a cross-hatching and squiggling technique to add a sense of worn leather. This coat should be around 50/50 paint to water for better flow.
Second Layer of Texture:
Once the first layer is dry, use Cadian Fleshtone to add more refined texture marks. These marks should be thinner and more considered than the previous layer. Focus on the highlight areas but make sure to add some detail in the shadowed areas as well.
Highlight Detailing:
With Dwarf Skin (or a similar light flesh tone), add fine highlights to the cloak. These highlights should be placed carefully to enhance the texture and add depth. Use very thin paint (more than 50/50 water to paint) and minimal paint on the brush to achieve subtle, translucent marks.
Glazing:
Prepare three colors on your wet palette: Mournfang Brown, Rhinox Hide, and Scab Red.
Using heavily thinned Mournfang Brown (around 6 parts water to 1 part paint), glaze over the cloak, focusing on the mid-tones and recesses. This will add a warm tone and help unify the previous layers.
Apply Rhinox Hide glaze to the shadow areas to enhance depth. This glaze should also be very thin.
Use Scab Red to add some variation and interest, especially in the darker areas.
Fading the Edges:
To create a faded effect at the bottom of the cloak, use Scab Red mixed with Rhinox Hide. Thin the paint significantly and apply multiple layers, building up the color gradually.
Make sure the transitions are soft by using long strokes that follow the flow of the cloak.
Final Touches and Varnishing:
After completing the texturing and glazing, apply a coat of matte varnish to protect your work and reduce shine. This will also help to soften the overall effect and integrate all the layers.
Video – How to Paint Abaddon Cloak Freehand Part One
Paints and materials needed
Paints:
Games Workshop: Emperor’s Children, Fulgrim Pink, Rhinox Hide, Kantor Blue
Vallejo: Black, Heavy Grey, Sunset Red
Brushes:
Detail brush with a fine tip (size 00 or 0)
Standard brush
Palette: Wet palette recommended
Tools:
Clean cloth or paper towel
Magnifying visor (optional for fine details)
Ultramar Varnish (for a protective layer)
Preparing the Cloak
Visualizing the Design:
Before starting the freehand, visualize your design. You can use a photo editing tool to superimpose a rough sketch on a picture of the cloak to align your design. This helps in understanding the flow and positioning of the elements.
Base Preparation:
Ensure the texture work on the cloak is complete. This includes the heavy weathering and crack effects as detailed in the previous videos.
Applying a Protective Layer:
Apply a thin coat of Ultramar Varnish to the cloak. This provides a slight protective layer that can make it easier to correct mistakes without damaging the underlying paint.
Starting the Freehand
Marking Guidelines:
Use a thinned black paint to draw a cross on the cloak. This helps in aligning your design elements and ensuring symmetry.
Blocking in Colors:
Start by blocking in rough shapes for each of the Chaos Gods. Use the following colors for the base blocks:
Slaanesh: Fulgrim Pink
Nurgle: Rhinox Hide
Khorne: Sunset Red
Tzeentch: Kantor Blue
Detailed Blocking for Slaanesh:
Focus on the Slaanesh section first. Block in the basic face shape using Fulgrim Pink. Remember, this is just the base layer, so it doesn’t need to be perfect.
Refining the Shape:
Add basic facial features with a darker pink or purple mixed with Fulgrim Pink. This includes the rough position of the eyes, nose, and mouth.
Adjusting and Correcting:
Use Rhinox Hide to correct and refine the shapes. Rhinox Hide is great for this purpose due to its translucency, which allows you to darken areas without completely obscuring the details underneath.
Video – How to Paint Abaddon Cloak Freehand Part Two
Paints needed:
Paints:
Games Workshop: Emperor’s Children, Fulgrim Pink, Mephiston Red
Vallejo: Black, Sunset Red
P3: Morrow White
Refining the Slaanesh Head
Starting with the Horns (Optional):
Initially, I planned to add horns to the Slaanesh head, but later decided against it for compositional reasons. If you prefer to include horns, start by blocking them in with Fulgrim Pink or a similar color. Remember, details on such a small scale can become cluttered quickly.
Painting Over Mistakes:
If you decide against an element (like the horns), don’t worry. Paint over it with the base color of the cloak (Rhinox Hide) to blend it back in. Mistakes are part of the process and can be easily fixed.
Adding Black Hair:
Using Vallejo Black, paint in the hair for the Slaanesh head. Keep the hair wavy and flowing to add movement and dynamism. Focus on keeping the strokes soft and thin.
Refining Facial Features:
Continue refining the face. Use Emperor’s Children mixed with Morrow White for highlights, and Sunset Red mixed with Black for shadows. Work slowly and build up the layers gradually.
Pay special attention to the eye sockets, nose, and mouth. These areas define the expression and overall look of the face.
Balancing Highlights and Shadows:
It’s important to balance your highlights and shadows. Ensure the lighting is consistent across the face to maintain a three-dimensional look. Use Fulgrim Pink and Emperor’s Children for lighter areas and mix in more white for the brightest highlights.
Detailing and Texturing
Teeth and Tongue:
For the teeth, use Morrow White. Since the teeth are very small, it’s challenging to add transitions. Focus on making them look sharp and slightly pointy without over-emphasizing.
For the tongue, start with Sunset Red and add shading with a darker red. Add subtle highlights with Emperor’s Children mixed with Sunset Red.
Softening the Edges:
Around the eyes and mouth, use diluted Rhinox Hide to soften the edges and blend the features into the face. This helps avoid a cartoony look and makes the face appear more natural.
Adding Red Tones:
Use Mephiston Red diluted with water (2.5 parts water to 1 part paint) to add red tones to the face. Apply this glaze lightly to enhance the overall color without overpowering the existing details.
Video – How to Paint Abaddon Cloak Freehand Part Three
Paints needed
Paints:
Games Workshop: Mephiston Red, Evil Sunz Scarlet, Wild Rider Red, Balor Brown, Rhinox Hide, Morghast Bone, Blue Horror
Vallejo: Model Colour Black
Painting the Khorne Head
Base Colours:
Start with Mephiston Red to block in the base color of the Khorne head. Ensure even coverage.
Use Evil Sunz Scarlet to add highlights, focusing on areas that catch the most light.
Outlining with Black:
Use Vallejo Black to outline the features of the face. This helps define the shapes and make them stand out against the brown leather background.
Focus on outlining the eyes, nose, and mouth areas to start shaping the face.
Shading and Highlighting:
For shadows, use Rhinox Hide mixed with Mephiston Red. This helps deepen the shadows without losing the red tone.
Use Balor Brown for the first layer of highlights, especially on the raised areas like the cheekbones and forehead.
For more pronounced highlights, use Wild Rider Red mixed with Morghast Bone. Apply these sparingly to maintain the red color.
Detailing the Horns:
Paint the horns with Balor Brown as the base color.
Add highlights using Morghast Bone, focusing on creating a ribbed texture to give the horns a natural look.
Use Rhinox Hide to add shadows and define the ribs on the horns. The goal is to create a cylindrical appearance.
Adding Facial Features:
Paint the eyes black, then add a small dot of Balor Brown to represent the iris.
Add details to the teeth using Morghast Bone. The teeth should be sharp and prominent.
Use Blue Horror for final highlights on the face and horns. This helps tie all the heads together with a consistent light source.
Additional Details:
Add small horns or spikes on the Khorne head to fill in empty spaces and add more detail. Paint these with Balor Brown and highlight with Morghast Bone.
Use Mephiston Red to paint the gums around the teeth, adding Rhinox Hide for shading.
Video – How to Paint Abaddon Cloak Freehand Part Four
Paints and materials needed
Paints:
Games Workshop: Rhinox Hide, Deathworld Forest, Warboss Green (optional), Balor Brown, Morghast Bone, Screaming Skull, Mournfang Brown, Bugman’s Glow, Cadian Fleshtone
Vallejo: Black, Heavy Grey (optional), Golden Olive, Pale Grey Blue
Painting the Nurgle Head
Base Coloirs:
Start by sketching the rough shape of the Nurgle head with Deathworld Forest.
Use Rhinox Hide to outline and add shadows to define the initial shape of the head.
Building Up Details:
Use Warboss Green and Golden Olive to add highlights, focusing on areas that catch the most light. For a less vivid color, minimize the use of Warboss Green.
Apply Vallejo Black to outline the eyes, nose, and mouth, adding definition to the facial features.
Adding Wrinkles and Texture:
Paint wrinkles and lines using Golden Olive mixed with Deathworld Forest. Follow the natural flow of the face to make the lines look more realistic.
Use Rhinox Hide to deepen the shadows and add more depth to the wrinkles.
Painting the Mouth and Teeth:
Use Bugman’s Glow and Cadian Fleshtone for the gums. Start with Bugman’s Glow for the base and highlight with Cadian Fleshtone.
Paint the teeth with Morghast Bone, and add highlights with Screaming Skull. Outline the teeth with Vallejo Black for better definition.
Highlighting and Shading:
Use Balor Brown and Morghast Bone for additional highlights on the face and horn.
Blend the highlights using Rhinox Hide for smooth transitions. This helps in maintaining the three-dimensional look of the head.
Painting the Horn:
Base coat the horn with Balor Brown. Add highlights using Morghast Bone and Screaming Skull.
Create a ribbed texture on the horn using fine lines and blend with Rhinox Hide.
Detailing the Eyes:
Paint the eyes with Vallejo Black for the pupils and Balor Brown for the iris. Add a small white dot for the light reflection.
Adding the Tongue:
Paint the tongue with Bugman’s Glow and highlight with Cadian Fleshtone.
Add depth and shadows using Rhinox Hide and Pale Grey Blue.
Adjust the shape of the tongue as needed for better composition.
Video – How to Paint Abaddon Cloak Freehand Part Five
Paints needed:
Paints:
Games Workshop: Rhinox Hide, Balor Brown, Morghast Bone, Ushabti Bone, Mournfang Brown, Bugman’s Glow, Cadian Fleshtone, Blue Horror, Night Lords Blue, Temple Guard Blue
Vallejo: Black
Painting the Tzeentch Head
Base Colours:
Start by blocking in the rough shape of the Tzeentch head with Night Lords Blue. This dark background will help define the initial shape.
Use Temple Guard Blue to add initial highlights and define the contours of the head. This contrast will make the shape more visible despite the translucency of the paint.
Refining the Shape:
Use Vallejo Black to outline and add bold details. This will help define the facial features and add depth.
Apply Balor Brown to areas that will represent the beak and other prominent features of the head.
Detailing the Beak:
Use Balor Brown as the base for the beak. Add highlights with Morghast Bone and Ushabti Bone to create a gradient effect.
Paint the inside of the mouth with Vallejo Black to create depth.
Add details to the beak, such as small teeth, using Morghast Bone. Highlight with Ushabti Bone for a more pronounced effect.
Creating Texture:
Use Blue Horror and Temple Guard Blue to create a feathery texture on the head. These marks should be softer and more translucent to blend well with the darker base.
Add small tendrils or feathery protrusions using the same colors to differentiate the Tzeentch head from the other Chaos heads.
Painting the Eye:
Paint the eye with Balor Brown. Use multiple layers to build opacity, focusing on the lower part of the iris for a highlighted effect.
Add the pupil with Vallejo Black and a small white reflection dot with Morghast Bone.
Adding the Tongue:
Use Bugman’s Glow and Cadian Fleshtone to paint the tongue. Start with Bugman’s Glow for the base and highlight with Cadian Fleshtone.
Add depth and shadows using Rhinox Hide and Blue Horror. Adjust the shape of the tongue as needed to fit the overall design.
Final Touches:
Use Mournfang Brown to add subtle shading and transitions on the beak and other areas. This colour’s low opacity will help create smooth blends.
Add small details, such as saliva or other organic textures, with Blue Horror. Ensure the marks are thin and subtle for a more natural look.
Video – How to Paint Abaddon Cloak Freehand Final Part
This final part of the freehand painting series brings together the intricate design on Abaddon’s cloak, highlighting the iconic eight-pointed star of chaos and adding weathering effects for a unified, detailed finish.
Paints needed
Paints:
Games Workshop: XV-88, Balor Brown, Mournfang Brown, Rhinox Hide, Mephiston Red, Evil Sunz Scarlet, Wild Rider Red, Cadian Fleshtone, Temple Guard Blue, Kantor Blue (for additional eyes – iris)
Vallejo: Black, Pale Grey Blue, Neutral Grey, Ice Yellow
P3: Morrow White
Painting the Eight-Pointed Star of Chaos
Base Color:
Start by painting the base of the eight-pointed star with XV-88. This will serve as the foundation for a non-metallic gold effect.
Sketch the star and its arrows lightly, ensuring they fit around the four Chaos Gods’ heads without overpowering the design.
Refining the Star:
Add detail to the arrows, making them irregular in size and shape for a chaotic effect. Be mindful of the faces you have already painted.
Incorporate the star into the existing design by blending it into the heads and the background.
Painting the Eye of Chaos:
In the center of the star, paint an oval shape with Vallejo Black for the eye.
Add highlights around the eye using Neutral Grey and Pale Grey Blue, leaving a black outline for definition.
Paint the iris with Mephiston Red, then layer Evil Sunz Scarlet and Wild Rider Red towards the bottom for a glowing effect.
Add a highlight shine with Pale Grey Blue and a small dot of Morrow White for a realistic eye.
Adding Non-Metallic Gold Effects
Highlighting and Shading:
Add highlights to the star using Balor Brown, Mournfang Brown, and Rhinox Hide for depth. Use Ice Yellow for sharp highlights.
Focus on creating a three-dimensional look by highlighting edges and adding shadow in the appropriate areas.
Use small dots of Morrow White for the brightest points to simulate metallic reflections.
Integrating the Design:
Paint subtle connecting lines from the star to the heads using the same gold colors. This helps unify the design.
Blend some of the gold into the heads, especially around the edges, to show that they are part of a single piece.
Weathering Effects
Adding Wear and Tear:
Use Cadian Fleshtone to add fine scratches and wear marks over the entire design. These should be thin and subtle to avoid overpowering the details.
Focus on the edges and high points of the design where natural wear would occur.
Glazing:
Create glazes with Rhinox Hide and Mournfang Brown by diluting them with water (7:1 or 10:1 ratio).
Apply these glazes over the scratches and around the heads to tone down the highlights and add depth.
Use Mournfang Brown to add warmth back to the gold areas where needed.
Final Touches
Additional Eyes:
Paint small additional eyes throughout the design using the same technique as the main eye, but using Temple Guard Blue and Kantor Blue for the iris.
These eyes add a creepy, chaotic element to the design.
Final Review:
Step back and review the entire cloak to ensure the design is cohesive and balanced.
Make any final adjustments to highlights, shadows, and details to ensure the freehand looks integrated and realistic.
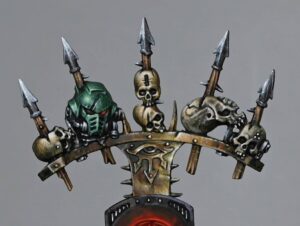
Video – How to Paint Abaddon Trophy Rack
Paints used:
Games Workshop: Balor Brown, Mournfang Brown, XV-88, Morghast Bone, Screaming Skull, Rhinox Hide, Khorne Red, Evil Sunz Scarlet, Wild Rider Red
Vallejo: Neutral Grey, Pale Grey Blue, Ice Yellow, White Grey, Heavy Black Green, Black
Space Marine Helmet
Base Coat:
Apply a base coat of Vallejo Heavy Black Green, thinned down with water (about 50/50 water to paint). Apply a couple of coats for a smooth finish.
Initial Highlights:
Mix Heavy Black Green with Ice Yellow for the first highlight. Start applying this mix to the raised areas, especially the forehead and the curves of the helmet.
Refining Highlights:
Gradually add more Ice Yellow to the mix and continue highlighting. Focus on the forehead curve, the edges, and the top of the helmet. Use controlled brush strokes towards the center of the highlight areas to build opacity and achieve a smooth transition.
Scratches and Battle Damage:
Use the same highlight mix to add scratches and battle damage. Vary the length and direction of the scratches, focusing on edges and raised areas. For deeper scratches, add Rhinox Hide to the mix and apply thin lines.
Final Highlights:
Use a mix of mostly Ice Yellow with a small amount of Heavy Black Green for the brightest highlights. Apply these to the most prominent areas, such as the center of the forehead and the edges of the helmet.
Eye Lens:
Paint the eye lens with Khorne Red, then layer Evil Sunz Scarlet and Wild Rider Red towards the front. Add a tiny dot of Ice Yellow mixed with Wild Rider Red for the final highlight. Finish with a small white dot in the back corner for a reflection.
Wooden Spikes
Base Coat:
Base coat the wooden spikes with Rhinox Hide.
Grain and Texture:
Use Mournfang Brown to paint the wood grain, following the sculpted lines on the model. Focus on the top and bottom of the spikes, leaving the middle section darker.
Layering:
Apply XV-88 to the raised areas and the grain lines, blending it into the Mournfang Brown. This creates a natural wood texture.
Highlights:
Use Morghast Bone for the final highlights, focusing on the edges and the splintered parts of the wood. Add a few thin horizontal lines to represent scratches and imperfections.
NMM Metal Spike Tips
Base Coat:
Base coat the metal tips with Neutral Grey.
Initial Highlights:
Apply Pale Grey Blue to the highlight areas, focusing on the upper parts of the tips and the edges.
Refining Highlights:
Add White Grey to Pale Grey Blue and apply smaller highlights, concentrating on the sharp edges and points.
Final Highlights:
Use pure White Grey for the brightest highlights, applying small dots and lines to the edges and points to simulate a shiny metal effect.
Consistency:
Ensure that the highlight direction is consistent with the light source. For the spikes on the left side, highlight the left edges, and for those on the right, highlight the right edges to create a natural look.
Step 4: Skulls
Base Coat:
Apply a base coat of Rhinox Hide to the skulls.
First Layer:
Apply Balor Brown in thin layers, focusing on the raised areas and leaving the deeper recesses darker.
Building Highlights:
Layer Morghast Bone over Balor Brown, concentrating on the upper sections of the skulls and the areas facing the light source.
Final Highlights:
Use Screaming Skull for the final highlights, applying it to the most prominent areas, such as the forehead, cheekbones, and edges. Use thin layers and build up the color gradually.
Details:
Paint the teeth and eye sockets carefully, using a mix of Morghast Bone and Screaming Skull for highlights. Add small dots and lines to represent cracks and imperfections.
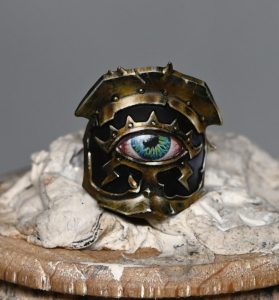
Video – How to Paint Abaddon Shoulder Pad
Paints used
Games Workshop: Flash Gitz Yellow, Temple Guard Blue, Kantor Blue, Cadian Fleshtone, Ushabti Bone, Balor Brown, Mournfang Brown, Rhinox Hide
Vallejo: Black, Pale Grey Blue, Ice Yellow
P3: Morrow White
Preparing the Surface
Surface Preparation:
Start by filling in any sculpted details you don’t need, such as the V-shape on the shoulder pad, using green stuff. Make sure it’s smooth and even. Prime the entire area with black primer.
Base Coating the Eye
Base Coat:
Apply a base coat of Cadian Fleshtone to the entire area where the eye will be. Thin the paint with water (about 1.5 parts water to 1 part paint) and apply 3-4 coats for a smooth, opaque finish.
Painting the Pupil
Pupil Outline:
Using Vallejo Model Color Black, paint a small black circle in the center of the eye area. Gradually enlarge the circle, ensuring it stays centered and smooth. Thin the paint with water (about 1.5 parts water to 1 part paint).
Painting the Iris
Base Layer:
Paint the iris using Kantor Blue. This layer doesn’t need to be perfect; it just provides a base for the subsequent layers.
Detailing the Iris:
Use Temple Guard Blue to paint the detailed lines and shapes within the iris. These lines should radiate from the pupil outward. Vary the direction and thickness of the lines to create a natural look. Ensure the paint is thin and the brush tip is sharp for precise lines.
Adding Depth:
Apply Flash Gitz Yellow over the Temple Guard Blue lines to create a greenish tone. Then, use Pale Grey Blue to refine the details and add highlights within the iris.
Highlighting the Eye
White of the Eye:
Highlight the white of the eye using Ushabti Bone. Thin the paint (1.5 parts water to 1 part paint) and build up the highlights towards the center of the eye. Use stippling to blend the transitions smoothly.
Veins:
Paint veins in the eye using Khorne Red. Make sure the lines are thin and subtle. Draw them from the edges towards the center, and then glaze over them with heavily thinned Doombull Brown (about 6 parts water to 1 part paint) to blend them in.
Shadow and Depth:
Add shadows using Rhinox Hide. Thin the paint (about 2 parts water to 1 part paint) and apply it to the upper eyelid area to create a shadow. This adds depth and realism to the eye.
Painting the NMM Gold Trim
Base Layer:
Apply a base coat of XV-88 to the trim. Ensure smooth coverage.
Building Layers:
Layer Balor Brown over XV-88, focusing on the raised areas and edges. Use Mournfang Brown for shadows and deeper areas.
Highlights:
Add highlights with Ice Yellow. Apply them to the upper parts and edges of the trim. Use Pale Grey Blue sparingly to add cool tones to the gold.
Final Highlights:
Use Morrow White for the brightest highlights. Apply small dots and lines to the edges and points for a sharp, reflective effect.
Adding Final Details
Texture and Scratches:
Add texture to the trim with Balor Brown and Mournfang Brown. Use thin, scratchy lines to create a worn effect. Blend these with Mournfang Brown to maintain the warmth of the gold.
Rivets and Reflections:
Highlight rivets with the same colors used for the trim. Ensure they are brighter than the surrounding areas. Add additional reflection points with Ice Yellow and Morrow White to enhance the metallic effect.
All videos are recorded in HD 1080p or higher – use full screen for the full effect and let the video load completely.
Explore more of my latest tutorials
If you don’t have an account here on my website, please sign up here! I have over 350 video tutorials with steps and tips, plus a selection of PDFs. If you are not sure about joining, you can explore my free videos with a free membership, or take the plunge and become a full subscriber for full access.
If you’d prefer to support me on Patreon, please visit: https://www.patreon.com/RichardGray [...]
