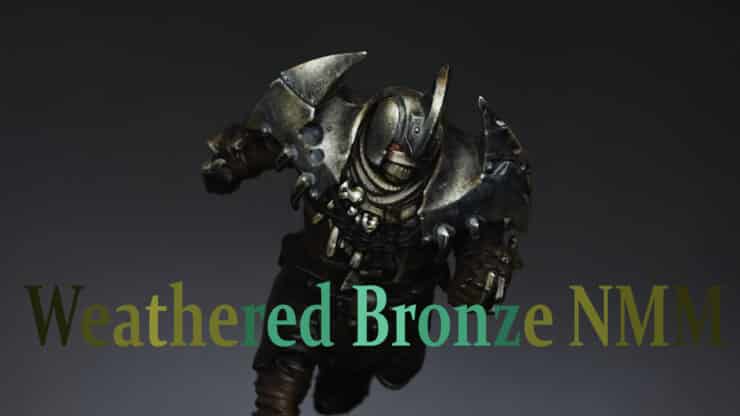
How to Paint a Blood Bowl Bronze Mummy with weathered NMM bronze effects, bandages, clothing, NMM Skull and Skin!
Scroll town to explore the two video tutorials in order, or quick jump to specific techniques and materials you might need.
Video One – How to paint NMM Bronze with Verdigris
Paints and Materials Needed
Games Workshop: Mournfang Brown, Rhinox Hide, XV-88, Balor Brown, Sybarite Green, Gauss Blaster Green
Vallejo: Ice Yellow, Pure White
Step-by-Step Guide on How to Paint a Blood Bowl Bronze Mummy
1. Priming and Base Coating:
- Start with the model already primed in black. Apply Mournfang Brown (Games Workshop) roughly on the armour, focusing on areas that would naturally catch light. The application at this stage can be quite loose and liberal.
2. Layering for Texture:
- Proceed with XV-88 (Games Workshop), this time being more careful and refined in your brushwork. Focus on creating a weathered texture, interpreting the previous layer’s marks as damage or wear. Use the very tip of the brush for finer lines and stippling.
3. Detailing with Lighter Tones:
- Use Balor Brown (Games Workshop) to further enhance the details. At this stage, focus on the edges, rivets, and any other raised details on the armour. Remember, the aim is to create a three-dimensional effect, highlighting the lower edges of dents or imperfections to create depth.
4. Highest Highlights:
- Introduce Ice Yellow (Vallejo) for the brightest parts of the armour. Apply it sparingly and only on the most raised areas to create the illusion of light reflecting off metal. Be cautious with this step to maintain a realistic metallic look.
5. Glazing for Depth:
- If needed, mix Rhinox Hide (Games Workshop) with water to create a glaze. Apply this over areas that are in shadow or need to be toned down. This step helps integrate the highlights and creates a more cohesive look.
6. Applying Verdigris:
- For the verdigris effect, use Sybarite Green and Gauss Blaster Green (both Games Workshop). Thin these paints down considerably. Apply them mainly in recessed areas, joints, and crevices where verdigris would naturally accumulate. Avoid covering the highest highlights to maintain the metallic sheen.
Technique Tips:
- Work in layers, building up from dark to light to create depth and realism.
- Focus on where light naturally hits the model, creating highlights that follow the form and curvature of the armour.
- In the verdigris step, less is more. It’s easier to add more verdigris effect than to remove it, so start with a light application and build up as neede
Video Two: Bandages, Clothing, NMM Skull, Skin and Base
Paints and Materials Needed
Paints (Games Workshop):
- Mournfang Brown
- Rhinox Hide
- XV-88
- Balor Brown
- Morghast Bone
- Ushabti Bone
- Death Korps Drab
- Hobgrot Hide (not recommended)
- Trollslayer Orange
Paints (Vallejo):
- Ice Yellow
- Pure White
- Neutral Grey
Brushes:
- Size 00 Artis Opus Brush (for detailed work)
- Size 2 Artis Opus Brush (for broader strokes and glazing)
Other Materials:
- MiniNatur Moss Pads (for the base grass effect)
Step-by-Step Guide
Bandages
- Base Layer: Start with Mournfang Brown (Games Workshop) as a base layer for the bandages.
- Main Colour: Apply Balor Brown (Games Workshop) over the bandages. It’s recommended to use this instead of Hobgrot Hide for better coverage and a more desired effect.
- Highlighting: Use Morghast Bone and Ushabti Bone (both from Games Workshop) for highlighting. Focus on creating lines parallel to the bandages’ direction, paying special attention to the upper edges around the face for more detail.
- Shadows and Grubby Effect: Apply a thinned down Rhinox Hide (Games Workshop) in shadowed areas and to add a grubby effect to the bandages.
Skull (Non-Metallic Metal Gold)
- Base Layer: Use Rhinox Hide (Games Workshop) as the base.
- Layering: Progressively layer with Mournfang Brown, XV-88, Balor Brown, Ice Yellow (Vallejo), and Pure White (Vallejo). Each layer should be smaller than the previous, creating a bright highlight effect.
- Refinement: Feather the edges of each layer for a smooth transition between shades.
Clothing (Trousers/Pants)
- Base Colour: Mix Rhinox Hide (Games Workshop) with Neutral Grey (Vallejo) and apply as the base colour.
- Texture and Highlight: Create a scratchy, rough texture using a mix of Rhinox Hide, Grey, and Ice Yellow (Vallejo). Add white to the mix for final highlights.
Belt
- Base Layer: Apply Rhinox Hide (Games Workshop) as the base colour.
- Detailing: Use Trollslayer Orange (Games Workshop) for the detailing, ensuring the paint is not too thick.
Skin
- Base Layer: Use Death Korps Drab (Games Workshop) as the base layer for exposed skin areas.
- Highlighting: Gradually add white to Death Korps Drab for highlighting, focusing on the knuckles, fingertips, and muscle definition.
Base and Finishing Touches
- Grass Application: The base is painted with Mournfang Brown (Games Workshop) and decorated with MiniNatur Moss Pads for grass.
- Final Adjustments: Ensure the consistency of the lighting and colour theme across the model.
If you don’t have an account, please sign up here! The website currently has over 350 video tutorials with steps and tips, plus a selection of PDFs. If you are not sure about joining, you can explore my free videos with a free membership, or take the plunge and become a full subscriber for full access.
If you’d prefer to support me on Patreon, please visit: https://www.patreon.com/RichardGray


