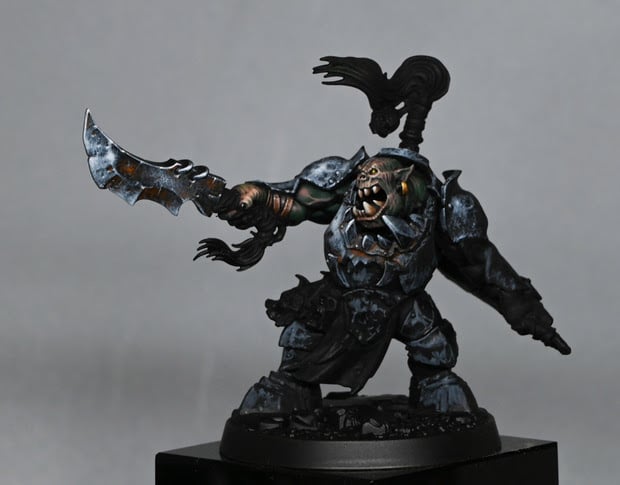
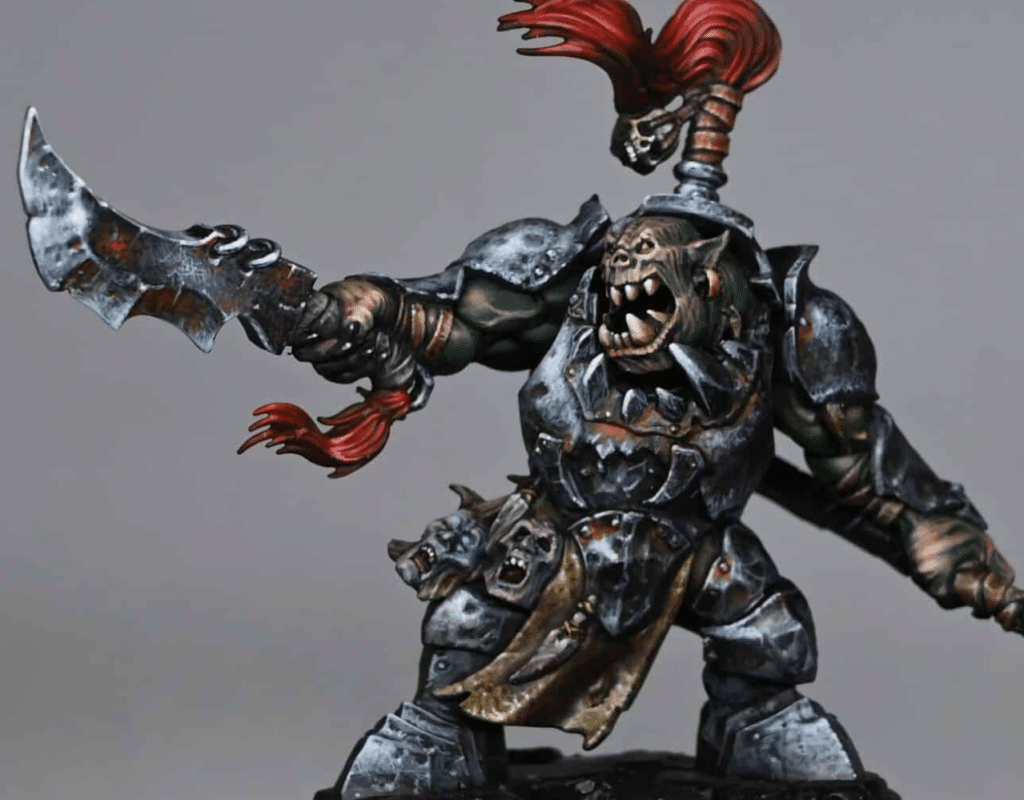
Morgok from Morgok’s Krushas

Follow along with my detailed step-by-step video tutorials of how I painted Morgok from Morgok’s Krushas!

Morgok from Morgok’s Krushas

Morgok from Morgok’s Krushas – All Videos

How to paint Morgok from Morgoks Crushas

Morgok and his mob of Ironjawz brutes once hunted down and fought the greatest prey they could find amongst Ghur’s trackless wastes. Whether they ran down spiny nephrodiles or fought the storm-warriors of Sigmar, Morgok’s Krushas sought the mightiest trophies in the name of their bellicose deity, Gorkamorka.

Here is a series of videos on how I painted him!

Morgok Tutorials by Technique

For all the tutorials on Morgok from Morgok’s Krushas click below!

Morgok
I love the look of this model and had to create some tutorials on how to paint Morgok from Morgoks Crushas! Morgok and his mob of Ironjawz brutes once hunted down and fought the greatest prey they could find amongst Ghur’s trackless wastes. Whether they ran down spiny nephrodiles or fought the storm-warriors of Sigmar, Morgok’s Krushas sought the mightiest trophies in the name of their bellicose deity, Gorkamorka. Scroll down to explore the how to paint Morgok tutorials in order, or choose from the contents below if you’d like to skip to a specific part of the model. Video – How to Paint Morgok: Part One (Face, Teeth and Armour)Materials and PaintsStep-by-Step GuideVideo – How to Paint Morgok: SwordMaterials and PaintsStep-by-Step GuideVideo – How to Paint Morgok: Hair and LeatherMaterials and PaintsStep-by-Step GuideVideo – How to Paint Morgok: Final PartMaterials and PaintsStep-by-Step Guide Video – How to Paint Morgok: Part One (Face, Teeth and Armour) Materials and Paints Paints: Games Workshop: Mournfang Brown Morghast Bone Screaming Skull Flash Gitz Yellow Cadian Fleshtone Bugman’s Glow Vallejo: Neutral Grey Pale Grey Blue Heavy Black Green P3: Morrow White Brushes and Tools: Fine Detail Brushes: Essential for precise work, especially for facial details, scratches, and armour highlights. Larger Brushes: For basecoating and applying initial layers. A medium-size brush is suitable for most areas. Wet Palette: To keep your paints hydrated and workable, especially important for blending and layering. Water Cup: For rinsing brushes and thinning paints. Paper Towels or Cloth: For brush cleaning and drying. Additional Materials: Black Primer: To prime the model before painting. Blue Tack by Bostik: Useful for temporarily attaching parts like the head and chest, making them easier to handle while painting. Mixing Tray or Palette: For mixing paints and creating custom shades. Light Source: A lamp or natural light to observe how light and shadow play on the model, which guides highlighting and shading. Hairdryer (Optional): Can be used to speed up the drying process between layers. Step-by-Step Guide Priming: Start by priming Morgok in black. Keep the head and chest separate for ease of painting. Basecoat – Skin: Use Vallejo Heavy Black Green, thinned down (about 50% water). Apply several thin layers for a smooth, dark green base. Basecoat – Armour: Apply Vallejo Neutral Grey, also thinned down. This sets the stage for non-metallic black iron armour. Layering – Armour: With the same grey, build up layers, focusing on the armor’s texture and dents. Use the tip of your brush to pick out details and create a rough, worn look. Highlighting – Skin: Switch to Bugman’s Glow from Games Workshop for the skin. Paint details like creases and scratches directly, without a transition from the green. This creates high contrast and makes highlighting easier. Refining Highlights – Skin: Use Cadian Fleshtone for smaller, more precise highlights. Focus on the upper edges and fine details. This stage adds more depth and texture to the skin. Eyes: Paint the eyes with Flash Gitz Yellow. A simple blob will suffice, as we’re not aiming for competition standard. Directional Lighting: Think about how light hits the model. Highlight areas like the head and raised shoulder more to create depth. Final Highlights – Skin: Use Screaming Skull for the final highlights on the face. Apply it sparingly and precisely, refining the detail work. Layering – Armour: Introduce Vallejo Pale Grey Blue for further layers on the armour. Create a scratched, worn look by building up layers and focusing on edges and imperfections. Teeth – Basecoat: Start with Mournfang Brown, applying it evenly while leaving gaps between teeth. Teeth – Highlighting: Use Morghast Bone for highlighting. Remember, for the upper teeth, highlight near the gums, and for the lower teeth, highlight the tips. Teeth – Final Highlights: Add final highlights with P3 Morrow White on the very tips of the bottom teeth and near the gums of the top teeth. Additional Armour Work: Return to the armour, adding more highlights and refining the look with both Neutral Grey and Pale Grey Blue. Video – How to Paint Morgok: Sword Materials and Paints The following paints were used: Games Workshop: Mournfang Brown, Troll Slayer Orange Vallejo: Neutral Grey, Pale Grey Blue, Black P3: Morrow White (Any white is fine) Step-by-Step Guide Painting Morgok’s sword to achieve a heavily weathered, non-metallic metal (NMM) look involves creating high contrast and emphasizing sculpted details. Here’s a step-by-step guide: Preparing Your Palette: On your wet palette, lay out Vallejo Neutral Grey, Pale Grey Blue, Black, Games Workshop Mournfang Brown, Troll Slayer Orange, and P3 Morrow White (or any suitable white). Assessing the Sword: Observe the sword’s chunky and battered appearance, with its distinct shapes. Your goal is to emphasise these aspects rather than aiming for smooth transitions. Basecoat Application: Begin with Vallejo Neutral Grey as your base. Bear in mind, the blade’s flatter part will be darker, while the cutting edge should be lighter, creating a striking contrast. Layer Enhancement: Progress to Vallejo Pale Grey Blue, concentrating on the brighter sections of the blade, particularly on the curve before it flattens. Detailing with Fine Scratches: Utilise the tip of your brush to apply tiny, scratchy marks across the blade. Vary their sizes, but keep them diminutive to accentuate the worn effect. Highlighting with White: Employ P3 Morrow White to highlight the lower edges of these scratches. This approach lends a three-dimensional look, simulating actual dents. Creating a Shine: Utilise a stippling technique with Neutral Grey, Pale Grey Blue, and White to form a shine spot, bridging the cutting edge with the flat part of the blade. This spot should be roughly circular, yet not perfectly so, to imitate the diffusion of light. Rust and Grime Addition: With Mournfang Brown, stipple on rust and grime, concentrating on the crevices and recesses to add texture and augment the weathered appearance. Altering Highlight Transitions: If necessary, reposition the main highlight towards the middle of the flat side of the blade for enhanced contrast and detail accommodation. Scratch Enhancement: Return to the cutting edge to add more pronounced scratches, extending from the edge to the flat. Accentuate their central points with White to mimic light reflecting off imperfections. Rust Intensification with Troll Slayer Orange: Enhance the rust hue using Troll Slayer Orange. Its superb translucency allows for the gradual build-up of vibrant, saturated highlights. Final Adjustments: Re-examine the entire blade, adding final details and adjusting contrasts to ensure that the rust, grime, and highlights are well-balanced and realistic. Throughout your painting, focus on maintaining the sharp contrast between light and dark areas while enhancing the textured appearance of the sword. The objective is to achieve a realistic, weathered metallic look that complements the robust, worn style of Morgok’s sword. Video – How to Paint Morgok: Hair and Leather Materials and Paints The following paints were used: Games Workshop: Abaddon Black, Mepthiston Red, Evil Suns Scarlet, XV-88, Balor Brown, Dryad Bark, Rhinox Hide, Troll Slayer Orange Vallejo: Pale Grey Blue, Black Step-by-Step Guide Painting the hair and leather on Morgok, the Orruk leader from Morgok’s Krushas, involves several steps to achieve a vivid and realistic look. Here’s a clear and concise guide: Hair Basecoat: Mix Mephiston Red with a bit of Abaddon Black (approximately 2 parts Mephiston Red to 1 part Abaddon Black). Apply this mixture to the hair, noting that it appears redder when wet but dries to a browner shade. Leather Basecoat: Use Dryad Bark for the leather parts. This serves as a base for further detailing and shading. Hair Highlighting: Begin highlighting the hair with plain Mephiston Red. This creates a bright and vibrant effect when wet but darkens upon drying. Ensure even coverage, avoiding too much contrast in the crevices. Building Hair Texture: Continue to build the hair’s texture by using Evil Sunz Scarlet. Focus on large strands and upward-facing hair sections. This stage is about setting the overall light volume. Refining Hair Highlights: Mix Evil Sunz Scarlet with Pale Grey Blue (about 2 parts Evil Sunz Scarlet to 1 part Pale Grey Blue). Apply this mix for the final hair highlights, focusing on edges and keeping the highlights consistent and directional. Adjusting Leather Colour: If you find the leather too desaturated, glaze it with Rhinox Hide and then Troll Slayer Orange to add depth and richness. This step is adjustable based on personal preference. Detailing Leather: Start detailing the leather with XV-88, focusing on vertical scratchy marks and blending them into the base colour. This mimics a worn leather texture. Enhancing Leather Texture: Use Balor Brown for further texture on the leather. Apply thin lines to mimic cracks and wear, focusing on the lighter areas for highlights. Leather Shadowing: Mix Balor Brown with a bit of black (Vallejo Black or similar) and apply this to the shadowed areas of the leather. This step adds depth and contrast. Leather Final Highlights: For the highest highlights on the leather, use pure Pale Grey Blue. Apply sparingly and focus on areas where light would naturally hit the most. Glazing for Depth: Finally, apply a glaze of Rhinox Hide over the leather to unify the colours and tones. This also helps in blending the highlights into the base colour. Remember to let each layer dry before applying the next, and adjust the intensity of your highlights and shadows to match the overall look you desire for Morgok. The aim is to create a vibrant, detailed, and realistic appearance for both the hair and leather parts of the miniature. Video – How to Paint Morgok: Final Part Materials and Paints The following paints were used: Games Workshop: Cadian Fleshtone, Balor Brown, Morghast Bone, Kantor Blue, XV-88 (Or Balor Brown mixed with black), Rhinox Hide Vallejo: Neutral Grey, Pale Grey Blue P3: Morrow White Step-by-Step Guide To finish painting Morgok from Morgok’s Krushas, focusing on the kill trophies and final touches to the armour, here’s a step-by-step guide: Painting the Trophy Heads: Basecoat: Start with Vallejo Neutral Grey to outline highlight areas. This grey base helps to convey the deceased look of the heads. Highlighting: Apply Cadian Fleshtone, which appears pinkish on the palette but turns pale when applied. Mix it with two parts water to one part paint for translucency, allowing underlying grey to show. This creates a dehydrated, mummified look. Focus on prominent features like cheekbones, forehead, upper lip, and nose. Adding Cool Tones: Use Kantor Blue, heavily diluted (about four parts water to one paint), to add a cold, lifeless tone to the flesh. Be cautious as it’s strong and can overpower other colours. Apply sparingly and touch up with Cadian Fleshtone where needed. Painting the Hair: Basecoat: Use Rhinox Hide for a dark base. Detailing: Apply a mix of Balor Brown and black (or XV-88) for the texture. Water down slightly for a smoother finish. Follow with Morghast Bone for finer details and strands. Apply these colours in thin lines to represent the texture of the hair. Painting the Skull: Basecoat: Apply Balor Brown over black primer. Don’t aim for a smooth finish; a bit of messiness adds to the worn look. Highlighting: Use Morghast Bone for highlights, focusing on raised areas like the brow. This creates the effect of a weathered, unpolished skull. Final Touches to the Armour: Secondary Bounce Highlights: Use Neutral Grey for less bright areas, ensuring the main highlights are brighter. Apply these highlights on areas like the underside of the armour, keeping in mind the light source and overall weathered look. Refining Highlights: Use Pale Grey Blue and Morrow White for hard edges and minor details. Apply Morrow White sparingly to maintain focus on the model’s main areas. Adding Rust and Grime: Base Layer: Start with Mournfang Brown for rust and grime, focusing on areas like the belt. Secondary Layer: Apply Troll Slayer Orange for a more saturated rust effect. This colour is strong; use it carefully to avoid overpowering other elements. Glazing for Cohesion: Mixing the Glaze: Create a glaze with Abaddon Black, diluting it heavily (approximately five parts water to one part paint). Application: Apply the glaze carefully to mid-tones and shadows, avoiding the brightest highlights. This unifies the armour’s look, enhancing shadows and reducing the intensity of mid-tones for a cohesive finish. Throughout the process, maintain a balance between detail and the overall look of the model. The aim is to create a realistic, battle-worn appearance with attention to the finer details, especially on the trophy heads and armour If you don’t have an account, please sign up here! The website currently has over 350 video tutorials with steps and tips, plus a selection of PDFs. If you are not sure about joining, you can explore my free videos with a free membership, or take the plunge and become a full subscriber for full access. If you’d prefer to support me on Patreon, please visit: https://www.patreon.com/RichardGray [...]
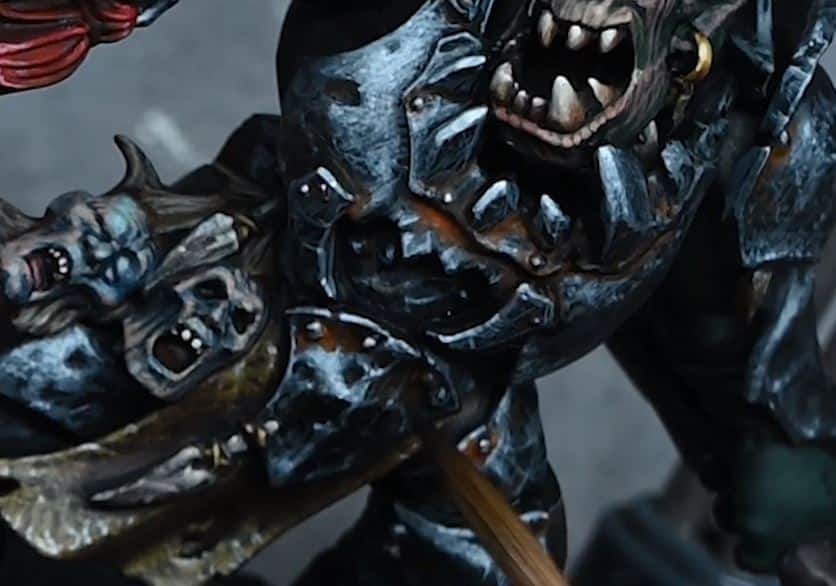
The final painting Morgok video, with kill trophies, highlights, cloth, leather and just those lovely finishing touches.  Video – Kill trophies, highlights, cloth, leather and more on Morgok! Materials and Paints The following paints were used: Games Workshop: Cadian Fleshtone, Balor Brown, Morghast Bone, Kantor Blue, XV-88 (Or Balor Brown mixed with black), Rhinox Hide Vallejo: Neutral Grey, Pale Grey Blue P3: Morrow White Step-by-Step Guide To finish painting Morgok from Morgok’s Krushas, focusing on the kill trophies and final touches to the armour, here’s a step-by-step guide: Painting the Trophy Heads: Basecoat: Start with Vallejo Neutral Grey to outline highlight areas. This grey base helps to convey the deceased look of the heads. Highlighting: Apply Cadian Fleshtone, which appears pinkish on the palette but turns pale when applied. Mix it with two parts water to one part paint for translucency, allowing underlying grey to show. This creates a dehydrated, mummified look. Focus on prominent features like cheekbones, forehead, upper lip, and nose. Adding Cool Tones: Use Kantor Blue, heavily diluted (about four parts water to one paint), to add a cold, lifeless tone to the flesh. Be cautious as it’s strong and can overpower other colours. Apply sparingly and touch up with Cadian Fleshtone where needed. Painting the Hair: Basecoat: Use Rhinox Hide for a dark base. Detailing: Apply a mix of Balor Brown and black (or XV-88) for the texture. Water down slightly for a smoother finish. Follow with Morghast Bone for finer details and strands. Apply these colours in thin lines to represent the texture of the hair. Painting the Skull: Basecoat: Apply Balor Brown over black primer. Don’t aim for a smooth finish; a bit of messiness adds to the worn look. Highlighting: Use Morghast Bone for highlights, focusing on raised areas like the brow. This creates the effect of a weathered, unpolished skull. Final Touches to the Armour: Secondary Bounce Highlights: Use Neutral Grey for less bright areas, ensuring the main highlights are brighter. Apply these highlights on areas like the underside of the armour, keeping in mind the light source and overall weathered look. Refining Highlights: Use Pale Grey Blue and Morrow White for hard edges and minor details. Apply Morrow White sparingly to maintain focus on the model’s main areas. Adding Rust and Grime: Base Layer: Start with Mournfang Brown for rust and grime, focusing on areas like the belt. Secondary Layer: Apply Troll Slayer Orange for a more saturated rust effect. This colour is strong; use it carefully to avoid overpowering other elements. Glazing for Cohesion: Mixing the Glaze: Create a glaze with Abaddon Black, diluting it heavily (approximately five parts water to one part paint). Application: Apply the glaze carefully to mid-tones and shadows, avoiding the brightest highlights. This unifies the armour’s look, enhancing shadows and reducing the intensity of mid-tones for a cohesive finish. Throughout the process, maintain a balance between detail and the overall look of the model. The aim is to create a realistic, battle-worn appearance with attention to the finer details, especially on the trophy heads and armour. Morgok from Morgok’s Krushas – All Videos Painting Morgok from Morgoks Crushas Morgok and his mob of Ironjawz brutes once hunted down and fought the greatest prey they could find amongst Ghur’s trackless wastes. Whether they ran down spiny nephrodiles or fought the storm-warriors of Sigmar, Morgok’s Krushas sought the mightiest trophies in the name of their bellicose deity, Gorkamorka. Here is the full series of videos on how I painted him! Watch Now If you don’t have an account, please sign up here! The website currently has over 350 video tutorials with steps and tips, plus a selection of PDFs. If you are not sure about joining, you can explore my free videos with a free membership, or take the plunge and become a full subscriber for full access. If you’d prefer to support me on Patreon, please visit: https://www.patreon.com/RichardGray [...]
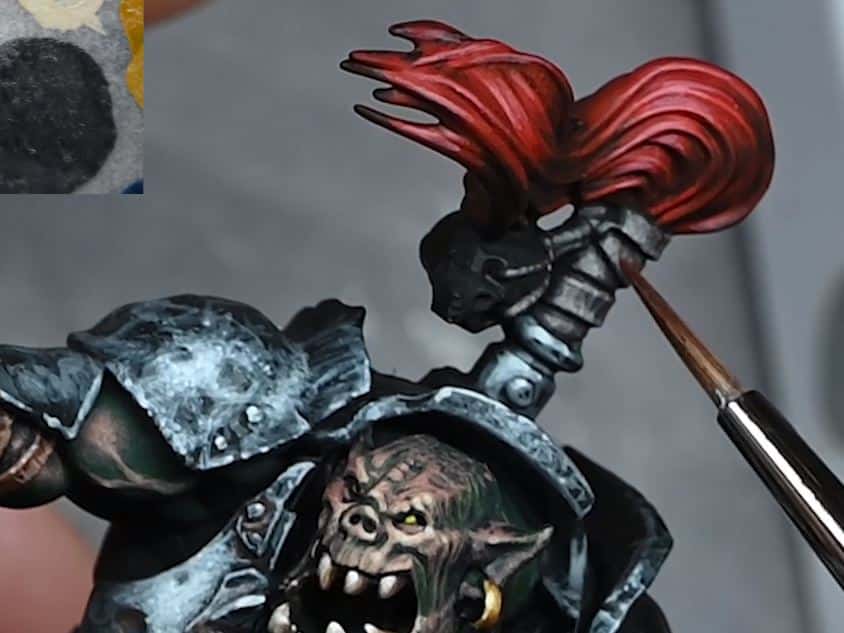
The latest video for Morgok, from Morgok’s Krushas. This video features how to paint the hair and leather.  Video – How to Paint Morgok: Hair and Leather Materials and Paints The following paints were used: Games Workshop: Abaddon Black, Mepthiston Red, Evil Suns Scarlet, XV-88, Balor Brown, Dryad Bark, Rhinox Hide, Troll Slayer Orange Vallejo: Pale Grey Blue, Black Step-by-Step Guide Painting the hair and leather on Morgok, the Orruk leader from Morgok’s Krushas, involves several steps to achieve a vivid and realistic look. Here’s a clear and concise guide: Hair Basecoat: Mix Mephiston Red with a bit of Abaddon Black (approximately 2 parts Mephiston Red to 1 part Abaddon Black). Apply this mixture to the hair, noting that it appears redder when wet but dries to a browner shade. Leather Basecoat: Use Dryad Bark for the leather parts. This serves as a base for further detailing and shading. Hair Highlighting: Begin highlighting the hair with plain Mephiston Red. This creates a bright and vibrant effect when wet but darkens upon drying. Ensure even coverage, avoiding too much contrast in the crevices. Building Hair Texture: Continue to build the hair’s texture by using Evil Sunz Scarlet. Focus on large strands and upward-facing hair sections. This stage is about setting the overall light volume. Refining Hair Highlights: Mix Evil Sunz Scarlet with Pale Grey Blue (about 2 parts Evil Sunz Scarlet to 1 part Pale Grey Blue). Apply this mix for the final hair highlights, focusing on edges and keeping the highlights consistent and directional. Adjusting Leather Colour: If you find the leather too desaturated, glaze it with Rhinox Hide and then Troll Slayer Orange to add depth and richness. This step is adjustable based on personal preference. Detailing Leather: Start detailing the leather with XV-88, focusing on vertical scratchy marks and blending them into the base colour. This mimics a worn leather texture. Enhancing Leather Texture: Use Balor Brown for further texture on the leather. Apply thin lines to mimic cracks and wear, focusing on the lighter areas for highlights. Leather Shadowing: Mix Balor Brown with a bit of black (Vallejo Black or similar) and apply this to the shadowed areas of the leather. This step adds depth and contrast. Leather Final Highlights: For the highest highlights on the leather, use pure Pale Grey Blue. Apply sparingly and focus on areas where light would naturally hit the most. Glazing for Depth: Finally, apply a glaze of Rhinox Hide over the leather to unify the colours and tones. This also helps in blending the highlights into the base colour. Remember to let each layer dry before applying the next, and adjust the intensity of your highlights and shadows to match the overall look you desire for Morgok. The aim is to create a vibrant, detailed, and realistic appearance for both the hair and leather parts of the miniature. Morgok from Morgok’s Krushas – All Videos Painting Morgok from Morgoks Crushas Morgok and his mob of Ironjawz brutes once hunted down and fought the greatest prey they could find amongst Ghur’s trackless wastes. Whether they ran down spiny nephrodiles or fought the storm-warriors of Sigmar, Morgok’s Krushas sought the mightiest trophies in the name of their bellicose deity, Gorkamorka. Here is the full series of videos on how I painted him! Watch Now If you don’t have an account, please sign up here! The website currently has over 350 video tutorials with steps and tips, plus a selection of PDFs. If you are not sure about joining, you can explore my free videos with a free membership, or take the plunge and become a full subscriber for full access. If you’d prefer to support me on Patreon, please visit: https://www.patreon.com/RichardGray [...]
Below is the latest video for Morgok from Morgok’s Krushas, this time looking at how to paint the heavily weathered Morgok NMM sword. Video – How to Paint Morgok NMM: Sword All videos are recorded in HD 1080p or higher – use full screen for the full effect and let the video load completely. Materials and Paints The following paints were used: Games Workshop: Mournfang Brown, Troll Slayer Orange Vallejo: Neutral Grey, Pale Grey Blue, Black P3: Morrow White (Any white is fine) Step-by-Step Guide Painting Morgok’s sword to achieve a heavily weathered, non-metallic metal (NMM) look involves creating high contrast and emphasizing sculpted details. Here’s a step-by-step guide: Preparing Your Palette: On your wet palette, lay out Vallejo Neutral Grey, Pale Grey Blue, Black, Games Workshop Mournfang Brown, Troll Slayer Orange, and P3 Morrow White (or any suitable white). Assessing the Sword: Observe the sword’s chunky and battered appearance, with its distinct shapes. Your goal is to emphasise these aspects rather than aiming for smooth transitions. Basecoat Application: Begin with Vallejo Neutral Grey as your base. Bear in mind, the blade’s flatter part will be darker, while the cutting edge should be lighter, creating a striking contrast. Layer Enhancement: Progress to Vallejo Pale Grey Blue, concentrating on the brighter sections of the blade, particularly on the curve before it flattens. Detailing with Fine Scratches: Utilise the tip of your brush to apply tiny, scratchy marks across the blade. Vary their sizes, but keep them diminutive to accentuate the worn effect. Highlighting with White: Employ P3 Morrow White to highlight the lower edges of these scratches. This approach lends a three-dimensional look, simulating actual dents. Creating a Shine: Utilise a stippling technique with Neutral Grey, Pale Grey Blue, and White to form a shine spot, bridging the cutting edge with the flat part of the blade. This spot should be roughly circular, yet not perfectly so, to imitate the diffusion of light. Rust and Grime Addition: With Mournfang Brown, stipple on rust and grime, concentrating on the crevices and recesses to add texture and augment the weathered appearance. Altering Highlight Transitions: If necessary, reposition the main highlight towards the middle of the flat side of the blade for enhanced contrast and detail accommodation. Scratch Enhancement: Return to the cutting edge to add more pronounced scratches, extending from the edge to the flat. Accentuate their central points with White to mimic light reflecting off imperfections. Rust Intensification with Troll Slayer Orange: Enhance the rust hue using Troll Slayer Orange. Its superb translucency allows for the gradual build-up of vibrant, saturated highlights. Final Adjustments: Re-examine the entire blade, adding final details and adjusting contrasts to ensure that the rust, grime, and highlights are well-balanced and realistic. Throughout your painting, focus on maintaining the sharp contrast between light and dark areas while enhancing the textured appearance of the sword. The objective is to achieve a realistic, weathered metallic look that complements the robust, worn style of Morgok’s sword and the Morgok NMM on the rest of the model. Morgok from Morgok’s Krushas – All Videos Painting Morgok from Morgoks Crushas Morgok and his mob of Ironjawz brutes once hunted down and fought the greatest prey they could find amongst Ghur’s trackless wastes. Whether they ran down spiny nephrodiles or fought the storm-warriors of Sigmar, Morgok’s Krushas sought the mightiest trophies in the name of their bellicose deity, Gorkamorka. Here is the full series of videos on how I painted him! Watch Now If you don’t have an account, please sign up here! The website currently has over 350 video tutorials with steps and tips, plus a selection of PDFs. If you are not sure about joining, you can explore my free videos with a free membership, or take the plunge and become a full subscriber for full access. If you’d prefer to support me on Patreon, please visit: https://www.patreon.com/RichardGray [...]
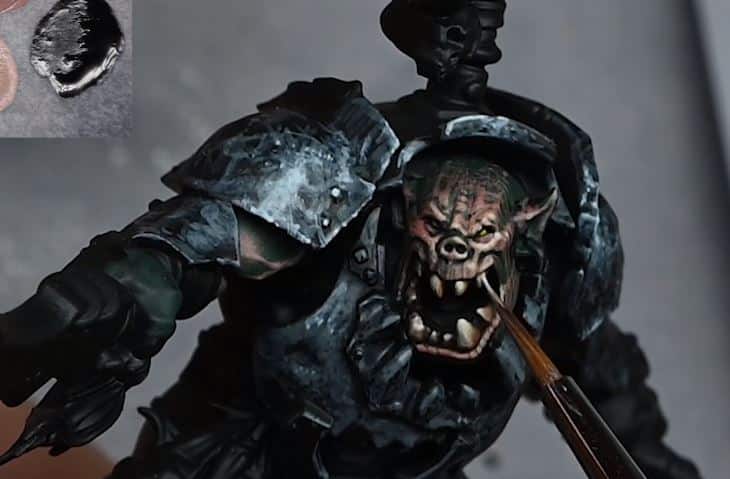
Taking a quick from more serious painting to have some fun with my first ever Orruk! This guy is Morgok the Orruk from Morgok’s Krushas, an Underworld warband. I’ve gone for a slightly different colour of skin to regular orruks. This was achieved using Vallejo Heavy Black Green, Bugman’s Glow, Cadian Fleshtone, Screaming Skull! Video – Morgok the Orruk: Face, Teeth and Armour Materials and Paints Paints: Games Workshop: Mournfang Brown Morghast Bone Screaming Skull Flash Gitz Yellow Cadian Fleshtone Bugman’s Glow Vallejo: Neutral Grey Pale Grey Blue Heavy Black Green P3: Morrow White Brushes and Tools: Fine Detail Brushes: Essential for precise work, especially for facial details, scratches, and armour highlights. Larger Brushes: For basecoating and applying initial layers. A medium-size brush is suitable for most areas. Wet Palette: To keep your paints hydrated and workable, especially important for blending and layering. Water Cup: For rinsing brushes and thinning paints. Paper Towels or Cloth: For brush cleaning and drying. Additional Materials: Black Primer: To prime the model before painting. Blue Tack by Bostik: Useful for temporarily attaching parts like the head and chest, making them easier to handle while painting. Mixing Tray or Palette: For mixing paints and creating custom shades. Light Source: A lamp or natural light to observe how light and shadow play on the model, which guides highlighting and shading. Hairdryer (Optional): Can be used to speed up the drying process between layers. Step-by-Step Guide Priming: Start by priming Morgok the Orruk in black. Keep the head and chest separate for ease of painting. Basecoat – Skin: Use Vallejo Heavy Black Green, thinned down (about 50% water). Apply several thin layers for a smooth, dark green base. Basecoat – Armour: Apply Vallejo Neutral Grey, also thinned down. This sets the stage for non-metallic black iron armour. Layering – Armour: With the same grey, build up layers, focusing on the armor’s texture and dents. Use the tip of your brush to pick out details and create a rough, worn look. Highlighting – Skin: Switch to Bugman’s Glow from Games Workshop for the skin. Paint details like creases and scratches directly, without a transition from the green. This creates high contrast and makes highlighting easier. Refining Highlights – Skin: Use Cadian Fleshtone for smaller, more precise highlights. Focus on the upper edges and fine details. This stage adds more depth and texture to the skin. Eyes: Paint the eyes with Flash Gitz Yellow. A simple blob will suffice, as we’re not aiming for competition standard. Directional Lighting: Think about how light hits the model. Highlight areas like the head and raised shoulder more to create depth. Final Highlights – Skin: Use Screaming Skull for the final highlights on the face. Apply it sparingly and precisely, refining the detail work. Layering – Armour: Introduce Vallejo Pale Grey Blue for further layers on the armour. Create a scratched, worn look by building up layers and focusing on edges and imperfections. Teeth – Basecoat: Start with Mournfang Brown, applying it evenly while leaving gaps between teeth. Teeth – Highlighting: Use Morghast Bone for highlighting. Remember, for the upper teeth, highlight near the gums, and for the lower teeth, highlight the tips. Teeth – Final Highlights: Add final highlights with P3 Morrow White on the very tips of the bottom teeth and near the gums of the top teeth. Additional Armour Work: Return to the armour, adding more highlights and refining the look with both Neutral Grey and Pale Grey Blue. All videos are recorded in HD 1080p or higher – use full screen for the full effect and let the video load completely. Morgok the Orruk from Morgok’s Krushas – All Videos Painting Morgok from Morgoks Crushas Morgok the Orruk and his mob of Ironjawz brutes once hunted down and fought the greatest prey they could find amongst Ghur’s trackless wastes. Whether they ran down spiny nephrodiles or fought the storm-warriors of Sigmar, Morgok’s Krushas sought the mightiest trophies in the name of their bellicose deity, Gorkamorka. Here is the full series of videos on how I painted him! Watch Now If you don’t have an account, please sign up here! The website currently has over 350 video tutorials with steps and tips, plus a selection of PDFs. If you are not sure about joining, you can explore my free videos with a free membership, or take the plunge and become a full subscriber for full access. If you’d prefer to support me on Patreon, please visit: https://www.patreon.com/RichardGray [...]

If you don’t have an account, please sign up here! The website currently has over 350 video tutorials with steps and tips, plus a selection of PDFs. If you are not sure about joining, you can explore my free videos with a free membership, or take the plunge and become a full subscriber for full access.

Morgok from Morgok’s Krushas

If you’d prefer to support me on Patreon, please visit: https://www.patreon.com/RichardGray

Leave a Reply