


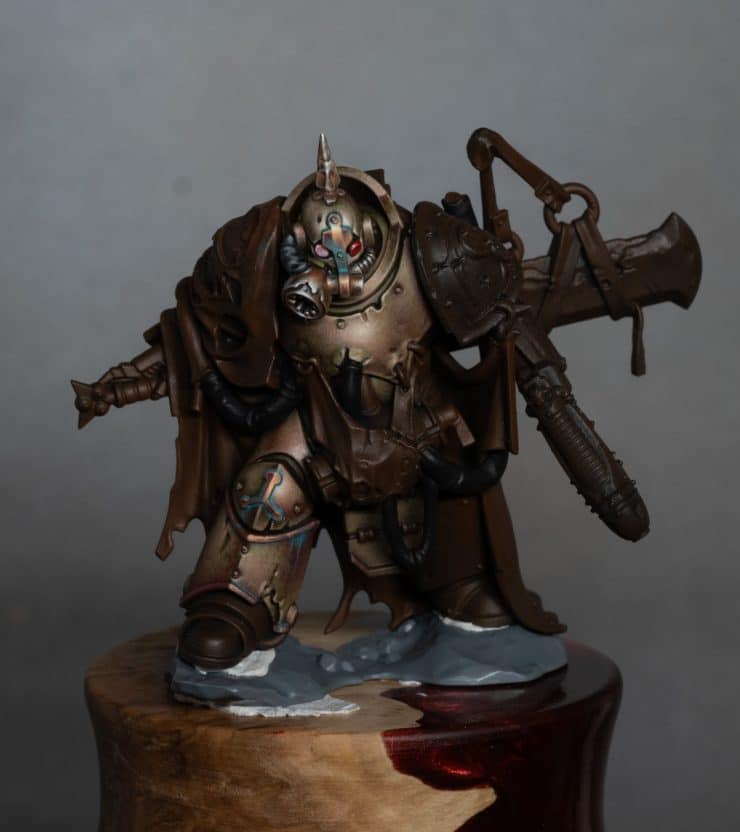
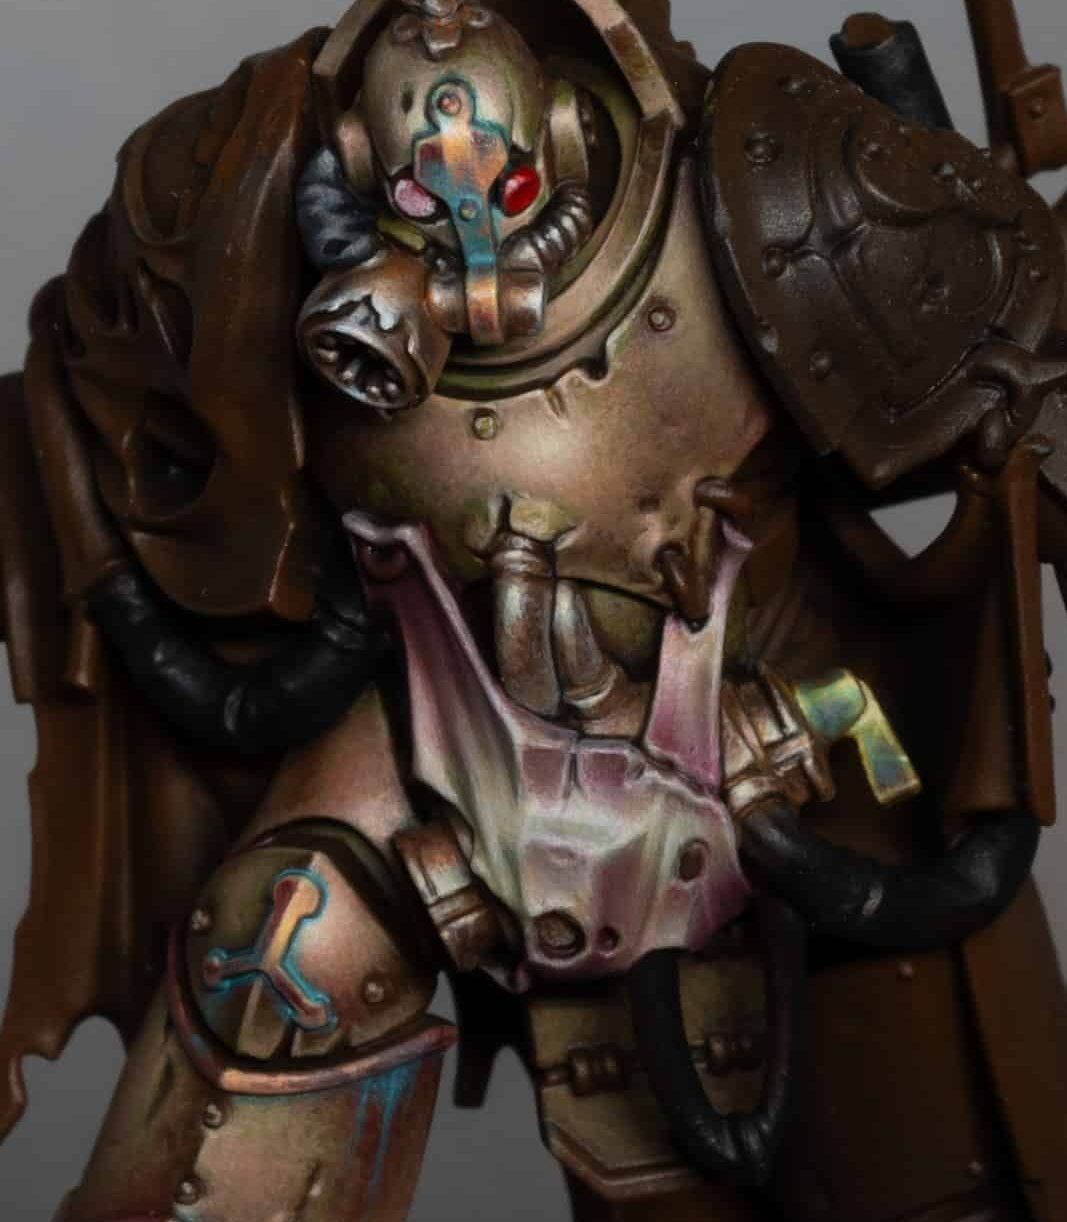
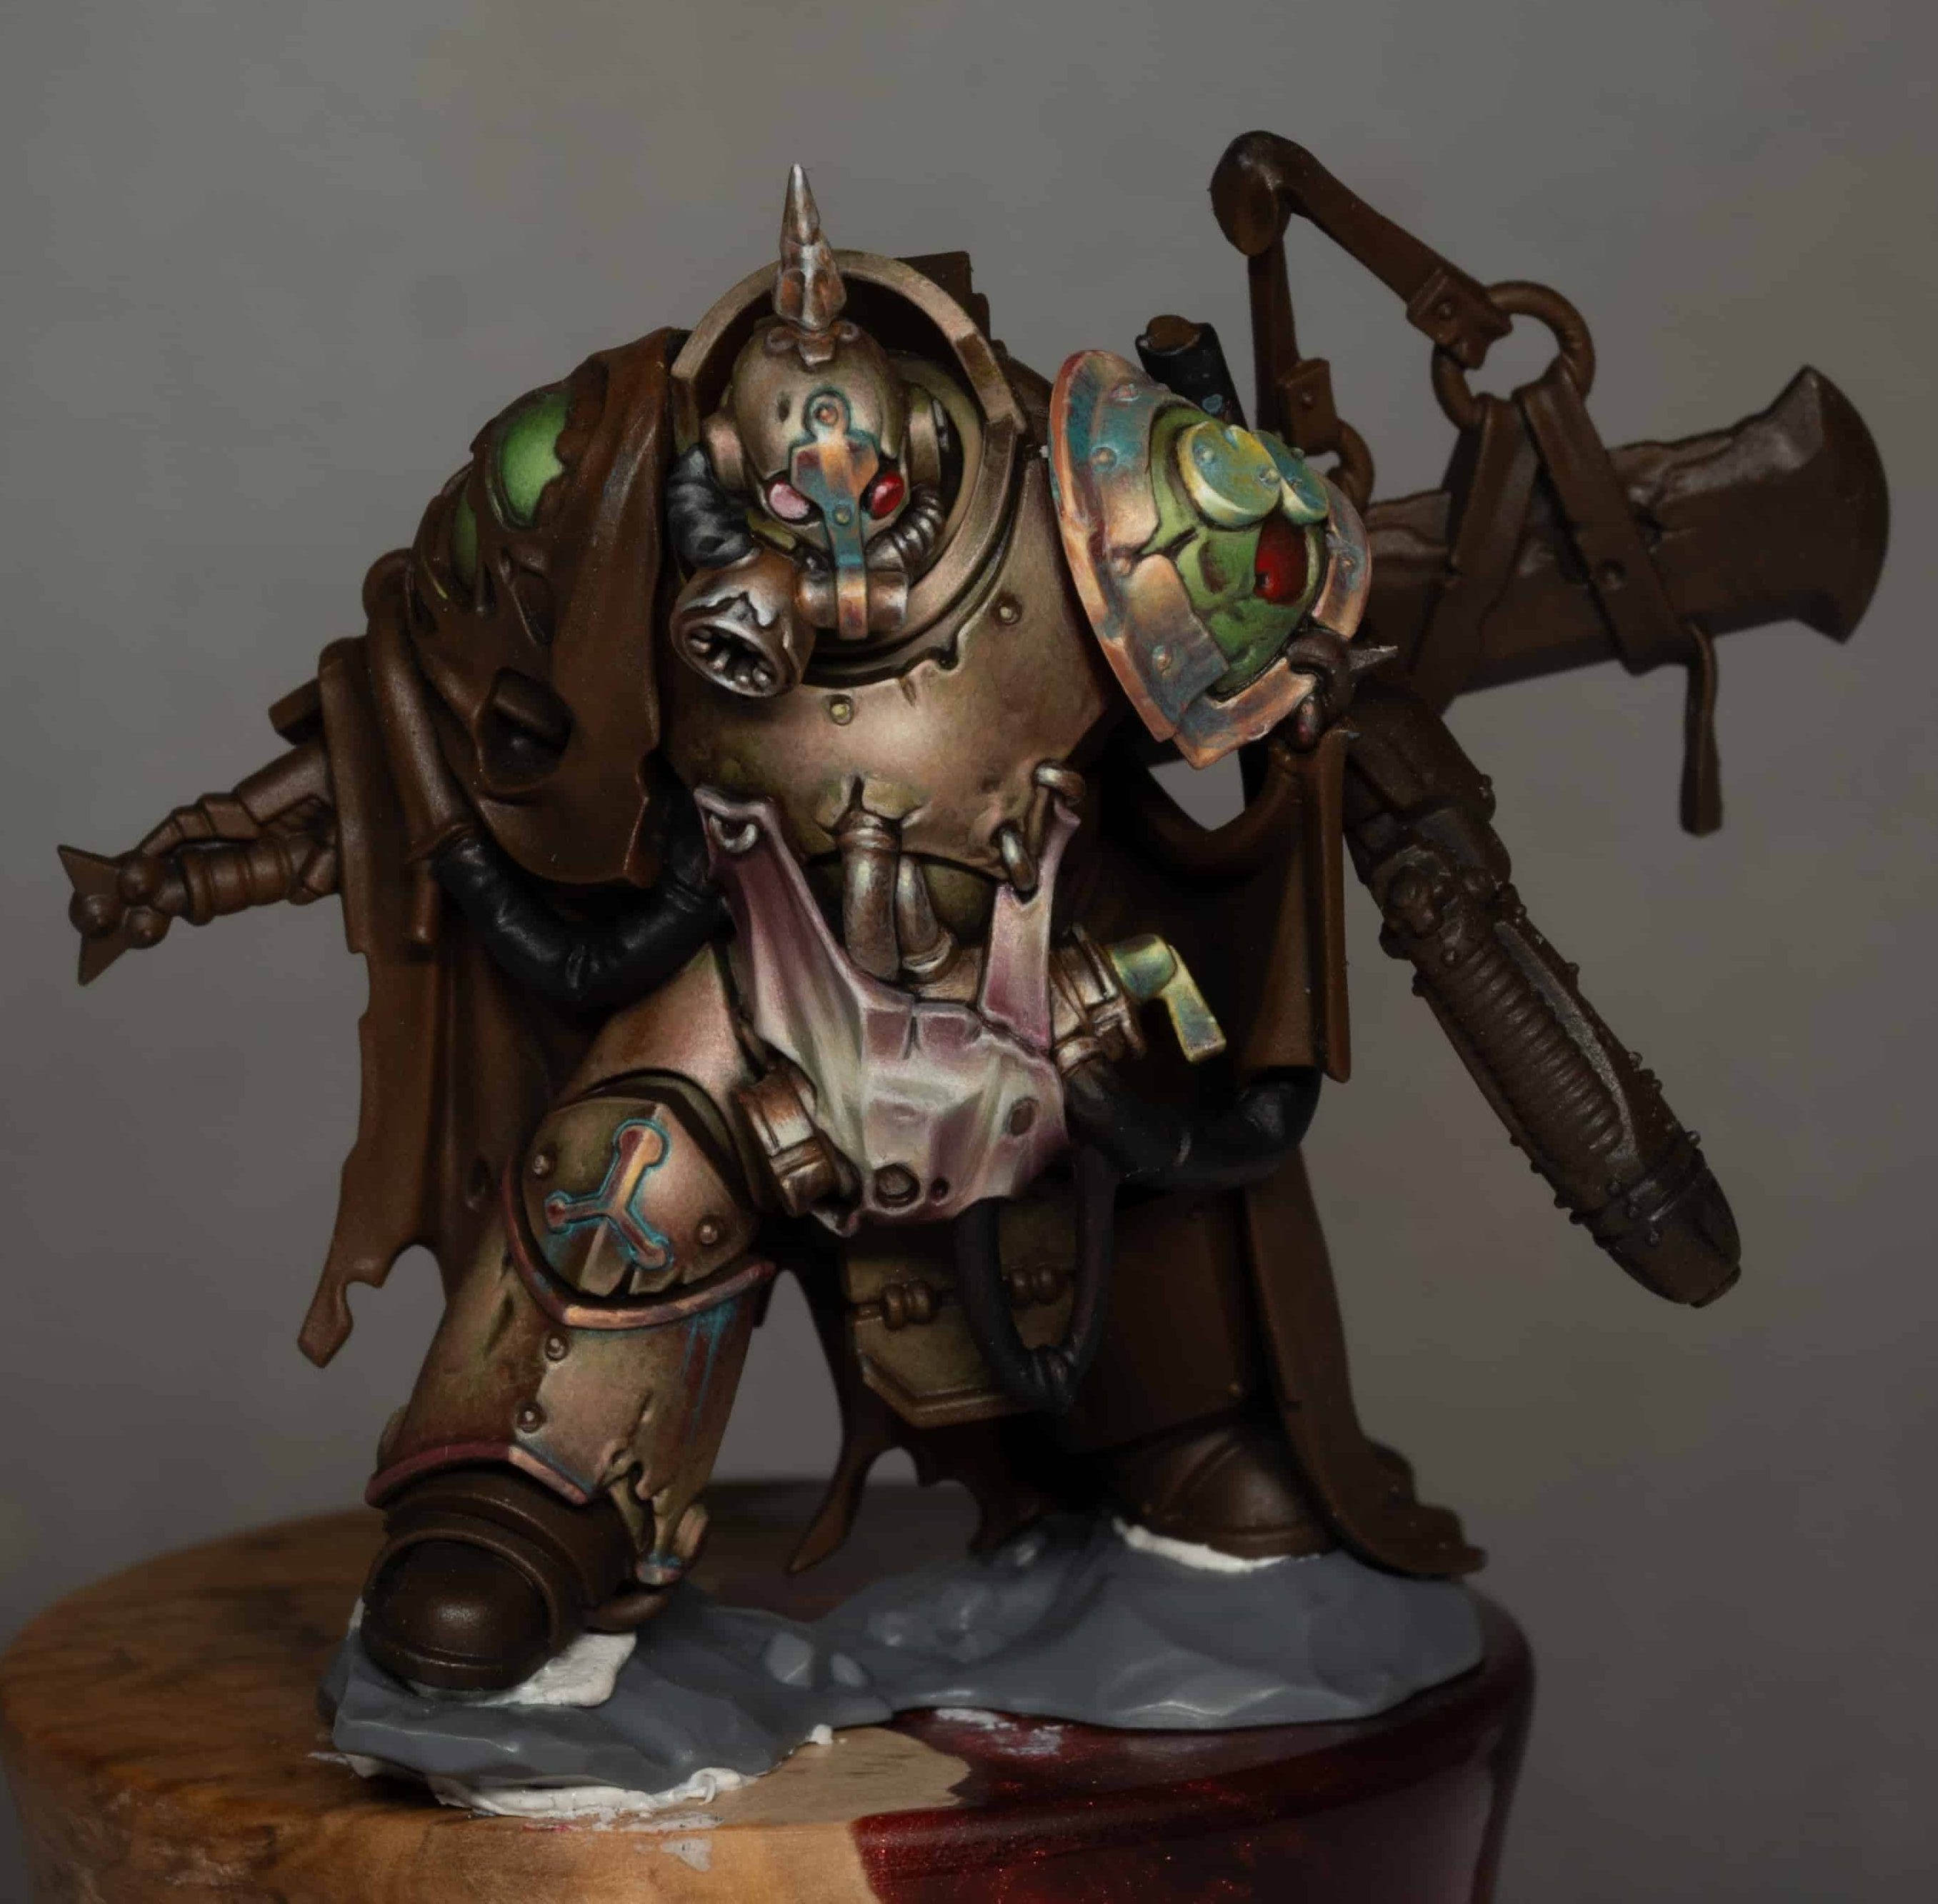
In this video and written guide, we look at how to Paint the Lord of Poxes, specifically his textured Death Guard Armour, from the new Poxwrought Vector Battleforce – a delightfully bloated centrepiece model sent by Games Workshop as a review copy. This first part focuses purely on the armour, using textured brushwork and light volume highlighting to create a dirty, fleshy, Nurgle-infused finish.
Using a combination of Mournfang Brown for the base and Golden Olive, Cadian Fleshtone, and Ice Yellow for successive highlights, we explore how to build up texture with deliberate roughness and control. I discusses brush handling, lighting logic, and tonal balance, especially how to ensure the model’s large, flat panels don’t become dull or lifeless.
There’s also a touch of Burnt Red glazing at the end to give the armour a grimy, corrupted feel, leaning into the lore of the Death Guard’s decaying, living warplate.
Video: How to Paint the Lord of Poxes Part One
Paints and Materials Used
- Games Workshop: Mournfang Brown, Cadian Fleshtone
- AK Interactive: Golden Olive, Ice Yellow, Burnt Red
- Brushes: Artis Opus Series M, sizes 00, 1, and 4
Step by Step – How to Paint the Lord of Poxes – Textured Death Guard Armour
Step 1: Prime and Base Layer
- Prime the model black.
- Airbrush (or paint) a base layer of Mournfang Brown. This sets a warm, earthy tone that adds depth and grime under later highlights.
Step 2: First Highlights – Start Defining Light Volumes
- Mix Mournfang Brown with AK Golden Olive.
- Using a large brush (Artis Opus Size 4 recommended), begin loosely stippling on highlights where light would hit – shoulders, chest, tops of legs.
- Be generous with coverage. These early highlights should establish large light areas.
Step 3: Pure Golden Olive
- Switch to pure Golden Olive and begin layering it over the previously highlighted areas, building stronger light volumes.
- Use loose, scratchy marks to create a sense of wear and surface texture.
- If you want a more classic green Death Guard look, you could stop here.
Step 4: Midtone Texture – Add Cadian Fleshtone
- Mix Golden Olive with Cadian Fleshtone.
- Use this mix to add textured mid-highlights across the light-facing areas of the armour.
- Try switching to a smaller brush (like Size 00) for finer texture and variation.
Step 5: Strengthen Highlights
- Layer in more Cadian Fleshtone to the mix, gradually pushing your highlights lighter.
- You can also dot and scratch small marks into shadowy areas for extra weathering effects.
Step 6: Brightest Highlights
- Mix Cadian Fleshtone with a small amount of Ice Yellow for the final highlight stage.
- Gently stipple or scratch this on to the very brightest points – top of the chest, shoulders, head.
- If it feels too bright or stark, you can soften the edges by glazing back over with Cadian Fleshtone.
Step 7: Glaze for Warmth and Depth
- Thin AK Burnt Red heavily (around 4–5 parts water to 1 part paint).
- Use a large brush to glaze it into the recesses and shadows, avoiding the brightest highlights.
- Build up several gentle layers to tint the armour with a subtle grimy warmth and tie the tones together.
Final Tips on How to Paint the Lord of Poxes
- Don’t worry if some transitions feel rough—this technique thrives on texture and subtle layering.
- Think of the armour as part-corrupted flesh, not just dirty plate. Let that guide your colour and texture choices.
- You can push the organic feel further with veins or subtle cast shadows in later stages.
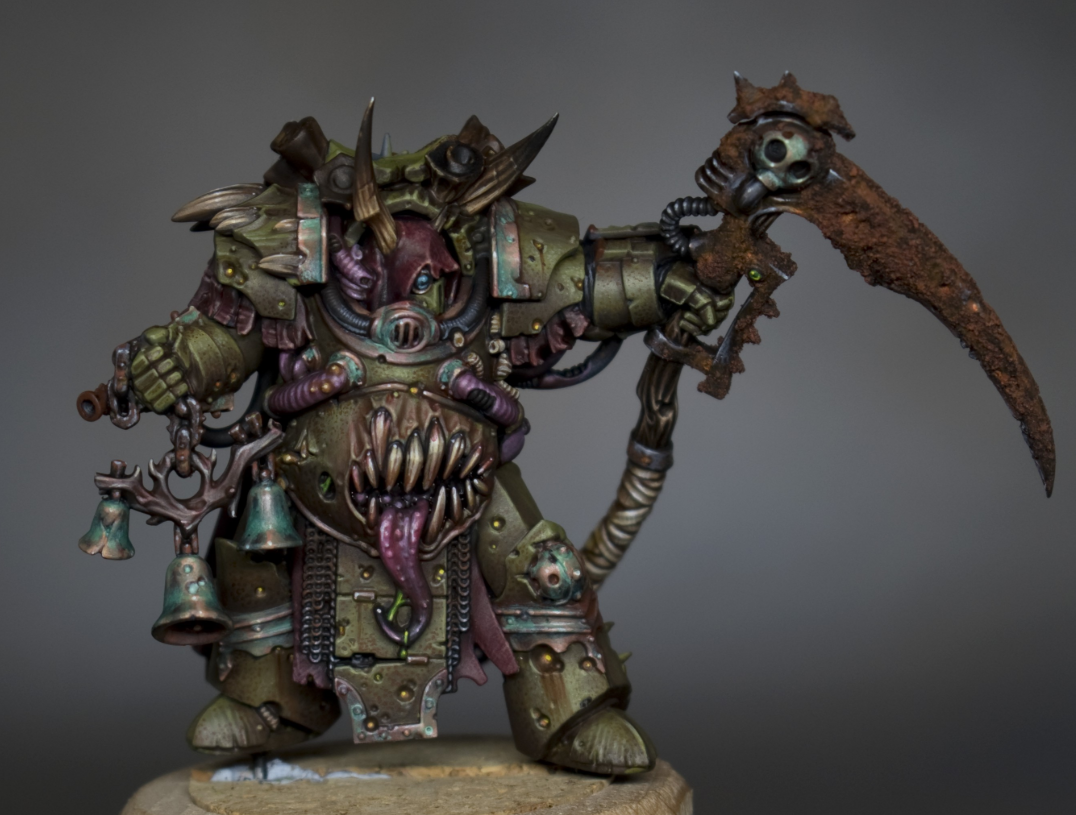
Video: How to Paint the Lord of Poxes Part Two
This is Part 2 of the Lord of Poxes Death Guard painting tutorial.
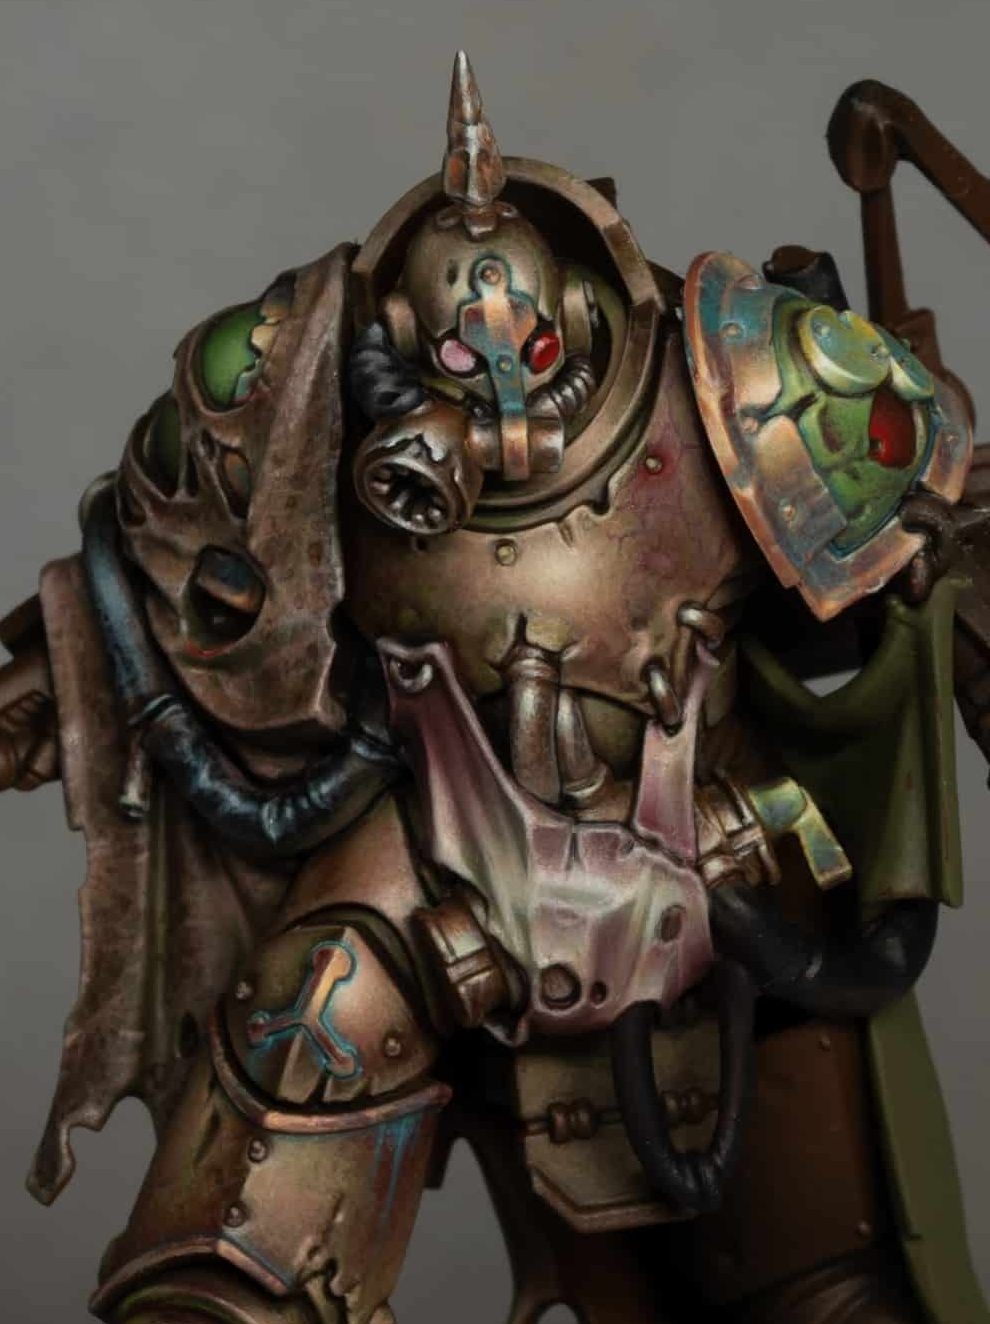
In this video, we continue working on the armour (from Part 1), with a focus on:
- Additional bounce lighting on side panels and helmet
- Non-metallic metal (NMM) face trim and steel surfaces
- Rust and verdigris weathering
- Shading and highlighting the eyes
Paints and Materials Used
Games Workshop:
- Mournfang Brown
- Cadian Fleshtone
- Sotek Green
- Sybarite Green
- Mephiston Red
- Evil Sunz Scarlet
AK Interactive:
- Golden Olive
- Ice Yellow
- Burnt Red
- White
- Grey Green
- Deep Orange
Brushes:
- Size 4 Artis Opus (for broad glazing and smooth transitions)
- Size 00 (for fine NMM and facial details)
Step-by-Step Painting Guide
1. Side Panel Armour & Helmet Edge
These areas sit outside the golden angle, so they’re highlighted with reduced brightness to preserve composition.
- Base mix: Golden Olive + Mournfang Brown (50:50)
- Layer progression:
- Golden Olive
- Golden Olive + Cadian Fleshtone
- Cadian Fleshtone
- Cadian Fleshtone + Ice Yellow
- (Optional: pure Ice Yellow on golden angle highlights only)
- Burnt Red Glaze: Thin (4–5 parts water) to tint and blend highlights.
Tip: Bounce lighting on side armour adds realism without competing for attention—keep it subtle.
2. NMM Bronze Face Trim
- Base: Mephiston Red + Cadian Fleshtone
- Highlights:
- Cadian Fleshtone
- Cadian Fleshtone + Ice Yellow
- Ice Yellow
- Glaze: Very thin Deep Orange (4–5 parts water)
- Final Edge Highlights: Touch up with Ice Yellow or White for key shine points
3. Verdigris Weathering (Face Trim)
- Mix: 50:50 Sotek Green + Sybarite Green
- Application: Thin 3:1 or more with water, focus on recesses and darker sections
- Optional Highlight: Add AK White to the mix for a second pass of denser corrosion effects
Note: Lighter verdigris works better on brighter areas, darker verdigris for shadowed recesses.
4. The Eyes
- Left Eye (forward-facing): Highlighted to almost white
- Right Eye (tilted down): Strong red tones, darker shading
Paint order:
- Mephiston Red
- Evil Sunz Scarlet
- Evil Sunz Scarlet + Ice Yellow
- Final glint: Ice Yellow or White
5. NMM Steel (Face Apparatus & Tubes)
- Base: Grey Green
- Highlights:
- Grey Green + White
- Progressively more White
- Rust Glazing:
- Mournfang Brown (thin, 4–5:1 water)
- Deep Orange (similarly thinned)
- Final Touches: Reapply small white dots for shine if needed
Pro Tip: Bounce lights in this area can be tinted with Golden Olive + Cadian Fleshtone to reflect surrounding armour.

Videos Not Showing?
To view any of my paid tutorials, you need to be a member of the website – please click below to log in or join the site.


Not sure about joining just yet? Check out my Youtube for all my free tutorials or sign up as a free “friend” member on this site and visit the free videos page!
If you’d prefer to support me on Patreon, please visit: https://www.patreon.com/RichardGray